【Redis】整合使用,进行注解式开发及应用场景和击穿、穿透、雪崩的讲解
目录
一、整合
1. 为什么
2. 整合应用
( 1 ) pom配置
( 2 ) 所需配置
3. 注解式开发及应用场景
1. @Cacheable
2. @CachePut
3. @CacheEvict
4. 击穿、穿透、雪崩
一、整合
1. 为什么
Redis可以与SSM项目整合,主要是为了提高项目的性能和效率。以下是整合Redis对项目开发的好处:
1. 缓存数据:Redis作为内存数据库,可以将常用的数据存储在内存中,以提高数据的读取速度。通过缓存数据,可以减少对数据库的访问次数,从而提高系统的响应速度。
2. 高性能缓存:Redis是一种基于内存的高性能缓存数据库,通过将常用的数据存储在内存中,可以大大提高数据的读取速度。在SSM项目中,可以将频繁访问的数据存储在Redis中,减少对数据库的访问次数,从而提高系统的响应速度和性能。
3. 分布式锁:在分布式环境中,多个节点同时访问共享资源可能会导致数据冲突和并发问题。Redis提供了分布式锁的功能,可以保证在同一时刻只有一个线程可以访问共享资源,避免数据的冲突和并发问题。
4. 消息队列:Redis支持发布/订阅模式和消息队列功能,可以用于解耦系统的各个模块,实现异步处理和消息传递。通过使用Redis的消息队列,可以提高系统的可扩展性和可靠性。
5. 计数器和排行榜:Redis提供了计数器和有序集合的功能,可以用于实现各种统计和排行榜功能。在SSM项目中,可以利用Redis的计数器和排行榜功能,方便地统计数据和展示排名,提升用户体验和系统的功能性。
6. 分布式缓存:通过将Redis部署在多台服务器上,可以实现分布式缓存,提高系统的可用性和容错性。通过使用分布式缓存,可以将数据分散存储在不同的服务器上,避免单点故障和数据丢失的风险
综上所述,整合Redis可以提升SSM项目的性能、并发处理能力、可扩展性和可靠性,从而提高系统的用户体验和功能性。
2. 整合应用
( 1 ) pom配置
在项目的 pom.xml 文件中添加Redis的依赖
以下是导入的所有依赖 :
<?xml version="1.0" encoding="UTF-8"?><project xmlns="http://maven.apache.org/POM/4.0.0" xmlns:xsi="http://www.w3.org/2001/XMLSchema-instance"xsi:schemaLocation="http://maven.apache.org/POM/4.0.0 http://maven.apache.org/xsd/maven-4.0.0.xsd"><modelVersion>4.0.0</modelVersion><groupId>org.example</groupId><artifactId>ssm2</artifactId><version>1.0-SNAPSHOT</version><packaging>war</packaging><name>ssm2 Maven Webapp</name><!-- FIXME change it to the project's website --><url>http://www.example.com</url><properties><project.build.sourceEncoding>UTF-8</project.build.sourceEncoding><maven.compiler.source>1.8</maven.compiler.source><maven.compiler.target>1.8</maven.compiler.target><maven.compiler.plugin.version>3.7.0</maven.compiler.plugin.version><!--添加jar包依赖--><!--1.spring 5.0.2.RELEASE相关--><spring.version>5.0.2.RELEASE</spring.version><!--2.mybatis相关--><mybatis.version>3.4.5</mybatis.version><!--mysql--><mysql.version>5.1.44</mysql.version><!--pagehelper分页jar依赖--><pagehelper.version>5.1.2</pagehelper.version><!--mybatis与spring集成jar依赖--><mybatis.spring.version>1.3.1</mybatis.spring.version><!--3.dbcp2连接池相关 druid--><commons.dbcp2.version>2.1.1</commons.dbcp2.version><commons.pool2.version>2.4.3</commons.pool2.version><!--4.log日志相关--><log4j2.version>2.9.1</log4j2.version><!--5.其他--><junit.version>4.12</junit.version><servlet.version>4.0.0</servlet.version><lombok.version>1.18.2</lombok.version><ehcache.version>2.10.0</ehcache.version><slf4j-api.version>1.7.7</slf4j-api.version><redis.version>2.9.0</redis.version><redis.spring.version>1.7.1.RELEASE</redis.spring.version></properties><dependencies><!--1.spring相关--><dependency><groupId>org.springframework</groupId><artifactId>spring-context</artifactId><version>${spring.version}</version></dependency><dependency><groupId>org.springframework</groupId><artifactId>spring-orm</artifactId><version>${spring.version}</version></dependency><dependency><groupId>org.springframework</groupId><artifactId>spring-tx</artifactId><version>${spring.version}</version></dependency><dependency><groupId>org.springframework</groupId><artifactId>spring-aspects</artifactId><version>${spring.version}</version></dependency><dependency><groupId>org.springframework</groupId><artifactId>spring-web</artifactId><version>${spring.version}</version></dependency><dependency><groupId>org.springframework</groupId><artifactId>spring-test</artifactId><version>${spring.version}</version></dependency><!--2.mybatis相关--><dependency><groupId>org.mybatis</groupId><artifactId>mybatis</artifactId><version>${mybatis.version}</version></dependency><!--mysql--><dependency><groupId>mysql</groupId><artifactId>mysql-connector-java</artifactId><version>${mysql.version}</version></dependency><!--pagehelper分页插件jar包依赖--><dependency><groupId>com.github.pagehelper</groupId><artifactId>pagehelper</artifactId><version>${pagehelper.version}</version></dependency><!--mybatis与spring集成jar包依赖--><dependency><groupId>org.mybatis</groupId><artifactId>mybatis-spring</artifactId><version>${mybatis.spring.version}</version></dependency><!--3.dbcp2连接池相关--><dependency><groupId>org.apache.commons</groupId><artifactId>commons-dbcp2</artifactId><version>${commons.dbcp2.version}</version></dependency><dependency><groupId>org.apache.commons</groupId><artifactId>commons-pool2</artifactId><version>${commons.pool2.version}</version></dependency><!--4.log日志相关依赖--><!--核心log4j2jar包--><dependency><groupId>org.apache.logging.log4j</groupId><artifactId>log4j-core</artifactId><version>${log4j2.version}</version></dependency><dependency><groupId>org.apache.logging.log4j</groupId><artifactId>log4j-api</artifactId><version>${log4j2.version}</version></dependency><!--web工程需要包含log4j-web,非web工程不需要--><dependency><groupId>org.apache.logging.log4j</groupId><artifactId>log4j-web</artifactId><version>${log4j2.version}</version></dependency><!--5.其他--><dependency><groupId>junit</groupId><artifactId>junit</artifactId><version>${junit.version}</version><scope>test</scope></dependency><dependency><groupId>javax.servlet</groupId><artifactId>javax.servlet-api</artifactId><version>${servlet.version}</version><scope>provided</scope></dependency><dependency><groupId>org.projectlombok</groupId><artifactId>lombok</artifactId><version>${lombok.version}</version><scope>provided</scope></dependency><dependency><groupId>org.springframework</groupId><artifactId>spring-webmvc</artifactId><version>${spring.version}</version></dependency><!-- jsp依赖--><dependency><groupId>javax.servlet.jsp</groupId><artifactId>javax.servlet.jsp-api</artifactId><version>2.3.3</version></dependency><dependency><groupId>jstl</groupId><artifactId>jstl</artifactId><version>1.2</version></dependency><dependency><groupId>taglibs</groupId><artifactId>standard</artifactId><version>1.1.2</version></dependency><dependency><groupId>commons-fileupload</groupId><artifactId>commons-fileupload</artifactId><version>1.3.3</version></dependency><!--    做服务端参数校验 JSR303 的jar包依赖 --><dependency><groupId>org.hibernate</groupId><artifactId>hibernate-validator</artifactId><version>6.0.7.Final</version></dependency><!--    用来SpringMVC支持json数据转换--><dependency><groupId>com.fasterxml.jackson.core</groupId><artifactId>jackson-databind</artifactId><version>2.9.3</version></dependency><dependency><groupId>com.fasterxml.jackson.core</groupId><artifactId>jackson-core</artifactId><version>2.9.3</version></dependency><dependency><groupId>com.fasterxml.jackson.core</groupId><artifactId>jackson-annotations</artifactId><version>2.9.3</version></dependency><!--    shiro相关依赖 --><dependency><groupId>org.apache.shiro</groupId><artifactId>shiro-core</artifactId><version>1.3.2</version></dependency><dependency><groupId>org.apache.shiro</groupId><artifactId>shiro-web</artifactId><version>1.3.2</version></dependency><dependency><groupId>org.apache.shiro</groupId><artifactId>shiro-spring</artifactId><version>1.3.2</version></dependency><dependency><groupId>net.sf.ehcache</groupId><artifactId>ehcache</artifactId><version>${ehcache.version}</version></dependency><!-- slf4j核心包 --><dependency><groupId>org.slf4j</groupId><artifactId>slf4j-api</artifactId><version>${slf4j-api.version}</version></dependency><dependency><groupId>org.slf4j</groupId><artifactId>jcl-over-slf4j</artifactId><version>${slf4j-api.version}</version><scope>runtime</scope></dependency><!--用于与slf4j保持桥接 --><dependency><groupId>org.apache.logging.log4j</groupId><artifactId>log4j-slf4j-impl</artifactId><version>${log4j2.version}</version></dependency><dependency><groupId>redis.clients</groupId><artifactId>jedis</artifactId><version>${redis.version}</version></dependency><dependency><groupId>org.springframework.data</groupId><artifactId>spring-data-redis</artifactId><version>${redis.spring.version}</version></dependency></dependencies><build><finalName>ssm2</finalName><resources><!--解决mybatis-generator-maven-plugin运行时没有将XxxMapper.xml文件放入target文件夹的问题--><resource><directory>src/main/java</directory><includes><include>**/*.xml</include></includes></resource><!--解决mybatis-generator-maven-plugin运行时没有将jdbc.properites文件放入target文件夹的问题--><resource><directory>src/main/resources</directory><includes><include>*.properties</include><include>*.xml</include></includes></resource></resources><pluginManagement><!-- lock down plugins versions to avoid using Maven defaults (may be moved to parent pom) --><plugins><plugin><groupId>org.apache.maven.plugins</groupId><artifactId>maven-compiler-plugin</artifactId><version>${maven.compiler.plugin.version}</version><configuration><source>${maven.compiler.source}</source><target>${maven.compiler.target}</target><encoding>${project.build.sourceEncoding}</encoding></configuration></plugin><plugin><groupId>org.mybatis.generator</groupId><artifactId>mybatis-generator-maven-plugin</artifactId><version>1.3.2</version><dependencies><!--使用Mybatis-generator插件不能使用太高版本的mysql驱动 --><dependency><groupId>mysql</groupId><artifactId>mysql-connector-java</artifactId><version>${mysql.version}</version></dependency></dependencies><configuration><overwrite>true</overwrite></configuration></plugin><plugin><artifactId>maven-clean-plugin</artifactId><version>3.1.0</version></plugin><!-- see http://maven.apache.org/ref/current/maven-core/default-bindings.html#Plugin_bindings_for_war_packaging --><plugin><artifactId>maven-resources-plugin</artifactId><version>3.0.2</version></plugin><plugin><artifactId>maven-compiler-plugin</artifactId><version>3.8.0</version></plugin><plugin><artifactId>maven-surefire-plugin</artifactId><version>2.22.1</version></plugin><plugin><artifactId>maven-war-plugin</artifactId><version>3.2.2</version></plugin><plugin><artifactId>maven-install-plugin</artifactId><version>2.5.2</version></plugin><plugin><artifactId>maven-deploy-plugin</artifactId><version>2.8.2</version></plugin></plugins></pluginManagement></build>
</project>
注意
在引入Redis的依赖时,需要注意以下几点:
1. 版本兼容性:确保所引入的Redis依赖与项目的其他依赖库相兼容。不同版本的Redis依赖可能会有不同的功能和API,因此需要根据项目的实际情况选择合适的版本。
2. 依赖冲突:检查项目的依赖关系,避免与Redis依赖存在冲突。如果项目中已经引入了其他与Redis相关的库,如Jedis或Lettuce等,需要确认它们与所引入的Redis依赖是否兼容,避免冲突。
3. Maven坐标:确保在pom.xml文件中正确地添加Redis的依赖坐标。可以通过访问Maven中央仓库或Redis官方网站获取最新的依赖坐标。
4. 依赖更新:定期检查Redis依赖的更新情况,以获取最新的功能和修复的bug。Redis社区会不断更新和改进Redis的版本,因此及时更新依赖可以提高项目的性能和安全性。
5. 依赖管理工具:根据项目的需要,可以选择使用不同的依赖管理工具,如Maven或Gradle。确保在使用相应工具时正确配置Redis的依赖。
通过注意以上几点,可以确保引入Redis的依赖时避免出现版本冲突、依赖错误等问题,从而顺利地进行Redis与SSM项目的整合。
( 2 ) 所需配置
在SSM项目中创建一个 spring-readis.xml,配置Redis连接信息,配置数据源,配置序列化器及redis的key生成策略,配置RedisTemplate。
创建 redis.properties 进行编写数据连接的信息,包括主机名、端口号、密码等。
redis.hostName=localhost
redis.port=6379
redis.password=123456
redis.timeout=10000
redis.maxIdle=300
redis.maxTotal=1000
redis.maxWaitMillis=1000
redis.minEvictableIdleTimeMillis=300000
redis.numTestsPerEvictionRun=1024
redis.timeBetweenEvictionRunsMillis=30000
redis.testOnBorrow=true
redis.testWhileIdle=true
redis.expiration=3600
创建 spring-redis.xml 配置文件,在其中配置以下
redis连接池的配置
<bean id="poolConfig" class="redis.clients.jedis.JedisPoolConfig"><!--最大空闲数--><property name="maxIdle" value="${redis.maxIdle}"/><!--连接池的最大数据库连接数 --><property name="maxTotal" value="${redis.maxTotal}"/><!--最大建立连接等待时间--><property name="maxWaitMillis" value="${redis.maxWaitMillis}"/><!--逐出连接的最小空闲时间 默认1800000毫秒(30分钟)--><property name="minEvictableIdleTimeMillis" value="${redis.minEvictableIdleTimeMillis}"/><!--每次逐出检查时 逐出的最大数目 如果为负数就是 : 1/abs(n), 默认3--><property name="numTestsPerEvictionRun" value="${redis.numTestsPerEvictionRun}"/><!--逐出扫描的时间间隔(毫秒) 如果为负数,则不运行逐出线程, 默认-1--><property name="timeBetweenEvictionRunsMillis" value="${redis.timeBetweenEvictionRunsMillis}"/><!--是否在从池中取出连接前进行检验,如果检验失败,则从池中去除连接并尝试取出另一个--><property name="testOnBorrow" value="${redis.testOnBorrow}"/><!--在空闲时检查有效性, 默认false --><property name="testWhileIdle" value="${redis.testWhileIdle}"/></bean>
配置redis连接工厂
<!-- 3. redis连接工厂 --><bean id="connectionFactory" class="org.springframework.data.redis.connection.jedis.JedisConnectionFactory"destroy-method="destroy"><property name="poolConfig" ref="poolConfig"/><!--IP地址 --><property name="hostName" value="${redis.hostName}"/><!--端口号 --><property name="port" value="${redis.port}"/><!--如果Redis设置有密码 --><property name="password" value="${redis.password}"/><!--客户端超时时间单位是毫秒 --><property name="timeout" value="${redis.timeout}"/></bean>
redis操作模板
<!-- 4. redis操作模板,使用该对象可以操作redis相当于session,专门操作数据库。--><bean id="redisTemplate" class="org.springframework.data.redis.core.RedisTemplate"><property name="connectionFactory" ref="connectionFactory"/><!--如果不配置Serializer,那么存储的时候缺省使用String,如果用User类型存储,那么会提示错误User can't cast to String!! --><property name="keySerializer"><bean class="org.springframework.data.redis.serializer.StringRedisSerializer"/></property><property name="valueSerializer"><bean class="org.springframework.data.redis.serializer.GenericJackson2JsonRedisSerializer"/></property><property name="hashKeySerializer"><bean class="org.springframework.data.redis.serializer.StringRedisSerializer"/></property><property name="hashValueSerializer"><bean class="org.springframework.data.redis.serializer.GenericJackson2JsonRedisSerializer"/></property><!--开启事务 --><property name="enableTransactionSupport" value="true"/></bean>
配置缓存管理器
<!-- 5.配置缓存管理器 --><bean id="redisCacheManager" class="org.springframework.data.redis.cache.RedisCacheManager"><constructor-arg name="redisOperations" ref="redisTemplate"/><!--redis缓存数据过期时间单位秒--><property name="defaultExpiration" value="${redis.expiration}"/><!--是否使用缓存前缀,与cachePrefix相关--><property name="usePrefix" value="true"/><!--配置缓存前缀名称--><property name="cachePrefix"><bean class="org.springframework.data.redis.cache.DefaultRedisCachePrefix"><constructor-arg index="0" value="-cache-"/></bean></property></bean>
创建 CacheKeyGenerator.java 配置缓存生成键名的生成规则
package com.CloudJun.ssm.redis;import lombok.extern.slf4j.Slf4j;
import org.springframework.cache.interceptor.KeyGenerator;
import org.springframework.util.ClassUtils;import java.lang.reflect.Array;
import java.lang.reflect.Method;@Slf4j
public class CacheKeyGenerator implements KeyGenerator {// custom cache keypublic static final int NO_PARAM_KEY = 0;public static final int NULL_PARAM_KEY = 53;@Overridepublic Object generate(Object target, Method method, Object... params) {StringBuilder key = new StringBuilder();key.append(target.getClass().getSimpleName()).append(".").append(method.getName()).append(":");if (params.length == 0) {key.append(NO_PARAM_KEY);} else {int count = 0;for (Object param : params) {if (0 != count) {//参数之间用,进行分隔key.append(',');}if (param == null) {key.append(NULL_PARAM_KEY);} else if (ClassUtils.isPrimitiveArray(param.getClass())) {int length = Array.getLength(param);for (int i = 0; i < length; i++) {key.append(Array.get(param, i));key.append(',');}} else if (ClassUtils.isPrimitiveOrWrapper(param.getClass()) || param instanceof String) {key.append(param);} else {//Java一定要重写hashCode和eqaulskey.append(param.hashCode());}count++;}}String finalKey = key.toString();
//        IEDA要安装lombok插件log.debug("using cache key={}", finalKey);return finalKey;}
}
最后 spring-redis.xml 配置文件的所有配置如下 :
<?xml version="1.0" encoding="UTF-8"?>
<beans xmlns="http://www.springframework.org/schema/beans"xmlns:xsi="http://www.w3.org/2001/XMLSchema-instance"xmlns:context="http://www.springframework.org/schema/context"xmlns:cache="http://www.springframework.org/schema/cache"xsi:schemaLocation="http://www.springframework.org/schema/beanshttp://www.springframework.org/schema/beans/spring-beans.xsdhttp://www.springframework.org/schema/contexthttp://www.springframework.org/schema/context/spring-context.xsdhttp://www.springframework.org/schema/cachehttp://www.springframework.org/schema/cache/spring-cache.xsd"><!-- 1. 引入properties配置文件 --><!--<context:property-placeholder location="classpath:redis.properties" />--><!-- 2. redis连接池配置--><bean id="poolConfig" class="redis.clients.jedis.JedisPoolConfig"><!--最大空闲数--><property name="maxIdle" value="${redis.maxIdle}"/><!--连接池的最大数据库连接数  --><property name="maxTotal" value="${redis.maxTotal}"/><!--最大建立连接等待时间--><property name="maxWaitMillis" value="${redis.maxWaitMillis}"/><!--逐出连接的最小空闲时间 默认1800000毫秒(30分钟)--><property name="minEvictableIdleTimeMillis" value="${redis.minEvictableIdleTimeMillis}"/><!--每次逐出检查时 逐出的最大数目 如果为负数就是 : 1/abs(n), 默认3--><property name="numTestsPerEvictionRun" value="${redis.numTestsPerEvictionRun}"/><!--逐出扫描的时间间隔(毫秒) 如果为负数,则不运行逐出线程, 默认-1--><property name="timeBetweenEvictionRunsMillis" value="${redis.timeBetweenEvictionRunsMillis}"/><!--是否在从池中取出连接前进行检验,如果检验失败,则从池中去除连接并尝试取出另一个--><property name="testOnBorrow" value="${redis.testOnBorrow}"/><!--在空闲时检查有效性, 默认false  --><property name="testWhileIdle" value="${redis.testWhileIdle}"/></bean><!-- 3. redis连接工厂 --><bean id="connectionFactory" class="org.springframework.data.redis.connection.jedis.JedisConnectionFactory"destroy-method="destroy"><property name="poolConfig" ref="poolConfig"/><!--IP地址 --><property name="hostName" value="${redis.hostName}"/><!--端口号  --><property name="port" value="${redis.port}"/><!--如果Redis设置有密码  --><property name="password" value="${redis.password}"/><!--客户端超时时间单位是毫秒  --><property name="timeout" value="${redis.timeout}"/></bean><!-- 4. redis操作模板,使用该对象可以操作redis相当于session,专门操作数据库。--><bean id="redisTemplate" class="org.springframework.data.redis.core.RedisTemplate"><property name="connectionFactory" ref="connectionFactory"/><!--如果不配置Serializer,那么存储的时候缺省使用String,如果用User类型存储,那么会提示错误User can't cast to String!!  --><property name="keySerializer"><bean class="org.springframework.data.redis.serializer.StringRedisSerializer"/></property><property name="valueSerializer"><bean class="org.springframework.data.redis.serializer.GenericJackson2JsonRedisSerializer"/></property><property name="hashKeySerializer"><bean class="org.springframework.data.redis.serializer.StringRedisSerializer"/></property><property name="hashValueSerializer"><bean class="org.springframework.data.redis.serializer.GenericJackson2JsonRedisSerializer"/></property><!--开启事务  --><property name="enableTransactionSupport" value="true"/></bean><!--  5.配置缓存管理器  --><bean id="redisCacheManager" class="org.springframework.data.redis.cache.RedisCacheManager"><constructor-arg name="redisOperations" ref="redisTemplate"/><!--redis缓存数据过期时间单位秒--><property name="defaultExpiration" value="${redis.expiration}"/><!--是否使用缓存前缀,与cachePrefix相关--><property name="usePrefix" value="true"/><!--配置缓存前缀名称--><property name="cachePrefix"><bean class="org.springframework.data.redis.cache.DefaultRedisCachePrefix"><constructor-arg index="0" value="-cache-"/></bean></property></bean><!--6.配置缓存生成键名的生成规则--><bean id="cacheKeyGenerator" class="com.CloudJun.ssm.redis.CacheKeyGenerator"></bean><!--7.启用缓存注解功能--><cache:annotation-driven cache-manager="redisCacheManager" key-generator="cacheKeyGenerator"/>
</beans>
创建 applicationContext-shiro.xml 配置文件
<?xml version="1.0" encoding="UTF-8"?>
<beans xmlns="http://www.springframework.org/schema/beans"xmlns:xsi="http://www.w3.org/2001/XMLSchema-instance"xsi:schemaLocation="http://www.springframework.org/schema/beans http://www.springframework.org/schema/beans/spring-beans.xsd"><!--配置自定义的Realm--><bean id="shiroRealm" class="com.CloudJun.ssm.shiro.MyRealm"><property name="userBiz" ref="userBiz" /><!--注意:重要的事情说三次~~~~~~此处加密方式要与用户注册时的算法一致 --><!--注意:重要的事情说三次~~~~~~此处加密方式要与用户注册时的算法一致 --><!--注意:重要的事情说三次~~~~~~此处加密方式要与用户注册时的算法一致 --><!--以下三个配置告诉shiro将如何对用户传来的明文密码进行加密--><property name="credentialsMatcher"><bean id="credentialsMatcher" class="org.apache.shiro.authc.credential.HashedCredentialsMatcher"><!--指定hash算法为MD5--><property name="hashAlgorithmName" value="md5"/><!--指定散列次数为1024次--><property name="hashIterations" value="1024"/><!--true指定Hash散列值使用Hex加密存. false表明hash散列值用用Base64-encoded存储--><property name="storedCredentialsHexEncoded" value="true"/></bean></property></bean><!--注册安全管理器--><bean id="securityManager" class="org.apache.shiro.web.mgt.DefaultWebSecurityManager"><property name="sessionManager" ref="sessionManager"></property><property name="realm" ref="shiroRealm" /></bean><!--Shiro核心过滤器--><bean id="shiroFilter" class="org.apache.shiro.spring.web.ShiroFilterFactoryBean"><!-- Shiro的核心安全接口,这个属性是必须的 --><property name="securityManager" ref="securityManager" /><!-- 身份验证失败,跳转到登录页面 --><property name="loginUrl" value="/login"/><!-- 身份验证成功,跳转到指定页面 --><!--<property name="successUrl" value="/index.jsp"/>--><!-- 权限验证失败,跳转到指定页面 --><property name="unauthorizedUrl" value="/unauthorized.jsp"/><!-- Shiro连接约束配置,即过滤链的定义 --><property name="filterChainDefinitions"><value><!--注:anon,authcBasic,auchc,user是认证过滤器perms,roles,ssl,rest,port是授权过滤器--><!--anon 表示匿名访问,不需要认证以及授权--><!--authc表示需要认证 没有进行身份认证是不能进行访问的--><!--roles[admin]表示角色认证,必须是拥有admin角色的用户才行-->/user/login=anon/user/updatePwd.jsp=authc/admin/*.jsp=roles[4]/user/teacher.jsp=perms[2]<!-- /css/**               = anon/images/**            = anon/js/**                = anon/                     = anon/user/logout          = logout/user/**              = anon/userInfo/**          = authc/dict/**              = authc/console/**           = roles[admin]/**                   = anon--></value></property></bean><!-- Shiro生命周期,保证实现了Shiro内部lifecycle函数的bean执行 --><bean id="lifecycleBeanPostProcessor" class="org.apache.shiro.spring.LifecycleBeanPostProcessor"/><!-- Session ID 生成器 --><bean id="sessionIdGenerator" class="org.apache.shiro.session.mgt.eis.JavaUuidSessionIdGenerator"></bean><!--sessionDao自定义会话管理,针对Session会话进行CRUD操作--><bean id="customSessionDao" class="org.apache.shiro.session.mgt.eis.MemorySessionDAO"><property name="sessionIdGenerator" ref="sessionIdGenerator"/></bean><!--会话监听器--><bean id="shiroSessionListener" class="com.CloudJun.ssm.shiro.MySessionListener"/><!--会话cookie模板--><bean id="sessionIdCookie" class="org.apache.shiro.web.servlet.SimpleCookie"><!--设置cookie的name--><constructor-arg value="shiro.session"/><!--设置cookie有效时间 永不过期--><property name="maxAge" value="-1"/><!--设置httpOnly 防止xss攻击:cookie劫持--><property name="httpOnly" value="true"/></bean><!--SessionManager会话管理器--><bean id="sessionManager" class="org.apache.shiro.web.session.mgt.DefaultWebSessionManager"><!--设置session会话过期时间 毫秒 2分钟=120000--><property name="globalSessionTimeout" value="120000"/><!--设置sessionDao--><property name="sessionDAO" ref="customSessionDao"/><!--设置间隔多久检查一次session的有效性 默认1分钟--><property name="sessionValidationInterval" value="60000"/><!--配置会话验证调度器--><!--<property name="sessionValidationScheduler" ref="sessionValidationScheduler"/>--><!--是否开启检测,默认开启--><!--<property name="sessionValidationSchedulerEnabled" value="true"/>--><!--是否删除无效的session,默认开启--><property name="deleteInvalidSessions" value="true"/><!--配置session监听器--><property name="sessionListeners"><list><ref bean="shiroSessionListener"/></list></property><!--会话Cookie模板--><property name="sessionIdCookie" ref="sessionIdCookie"/><!--取消URL后面的JSESSIONID--><property name="sessionIdUrlRewritingEnabled" value="true"/></bean>
</beans>
在引用的配置文件中引用以上配置的文件 如 applicationContext.xml
<?xml version="1.0" encoding="UTF-8"?>
<beans xmlns="http://www.springframework.org/schema/beans"xmlns:xsi="http://www.w3.org/2001/XMLSchema-instance"xmlns:context="http://www.springframework.org/schema/context" xmlns:tx="http://www.springframework.org/schema/tx"xmlns:aop="http://www.springframework.org/schema/aop"xsi:schemaLocation="http://www.springframework.org/schema/beans http://www.springframework.org/schema/beans/spring-beans.xsd http://www.springframework.org/schema/context http://www.springframework.org/schema/context/spring-context.xsd http://www.springframework.org/schema/tx http://www.springframework.org/schema/tx/spring-tx.xsd http://www.springframework.org/schema/aop http://www.springframework.org/schema/aop/spring-aop.xsd"><!--1. 引入外部多文件方式 --><bean id="propertyConfigurer"class="org.springframework.beans.factory.config.PropertyPlaceholderConfigurer"><property name="systemPropertiesModeName" value="SYSTEM_PROPERTIES_MODE_OVERRIDE" /><property name="ignoreResourceNotFound" value="true" /><property name="locations"><list><value>classpath:jdbc.properties</value><value>classpath:redis.properties</value></list></property></bean><!--  框架会越学越多,不能将所有的框架配置,放到同一个配制间,否者不便于管理  --><import resource="applicationContext-mybatis.xml"></import><import resource="spring-redis.xml"></import><import resource="applicationContext-shiro.xml"></import>
</beans>
以上是基本的配置步骤,根据具体的项目需求和框架版本可能会有所不同。在实际应用中,还可以根据需要配置Redis的集群、哨兵模式、持久化等功能,以提高系统的可用性和可靠性。
3. 注解式开发及应用场景
1. @Cacheable
@Cacheable是Spring框架提供的一个缓存注解,用于标记方法的返回结果可以被缓存起来,以提高系统的性能。
具体来说,@Cacheable注解的作用如下:
1. 缓存结果:当一个被@Cacheable注解修饰的方法被调用时,Spring会先检查缓存中是否存在该方法的返回结果。如果缓存中已经存在,则直接返回缓存中的结果,而不再执行方法体内的代码逻辑。
2. 缓存键生成:@Cacheable注解可以指定一个缓存键(key)来标识缓存中的数据。默认情况下,缓存键是由方法的参数组成的。如果两次调用的方法参数相同,则会使用相同的缓存键,从而直接返回缓存中的结果。
3. 缓存管理:@Cacheable注解可以与其他缓存管理工具(如Redis、Ehcache等)进行整合使用。通过在配置文件中配置相应的缓存管理器,可以将方法的返回结果存储到指定的缓存中,以供后续的调用使用。
4. 缓存失效:@Cacheable注解还可以指定一个失效时间(TTL)来控制缓存的有效期。当缓存的有效期过期后,下一次调用该方法时会重新执行方法体内的代码逻辑,并将新的结果存储到缓存中。
使用@Cacheable注解可以有效地减少对数据库或其他资源的访问次数,提高系统的响应速度和并发处理能力。但需要注意的是,使用缓存时需要权衡缓存的一致性和实时性,避免数据不一致或过期的问题。
常用属性及用法作用
@Cacheable注解有以下常用属性及用法作用:
-
value:指定缓存的名称,用于区分不同的缓存空间。可以在配置文件中配置相应的缓存管理器,以决定将缓存存储在哪个缓存空间中。可以指定多个缓存名称,使用逗号分隔。
-
key:指定缓存的键,用于标识缓存中的数据。默认情况下,缓存键是由方法的参数组成的。可以使用SpEL表达式来指定缓存键,例如:@Cacheable(key = "#id"),其中id是方法的参数。
-
condition:指定一个SpEL表达式,用于判断是否执行缓存操作。只有当表达式的结果为true时,才会执行缓存操作。例如:@Cacheable(condition = "#result != null"),表示只有当方法的返回结果不为空时,才会执行缓存操作。
-
unless:指定一个SpEL表达式,用于判断是否不执行缓存操作。只有当表达式的结果为false时,才会执行缓存操作。例如:@Cacheable(unless = "#result == null"),表示只有当方法的返回结果为空时,才不会执行缓存操作。
-
keyGenerator:指定一个自定义的缓存键生成器,用于生成缓存的键。可以实现KeyGenerator接口来自定义缓存键的生成逻辑。
使用@Cacheable注解可以将方法的返回结果缓存起来,提高系统的响应速度和并发处理能力。通过指定缓存名称、缓存键、条件和键生成器等属性,可以对缓存进行更加精细的控制。同时,需要注意权衡缓存的一致性和实时性,避免数据不一致或过期的问题。
2. @CachePut
@CachePut是Spring框架提供的一个缓存注解,用于标记方法执行后更新缓存中的数据。
具体来说,@CachePut注解的作用如下:
1. 更新缓存:当一个被@CachePut注解修饰的方法被调用时,Spring会执行方法体内的代码逻辑,并更新缓存中与该方法相关的数据。可以通过指定缓存键(key)来更新指定的缓存数据,或者通过指定allEntries=true来更新所有缓存数据。
2. 缓存键生成:与@Cacheable注解类似,@CachePut注解也可以指定一个缓存键(key)来标识缓存中的数据。默认情况下,缓存键是由方法的参数组成的。
3. 缓存管理:@CachePut注解同样可以与其他缓存管理工具(如Redis、Ehcache等)进行整合使用。通过在配置文件中配置相应的缓存管理器,可以更新指定缓存中的数据。
使用@CachePut注解可以在方法执行后更新缓存中的数据,适用于需要更新缓存数据的场景。通过指定缓存键或设置allEntries=true,可以更新指定的缓存数据或更新所有缓存数据。因此,@CachePut注解常用于需要保持缓存数据与实际数据一致性的方法,以避免脏数据或过期数据的问题。
@CachePut的常用属性及用法作用和@Cacheable的常用属性及用法作用是一样的并且作用也相同,都是Spring框架提供的缓存注解,但在作用上有一些区别。
1. 功能区别:
- @Cacheable注解用于标记方法的返回结果应该被缓存,当相同的方法被再次调用时,会直接从缓存中获取结果,而不会执行方法体内的代码逻辑。
- @CachePut注解用于标记方法执行后更新缓存中的数据,即使缓存中已存在相同的键值对,也会强制更新缓存数据。
2. 使用场景区别:
- @Cacheable适用于读取频繁,但不经常更新的数据。例如,查询数据库中的静态数据或配置信息。
- @CachePut适用于需要频繁更新缓存数据的场景。例如,写入数据库的操作,每次写入后都需要更新缓存中的数据。
3. 缓存键的生成方式:
- @Cacheable默认使用方法的参数作为缓存键,可以通过指定key属性来自定义缓存键的生成方式。
- @CachePut同样默认使用方法的参数作为缓存键,也可以通过指定key属性来自定义缓存键的生成方式。
总体来说,@Cacheable注解用于读取缓存数据,而@CachePut注解用于更新缓存数据。在使用时,需要根据实际的业务需求来选择合适的注解。有时候,两者也可以结合使用,以实现更加灵活的缓存操作。
3. @CacheEvict
@CacheEvict是Spring框架提供的一个缓存注解,用于标记方法执行后清除缓存中的数据。
作用和@CachePut注解及@Cacheable注解都大同小异。
常用属性及用法作用
@CacheEvict注解有以下几个常用的属性:
- 1. value:指定要操作的缓存名称,可以是一个字符串数组,用于指定多个缓存名称。
- 2. key:指定缓存的键,可以使用SpEL表达式来动态生成缓存键。
- 3. condition:指定一个SpEL表达式,当条件为true时才会执行缓存移除操作。
- 4. allEntries:一个布尔值,用于指定是否移除指定缓存中的所有数据。默认为false,表示只移除指定键对应的缓存数据。
- 5. beforeInvocation:一个布尔值,用于指定缓存移除操作是在方法执行前还是执行后进行。默认为false,表示在方法执行后进行缓存移除操作。
@CacheEvict的作用是从缓存中移除数据。通过指定缓存名称、缓存键、条件等属性,可以对缓存进行更加精细的控制。常见的用法包括:
1. 移除指定缓存中的指定键的数据:
@CacheEvict(value = "myCache", key = "#id")
public void deleteData(String id) {// 删除数据的逻辑
}
2. 移除指定缓存中的所有数据:
@CacheEvict(value = "myCache", allEntries = true)
public void clearCache() {// 清除缓存的逻辑
}
3. 根据条件移除缓存数据:
@CacheEvict(value = "myCache", condition = "#result > 0")
public int updateData(String id) {// 更新数据的逻辑return updatedRows;
}
需要注意的是,@CacheEvict注解通常用于更新缓存数据或在删除数据时同步移除缓存数据,因此建议在方法执行后进行缓存移除操作(即beforeInvocation属性设置为false)。这样可以避免在方法执行过程中出现异常导致缓存数据未正确移除的问题。
功能
- @CacheEvict注解用于标记方法执行后从缓存中移除数据。它可以在方法执行前或执行后移除缓存数据。
使用场景
- @CacheEvict适用于需要从缓存中移除数据的场景。例如,删除数据库中的数据后,需要同时从缓存中移除对应的数据。
缓存键的生成方式
- @CacheEvict默认使用方法的参数作为缓存键,可以通过指定key属性来自定义缓存键的生成方式。
4. 击穿、穿透、雪崩
缓存中常见的三种现象:击穿、穿透、雪崩。
1. 击穿
当缓存中不存在某个key的数据,而有大量并发请求访问这个key时,这些请求会直接穿过缓存,去访问数据库,导致数据库压力过大,甚至宕机。这种现象称为“击穿”。
解决方法:
使用互斥锁或分布式锁,保证只有一个线程去访问数据库,其他线程等待结果即可。
2. 穿透
当某个key对应的数据在缓存中不存在,而且这个key被大量请求访问时,这些请求会直接访问数据库,导致数据库压力过大,甚至宕机。这种现象称为“穿透”。
解决方法:
在缓存中预先设置这个key对应的空值或默认值,避免大量请求直接访问数据库。
3. 雪崩
当缓存中的大量数据同时失效,而且这些数据被大量请求访问时,这些请求会直接访问数据库,导致数据库压力过大,甚至宕机。这种现象称为“雪崩”。
解决方法:
- - 缓存数据的失效时间设置随机,避免大量数据同时失效。
- - 使用多级缓存架构,避免单点故障。
- - 使用熔断机制,当缓存失效时,暂时屏蔽对数据库的访问,避免压力过大。
以上三种现象都是缓存中常见的问题,需要在缓存的设计和使用中予以考虑和解决。
相关文章:

【Redis】整合使用,进行注解式开发及应用场景和击穿、穿透、雪崩的讲解
目录 一、整合 1. 为什么 2. 整合应用 ( 1 ) pom配置 ( 2 ) 所需配置 3. 注解式开发及应用场景 1. Cacheable 2. CachePut 3. CacheEvict 4. 击穿、穿透、雪崩 一、整合 1. 为什么 Redis可以与SSM项目整合,主要是为了提高项目的性能和效率。以下是整合Re…...
数据分析-numpy
numpy numpy numpy简介优点下载ndarray的属性输出数据类型routines 函数ndarray对象的读写操作ndarray的级联和切分级联切分 ndarray的基本运算广播机制(Broadcast)ndarry的聚合操作数组元素的操作numpy 数学函数numpy 查找和排序 写在最后面 简介 nump…...
【Java】云HIS云端数字医院信息平台源码
一、云HIS系统特色 • 使用简易化 即开即用,快速复制,按需开通功能模块,多机构共享机房、软件、服务器、存储设备等资源,资源利用最大化。 • 连锁集团化 可支持连锁集团化管理,1N模式,支撑运营&#x…...

Jupyter Notebook 内核似乎挂掉了,它很快将自动重启
报错原因: OMP: Error #15: Initializing libiomp5md.dll, but found libiomp5md.dll already initialized. OMP: Hint This means that multiple copies of the OpenMP runtime have been linked into the program. That is dangerous, since it can degrade perfo…...
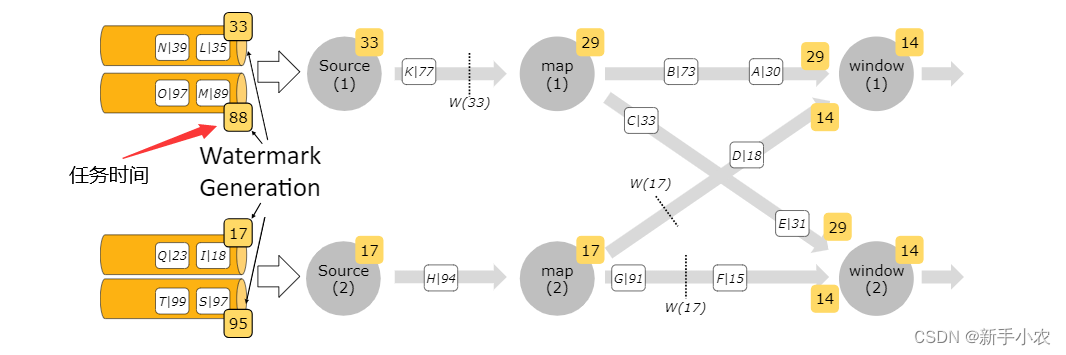
Flink -- 事件时间 Watermark
1、事件时间: 指的是数据产生的时间或是说是数据发生的时间。 在Flink中有三种时间分别是: Event Time:事件时间,数据产生的时间,可以反应数据真实发生的时间 Infestion Time:事件接收时间 Processing Tim…...

Django框架简介
文章目录 Django框架介绍MVC与MVT模型MVCMTV 版本问题运行django注意事项 Django的下载与基本命令下载Django方式一:在命令界面使用pip安装方式二:使用pycharm安装 Django的基础命令命令行操作pycharm操作 Django项目命令行操作与Pycharm操作的区别应用D…...
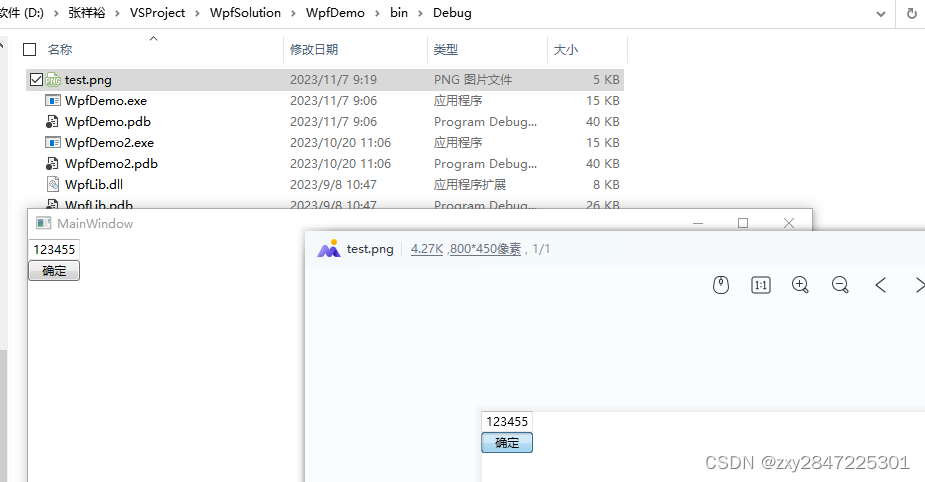
把wpf的窗体保存为png图片
昨晚在stack overflow刷问题时看到有这个问题,今天早上刚好来尝试学习一下 stack overflow的链接如下: c# - How to render a WPF UserControl to a bitmap without creating a window - Stack Overflow 测试步骤如下: 1 新建.net frame…...

2023NOIP A层联测28-大眼鸹猫
给你两个长度为 n n n 的序列 a , b a,b a,b,这两个序列都是单调不降的。 你可以对 a a a 进行不超过 m m m 次操作,每次操作你可以选择一个 i i i 满足 1 ≤ i ≤ n 1\le i\le n 1≤i≤n,然后选择一个整数(可以是负数&…...
电机应用-直流有刷电机
目录 直流有刷电机 工作原理 直流有刷减速电机的重要参数 电路原理与分析 驱动芯片分析 L298N驱动芯片 直流有刷减速电机控制实现 控制速度原理 硬件设计 L298N 野火直流有刷电机驱动板-MOS管搭建板 软件设计1:两个直流有刷减速电机按键控制 开发设计 …...

BIM、建筑机器人、隧道工程施工关键技术
一、BIM简介 (一)BIM概念 BIM(Building Information Modeling),建筑信息模型。该技术通过数字化手段,在计算机中建立虚拟建筑,该虚拟建筑提供从单一到完整、包含逻辑关系的建筑信息库。信息库…...
快速了解什么是跳跃表(skip list)
什么是跳跃表(skip list) 跳跃表(Skip List)是一种概率性的数据结构,它通过在多层链表的基础上添加“快速通道”来提高搜索效率。跳跃表的效率可以与平衡树相媲美,即在平均和最坏的情况下,查找…...

【Node.js入门】1.1Node.js 简介
Node.js入门之—1.1Node.js 简介 文章目录 Node.js入门之—1.1Node.js 简介什么是 Node.js错误说法 Node.js 的特点跨平台三方类库自带http服务器非阻塞I/O事件驱动单线程 Node.js 的应用场合适合用Node.js的场合不适合用Node.js的场合弥补Node.js不足的解决方案 什么是 Node.j…...
数据库 高阶语句
目录 数据库 高阶语句 使用select 语句,用order by来对进行排序 区间判断查询和去重查询 如何对结果进行分组查询group by语句 limit 限制输出的结果记录,查看表中的指定行 通配符 设置别名:alias 简写就是 as 使用select 语句&#x…...
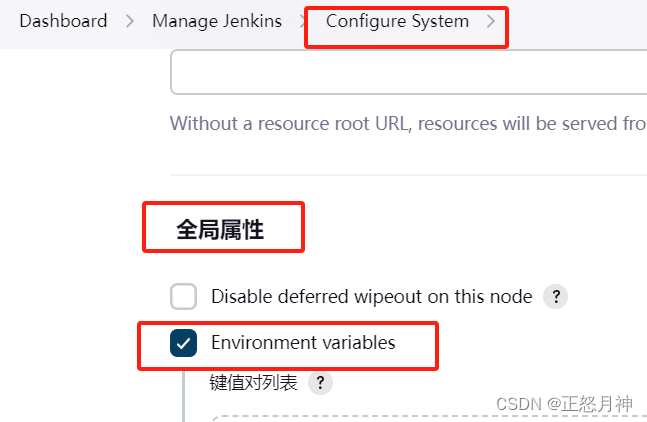
jenkins Java heap space
jenkins Java heap space,是内存不够。 两个解决方案: 一,修改配置文件 windows系统中,找到Jenkins的安装路径, 修改jenkins.xml 将 -Xmx256m 改为 -Xmx1024m 或者更大 重启jenkins服务。 二,jenkins增…...
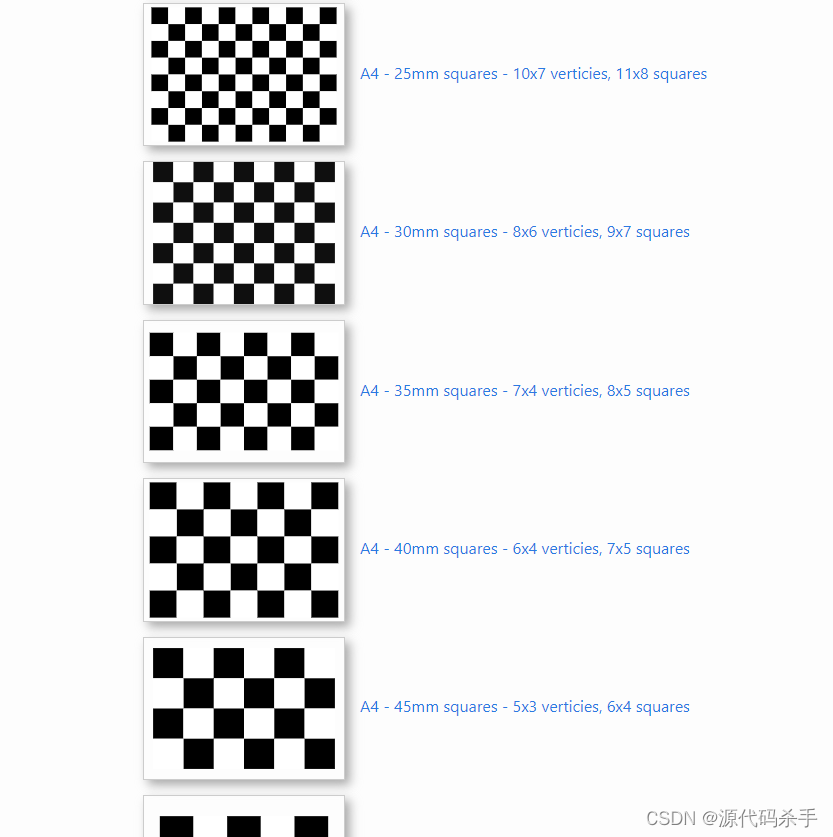
OpenCV校准棋盘集合
棋盘格可以与相机校准工具一起使用,例如ROS的camera_calibration包。您可以通过单击下面的任何链接免费下载 PDF 格式的各种棋盘,没有水印或广告。此外,还添加了基于 JavaScript 的棋盘生成器,允许您生成自定义尺寸。 提示&#…...

使用git将本地项目推送到远程仓库github
总结:本地项目通过git上传到github 1)、在本地创建一个版本库(即文件夹),通过 git init 把它变成Git仓库; 2)、把项目复制到这个文件夹里面,再通过 git add . 把项目添加到仓库; 3)、再通过 gi…...
Mybatis-Plus使用Wrapper自定义SQL
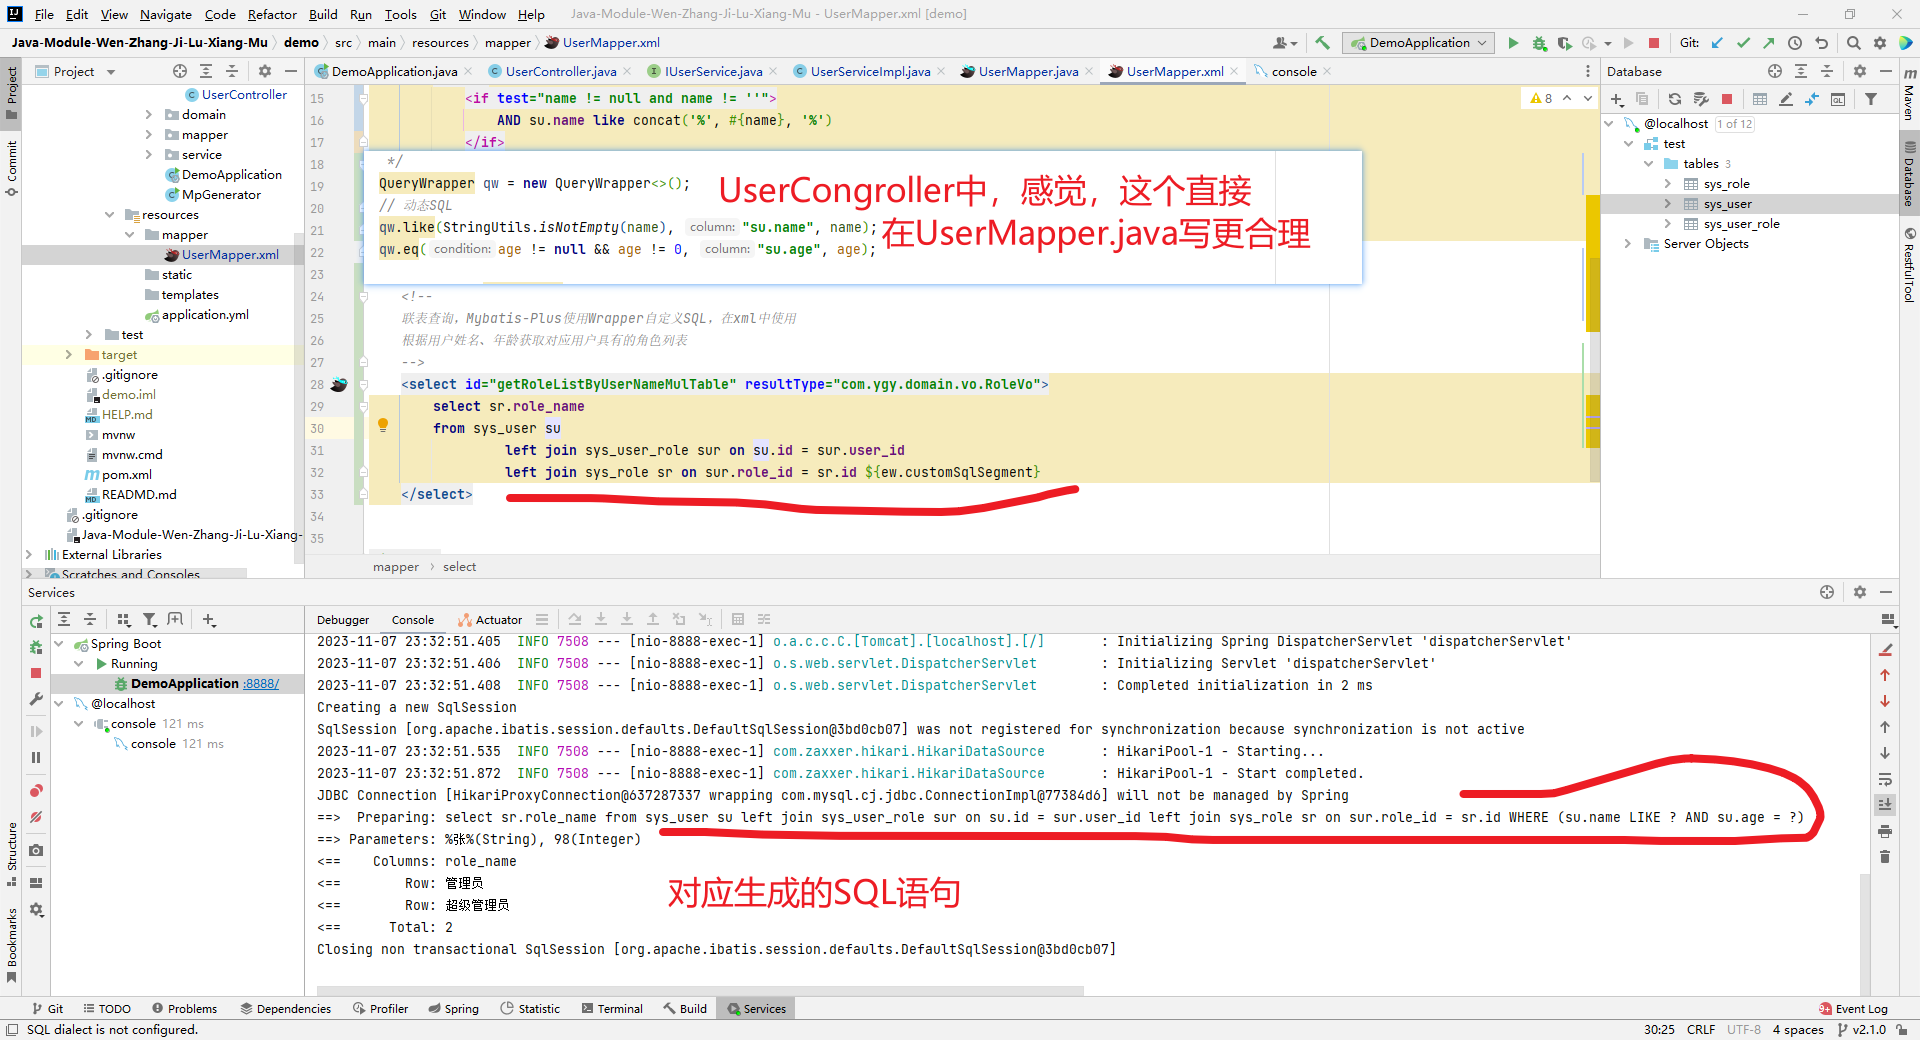
文章目录 准备工作Mybatis-Plus使用Wrapper自定义SQL注意事项目录结构如下所示domain层Controller层Service层ServiceImplMapper层UserMapper.xml 结果如下所示:单表查询条件构造器单表查询,Mybatis-Plus使用Wrapper自定义SQL联表查询不用,My…...
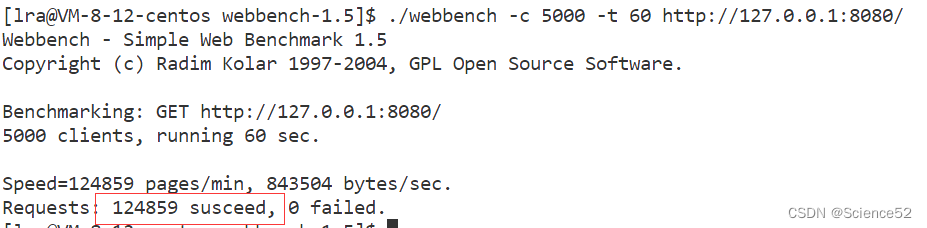
仿mudou库one thread one loop式并发服务器
目录 1.实现目标 2.HTTP服务器 实现高性能服务器-Reactor模型 模块划分 SERVER模块: HTTP协议模块: 3.项目中的子功能 秒级定时任务实现 时间轮实现 正则库的简单使用 通⽤类型any类型的实现 4.SERVER服务器实现 日志宏的封装 缓冲区Buffer…...

二十三种设计模式全面解析-组合模式与装饰器模式的结合:实现动态功能扩展
在前文中,我们介绍了组合模式的基本原理和应用,以及它在构建对象结构中的价值和潜力。然而,组合模式的魅力远不止于此。在本文中,我们将继续探索组合模式的进阶应用,并展示它与其他设计模式的结合使用,以构…...
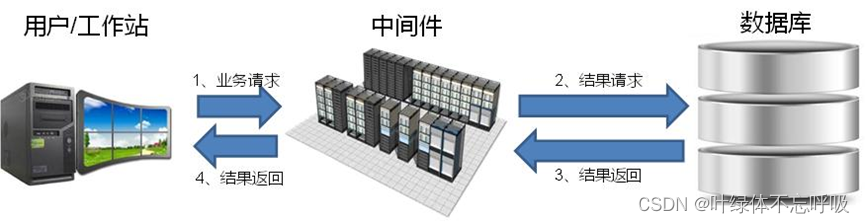
智慧城市建设解决方案分享【完整】
文章目录 第1章 前言第2章 智慧城市建设的背景2.1 智慧城市的发展现状2.2 智慧城市的发展趋势 第3章 智慧城市“十二五”规划要点3.1 国民经济和社会发展“十二五”规划要点3.2 “十二五”信息化发展规划要点 第4章 大数据:智慧城市的智慧引擎4.1 大数据技术—智慧城…...

Display Driver Uninstaller:三步搞定显卡驱动残留问题,让你的电脑焕然一新!
Display Driver Uninstaller:三步搞定显卡驱动残留问题,让你的电脑焕然一新! 【免费下载链接】display-drivers-uninstaller Display Driver Uninstaller (DDU) a driver removal utility / cleaner utility 项目地址: https://gitcode.com…...

SSD设计必看:巧用ONFI的CE_n引脚缩减机制,轻松搞定多NAND芯片堆叠与寻址
高密度NAND存储设计进阶:ONFI引脚复用与菊花链拓扑实战解析 当企业级SSD容量突破100TB门槛时,硬件工程师们会面临一个有趣的悖论——存储颗粒数量呈指数级增长,而主控芯片的物理引脚资源却始终有限。我曾参与一款全闪存阵列的研发,…...

Rust 所有权系统的工程化设计
Rust 所有权系统的工程化设计 Rust 的所有权系统是其最独特的语言特性之一,它通过编译时检查而非运行时垃圾回收来管理内存安全,同时兼顾性能与可靠性。这一设计不仅解决了传统系统级编程中的内存泄漏、数据竞争等问题,还为工程实践提供了可…...

Xilinx URAM深度实践:基于xpm_memory_tdpram原语构建高性能双端口存储模块
1. URAM基础与xpm_memory_tdpram原理解析 在FPGA开发中,存储资源的选择直接影响系统性能和资源利用率。Xilinx UltraRAM(URAM)是专为高性能应用设计的存储单元,相比传统BRAM,它具有更大的容量和更高的带宽特性。每个UR…...
)
Kimi K2.6 深夜正式发布:对标 Opus 4.6,刷新开源编程天花板(2026.04.21)
🤵♂️ 个人主页:小李同学_LSH的主页 ✍🏻 作者简介:LLM学习者 🐋 希望大家多多支持,我们一起进步!😄 如果文章对你有帮助的话, 欢迎评论 💬点赞Ǵ…...

如何高效管理原神游戏数据:开源工具箱的终极解密
如何高效管理原神游戏数据:开源工具箱的终极解密 【免费下载链接】Snap.Hutao 实用的开源多功能原神工具箱 🧰 / Multifunctional Open-Source Genshin Impact Toolkit 🧰 项目地址: https://gitcode.com/GitHub_Trending/sn/Snap.Hutao …...

PageAdmin平台化:多业务系统动态构建技术
以下是针对“PageAdmin应用系统平台化”的技术实现方案,聚焦于将传统单应用后台管理系统改造为可无限创建业务系统的低代码平台,仅涉及技术架构与实现步骤。 一、平台化核心架构设计 将PageAdmin从“单个后台系统”改造为多业务系统托管平台,…...
]派生宏与等价关系在自定义类型中的一致性)
Rust的#[derive(PartialEq, Eq)]派生宏与等价关系在自定义类型中的一致性
Rust语言中的类型系统以其严谨性著称,而#[derive(PartialEq, Eq)]派生宏则为自定义类型的等价关系提供了优雅的实现方式。等价关系是数学中的基本概念,要求满足自反性、对称性和传递性。在编程中,正确实现这些性质对于数据比较、集合操作等场…...

如何5步搞定RTAB-Map多相机视觉对齐:新手的完整实战指南
如何5步搞定RTAB-Map多相机视觉对齐:新手的完整实战指南 【免费下载链接】rtabmap RTAB-Map library and standalone application 项目地址: https://gitcode.com/gh_mirrors/rt/rtabmap RTAB-Map是一个强大的实时定位与建图开源库,特别擅长处理多…...

LILYGO T-FPGA开发套件:ESP32-S3与FPGA协同开发指南
1. LILYGO T-FPGA开发套件概览LILYGO T-FPGA开发套件是一款将ESP32-S3无线微控制器与Gowin GW1NSR-4C FPGA集成在一起的创新硬件平台。这个M.2规格的模块设计非常巧妙,通过标准接口可以轻松插入配套的扩展底板,为开发者提供了完整的物联网可编程逻辑开发…...