pytorch学习之第二课之预测温度
主要有以下几个步骤
第一:导入相应的工具包
第二:导入需要使用的数据集
第三:对导入的数据集输入进行预处理,找出特征与标签,查看数据特征的类型,判断是否需要标准化或者归一化处理
第四:构建神经网络的一些参数
在使用matplotlib时,需要加入
import matplotlib
matplotlib.use('TkAgg')
import matplotlib.pyplot as plt
防止报错
实现如下:
import numpy as np
import pandas as pd
import matplotlib
matplotlib.use('TkAgg')
import matplotlib.pyplot as plt
# 导入sklearn预处理模块
from sklearn import preprocessingimport torch
import torch.optim as optim
import datetime
import warnings
warnings.filterwarnings("ignore")
# matplotlib inline
features = pd.read_csv('C:\\Users\\Administrator\\Desktop\\temps.csv')
# 观看数据大致情况
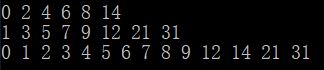
print(features.head())
# 查看数据维度
print(features.shape)#对年月日进行格式转换
years = features['year']
months = features['month']
days = features['day']
dates = [str(int(year))+'-'+str(int(month))+'-'+str(int(day)) for year, month, day in zip(years, months, days)]
dates = [datetime.datetime.strptime(date,'%Y-%m-%d')for date in dates]
print(dates[:2])# 准备画图
# 指定绘画的风格
plt.style.use('fivethirtyeight')#设置布局
# fig,((ax1,ax2),(ax3,ax4))=plt.subplots(nrows=2,ncols=2,figsize = (10,10))
# fig.autofmt_xdate(rotation=45)
fig, ((ax1, ax2), (ax3, ax4)) = plt.subplots(nrows=2, ncols=2, figsize = (10,10))
fig.autofmt_xdate(rotation = 45)#标签值
ax1.plot(dates,features['actual'])
ax1.set_xlabel(''); ax1.set_ylabel('Temperature'); ax1.set_title('Max Temp')#昨天
ax2.plot(dates,features['temp_1'])
ax2.set_xlabel(''); ax2.set_ylabel('Temperature'); ax2.set_title('previous Max Temp')#前天
ax3.plot(dates,features['temp_2'])
ax3.set_xlabel('Date'); ax3.set_ylabel('Temperature'); ax3.set_title('Two Days Prior Max Temp')# 我的二货朋友
ax4.plot(dates,features['friend'])
ax4.set_xlabel('Date'); ax4.set_ylabel('Temperature'); ax4.set_title('Friend Estimate')plt.tight_layout(pad=2)plt.show(block = True)# 独热编码
features = pd.get_dummies(features)
print(features.head())# 标签
labels = np.array(features['actual'])# 在特征中去掉标签
features = features.drop('actual',axis=1)# 名字单独保存,以防后面需要
features_list = list(features.columns)# 转换成合适的格式
features = np.array(features)
print(features.shape)# 对数据进行预处理
# 由于数据差距太大所以需要进行标准化处理
input_features = preprocessing.StandardScaler().fit_transform(features)## 构建网络模型
x = torch.tensor(input_features, dtype=float)
y = torch.tensor(labels, dtype=float)# 权重参数初始化
weights = torch.randn((14, 128), dtype=float, requires_grad=True)
# 将14个特征转换成128层隐层特征,这里就是对特征进行了升维
biases = torch.randn(128, dtype=float, requires_grad=True)
weights2 = torch.randn((128, 1), dtype=float, requires_grad=True)
biases2 = torch.randn(1, dtype=float, requires_grad=True)learning_rate = 0.01
losses = []for i in range(1000):# 计算隐层hidden = x.mm(weights) + biases# 加入激活函数hidden = torch.relu(hidden)# 预测结果predictions = hidden.mm(weights2) + biases2# 通过计算损失函数loss = torch.mean((predictions - y) ** 2)losses.append(loss.data.numpy())#打印损失值if i % 100 == 0:print('loss:', loss)# 反向计算传播loss.backward()# 更新参数weights.data.add_(-learning_rate*weights.grad.data)biases.data.add_(-learning_rate*biases.grad.data)weights2.data.add_(-learning_rate * weights2.grad.data)biases2.data.add_(-learning_rate * biases2.grad.data)# 每次更新完都要清空迭代,不然会累加weights.grad.data.zero_()biases.grad.data.zero_()weights2.grad.data.zero_()biases2.grad.data.zero_()
但是着这种构造太麻烦,因为导入的工具包都帮我们设置好了,我们只需要设置相应的参数即可
改版如下:
import numpy as np
import pandas as pd
import matplotlib
matplotlib.use('TkAgg')
import matplotlib.pyplot as plt
# 导入sklearn预处理模块
from sklearn import preprocessingimport torch
import torch.optim as optim
import datetime
import warnings
warnings.filterwarnings("ignore")
# matplotlib inline
features = pd.read_csv('C:\\Users\\Administrator\\Desktop\\temps.csv')
# 观看数据大致情况
print(features.head())
# 查看数据维度
print(features.shape)#对年月日进行格式转换
years = features['year']
months = features['month']
days = features['day']
dates = [str(int(year))+'-'+str(int(month))+'-'+str(int(day)) for year, month, day in zip(years, months, days)]
dates = [datetime.datetime.strptime(date,'%Y-%m-%d')for date in dates]
print(dates[:2])# 独热编码
features = pd.get_dummies(features)
print(features.head())# 标签
labels = np.array(features['actual'])# 在特征中去掉标签
features = features.drop('actual',axis=1)# 名字单独保存,以防后面需要
features_list = list(features.columns)# 转换成合适的格式
features = np.array(features)
print(features.shape)# 对数据进行预处理
# 由于数据差距太大所以需要进行标准化处理
input_features = preprocessing.StandardScaler().fit_transform(features)## 构建网络模型
x = torch.tensor(input_features, dtype=float)
y = torch.tensor(labels, dtype=float)# 权重参数初始化
weights = torch.randn((14, 128), dtype=float, requires_grad=True)
# 将14个特征转换成128层隐层特征,这里就是对特征进行了升维
biases = torch.randn(128, dtype=float, requires_grad=True)
weights2 = torch.randn((128, 1), dtype=float, requires_grad=True)
biases2 = torch.randn(1, dtype=float, requires_grad=True)input_size = input_features.shape[1]
hidden_size = 128
output_size = 1
batch_size = 16
my_nn = torch.nn.Sequential(torch.nn.Linear(input_size,hidden_size),torch.nn.Sigmoid(),torch.nn.Linear(hidden_size,output_size),
)
cost = torch.nn.MSELoss(reduction='mean')
optimizer = torch.optim.Adam(my_nn.parameters(),lr=0.01)#动态调整学习率# 训练网络
losses = []for i in range(1000):batch_lose = []for start in range(0, len(input_features),batch_size):end = start+batch_size if start+batch_size<len(input_features) else len(input_features)xx = torch.tensor(input_features[start:end],dtype=torch.float,requires_grad=True)yy = torch.tensor(labels[start:end],dtype=torch.float,requires_grad=True)prediction = my_nn(xx)loss = cost(prediction,yy)optimizer.zero_grad()loss.backward()# 更新操作optimizer.step()batch_lose.append(loss.data.numpy())# 打印损失if i % 100 == 0:losses.append(np.mean(batch_lose))print(i,np.mean(batch_lose))# 预测训练模型
# 还是需要将数据转换成torchtensor格式
x = torch.tensor(input_features,dtype=torch.float)
# 要将预测的结果转换numpy格式更容易后续计算
pred = my_nn(x).data.numpy()#转换日期格式
dates = [str(int(year))+'-'+str(int(month))+'-'+str(int(day))for year,month,day in zip(years,months,days)]
dates = [datetime.datetime.strptime(date,'%Y-%m-%d')for date in dates]
#创建一个表格存储日期和对应的标签值
true_date = pd.DataFrame(data={'date':dates,'actual':labels})# 创建一个存日期和其对应的模型预测值
months = features[:,features_list.index('month')]
days = features[:, features_list.index('day')]
years = features[:,features_list.index('year')]test_dates = [str(int(year))+'-'+str(int(month))+'-'+str(int(day))for year,month,day in zip(years,months,days)]
test_dates = [datetime.datetime.strptime(date,'%Y-%m-%d')for date in test_dates]pred_data = pd.DataFrame(data={'date':test_dates,'pred':pred.reshape(-1)})plt.plot(true_date['date'],true_date['actual'],'b-',label = 'actual')
plt.plot(pred_data['date'],pred_data['pred'],'ro',label = 'prediction')
plt.xticks(fontsize=15, rotation=45, ha='right')
plt.legend()
相关文章:

pytorch学习之第二课之预测温度
主要有以下几个步骤 第一:导入相应的工具包 第二:导入需要使用的数据集 第三:对导入的数据集输入进行预处理,找出特征与标签,查看数据特征的类型,判断是否需要标准化或者归一化处理 第四:构建神…...

基于Mahony互补滤波的IMU数据优化_学习笔记整理
这周自己被安排进行优化软件 IMU 姿态解算项目,之前自己只简单了解四元数,对IMU数据处理从未接触,通过这一周的学习感觉收获颇丰,在今天光棍节之际,,,用大半天的时间对这一周的收获进行整理&…...

c语言实现哈夫曼编码
要实现哈夫曼编码,需要以下步骤: 统计字符出现的频率构建哈夫曼树遍历哈夫曼树,给不同的字符赋予不同的编码将编码后的字符写入文件中 下面是一个简单的 C 语言实现: #include <stdio.h> #include <stdlib.h> #inc…...
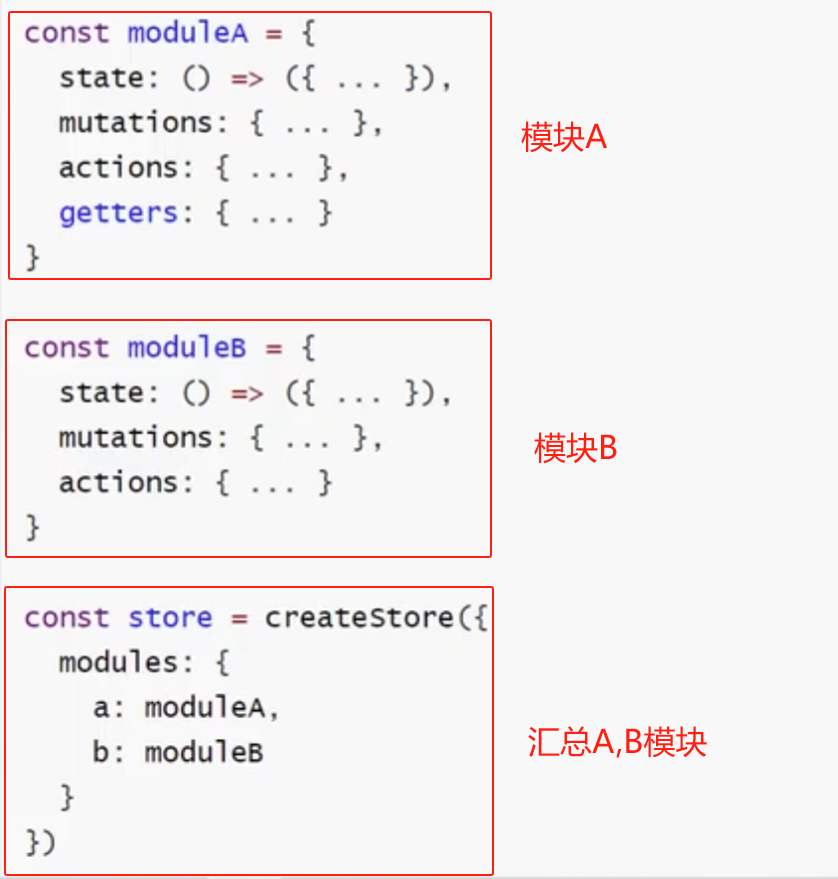
Vuex:模块化Module :VCA模式
VCA中不支持辅助函数,因为辅助函数中是用this.$store,而VCA中没有绑定this的 由于使用单一状态树,应用的所有状态会集中到一个比较大的对象。当应用变得非常复杂时,store 对象就有可能变得相当臃肿。 这句话的意思是,…...
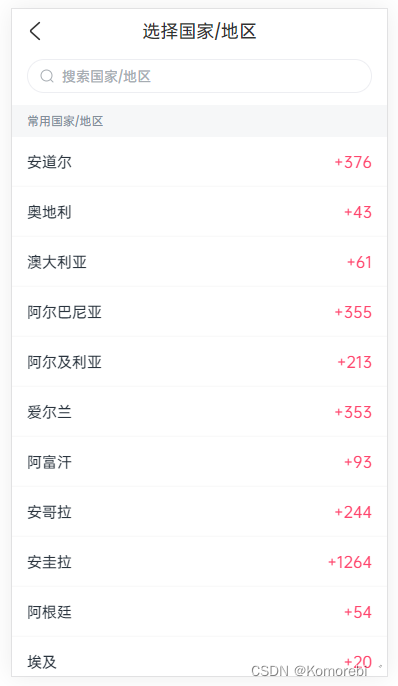
【uni-app + uView】CountryCodePicker 国家区号组件
1. 效果图 2. 组件完整代码 <template><u-popup class="country-code-picker-container" v-if="show" :show...

思科对路由器的配置
②对路由器R2进行配置 对路由器R2进行配置,先对各接口配置基本IP地址,然后配置动态路由协议。(对实验步骤进行文字描述) Router>enable //用户模式进入特权…...
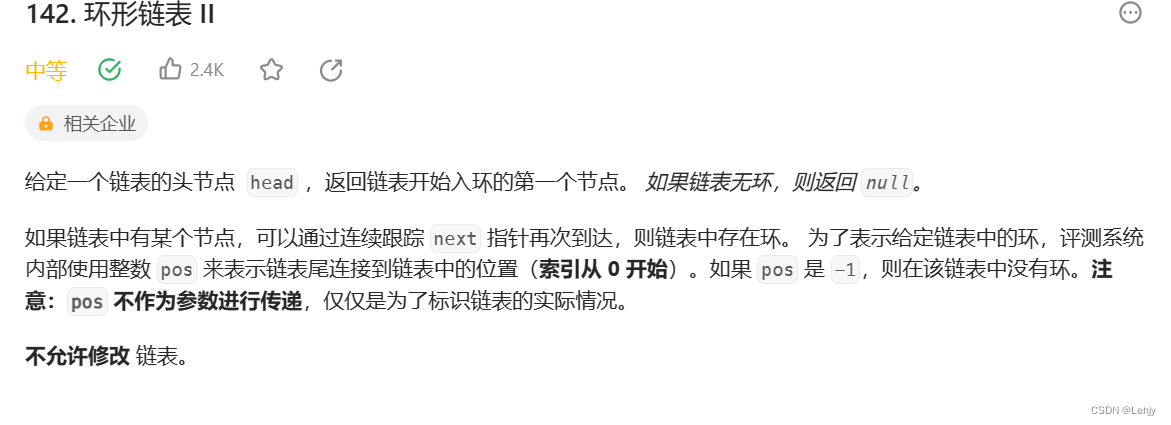
实战Leetcode(三)
Practice makes perfect! 实战一: 带环问题其实我们小学时就接触过,就比如在操场上比赛跑步的追击问题,这里也是一样,如果我们定义两个指针,一个快指针,一个慢指针,快指针走的快&…...

【PTE-day05 宽字节注入】
1、函数 过滤输入的函数: addslashes mysql_real_escape_string mysql_escape_string当字符的大小为一个字节时,称之为窄字节 例如ascii编码 当字符的大小为两个字节时,称之为宽字节 例如GB2312、GBK、GB8030 mysql使用GBK编码时,默认的会认为两个字符为一个汉字,前一个字…...
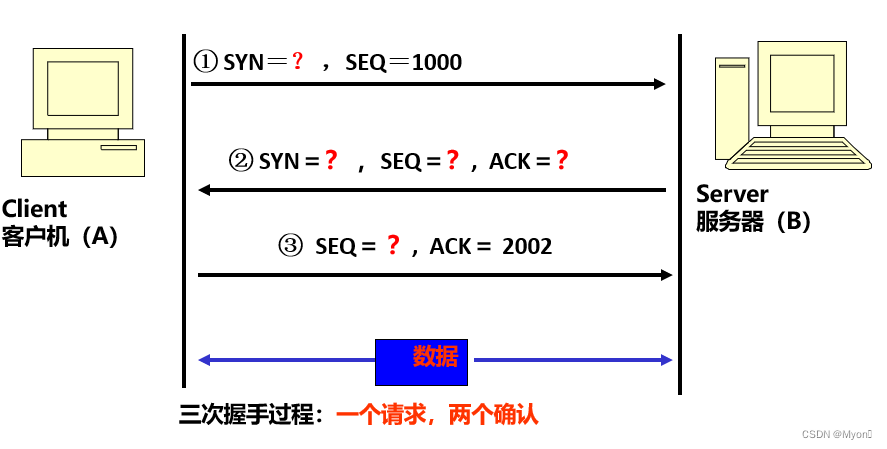
计算机网络期末复习-Part3
1、rdt1.0,rdt2.0,rdt3.0的底层信道模型 RDT 1.0: 完全可靠的底层信道,没有比特差错,也没有分组丢失。 RDT 2.0: 具有比特差错的底层信道,有比特差错,但没有分组丢失。 RDT 3.0: 具有差错和丢包的底层信道…...

docker在虚拟机中的应用
文章目录 Docker的基础概念与入门docker与docker镜像的理解虚拟机下[ubantu系统下]Docker的安装Docker-engine 的常用命令Docker 的 Example配置Docker的国内源虚拟机安装Postgresql的Docker物理机访问Postgresql数据库利用Docker-engine容器化前端项目工程1. 编写项目电器2. 构…...

小程序样式淡入淡出效果
小程序切换下一个文章或者页面,淡入淡出效果 // detail.js getArticleData: function(articleId) {// 开始淡出效果this.animate(.detail-page, [{ opacity: 1.0, ease: ease-out },{ opacity: 0.0, ease: ease-out }], 500, () > {// 在淡出动画完成后请求文章…...

虚幻5 删除C盘缓存及修改缓存路径
一.修改C盘缓存 C盘缓存路径为: C:\Users\xx(这里是你的用户名)\AppData\Local\UnrealEngine\Common\DerivedDataCache 注意,如果没有AppData文件夹,请依次点击查看-勾选显示隐藏的项目,即可 可删除里面的所有文件即可 二.修改…...
手写C++ 实现链表的反转、删除、合并
目录 一、手写List成员方法 1.1 打印链表 1.2 删除链表节点 1.3 链表中倒数第k个节点 1.4 反转链表 1.5 合并两个排序链表 二、完整代码 一、C实现链表成员方法 在上一篇博客《手写链表C》,实现了基本的List类。在面试中,经常被问到List如何反转、…...

虚幻C++基础 day4
虚幻中的UI 虚幻中的比较常用的UI:Widget Blueprint又称UMG虚幻中的两种布局: 网格布局锚布局 创建Widget Blueprint 网格布局 有点类似Qt中的网格布局,将UI面板进行行列切分Horizontal Box:水平分布Vertical Box:…...
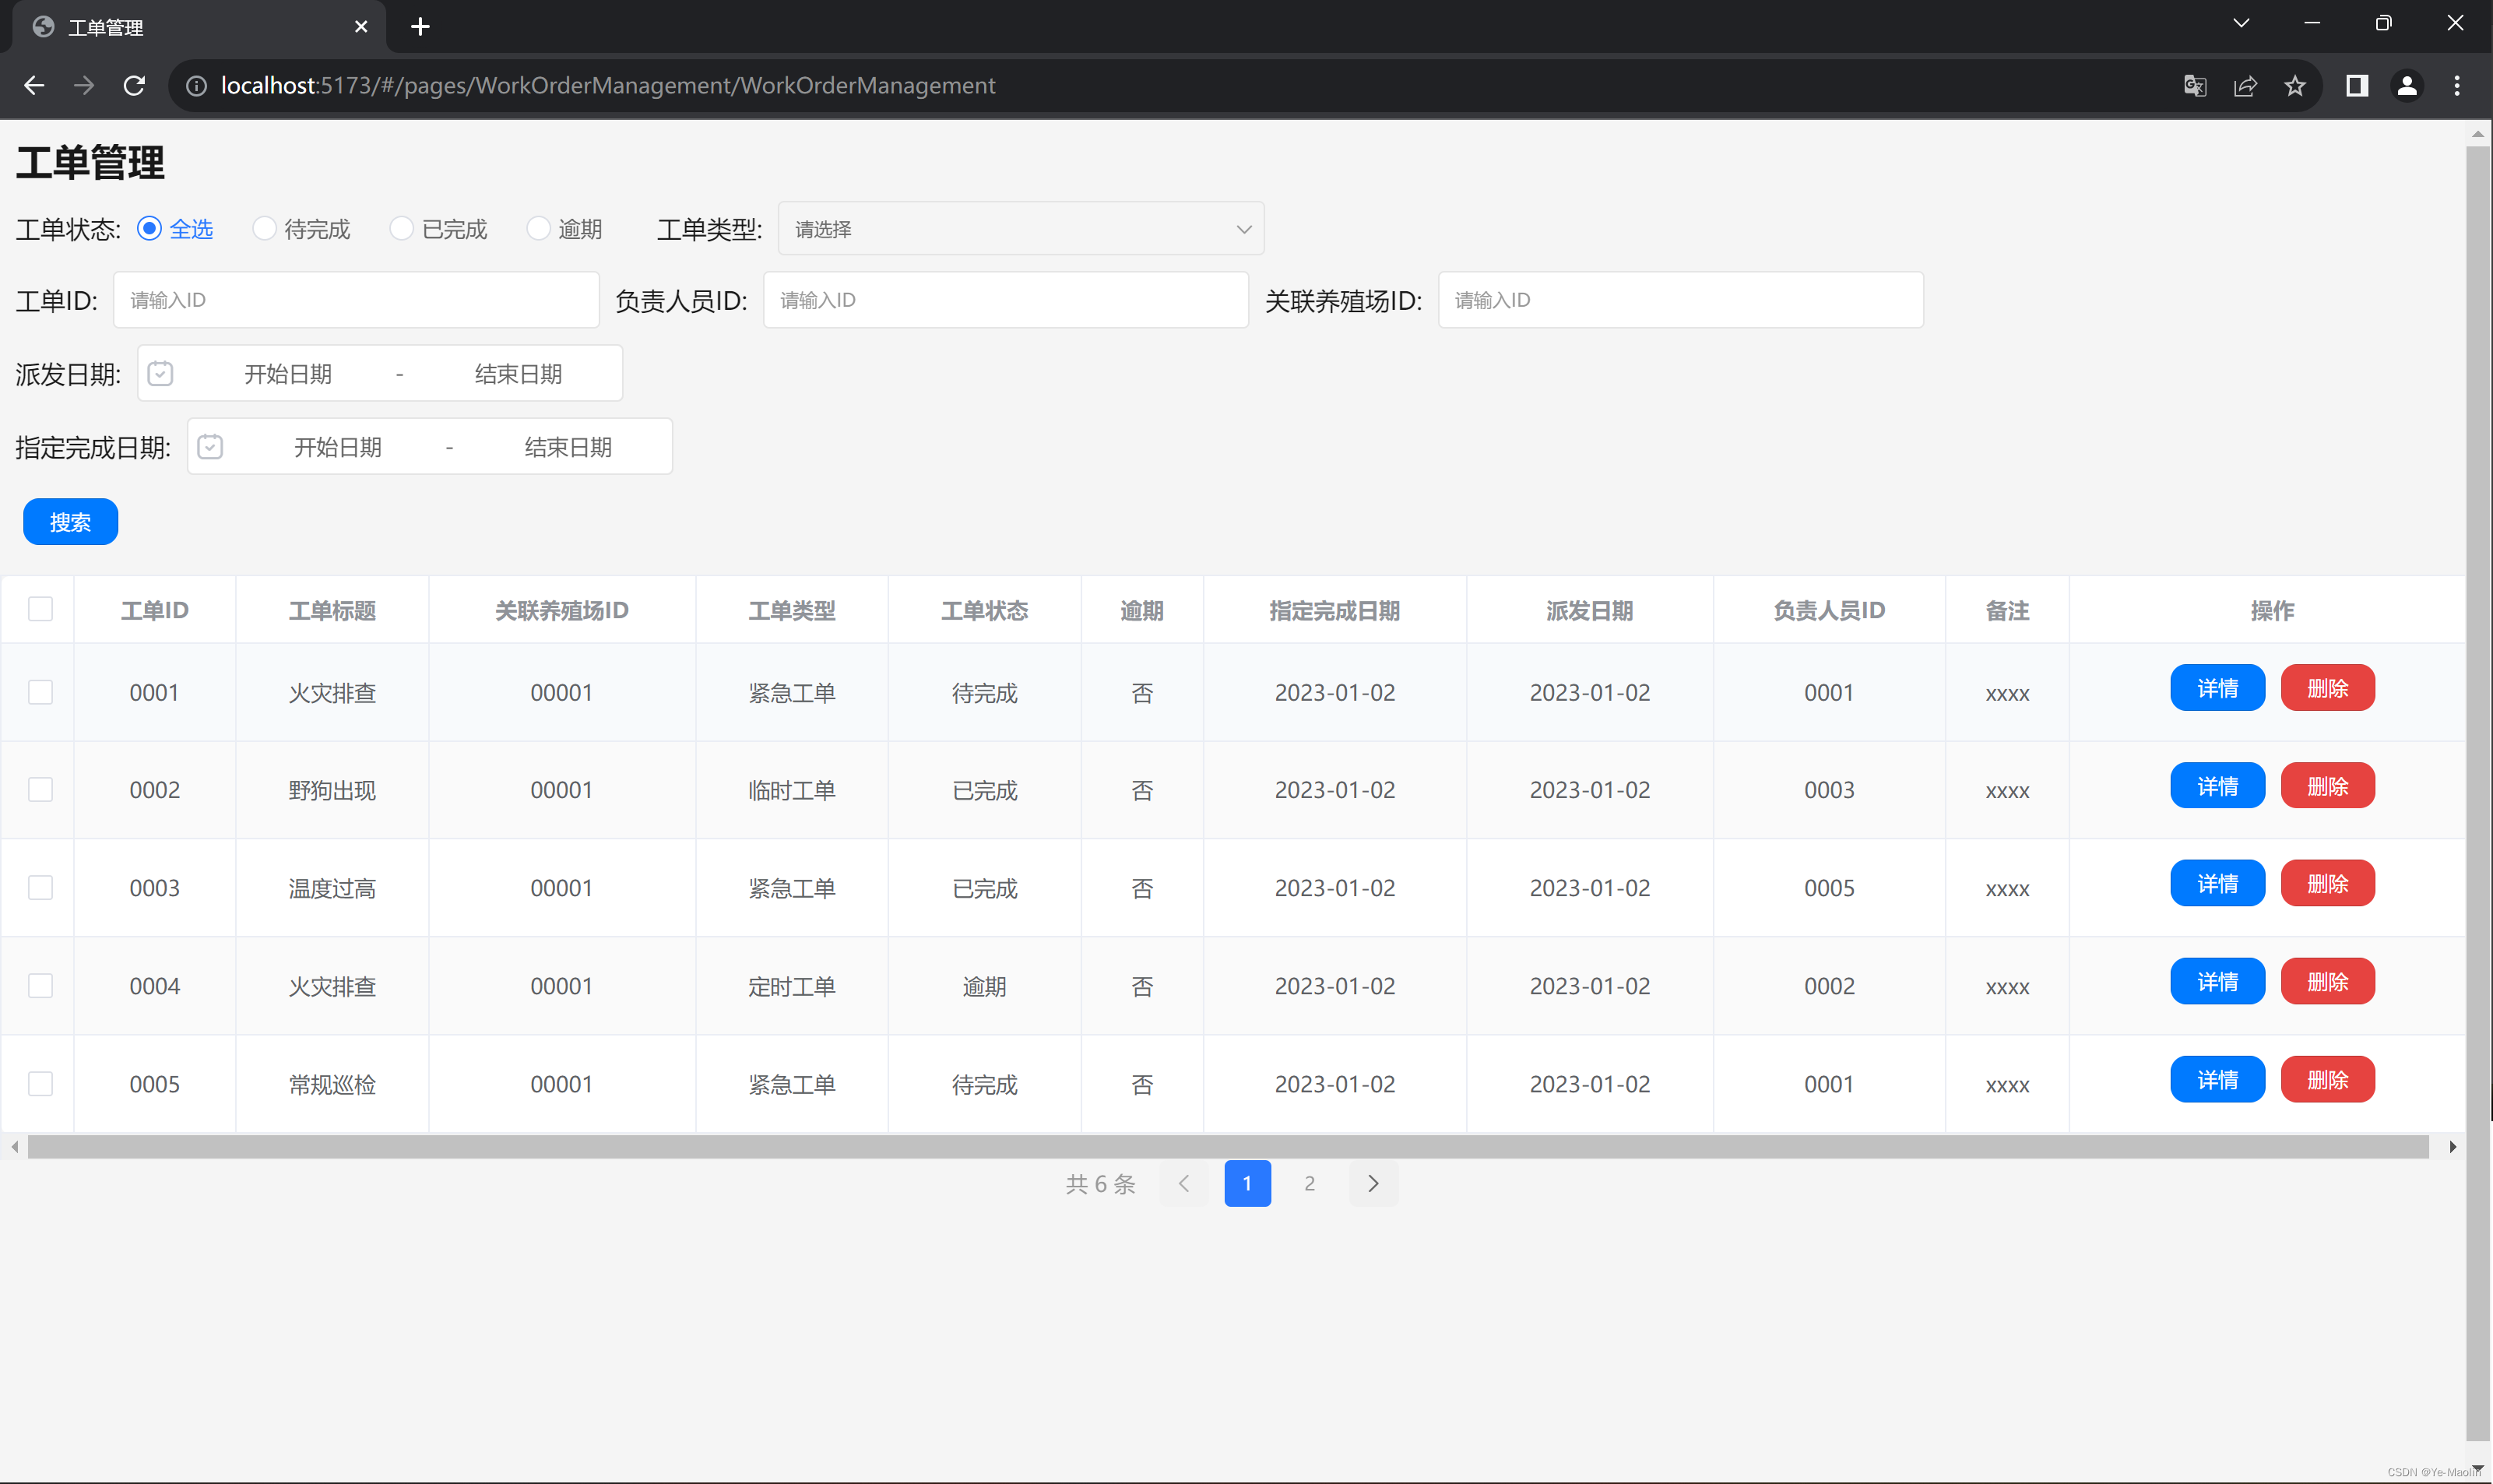
【Vue】【uni-app】工单管理页面实现
用的是uni-app的uni-ui拓展组件实现的 功能是对工单进行一个展示,并对工单根据一些筛选条件进行搜索 目前是实现了除了日期之外的搜索功能,测试数据是下面这个tableData.js,都是我自己手写的,后端请求也稍微写了一些,…...

【系统架构设计】架构核心知识: 2.1 软件过程模型
目录 一 软件过程模型 1 瀑布模型 2 V模型 3 喷泉模型 4 增量模型 5 原型模型...
数据管理系统-week1-文件系统、数据库和数据库管理系统
文章目录 前言一、 文件系统文件系统的限制 二、 数据库系统三、 数据库管理系统参考文献 前言 一、 文件系统 对于更高级的数据处理应用程序来说,基于数据块的持久存储逻辑模型过于简单数据块序列被划分为称为文件的数据块的可变子序列,与文件相关的名…...

探索OpenCV中直方图的神奇之处:应用与实现
文章目录 导言:直方图概述:函数原型参数说明:代码示例 应用场景:结语: 导言: 直方图是数字图像处理中一个强大而重要的工具,它通过可视化数据的分布情况,帮助我们更好地理解图像的特…...
)
MapReduce编程——矩阵乘法(Python版本)
数据格式 对于矩阵元素 A i j A_{ij} Aij,将其处理为 < i , j , M a t r i x N a m e , v a l u e > <i,j,MatrixName,value> <i,j,MatrixName,value>的四元组格式,例如矩阵[[2, 1, 3, 4], [10, -8, 7, 2], [9, 1, 6, -2]]可被转化…...
nature日报:为什么印度德里现在的空气污染如此严重?
为什么印度德里现在的空气污染如此严重? 后季风季节为印度大城市的空气污染积累创造了理想的条件。 本文整理扩展自2023年11月10日nature杂志的NEWS EXPLAINER——Why is Delhi’s air pollution so bad right now? (nature.com) Highlights 季风期间࿰…...

Janus-Pro-7B多场景落地:食品包装图→营养成分识别+健康建议生成
Janus-Pro-7B多场景落地:食品包装图→营养成分识别健康建议生成 1. 项目背景与价值 现代人越来越关注健康饮食,但面对琳琅满目的食品包装,想要快速了解营养成分并做出健康选择并不容易。传统的做法需要仔细阅读包装上的小字营养表ÿ…...

外盘期货 Tick 级行情 API 开发服务
外盘期货 Tick 级行情 API 开发,核心是接入低延迟、稳定的实时逐笔成交 / 盘口数据流,用于量化、做市、行情展示等场景。主流路径是:经纪商原生 API / 专业数据服务商 API → WebSocket/CTP 兼容长连接 → 回调解析 Tick → 缓存 / 入库 / 策…...

别再踩坑了!Ubuntu 20.04/22.04下禾赛Pandar系列激光雷达ROS驱动保姆级安装指南
Ubuntu 20.04/22.04下禾赛激光雷达ROS驱动安装避坑指南 刚拿到禾赛Pandar系列激光雷达时,那种兴奋感我至今记得——直到在Ubuntu系统上折腾ROS驱动连续报错三天。如果你正在经历catkin_make编译失败、rviz里死活看不到点云、或者依赖库版本冲突的绝望时刻ÿ…...

Grafana 13.0.1 正式发布,带来 Dashboard、Provisioning 功能更新与 Bug 修复
Grafana 作为监控和可观察性的开源平台,能可视化多来源指标、日志。近日,Grafana 13.0.1 正式发布,带来了一系列更新。 平台简介 Grafana 是用于监控和可观察性的开源平台,可将来自 Prometheus、Loki 等多个来源的指标、日志等进行…...

Windows变身AirPlay 2接收器:三步实现iPhone投屏Windows的终极指南
Windows变身AirPlay 2接收器:三步实现iPhone投屏Windows的终极指南 【免费下载链接】airplay2-win Airplay2 for windows 项目地址: https://gitcode.com/gh_mirrors/ai/airplay2-win 还在为Windows电脑无法接收iPhone、iPad投屏而烦恼吗?Airplay…...

AndLua逆向实战:从混淆字节码到源码还原的完整解析
1. AndLua逆向工程入门:从加密原理到实战准备 第一次接触AndLua逆向时,我被那些看似乱码的加密字符串搞得一头雾水。后来才发现,这就像玩解谜游戏,只要掌握关键线索就能层层突破。AndLua作为Android平台上的Lua实现,其…...

烽火HG5143D光猫破解实战:用Fiddler抓包获取超级密码,开启Telnet保姆级教程
烽火HG5143D光猫深度配置指南:安全获取管理权限与网络优化方案 家里新装了电信宽带,配套的烽火HG5143D光猫却锁死了路由模式,想接自己的路由器拨号都成问题?这种情况在电信家庭网关用户中并不少见。作为一款采用Linux系统的智能光…...

静息态fMRI预处理实战:从DICOM到ALFF的完整流程解析
1. 静息态fMRI预处理入门指南 第一次接触静息态fMRI数据时,我被满屏的DICOM文件搞得晕头转向。这些医学影像数据就像一堆未经整理的拼图碎片,需要我们通过预处理流程将它们转化为可分析的标准化数据。静息态fMRI(rs-fMRI)记录了大…...
)
从试点到全栈替代:SITS2026中台团队用AI编程工具重构127个微服务的完整迁移路线图(含Git提交行为分析数据)
第一章:SITS2026案例:大厂AI编程工具实践 2026奇点智能技术大会(https://ml-summit.org) 在2026奇点智能技术大会(SITS2026)的工业实践分论坛中,某头部云厂商首次完整公开其内部AI编程助手“CodePilot Pro”的落地路…...
)
知识抽取避坑手册:关系抽取中90%人会犯的3个标注错误(附真实案例)
知识抽取避坑手册:关系抽取中90%人会犯的3个标注错误(附真实案例) 在电商平台的商品评论中,当用户评价"这款手机充电速度和官方描述一致"时,新手标注员常会忽略"充电速度"与"官方描述"之…...