《嵌入式应用开发》实验一、开发环境搭建与布局(上)
1. 搭建开发环境
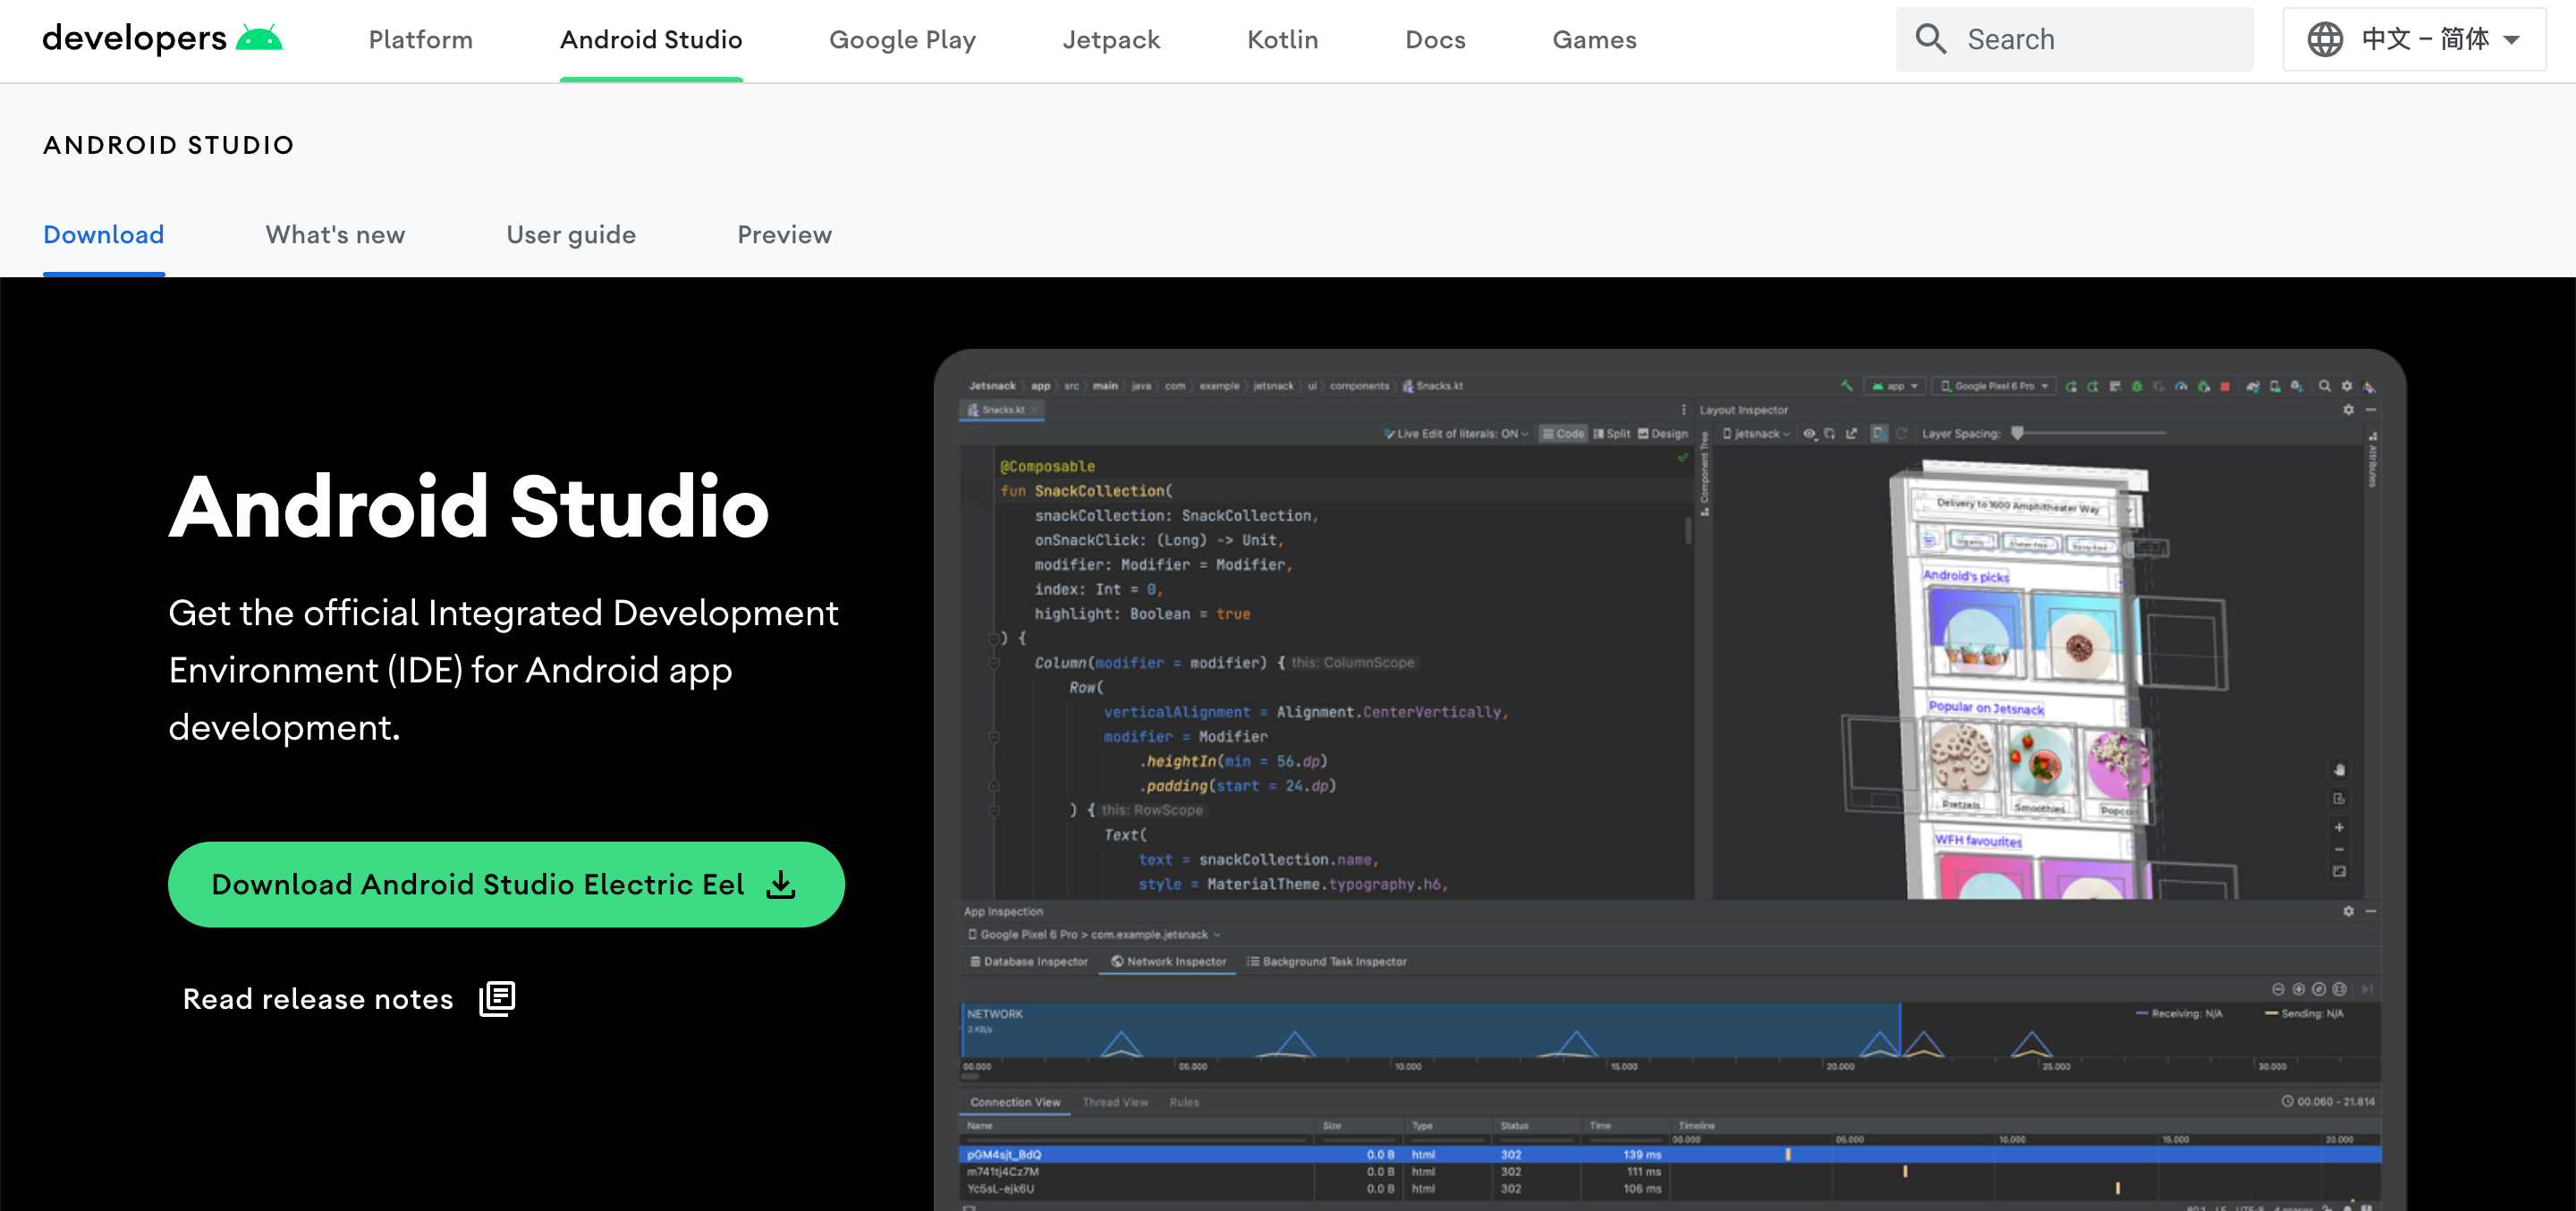
去官网(https://developer.android.google.cn/studio)下载 Android Studio。
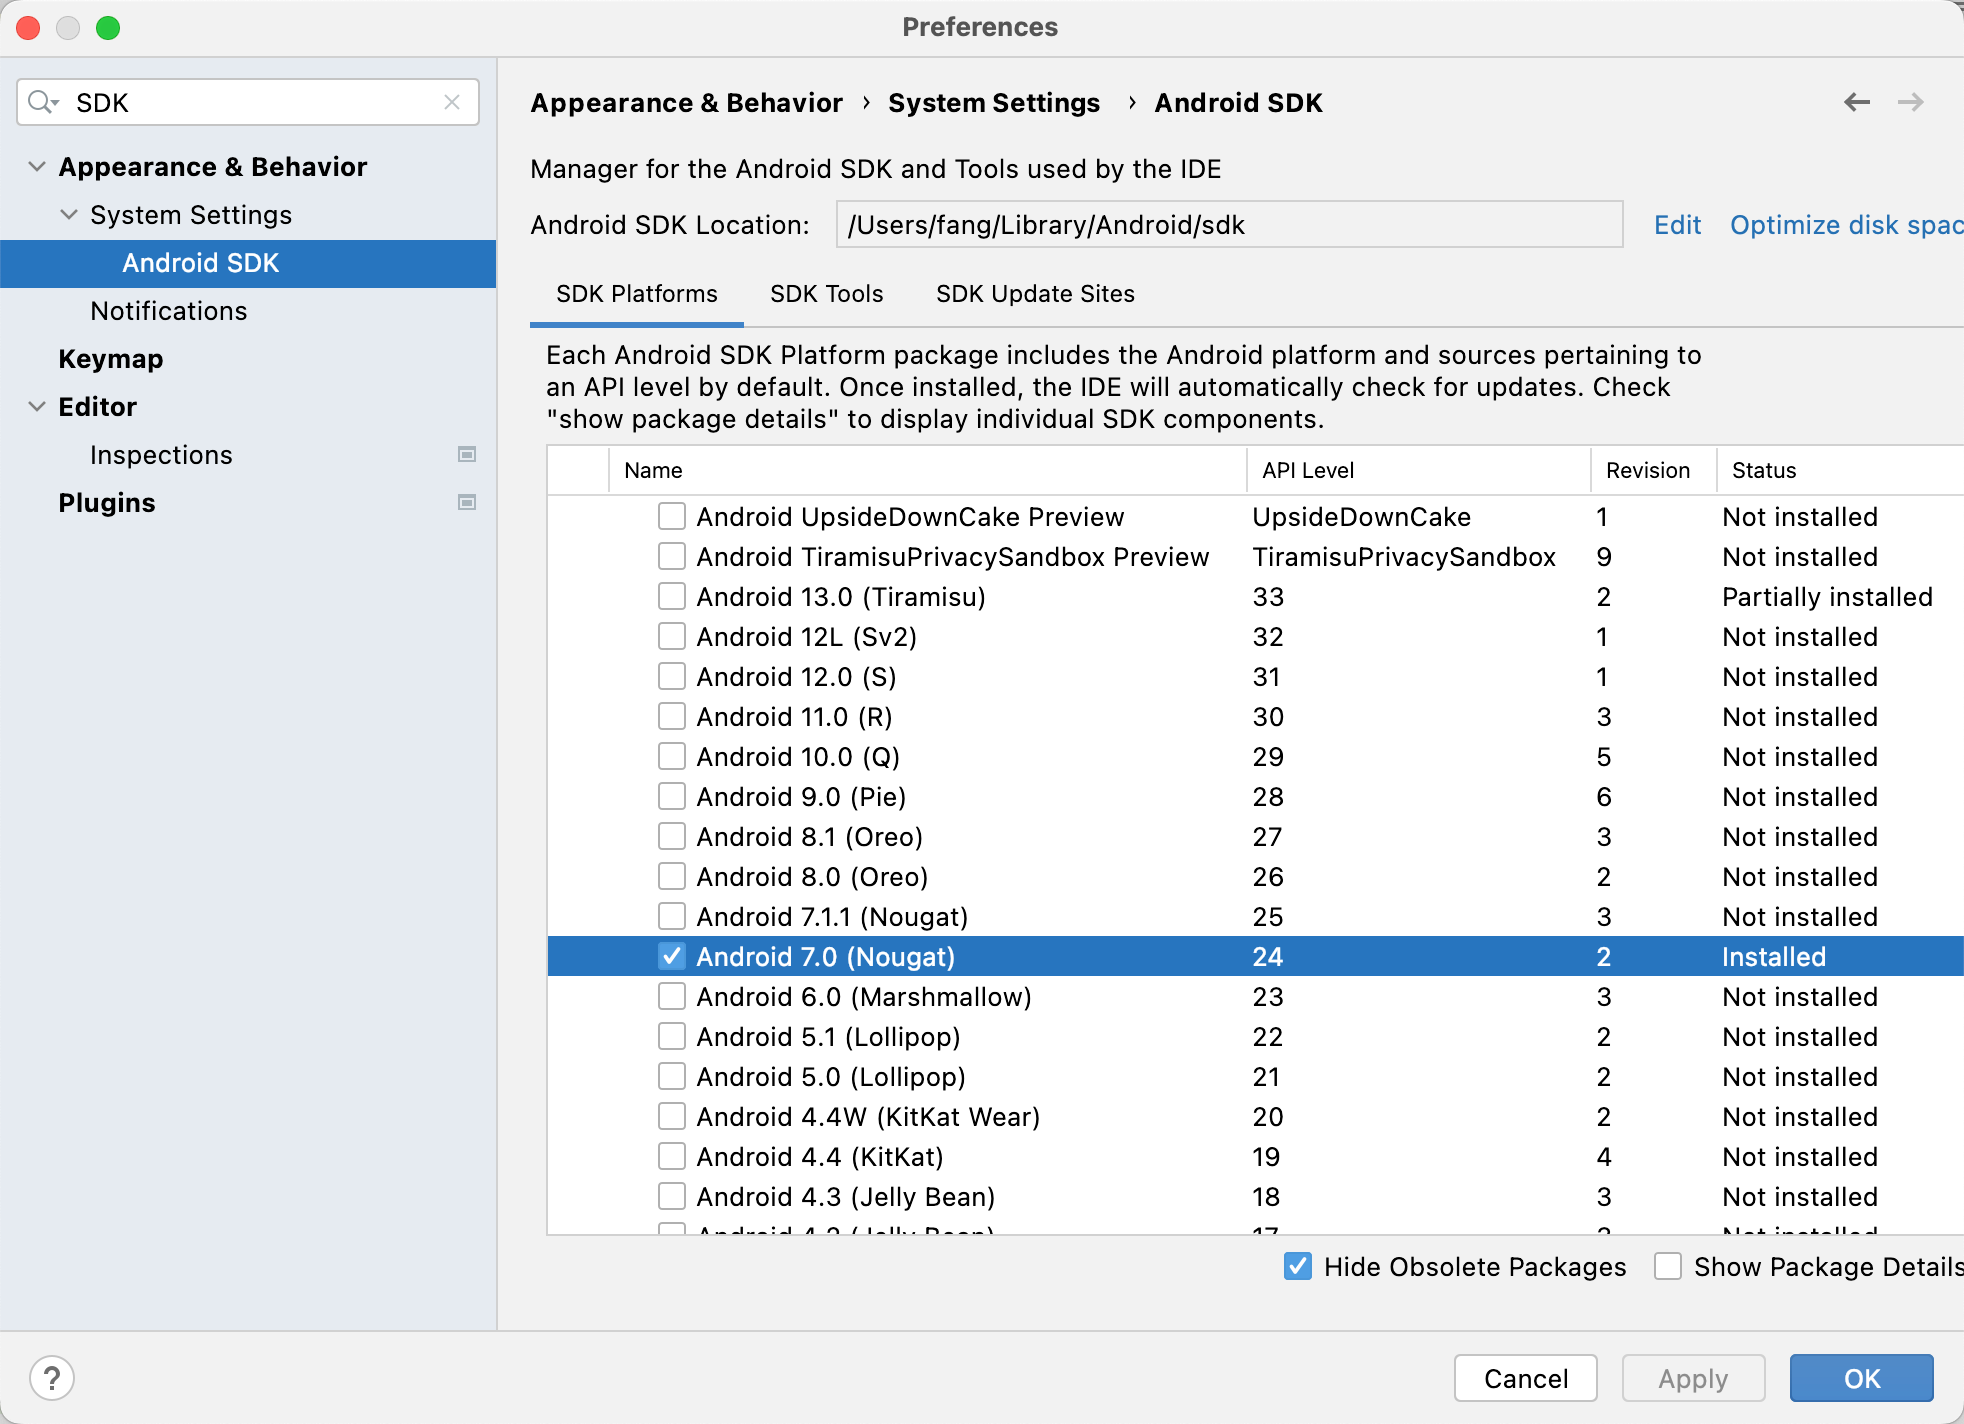
安装SDK(默认Android 7.0即可)
全局 gradle 镜像配置
在用户主目录下的 .gradle 文件夹下面新建文件 init.gradle,内容为
allprojects {repositories {def ALIYUN_REPOSITORY_URL = 'https://maven.aliyun.com/repository/central'def ALIYUN_JCENTER_URL = 'https://maven.aliyun.com/repository/public'all { ArtifactRepository repo ->if(repo instanceof MavenArtifactRepository){def url = repo.url.toString()if (url.startsWith('https://repo1.maven.org/maven2') || url.startsWith('http://repo1.maven.org/maven2')) {project.logger.lifecycle "Repository ${repo.url} replaced by $ALIYUN_REPOSITORY_URL."remove repo}if (url.startsWith('https://jcenter.bintray.com/') || url.startsWith('http://jcenter.bintray.com/')) {project.logger.lifecycle "Repository ${repo.url} replaced by $ALIYUN_JCENTER_URL."remove repo}}}maven {url ALIYUN_REPOSITORY_URLurl ALIYUN_JCENTER_URL}}buildscript{repositories {def ALIYUN_REPOSITORY_URL = 'https://maven.aliyun.com/repository/central'def ALIYUN_JCENTER_URL = 'https://maven.aliyun.com/repository/public'all { ArtifactRepository repo ->if(repo instanceof MavenArtifactRepository){def url = repo.url.toString()if (url.startsWith('https://repo1.maven.org/maven2') || url.startsWith('http://repo1.maven.org/maven2')) {project.logger.lifecycle "Repository ${repo.url} replaced by $ALIYUN_REPOSITORY_URL."remove repo}if (url.startsWith('https://jcenter.bintray.com/') || url.startsWith('http://jcenter.bintray.com/')) {project.logger.lifecycle "Repository ${repo.url} replaced by $ALIYUN_JCENTER_URL."remove repo}}}maven {url ALIYUN_REPOSITORY_URLurl ALIYUN_JCENTER_URL}}}
}
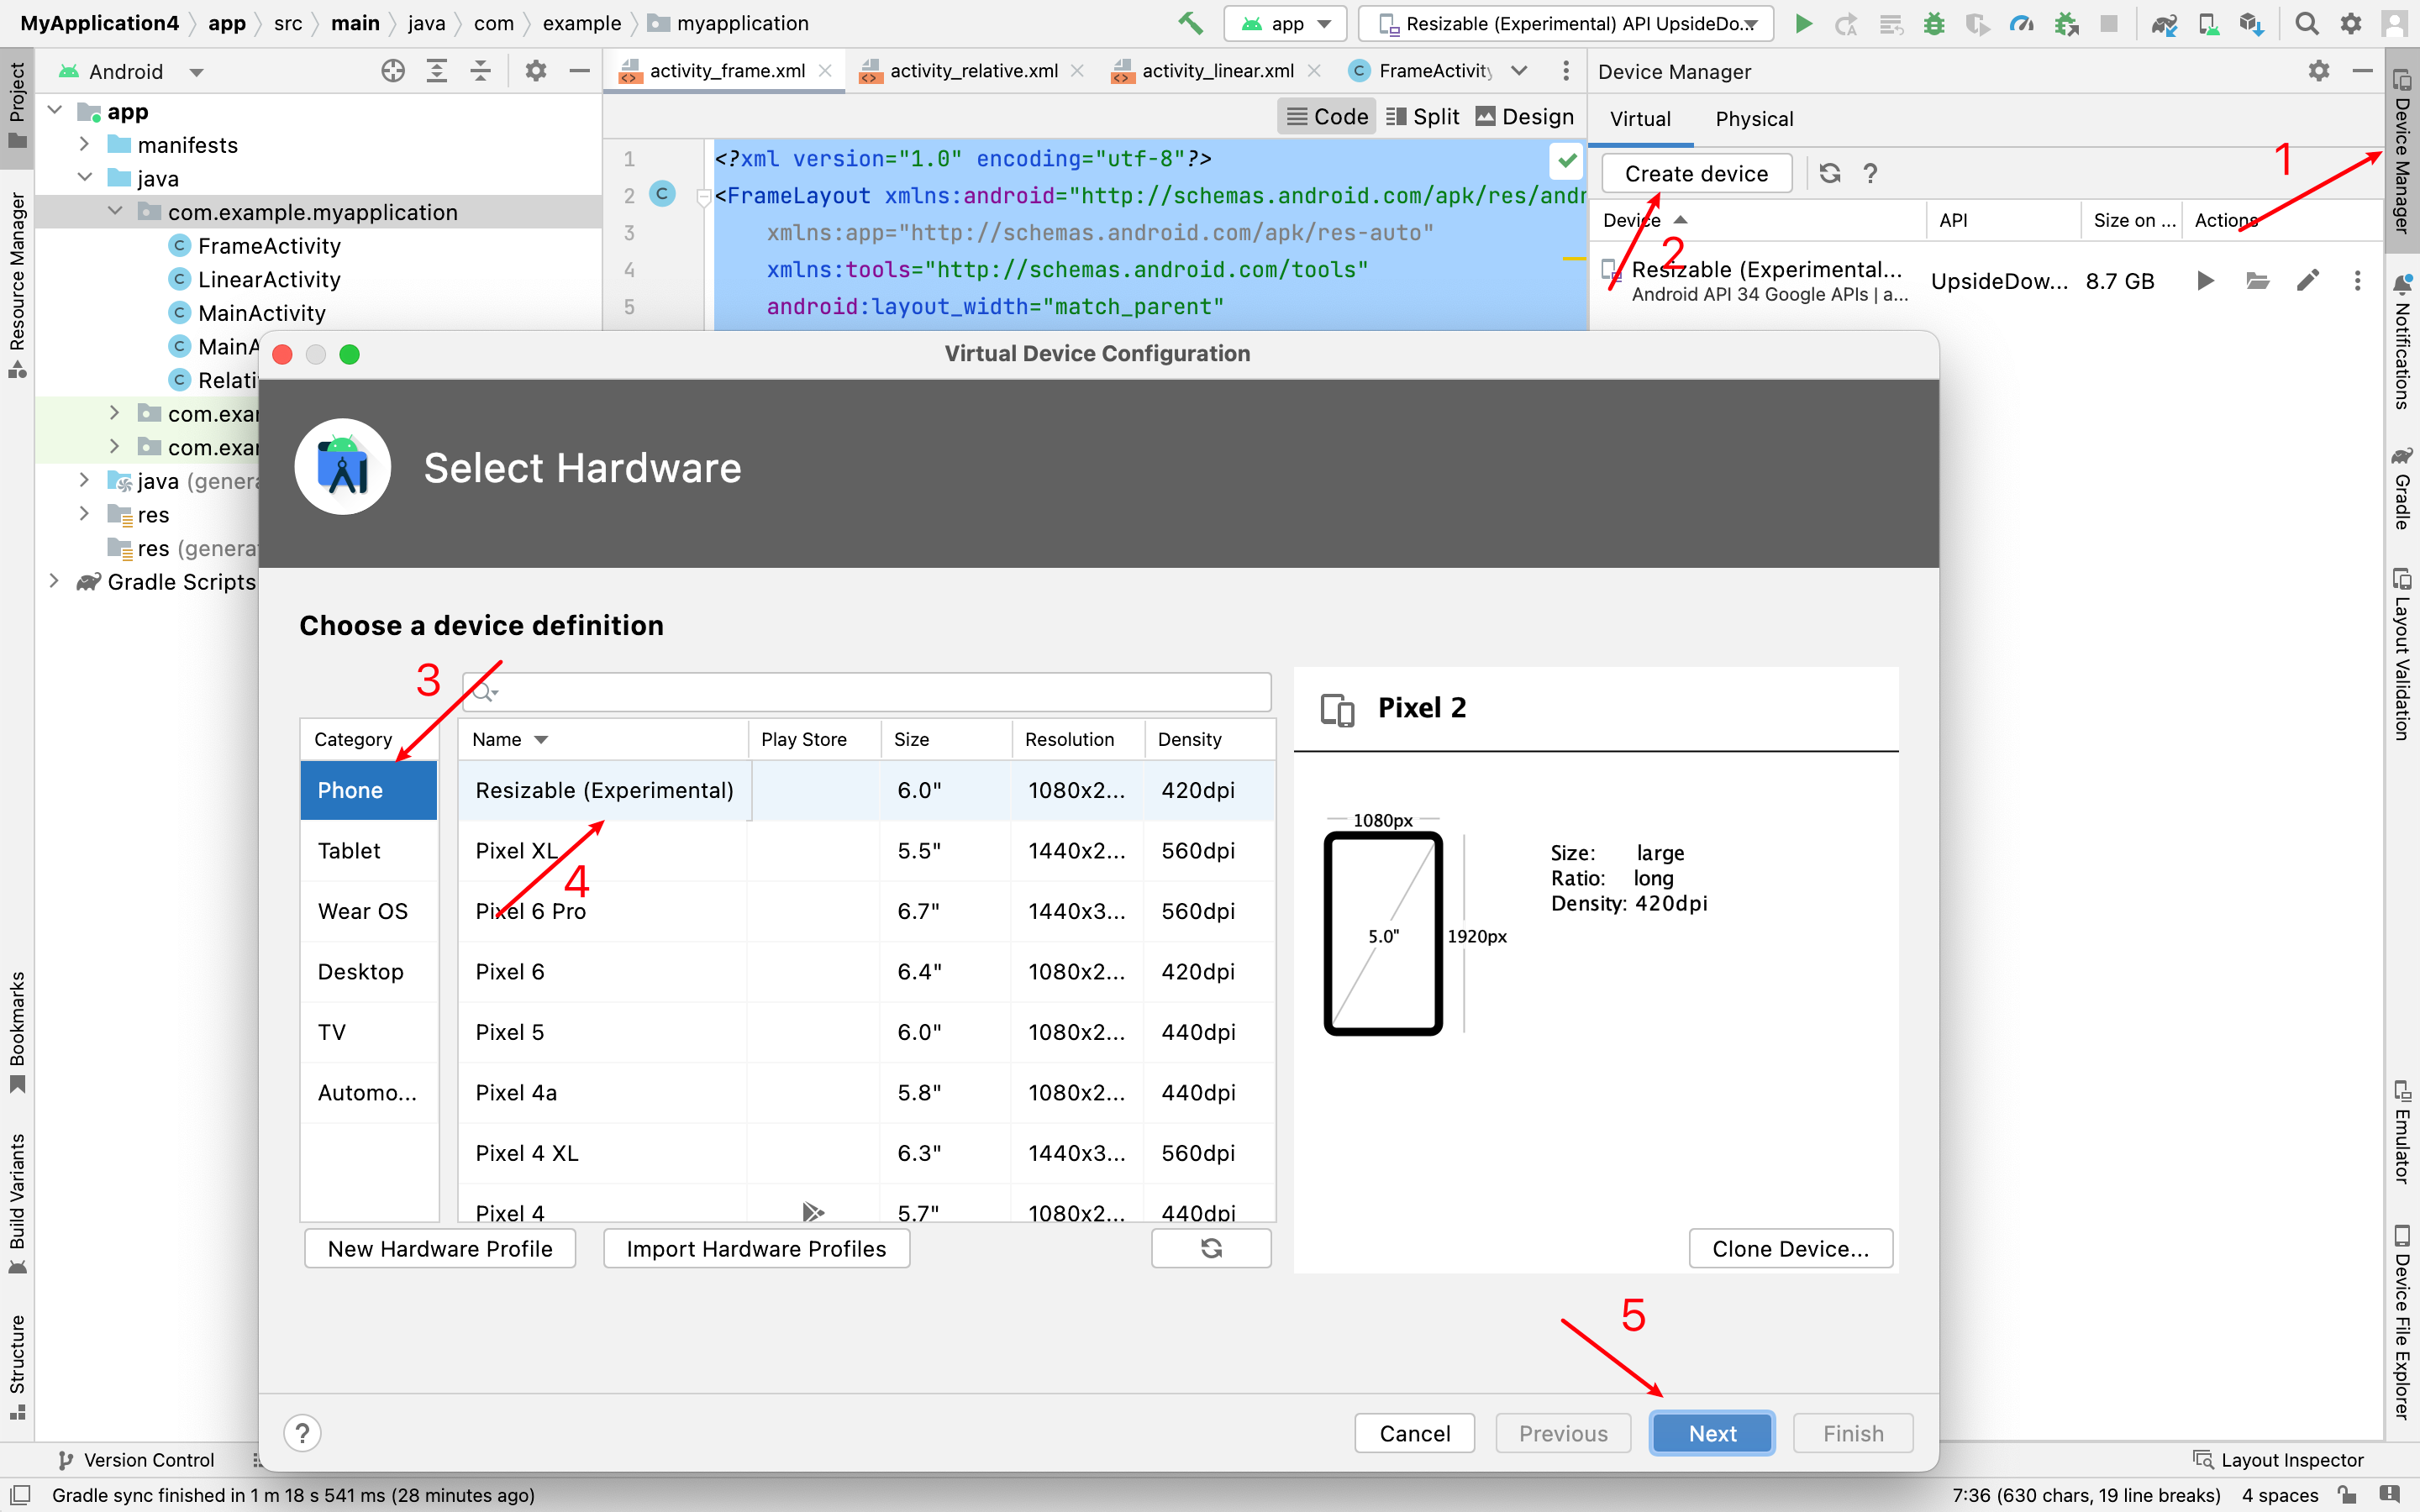
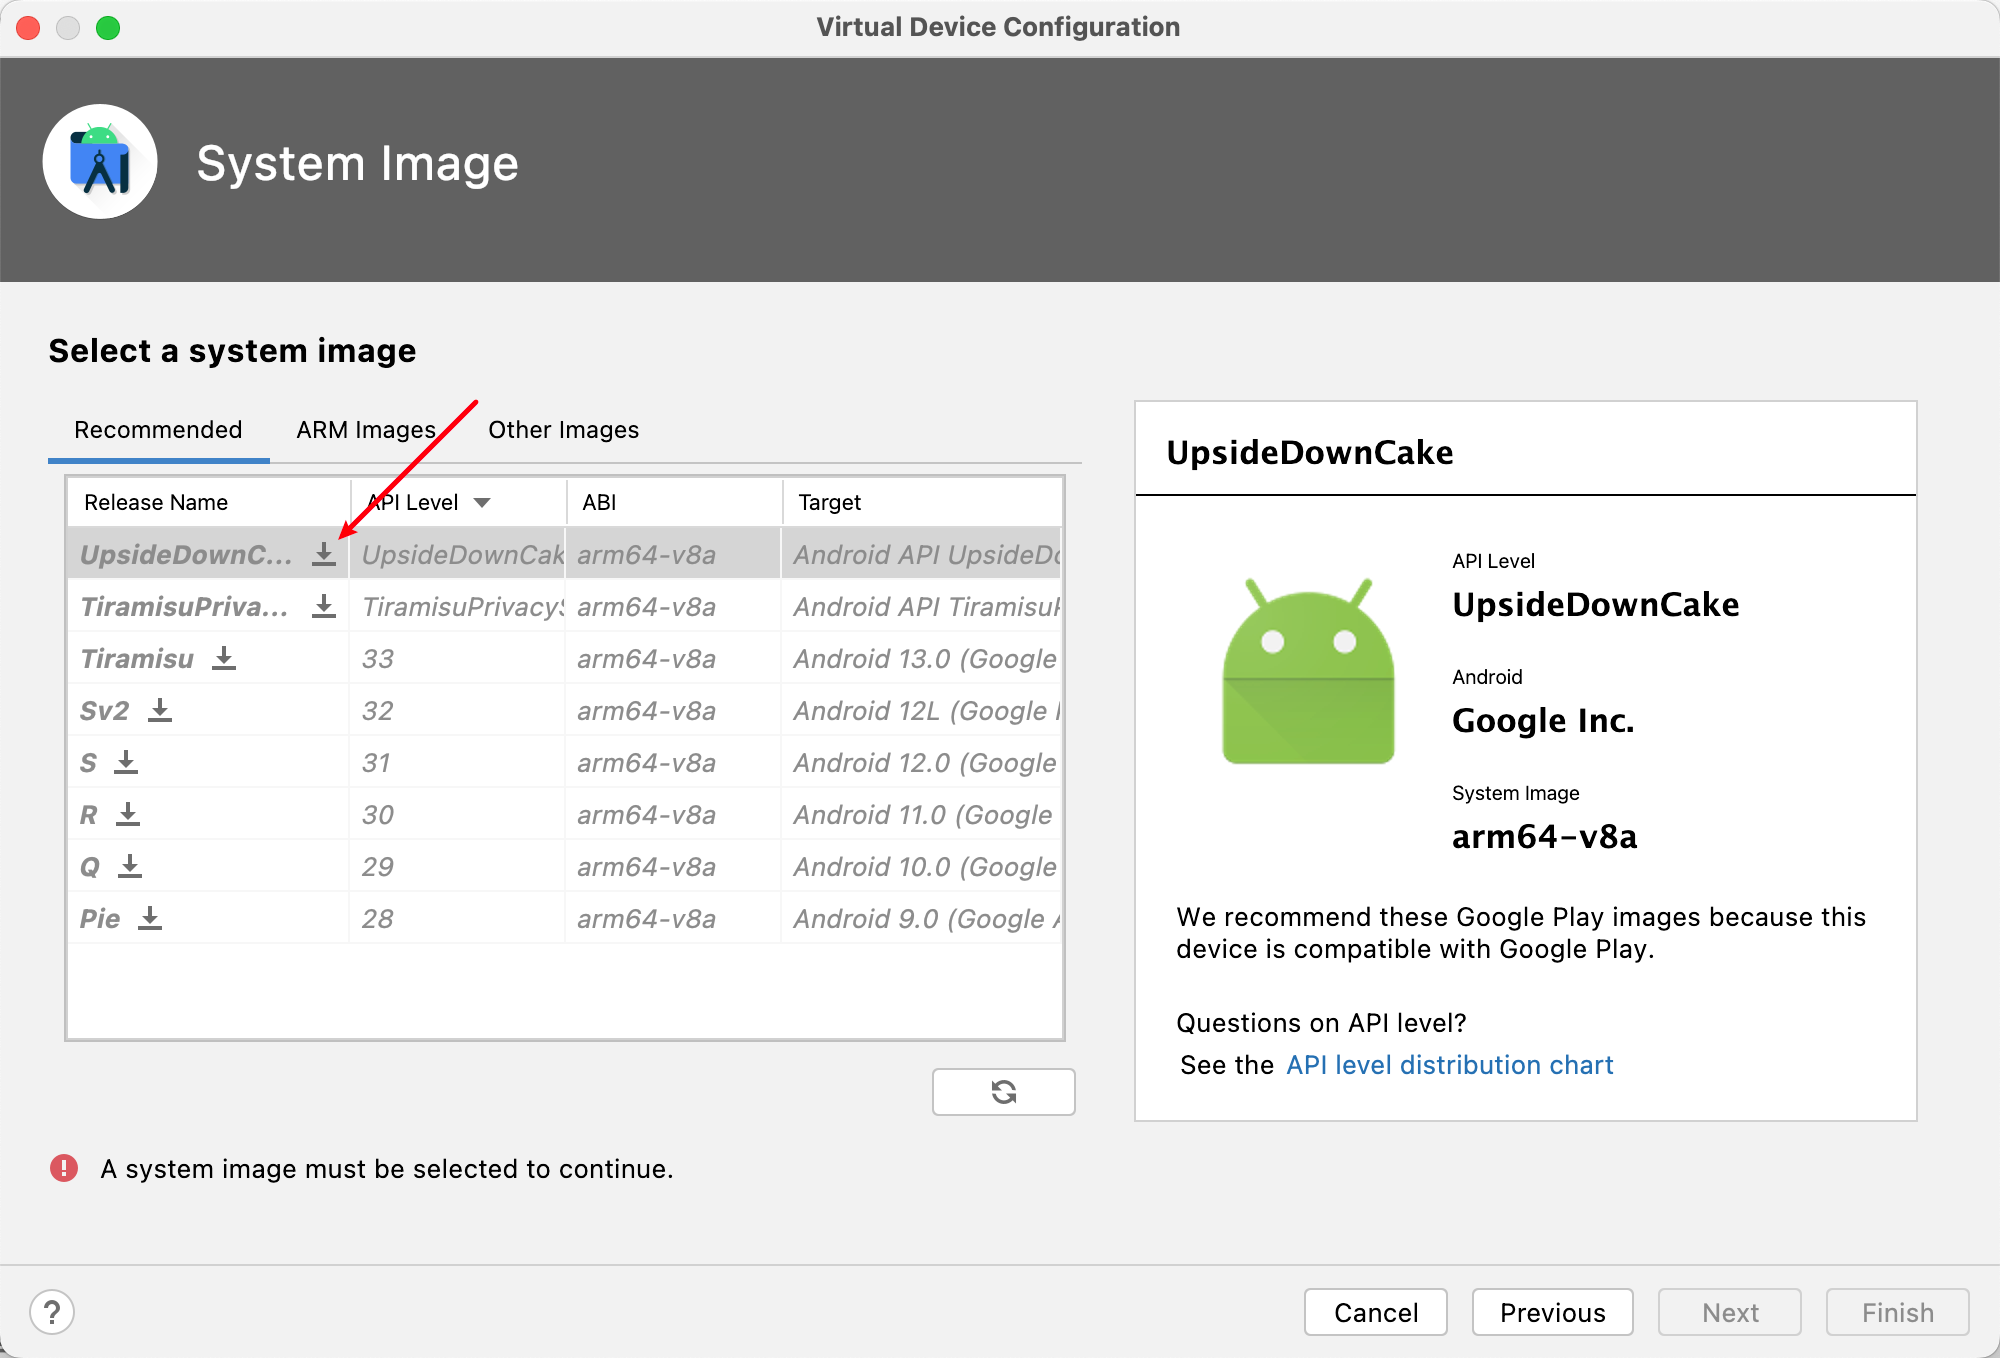
安装模拟器
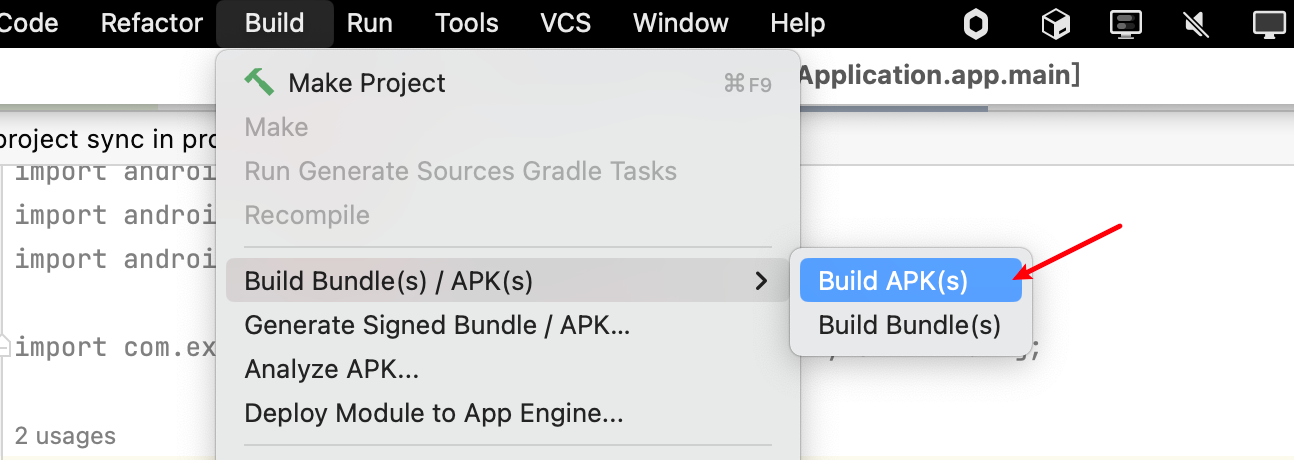
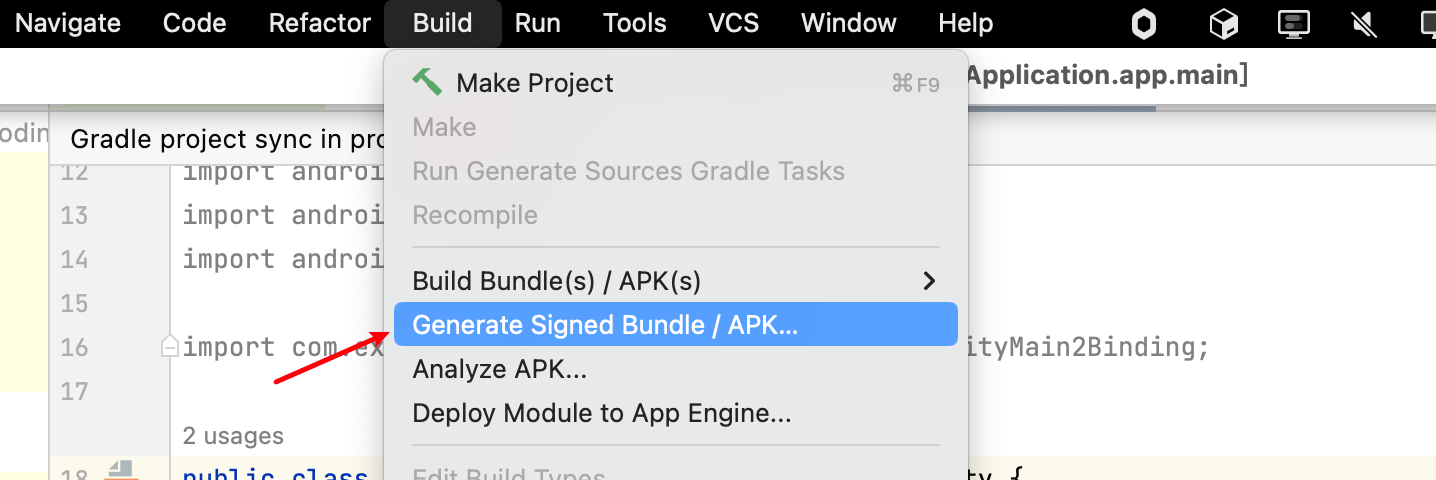
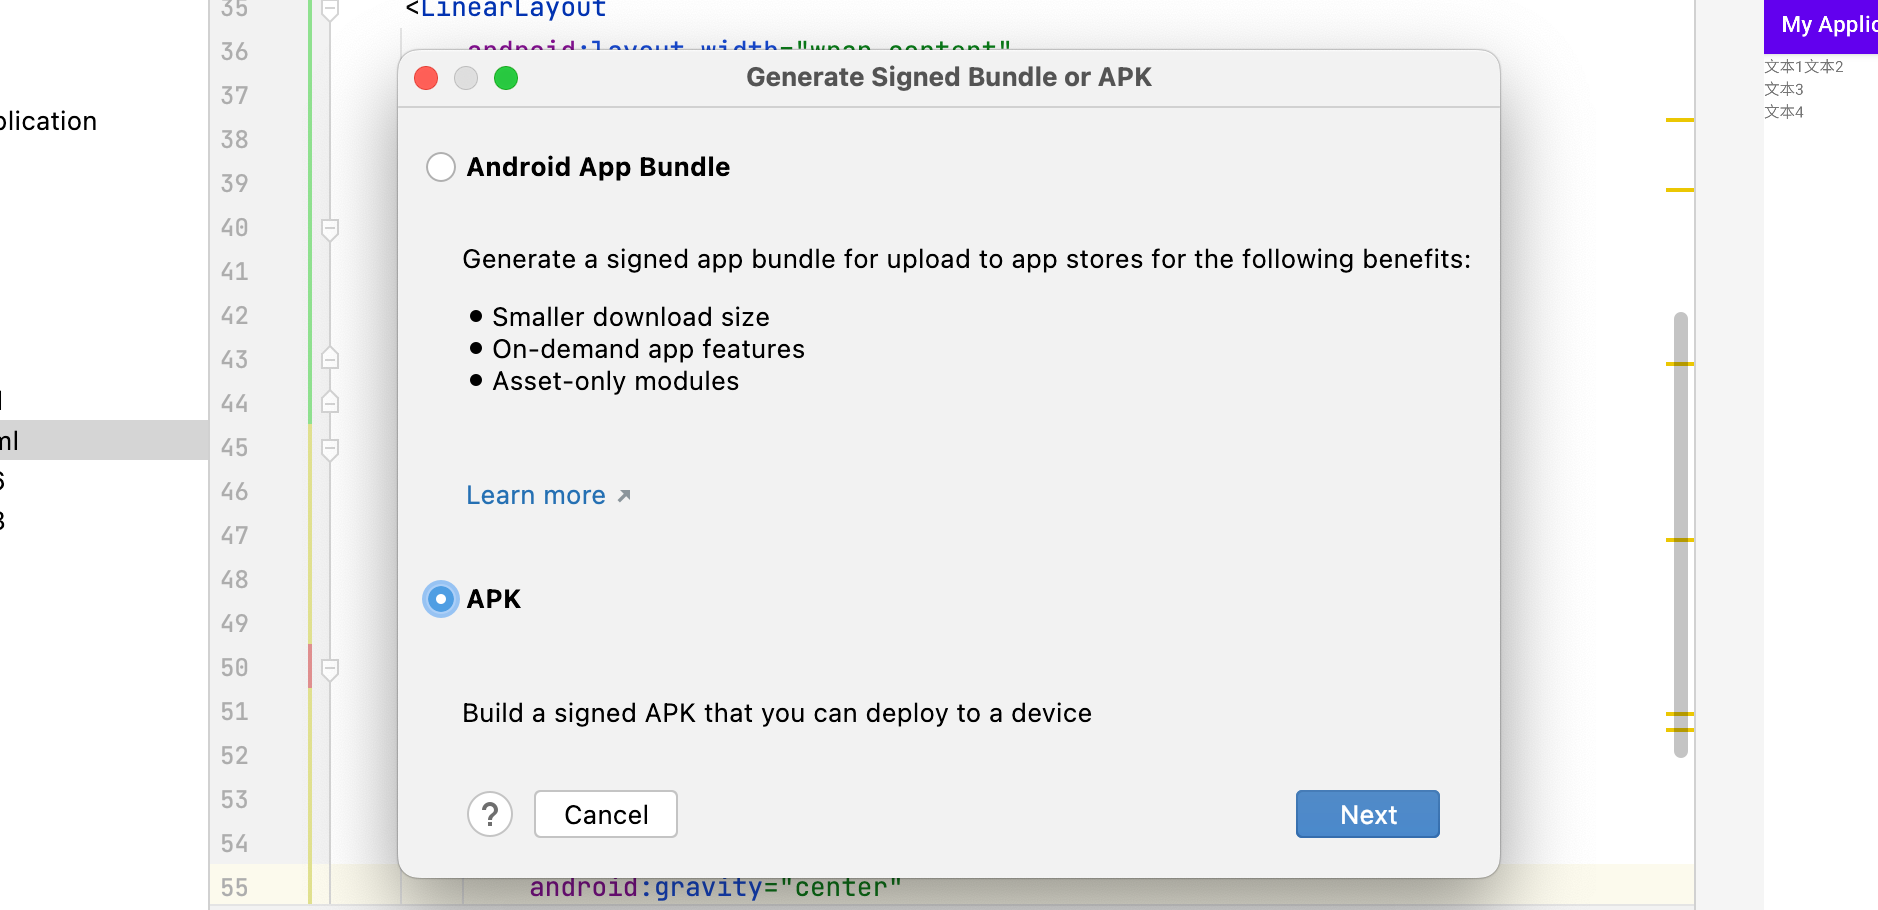
2. 生成APK文件
两种方式,一种是debug版本,一种是带签名的版本。
debug版本:
带签名的版本:
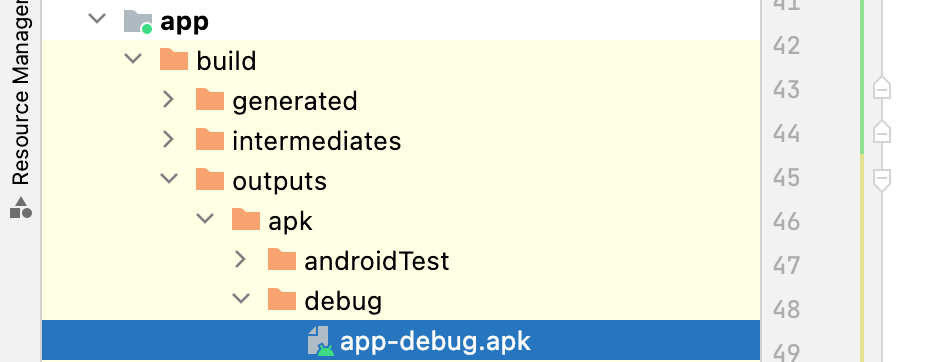
构建完毕后可以在 app/build/outputs/apk里找到
运行结果:
3. 练习线性布局
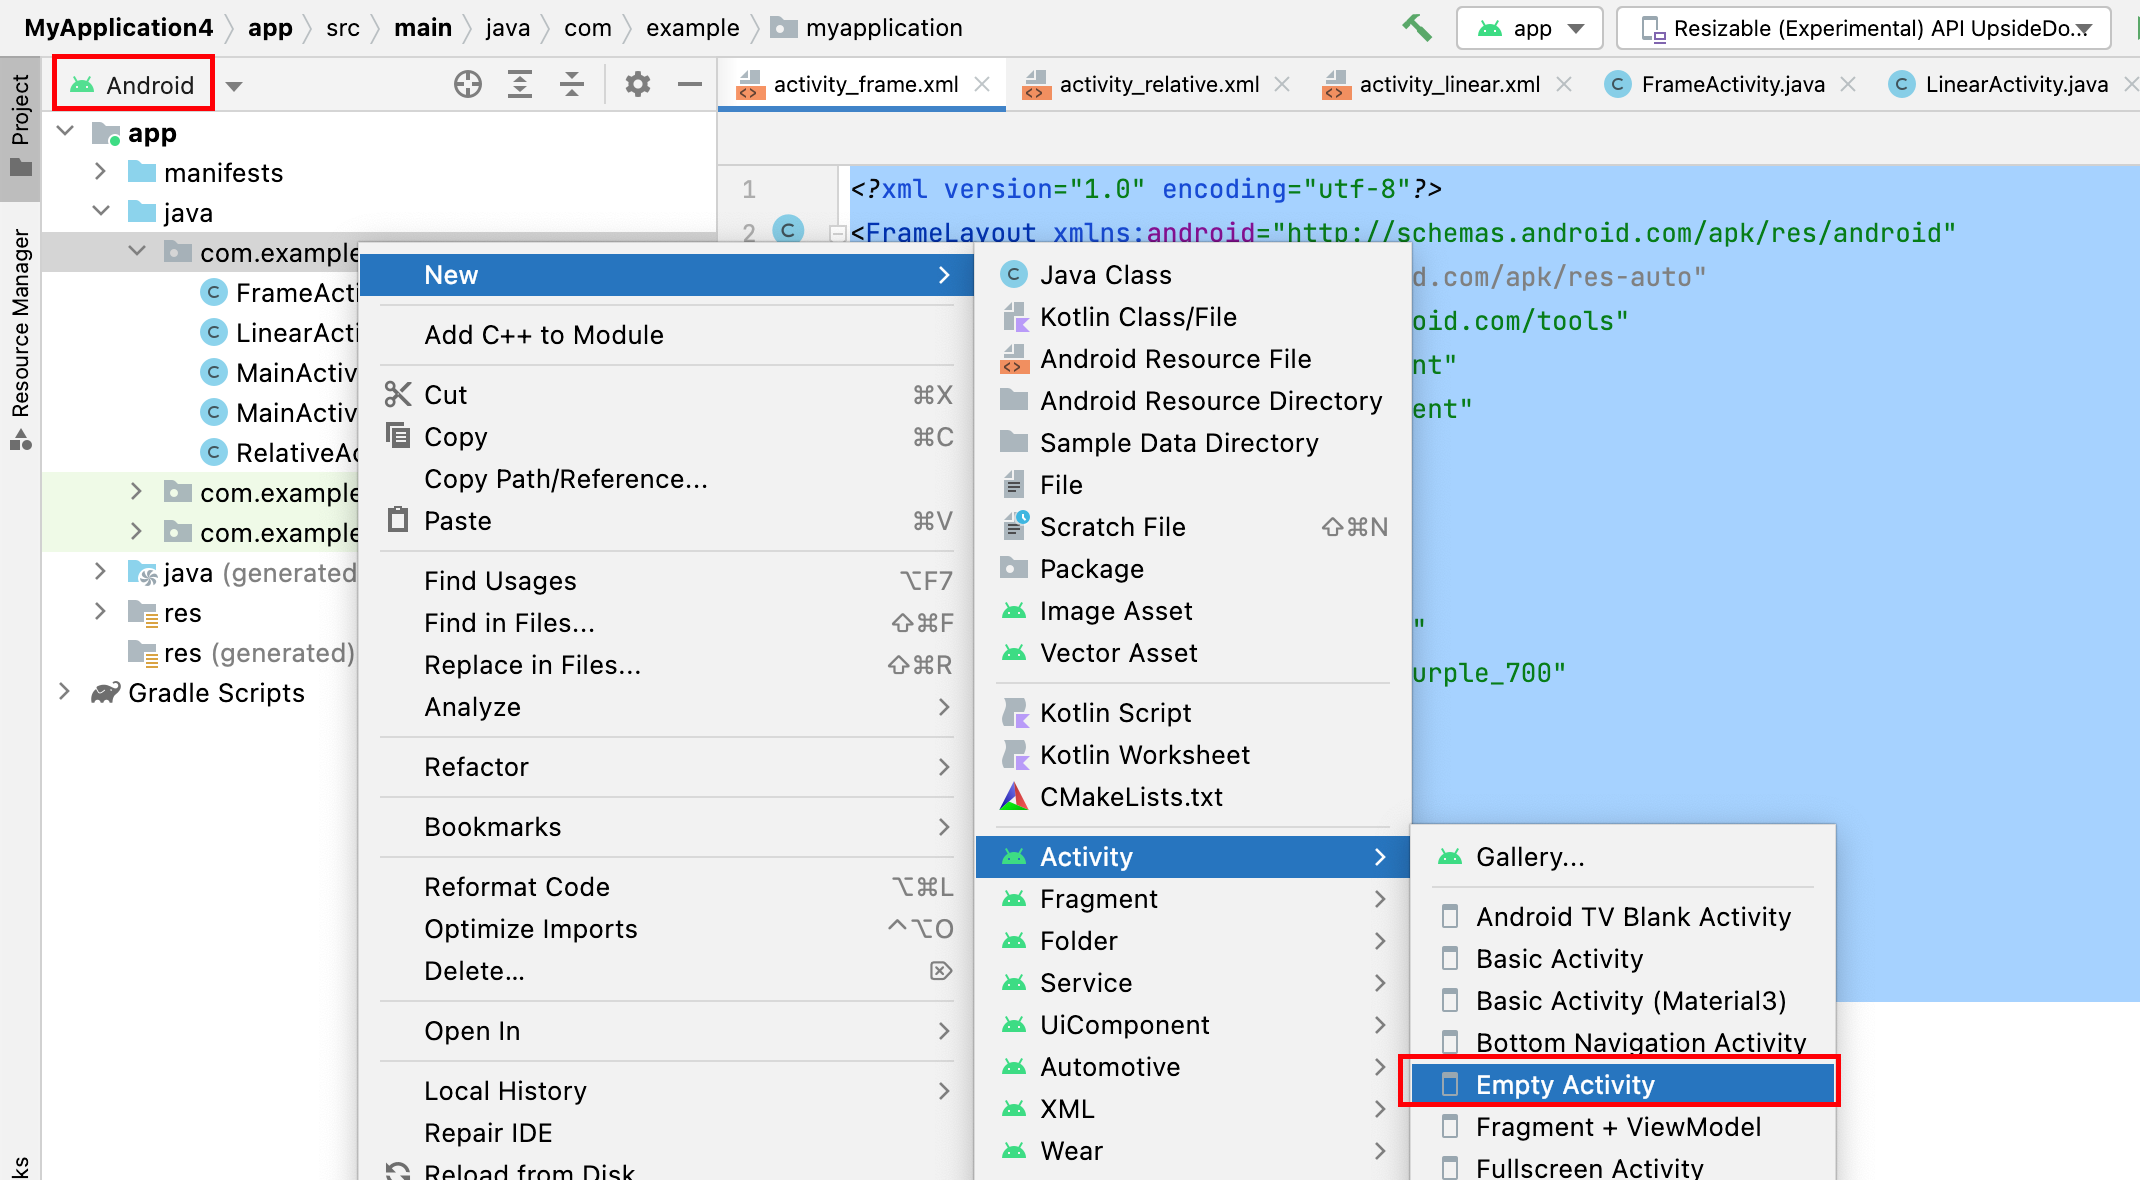
番外:如何创建一个新的 Activity?
将
YourName替换为你要创建的 Activity的名字,点击Finish即可。
orientation
- vertical(垂直): 从上到下
- horizontal(水平):从左到右
dp:设置边距单位
sp:设置文字大小单位
尽量避免将宽高设置为固定值。
练习一:试着做出如下界面
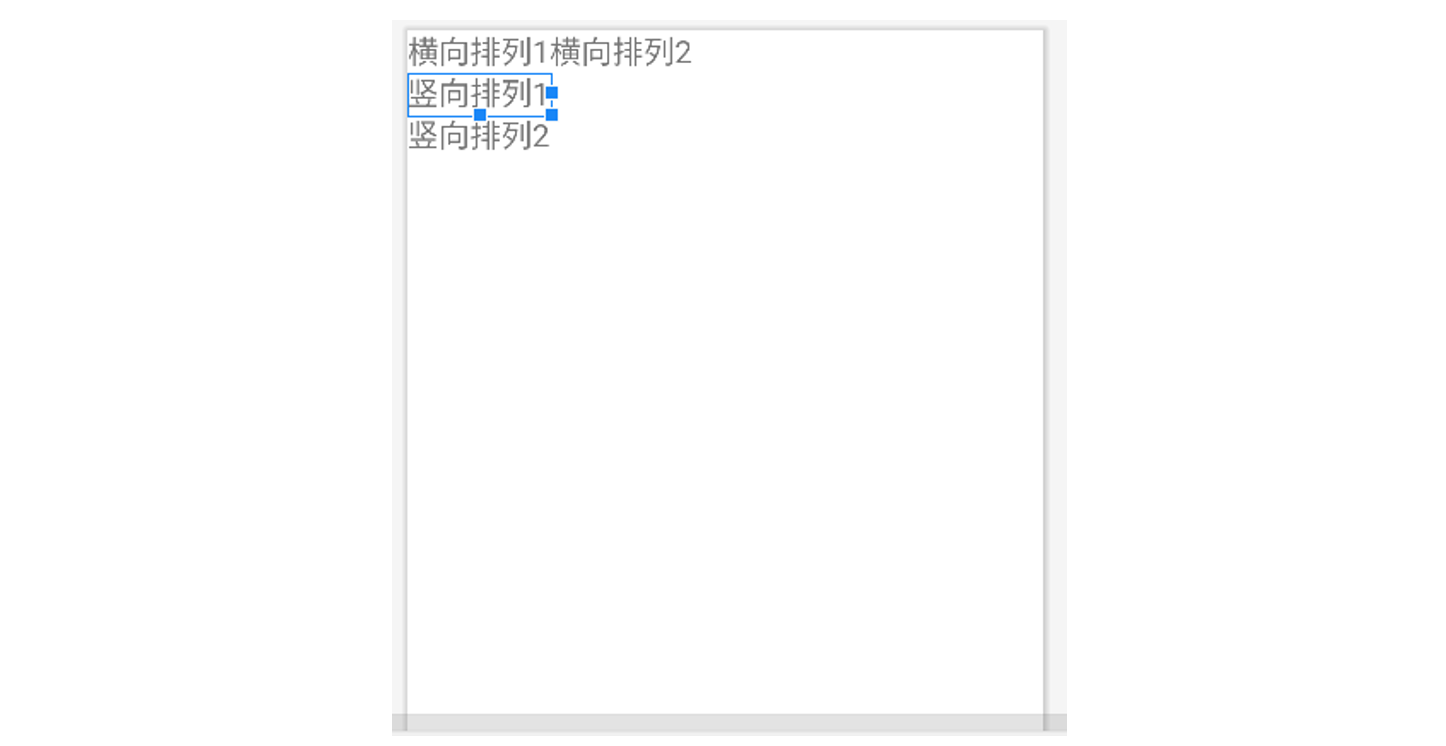
实现解析:将整体看作一个大的线型布局(纵向),里面塞三个横向布局。
将文本1,2放入第一个横向布局,文本3放入第二个横向布局,文本4放入第三个横向布局。
<?xml version="1.0" encoding="utf-8"?>
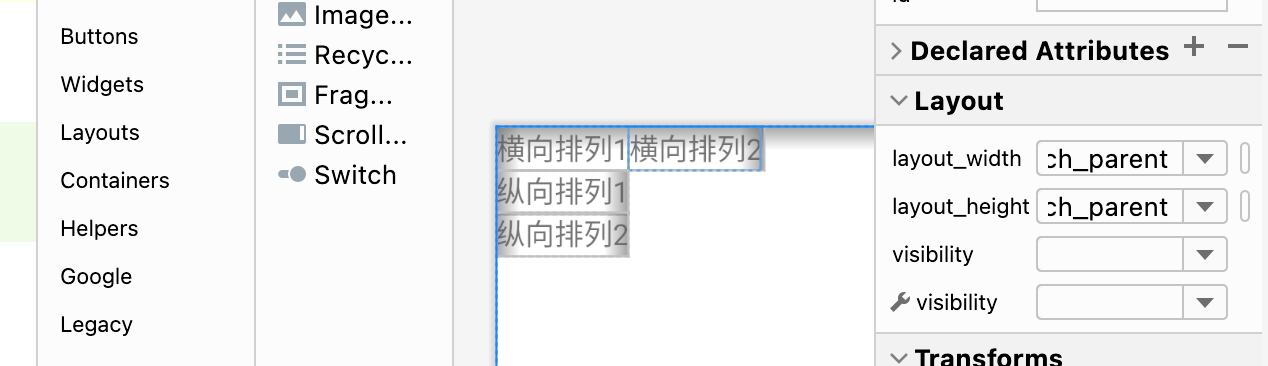
<LinearLayout xmlns:android="http://schemas.android.com/apk/res/android"xmlns:app="http://schemas.android.com/apk/res-auto"xmlns:tools="http://schemas.android.com/tools"android:layout_width="match_parent"android:layout_height="match_parent"tools:context=".LinearActivity"android:orientation="vertical"><LinearLayoutandroid:layout_width="wrap_content"android:layout_height="wrap_content"android:orientation="horizontal"><TextViewandroid:layout_width="wrap_content"android:layout_height="wrap_content"android:text="横向排列1" /><TextViewandroid:layout_width="wrap_content"android:layout_height="wrap_content"android:text="横向排列2" /></LinearLayout><LinearLayoutandroid:layout_width="wrap_content"android:layout_height="wrap_content"android:orientation="horizontal"><TextViewandroid:layout_width="wrap_content"android:layout_height="wrap_content"android:text="纵向排列1" /></LinearLayout><LinearLayoutandroid:layout_width="wrap_content"android:layout_height="wrap_content"android:orientation="horizontal"><TextViewandroid:layout_width="wrap_content"android:layout_height="wrap_content"android:text="纵向排列2" /></LinearLayout></LinearLayout>
效果如图:
在此基础上,使用 margin、padding、textSize、gravity、layout_gravity修饰后的效果:

最终代码:
<?xml version="1.0" encoding="utf-8"?>
<LinearLayout xmlns:android="http://schemas.android.com/apk/res/android"xmlns:app="http://schemas.android.com/apk/res-auto"xmlns:tools="http://schemas.android.com/tools"android:layout_width="match_parent"android:layout_height="match_parent"tools:context=".LinearActivity"android:orientation="vertical"><LinearLayoutandroid:layout_width="wrap_content"android:layout_height="wrap_content"android:orientation="horizontal"><TextViewandroid:layout_width="wrap_content"android:layout_height="wrap_content"android:textSize="20dp"android:text="横向排列1" /><TextViewandroid:layout_width="wrap_content"android:layout_height="wrap_content"android:textSize="30dp"android:text="横向排列2" /></LinearLayout><LinearLayoutandroid:layout_width="wrap_content"android:layout_height="wrap_content"android:orientation="horizontal"><TextViewandroid:layout_width="wrap_content"android:layout_height="wrap_content"android:layout_margin="15dp"android:text="纵向排列1" /></LinearLayout><LinearLayoutandroid:layout_width="match_parent"android:layout_height="wrap_content"android:orientation="horizontal"android:gravity="center"><TextViewandroid:layout_width="wrap_content"android:layout_height="wrap_content"android:layout_gravity="center"android:padding="10dp"android:text="纵向排列2" /></LinearLayout></LinearLayout>
4. 练习相对布局。
强调相对定位,以其他组件或父容器作为参照物,摆放组件的位置。
android:gravity设置子组件的摆放方式。android:ignoregravity设置某个子组件不受gravity的控制。
设置组件上的属性:android:layout_above、android:layout_below、android:layout_toLeftOf、android:layout_toRightOf
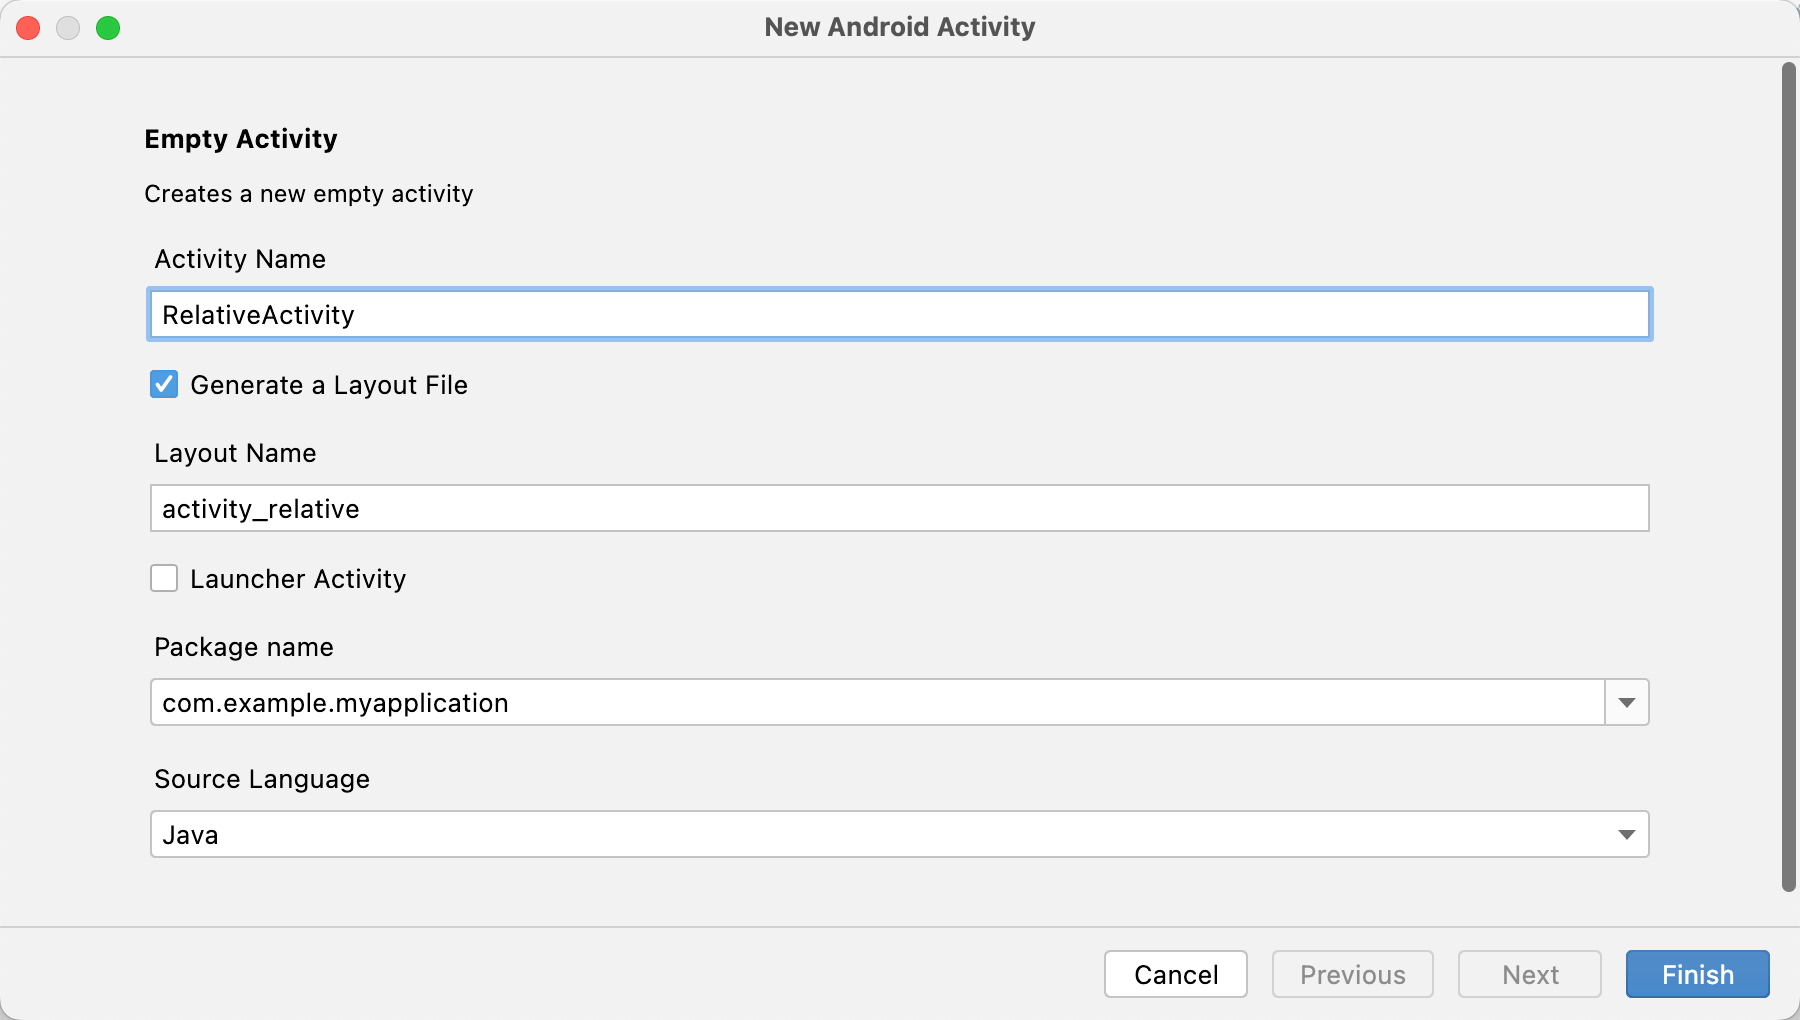
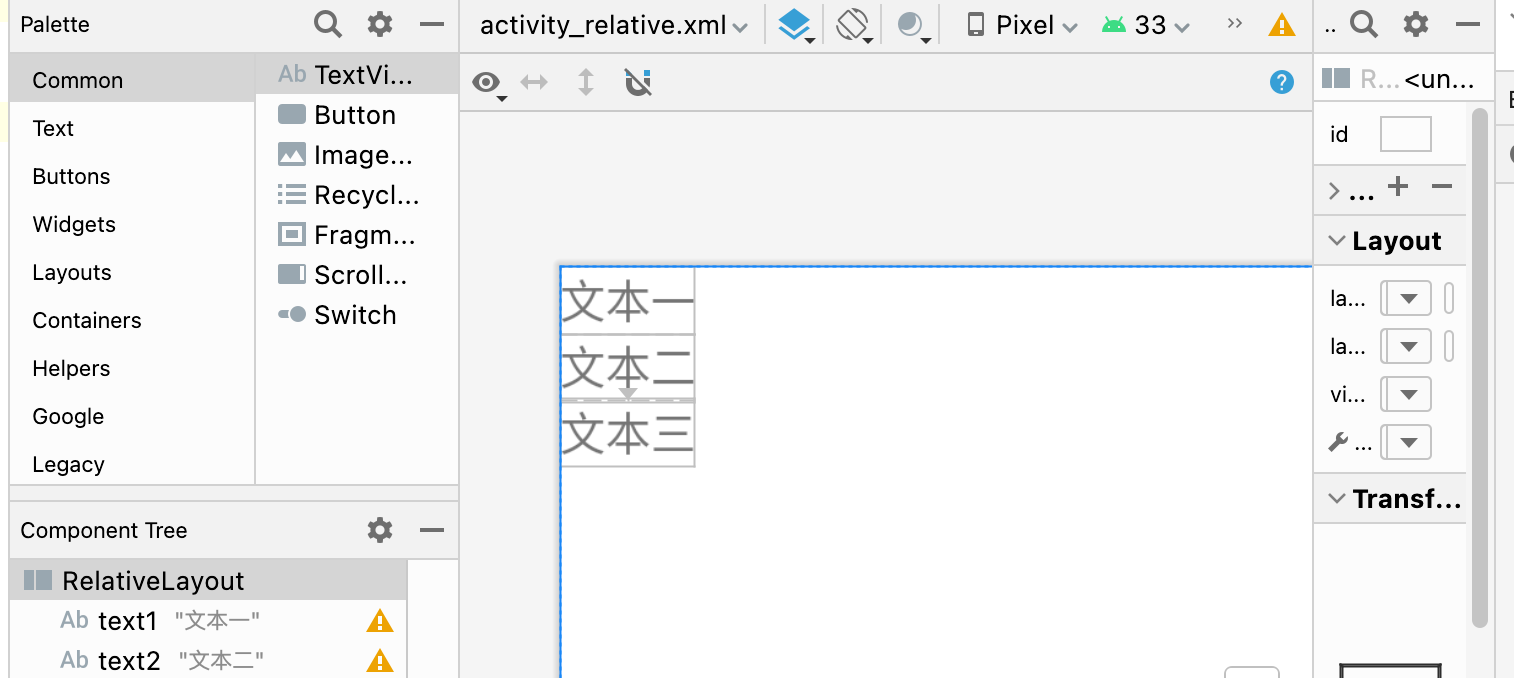
练习一:实现三个文本对齐,以第一个文本为参照相对定位。
新建一个 Activity,起名为 RelativeActivity
相对布局的操作就是:首先定义一个 RelativeLayout的布局,为其一个子元素赋予属性 android:id(如:@id/text1),其他元素则可以用 android:layout_below="@id/text1"来相对定位。
<?xml version="1.0" encoding="utf-8"?>
<RelativeLayout xmlns:android="http://schemas.android.com/apk/res/android"xmlns:app="http://schemas.android.com/apk/res-auto"xmlns:tools="http://schemas.android.com/tools"android:layout_width="match_parent"android:layout_height="match_parent"tools:context=".RelativeActivity"><TextViewandroid:id="@+id/text1"android:layout_width="wrap_content"android:layout_height="wrap_content"android:text="文本一"/><TextViewandroid:id="@+id/text2"android:layout_below="@id/text1"android:layout_width="wrap_content"android:layout_height="wrap_content"android:text="文本二"/><TextViewandroid:layout_below="@id/text2"android:layout_width="wrap_content"android:layout_height="wrap_content"android:text="文本三"/>
</RelativeLayout>
5. 练习表格布局。
6. 练习网格布局。
7. 练习约束布局。
8. 练习帧布局。
是Android中最为简单的一种布局。
可以实现层叠效果(从坐标(0,0)开始)、以及拖动效果。
android:gravity设置子组件的摆放方式。android:gravity放在组件的属性描述里设置的是文字居中。android:layout_gravity设置的是当前控件在布局中的位置。
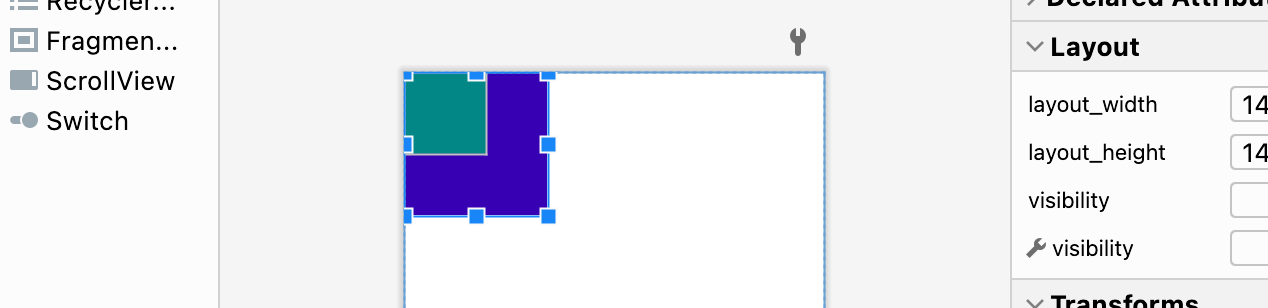
练习:创建两个文本,设置不同的颜色和大小,实现层叠效果
<?xml version="1.0" encoding="utf-8"?>
<FrameLayout xmlns:android="http://schemas.android.com/apk/res/android"xmlns:app="http://schemas.android.com/apk/res-auto"xmlns:tools="http://schemas.android.com/tools"android:layout_width="match_parent"android:layout_height="match_parent"tools:context=".FrameActivity"><TextViewandroid:layout_width="140dp"android:layout_height="140dp"android:background="@color/purple_700"/><TextViewandroid:layout_width="80dp"android:layout_height="80dp"android:background="@color/teal_700" /></FrameLayout>
相关文章:
《嵌入式应用开发》实验一、开发环境搭建与布局(上)
1. 搭建开发环境 去官网(https://developer.android.google.cn/studio)下载 Android Studio。 安装SDK(默认Android 7.0即可) 全局 gradle 镜像配置 在用户主目录下的 .gradle 文件夹下面新建文件 init.gradle,内容为…...
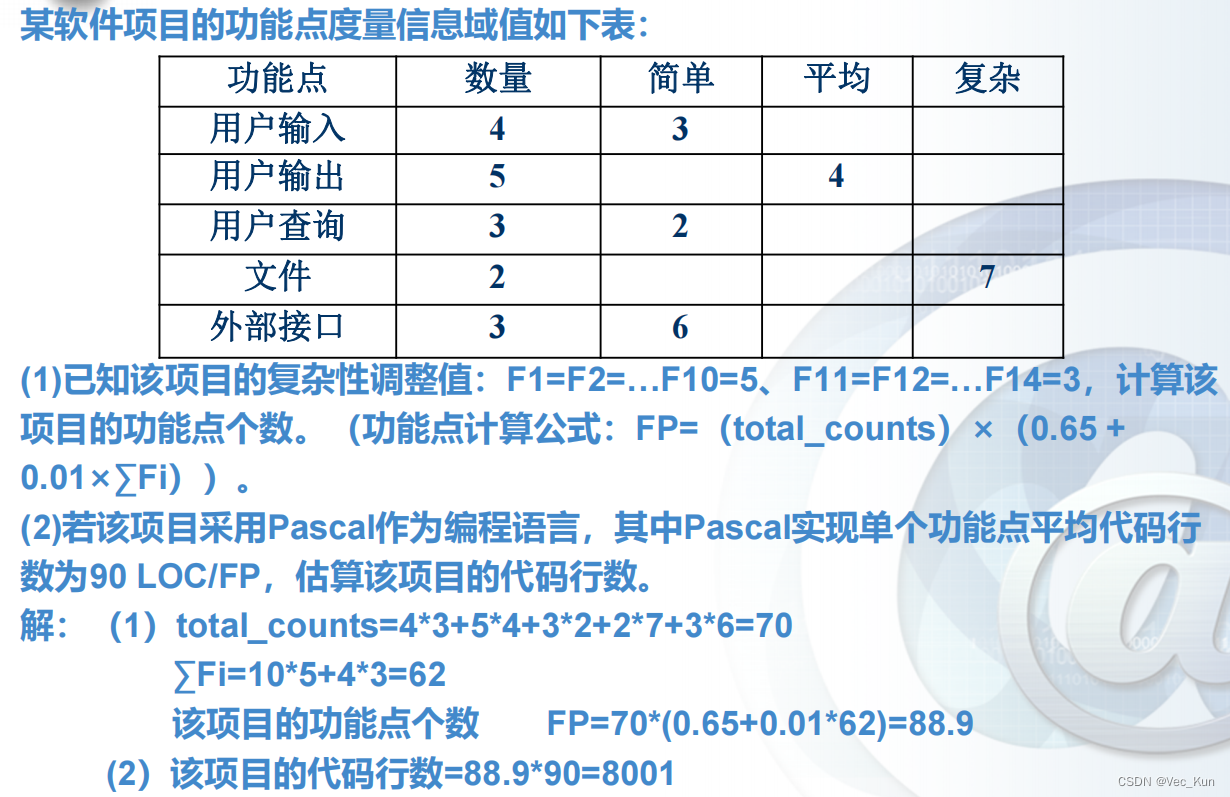
电子科技大学软件工程期末复习笔记(五):生产率和工作度量
目录 前言 重点一览 软件产品度量 测量软件生产率的两种方法 基于LOC测量 例题: 优点 缺点 基于功能点测量 例题: 本章小结 前言 本复习笔记基于王玉林老师的课堂PPT与复习大纲,供自己期末复习与学弟学妹参考用。 重点一览 这一部分内…...
400G光模块知识大全
400G光模块是目前高速传输领域中的一种先进产品,被广泛应用于高性能数据中心、通信网络、大规模计算、云计算等领域。本文将从400G光模块的定义、技术、产品型号、应用场景以及未来发展方向进行详细介绍。一、什么是400G光模块?400G光模块是指传输速率达…...
【Linux】零成本在家搭建自己的私人服务器解决方案
我这个人自小时候以来就特喜欢永久且免费的东西,也因此被骗过(花巨款买了永久超级会员最后就十几天)。 长大后骨子里也是喜欢永久且免费的东西,所以我不买服务器,用GitHubPage或者GiteePage搭建自己的静态私人博客&…...

Python 多线程、多进程和协程
一、多线程 threading 模块 threading 模块对象 对象描述Thread表示一个执行线程的对象Lock锁原语对象(与 thread 模块中的锁一样)RLock可重入锁对象,使单一线程可以(再次)获得已持有的锁(递归锁&#x…...

Xml 注解
文章目录XmlRootElement(name"MyRootElement")XmlAccessorType(XmlAccessType.FIELD)XmlElementXmlAttributeXmlValueXmlElementRefXmlRootElement(name“MyRootElement”) XmlRootElement(name"MyRootElement") public class AccessorType {public Strin…...
【CSS文字滚动】CSS实现文字横向循环无缝滚动,鼠标移入暂停移出继续(附实测源码)
CSS如何实现文字横向滚动滚动效果1、垃圾liMarquee(最好别用)2、css实现文字滚动,且鼠标移入移出暂停和继续HTML源码如下:CSS源码如下:JS源码如下:3、片尾彩蛋CSS实现文字横向循环无缝滚动,鼠标…...
不使用implements关键字实现实现类(类似于mapper)
首先,说明一下功能需求,平时定义一个接口,就要使用implements关键字来实现接口。那么,当不使用此关键字的时候,是否也能使相关接口也能够绑定实现类呢? 答案是肯定的。 此篇文章的主要功能有两个…...
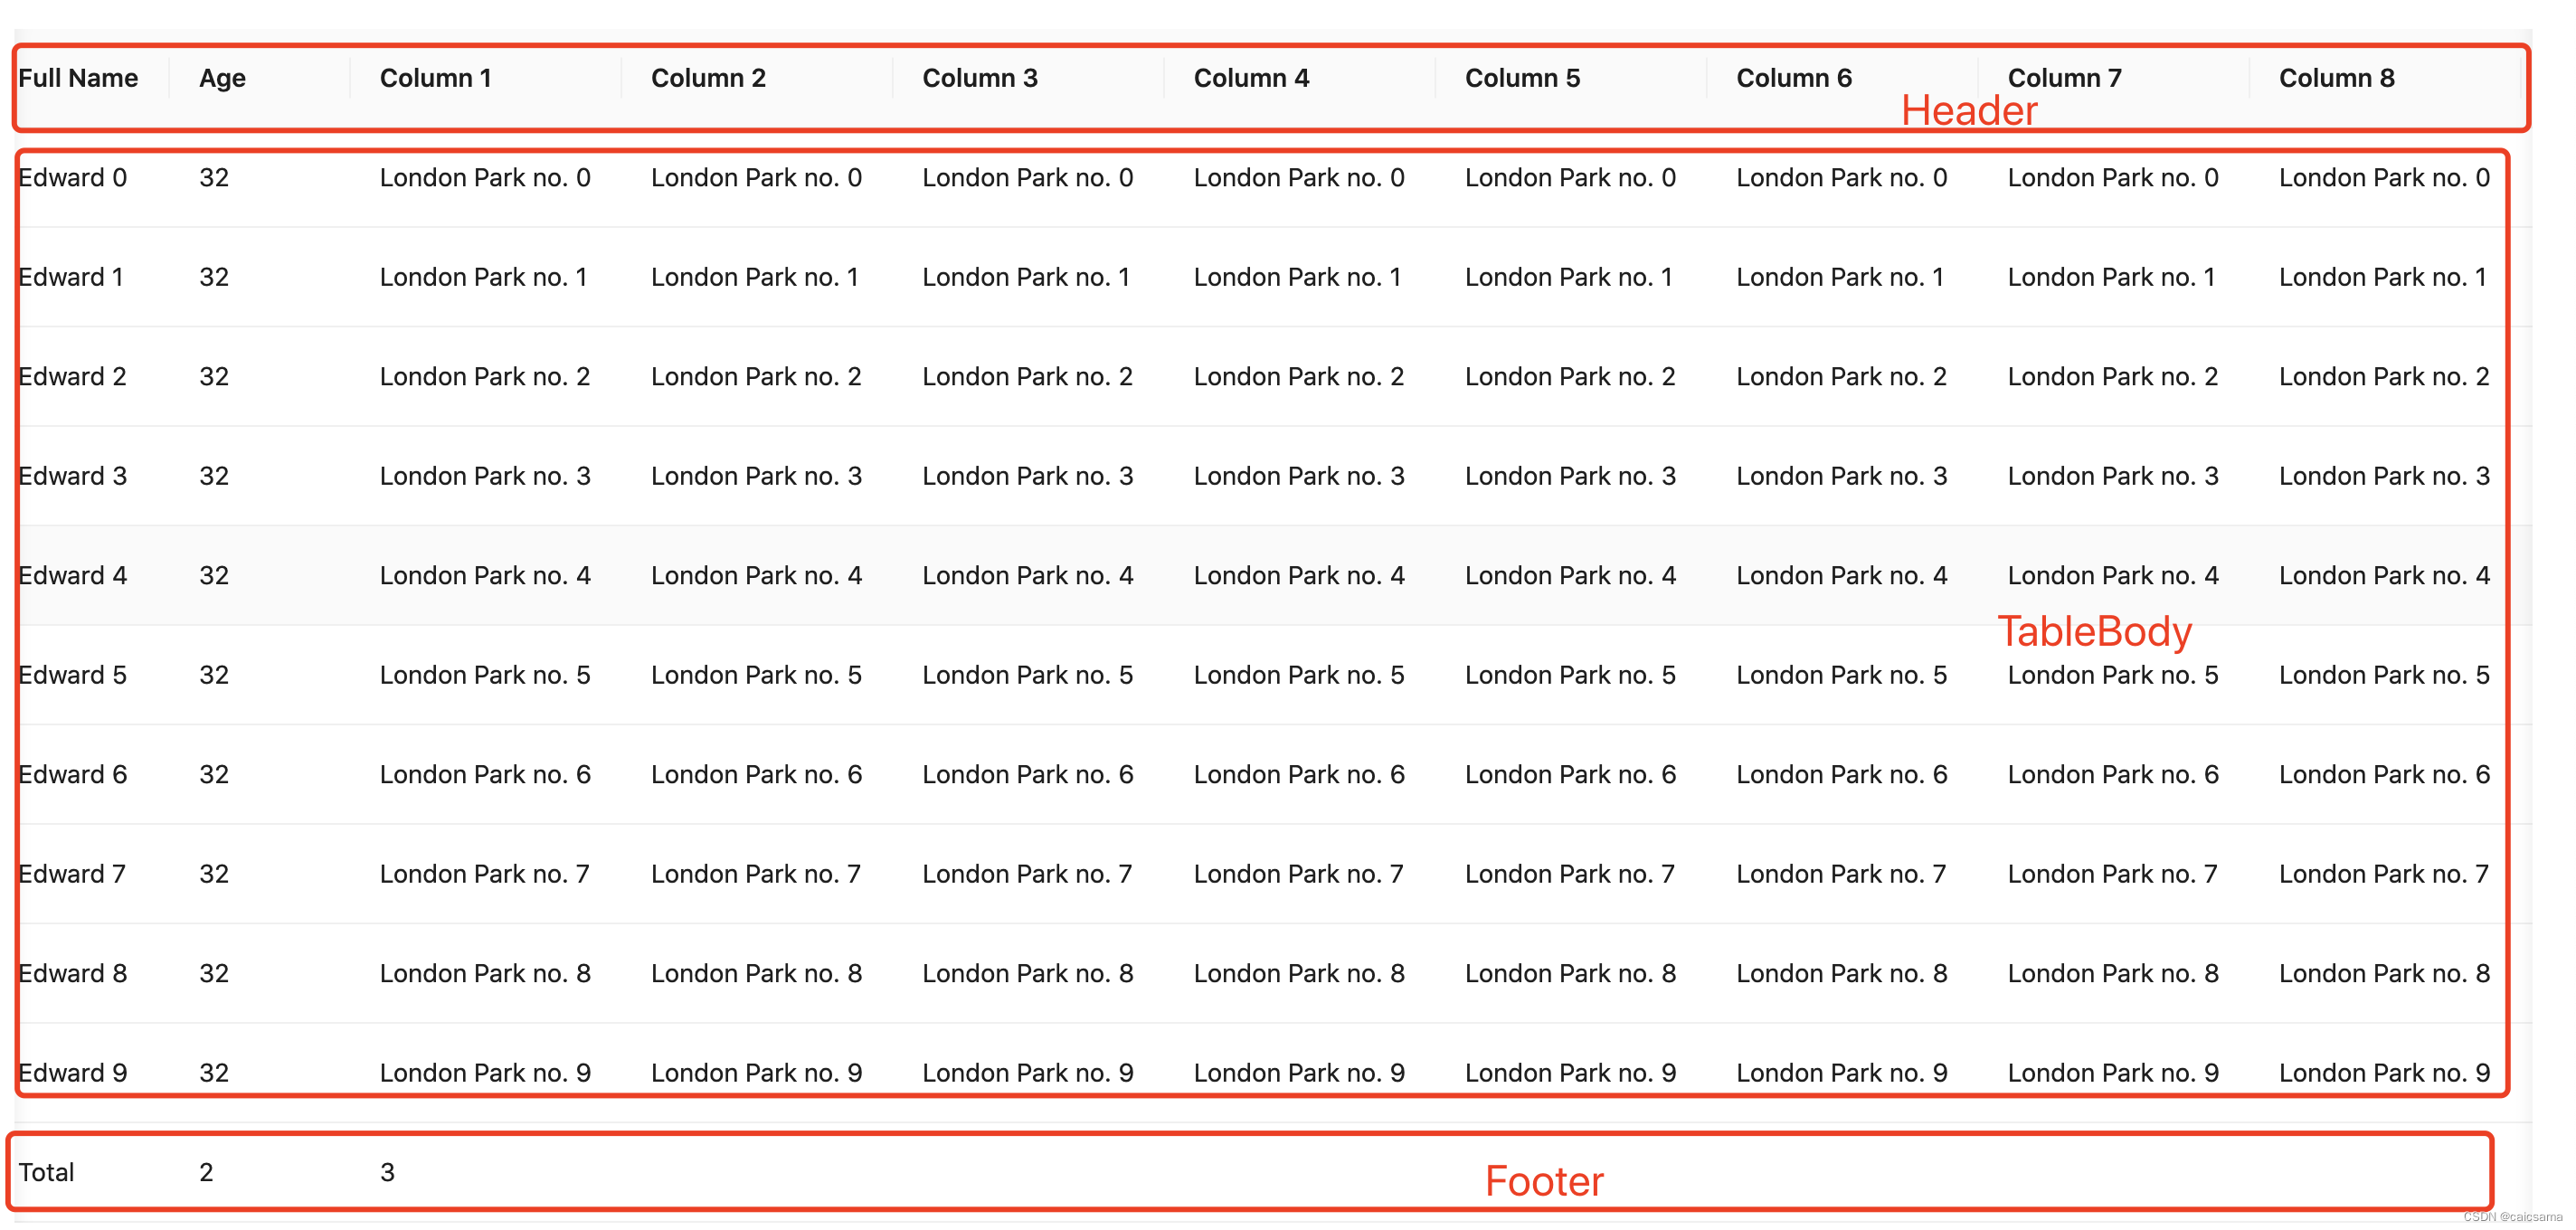
antd4里table的滚动是如何实现的?
rc-table里Header、Footer、TableBody实现保持同频滚动的方法 场景:Header、Footer都有,Table设置了scrollX,才关注同频滚动 那么是如何实现的? 监听onScroll方法获取到滚动条向左的滚动的距离scrollLeft;同时给三个…...

抓取namenode 50070 jmx的指标信息
在生产实践过程中,需要把data退役之后需要停机下线,在下线之前需要确认机器是否已下线完成,要去namenode的50070界面上查看显然效率低,为了能够快速拿到节点信息,写了简单的脚本。jmx/50070还有很多信息可以获取&#…...

aspnetcore-browser-refresh.js和Visual Studio Browser Link
我在调试ASP.NET Core web应用时,发现请求的页面文档底部多了一部分文件,而在我的页面中却没有包含,故查询资料,在此记录: 图中,可以看到红框部分是多出来了2个脚本 1.aspnetcore-browser-refresh.js 这里…...
 —— 筑梦之路)
hadoop 集群常用命令(学习笔记) —— 筑梦之路
概念介绍 #HDFS 概述Hadoop Distributed File System,简称HDFS,是一个分布式文件系统。(1)NameNode(nn):存储文件的元数据,如文件名,文件目录结构,文件属性&…...

ARC142D Deterministic Placing
ARC142D Deterministic Placing 题目大意 有一棵nnn个顶点的树,每个点上最多放一张卡片,你可以做如下操作: 同时将所有的卡片移到它所在顶点的相邻的一个顶点上 一个操作我们说它是好的,当下列条件满足: 每条边最…...
阶段八:服务框架高级(第二章:分布式事务)
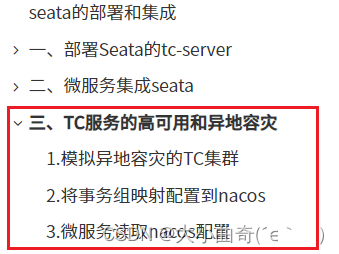
阶段八:服务框架高级(第二章:分布式事务)Day-分布式事务0.学习目标1.分布式事务问题1.1.本地事务1.2.分布式事务1.3.演示分布式事务问题2.理论基础2.1.CAP定理2.1.1.一致性2.1.2.可用性2.1.3.分区容错2.1.4.矛盾2.2.BASE理论2.3.解…...
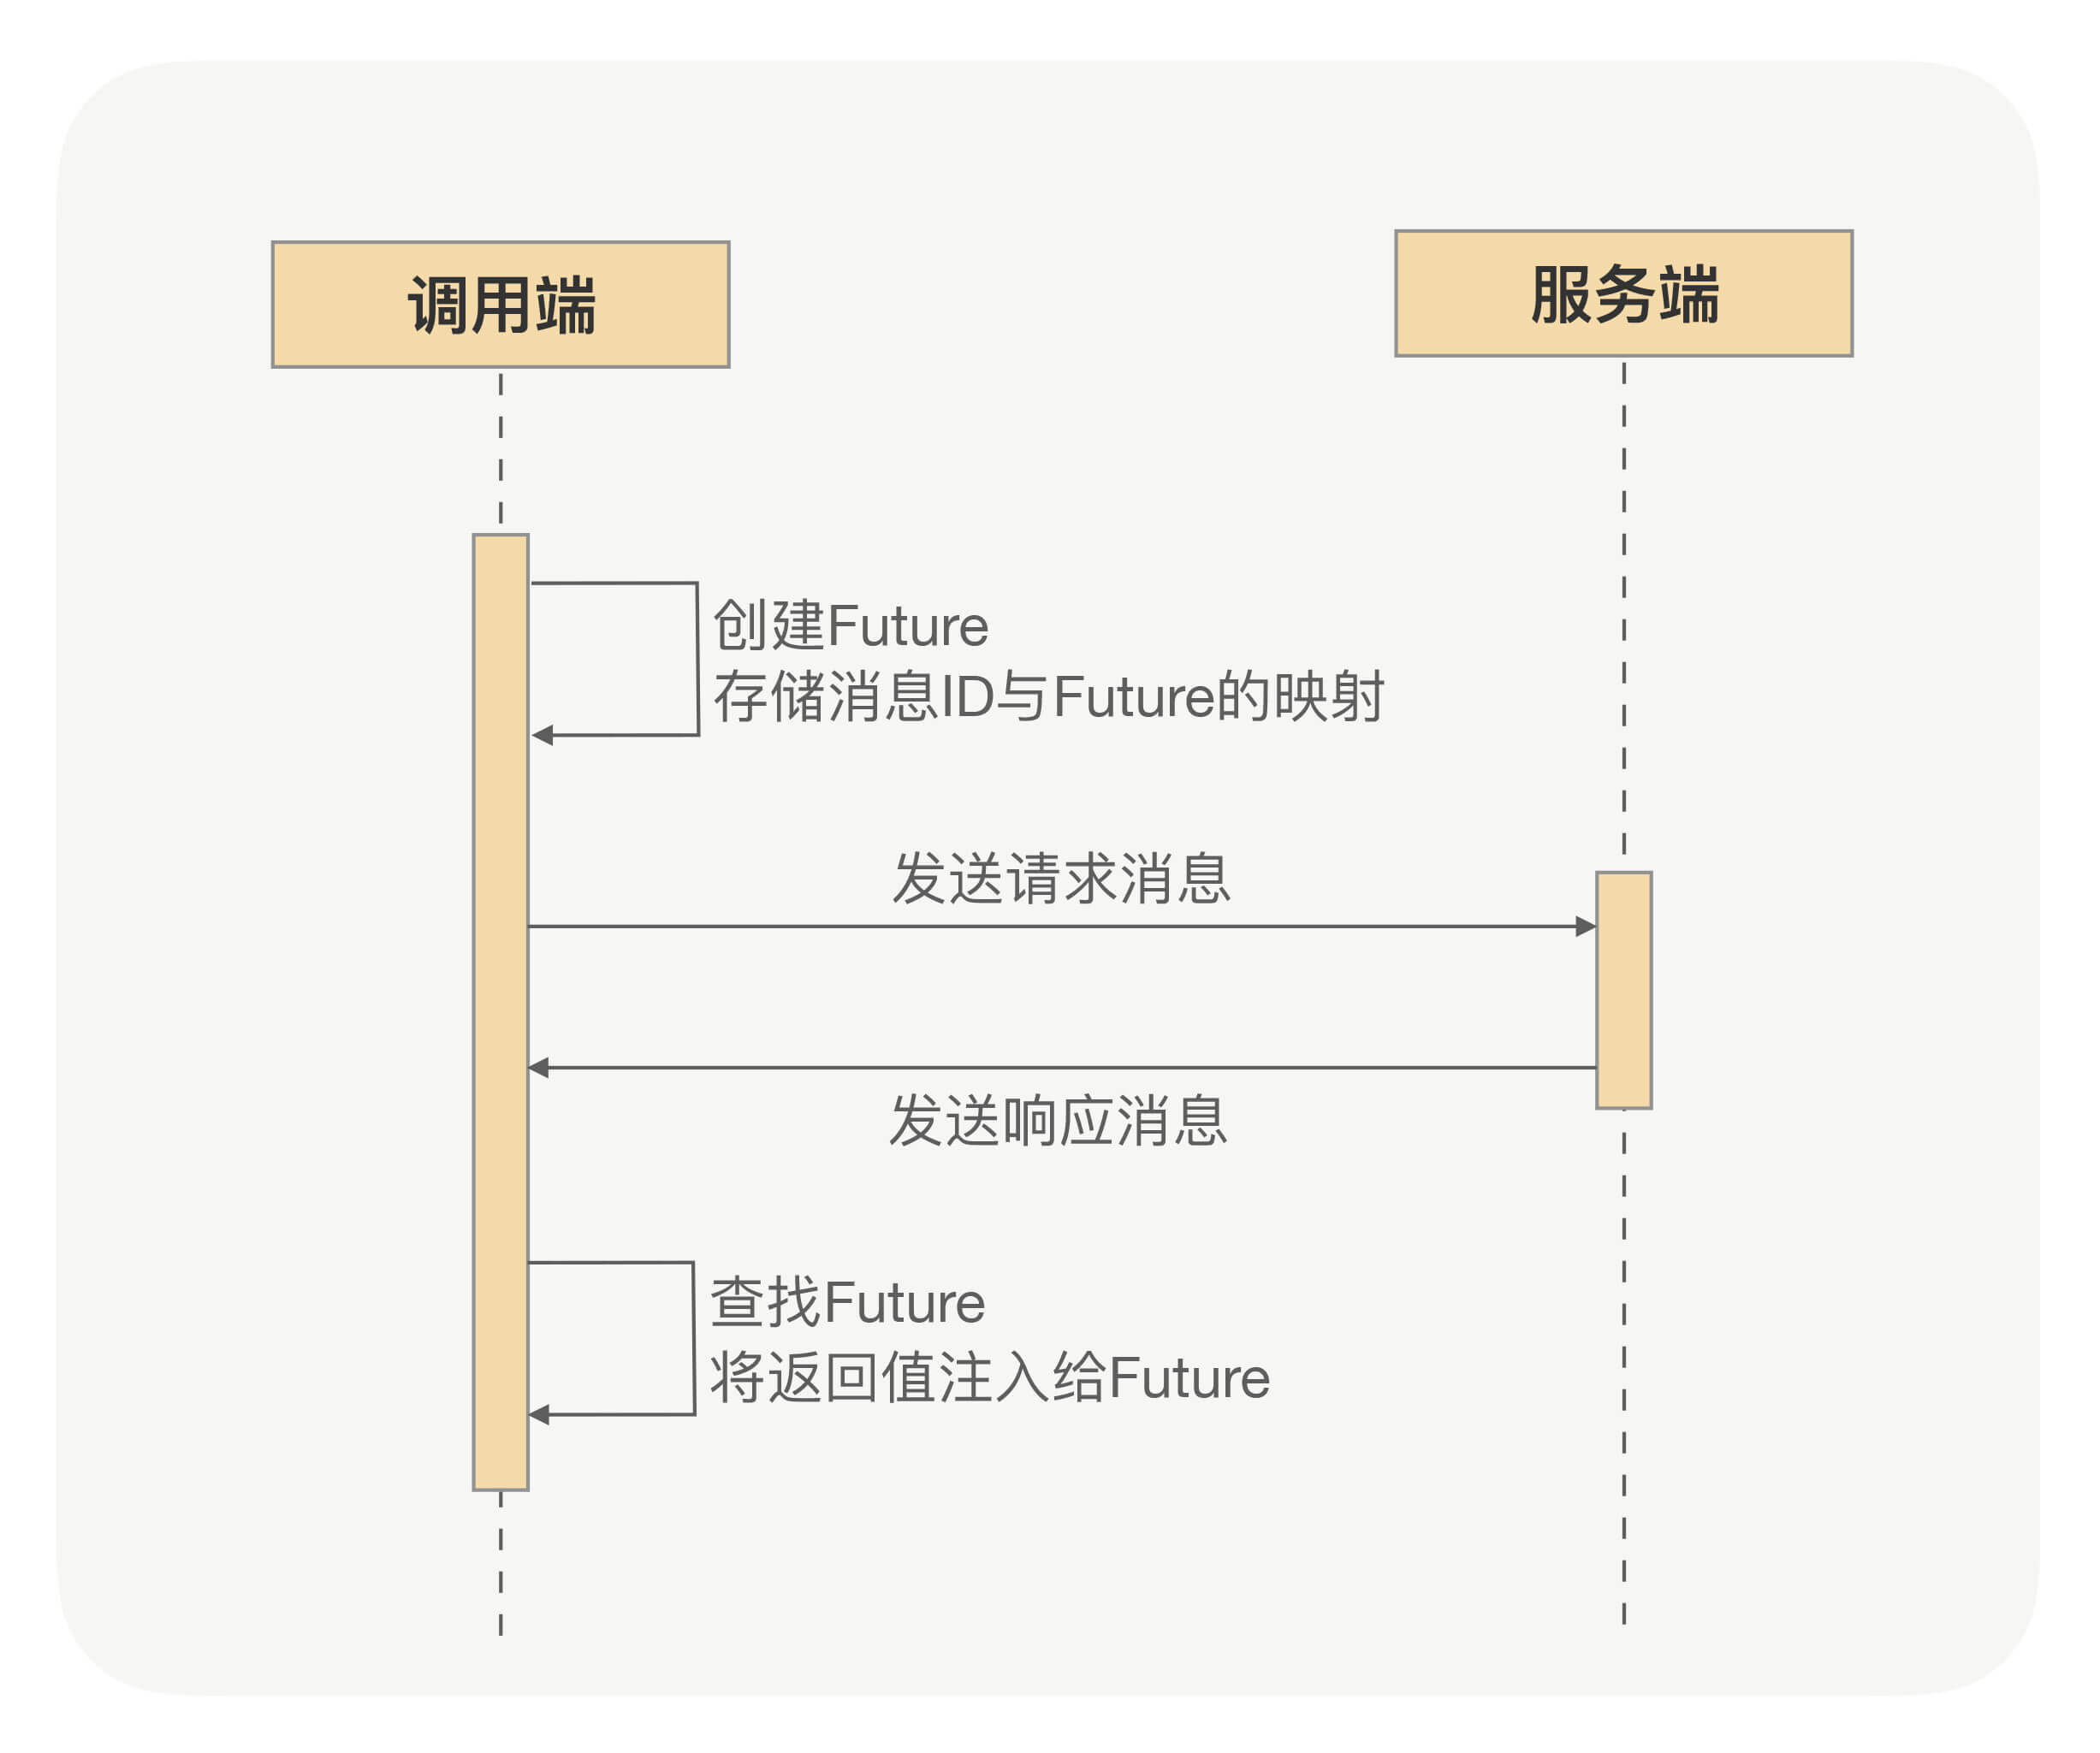
RPC异步化原理
深入RPC,更好使用RPC,须从RPC框架整体性能考虑问题。得知道如何提升RPC框架的性能、稳定性、安全性、吞吐量及如何在分布式下快速定位问题。RPC框架如何压榨单机吞吐量? 1 前言 TPS一直上不去,压测时CPU压到40%~50%就…...

C# 多窗口切换的实现
1、目的在主窗口中根据不同的按钮选择不同的子窗口显示。2、实现(1)、创建Winform窗体程序,放入SplitContainer控件splitContainer1将窗体分成左右2部分;(2)、在左侧splitContainer1.panel1中放入3个Button…...
【深度学习】RNN
1. 什么是RNN 循环神经网络(Recurrent Neural Network, RNN)是一类以序列(sequence)数据为输入,在序列的演进方向进行递归(recursion)且所有节点(循环单元)按链式连接的递…...

招聘岗位,机会难得
岗位需求 费话不多说,直接上JD: 嵌入式开发工程师: 17:411.计算机、通信等相关专业。 2.熟悉网络基础知识,熟悉802.11a/b/g/n/ac协议,能通过抓包等分析手段排查定位各种wifi相关问题。 3.熟悉路由器主要功能及实现原…...
)
web打印的几种方法(2023)
在工作中出现web打印的情况是非常多的,其实这也是一个比较烦人的问题,这篇博客整理一下关于Web打印的一些方法或者方式。 1. window.print() 这个方法是用来打印网页的,页面上的其他的元素也会被打印处理,在打印的时候页眉页脚是…...

代码随想录算法训练营day44 | 动态规划之完全背包 518. 零钱兑换 II 377. 组合总和 Ⅳ
day44完全背包基础知识问题描述举个栗子518. 零钱兑换 II1.确定dp数组以及下标的含义2.确定递推公式3.dp数组如何初始化4.确定遍历顺序5.举例推导dp数组377. 组合总和 Ⅳ1.确定dp数组以及下标的含义2.确定递推公式3.dp数组如何初始化4.确定遍历顺序5.举例来推导dp数组完全背包基…...

本日我的《宅男神探》为当当电子书【玄幻/惊悚】榜第六名
本日我的《宅男神探》为当当电子书【玄幻/惊悚】榜第六名! 地址http://e.dangdang.com/products/1901322470.html 杨赞是一名热爱推理的年轻人,平时喜欢用逻辑思维分析生活中的各类 问题。大学毕业后,他在母校附近开了一家小书店࿰…...

【原创】金三银四末班车!4个高薪安全岗,2W月短期项目、百万年薪云架构师,速来!
【原创】金三银四末班车!4个高薪安全岗,2W/月短期项目、百万年薪云架构师,速来! 金三银四虽然接近尾声,但好岗位从不等人!这次我们挖到了4个含金量超高的信息安全岗位,覆盖北京、深圳、上海、厦…...

PS CC 2019安装避坑指南:解决86%卡住和D3DCOMPILER_47.dll缺失问题
Photoshop CC 2019完整安装指南:从下载到故障排除 Photoshop CC 2019作为Adobe Creative Cloud系列中的重要版本,至今仍被许多设计师和摄影师所青睐。虽然Adobe已推出更新的版本,但2019版因其稳定性和适中的系统需求,依然是中低配…...

3步掌握DDrawCompat:轻松解决Windows老游戏兼容性的终极方案
3步掌握DDrawCompat:轻松解决Windows老游戏兼容性的终极方案 【免费下载链接】DDrawCompat DirectDraw and Direct3D 1-7 compatibility, performance and visual enhancements for Windows Vista, 7, 8, 10 and 11 项目地址: https://gitcode.com/gh_mirrors/dd/…...
Qwen-Image-2512-Pixel-Art-LoRA 模型原理浅析:理解LoRA在图像生成中的作用
Qwen-Image-2512-Pixel-Art-LoRA 模型原理浅析:理解LoRA在图像生成中的作用 最近在玩AI画图的朋友,可能都遇到过这样的烦恼:想让一个通用的大模型画出特定风格,比如复古的像素风,结果要么画得不像,要么就得…...

番茄小说离线阅读解决方案:打造你的个人数字图书馆
番茄小说离线阅读解决方案:打造你的个人数字图书馆 【免费下载链接】fanqienovel-downloader 下载番茄小说 项目地址: https://gitcode.com/gh_mirrors/fa/fanqienovel-downloader 在数字阅读时代,你是否曾遇到过这样的困扰:网络信号不…...

NVMe-CLI:Linux系统下NVMe固态硬盘管理的瑞士军刀
NVMe-CLI:Linux系统下NVMe固态硬盘管理的瑞士军刀 【免费下载链接】nvme-cli NVMe management command line interface. 项目地址: https://gitcode.com/gh_mirrors/nv/nvme-cli 你是否曾经为Linux系统中的NVMe固态硬盘管理而烦恼?想要查看设备健…...

机器标识重置技术实现的Cursor Pro功能解锁解决方案
机器标识重置技术实现的Cursor Pro功能解锁解决方案 【免费下载链接】cursor-free-vip [Support 0.45](Multi Language 多语言)自动注册 Cursor Ai ,自动重置机器ID , 免费升级使用Pro 功能: Youve reached your trial request li…...

PP-DocLayoutV3参数详解:text/title/table/figure等11类版面区域置信度解析
PP-DocLayoutV3参数详解:text/title/table/figure等11类版面区域置信度解析 1. 引言:为什么版面分析需要“置信度”? 想象一下,你拿到一份扫描的合同,想用OCR(文字识别)把它变成可编辑的电子版…...

GyverDS18库:工业级DS18B20单总线温度驱动设计与实践
1. GyverDS18库深度解析:面向工业级应用的DS18B20全功能驱动设计Dallas DS18B20是业界最成熟的单总线数字温度传感器之一,凭借其独特的1-Wire协议、无需外部ADC、支持多点组网及寄生供电能力,在工业监控、环境监测、智能家电等领域广泛应用。…...