RabbitMQ集群配置以及负载均衡配置
RabbitMQ集群配置以及负载均衡配置
- 环境配置
- 集群配置
- 安装rabbitmq
- 启动rabbitmq
- 开启远程登录
- 添加用户并且授权用户
- 添加数据存放目录和日志存放目录
- 查看端口
- 拷⻉erlang.cookie
- 将mq-2、mq-3作为内存节点加⼊mq-1节点集群中
- 查看集群状态
- 添加一个新的队列
- RabbitMq负载均衡配置-HAProxy
- 安装HAProxy
- 修改配置文件
- 登录haproxy
- mysql授权root用户远程登录
环境配置
| 服务器 | ip地址 |
|---|---|
| rabbitmq-1 | 192.168.10.128 |
| rabbitmq-2 | 192.168.10.129 |
| rabbitmq-3 | 192.168.10.130 |
集群配置
安装rabbitmq
-
三台机子都配置对应得hosts文件
[root@localhost ~]# cat /etc/hosts 127.0.0.1 localhost localhost.localdomain localhost4 localhost4.localdomain4 ::1 localhost localhost.localdomain localhost6 localhost6.localdomain6 192.168.10.128 rabbitmq-1 192.168.10.129 rabbitmq-2 192.168.10.130 rabbitmq-3 -
三台机子都得安排rabbitmq
目前三台机子都上传了对应得安装包[root@localhost ~]# ls anaconda-ks.cfg rabbitmq-server-3.7.10-1.el7.noarch.rpm erlang-21.3.8.21-1.el7.x86_64.rpm [root@localhost ~]# yum install -y erlang-21.3.8.21-1.el7.x86_64.rpm [root@localhost ~]# yum install -y rabbitmq-server-3.7.10-1.el7.noarch.rpm
启动rabbitmq
[root@localhost ~]#  systemctl daemon-reload
[root@localhost ~]# systemctl start rabbitmq-server
开启远程登录
[root@localhost ~]# cd /usr/share/doc/rabbitmq-server-3.7.10/
[root@localhost rabbitmq-server-3.7.10]# cp rabbitmq.config.example /etc/rabbitmq
[root@localhost rabbitmq-server-3.7.10]# cd /etc/rabbitmq/
[root@localhost rabbitmq]# ls
enabled_plugins  rabbitmq.config.example
[root@localhost rabbitmq]# mv rabbitmq.config.example  rabbitmq.config
[root@localhost rabbitmq]# vim rabbitmq.config
修改下面配置文件的内容 第349行
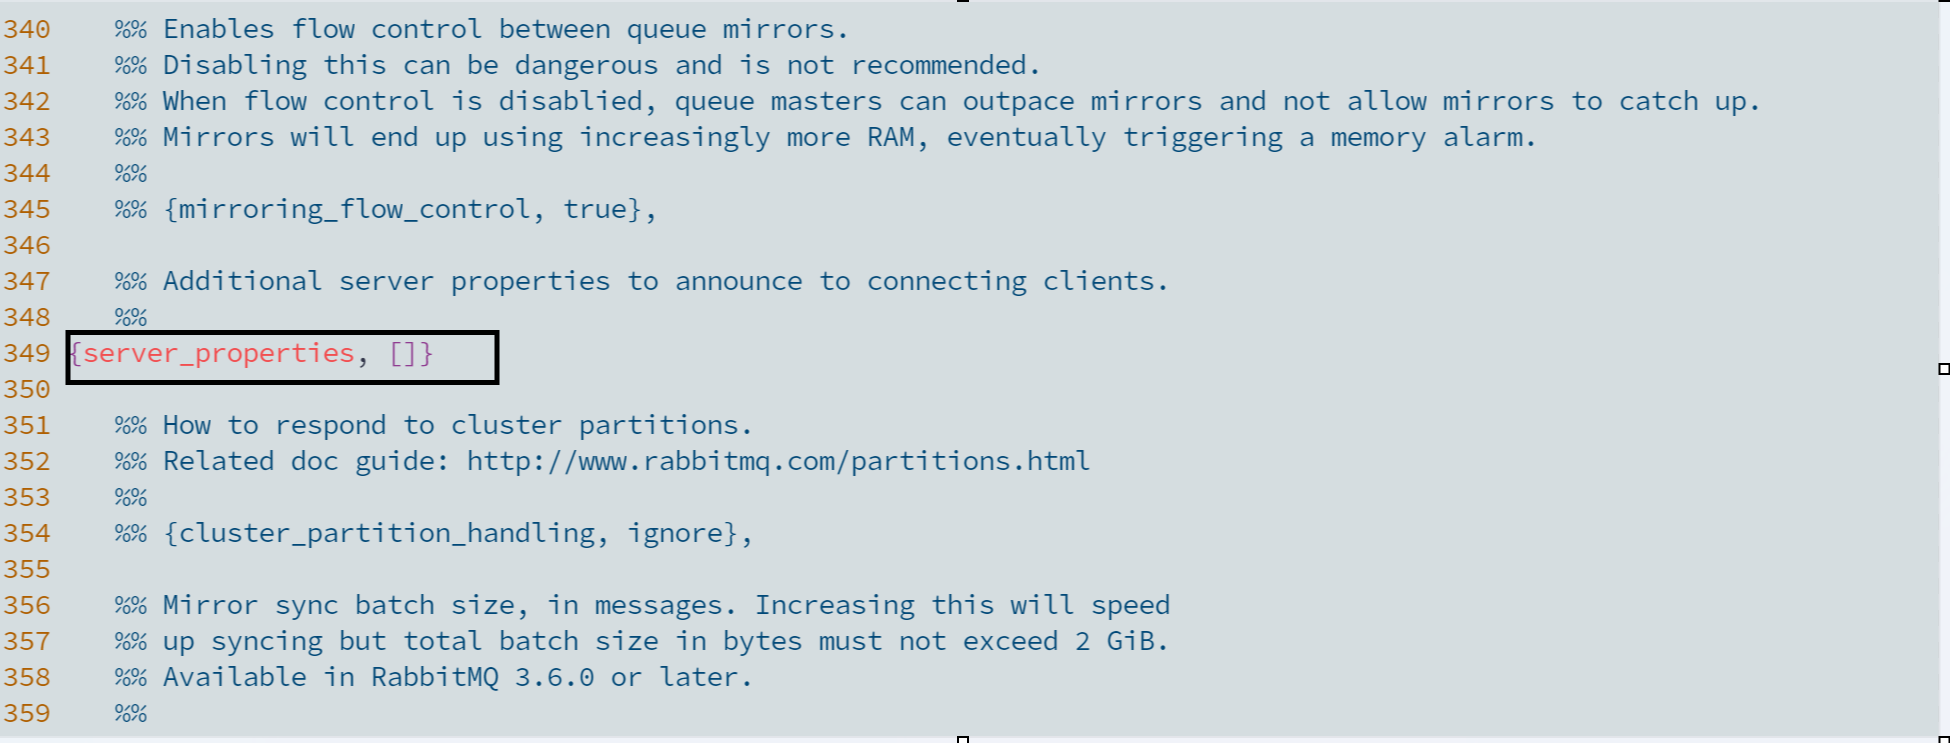
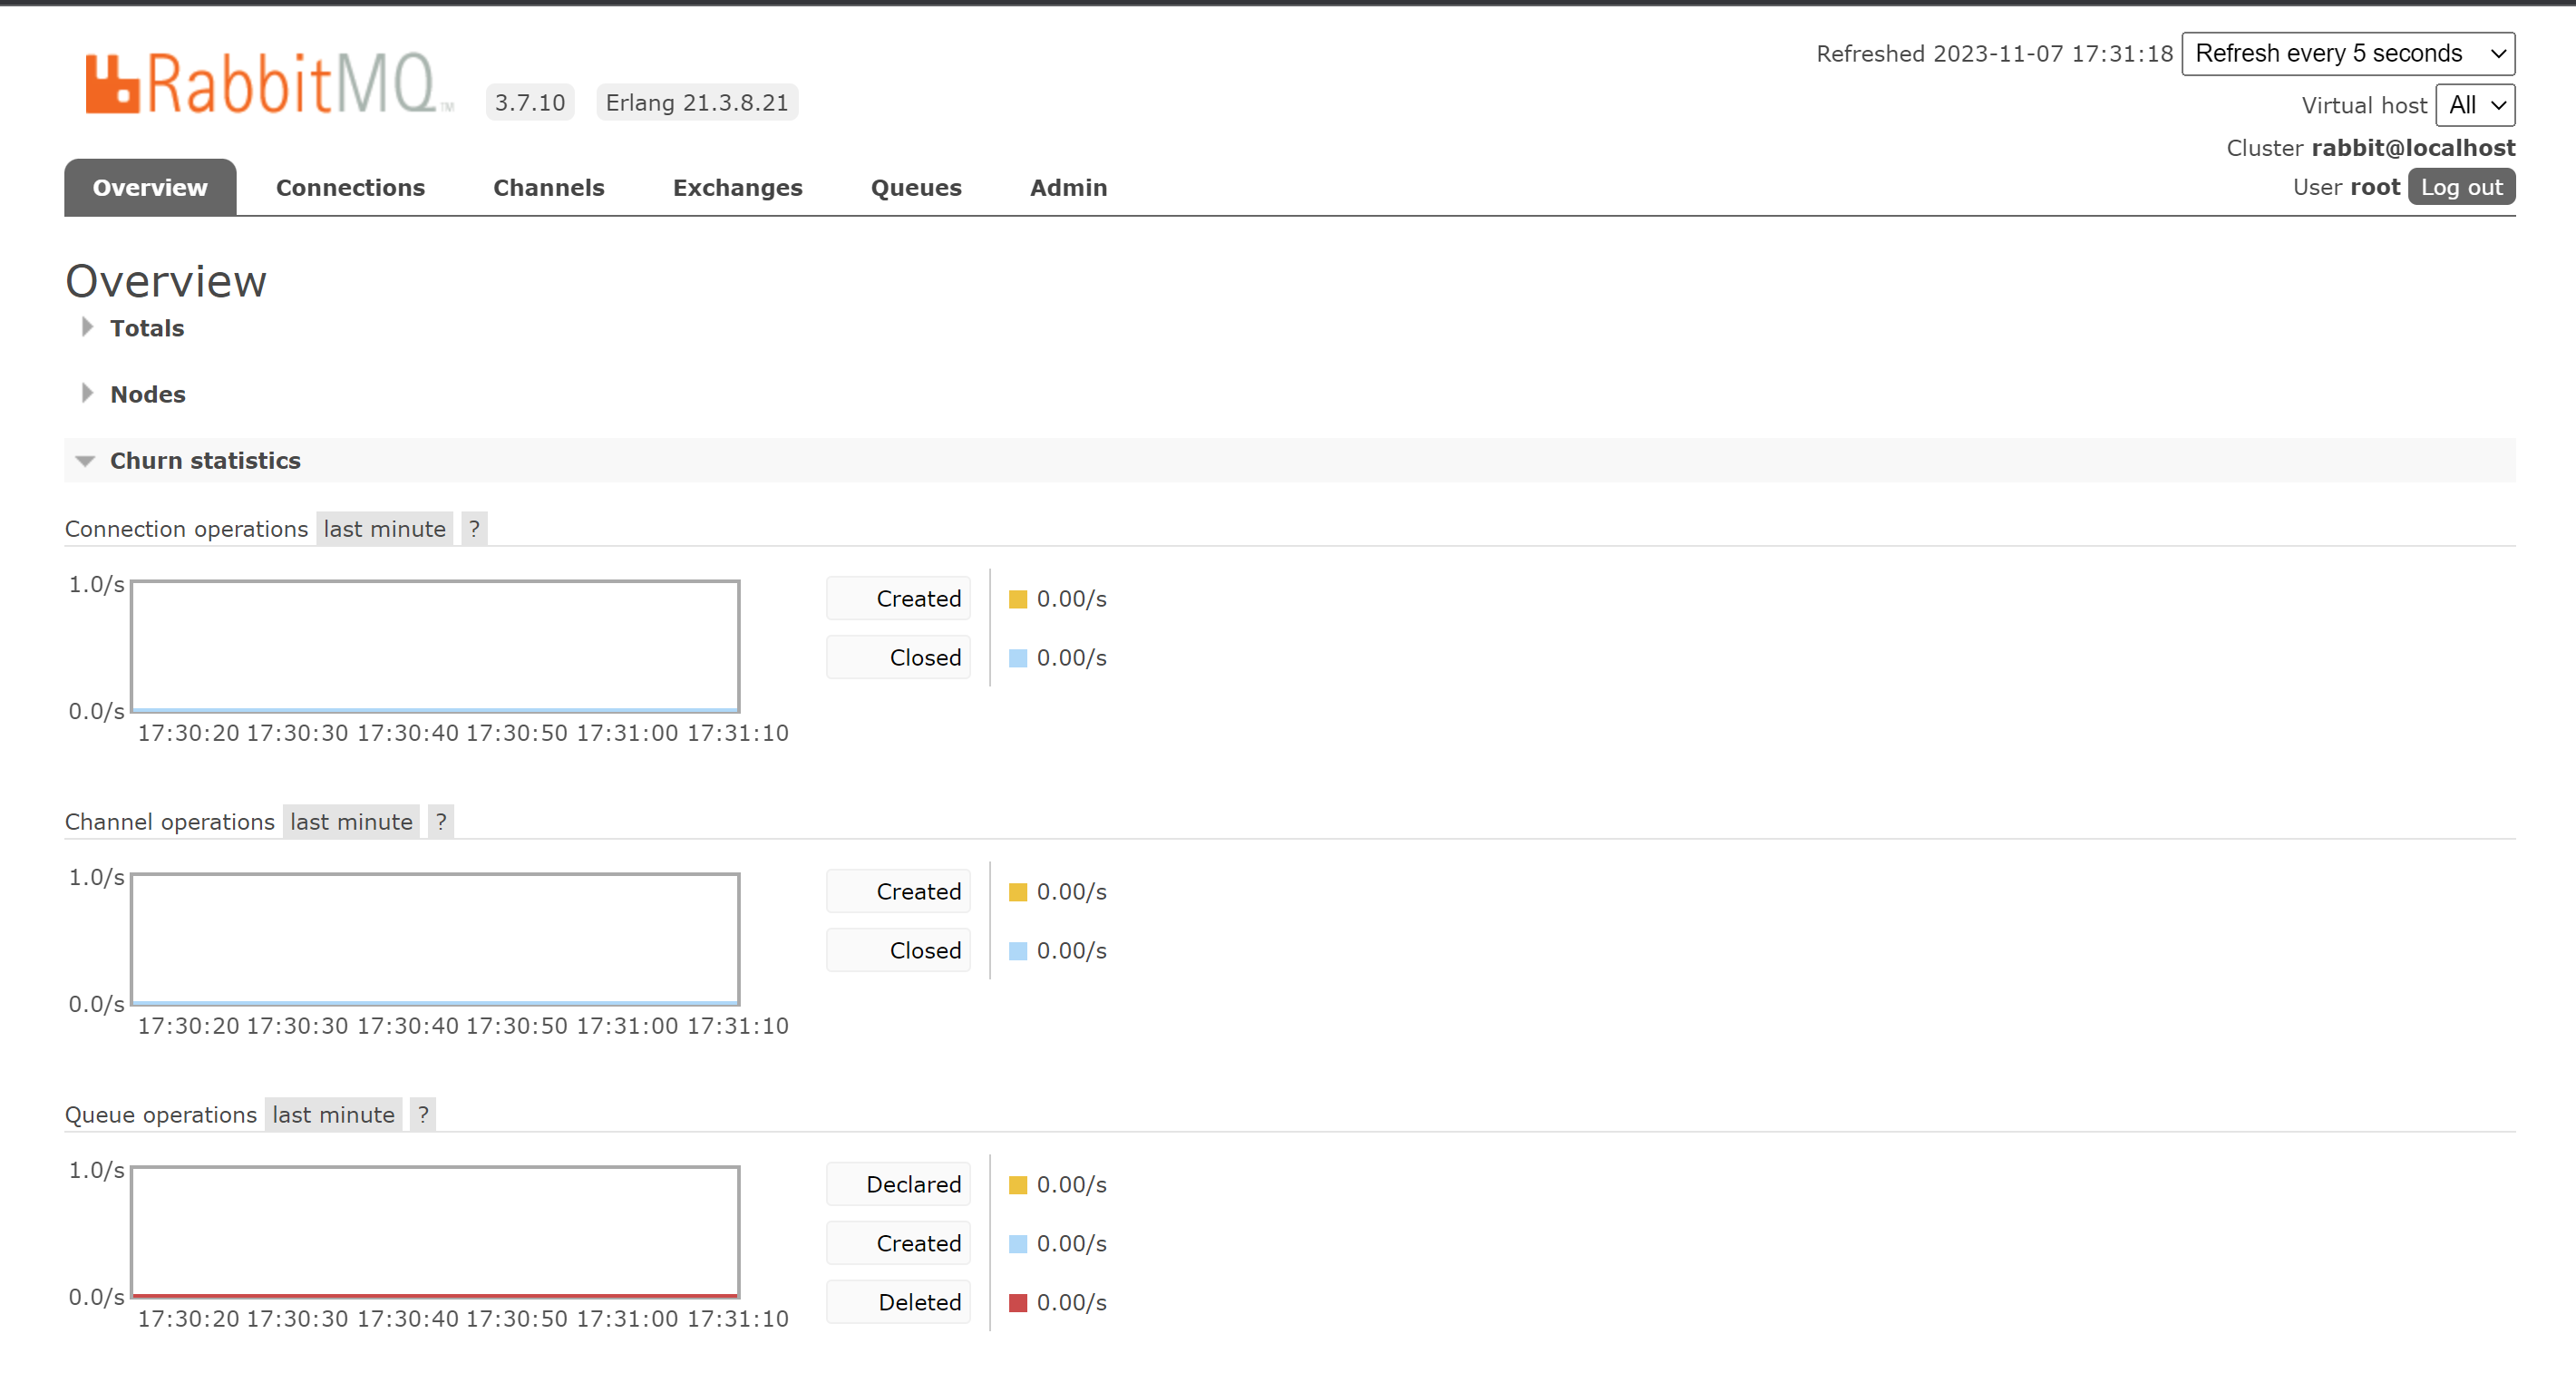
# 开启rabbitmq的web访问界面:
[root@localhost ~]# rabbitmq-plugins enable rabbitmq_management
-
输入对应的ip即可以登录
有默认用户guest 密码也是guest
添加用户并且授权用户
[root@localhost ~]# rabbitmqctl add_user root 1
Adding user "root" ...
[root@localhost ~]# rabbitmqctl set_user_tags root administrator
Setting tags for user "root" to [administrator] ...
[root@localhost ~]# rabbitmqctl list_users
Listing users ...
user    tags
guest   [administrator]
root    [administrator]
[root@localhost ~]# rabbitmqctl set_permissions -p "/" root ".*" ".*" ".*"
Setting permissions for user "root" in vhost "/" ...
添加数据存放目录和日志存放目录
[root@localhost ~]# mkdir -p /data/rabbitmq/data
[root@localhost ~]# mkdir -p /data/rabbitmq/logs
[root@localhost ~]# chmod 777 -R /data/rabbitmq
[root@localhost ~]# chown rabbitmq.rabbitmq /data/ -R
创建配置文件:
[root@localhost ~]# vim /etc/rabbitmq/rabbitmq-env.conf
[root@localhost ~]# cat /etc/rabbitmq/rabbitmq-env.conf
RABBITMQ_MNESIA_BASE=/data/rabbitmq/data
RABBITMQ_LOG_BASE=/data/rabbitmq/logs
重启服务
[root@localhost ~]# systemctl restart rabbitmq-server
查看端口
[root@localhost ~]# ss -ntlp
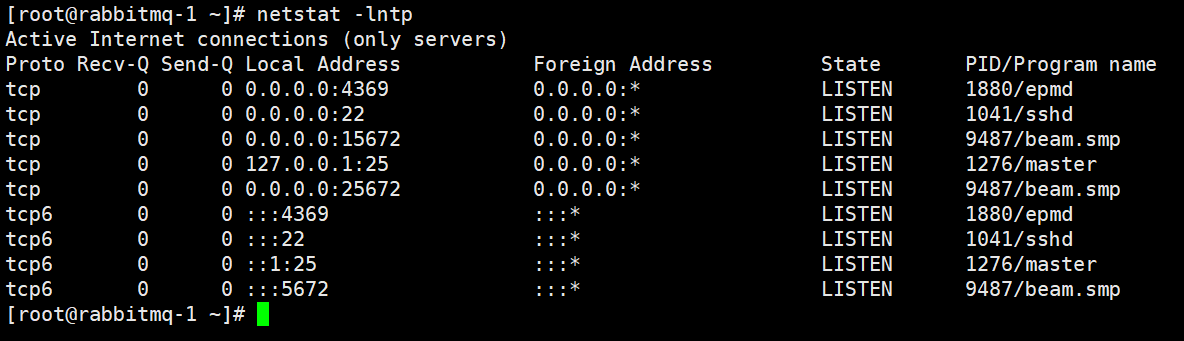
4369 – erlang发现端口
5672 --程序连接端口
15672 – 管理界面ui端口
25672 – server间内部通信口
拷⻉erlang.cookie
[root@localhost ~]# cd /var/lib/rabbitmq/
# ⽤scp的⽅式将rabbitmq-1节点的.erlang.cookie的值复制到其他两个节点中。
[root@localhost rabbitmq]# scp .erlang.cookie 192.168.10.129:/var/lib/rabbitmq/
root@192.168.10.129's password:
.erlang.cookie                                                                                                       100%   20    14.6KB/s   00:00
[root@localhost rabbitmq]# scp .erlang.cookie 192.168.10.130:/var/lib/rabbitmq/
root@192.168.10.130's password:
.erlang.cookie
各节点是经由过程⼀个magic cookie来实现的,这个cookie存放在/var/lib/rabbitmq/.erlang.cookie中,⽂件是400的权限。所以必须保证各节点cookie⼀致,不然节点之间就⽆法通信.
(官方在介绍集群的文档中提到过.erlang.cookie 一般会存在这两个地址:第一个是home/.erlang.cookie;第二个地方就是/var/lib/rabbitmq/.erlang.cookie。如果我们使用解压缩方式安装部署的rabbitmq,那么这个文件会在{home}目录下,也就是$home/.erlang.cookie。如果我们使用rpm等安装包方式进行安装的,那么这个文件会在/var/lib/rabbitmq目录下。)
将mq-2、mq-3作为内存节点加⼊mq-1节点集群中
在mq-2、mq-3执⾏如下命令:
[root@localhost ~]# systemctl restart rabbitmq-server
[root@localhost ~]# rabbitmqctl stop_app  #停止节点
[root@localhost ~]# rabbitmqctl reset   #如果有数据需要重置,没有则不用
[root@localhost ~]# rabbitmqctl join_cluster --ram rabbit@rabbitmq-1  #添加到磁盘节点
Clustering node 'rabbit@rabbitmq-2' with 'rabbit@rabbitmq-1' ...
[root@localhost ~]# rabbitmqctl start_app  #启动节点
Starting node 'rabbit@rabbitmq-2' ...
======================================================================
[root@localhost ~]# systemctl restart rabbitmq-server
[root@localhost ~]# rabbitmqctl stop_app
[root@localhost ~]# rabbitmqctl reset
[root@localhost ~]# rabbitmqctl join_cluster --ram rabbit@rabbitmq-1
Clustering node 'rabbit@rabbitmq-3' with 'rabbit@rabbitmq-1' ...
[root@localhost ~]# rabbitmqctl start_app
Starting node 'rabbit@rabbitmq-3' ...(1)默认rabbitmq启动后是磁盘节点,在这个cluster命令下,mq-2和mq-3是内存节点,
mq-1是磁盘节点。
(2)如果要使mq-2、mq-3都是磁盘节点,去掉--ram参数即可。
(3)如果想要更改节点类型,可以使⽤命令rabbitmqctl change_cluster_node_type
disc(ram),前提是必须停掉rabbit应⽤
注:
#如果有需要使用磁盘节点加入集群[root@rabbitmq-2 ~]# rabbitmqctl join_cluster  rabbit@rabbitmq-1[root@rabbitmq-3 ~]# rabbitmqctl join_cluster  rabbit@rabbitmq-1
登录上去有上面这几个即就是添加成功了
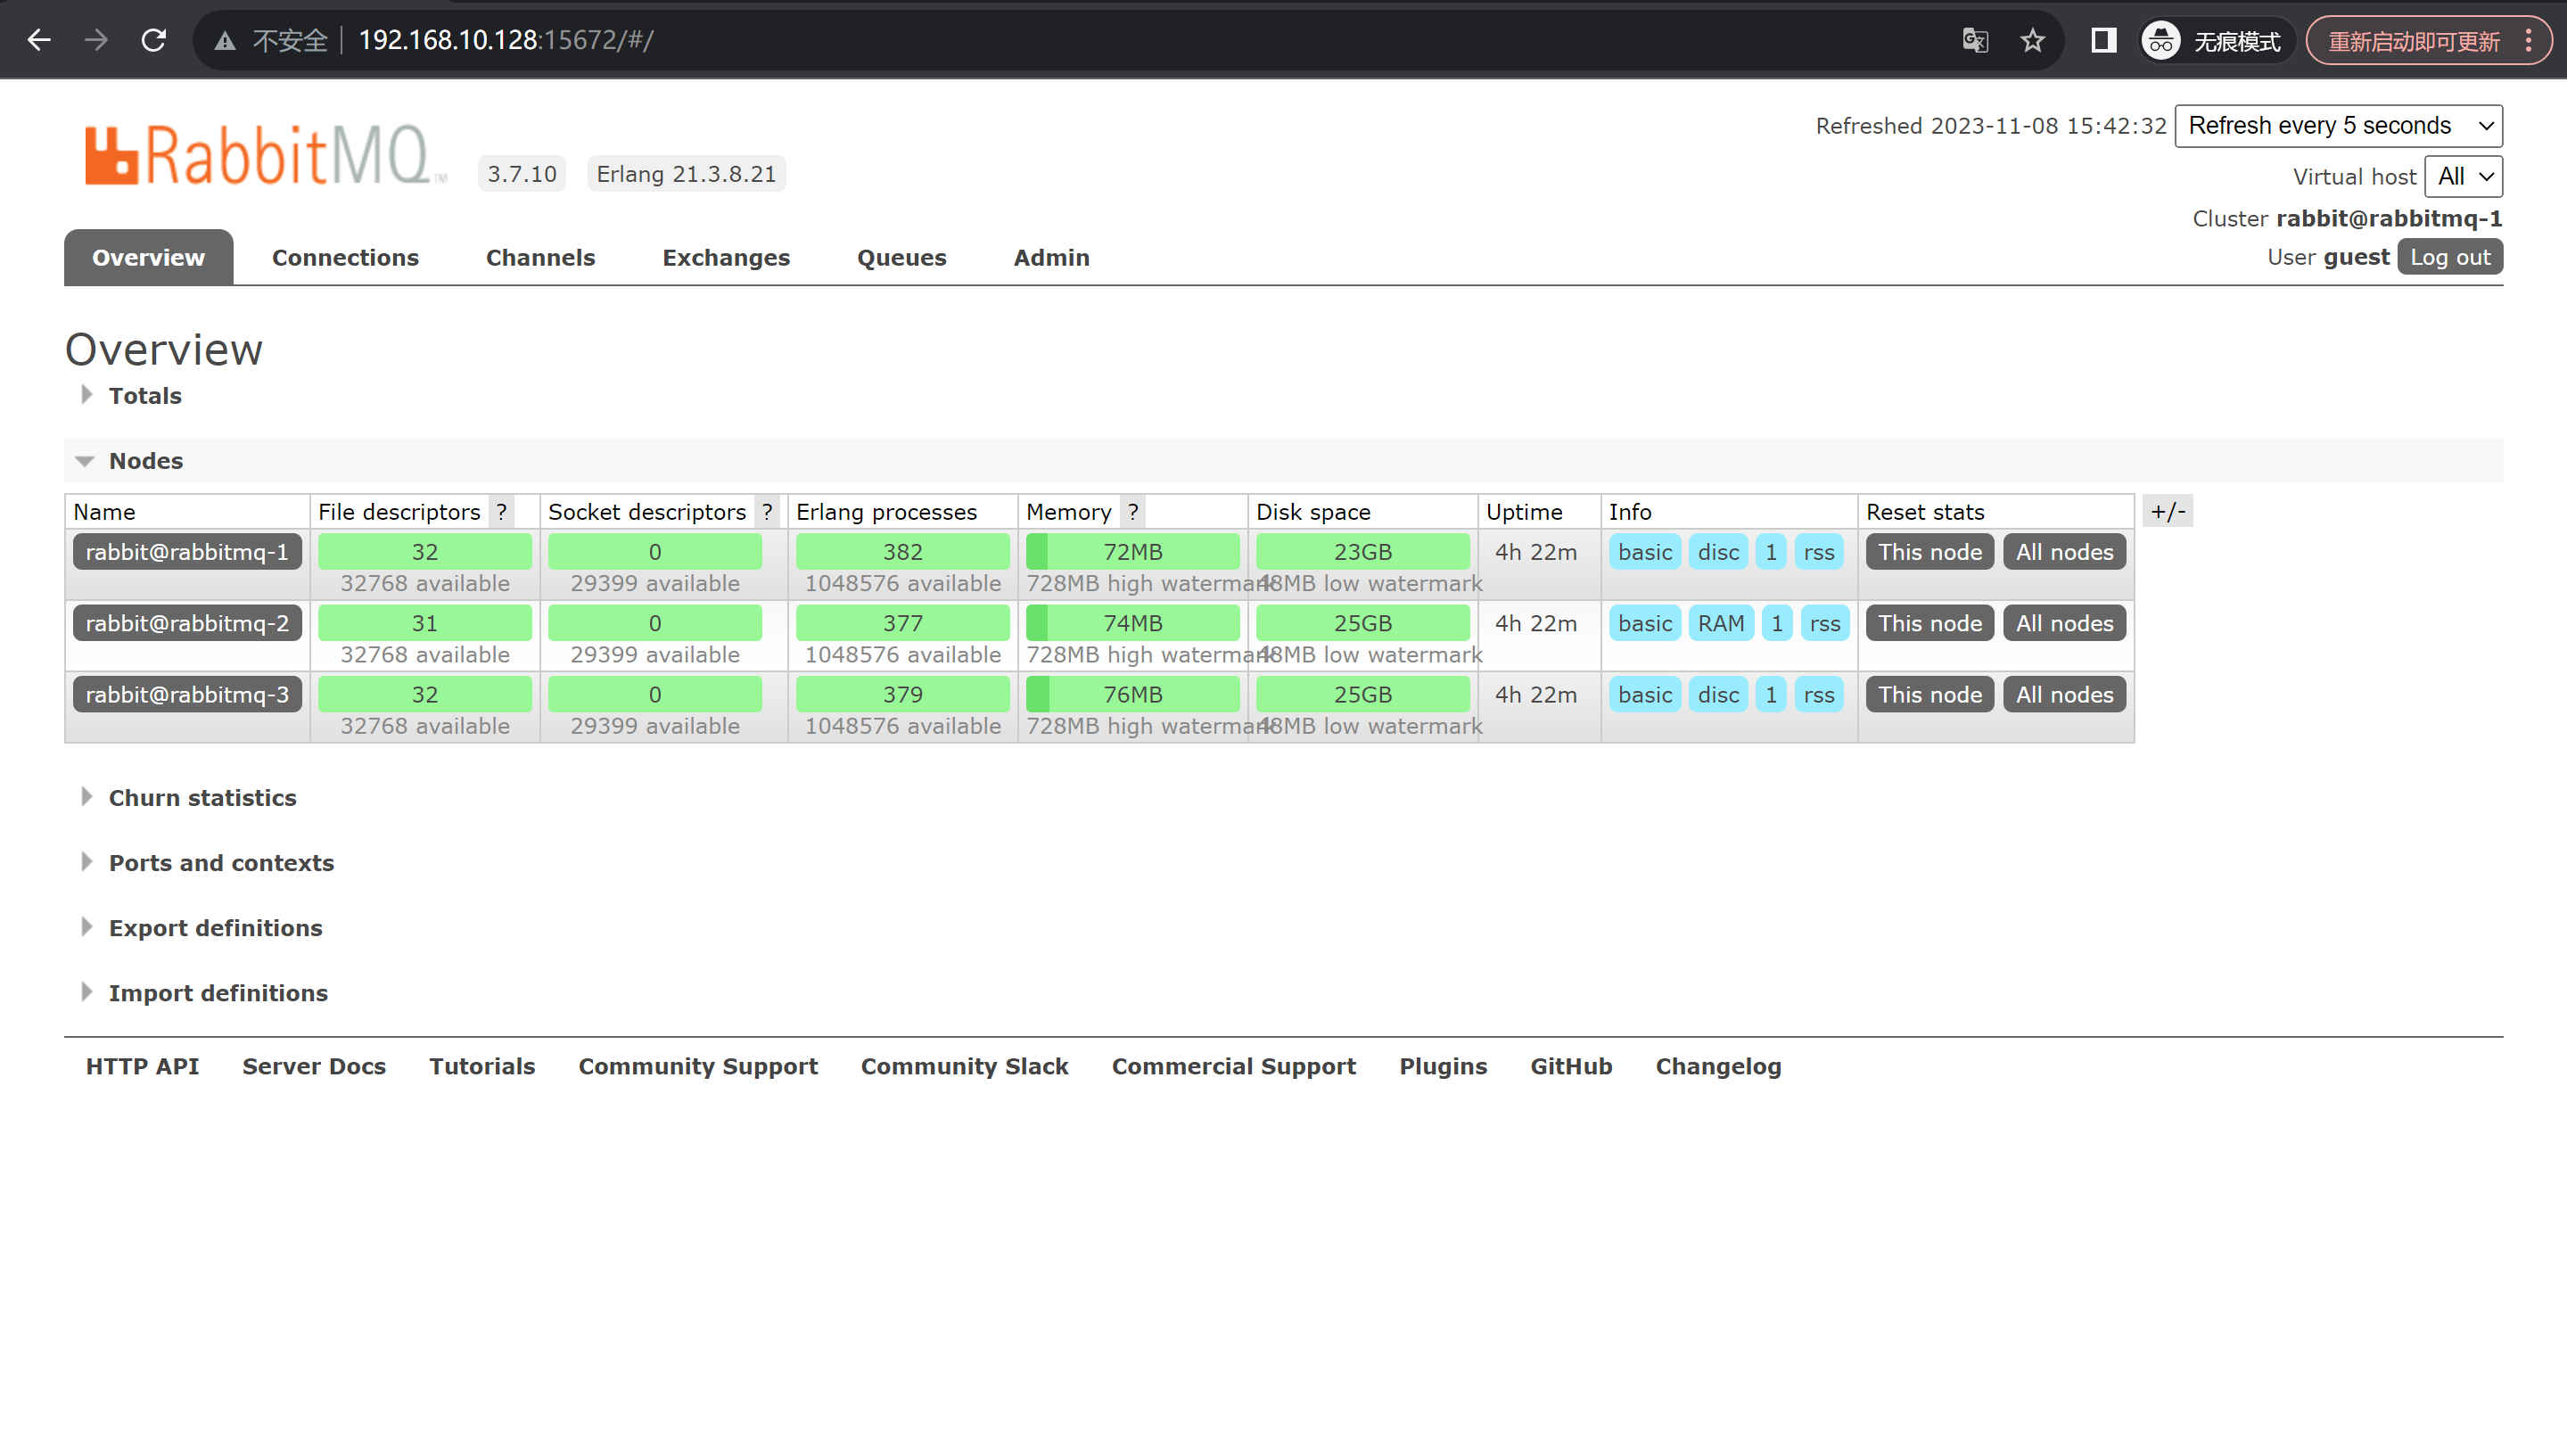
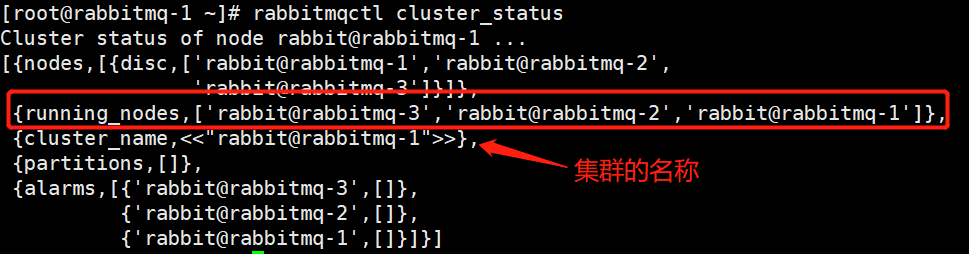
查看集群状态
# 在任意一个上面即可查看
在 RabbitMQ 集群任意节点上执行 rabbitmqctl cluster_status来查看是否集群配置成功。
在mq-1磁盘节点上面查看
[root@localhost ~]# rabbitmqctl cluster_status
添加一个新的队列
- 添加队列

-
更改为集群可看
当前这个只有mq-1可用
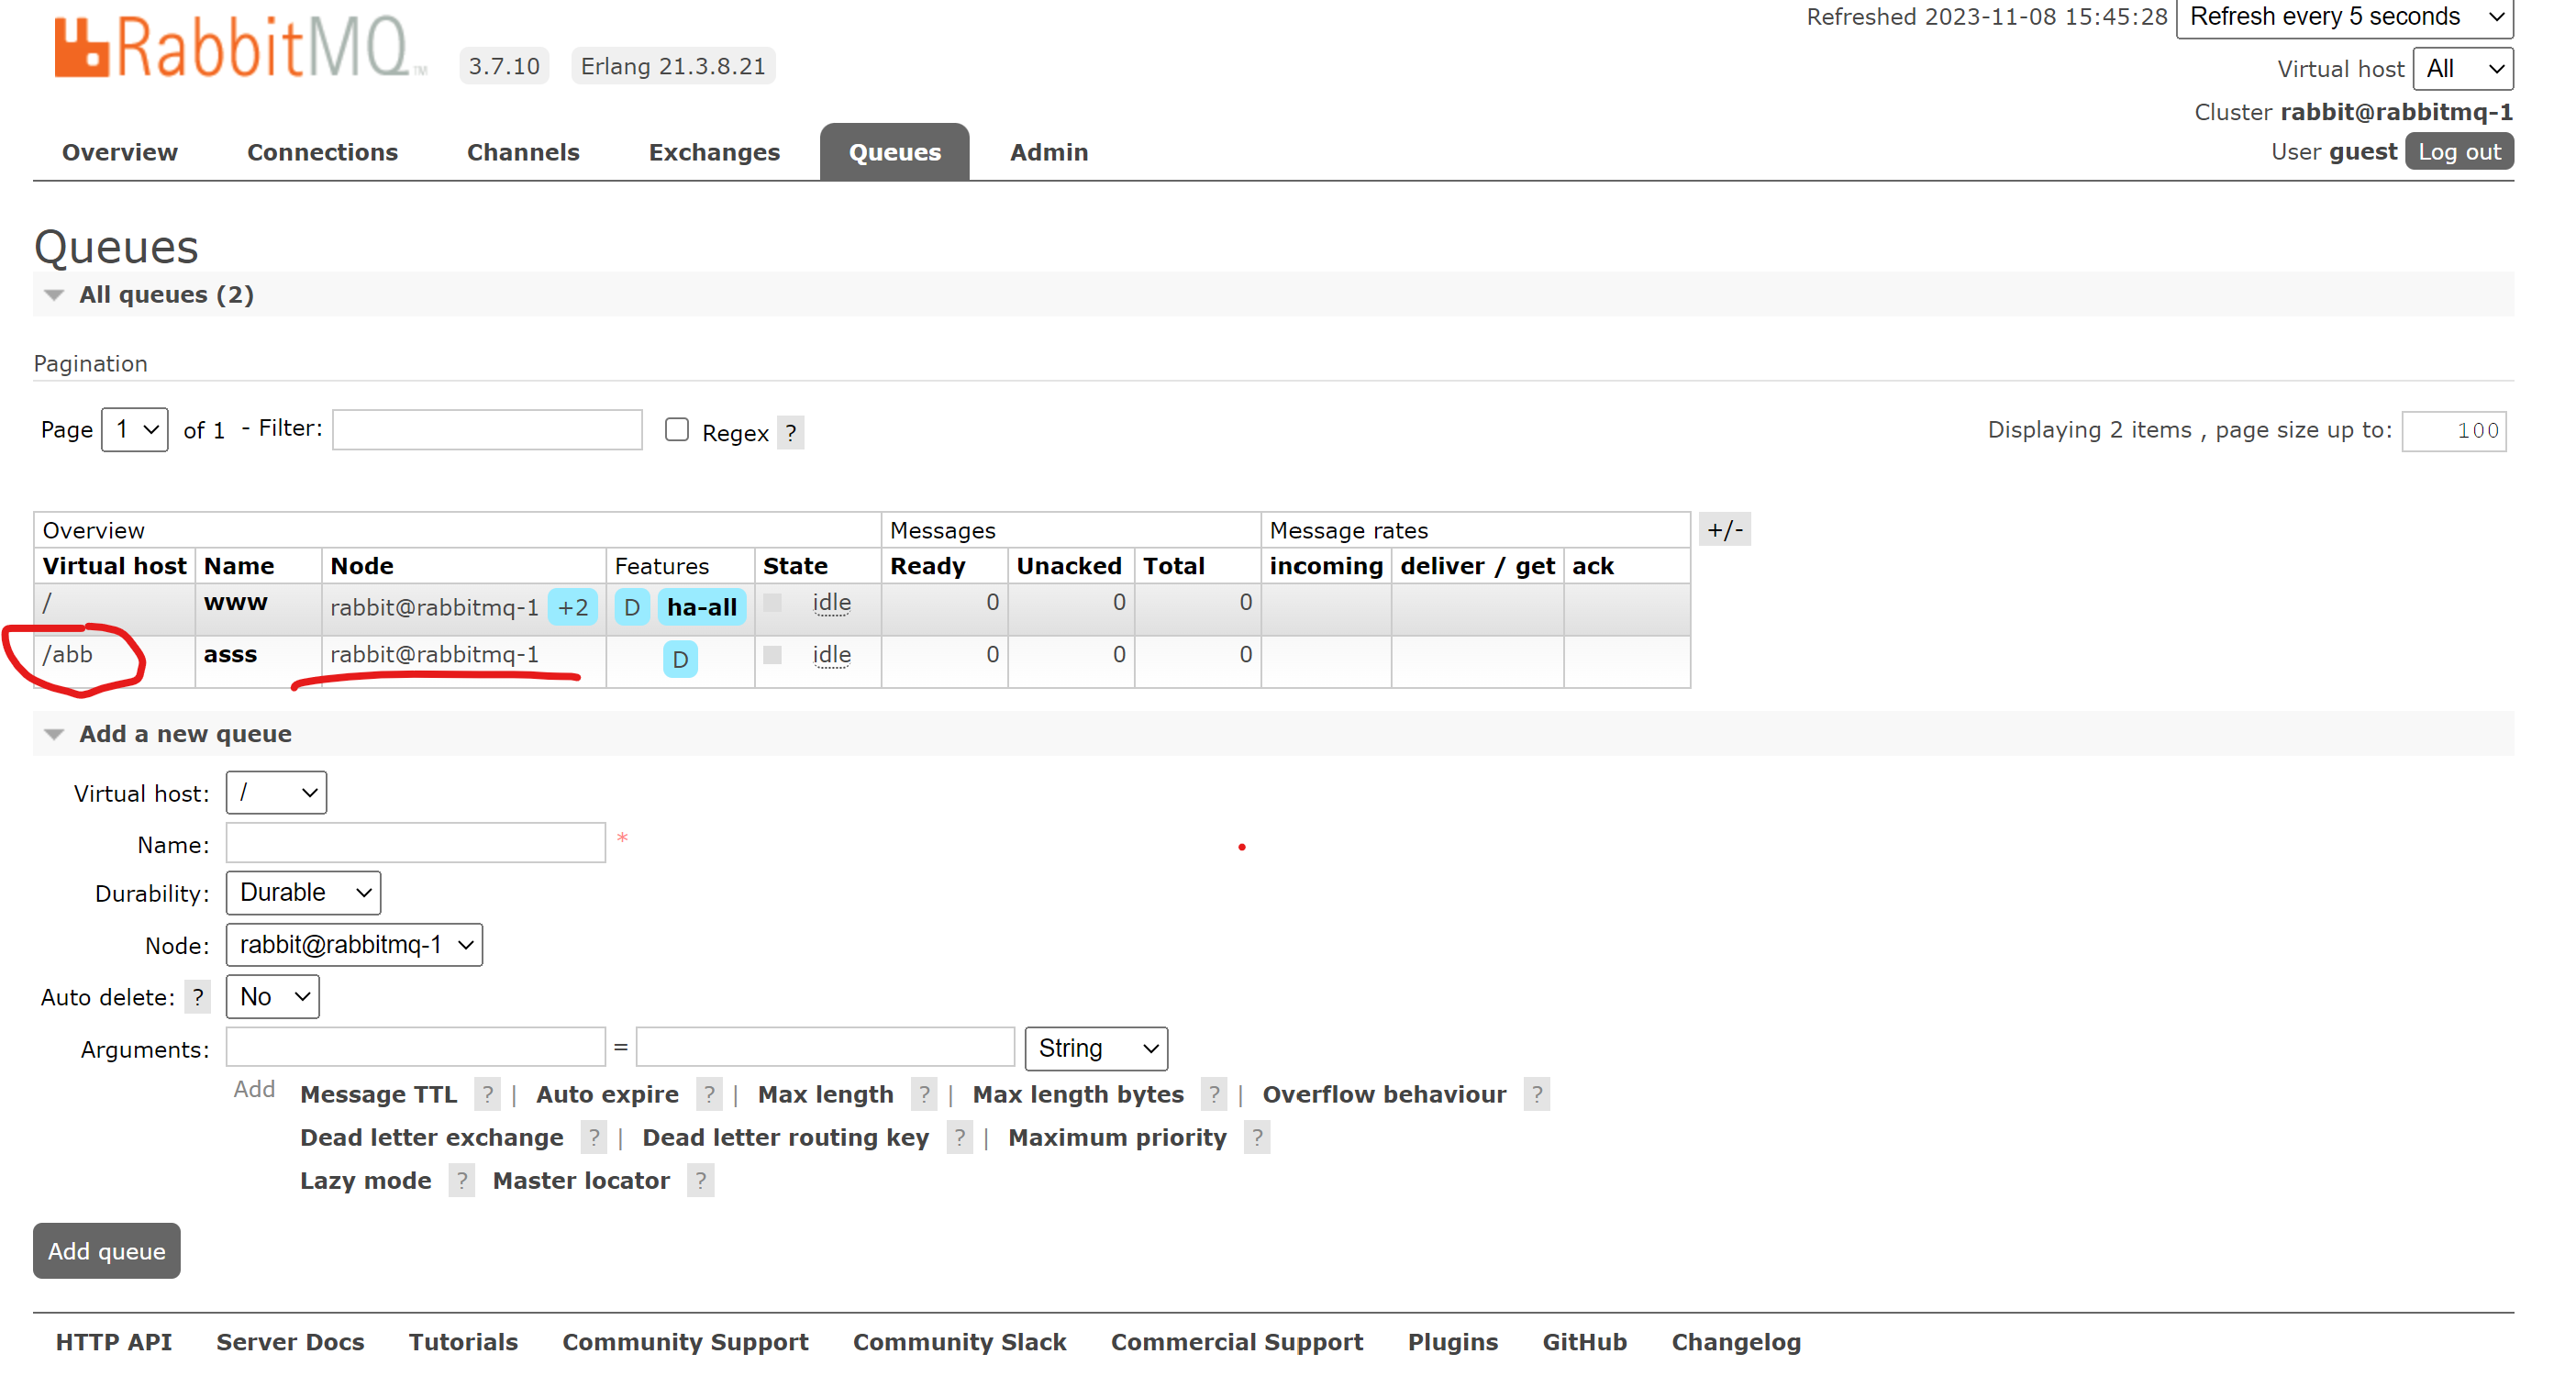
修改 修改完之后就跟上面得一样了
[root@localhost ~]# rabbitmqctl set_policy ha-all "^" '{"ha-mode":"all"}'
RabbitMq负载均衡配置-HAProxy
安装HAProxy
[root@localhost ~]# yum install haproxy
修改配置文件
[root@localhost ~]# vim /etc/haproxy/haproxy.cfg
ballog 127.0.0.1 local2chroot /var/lib/haproxypidfile /var/run/haproxy.pidmaxconn 4000user haproxygroup haproxynbproc 4daemon# turn on stats unix socketstats socket /var/lib/haproxy/stats
#---------------------------------------------------------------------
defaultsmode httplog globalretries 3timeout connect 10stimeout client 1mtimeout server 1mtimeout check 10smaxconn 2048
#---------------------------------------------------------------------
##监控查看本地状态#####
listen admin_statsbind *:88mode httpoption httplogoption httpcloselog 127.0.0.1 local0 errstats uri /haproxystats auth root:1stats refresh 30s
####################################
###反代监控
frontend serverbind *:5670log globalmode tcp#option forwardfordefault_backend rabbitmqmaxconn 3
backend rabbitmqmode tcplog globalbalance roundrobinserver rabbitmq1 192.168.10.128:5672 check inter 2000s rise 2 fall 3server rabbitmq2 192.168.10.129:5672 check inter 2000s rise 2 fall 3server rabbitmq3 192.168.10.130:5672 check inter 2000s rise 2 fall 3[root@localhost ~]# systemctl start haproxy
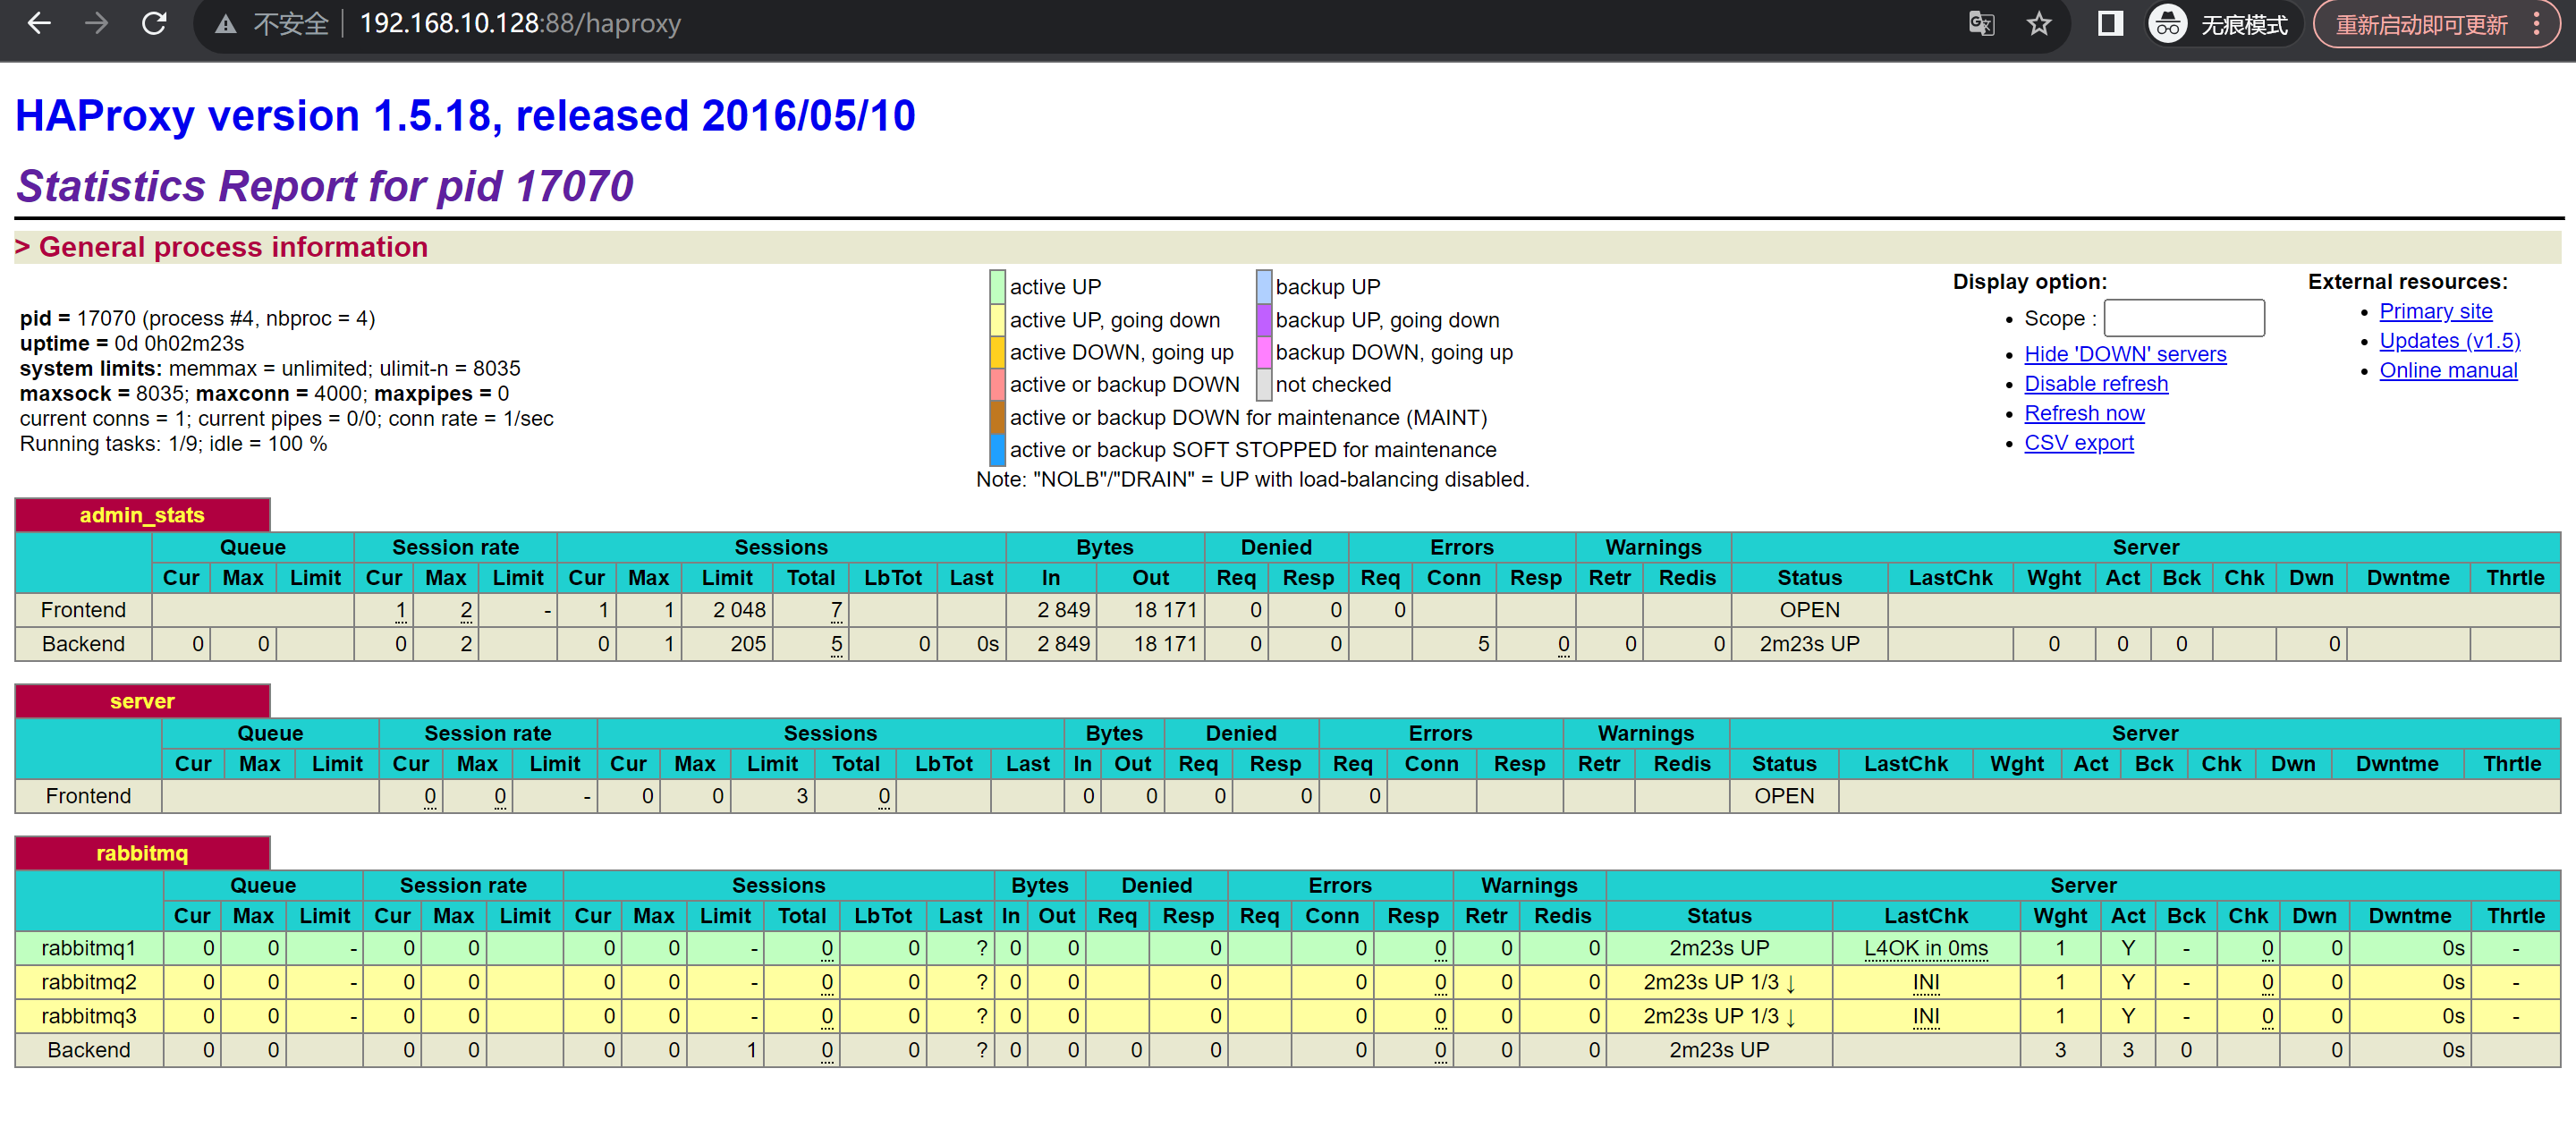
[root@localhost ~]# ss -ntlp | grep 88
LISTEN 0 128 *:88 *:* users:(("haproxy",pid=17070,fd=5),("haproxy",pid=17069,fd=5),("haproxy",pid=17068,fd=5),("haproxy",pid=17067,fd=5))
登录haproxy
192.168.10.128:88/haproxy
mysql授权root用户远程登录
[root@localhost ~]# mysql -uroot -p'Cjb@1234'
mysql: [Warning] Using a password on the command line interface can be insecure.
Welcome to the MySQL monitor.  Commands end with ; or \g.
Your MySQL connection id is 5
Server version: 5.7.42 MySQL Community Server (GPL)Copyright (c) 2000, 2023, Oracle and/or its affiliates.Oracle is a registered trademark of Oracle Corporation and/or its
affiliates. Other names may be trademarks of their respective
owners.Type 'help;' or '\h' for help. Type '\c' to clear the current input statement.mysql> grant all on *.* to 'root'@'%' identified by 'Cjb@1234';
Query OK, 0 rows affected, 1 warning (0.00 sec)mysql> \q
Bye
相关文章:
RabbitMQ集群配置以及负载均衡配置
RabbitMQ集群配置以及负载均衡配置 环境配置集群配置安装rabbitmq启动rabbitmq开启远程登录添加用户并且授权用户添加数据存放目录和日志存放目录查看端口拷⻉erlang.cookie将mq-2、mq-3作为内存节点加⼊mq-1节点集群中查看集群状态添加一个新的队列 RabbitMq负载均衡配置-HAPr…...
Leetcode Hot100之六:42.接雨水
题目 给定 n 个非负整数表示每个宽度为 1 的柱子的高度图,计算按此排列的柱子,下雨之后能接多少雨水。 提示: n height.length 1 < n < 2 * 10^4 0 < height[i] < 10^5 思路 暴力循环: 原本的思路是左边界i从左到…...

electron 主进程 和 渲染进程通信 ipcRenderer 和 mainWindow.webContents
electron 开发时最麻烦就是electron版本和node版本的选择和正确安装 electron 用npm安装时太慢容易报错,建议用cnpm i 进行安装 注意最新版渲染进程使用node nodeIntegration: true, // 渲染进程可用node contextIsolation: false, // 这个值影响nodeIntegration是…...
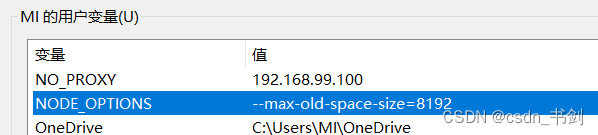
关于VUE启动内存溢出
安装node v10.14.2 后 启动公司的VUE项目 使用命令npm run dev 命令 报错: <--- Last few GCs --->[20940:00000244699848E0] 215872 ms: Scavenge 1690.2 (1836.4) -> 1679.6 (1836.4) MB, 5.4 / 0.7 ms (average mu 0.266, current mu 0.253) a…...

HBase学习笔记(1)—— 知识点总结
目录 HBase概述 HBase 基本架构 HBase安装部署启动 HBase Shell HBase数据读写流程 HBase 优化 HBase概述 HBase是以 hdfs 为数据存储的,一种分布式、非关系型的、可扩展的 NoSQL 数据库 关系型数据库和非关系型数据库的区别: 关系型数据库和非关…...
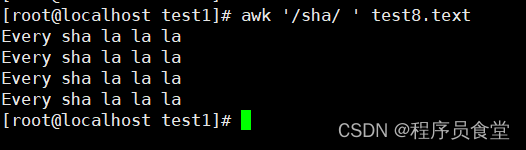
【Linux】 awk命令使用
AWK 是一种处理文本文件的语言,是一个强大的文本分析工具。 之所以叫 AWK 是因为其取了三位创始人 Alfred Aho,Peter Weinberger, 和 Brian Kernighan 的 Family Name 的首字符。 语法 awk [选项] [文件] awk [选项] [程序] [文件] awk命令 -Linux手…...
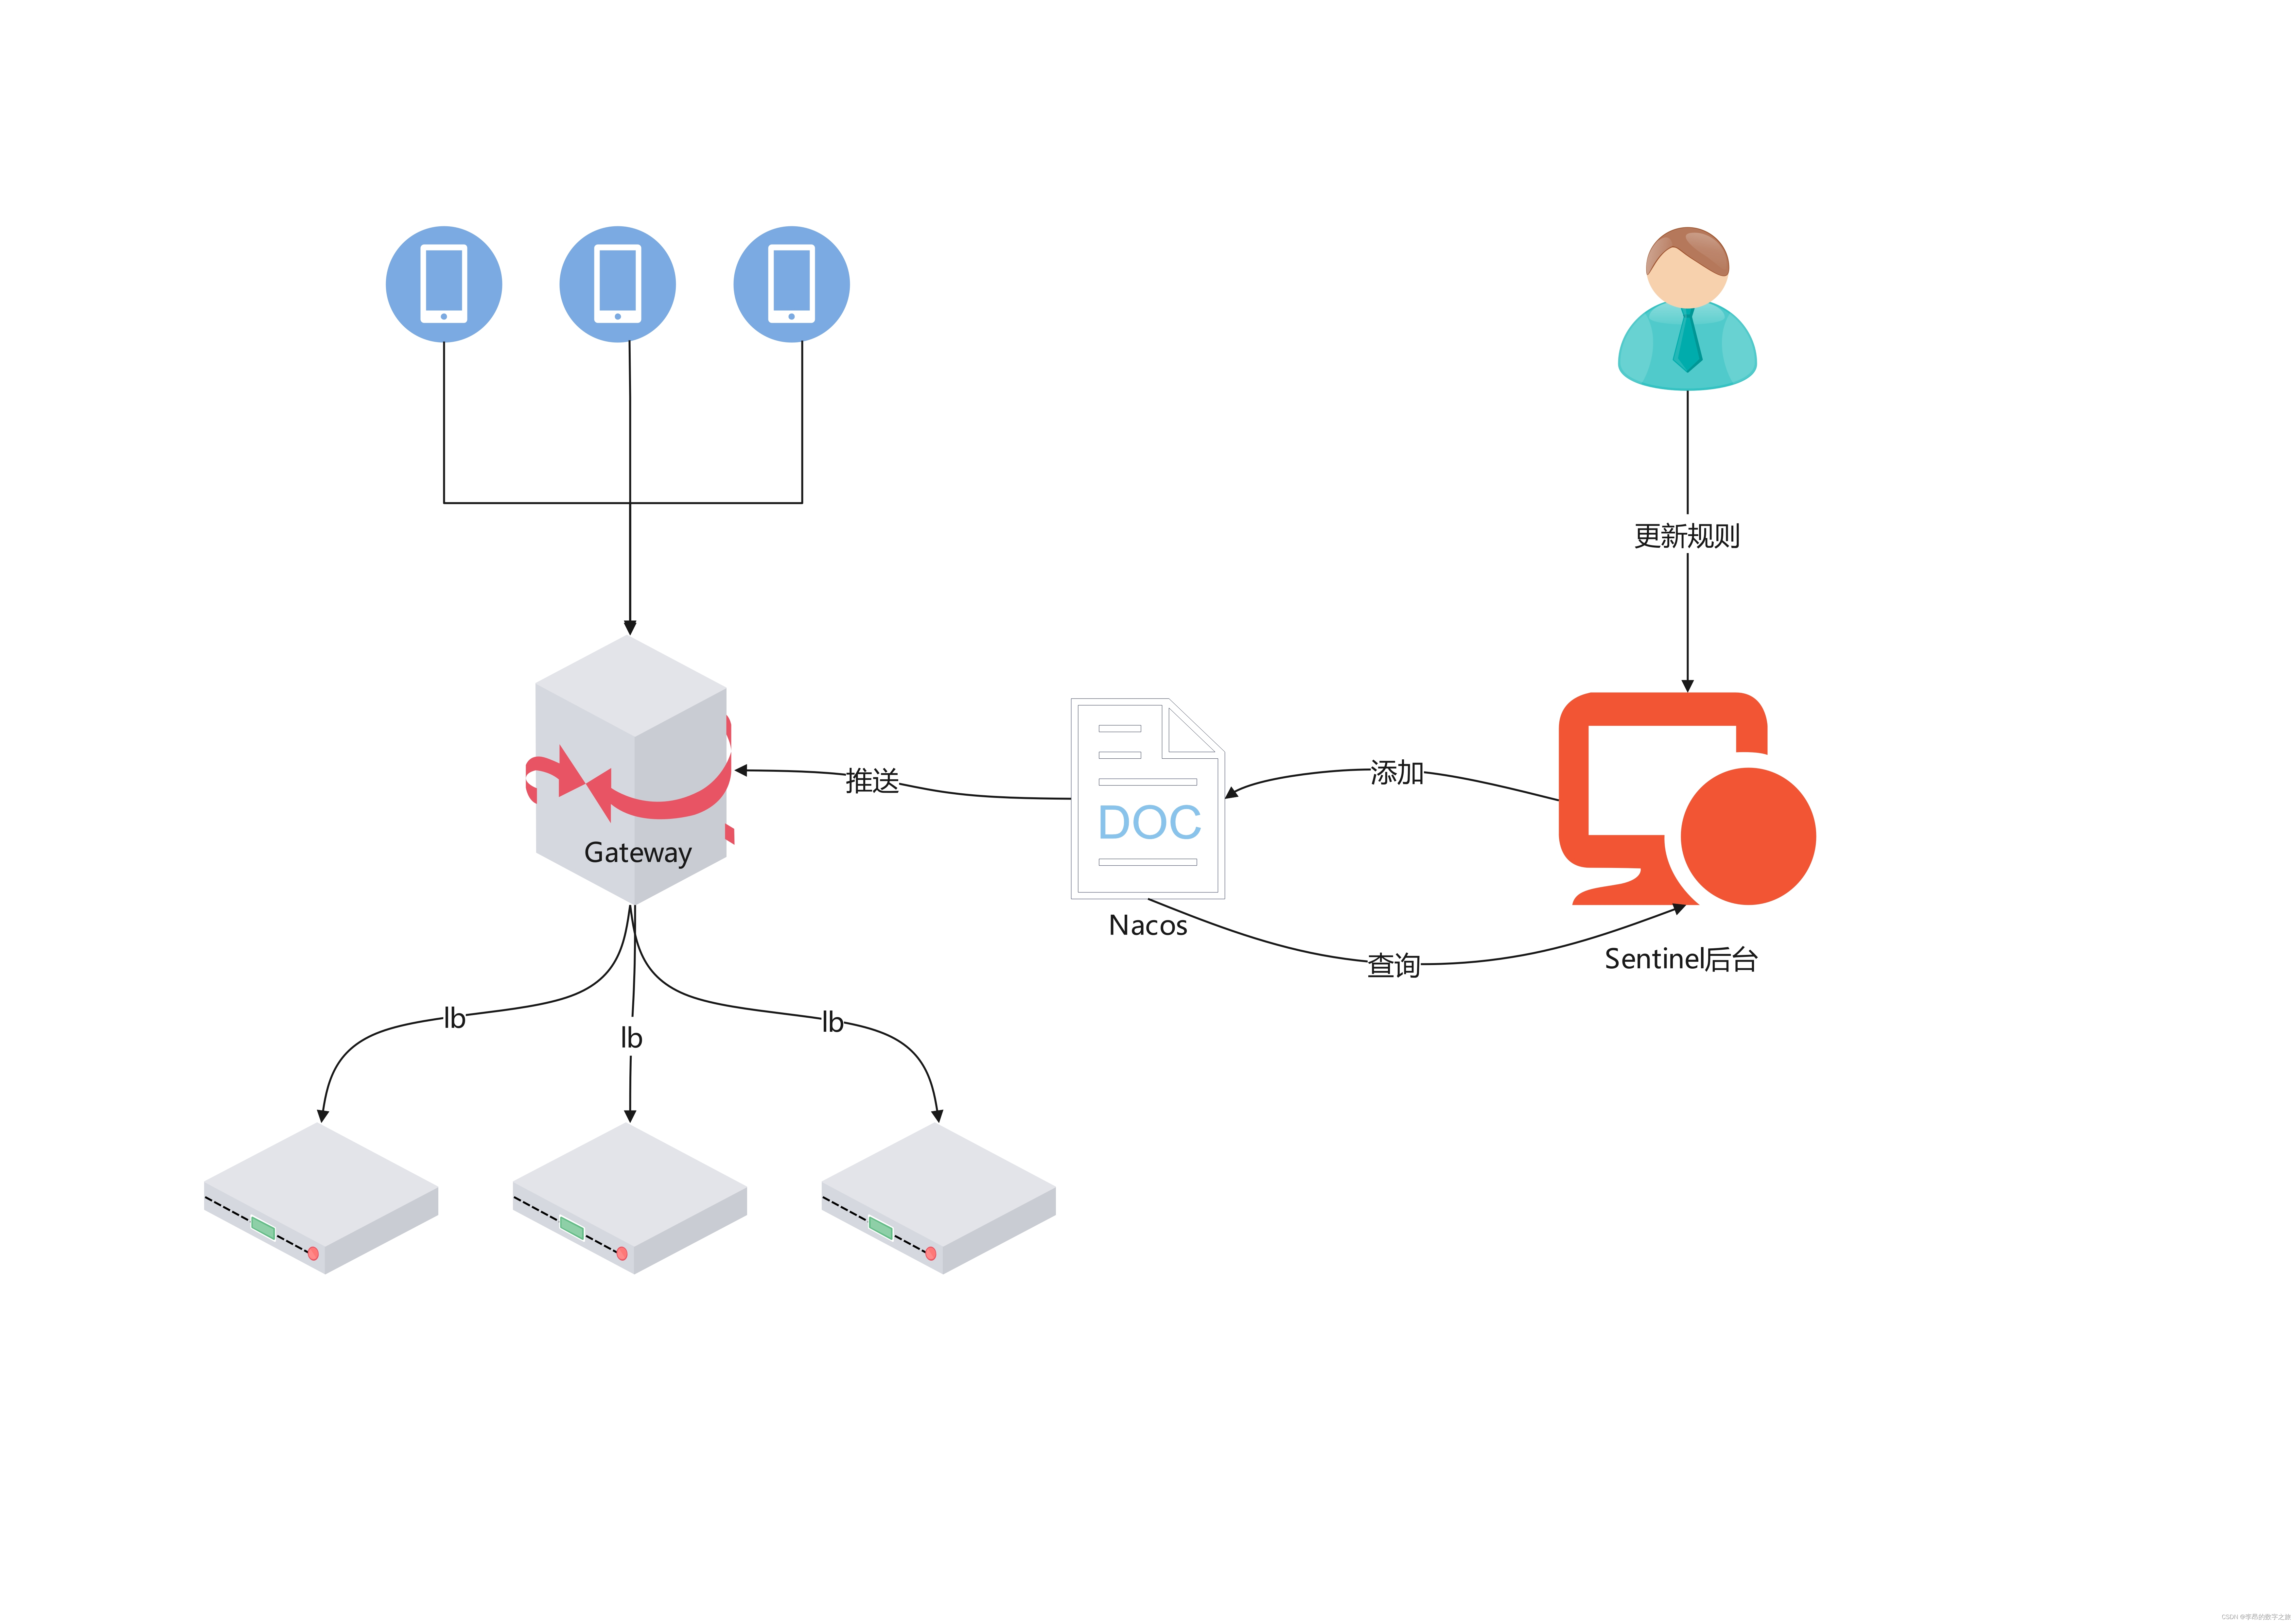
Sentinel网关限流
背景 在微服务架构下,每个服务的性能都不同,为避免出现流量洪峰将服务冲垮,需要依赖限流工具来保护服务的稳定性。sentinel是阿里提供的限流工具,社区活跃,功能也很全面,包含实时监控、流控、熔断等功能。…...
solidworks对电脑要求高吗?2023solidworks配置要求
solidworks对电脑要求高吗?SolidWorks是一款功能强大的三维CAD软件,对电脑配置有一定的要求。一般来说,运行SolidWorks需要的电脑配置包括较高的处理器性能、足够的内存和存储空间,以及一块性能良好的显卡。此外,对于大…...
)
搭建神经网络(torch.nn的用法)
零零碎碎总结了一些torch框架里面nn模块的用法,尤其是关于搭建神经网络的 nn.ModuleList nn.Module nn.Sequential nn.Linear nn.Dropout nn.Embedding nn.DataParallel() 将模型封装起来,便于在多个gpu上并行计算,训练或者推理 nn.…...
卡码网语言基础课 | 11. 句子缩写
目录 一、 字符串大小的比较 二、 ASCII码值 三、 基本框架代码 四、 解题思路 4.1 首字母问题 4.2 判定小写字母 4.3 小写字母转换为大写字母 五、空格判断 六、 代码模块化 6.1 满足的条件 6.2 代码完善 七、 题目解答 7.1 原始代码 7.2 改进代码 八、 拓展与…...

Surface RT 安装 Linux
零:起因 在家无事找出来一台老旧设备 Surface RT 一代的,系统最新是 Windows 8.1 arm版,应用商店都已经打不开了 虽说有破解方法,能运行些软件,但怎么说也不是任意安装,所以局限性还是相当的大࿰…...
C++中的函数重载:多功能而强大的特性
引言 函数重载是C编程语言中的一项强大特性,它允许在同一个作用域内定义多个同名函数,但这些函数在参数类型、个数或顺序上有所不同。本文将深入探讨函数重载的用法,以及它的优势和应用场景。 正文 在C中,函数重载是一项非常有…...

数据分析实战 | K-means算法——蛋白质消费特征分析
目录 一、数据及分析对象 二、目的及分析任务 三、方法及工具 四、数据读入 五、数据理解 六、数据准备 七、模型训练 编辑 八、模型评价 九、模型调参与预测 一、数据及分析对象 txt文件——“protein.txt”,主要记录了25个国家的9个属性,主…...

HTTP协议详解-下(Tomcat)
如何构造 HTTP 请求 对于 GET 请求 地址栏直接输入点击收藏夹html 里的 link script img a…form 标签 通过 form 标签构造GET请求 <body><!-- 表单标签, 允许用户和服务器之间交互数据 --><!-- 提交的数据报以键值对的结果来组织 --><form action&quo…...

acwing算法基础之搜索与图论--prim算法
目录 1 基础知识2 模板3 工程化 1 基础知识 朴素版prim算法的关键步骤: 初始化距离数组dist,将其内的所有元素都设为正无穷大。定义集合S,表示生成树。循环n次:找到不在集合S中且距离集合S最近的结点t,用它去更新剩余…...

Amazon EC2 Serial Console 现已在其他亚马逊云科技区域推出
即日起,交互式 EC2 Serial Console 现也在以下区域推出:中东(巴林)、亚太地区(雅加达)、非洲(开普敦)、中东(阿联酋)、亚太地区(香港)…...
-39)
hdlbits系列verilog解答(100输入逻辑门)-39
文章目录 一、问题描述二、verilog源码三、仿真结果一、问题描述 构建一个具有 100 个输入in[99:0]的组合电路。 有 3 个输出: out_and: output of a 100-input AND gate. out_or: output of a 100-input OR gate. out_xor: output of a 100-input XOR gate. 二、verilog源…...

Python 中 Selenium 的屏幕截图
文章目录 使用 save_screenshot() 函数在 Python 中使用 selenium 捕获屏幕截图使用 get_screenshot_as_file() 函数在 Python 中使用 selenium 捕获屏幕截图使用 Screenshot-Selenium 包在 Python 中使用 selenium 捕获屏幕截图总结我们可以使用 Selenium 在自动化 Web 浏览器…...

scrapy发json的post请求
一 、scrapy发json的post请求: def start_requests(self):self.headers {Content-Type: application/json}json_data {"productName": "", "currentPage": "1", "recordNumber": "10", "langua…...
一个整数,它加上100后是一个完全平方数,再加上168又是一个完全平方数,请问该数是多少?
目录 1解题思路: 2代码如下: 3运行结果: 4总结: 5介绍: 1解题思路: 利用循环(穷举法)来 对 所 需要的数 进行确定 2代码如下: #include <stdio.h>int main() …...

傅里叶变换实战:如何用Python避免频谱分析中的泄露效应?
傅里叶变换实战:如何用Python避免频谱分析中的泄露效应? 频谱分析是数字信号处理中的核心技能,而傅里叶变换则是打开这扇大门的钥匙。但在实际应用中,即使是最有经验的工程师也常常被频谱泄露问题困扰——那些本应清晰的频率峰为何…...

U盘拷贝显示文件xxx过大问题
有时当我们将文件拷贝到U盘时,明明磁盘还有足够的储存空间,但却出现了“对于目标文件系统,文件‘XXX’过大”提示信息,导致文件无法正常拷贝。那么这是怎么回事呢?我们又该如何解决这个问题呢?下面我们就一…...

如何快速掌握暗黑破坏神2存档编辑:新手的完整可视化指南
如何快速掌握暗黑破坏神2存档编辑:新手的完整可视化指南 【免费下载链接】d2s-editor 项目地址: https://gitcode.com/gh_mirrors/d2/d2s-editor 还在为修改暗黑2存档而烦恼吗?d2s-editor是一款基于Web的开源暗黑破坏神2存档编辑器,将…...

HarmonyOS UI 开发中的 EventHub:终结“回调地狱”的通信轻骑兵
HarmonyOS UI 开发中的 EventHub:终结“回调地狱”的通信轻骑兵做 HarmonyOS UI 开发的兄弟,多半都经历过这样的血压飙升时刻:页面 A 嵌了组件 B,组件 B 里还有子组件 C。突然有一天,产品要求在 C 里打个响指ÿ…...

Coze OAuth授权码模式 vs JWT模式:Java后端如何选择并实现无感鉴权?
Coze OAuth授权码模式 vs JWT模式:Java后端如何选择并实现无感鉴权? 在构建需要与Coze平台深度集成的企业级应用时,鉴权机制的选择直接影响系统的稳定性和自动化程度。面对需要7x24小时稳定运行的后台服务,传统的OAuth授权码模式常…...

Win11Debloat终极指南:免费快速优化Windows 11系统的完整方案
Win11Debloat终极指南:免费快速优化Windows 11系统的完整方案 【免费下载链接】Win11Debloat A simple, lightweight PowerShell script that allows you to remove pre-installed apps, disable telemetry, as well as perform various other changes to declutter…...

BurpSuite时间盲注爆破实战:Pikachu靶场从抓包到结果分析全流程
BurpSuite时间盲注爆破实战:Pikachu靶场从抓包到结果分析全流程 在渗透测试领域,时间盲注是一种特殊的SQL注入技术,当目标网站对错误信息进行屏蔽时,通过观察服务器响应时间的差异来推断数据库信息。本文将带您深入Pikachu靶场环境…...

QT QRadioButton 自定义指示器样式:从入门到精通
1. 初识QRadioButton的指示器 第一次接触QT开发时,我发现QRadioButton默认的圆形指示器样式实在太过普通。那个小小的灰色圆圈,选中时变成黑色圆点,怎么看都像是Windows 95时代的产物。作为一个对UI有追求的开发者,我决定要改变这…...

大气层系统:Switch开源项目安装配置完全指南
大气层系统:Switch开源项目安装配置完全指南 【免费下载链接】Atmosphere-stable 大气层整合包系统稳定版 项目地址: https://gitcode.com/gh_mirrors/at/Atmosphere-stable 你是否想让Switch拥有更多自定义功能,却担心操作复杂、风险太高&#x…...

终极指南:如何用SillyTavern打造你的专属AI聊天伴侣
终极指南:如何用SillyTavern打造你的专属AI聊天伴侣 【免费下载链接】SillyTavern LLM Frontend for Power Users. 项目地址: https://gitcode.com/GitHub_Trending/si/SillyTavern SillyTavern是一款专为高级用户设计的LLM前端工具,它让你能够创…...