Flutter.源码分析.flutter/packages/flutter/lib/src/widgets/scroll_view.dart/GridView
李俊才 的个人博客:https://blog.csdn.net/qq_28550263
本文地址:https://blog.csdn.net/qq_28550263/article/details/134375048
本文提供 Flutter 框架中 GridView 类源码注释的中文翻译以及必要的分析解说。
目 录
1. 类注释部分
/// 一个可滚动的二维组件数组。
///
/// {@youtube 560 315 https://www.youtube.com/watch?v=bLOtZDTm4H8}
///
/// 网格的主轴方向是其滚动的方向([scrollDirection])。
///
/// 最常用的网格布局是 [GridView.count],它创建一个在交叉轴上有固定数量的瓷砖的布局,和
/// [GridView.extent],它创建一个瓷砖具有最大交叉轴范围的布局。自定义的 [SliverGridDelegate] 可以产生任意的2D
/// 子组件布局,包括不对齐或重叠的布局。
///
/// 要创建一个具有大量(或无限)子组件的网格,使用 [GridView.builder] 构造函数,配合
/// [SliverGridDelegateWithFixedCrossAxisCount] 或 [SliverGridDelegateWithMaxCrossAxisExtent]
/// 作为 [gridDelegate]。
///
/// 要使用自定义的 [SliverChildDelegate],使用 [GridView.custom]。
///
/// 要创建一个线性的子组件数组,使用 [ListView]。
///
/// 要控制滚动视图的初始滚动偏移,提供一个设置了 [ScrollController.initialScrollOffset] 属性的 [controller]。
///
/// ## 转换到 [CustomScrollView]
///
/// [GridView] 基本上是一个在其 [CustomScrollView.slivers] 属性中有一个 [SliverGrid] 的 [CustomScrollView]。
///
/// 如果 [GridView] 不再足够,例如因为滚动视图要同时有一个网格和一个列表,或者因为网格要与 [SliverAppBar] 结合等,
/// 那么从使用 [GridView] 到直接使用 [CustomScrollView] 的代码移植是直接的。
///
/// [GridView] 上的 [key],[scrollDirection],[reverse],[controller],[primary],[physics],
/// 和 [shrinkWrap] 属性直接映射到 [CustomScrollView] 上同名的属性。
///
/// [CustomScrollView.slivers] 属性应该是一个只包含 [SliverGrid] 的列表。
///
/// [GridView] 上的 [childrenDelegate] 属性对应于 [SliverGrid.delegate] 属性,
/// 而 [GridView] 上的 [gridDelegate] 属性对应于 [SliverGrid.gridDelegate] 属性。
///
/// [GridView],[GridView.count] 和 [GridView.extent]
/// 构造函数的 `children` 参数对应于 [childrenDelegate] 是一个具有相同参数的 [SliverChildListDelegate]。
/// [GridView.builder] 构造函数的 `itemBuilder` 和 `childCount` 参数对应于 [childrenDelegate] 是一个具有匹配参数的 [SliverChildBuilderDelegate]。
///
/// [GridView.count] 和 [GridView.extent] 构造函数创建
/// 自定义网格委托,并在 [SliverGrid] 上有同名的构造函数以便于转换:分别是 [SliverGrid.count] 和
/// [SliverGrid.extent]。
///
/// [padding] 属性对应于在 [CustomScrollView.slivers] 属性中有一个 [SliverPadding] 而不是网格本身,
/// 并且 [SliverGrid] 是 [SliverPadding] 的子组件。
///
/// 一旦代码被移植为使用 [CustomScrollView],其他的 slivers,如 [SliverList] 或 [SliverAppBar],
/// 可以放在 [CustomScrollView.slivers] 列表中。
///
/// {@tool snippet}
/// 这个示例演示了如何创建一个有两列的 [GridView]。子组件之间的间距使用 `crossAxisSpacing` 和 `mainAxisSpacing` 属性设置。
///
/// 
///
/// ```dart
/// GridView.count(
/// primary: false,
/// padding: const EdgeInsets.all(20),
/// crossAxisSpacing: 10,
/// mainAxisSpacing: 10,
/// crossAxisCount: 2,
/// children: <Widget>[
/// Container(
/// padding: const EdgeInsets.all(8),
/// color: Colors.teal[100],
/// child: const Text("He'd have you all unravel at the"),
/// ),
/// Container(
/// padding: const EdgeInsets.all(8),
/// color: Colors.teal[200],
/// child: const Text('Heed not the rabble'),
/// ),
/// Container(
/// padding: const EdgeInsets.all(8),
/// color: Colors.teal[300],
/// child: const Text('Sound of screams but the'),
/// ),
/// Container(
/// padding: const EdgeInsets.all(8),
/// color: Colors.teal[400],
/// child: const Text('Who scream'),
/// ),
/// Container(
/// padding: const EdgeInsets.all(8),
/// color: Colors.teal[500],
/// child: const Text('Revolution is coming...'),
/// ),
/// Container(
/// padding: const EdgeInsets.all(8),
/// color: Colors.teal[600],
/// child: const Text('Revolution, they...'),
/// ),
/// ],
/// )
/// ```
/// {@end-tool}
///
/// {@tool snippet}
/// 这个示例展示了如何使用 [CustomScrollView] 和 [SliverGrid] 创建与上一个示例相同的网格。
///
/// 
///
/// ```dart
/// CustomScrollView(
/// primary: false,
/// slivers: <Widget>[
/// SliverPadding(
/// padding: const EdgeInsets.all(20),
/// sliver: SliverGrid.count(
/// crossAxisSpacing: 10,
/// mainAxisSpacing: 10,
/// crossAxisCount: 2,
/// children: <Widget>[
/// Container(
/// padding: const EdgeInsets.all(8),
/// color: Colors.green[100],
/// child: const Text("He'd have you all unravel at the"),
/// ),
/// Container(
/// padding: const EdgeInsets.all(8),
/// color: Colors.green[200],
/// child: const Text('Heed not the rabble'),
/// ),
/// Container(
/// padding: const EdgeInsets.all(8),
/// color: Colors.green[300],
/// child: const Text('Sound of screams but the'),
/// ),
/// Container(
/// padding: const EdgeInsets.all(8),
/// color: Colors.green[400],
/// child: const Text('Who scream'),
/// ),
/// Container(
/// padding: const EdgeInsets.all(8),
/// color: Colors.green[500],
/// child: const Text('Revolution is coming...'),
/// ),
/// Container(
/// padding: const EdgeInsets.all(8),
/// color: Colors.green[600],
/// child: const Text('Revolution, they...'),
/// ),
/// ],
/// ),
/// ),
/// ],
/// )
/// ```
/// {@end-tool}
///
/// 默认情况下,[GridView] 会自动填充网格的滚动边界的限制,以避免 [MediaQuery] 的填充指示的部分遮挡。
/// 要避免这种行为,用零 [padding] 属性覆盖。
///
/// {@tool snippet}
/// 下面的示例演示了如何使用 [MediaQuery.removePadding] 覆盖默认的顶部填充。
///
/// ```dart
/// Widget myWidget(BuildContext context) {
/// return MediaQuery.removePadding(
/// context: context,
/// removeTop: true,
/// child: GridView.builder(
/// gridDelegate: const SliverGridDelegateWithFixedCrossAxisCount(
/// crossAxisCount: 3,
/// ),
/// itemCount: 300,
/// itemBuilder: (BuildContext context, int index) {
/// return Card(
/// color: Colors.amber,
/// child: Center(child: Text('$index')),
/// );
/// }
/// ),
/// );
/// }
/// ```
/// {@end-tool}
///
/// {@tool dartpad}
/// 这个示例展示了在 [GridView] 或 [ListView] 中 [ListTile] 选择的自定义实现。
/// 长按任何 ListTile 以启用选择模式。
///
/// ** 查看 examples/api/lib/widgets/scroll_view/list_view.0.dart 中的代码 **
/// {@end-tool}
///
/// 另请参阅:
///
/// * [SingleChildScrollView],这是一个有一个单一子组件的可滚动组件。
/// * [ListView],这是一个可滚动的,线性的组件列表。
/// * [PageView],这是一个滚动的子组件列表,每个子组件都是视口的大小。
/// * [CustomScrollView],这是一个创建自定义滚动效果的可滚动组件。
/// * [SliverGridDelegateWithFixedCrossAxisCount],它创建一个在交叉轴上有固定数量的瓷砖的布局。
/// * [SliverGridDelegateWithMaxCrossAxisExtent],它创建一个瓷砖具有最大交叉轴范围的布局。
/// * [ScrollNotification] 和 [NotificationListener],它们可以用来观察滚动位置,而无需使用 [ScrollController]。
/// * [布局组件目录](https://flutter.dev/widgets/layout/)。
class GridView extends BoxScrollView {// ...
}
2. 默认构造函数部分
/// 使用自定义 [SliverGridDelegate] 创建一个可滚动的二维组件数组。////// [gridDelegate] 参数不能为空。////// `addAutomaticKeepAlives` 参数对应于 [SliverChildListDelegate.addAutomaticKeepAlives] 属性。/// `addRepaintBoundaries` 参数对应于 [SliverChildListDelegate.addRepaintBoundaries] 属性。两者都不能为 null。GridView({super.key,super.scrollDirection,super.reverse,super.controller,super.primary,super.physics,super.shrinkWrap,super.padding,required this.gridDelegate,bool addAutomaticKeepAlives = true,bool addRepaintBoundaries = true,bool addSemanticIndexes = true,super.cacheExtent,List<Widget> children = const <Widget>[],int? semanticChildCount,super.dragStartBehavior,super.clipBehavior,super.keyboardDismissBehavior,super.restorationId,}) : childrenDelegate = SliverChildListDelegate(children,addAutomaticKeepAlives: addAutomaticKeepAlives,addRepaintBoundaries: addRepaintBoundaries,addSemanticIndexes: addSemanticIndexes,),super(semanticChildCount: semanticChildCount ?? children.length,);
从 GridView 默认构造函数的结构可以看出,它本质上不过是创建了一个 SliverChildListDelegate 对象并赋值给 childrenDelegate。
而 SliverChildListDelegate 是 SliverChildDelegate 的一个实现,它使用一个固定的子部件列表来生成网格的子部件。这里,children 参数就是这个列表。另外,addAutomaticKeepAlives、addRepaintBoundaries 和 addSemanticIndexes 参数用于控制子部件的生命周期、是否添加重绘边界和语义索引。
另外一方面,该构造函数种调用了其父类(BoxScrollView)的构造函数。semanticChildCount 参数用于语义分析,它表示 GridView 中的子部件数量。如果 semanticChildCount 为 null,则使用 children.length 作为默认值。
3. GridView.builder构造函数部分
GridView.builder 构造函数用于创建一个可以滚动的,按需创建的二维部件数组。这对于具有大量(或无限)子部件的网格视图非常合适,因为构建器只会为实际可见的子部件调用。
/// 创建一个可滚动的,按需创建的二维部件数组。////// 对于具有大量(或无限)子部件的网格视图,此构造函数是合适的,因为构建器只会为实际可见的子部件调用。////// 提供非空的 `itemCount` 可以提高 [GridView] 估计最大滚动范围的能力。////// `itemBuilder` 只会被调用大于等于零且小于 `itemCount` 的索引。////// {@macro flutter.widgets.ListView.builder.itemBuilder}////// {@macro flutter.widgets.PageView.findChildIndexCallback}////// [gridDelegate] 参数是必需的。////// `addAutomaticKeepAlives` 参数对应于 [SliverChildBuilderDelegate.addAutomaticKeepAlives] 属性。/// `addRepaintBoundaries` 参数对应于 [SliverChildBuilderDelegate.addRepaintBoundaries] 属性。/// `addSemanticIndexes` 参数对应于 [SliverChildBuilderDelegate.addSemanticIndexes] 属性。GridView.builder({super.key,super.scrollDirection,super.reverse,super.controller,super.primary,super.physics,super.shrinkWrap,super.padding,required this.gridDelegate,required NullableIndexedWidgetBuilder itemBuilder,ChildIndexGetter? findChildIndexCallback,int? itemCount,bool addAutomaticKeepAlives = true,bool addRepaintBoundaries = true,bool addSemanticIndexes = true,super.cacheExtent,int? semanticChildCount,super.dragStartBehavior,super.keyboardDismissBehavior,super.restorationId,super.clipBehavior,}) : childrenDelegate = SliverChildBuilderDelegate(itemBuilder,findChildIndexCallback: findChildIndexCallback,childCount: itemCount,addAutomaticKeepAlives: addAutomaticKeepAlives,addRepaintBoundaries: addRepaintBoundaries,addSemanticIndexes: addSemanticIndexes,),super(semanticChildCount: semanticChildCount ?? itemCount,);
从代码可以看到,这个构造函数接收多个参数,其中最重要的两个参数是 gridDelegate 和 itemBuilder。
gridDelegate是一个 SliverGridDelegate 对象,它决定了网格的布局。这是一个必需的参数。itemBuilder是一个函数,它接收一个 BuildContext 和一个索引,然后返回一个 Widget。这个函数只会被调用大于等于零且小于itemCount的索引。这是一个必需的参数。
GridView.builder 构造函数的工作原理是,当需要渲染一个子部件时,它会调用 itemBuilder 函数,传入当前的 BuildContext 和子部件的索引,然后将返回的 组件 添加到网格中。这样,只有当子部件实际需要显示时,才会调用 itemBuilder 函数创建子部件。
此外,GridView.builder 还接收一些其他参数,如 itemCount、addAutomaticKeepAlives、addRepaintBoundaries 和 addSemanticIndexes,这些参数用于控制 GridView 的行为。
最后,GridView.builder 通过 SliverChildBuilderDelegate 创建了一个 childrenDelegate,然后传递给 GridView 的父类构造函数。这个 childrenDelegate 决定了如何为 GridView 创建子部件。
4. GridView.custom 构造函数部分
/// 使用自定义 [SliverGridDelegate] 和自定义 [SliverChildDelegate] 创建一个可滚动的二维部件数组。////// 要使用 [IndexedWidgetBuilder] 回调来构建子部件,可以使用 [SliverChildBuilderDelegate] 或使用 [GridView.builder] 构造函数。////// [gridDelegate] 和 [childrenDelegate] 参数不能为空。const GridView.custom({super.key,super.scrollDirection,super.reverse,super.controller,super.primary,super.physics,super.shrinkWrap,super.padding,required this.gridDelegate,required this.childrenDelegate,super.cacheExtent,super.semanticChildCount,super.dragStartBehavior,super.keyboardDismissBehavior,super.restorationId,super.clipBehavior,});GridView.custom 构造函数用于创建一个可滚动的二维部件数组,它允许你完全自定义 **SliverGridDelegate **和 SliverChildDelegate。
- SliverGridDelegate 决定了网格的布局,例如每行的列数、每个子部件的尺寸等。
- SliverChildDelegate 决定了如何生成网格的子部件。你可以使用 SliverChildBuilderDelegate 来按需生成子部件,或者使用 SliverChildListDelegate 来生成一个固定列表的子部件。
GridView.custom 构造函数接收多个参数,其中最重要的两个参数是 gridDelegate 和 childrenDelegate,这两个参数都是必需的。
gridDelegate是一个 SliverGridDelegate 对象,它决定了网格的布局。childrenDelegate是一个 SliverChildDelegate 对象,它决定了如何为 GridView 创建子部件。
GridView.custom 会根据
gridDelegate的设置来布局网格,然后调用childrenDelegate来生成子部件。这样,你可以完全自定义 GridView 的布局和子部件的生成方式。
在这个构造函数的实现种:
-
gridDelegate实现网格的布局工作:gridDelegate是 SliverGridDelegate 类型的对象,它是一个委托,负责定义网格的布局。具体来说,它决定了网格中每行的列数,以及每个格子的大小。当 GridView 需要布局其子部件时,它会调用gridDelegate的方法来获取布局信息。所以,你可以说 gridDelegate 委托了网格的布局工作。 -
childrenDelegate实现子部件的创建工作:childrenDelegate是 SliverChildDelegate 类型的对象,它是一个委托,负责创建网格的子部件。具体来说,当 GridView 需要渲染一个新的子部件时,它会调用childrenDelegate的方法来创建这个子部件。
5. GridView.count 构造函数部分
GridView.count 构造函数用于创建一个可滚动的二维部件数组,其中交叉轴上有固定数量的格子。这个构造函数接收多个参数,其中最重要的是
crossAxisCount,它决定了交叉轴上的格子数量。此外,还可以设置 mainAxisSpacing 和 crossAxisSpacing 来控制格子之间的间距,以及 childAspectRatio 来控制每个格子的宽高比。
该构造函数的代码为:
/// 创建一个可滚动的,二维部件数组,交叉轴上有固定数量的格子。////// 使用 [SliverGridDelegateWithFixedCrossAxisCount] 作为 [gridDelegate]。////// `addAutomaticKeepAlives` 参数对应于 [SliverChildListDelegate.addAutomaticKeepAlives] 属性。/// `addRepaintBoundaries` 参数对应于 [SliverChildListDelegate.addRepaintBoundaries] 属性。两者都不能为空。////// 另请参阅:////// * [SliverGrid.count],[SliverGrid] 的等效构造函数。GridView.count({super.key,super.scrollDirection,super.reverse,super.controller,super.primary,super.physics,super.shrinkWrap,super.padding,required int crossAxisCount,double mainAxisSpacing = 0.0,double crossAxisSpacing = 0.0,double childAspectRatio = 1.0,bool addAutomaticKeepAlives = true,bool addRepaintBoundaries = true,bool addSemanticIndexes = true,super.cacheExtent,List<Widget> children = const <Widget>[],int? semanticChildCount,super.dragStartBehavior,super.keyboardDismissBehavior,super.restorationId,super.clipBehavior,}) : gridDelegate = SliverGridDelegateWithFixedCrossAxisCount(crossAxisCount: crossAxisCount,mainAxisSpacing: mainAxisSpacing,crossAxisSpacing: crossAxisSpacing,childAspectRatio: childAspectRatio,),childrenDelegate = SliverChildListDelegate(children,addAutomaticKeepAlives: addAutomaticKeepAlives,addRepaintBoundaries: addRepaintBoundaries,addSemanticIndexes: addSemanticIndexes,),super(semanticChildCount: semanticChildCount ?? children.length,);
从代码可以看出,GridView.count 构造函数会根据 crossAxisCount、mainAxisSpacing、crossAxisSpacing 和 childAspectRatio 的值来布局网格,然后根据 children 列表来创建子部件。这使得你可以轻松地创建一个具有固定列数的网格视图。
在 GridView.count 构造函数中,gridDelegate 被设置为 SliverGridDelegateWithFixedCrossAxisCount 对象。这个对象会根据 crossAxisCount、mainAxisSpacing、crossAxisSpacing 和 childAspectRatio 的值来布局网格。
childrenDelegate 被设置为 SliverChildListDelegate 对象,它会根据传入的 children 列表来创建子部件。addAutomaticKeepAlives、addRepaintBoundaries 和 addSemanticIndexes 参数会传递给 SliverChildListDelegate,用于控制子部件的生命周期、是否添加重绘边界和语义索引。
6. GridView.extent构造函数部分
GridView.extent 构造函数用于创建一个可滚动的二维部件数组,其中交叉轴上的每个格子都有最大的宽度。
这个构造函数接收多个参数,其中最重要的是 maxCrossAxisExtent,它决定了交叉轴上每个格子的最大宽度。此外,还可以设置 mainAxisSpacing 和 crossAxisSpacing 来控制格子之间的间距,以及 childAspectRatio 来控制每个格子的宽高比。
该构造函数源码为:
/// 创建一个可滚动的,二维部件数组,每个格子在交叉轴上都有最大的范围。////// 使用 [SliverGridDelegateWithMaxCrossAxisExtent] 作为 [gridDelegate]。////// `addAutomaticKeepAlives` 参数对应于 [SliverChildListDelegate.addAutomaticKeepAlives] 属性。/// `addRepaintBoundaries` 参数对应于 [SliverChildListDelegate.addRepaintBoundaries] 属性。两者都不能为空。////// 另请参阅:////// * [SliverGrid.extent],[SliverGrid] 的等效构造函数。GridView.extent({super.key,super.scrollDirection,super.reverse,super.controller,super.primary,super.physics,super.shrinkWrap,super.padding,required double maxCrossAxisExtent,double mainAxisSpacing = 0.0,double crossAxisSpacing = 0.0,double childAspectRatio = 1.0,bool addAutomaticKeepAlives = true,bool addRepaintBoundaries = true,bool addSemanticIndexes = true,super.cacheExtent,List<Widget> children = const <Widget>[],int? semanticChildCount,super.dragStartBehavior,super.keyboardDismissBehavior,super.restorationId,super.clipBehavior,}) : gridDelegate = SliverGridDelegateWithMaxCrossAxisExtent(maxCrossAxisExtent: maxCrossAxisExtent,mainAxisSpacing: mainAxisSpacing,crossAxisSpacing: crossAxisSpacing,childAspectRatio: childAspectRatio,),childrenDelegate = SliverChildListDelegate(children,addAutomaticKeepAlives: addAutomaticKeepAlives,addRepaintBoundaries: addRepaintBoundaries,addSemanticIndexes: addSemanticIndexes,),super(semanticChildCount: semanticChildCount ?? children.length,);GridView.extent 构造函数会根据 maxCrossAxisExtent、mainAxisSpacing、crossAxisSpacing 和 childAspectRatio 的值来布局网格,然后根据 children 列表来创建子部件。这使得你可以轻松地创建一个具有固定最大宽度的网格视图。
在 GridView.extent 构造函数中,gridDelegate 被设置为 SliverGridDelegateWithMaxCrossAxisExtent 对象。这个对象会根据 maxCrossAxisExtent、mainAxisSpacing、crossAxisSpacing 和 childAspectRatio 的值来布局网格。
childrenDelegate 被设置为 SliverChildListDelegate 对象,它会根据传入的 children 列表来创建子部件。addAutomaticKeepAlives、addRepaintBoundaries 和 addSemanticIndexes 参数会传递给 SliverChildListDelegate,用于控制子部件的生命周期、是否添加重绘边界和语义索引。
7. gridDelegate属性
gridDelegate 是 GridView 类中的一个属性,它的类型是 SliverGridDelegate。这个属性是一个委托(delegate),它决定了 GridView 中子部件的布局。
其源代码为:
/// 一个委托,控制 [GridView] 中子部件的布局。////// [GridView],[GridView.builder] 和 [GridView.custom] 构造函数允许你明确指定这个委托。其他构造函数隐式创建一个 [gridDelegate]。final SliverGridDelegate gridDelegate;
gridDelegate 属性的作用就是定义 GridView 中子部件的布局。这使得 GridView 可以灵活地适应各种需求,例如创建固定列数的网格,或者创建具有固定最大宽度的网格。
SliverGridDelegate 是一个抽象类,它有两个常用的子类:SliverGridDelegateWithFixedCrossAxisCount 和 SliverGridDelegateWithMaxCrossAxisExtent。
- SliverGridDelegateWithFixedCrossAxisCount 创建一个网格,其中交叉轴上有固定数量的格子。你可以指定交叉轴上的格子数量,以及格子之间的间距和宽高比。
- SliverGridDelegateWithMaxCrossAxisExtent 创建一个网格,其中交叉轴上的每个格子都有最大的宽度。你可以指定每个格子的最大宽度,以及格子之间的间距和宽高比。
在 GridView、GridView.builder 和 GridView.custom 构造函数中,你可以明确指定 gridDelegate。在其他构造函数中,gridDelegate 会自动创建。
8. childrenDelegate属性
/// 一个委托,为 [GridView] 提供子部件。////// [GridView.custom] 构造函数允许你明确指定这个委托。其他构造函数创建一个包装给定子部件列表的 [childrenDelegate]。final SliverChildDelegate childrenDelegate;
可以看到,childrenDelegate 属性类型为 SliverChildDelegate。这个属性是一个 委托(delegate),它决定了如何为 GridView 创建子部件。
SliverChildDelegate 是一个抽象类,它有两个常用的子类:SliverChildListDelegate 和 SliverChildBuilderDelegate。其中:
- SliverChildListDelegate 接收一个固定长度的子部件列表,然后按照列表顺序创建子部件。
- SliverChildBuilderDelegate 接收一个构建函数,然后按需创建子部件。这对于具有大量子部件的 GridView 非常有用,因为只有当子部件实际需要显示时,才会调用构建函数创建子部件。
在 GridView.custom 构造函数中,你可以明确指定 childrenDelegate。在其他构造函数中,childrenDelegate 会自动创建,通常是包装给定的子部件列表。
因此,childrenDelegate 属性的作用就是定义如何为 GridView 创建子部件。这使得 GridView 可以灵活地适应各种需求,例如创建固定数量的子部件,或者按需创建子部件。
9. buildChildLayout方法
buildChildLayout 负责构建 GridView 的子布局。
Widget buildChildLayout(BuildContext context) {return SliverGrid(delegate: childrenDelegate,gridDelegate: gridDelegate,);}
buildChildLayout 方法的作用就是根据 GridView 的属性来创建一个 SliverGrid 对象,这个 SliverGrid 对象定义了 GridView 的子布局。
这个方法接收一个 BuildContext 对象作为参数,然后返回一个 SliverGrid 对象。
SliverGrid 是一个可以在网格中显示其子项的滑动列表。它需要两个参数:delegate 和 gridDelegate:
delegate参数是一个 SliverChildDelegate 对象,它决定了如何创建和布局子项。在 GridView 中,这个参数的值是childrenDelegate属性。gridDelegate参数是一个 SliverGridDelegate 对象,它决定了网格的布局。在 GridView 中,这个参数的值是gridDelegate属性。
相关文章:

Flutter.源码分析.flutter/packages/flutter/lib/src/widgets/scroll_view.dart/GridView
Flutter.源码分析 GridView flutter/packages/flutter/lib/src/widgets/scroll_view.dart/GridView 李俊才 的个人博客:https://blog.csdn.net/qq_28550263 本文地址:https://blog.csdn.net/qq_28550263/article/details/134375048 本文提供 Flutter 框…...
IDEA 2022创建Spring Boot项目
首先点击New Project 接下来: (1). 我们点击Spring Initializr来创建。 (2). 填写项目名称 (3). 选择路径 (4). 选择JDK------这里笔者选用jdk17。 (5). java选择对应版本即可。 (6). 其余选项如无特殊需求保持默认即可。 然后点击Next。 稍等一会,…...
Python 框架学习 Django篇 (十) Redis 缓存
开发服务器系统的时候,程序的性能是至关重要的。经过我们前面框架的学习,得知一个请求的处理基本分为接受http请求、数据库处理、返回json数据,而这3个部分中就属链接数据库请求的响应速度最慢,因为数据库操作涉及到数据库服务处理…...

考研数学笔记:线性代数中抽象矩阵性质汇总
在考研线性代数这门课中,对抽象矩阵(矩阵 A A A 和矩阵 B B B 这样的矩阵)的考察几乎贯穿始终,涉及了很多性质、运算规律等内容,在这篇考研数学笔记中,我们汇总了几乎所有考研数学要用到的抽象矩阵的性质…...

C语言--假设共有鸡、兔30只,脚90只,求鸡、兔各有多少只
一.题目描述 假设共有鸡、兔30只,脚90只,求鸡、兔各有多少只? 二.思路分析 本题是一个典型的穷举法例题,而穷举法,最重要的就是条件判断。⭐⭐ 本题中的条件很容易发现: 假设鸡有x只,兔有y只…...
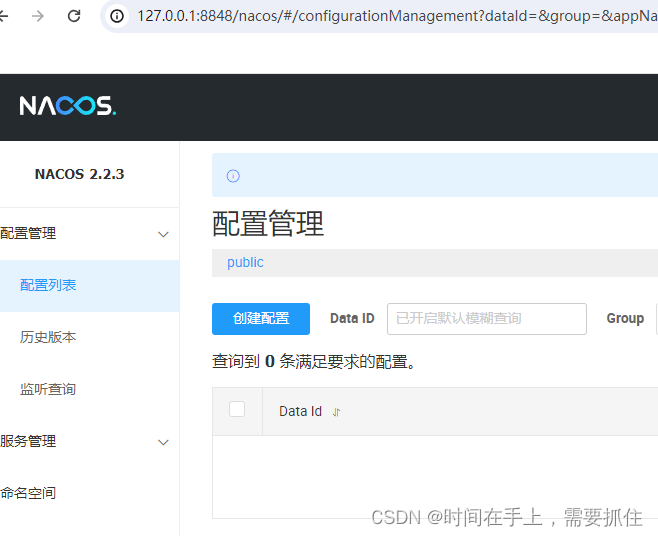
nacos适配达梦数据库
一、下载源码 源码我直接下载gitee上nacos2.2.3的,具体链接:https://gitee.com/mirrors/Nacos/tree/2.2.3,具体如下图: 二、集成达梦数据库驱动 解压源码包,用idea打开源码,等idea和maven编译完成ÿ…...
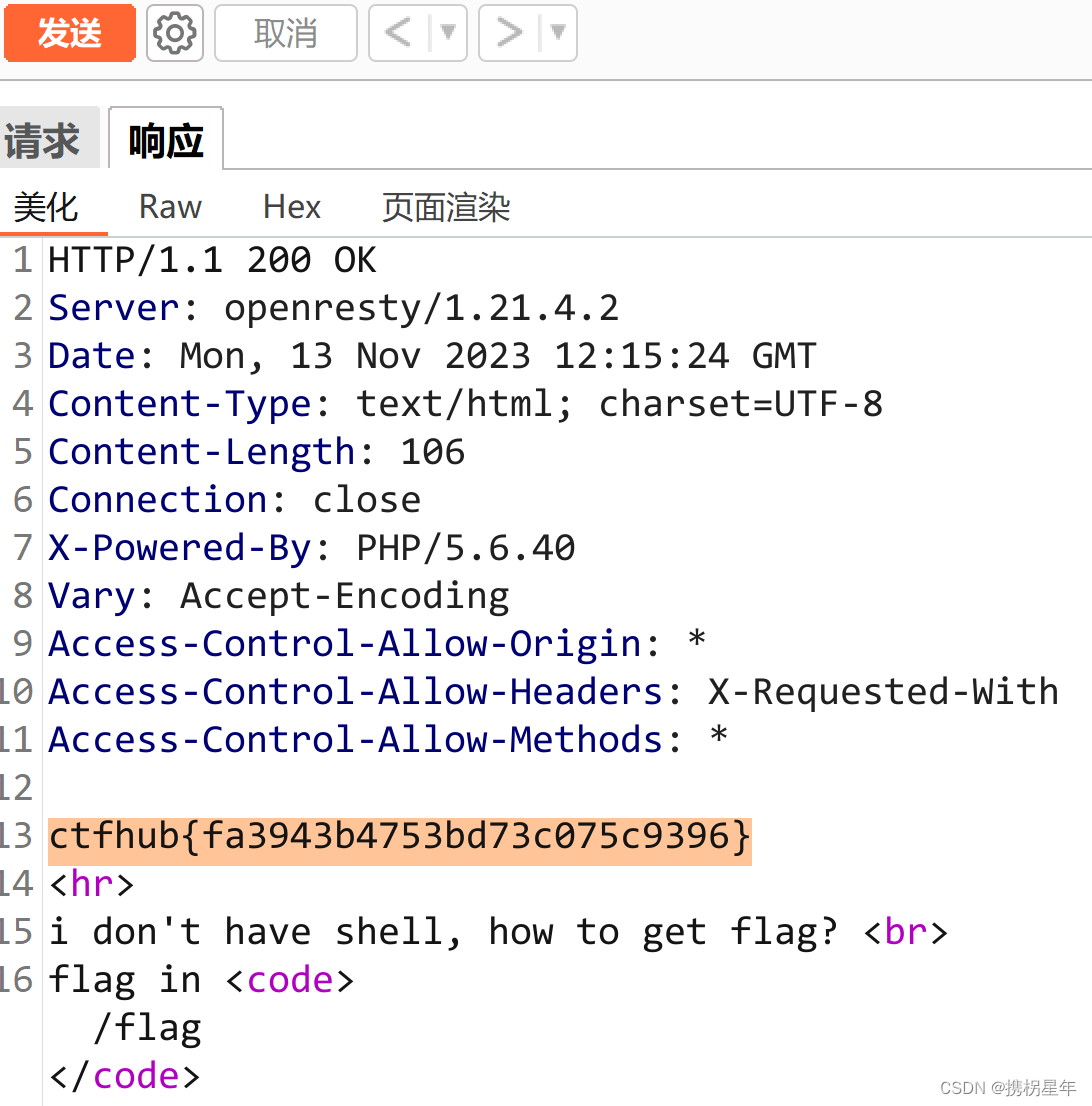
CTFhub-RCE-读取源代码
源代码: <?php error_reporting(E_ALL); if (isset($_GET[file])) { if ( substr($_GET["file"], 0, 6) "php://" ) { include($_GET["file"]); } else { echo "Hacker!!!"; } } else {…...
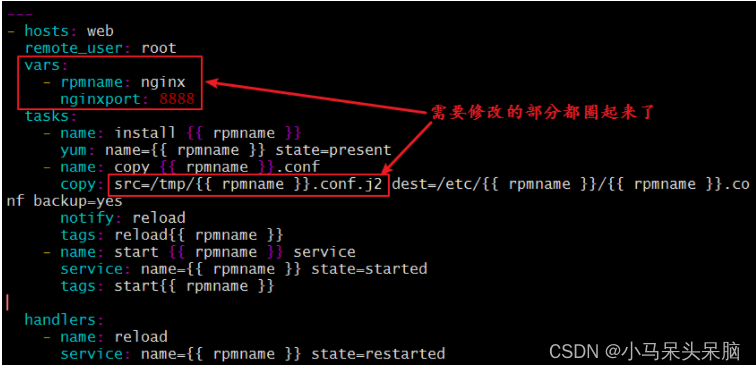
Ansible playbook详解
playbook是ansible用于配置,部署,和被管理被控节点的剧本 playbook常用的YMAL格式:(文件名称以 .yml结尾) 1、文件的第一行应该以 "---" (三个连字符)开始,表明YMAL文件的开始。 2、在同一…...

Linux编辑器:vim的简单介绍及使用
目录 1.什么是vim 2.vim的基本概念 3.vim 的基本操作 4. 各模式下的命令集 4.1 正常模式命令集 4.2 末行模式命令集 5.补充 5.1 vim支持多文件编辑 5.2 vim 的配置 1.vim 配置原理 2. 常用简单配置选项: 3. 使用插件 1.什么是vim Vim 是从 vi 发展出…...
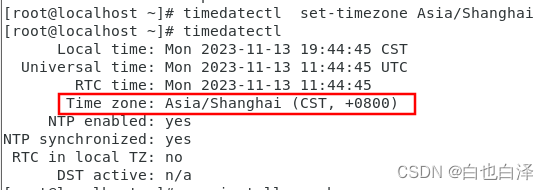
Redhat7查看时区、修改时区
问题: 安装好redhat7之后,发现时间和物理机上面的网络时间不一致,于是查看本着修改时间的目的,却发现原来是时区的问题。 解决步骤: 查看时区状态信息 timedatectl修改时区到亚洲/上海 timedatectl set-timezone A…...

OpenCV踩坑笔记使用笔记入门笔记整合SpringBoot笔记大全
springboot开启摄像头抓拍照片并上传实现&问题记录 NotAllowedErrot: 请求的媒体源不能使用,以下情况会返回该错误: 当前页面内容不安全,没有使用HTTPS没有通过用户授权NotFoundError: 没有找到指定的媒体通道NoReadableError: 访问硬件设备出错Ov…...
)
【数据结构】栈和队列的模拟实现(两个方式实现)
前言 💓作者简介: 加油,旭杏,目前大二,正在学习C,数据结构等👀 💓作者主页:加油,旭杏的主页👀 ⏩本文收录在:再识C进阶的专栏…...

OpenCV+相机校准和3D重建
相机校准至少需要10个测试图案,所需的重要输入数据是3D现实世界点集以及图像中这些点的相应2D坐标。3D点称为对象点,而2D图像点称为图像点。 准备工作 除了棋盘,我们还可以使用圆形网格。 在这种情况下,我们必须使用函数cv.find…...
2023.11.14-hive之表操作练习和文件导入练习
目录 需求1.数据库基本操作 需求2. 默认分隔符案例 需求1.数据库基本操作 -- 1.创建数据库test_sql,cs1,cs2,cs3 create database test_sql; create database cs1; create database cs2; create database cs3; -- 2.1删除数据库cs2 drop database cs2; -- 2.2在cs3库中创建…...
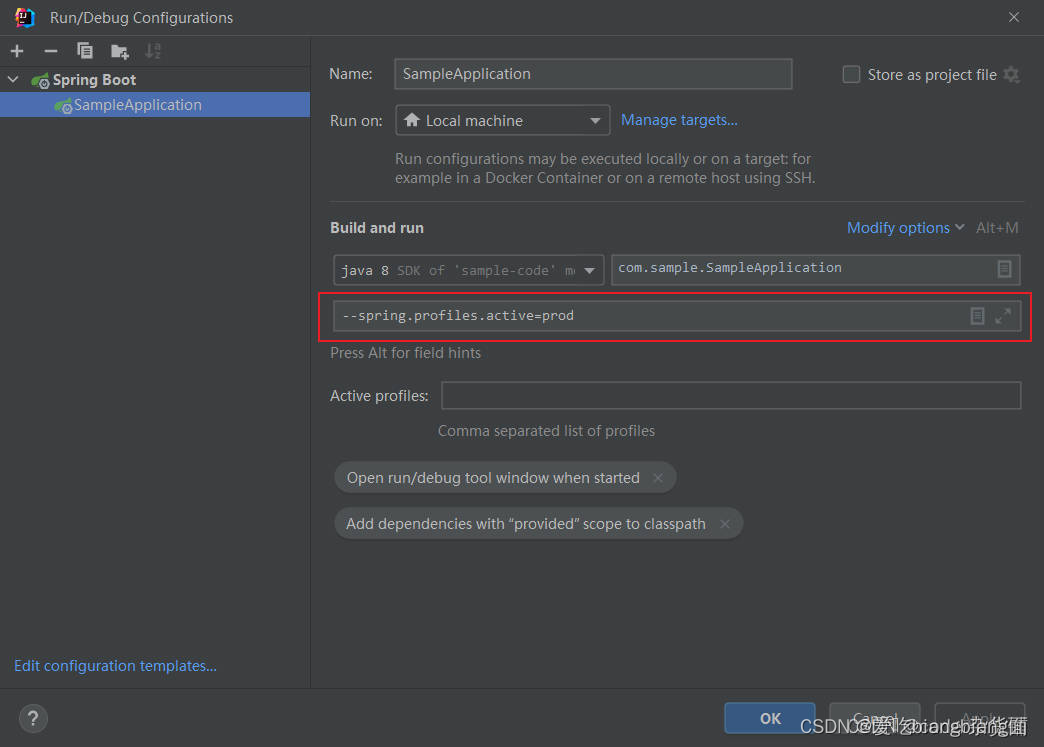
idea2023启动springboot项目如何指定配置文件
方法一: 方法二: 举例:...
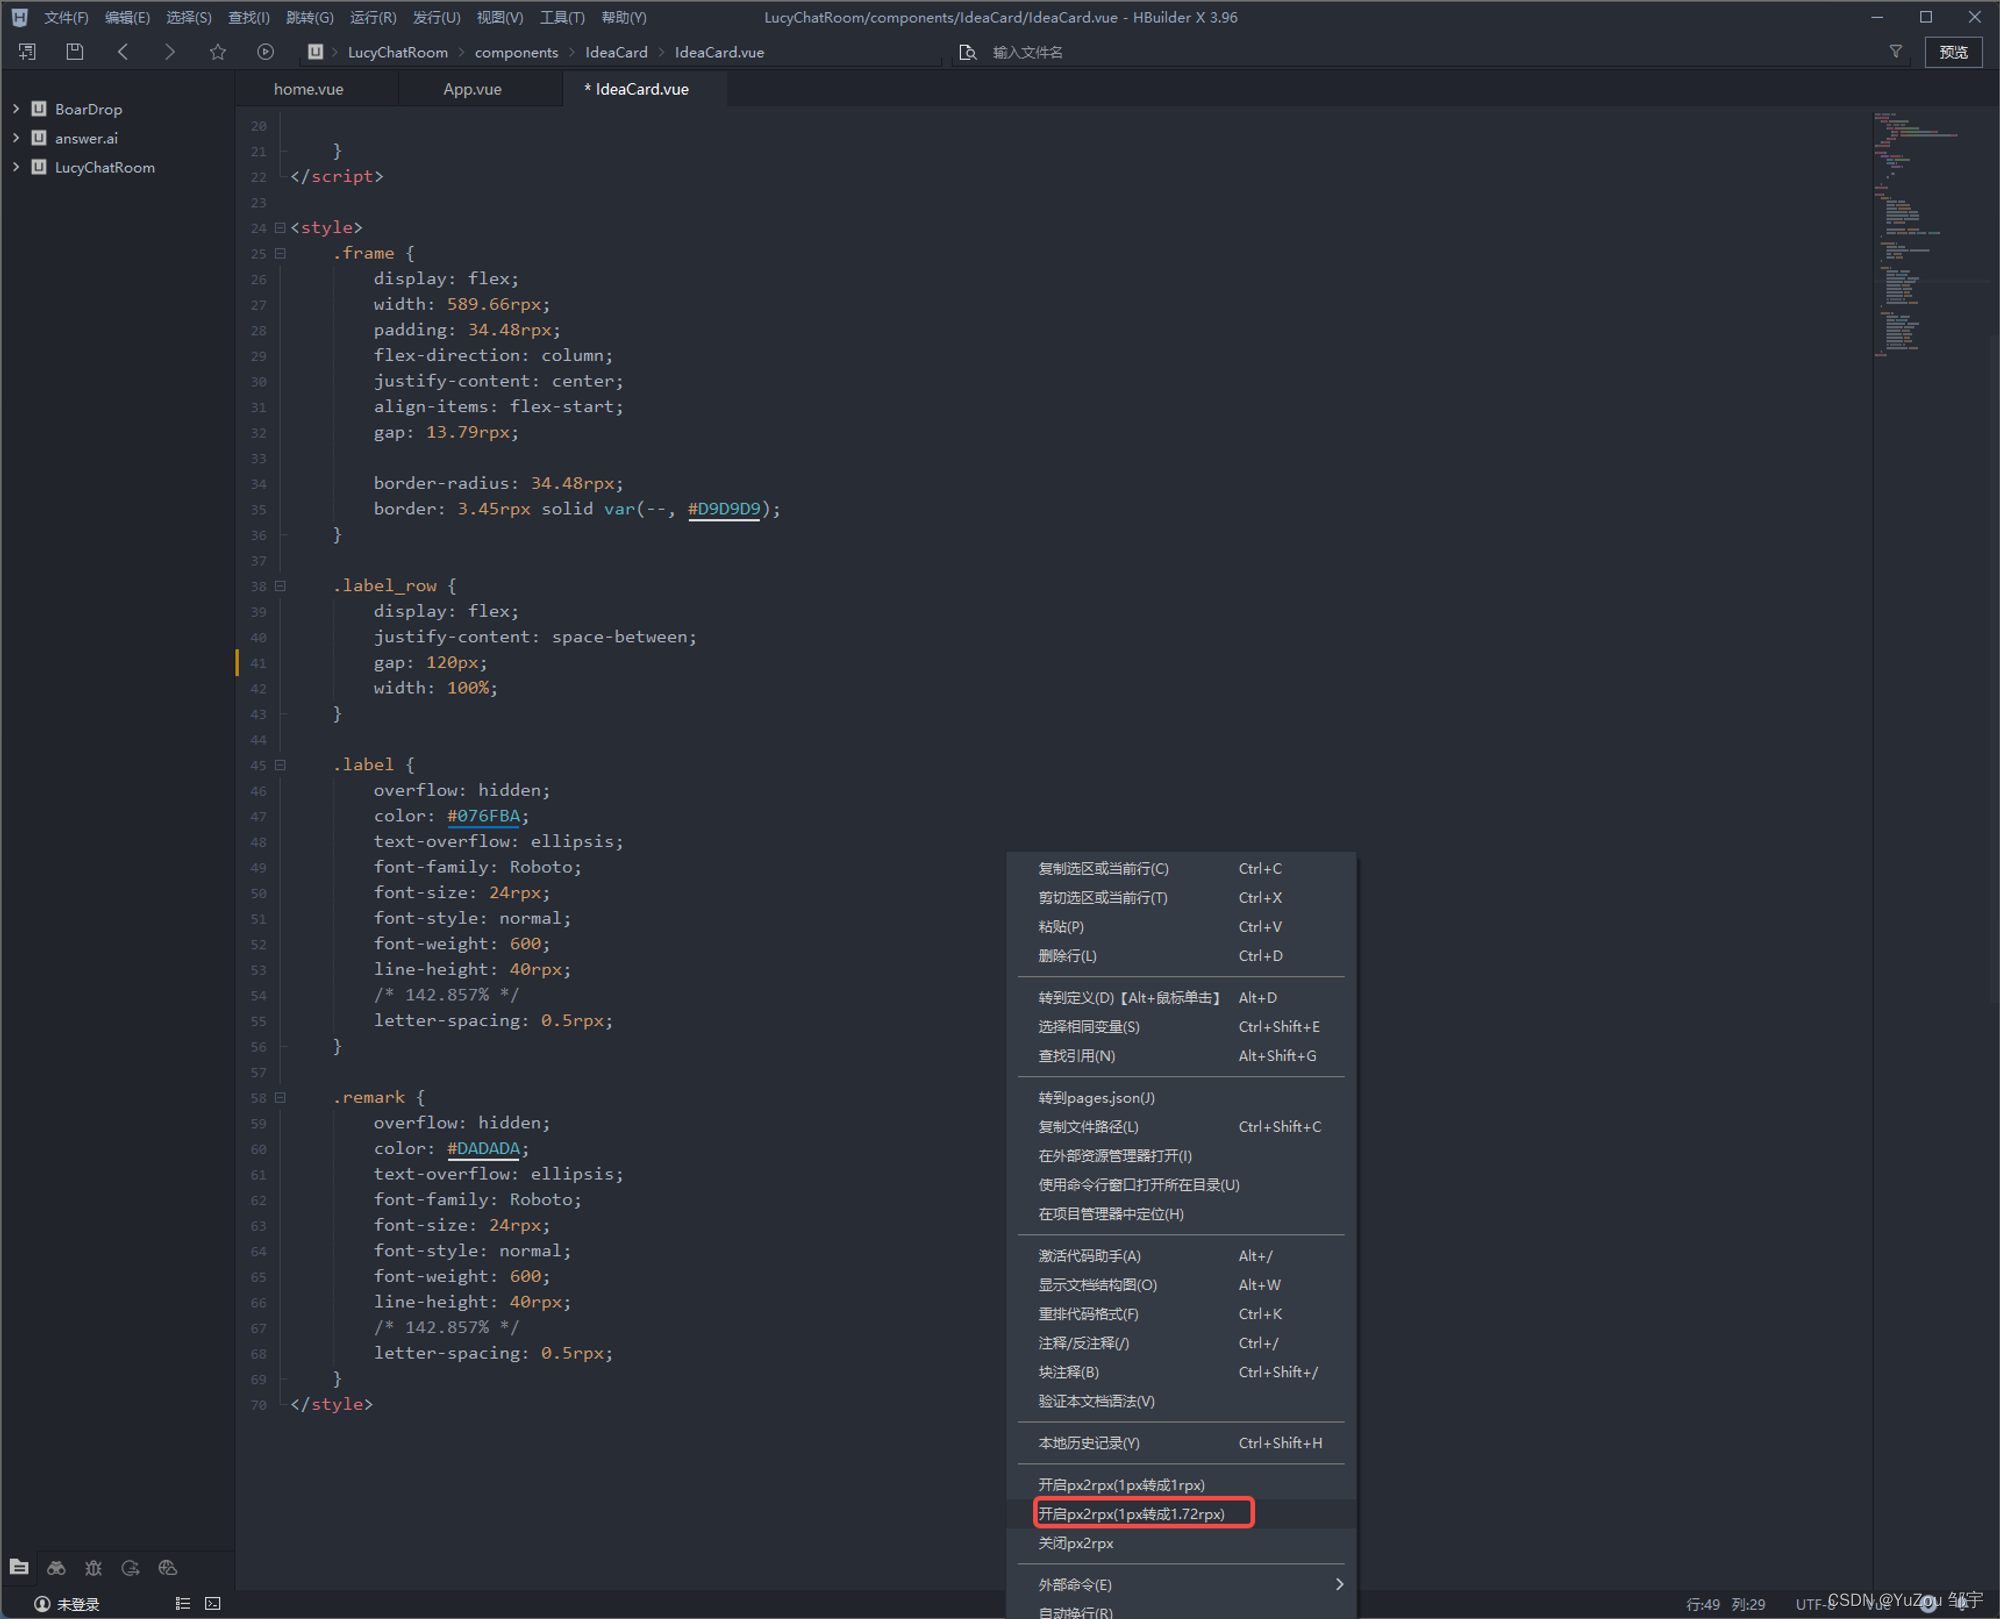
在 uniapp 中 一键转换单位 (px 转 rpx)
在 uniapp 中 一键转换单位 px 转 rpx Uni-app 官方转换位置利用【px2rpx】插件Ctrl S一键全部转换下载插件修改插件 Uni-app 官方转换位置 首先在App.vue中输入这个: uni.getSystemInfo({success(res) {console.log("屏幕宽度", res.screenWidth) //屏…...

SQL对数据进行去重
工作中使用SQL对数据进行处理计算时可能会遇到这样的问题;读取的表数据会有重复,或者我们关注的几个字段的数据会有重复,直接使用原表数据会引起计算结果不准或者做表连接时产生笛卡尔积。 本文记录使用SQL进行数据去重的几种算法。 distinc…...
登录注册代码模板(Vue3+SpringBoot)[邮箱发送验证码(HTML)、RSA 加密解密(支持长文本)、黑暗与亮色主题切换、AOP信息校验]
文章归档:https://www.yuque.com/u27599042/coding_star/cx5ptule64utcr9e 仓库地址 https://gitee.com/tongchaowei/login-register-template 网页效果展示 相关说明 在该代码模板中,实现了如下功能: 邮箱发送验证码(邮件内容…...

【计算机网络】VRRP协议理论和配置
目录 1、VRRP虚拟路由器冗余协议 1.1、协议作用 1.2、名词解释 1.3、简介 1.4、工作原理 1.5、应用实例 2、 VRRP配置 2.1、配置命令 2.2、拓扑与配置: 1、VRRP虚拟路由器冗余协议 1.1、协议作用 虚拟路由冗余协议(Virtual Router Redundancy Protocol&am…...

ubuntu操作系统的docker更换存储目录
前言 要将Docker的存储目录更改为/home/docker,你需要进行以下步骤: 目录 前言1、停止Docker服务2、创建新的存储目录3、编辑Docker配置文件4、启动Docker服务5、验证更改 1、停止Docker服务 首先停止Docker守护进程,可以使用以下命令&…...

Stitches项目架构分析:RequireJS模块化设计与Grunt构建流程完全指南 [特殊字符]
Stitches项目架构分析:RequireJS模块化设计与Grunt构建流程完全指南 🚀 【免费下载链接】stitches HTML5 Sprite Sheet Generator 项目地址: https://gitcode.com/gh_mirrors/sti/stitches Stitches是一个基于HTML5的雪碧图生成器,它采…...

混合求解器:用神经网络增强传统微分方程数值方法
1. 项目概述:当数值方法遇到机器学习在科学计算和工程仿真领域,求解常微分方程(ODE)和偏微分方程(PDE)是绕不开的核心任务。无论是模拟电路中的电流变化、预测天气系统的演变,还是分析机械结构的…...

BetterJoy完整配置指南:5分钟让Switch手柄在PC上完美运行
BetterJoy完整配置指南:5分钟让Switch手柄在PC上完美运行 【免费下载链接】BetterJoy Allows the Nintendo Switch Pro Controller, Joycons and SNES controller to be used with CEMU, Citra, Dolphin, Yuzu and as generic XInput 项目地址: https://gitcode.c…...
:数组排序、去重、查找)
数组专项(一):数组排序、去重、查找
大家好,欢迎来到《算法面试60讲(2026最新版全真题带解析)》第19篇!上一篇我们彻底吃透了字符串专项的核心难点——BF暴力匹配与KMP高效匹配算法,搞定了字符串模块面试最难的算法考点。从本节课开始,我们正式进入算法面试第一高频模块:数组专项。 在算法面试中,数组是出…...

照着用就行:2026 最新降AIGC软件测评与推荐
2026年真正好用的AI论文降重与改写工具,核心看降重效果、去AI味、格式保留、学术适配四大指标。综合实测,千笔AI、ThouPen、豆包、DeepSeek、Grammarly 是当前最值得推荐的梯队,覆盖从免费到付费、从中文到英文、从文科到理工的全场景需求。 …...

为你的Hermes Agent自定义Provider,接入Taotoken多模型池
🚀 告别海外账号与网络限制!稳定直连全球优质大模型,限时半价接入中。 👉 点击领取海量免费额度 为你的Hermes Agent自定义Provider,接入Taotoken多模型池 在构建复杂的AI应用时,开发者常常面临一个核心挑…...
)
Unity/Unreal开发者必看:用手机和陀螺仪实验,5分钟搞懂万向节死锁(附避坑指南)
Unity/Unreal开发者实战指南:用手机陀螺仪5分钟破解万向节死锁当你调试第一人称视角时,角色突然卡在墙面无法转动;当无人机模型在俯冲90度时失控乱转——这些很可能都是万向节死锁(Gimbal Lock)在作祟。作为实时3D开发中最恼人的数学陷阱之一…...

NanaZip:现代Windows文件压缩问题的终极解决方案
NanaZip:现代Windows文件压缩问题的终极解决方案 【免费下载链接】NanaZip The 7-Zip derivative intended for the modern Windows experience 项目地址: https://gitcode.com/gh_mirrors/na/NanaZip 还在为Windows文件压缩工具界面老旧、功能单一而烦恼吗&…...

基于TESS光变曲线与深度学习的O型星物理参数预测研究
1. 项目概述与核心挑战在恒星天体物理研究中,大质量O型星扮演着至关重要的角色。它们不仅是宇宙中光度最高的天体之一,其强烈的辐射、恒星风和最终的超新星爆发,更是驱动星系化学演化和能量注入星际介质的关键引擎。然而,深入理解…...

DeepSeek模型微调全链路解析:从数据准备、LoRA配置到推理部署的7大关键步骤
更多请点击: https://intelliparadigm.com 第一章:DeepSeek模型微调全链路概览 DeepSeek系列大语言模型(如DeepSeek-V2、DeepSeek-Coder)凭借其开源特性、高性能推理能力与丰富的领域适配性,已成为工业界与学术界微调…...