jetson配置笔记
typora-root-url: /home/msj/ubuntu笔记本台式机环境配置说明/images
Ubuntu18.04 配置
说明:我们所有文档配置都是按照ubuntu18.04,保证x86架构(笔记本台式机)和 ARM架构(jetson Nano只能安装18.04)的一致性
1. 更换各类源
我们所有源都更换清华源, 如有问题请参考官网
1.1 ubuntu
Ubuntu 的软件源配置文件是 /etc/apt/sources.list。将系统自带的该文件做个备份,将该文件替换为清华源,即可使用选择的软件源镜像。
# 备份
sudo cp /etc/apt/sources.list /etc/apt/sources.list.backup#打开文件,内容更换成下面内容并保存
sudo gedit /etc/apt/sources.list
# 默认注释了源码镜像以提高 apt update 速度,如有需要可自行取消注释
deb https://mirrors.tuna.tsinghua.edu.cn/ubuntu-ports/ bionic main restricted universe multiverse
# deb-src https://mirrors.tuna.tsinghua.edu.cn/ubuntu-ports/ bionic main restricted universe multiverse
deb https://mirrors.tuna.tsinghua.edu.cn/ubuntu-ports/ bionic-updates main restricted universe multiverse
# deb-src https://mirrors.tuna.tsinghua.edu.cn/ubuntu-ports/ bionic-updates main restricted universe multiverse
deb https://mirrors.tuna.tsinghua.edu.cn/ubuntu-ports/ bionic-backports main restricted universe multiverse
# deb-src https://mirrors.tuna.tsinghua.edu.cn/ubuntu-ports/ bionic-backports main restricted universe multiverse# deb https://mirrors.tuna.tsinghua.edu.cn/ubuntu-ports/ bionic-security main restricted universe multiverse
# # deb-src https://mirrors.tuna.tsinghua.edu.cn/ubuntu-ports/ bionic-security main restricted universe multiversedeb http://ports.ubuntu.com/ubuntu-ports/ bionic-security main restricted universe multiverse
# deb-src http://ports.ubuntu.com/ubuntu-ports/ bionic-security main restricted universe multiverse# 预发布软件源,不建议启用
# deb https://mirrors.tuna.tsinghua.edu.cn/ubuntu-ports/ bionic-proposed main restricted universe multiverse
# # deb-src https://mirrors.tuna.tsinghua.edu.cn/ubuntu-ports/ bionic-proposed main restricted universe multiverse
2.安装ROS-Melodic
- 设置清华源的source.list
sudo sh -c '. /etc/lsb-release && echo "deb http://mirrors.tuna.tsinghua.edu.cn/ros/ubuntu/ `lsb_release -cs` main" > /etc/apt/sources.list.d/ros-latest.list'
- 设置GPG Key,并更新
sudo apt-key adv --keyserver 'hkp://keyserver.ubuntu.com:80' --recv-key C1CF6E31E6BADE8868B172B4F42ED6FBAB17C654
sudo apt update
- 安装桌面完整版
sudo apt install ros-melodic-desktop-full
如果安装额外的其他包,用下面命令
sudo apt install ros-melodic-PACKAGE_NAME
- 设置环境变量,令每个终端窗口都可以启动ros
echo "source /opt/ros/melodic/setup.bash" >> ~/.bashrc
source ~/.bashrc
- 安装依赖
sudo apt install python-rosdep python-rosinstall python-rosinstall-generator python-wstool build-essential
- 初始化rosdep
sudo rosdep init
Bug1 - 会出现错误:这个错误是因为网络无法连接,无法下载20-default.list文件
ERROR: cannot download default sources list from:
https://raw.githubusercontent.com/ros/rosdistro/master/rosdep/sources.list.d/20-default.list
Website may be down.
Solution1 - 我们参考清华源处理方法,也有其他更改下载链接方法,请自行百度。
# 手动模拟 rosdep init
sudo mkdir -p /etc/ros/rosdep/sources.list.d/
sudo curl -o /etc/ros/rosdep/sources.list.d/20-default.list https://mirrors.tuna.tsinghua.edu.cn/github-raw/ros/rosdistro/master/rosdep/sources.list.d/20-default.list
# 为 rosdep update 换源
export ROSDISTRO_INDEX_URL=https://mirrors.tuna.tsinghua.edu.cn/rosdistro/index-v4.yaml
rosdep update# 每次 rosdep update 之前,均需要增加该环境变量
# 为了持久化该设定,可以将其写入 .bashrc 中,例如
echo 'export ROSDISTRO_INDEX_URL=https://mirrors.tuna.tsinghua.edu.cn/rosdistro/index-v4.yaml' >> ~/.bashrc
#更新
rosdep update
出现以下输出:
reading in sources list data from /etc/ros/rosdep/sources.list.d
Hit https://mirrors.tuna.tsinghua.edu.cn/github-raw/ros/rosdistro/master/rosdep/osx-homebrew.yaml
Hit https://mirrors.tuna.tsinghua.edu.cn/github-raw/ros/rosdistro/master/rosdep/base.yaml
Hit https://mirrors.tuna.tsinghua.edu.cn/github-raw/ros/rosdistro/master/rosdep/python.yaml
Hit https://mirrors.tuna.tsinghua.edu.cn/github-raw/ros/rosdistro/master/rosdep/ruby.yaml
Query rosdistro index https://mirrors.tuna.tsinghua.edu.cn/rosdistro/index-v4.yaml
Skip end-of-life distro "ardent"
Skip end-of-life distro "bouncy"
Skip end-of-life distro "crystal"
Skip end-of-life distro "dashing"
Skip end-of-life distro "eloquent"
Skip end-of-life distro "foxy"
Skip end-of-life distro "galactic"
Skip end-of-life distro "groovy"
Add distro "humble"
Skip end-of-life distro "hydro"
Skip end-of-life distro "indigo"
Add distro "iron"
Skip end-of-life distro "jade"
Skip end-of-life distro "kinetic"
Skip end-of-life distro "lunar"
Skip end-of-life distro "melodic"
Add distro "noetic"
Add distro "rolling"
updated cache in /home/msj/.ros/rosdep/sources.cache
- 测试是否安装成功,打开roscore
roscore
出现以下输出,显示ros证明安装成功.

3. 安装cartographer-ros
介绍
cartographer_ros的安装、编译、与运行
软件架构
cartographer_install:cartographer的依赖安装包、源码安装包、安装脚本
cartographer_ros_ws/src/cartographer:cartographer的源码(如果之后需要修改carto的算法,需要在这里修改)
cartographer_ros_ws/src/cartographer_ros:cartographer的ros接口
安装
-
如果之前安装过这些库,删除系统中之前安装过的相关依赖库。
cd /usr/local/include sudo rm -rf absl sudo rm -rf ceres sudo rm -rf cartographer cd google sudo rm -rf protobuf -
卸载ros自带的proto2
sudo apt-get remove libprotobuf-dev -
安装一些系统依赖
sudo apt-get install \clang \cmake \g++ \git \google-mock \libboost-all-dev \libcairo2-dev \libcurl4-openssl-dev \libeigen3-dev \libgflags-dev \libgoogle-glog-dev \liblua5.2-dev \libsuitesparse-dev \lsb-release \ninja-build \stow \python-wstool \python-rosdep \python-sphinx \libatlas-base-dev -
安装cartographer_install中的依赖库
- 如果之前安装过,需要事先删除依赖库中的build文件夹.
- 最好不要使用脚本安装,最好手动安装,以看出每一步安装的具体报错.
cd cartographer_install# Build and install abseil-cpp
set -o errexit
set -o verbosecd abseil-cpp
git checkout d902eb869bcfacc1bad14933ed9af4bed006d481
mkdir build
cd build
cmake -G Ninja \-DCMAKE_BUILD_TYPE=Release \-DCMAKE_POSITION_INDEPENDENT_CODE=ON \-DCMAKE_INSTALL_PREFIX=/usr/local/stow/absl \..
ninja
sudo ninja install
cd /usr/local/stow
sudo stow absl# Build and install Ceres. 注意使用ninja编译可能失败 因为板子性能限制
cd -
cd ../../ceres-solver
mkdir build
cd build
cmake .. -G Ninja -DCXX11=ON
ninja
#CTEST_OUTPUT_ON_FAILURE=1 ninja test
sudo ninja install# 如果ninja编译卡死则用cmake编译, 如果上述步骤通过,忽略此步骤
cd ..
rm -rf build
mkdir build
cd build
cmake ..
make
sudo make install# Build and install proto3.
cd ../../protobuf
mkdir build
cd build
cmake -G Ninja \-DCMAKE_POSITION_INDEPENDENT_CODE=ON \-DCMAKE_BUILD_TYPE=Release \-Dprotobuf_BUILD_TESTS=OFF \../cmake
装arm的:
cd …
把autogen.sh文件的属性改成可执行文件
./autogen.sh
./configure --host=arm-linux --with-protoc=protoc
make
sudo make install
ninja
sudo ninja install
Build and install Cartographer.
cd …/…/cartographer
mkdir build
cd build
cmake … -G Ninja
ninja
#CTEST_OUTPUT_ON_FAILURE=1 ninja test
sudo ninja install
#### 编译建立工作空间,并将我们准备的src(包含多个功能包的文件夹)拷贝到工作空间下(以后只需要修改cartographer_ros,即.launch和.lua文件)```shell
# 创建工作空间
mkdir ~/msj_ws# 将我们src拷贝到工作空间下
cp YOUR_PATH/src ~/msj_wscatkin_make
https://google-cartographer-ros.readthedocs.io/en/latest/demos.html
相关文章:
jetson配置笔记
typora-root-url: /home/msj/ubuntu笔记本台式机环境配置说明/images Ubuntu18.04 配置 说明:我们所有文档配置都是按照ubuntu18.04,保证x86架构(笔记本台式机)和 ARM架构(jetson Nano只能安装18.04)的一致性 1. 更换各类源 我们所有源都更换清华源&a…...
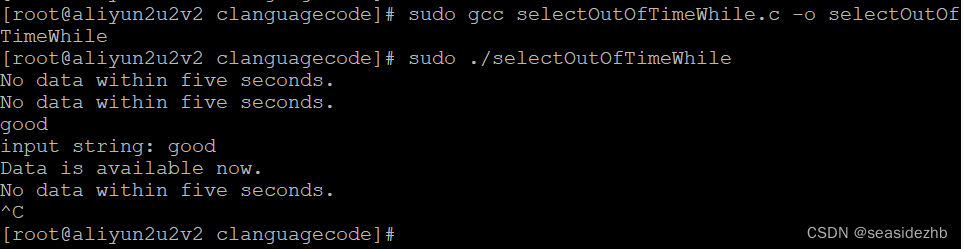
使用select实现定时任务
selectOutOfTime.c里边的代码如下: #include<stdio.h> #include<sys/time.h> #include<sys/types.h> #include<unistd.h> #include <string.h>#define BUF_SIZE 100int main(void){fd_set reads;struct timeval tv;int errorNum;cha…...

uniapp的实战总结大全
🙂博主:冰海恋雨 🙂文章核心:uniapp部分总结 目录 编辑 目录 前言: 解决方案 1. 跨平台开发 2. Vue.js生态 3. 组件库 4. 自定义组件 5. Native能力 6. 插件生态 7. 性能优化 写法 1. 模板…...
No205.精选前端面试题,享受每天的挑战和学习
🤍 前端开发工程师(主业)、技术博主(副业)、已过CET6 🍨 阿珊和她的猫_CSDN个人主页 🕠 牛客高级专题作者、在牛客打造高质量专栏《前端面试必备》 🍚 蓝桥云课签约作者、已在蓝桥云课上架的前后端实战课程《Vue.js 和 Egg.js 开发企业级健康管理项目》、《带你从入…...

保序回归:拯救你的校准曲线(APP)
保序回归:拯救你的校准曲线(APP) 校准曲线之所以是评价模型效能的重要指标是因为,校准曲线衡量模型预测概率与实际发生概率之间的一致性,它可以帮助我们了解模型的预测结果是否可信。一个理想的模型应该能够准确地预测…...

清华镜像源地址,适用于pip下载速度过慢从而导致下载失败的问题
清华地址 https://pypi.tuna.tsinghua.edu.cn/simple下载各种各样的包的指令模板 pip install XXX -i https://pypi.tuna.tsinghua.edu.cn/simple这样就行了,XXX代表的是你将要下载的包名称。 比如: pip install opencv-python -i https://pypi.tuna.…...

arcgis--NoData数据处理
方法一:利用【栅格计算器】可以对NoData的值进行修改。【Spatial Analyst工具】-【地图代数】-【栅格计算器】,将NoData修改为某一个值。 方法二:先对原始数据进行重分类,分成1类,将NoData赋值为2,。然后,将…...

基于单片机教室人数实时检测系统仿真及源程序
一、系统方案 1、本设计采用51单片机作为主控器。 2、红外传感器检测进出人数,液晶1602显示。 3、按键最多容纳人数,烟雾报警。 二、硬件设计 原理图如下: 三、单片机软件设计 1、首先是系统初始化 void lcd_init() { lcd_write_com(0x38…...
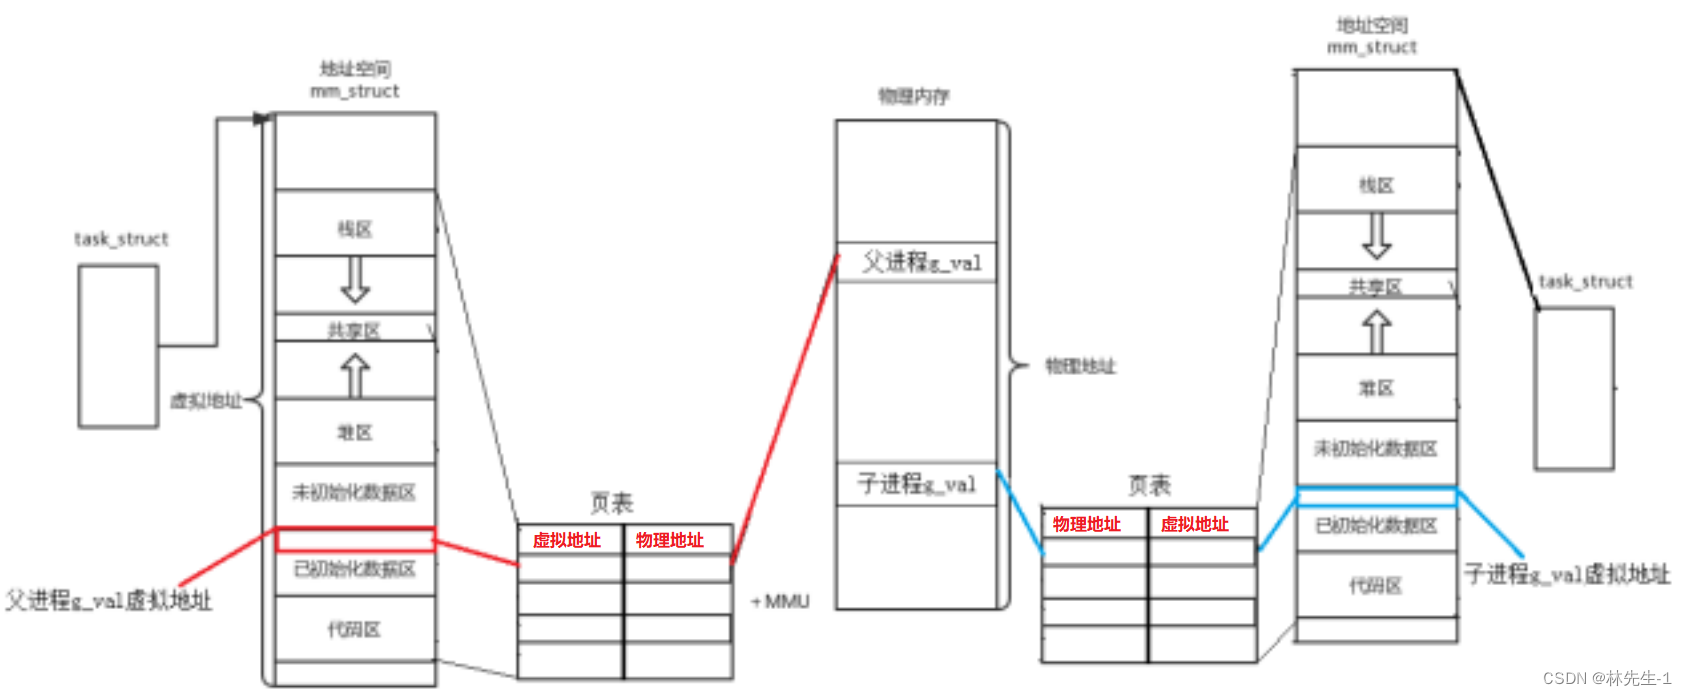
【Linux笔记】Linux环境变量与地址空间
【Linux笔记】Linux环境变量与地址空间 一、命令行参数1.1、main函数的参数1.2、main函数的第三个参数 二、环境变量的概念与内容2.1、环境变量的概念2.2、环境变量的分类2.3、环境变量的组织形式2.4、常见的环境变量 三、设置环境变量3.1、通过命令获取或设置环境变量3.2、通过…...

【springboot】@restcontroller和@controller的区别
返回值不同:RestController注解的类中的所有方法都会返回JSON或XML等数据格式,而Controller注解的类中的方法可以返回JSP或HTML等视图页面。 默认注解不同:RestController注解中包含了ResponseBody注解,表示返回的数据会直接作为…...

oracle 不支持的字符集 orai18n.jar ZHS16GBK 异常问题解决
项目场景: 项目中有使用到oracle数据库来存在数据。 问题描述 在使用查询语句是,oracle会报错。 java.sql.SQLException: 不支持的字符集 (在类路径中添加 orai18n.jar): ZHS16GBK 原因分析: 经排查发现缺少oracle字符集的依赖包导致的。…...

设计模式-04-原型模式
经典的设计模式有23种,但是常用的设计模式一般情况下不会到一半,我们就针对一些常用的设计模式进行一些详细的讲解和分析,方便大家更加容易理解和使用设计模式。 1-什么是原型模式 如果对象的创建成本比较大,而同一个类的不同对象…...
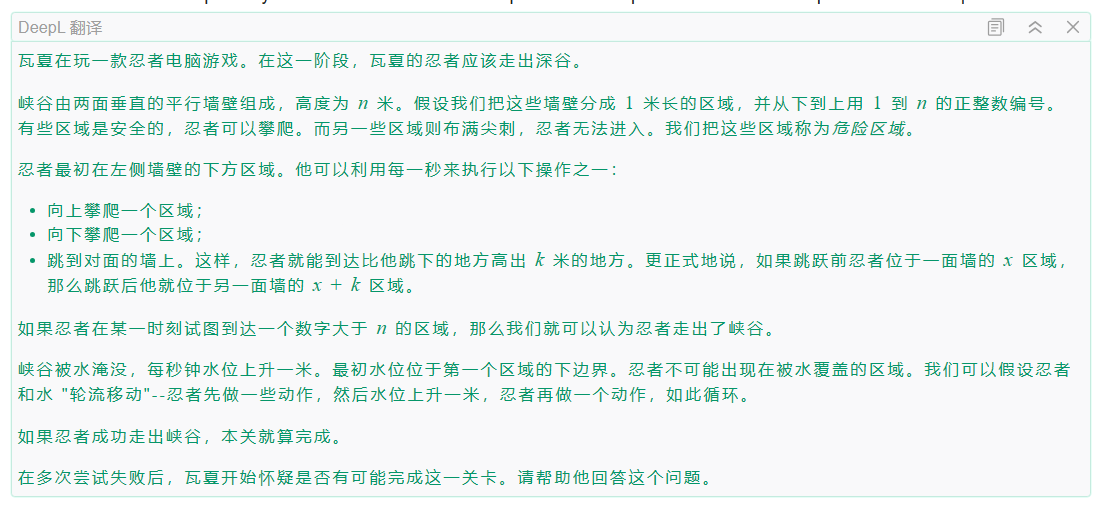
D. Jumping on Walls bfs
Problem - 199D - Codeforces 题目大意:有一个两个垂直的平行墙壁组成的一个峡谷。一个人初始是在左边墙壁第一层。在每个墙壁上有些障碍点,用X表示,这些障碍点不能被到达。,他可以执行以下三个操作: 向当前墙壁往上…...
)
preg_replace调用system(“ls“)
题目 <?php error_reporting(0); if(isset($_GET[code]) && isset($_POST[pattern])) {$pattern$_POST[pattern];if(!preg_match("/flag|system|pass|cat|chr|ls|[0-9]|tac|nl|od|ini_set|eval|exec|dir|\.|\|read*|show|file|\<|popen|pcntl|var_dump|pr…...

MT8788核心板主要参数介绍_联发科MTK安卓核心板智能模块
MT8788核心板是一款功能强大的4G全网通安卓智能模块,具有超高性能和低功耗特点。该模块采用联发科AIOT芯片平台。 MT8788核心板搭载了12nm制程的四个Cortex-A73和四个Cortex-A53处理器,最高主频可达2.0GHZ。它还配备了4GB64GB(2GB16GB、3GB32GB)的内存&a…...

Matlab批量提取图片特征向量
最近matlab数字图像处理课程需要,对上千张训练集测试集图片进行批量的特征提取,作为 SVM的输入。 所以就有了用matlab来批量提取图像特征向量,并保存,方便后续使用。 批量提取函数: % 函数返回参数% 分类列向量Categ…...

数据库系统原理与实践 笔记 #8
文章目录 数据库系统原理与实践 笔记 #8关系数据库设计(续)规范化(Normalization)范式(Normal Form)第一范式第二范式Boyce-Codd范式(BCNF)将模式分解成BCNFBCNF和保持依赖第三范式 函数依赖理论正则覆盖无关属性无关属性的验证无损分解保持依赖 数据库系统原理与实践 笔记 #8 …...

Ubuntu 和 Windows 文件互传
FTP 服务 FTP 采用 Internet 标准文件传输协议 FTP 的用户界面, 向用户提供了一组用来管理计算机之间文件传输的应用程序。在开发的过程中会频繁的在 Windows 和 Ubuntu 下进行文件传输,比如在 Windwos 下进行代码编写,然后将编写好的代码拿到…...

如何在WPF应用程序中全局捕获异常
在WPF (Windows Presentation Foundation) 应用程序中,你可以使用 AppDomain.CurrentDomain.UnhandledException 事件来全局捕获未处理的异常。这个事件会在应用程序中的任何地方发生未处理的异常时触发。以下是一个简单的例子,演示如何在WPF应用程序中全…...
自定义Matplotlib中的颜色映射(cmap)
要自定义Matplotlib中的颜色映射(cmap),您可以按照以下步骤进行操作: 导入所需的库: import numpy as np import matplotlib.pyplot as plt from matplotlib.colors import LinearSegmentedColormap创建自定义颜色映…...
)
Goframe项目实战:从数据库表到API接口的全链路开发指南(含避坑点)
Goframe项目实战:从数据库表到API接口的全链路开发指南(含避坑点)在当今微服务架构盛行的时代,Go语言因其高性能和并发优势成为后端开发的热门选择。而Goframe作为一款企业级的Go应用开发框架,提供了从数据库操作到API…...

③ AI副业第一步:如何找到适合自己的AI赚钱赛道
③ AI副业第一步:如何找到适合自己的AI赚钱赛道选对赛道,努力才有意义。选错赛道,越努力离钱越远。前言:为什么大多数人AI副业做不起来? 我观察了100想做AI副业的人,失败的原因高度一致: 失败路…...

用STM32CubeMX和HAL库快速上手WS2812B:告别手动计算延时,一键生成驱动框架
基于STM32CubeMX的WS2812B智能灯光控制:从零构建现代化驱动方案在智能硬件和物联网设备快速发展的今天,WS2812B可编程LED灯带因其丰富的色彩表现和简单的单线控制方式,成为创客和工程师们最喜爱的显示组件之一。然而,传统的寄存器…...

SMUDebugTool终极指南:如何深度掌控AMD Ryzen处理器的隐藏性能
SMUDebugTool终极指南:如何深度掌控AMD Ryzen处理器的隐藏性能 【免费下载链接】SMUDebugTool A dedicated tool to help write/read various parameters of Ryzen-based systems, such as manual overclock, SMU, PCI, CPUID, MSR and Power Table. 项目地址: ht…...

CPU架构启发的智能仓储布局优化实践
1. 仓库布局优化的核心挑战与创新机遇在物流仓储领域,拣货环节通常占据运营成本的55%-65%,而其中约50%的时间消耗在无效行走路径上。传统矩形仓库布局虽然易于规划和施工,但其正交的通道设计导致拣货员需要频繁进行90度转向,这种&…...

基于EMA与轻量级机器学习的Wi-Fi链路质量预测实战
1. 项目概述与核心价值在工业自动化、仓储物流和智能制造等场景里,无线网络的稳定性正变得前所未有的重要。想象一下,一个自动导引运输车(AGV)正在执行物料搬运任务,或者一个机械臂正在与中央控制系统进行实时数据同步…...

Godot 4.2 + C# 避坑指南:手把手教你打包发布你的第一个2D游戏到Steam
Godot 4.2 C# 避坑指南:从开发到Steam发布的完整实战手册当你终于完成心爱的2D游戏开发,准备向全世界展示你的作品时,打包发布这个看似简单的环节往往会成为独立开发者最大的噩梦。特别是使用Godot 4.2搭配C#的项目,从导出设置到…...

基于Arduino Uno与MQ-2传感器的智能气体检测报警系统DIY全攻略
1. 项目概述与核心思路最近在捣鼓家里的智能安防,琢磨着能不能自己做一个成本可控、反应灵敏的气体检测报警装置。市面上成品烟雾报警器虽然成熟,但要么功能单一,要么价格不菲,而且很难根据自己的需求进行定制化调整,比…...

终极虚拟显示器解决方案:ParsecVDisplay完整使用指南
终极虚拟显示器解决方案:ParsecVDisplay完整使用指南 【免费下载链接】parsec-vdd ✨ Perfect virtual display for game streaming 项目地址: https://gitcode.com/gh_mirrors/pa/parsec-vdd ParsecVDisplay是一个基于Parsec虚拟显示驱动(VDD)的独立应用程序…...

5分钟掌握AutoClicker:Windows鼠标点击自动化的终极指南
5分钟掌握AutoClicker:Windows鼠标点击自动化的终极指南 【免费下载链接】AutoClicker AutoClicker is a useful simple tool for automating mouse clicks. 项目地址: https://gitcode.com/gh_mirrors/au/AutoClicker AutoClicker是一款专为Windows设计的鼠…...