C++ Qt 学习(九):模型视图代理
1. Qt 模型视图代理
- Qt 模型视图代理,也可以称为 MVD 模式
- 模型(model)、视图(view)、代理(delegate)
- 主要用来显示编辑数据

1.1 模型
- 模型 (Model) 是视图与原始数据之间的接口
- 原始数据可以是:数据库的一个数据表、内存中的一个 StringList,磁盘文件结构等
- QAbstractItemModel 是所有模型的祖宗类,其它 model 类都派生于它

1.2 视图
- 视图 (View) 是显示和编辑数据的界面组件
- 主要的视图组件有 QListView、QTreeView 和 QTableView
- QListWidget、QTreeWidget 和 QTableWidget 是视图类的简化版
- 它们不使用数据模型,而是将数据直接存储在组件的每个项里
- QAbstractItemView 是所有视图的祖宗类,其它 view 类都派生于它

1.3 代理
- 代理 (Delegate) 为视图组件提供数据编辑器
- 如在表格组件中,编辑一个单元格的数据时,缺省是使用一个 QLineEdit 编辑框
- 代理负责从数据模型获取相应的数据,然后显示在编辑器里,修改数据后,又将其保存到数据模型中
2. QTableView 应用

- tableView.pro
QT       += core gui// 使用 QAxObject 需添加下行
// The QAxObject class provides a QObject that wraps a COM object.
greaterThan(QT_MAJOR_VERSION, 4): QT += widgets axcontainer
2.1 widget.ui

2.2 主窗口
2.2.1 widget.h
#ifndef WIDGET_H
#define WIDGET_H#include <QWidget>
#include <QStandardItemModel>
#include <QItemSelectionModel>
#include "cintspindelegate.h"
#include "cfloatspindelegate.h"
#include "ccomboboxdelegate.h"QT_BEGIN_NAMESPACE
namespace Ui { class Widget; }
QT_END_NAMESPACEclass Widget : public QWidget {Q_OBJECTpublic:Widget(QWidget *parent = nullptr);~Widget();private slots:void on_btnOpenExcel_clicked();void on_btnReshowData_clicked();void OnCurrentChanged(const QModelIndex ¤t, const QModelIndex &previous);void on_btnAppendLast_clicked();void on_btnAppend_clicked();void on_btnDeleteSelectedLine_clicked();private:Ui::Widget *ui;QStandardItemModel *m_pItemModel; // 数据模型QItemSelectionModel *m_pSelectionModel; // Item 选择模型CIntSpinDelegate m_intSpinDelegate; // 整型数 spinbox 代理CFloatSpinDelegate m_floatSpinDelegate; // 浮点数 spinbox 代理CComboBoxDelegate m_comboBoxDelegate; // combobox 代理
};
#endif // WIDGET_H
2.2.2 widget.cpp
#include "widget.h"
#include "ui_widget.h"
#include <QAxObject>
#include <QFileDialog>
#include <QStandardPaths>static const int COLUMN_COUNT = 7;Widget::Widget(QWidget *parent) : QWidget(parent), ui(new Ui::Widget) {ui->setupUi(this);showMaximized();m_pItemModel = new QStandardItemModel(1, COLUMN_COUNT, this);m_pSelectionModel = new QItemSelectionModel(m_pItemModel); // Item 选择模型// 选择当前单元格变化时的信号与槽connect(m_pSelectionModel, &QItemSelectionModel::currentChanged, this, &Widget::OnCurrentChanged);ui->tableView->setModel(m_pItemModel); // 设置数据模型ui->tableView->setSelectionModel(m_pSelectionModel); // 设置选择模型ui->tableView->setSelectionMode(QAbstractItemView::ExtendedSelection);ui->tableView->setSelectionBehavior(QAbstractItemView::SelectItems);// 给第 3,4,5 列设置自定义代理组件ui->tableView->setItemDelegateForColumn(3, &m_floatSpinDelegate);ui->tableView->setItemDelegateForColumn(4, &m_intSpinDelegate);ui->tableView->setItemDelegateForColumn(5, &m_comboBoxDelegate);
}Widget::~Widget() {delete ui;
}// 打开 excel
void Widget::on_btnOpenExcel_clicked() {QAxObject *excel = new QAxObject(this);excel->setControl("Excel.Application");excel->setProperty("Visible", false); // 显示窗体看效果,选择 ture 将会看到 excel 表格被打开excel->setProperty("DisplayAlerts", true);QAxObject *workbooks = excel->querySubObject("WorkBooks"); // 获取工作簿(excel文件)集合QString str = QFileDialog::getOpenFileName(this, u8"打开excel","D:/MyQtCreatorProject/9_2_tableView",u8"Excel 文件(*.xls *.xlsx)");// 打开刚才选定的 excelworkbooks->dynamicCall("Open(const QString&)", str);QAxObject *workbook = excel->querySubObject("ActiveWorkBook");QAxObject *worksheet = workbook->querySubObject("WorkSheets(int)",1);QAxObject *usedRange = worksheet->querySubObject("UsedRange"); // 获取表格中的数据范围QVariant var = usedRange->dynamicCall("Value"); // 将所有的数据读取到 QVariant 容器中保存QList<QList<QVariant>> excel_list; // 用于将 QVariant 转换为 Qlist 的二维数组QVariantList varRows = var.toList();if (varRows.isEmpty()) {return;}const int row_count = varRows.size();QVariantList rowData;for (int i = 0; i < row_count; ++i) {rowData = varRows[i].toList();excel_list.push_back(rowData);}// 将每一行的内容放到 contentListQList<QStringList> contentList;for (int i = 0; i < row_count; i++) {QList<QVariant> curList = excel_list.at(i);int curRowCount = curList.size();QStringList oneLineStrlist;for (int j = 0; j < curRowCount; j++) {QString content = curList.at(j).toString();oneLineStrlist << content;}contentList << oneLineStrlist;}workbook->dynamicCall("Close(Boolean)", false);excel->dynamicCall("Quit(void)");delete excel;// 解析 contentList,填充 tableViewint rowCounts = contentList.size();QStandardItem *aItem;// 遍历行for (int i = 0; i < rowCounts; i++) {QStringList tmpList = contentList[i];if(i == 0) {// 设置表头m_pItemModel->setHorizontalHeaderLabels(tmpList);} else {int j;for (j = 0; j < COLUMN_COUNT - 1; j++) {// 不包含最后一列aItem = new QStandardItem(tmpList.at(j));m_pItemModel->setItem(i-1, j, aItem); // 为模型的某个行列位置设置 Item}// 设置最后一列aItem = new QStandardItem(contentList[0].at(j)); // 获取最后一列的指针aItem->setCheckable(true); // 设置可以使用 check 控件if (tmpList.at(j) == "0")aItem->setCheckState(Qt::Unchecked); // 根据数据设置 check 状态elseaItem->setCheckState(Qt::Checked);m_pItemModel->setItem(i-1 , j, aItem); // 设置最后一列}}
}// 选择单元格变化时的响应
void Widget::OnCurrentChanged(const QModelIndex ¤t, const QModelIndex &previous) {Q_UNUSED(previous);if (current.isValid()) { // 当前模型索引有效ui->textEdit->clear();ui->textEdit->append(QString::asprintf(u8"当前单元格:%d行,%d列",current.row(),current.column())); // 显示模型索引的行和列号QStandardItem *aItem;aItem = m_pItemModel->itemFromIndex(current); // 从模型索引获得 itemui->textEdit->append(u8"单元格内容:" + aItem->text()); // 显示 item 的文字内容}
}// 在表格最后一行添加
void Widget::on_btnAppendLast_clicked() {QList<QStandardItem*> aItemList;QStandardItem *aItem;for (int i = 0; i < COLUMN_COUNT - 1; i++) { // 不包含最后 1 列aItem = new QStandardItem(u8"自定义");aItemList << aItem;}// 获取最后一列的表头文字QString str = m_pItemModel->headerData(m_pItemModel->columnCount()-1, Qt::Horizontal, Qt::DisplayRole).toString();aItem = new QStandardItem(str);aItem->setCheckable(true);aItemList<<aItem; // 添加到容器m_pItemModel->insertRow(m_pItemModel->rowCount(), aItemList); // 插入一行,需要每个 Cell 的 ItemQModelIndex curIndex = m_pItemModel->index(m_pItemModel->rowCount()-1, 0); // 创建最后一行的 ModelIndex// 如果之前点击了表格,清空选择项m_pSelectionModel->clearSelection();// 设置刚插入的行为当前选择行m_pSelectionModel->setCurrentIndex(curIndex, QItemSelectionModel::Select);
}void Widget::on_btnAppend_clicked() {QList<QStandardItem*> aItemList;QStandardItem *aItem;for(int i = 0; i < COLUMN_COUNT-1; i++) {aItem = new QStandardItem(u8"自定义");aItemList << aItem;}// 获取表头文字QString str = m_pItemModel->headerData(m_pItemModel->columnCount()-1, Qt::Horizontal, Qt::DisplayRole).toString();aItem = new QStandardItem(str);aItem->setCheckable(true);aItemList<<aItem;QModelIndex curIndex = m_pSelectionModel->currentIndex(); // 获取当前选中项的模型索引m_pItemModel->insertRow(curIndex.row(), aItemList); // 在当前行的前面插入一行m_pSelectionModel->clearSelection(); // 清除已有选择m_pSelectionModel->setCurrentIndex(curIndex, QItemSelectionModel::Select);
}// 删除选择的行
void Widget::on_btnDeleteSelectedLine_clicked() {QModelIndex curIndex = m_pSelectionModel->currentIndex(); // 获取当前选择单元格的模型索引if (curIndex.row() == m_pItemModel->rowCount() - 1) { // 如果是最后一行m_pItemModel->removeRow(curIndex.row()); // 删除最后一行} else {m_pItemModel->removeRow(curIndex.row()); // 删除一行,并重新设置当前选择行m_pSelectionModel->setCurrentIndex(curIndex, QItemSelectionModel::Select);}
}// 将 tableView 的数据显示在 textEdit
void Widget::on_btnReshowData_clicked() {ui->textEdit->clear(); // 清空QStandardItem *aItem;QString str;// 获取表头文字int i, j;for (i = 0; i < m_pItemModel->columnCount(); i++) {aItem = m_pItemModel->horizontalHeaderItem(i); // 获取表头的一个项数据str = str + aItem->text() + "\t"; // 用 tab 间隔文字}ui->textEdit->append(str); // 添加为文本框的一行//获取数据区的每行for (i = 0; i < m_pItemModel->rowCount(); i++) {str = "";for (j = 0; j<m_pItemModel->columnCount()-1; j++) {aItem = m_pItemModel->item(i,j);str = str + aItem->text() + QString::asprintf("\t"); //以 tab 分隔}aItem = m_pItemModel->item(i, j); // 最后一行if (aItem->checkState() == Qt::Checked)str = str + "1";elsestr = str + "0";ui->textEdit->append(str);}
}
2.3 整型数 spinbox 代理
2.3.1 cintspindelegate.h
#ifndef CINTSPINDELEGATE_H
#define CINTSPINDELEGATE_H#include <QStyledItemDelegate>class CIntSpinDelegate : public QStyledItemDelegate {Q_OBJECT
public:CIntSpinDelegate(QObject *parent=0);// 自定义代理组件必须继承以下 4 个函数// 创建编辑组件QWidget *createEditor(QWidget *parent, const QStyleOptionViewItem &option,const QModelIndex &index) const Q_DECL_OVERRIDE;// 从数据模型获取数据,显示到代理组件中void setEditorData(QWidget *editor, const QModelIndex &index) const Q_DECL_OVERRIDE;// 将代理组件的数据,保存到数据模型中void setModelData(QWidget *editor, QAbstractItemModel *model,const QModelIndex &index) const Q_DECL_OVERRIDE;// 更新代理编辑组件的大小void updateEditorGeometry(QWidget *editor, const QStyleOptionViewItem &option,const QModelIndex &index) const Q_DECL_OVERRIDE;
};#endif // CINTSPINDELEGATE_H
2.3.2 cintspindelegate.cpp
#include "cintspindelegate.h"
#include <QSpinBox>CIntSpinDelegate::CIntSpinDelegate(QObject *parent) : QStyledItemDelegate(parent) {}QWidget *CIntSpinDelegate::createEditor(QWidget *parent,const QStyleOptionViewItem &option, const QModelIndex &index) const {// 创建代理编辑组件Q_UNUSED(option);Q_UNUSED(index);QSpinBox *editor = new QSpinBox(parent);  // 创建一个 QSpinBoxeditor->setFrame(false);  // 设置为无边框editor->setMinimum(0);editor->setMaximum(120);return editor;  // 返回此编辑器
}void CIntSpinDelegate::setEditorData(QWidget *editor, const QModelIndex &index) const {// 从数据模型获取数据,显示到代理组件中// 获取数据模型的模型索引指向的单元的数据int value = index.model()->data(index, Qt::EditRole).toInt();QSpinBox *spinBox = static_cast<QSpinBox*>(editor);  // 强制类型转换spinBox->setValue(value);  // 设置编辑器的数值
}void CIntSpinDelegate::setModelData(QWidget *editor, QAbstractItemModel *model, const QModelIndex &index) const {// 将代理组件的数据,保存到数据模型中QSpinBox *spinBox = static_cast<QSpinBox*>(editor);  // 强制类型转换spinBox->interpretText();      // 解释数据,如果数据被修改后,就触发信号int value = spinBox->value();  // 获取 spinBox 的值model->setData(index, value, Qt::EditRole); //更新到数据模型
}void CIntSpinDelegate::updateEditorGeometry(QWidget *editor, const QStyleOptionViewItem &option, const QModelIndex &index) const {// 设置组件大小Q_UNUSED(index);editor->setGeometry(option.rect);
}
2.4 浮点数 spinbox 代理
2.4.1 cfloatspindelegate.h
#ifndef CFLOATSPINDELEGATE_H
#define CFLOATSPINDELEGATE_H#include <QObject>
#include <QWidget>
#include <QStyledItemDelegate>class CFloatSpinDelegate : public QStyledItemDelegate {Q_OBJECT
public:CFloatSpinDelegate(QObject *parent=0);// 自定义代理组件必须继承以下4个函数// 创建编辑组件QWidget *createEditor(QWidget *parent, const QStyleOptionViewItem &option,const QModelIndex &index) const Q_DECL_OVERRIDE;void setEditorData(QWidget *editor, const QModelIndex &index) const Q_DECL_OVERRIDE;void setModelData(QWidget *editor, QAbstractItemModel *model,const QModelIndex &index) const Q_DECL_OVERRIDE;void updateEditorGeometry(QWidget *editor, const QStyleOptionViewItem &option,const QModelIndex &index) const Q_DECL_OVERRIDE;
};#endif // CFLOATSPINDELEGATE_H
2.4.2 cfloatspindelegate.cpp
#include "cfloatspindelegate.h"
#include <QDoubleSpinBox>CFloatSpinDelegate::CFloatSpinDelegate(QObject *parent):QStyledItemDelegate(parent) {}QWidget *CFloatSpinDelegate::createEditor(QWidget *parent,const QStyleOptionViewItem &option, const QModelIndex &index) const {Q_UNUSED(option);Q_UNUSED(index);QDoubleSpinBox *editor = new QDoubleSpinBox(parent);editor->setFrame(false);editor->setMinimum(0);editor->setDecimals(2);editor->setMaximum(100);return editor;
}void CFloatSpinDelegate::setEditorData(QWidget *editor, const QModelIndex &index) const {float value = index.model()->data(index, Qt::EditRole).toFloat();QDoubleSpinBox *spinBox = static_cast<QDoubleSpinBox*>(editor);spinBox->setValue(value);
}void CFloatSpinDelegate::setModelData(QWidget *editor, QAbstractItemModel *model, const QModelIndex &index) const {QDoubleSpinBox *spinBox = static_cast<QDoubleSpinBox*>(editor);spinBox->interpretText();float value = spinBox->value();QString str = QString::asprintf("%.2f", value);model->setData(index, str, Qt::EditRole);
}void CFloatSpinDelegate::updateEditorGeometry(QWidget *editor, const QStyleOptionViewItem &option, const QModelIndex &index) const {editor->setGeometry(option.rect);
}
2.5 combobox 代理
2.5.1 ccomboboxdelegate.h
#ifndef CCOMBOBOXDELEGATE_H
#define CCOMBOBOXDELEGATE_H#include <QItemDelegate>class CComboBoxDelegate : public QItemDelegate {Q_OBJECTpublic:CComboBoxDelegate(QObject *parent=0);// 自定义代理组件必须继承以下4个函数QWidget *createEditor(QWidget *parent, const QStyleOptionViewItem &option,const QModelIndex &index) const Q_DECL_OVERRIDE;void setEditorData(QWidget *editor, const QModelIndex &index) const Q_DECL_OVERRIDE;void setModelData(QWidget *editor, QAbstractItemModel *model,const QModelIndex &index) const Q_DECL_OVERRIDE;void updateEditorGeometry(QWidget *editor, const QStyleOptionViewItem &option,const QModelIndex &index) const Q_DECL_OVERRIDE;
};#endif // CCOMBOBOXDELEGATE_H
2.5.2 ccomboboxdelegate.cpp
#include "ccomboboxdelegate.h"
#include <QComboBox>CComboBoxDelegate::CComboBoxDelegate(QObject *parent) : QItemDelegate(parent) {}QWidget *CComboBoxDelegate::createEditor(QWidget *parent,const QStyleOptionViewItem &option, const QModelIndex &index) const {QComboBox *editor = new QComboBox(parent);editor->addItem(u8"优");editor->addItem(u8"良");editor->addItem(u8"一般");return editor;
}void CComboBoxDelegate::setEditorData(QWidget *editor, const QModelIndex &index) const {QString str = index.model()->data(index, Qt::EditRole).toString();QComboBox *comboBox = static_cast<QComboBox*>(editor);comboBox->setCurrentText(str);
}void CComboBoxDelegate::setModelData(QWidget *editor, QAbstractItemModel *model, const QModelIndex &index) const {QComboBox *comboBox = static_cast<QComboBox*>(editor);QString str = comboBox->currentText();model->setData(index, str, Qt::EditRole);
}void CComboBoxDelegate::updateEditorGeometry(QWidget *editor,const QStyleOptionViewItem &option, const QModelIndex &index) const {editor->setGeometry(option.rect);
}
3. QListView 应用

3.1 widget.h
#ifndef WIDGET_H
#define WIDGET_H#include <QWidget>
#include <QStringListModel>
#include <QMenu>QT_BEGIN_NAMESPACE
namespace Ui { class Widget; }
QT_END_NAMESPACEclass Widget : public QWidget {Q_OBJECTpublic:Widget(QWidget *parent = nullptr);~Widget();private:void initMenu();private slots:void on_btnAddItem_clicked();void on_btnDeleteItem_clicked();void on_btnInsert_clicked();void on_btnClearAllData_clicked();void on_btnReshow_clicked();void on_showRightMenu(const QPoint& pos);void OnActionDelete();// 链接 listview 的 clicked 信号void on_listView_clicked(const QModelIndex &index);private:Ui::Widget *ui;QStringListModel* m_pStringListModel;QMenu *m_pMenu;
};
#endif // WIDGET_H
3.2 widget.cpp
#include "widget.h"
#include "ui_widget.h"
#include <QMenu>Widget::Widget(QWidget *parent) : QWidget(parent), ui(new Ui::Widget) {ui->setupUi(this);this->setWindowTitle(u8"QListView使用教程");QStringList strList;strList << u8"北京" << u8"上海" << u8"深圳" << u8"广东"<< u8"南京" << u8"苏州" << u8"西安";// 创建数据模型m_pStringListModel = new QStringListModel(this);// 为模型设置 StringList,会导入 StringList 的内容m_pStringListModel->setStringList(strList);// 为 listView 设置数据模型ui->listView->setModel(m_pStringListModel);// 设置 listview 编辑属性// 双击与选择//ui->listView->setEditTriggers(QAbstractItemView::DoubleClicked | QAbstractItemView::SelectedClicked);initMenu();// listview 右键菜单ui->listView->setContextMenuPolicy(Qt::CustomContextMenu);connect(ui->listView, &QListView::customContextMenuRequested, this, &Widget::on_showRightMenu);
}Widget::~Widget() {delete ui;
}// 添加 item
void Widget::on_btnAddItem_clicked() {// 在尾部插入一空行, 不添加就把最后一行给替换了m_pStringListModel->insertRow(m_pStringListModel->rowCount());// 获取最后一行QModelIndex index = m_pStringListModel->index(m_pStringListModel->rowCount() - 1, 0);m_pStringListModel->setData(index,"new item", Qt::DisplayRole);  // 设置显示文字// 设置新添加的行选中ui->listView->setCurrentIndex(index);
}// 删除选中的项
void Widget::on_btnDeleteItem_clicked() {// 获取当前选中的 modelIndexQModelIndex index = ui->listView->currentIndex();// 删除当前行m_pStringListModel->removeRow(index.row());
}// 插入一项
void Widget::on_btnInsert_clicked() {// 获取选中 model IndexQModelIndex index=ui->listView->currentIndex();// 在当前行的前面插入一行m_pStringListModel->insertRow(index.row());m_pStringListModel->setData(index, "inserted item", Qt::DisplayRole);ui->listView->setCurrentIndex(index);
}// 回显 listview数据
void Widget::on_btnReshow_clicked() {// 获取数据模型的 StringListQStringList tmpList = m_pStringListModel->stringList();ui->textEdit->clear();  // 文本框清空for (int i = 0; i < tmpList.count(); i++) {// 显示数据模型的 StringList()返回的内容ui->textEdit->append(tmpList.at(i));}
}// 清除所有数据
void Widget::on_btnClearAllData_clicked() {m_pStringListModel->removeRows(0, m_pStringListModel->rowCount());
}void Widget::initMenu() {m_pMenu = new QMenu(ui->listView);QAction *pAc1 = new QAction(u8"删除", ui->listView);QAction *pAc2 = new QAction(u8"插入", ui->listView);QAction *pAc3 = new QAction(u8"置顶", ui->listView);QAction *pAc4 = new QAction(u8"排到最后", ui->listView);m_pMenu->addAction(pAc1);m_pMenu->addAction(pAc2);m_pMenu->addAction(pAc3);m_pMenu->addAction(pAc4);// 注意在 exec 前链接信号槽,因为 exec 会阻塞主线程,// 如果 connect 写在 exec 代码之后,信号槽将无法链接connect(pAc1, &QAction::triggered, this, &Widget::OnActionDelete);
}void Widget::on_showRightMenu(const QPoint& pos) {if (!((ui->listView->selectionModel()->selectedIndexes()).empty())) {m_pMenu->exec(QCursor::pos());  // 在当前鼠标位置显示}
}void Widget::OnActionDelete() {// 获取当前 modelIndexQModelIndex index = ui->listView->currentIndex();// 删除当前行m_pStringListModel->removeRow(index.row());
}void Widget::on_listView_clicked(const QModelIndex &index) {ui->textEdit->clear();  // 文本框清空// 显示 QModelIndex 的行、列号ui->textEdit->append(QString::asprintf(u8"当前项:row=%d, column=%d",index.row(), index.column()));
}
相关文章:
C++ Qt 学习(九):模型视图代理
1. Qt 模型视图代理 Qt 模型视图代理,也可以称为 MVD 模式 模型(model)、视图(view)、代理(delegate)主要用来显示编辑数据 1.1 模型 模型 (Model) 是视图与原始数据之间的接口 原始数据可以是:数据库的一个数据表、内存中的一个 StringListÿ…...
wpf devexpress 自定义统计
总计统计和分组统计包含预定义总计函数。这些函数允许你计算如下: 数据列的数量(Count) 最大和最小值(Max和Min) 总计和平均值(Sum和Average) 处理GridControl.CustomSummary 事件或者使用 GridControl.CustomSumm…...
【Flink】Flink任务缺失Jobmanager日志的问题排查
Flink任务缺失Jobmanager日志的问题排查 问题不是大问题,不是什么代码级别的高深问题,也没有影响任务运行,纯粹因为人员粗心导致,记录一下排查的过程。 问题描述 一个生产环境的奇怪问题,环境是flink1.15.0 on yarn…...

教程:使用 Keras 优化神经网络
一、介绍 在 我 之前的文章中,我讨论了使用 TensorFlow 实现神经网络。继续有关神经网络库的系列文章,我决定重点介绍 Keras——据说是迄今为止最好的深度学习库。 我 从事深度学习已经有一段时间了,据我所知,处理…...

什么是PWA(Progressive Web App)?它有哪些特点和优势?
聚沙成塔每天进步一点点 ⭐ 专栏简介 前端入门之旅:探索Web开发的奇妙世界 欢迎来到前端入门之旅!感兴趣的可以订阅本专栏哦!这个专栏是为那些对Web开发感兴趣、刚刚踏入前端领域的朋友们量身打造的。无论你是完全的新手还是有一些基础的开发…...

深入理解MongoDB的CRUD操作
MongoDB,一个广受欢迎的NoSQL数据库,以其灵活的文档模型、强大的查询能力和易于扩展的特性而著称。对于初学者和经验丰富的开发人员来说,熟练掌握MongoDB的增删改查(CRUD)操作是至关重要的。本博客将深入探讨如何在Mon…...
使用量子玻尔兹曼机推进机器学习:新范式
一、说明 量子玻尔兹曼机(QBM)是量子物理学和机器学习的前沿融合。通过利用叠加和纠缠等量子特性的力量,QBM 可以同时探索多个解决方案,使其异常擅长解决复杂问题。它使用量子位(量子计算的构建模块)以传统…...
优化|优化求解器自动调参
原文信息:MindOpt Tuner: Boost the Performance of Numerical Software by Automatic Parameter Tuning 作者:王孟昌 (达摩院决策智能实验室MindOpt团队成员) 一个算法开发者,可能会幻想进入这样的境界:算…...

vite vue3配置eslint和prettier以及sass
准备 教程 安装eslint 官网 vue-eslint ts-eslint 安装eslint yarn add eslint -D生成配置文件 npx eslint --init安装其他插件 yarn add -D eslint-plugin-import eslint-plugin-vue eslint-plugin-node eslint-plugin-prettier eslint-config-prettier eslint-plugin…...

C语言第入门——第十六课
目录 一、分治策略与递归 二、递归 1.求解n的阶乘 2.输入整数、倒序输出 3.输入整数、正序输出 4.计算第n位Fibonacci数列 编辑5.无序整数数组打印 6.找到对应数组下标 一、分治策略与递归 在我们遇到大问题的时候,我们的正确做法是将它分解成小问题&a…...

IntelliJ IDEA 快捷键 Windows 版本
前言:常用快捷键 IntelliJ IDEA编辑器大受欢迎的原因之一是它的智能提示和丰富的快捷键,在日常开发中熟练的使用快捷键会大大提升开发的效率,本篇文章就笔者日常开发中的总结,把常用的、好用的快捷键做一个列表,方便…...

重生之我必去大厂java开发
JavaDreamer 重生之我必去大厂java开发。主线任务进入大厂java开发。 author :developer_zxh GitHub | Gitee 本项目记录了本人从中国科学院大学硕士研究生开始,如何进入大工 java 开发岗位的学习记录(目前在校未求职,加入后此状…...
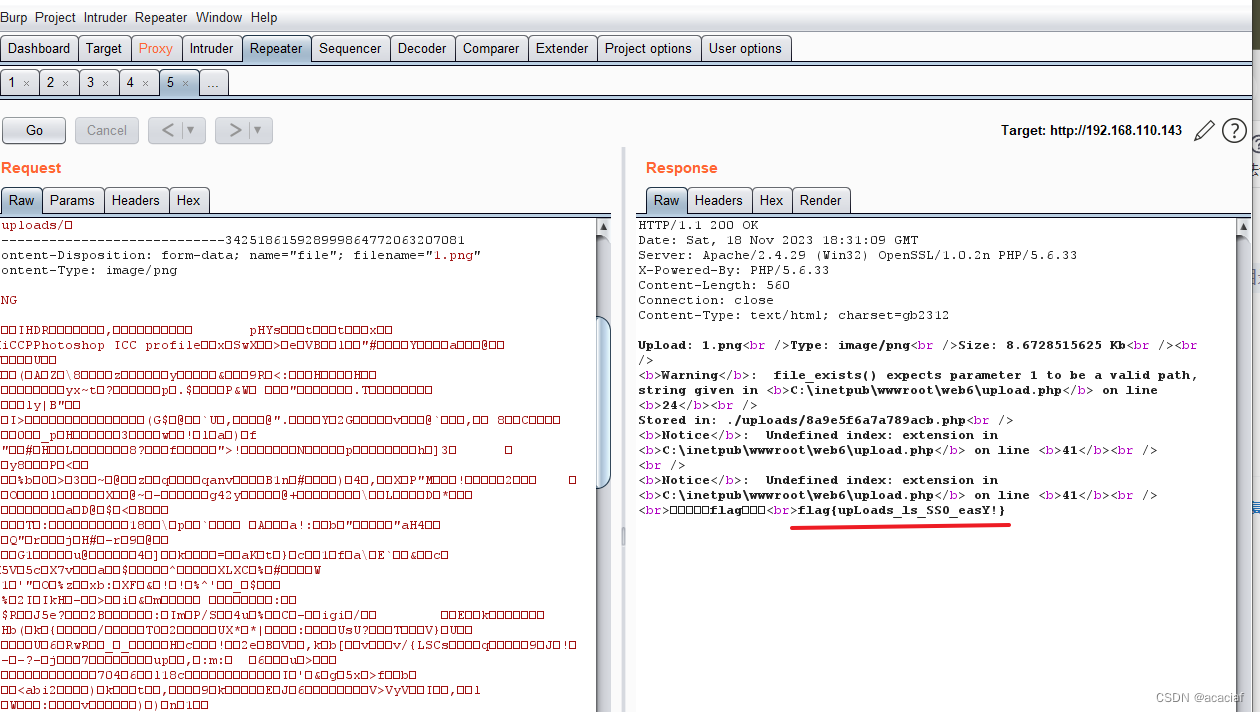
2023年中职“网络安全“—Web 渗透测试②
2023年中职“网络安全“—Web 渗透测试② Web 渗透测试任务环境说明:1.访问http://靶机IP/web1/,获取flag值,Flag格式为flag{xxx};2.访问http://靶机IP/web2/,获取flag值,Flag格式为flag{xxx};3.访问http://靶机IP/web…...
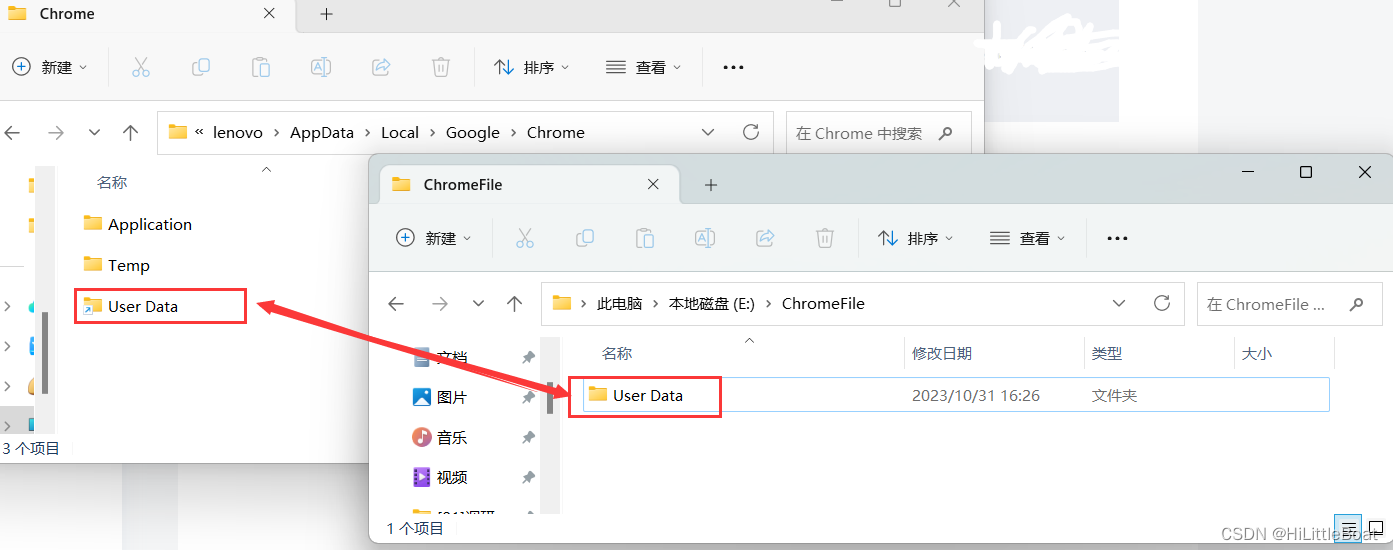
【整顿C盘】pycharm、chrome等软件,缓存移动
C盘爆了,特来找一下巨大的软件缓存,特此记录,跟随的各大教程,和自己的体会 一、爆炸家族JetBrains 这个适用于pycharm、idea、webstorm等等,只要是JetBrains家的,2020版本以上,都是一样的方法 p…...

C# using语句使用介绍
在C#中,using语句有两种主要用途:一是引入命名空间,二是提供一种简便的方式来处理资源的清理(主要用于实现了 IDisposable 接口的对象)。 引入命名空间:using 语句用于引入命名空间,从而可以在代…...
 201. 数字范围按位与 (位运算))
leetcode (力扣) 201. 数字范围按位与 (位运算)
文章目录 题目描述思路分析完整代码 题目描述 给你两个整数 left 和 right ,表示区间 [left, right] ,返回此区间内所有数字 按位与 的结果(包含 left 、right 端点)。 示例 1: 输入:left 5, right 7 输出…...
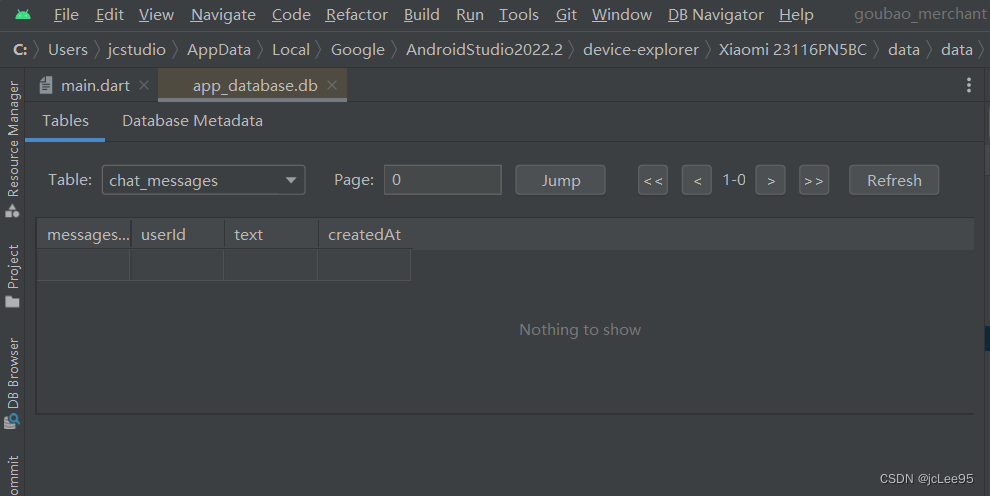
Flutter笔记: 在Flutter应用中使用SQLite数据库
Flutter笔记 在Flutter应用中使用SQLite数据库(基于sqflite) 作者:李俊才 (jcLee95):https://blog.csdn.net/qq_28550263 邮箱 :291148484163.com 本文地址:https://blog.csdn.net/q…...
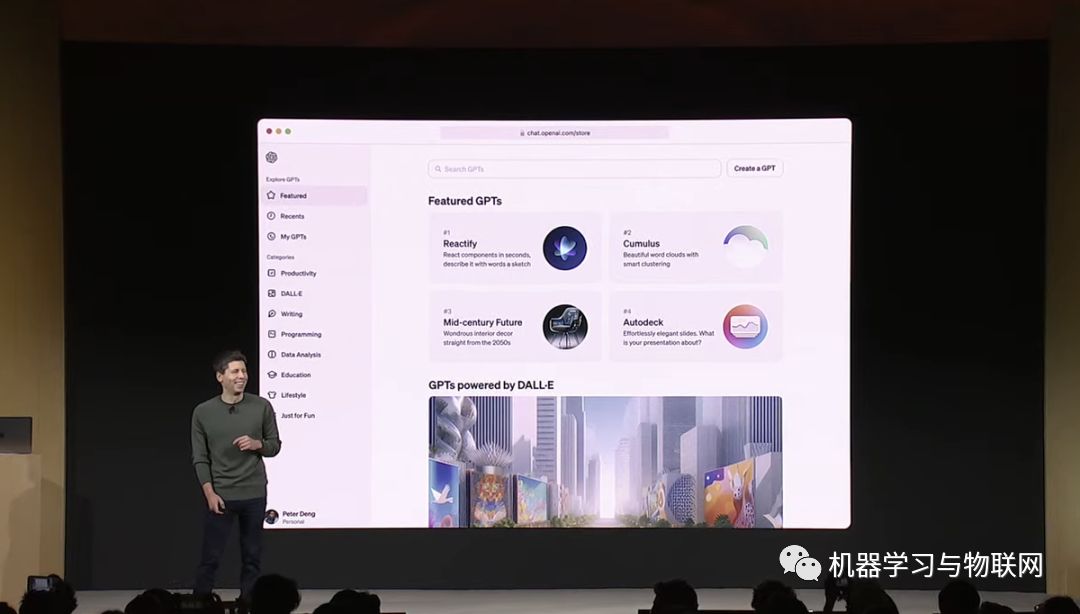
OpenAI GPT5计划泄露
OpenAI的首席执行官萨姆奥特曼在最近接受《金融时报》的专访时,分享了OpenAI未来发展的一些新动向。此外,他还透露了关于即将到来的GPT-5模型以及公司对AGI的长期目标的一些细节。 奥特曼指出: 1.OpenAI正在开发GPT-5,一种更先进的…...
【面试经典150 | 数学】Pow(x, n)
文章目录 写在前面Tag题目来源题目解读解题思路方法一:快速幂-递归方法二:快速幂-迭代 其他语言python3 写在最后 写在前面 本专栏专注于分析与讲解【面试经典150】算法,两到三天更新一篇文章,欢迎催更…… 专栏内容以分析题目为主…...

封装比较好的登录页面
封装比较好的登录页面 只在setup()函数中写流程,将逻辑代码抽离出来 <template><div class"wrapper"><img class"wrapper__img" srchttp://www.dell-lee.com/imgs/vue3/user.png /><div class"wrapper__input"&…...

AGENTS.md:为AI编码助手定制的项目说明书,提升人机协作效率
1. 项目概述:为什么你的项目需要一个“AI专属说明书”?如果你最近在尝试用GitHub Copilot、Cursor或者Claude Code来辅助开发,大概率遇到过这样的场景:你满怀期待地给AI下达一个指令,比如“帮我给这个React组件添加一个…...

AI系统行为治理:构建确定性护栏与运行时安全控制
1. 项目概述:为AI系统构建确定性的行为护栏如果你正在构建一个会“动手”的AI应用——无论是能帮你写代码的智能助手,还是能操作数据库的自动化流程,甚至是部署在物理设备上的机器人——那么你迟早会面临一个核心问题:如何确保它只…...

用HFSS Floquet Port仿真无限大阵列:从单元设计到S参数提取全流程解析
用HFSS Floquet Port仿真无限大阵列:从单元设计到S参数提取全流程解析 在相控阵天线和频率选择表面设计中,工程师常面临一个关键挑战:如何准确评估单个辐射单元在无限大周期阵列环境下的性能表现?传统有限阵列仿真不仅计算资源消耗…...

基于LLM与OpenClaw的智能自动化:构建自然语言驱动的桌面脚本生成器
1. 项目概述:连接两个世界的桥梁最近在折腾一个挺有意思的项目,叫hermes-openclaw-bridge。光看这个名字,可能有点摸不着头脑,但如果你同时关注过大型语言模型(LLM)和自动化脚本工具,大概就能猜…...

终极指南:boardgame.io v0.50重大更新,打造更强大的回合制游戏框架
终极指南:boardgame.io v0.50重大更新,打造更强大的回合制游戏框架 【免费下载链接】boardgame.io State Management and Multiplayer Networking for Turn-Based Games 项目地址: https://gitcode.com/gh_mirrors/bo/boardgame.io boardgame.io是…...

如何用嘎嘎降AI处理期刊投稿论文:SCI核心期刊论文全流程降AI4.8元完整操作教程
如何用嘎嘎降AI处理期刊投稿论文:SCI核心期刊论文全流程降AI4.8元完整操作教程 第一次用降AI工具会遇到很多不确定的地方——传什么格式、选哪个模式、怎么验收效果。 这篇教程把常见问题都覆盖了,主要基于嘎嘎降AI(www.aigcleaner.com&…...

【Prometheus】如何诊断 Prometheus 查询缓慢或超时的问题?
Prometheus 查询性能深度调优:从高基数陷阱到 TSDB 存储引擎的全链路诊断 用户问题原文:“如何诊断 Prometheus 查询缓慢或超时的问题?” 在支撑单集群500万+时间序列的生产环境中,Prometheus 查询性能是 SRE 团队的生命线。一次缓慢的查询不仅会拖垮 Grafana 面板,更可能…...

通讯录系统数据库设计与实现
1. 数据库设计与配置 1.1 数据库建表 SQL -- 创建数据库,使用UTF-8编码 CREATE DATABASE IF NOT EXISTS contact_system DEFAULT CHARACTER SET utf8mb4 DEFAULT COLLATE utf8mb4_unicode_ci;USE contact_system;-- 用户表 CREATE TABLE users (id INT PRIMARY …...

金属表面缺陷智能检测新突破
篇名问题,背景方法结论金属表面缺陷自适应分割算法1.金属表面划痕 2.金属表面凹凸 3.金属表面污点 4.金属表面刮擦 5.金属表面裂纹2.1多方向灰度波动分析 2.2领域灰度差分割算法 2.3PCA法图像压缩本文算法与其他算法相比,具有通用性好、分割准确度高等优…...
)
微分方程详解(理工科)
一句总纲:微分方程不是在求一个数,而是在求一个函数。它研究的是:如果我知道一个系统“怎么变化”,能不能反推出它“长什么样”。普通方程:未知量是一个数 (x)。微分方程:未知量是一个函数 y(x)。它的意思是…...