Qt图形视图框架:QGraphicsItem详解
Qt图形视图框架:QGraphicsItem详解
- Chapter1 Qt图形视图框架:QGraphicsItem详解
- Chapter2 自定义QGraphicsItem实现平移、改变尺寸和旋转
- 1. 平移
- 2. 改变尺寸
- 3. 旋转
- 完整代码如下:
- 头文件
- 源文件
Chapter1 Qt图形视图框架:QGraphicsItem详解
原文链接:https://blog.csdn.net/kenfan1647/article/details/116991074
Chapter2 自定义QGraphicsItem实现平移、改变尺寸和旋转
原文链接:https://blog.csdn.net/douzhq/article/details/105017924
我们在使用QGraphicsView框架的时候,经常需要自定义QGraphicsItem,并且需要实现Item的平移、改变大小和旋转的效果。接下来介绍他们的一种实现方式
1. 平移
平移效果如下图所示:

实现方式有两种方法:
使用QGraphicsItem本身的移动标志实现。
this->setFlag(QGraphicsItem::ItemIsMovable, true);
通过重写鼠标的相关事件实现。
这里需要重写下面三个函数:
void mousePressEvent(QGraphicsSceneMouseEvent *event) override;
void mouseMoveEvent(QGraphicsSceneMouseEvent *event) override;
void mouseReleaseEvent(QGraphicsSceneMouseEvent *event) override;
这里只贴出关键部分实现代码:
void mousePressEvent(QGraphicsSceneMouseEvent *event)
{    // 获取场景坐标和本地坐标QPointF scenePos = event->scenePos();QPointF pos = event->pos();// 保存当前的一些信息m_pos = pos;m_pressedPos = scenePos;m_startPos = this->pos();return QGraphicsItem::mousePressEvent(event);
}void mouseMoveEvent(QGraphicsSceneMouseEvent *event)
{// 获取场景坐标和本地坐标QPointF scenePos = event->scenePos();QPointF pos = event->pos();// 计算偏移qreal xInterval = scenePos.x() - m_pressedPos.x();qreal yInterval = scenePos.y() - m_pressedPos.y();// 设置在场景中位置this->setPos(m_startPos + QPointF(xInterval, yInterval));this->update();
}
这里 mousePressEvent 中保存了鼠标点击时的状态信息,包括鼠标点击时Item的本地坐标,场景坐标和该Item所在场景的坐标。 函数 mouseMoveEvent 中,获取鼠标移动的场景坐标位置计算偏移并设置新的Item的位置,从而实现平移效果。
2. 改变尺寸
改变尺寸效果如下图所示:

这里同样时通过重写 mousePressEvent 、 mouseMoveEvent 和 mouseReleaseEvent 实现。
关键部分代码如下:
void mousePressEvent(QGraphicsSceneMouseEvent *event)
{    // 获取场景坐标和本地坐标QPointF scenePos = event->scenePos();QPointF pos = event->pos();// 保存当前的一些信息m_pos = pos;m_pressedPos = scenePos;m_startPos = this->pos();return QGraphicsItem::mousePressEvent(event);
}void UICanvasItemBase::mouseMoveEvent(QGraphicsSceneMouseEvent *event)
{// 获取场景坐标和本地坐标QPointF scenePos = event->scenePos();QPointF loacalPos = event->pos();// 是否允许改变大小if (!m_isResizeable)return;// 是否为等比例修改大小qreal ratio = m_ratioValue;qreal itemWidth = abs(loacalPos.x()) * 2 - m_nInterval - m_nEllipseWidth;qreal itemHeight = abs(loacalPos.y()) * 2 - m_nInterval - m_nEllipseWidth;if (m_isRatioScale)itemHeight = itemWidth * 1.0 / ratio;// 设置图片的最小大小为10if (itemWidth < 10 || itemHeight < 10)return;m_size = QSize(itemWidth, itemHeight);this->update();
}
因为我这里的绘制的大小主要是通过 m_size ,改变 m_size 就是更改了 QGraphicsItem 的显示尺寸。本例子中的坐标系的中心点就是 m_size 的中心点。因此 itemWidth 的计算值为表示为:
qreal itemWidth = abs(loacalPos.x()) * 2 - m_nInterval - m_nEllipseWidth;
loacalPos.x() 为本地坐标系的 x 轴坐标, *2 正好为实际的宽度,这里的 m_nInterval 和 m_nEllipseWidth 表示图片和选择框之间的间距和拖拽手柄的半径。
3. 旋转
旋转效果如下图所示:
本篇文章讲述的旋转方法步骤如下:
- 计算上一次鼠标移动和本次鼠标移动位置之间的角度。
- 计算旋转的方向。
- 根据计算的角度和方向,计算真正的选中角度(顺时针为正,逆时针为负),为 QGraphicsItem 本身设置变换矩阵。
那么如何计算角度和方向呢??
- 通过向量的 点乘 ,计算角度。单位向量点乘的值,正好为角度的余弦。
- 通过向量的 叉乘 ,计算旋转的方向。叉乘的结果为与这两个向量垂直的向量,可以通过Z轴结果判断,如果结果为正表示顺时针,结果为负表示逆时针。
关键部分代码如下:
void mousePressEvent(QGraphicsSceneMouseEvent *event)
{    m_transform = this->transform();// 获取场景坐标和本地坐标QPointF scenePos = event->scenePos();QPointF pos = event->pos();// 保存当前的一些信息m_pos = pos;m_pressedPos = scenePos;m_startPos = this->pos();return QGraphicsItem::mousePressEvent(event);
}void UICanvasItemBase::mouseMoveEvent(QGraphicsSceneMouseEvent *event)
{// 获取场景坐标和本地坐标QPointF scenePos = event->scenePos();QPointF loacalPos = event->pos();// 获取并设置为单位向量QVector2D startVec(m_pos.x() - 0, m_pos.y() - 0);startVec.normalize();QVector2D endVec(loacalPos.x() - 0, loacalPos.y() - 0);endVec.normalize();// 单位向量点乘,计算角度qreal dotValue = QVector2D::dotProduct(startVec, endVec);if (dotValue > 1.0)dotValue = 1.0;else if (dotValue < -1.0)dotValue = -1.0;dotValue = qAcos(dotValue);if (isnan(dotValue))dotValue = 0.0;// 获取角度qreal angle = dotValue * 1.0 / (PI / 180);// 向量叉乘获取方向QVector3D crossValue = QVector3D::crossProduct( \QVector3D(startVec, 1.0), \QVector3D(endVec, 1.0));if (crossValue.z() < 0)angle = -angle;m_rotate += angle;// 设置变化矩阵m_transform.rotate(m_rotate);this->setTransform(m_transform);m_pos = loacalPos;this->update();
}
函数 normalize 表示转化为单位向量。
函数 QVector2D::dotProduct 计算两个向量的点乘结果。
函数 QVector3D::crossProduct 计算两个向量的叉乘,这里需要根据向量的Z值计算选装的方向,把2D的向量转化了3D向量作为函数的输入。
完整代码如下:
头文件
#ifndef UICANVASITEMBASE_H
#define UICANVASITEMBASE_H#include <QObject>
#include <QGraphicsItem>
#include <QPixmap>
#include <QGraphicsObject>class UICanvasItemBase : public QObject, public QGraphicsItem
{Q_OBJECTpublic:enum ItemOperator{t_none,t_move,t_resize,t_rotate};UICanvasItemBase(QGraphicsItem* parentItem = nullptr);~UICanvasItemBase() override;// 设置改变大小相关属性void setItemResizeable(bool resizeable);void setItemResizeRatio(bool resizeRation, qreal rationValue);private:// 初始化Iconvoid initIcon(void);static QImage m_closeIcon;static QImage m_resizeIcon;static QImage m_rotateIcon;QPixmap m_closePixmap;QPixmap m_resizePixmap;QPixmap m_rotatePixmap;// 设置是否能够更改尺寸bool m_isResizeable = true;bool m_isRatioScale = true;qreal m_ratioValue = 1.0;protected:QRectF boundingRect() const override;void paint(QPainter *painter, const QStyleOptionGraphicsItem *option, QWidget *widget) final;QPainterPath shape() const override;void mousePressEvent(QGraphicsSceneMouseEvent *event) override;void mouseMoveEvent(QGraphicsSceneMouseEvent *event) override;void mouseReleaseEvent(QGraphicsSceneMouseEvent *event) override;QVariant itemChange(QGraphicsItem::GraphicsItemChange change, const QVariant &value) override;// 自定义元素绘制virtual void customPaint(QPainter *painter, const QStyleOptionGraphicsItem *option, QWidget *widget);QSize m_size;ItemOperator m_itemOper = t_none;// 获取自定义绘制所需要的矩形QRectF getCustomRect(void) const;protected:// 处理Item上的类型virtual void mouseMoveMoveOperator(const QPointF& scenePos, const QPointF& loacalPos);virtual void mouseMoveResizeOperator(const QPointF& scenePos, const QPointF& loacalPos);virtual void mouseMoveRotateOperator(const QPointF& scenePos, const QPointF& loacalPos);QPointF m_pos;              // 本地所坐标点击的点QPointF m_pressedPos;       // 场景坐标点击的点QPointF m_startPos;         // Item再场景坐标的起始坐标QTransform m_transform;     // 变换矩阵qreal m_rotate = 0.0;       // 当前旋转角度signals:void onClickedCopyItem(void);private:int m_nInterval = 20;int m_nEllipseWidth = 12;    // 半径// 画笔设置QColor m_cPenColor;int m_nPenWidth = 1;// 画刷设置QColor m_cBrushColor;
};
#endif
源文件
#include "UICanvasItemBase.h"
#include "Utils.h"
#include <QPainter>
#include <QGraphicsSceneMouseEvent>
#include <QDebug>
#include <QGraphicsView>
#include <QGraphicsScene>
#include <QVector2D>
#include <QVector3D>#define PI 3.14159265358979QImage UICanvasItemBase::m_closeIcon;
QImage UICanvasItemBase::m_resizeIcon;
QImage UICanvasItemBase::m_rotateIcon;UICanvasItemBase::UICanvasItemBase(QGraphicsItem* parentItem):QGraphicsItem(parentItem),m_cPenColor(255, 0, 0),m_cBrushColor(200, 100, 100)
{this->setFlag(QGraphicsItem::ItemIsSelectable, true);initIcon();
}UICanvasItemBase::~UICanvasItemBase()
{}void UICanvasItemBase::setItemResizeable(bool resizeable)
{m_isResizeable = resizeable;
}void UICanvasItemBase::setItemResizeRatio(bool resizeRation, qreal rationValue)
{m_isRatioScale = resizeRation;m_ratioValue = rationValue;
}QRectF UICanvasItemBase::boundingRect() const
{QRectF rectF = getCustomRect();if (!this->isSelected())return rectF;rectF.adjust(-m_nInterval, -m_nInterval, m_nInterval, m_nInterval);rectF.adjust(-m_nEllipseWidth, -m_nEllipseWidth, m_nEllipseWidth, m_nEllipseWidth);return rectF;
}void UICanvasItemBase::paint(QPainter *painter, const QStyleOptionGraphicsItem *option, QWidget *widget)
{painter->setRenderHint(QPainter::Antialiasing, true);painter->setRenderHint(QPainter::SmoothPixmapTransform, true);painter->setRenderHint(QPainter::TextAntialiasing, true);// 自定义绘制customPaint(painter, option, widget);if (!this->isSelected())return;// 设置画笔QPen pen;pen.setWidth(m_nPenWidth);pen.setColor(m_cPenColor);pen.setStyle(Qt::DashLine);painter->setPen(pen);QRectF itemRect = this->getCustomRect();// 绘制轮廓线QRectF outLintRect = itemRect.adjusted(-m_nInterval, -m_nInterval, m_nInterval, m_nInterval);painter->drawRect(outLintRect);painter->setPen(Qt::NoPen);painter->setBrush(m_cBrushColor);// 绘制控制点painter->drawEllipse(outLintRect.topRight(), m_nEllipseWidth, m_nEllipseWidth);if (!m_closePixmap.isNull())painter->drawPixmap(QRect(outLintRect.topRight().x() - m_nEllipseWidth / 2, \outLintRect.topRight().y() - m_nEllipseWidth / 2, \m_nEllipseWidth, m_nEllipseWidth), m_closePixmap);painter->drawEllipse(outLintRect.bottomLeft(), m_nEllipseWidth, m_nEllipseWidth);if (!m_rotatePixmap.isNull())painter->drawPixmap(QRect(outLintRect.bottomLeft().x() - m_nEllipseWidth / 2, \outLintRect.bottomLeft().y() - m_nEllipseWidth / 2, \m_nEllipseWidth, m_nEllipseWidth), m_rotatePixmap);painter->drawEllipse(outLintRect.bottomRight(), m_nEllipseWidth, m_nEllipseWidth);if (!m_resizePixmap.isNull())painter->drawPixmap(QRect(outLintRect.bottomRight().x() - m_nEllipseWidth / 2, \outLintRect.bottomRight().y() - m_nEllipseWidth / 2, \m_nEllipseWidth, m_nEllipseWidth), m_resizePixmap);
}QPainterPath UICanvasItemBase::shape() const
{QPainterPath path;path.addRect(boundingRect());return path;
}void UICanvasItemBase::mousePressEvent(QGraphicsSceneMouseEvent *event)
{m_transform = this->transform();QRectF itemRect = this->getCustomRect();QRectF outLintRect = itemRect.adjusted(-m_nInterval, -m_nInterval, m_nInterval, m_nInterval);// 获取当前模式QPointF pos = event->pos();QPointF scenePos = event->scenePos();if (itemRect.contains(pos))m_itemOper = t_move;else if (g_utilTool->getDistance(pos, outLintRect.topRight()) <= m_nEllipseWidth)emit onClickedCopyItem();else if (g_utilTool->getDistance(pos, outLintRect.bottomLeft()) <= m_nEllipseWidth)m_itemOper = t_rotate;else if (g_utilTool->getDistance(pos, outLintRect.bottomRight()) <= m_nEllipseWidth)m_itemOper = t_resize;// 保存当前的一些信息m_pos = pos;m_pressedPos = scenePos;m_startPos = this->pos();return QGraphicsItem::mousePressEvent(event);
}void UICanvasItemBase::mouseMoveEvent(QGraphicsSceneMouseEvent *event)
{// 获取场景坐标和本地坐标QPointF scenePos = event->scenePos();QPointF pos = event->pos();if (m_itemOper == t_move){// 处理移动mouseMoveMoveOperator(scenePos, pos);}else if (m_itemOper == t_resize){// 处理更改大小mouseMoveResizeOperator(scenePos, pos);}else if (m_itemOper == t_rotate){// 处理旋转mouseMoveRotateOperator(scenePos, pos);}return QGraphicsItem::mouseMoveEvent(event);
}void UICanvasItemBase::mouseReleaseEvent(QGraphicsSceneMouseEvent *event)
{m_itemOper = t_none;return QGraphicsItem::mouseReleaseEvent(event);
}QVariant UICanvasItemBase::itemChange(QGraphicsItem::GraphicsItemChange change, const QVariant &value)
{if (change == QGraphicsItem::ItemSelectedChange)prepareGeometryChange();return QGraphicsItem::itemChange(change, value);
}void UICanvasItemBase::mouseMoveMoveOperator(const QPointF& scenePos, const QPointF& loacalPos)
{qreal xInterval = scenePos.x() - m_pressedPos.x();qreal yInterval = scenePos.y() - m_pressedPos.y();this->setPos(m_startPos + QPointF(xInterval, yInterval));this->update();
}void UICanvasItemBase::mouseMoveResizeOperator(const QPointF& scenePos, const QPointF& loacalPos)
{if (!m_isResizeable)return;qreal ratio = m_ratioValue;qreal itemWidth = abs(loacalPos.x()) * 2 - m_nInterval - m_nEllipseWidth;qreal itemHeight = abs(loacalPos.y()) * 2 - m_nInterval - m_nEllipseWidth;if (m_isRatioScale)itemHeight = itemWidth * 1.0 / ratio;// 设置图片的最小大小为10if (itemWidth < 10 || itemHeight < 10)return;m_size = QSize(itemWidth, itemHeight);this->update();
}void UICanvasItemBase::mouseMoveRotateOperator(const QPointF& scenePos, const QPointF& loacalPos)
{// 获取并设置为单位向量QVector2D startVec(m_pos.x() - 0, m_pos.y() - 0);startVec.normalize();QVector2D endVec(loacalPos.x() - 0, loacalPos.y() - 0);endVec.normalize();// 单位向量点乘,计算角度qreal dotValue = QVector2D::dotProduct(startVec, endVec);if (dotValue > 1.0)dotValue = 1.0;else if (dotValue < -1.0)dotValue = -1.0;dotValue = qAcos(dotValue);if (isnan(dotValue))dotValue = 0.0;// 获取角度qreal angle = dotValue * 1.0 / (PI / 180);// 向量叉乘获取方向QVector3D crossValue = QVector3D::crossProduct(QVector3D(startVec, 1.0),QVector3D(endVec, 1.0));if (crossValue.z() < 0)angle = -angle;m_rotate += angle;// 设置变化矩阵m_transform.rotate(m_rotate);this->setTransform(m_transform);m_pos = loacalPos;this->update();
}void UICanvasItemBase::customPaint(QPainter *painter, const QStyleOptionGraphicsItem *option, QWidget *widget)
{}QRectF UICanvasItemBase::getCustomRect(void) const
{QPointF centerPos(0, 0);return QRectF(centerPos.x() - m_size.width() / 2, centerPos.y() - m_size.height() / 2, \m_size.width(), m_size.height());
}void UICanvasItemBase::initIcon(void)
{if (m_closeIcon.isNull())m_closeIcon.load("./Images/close.png");if (m_resizeIcon.isNull())m_resizeIcon.load("./Images/resize.png");if (m_rotateIcon.isNull())m_rotateIcon.load("./Images/rotate.png");m_closePixmap = QPixmap::fromImage(m_closeIcon);m_resizePixmap = QPixmap::fromImage(m_resizeIcon);m_rotatePixmap = QPixmap::fromImage(m_rotateIcon);
}
函数 mouseMoveMoveOperator 、 mouseMoveResizeOperator 、 mouseMoveRotateOperator 就是平移、改变尺寸、旋转的处理函数。
相关文章:
Qt图形视图框架:QGraphicsItem详解
Qt图形视图框架:QGraphicsItem详解 Chapter1 Qt图形视图框架:QGraphicsItem详解Chapter2 自定义QGraphicsItem实现平移、改变尺寸和旋转1. 平移2. 改变尺寸3. 旋转完整代码如下:头文件源文件 Chapter1 Qt图形视图框架:QGraphicsIt…...
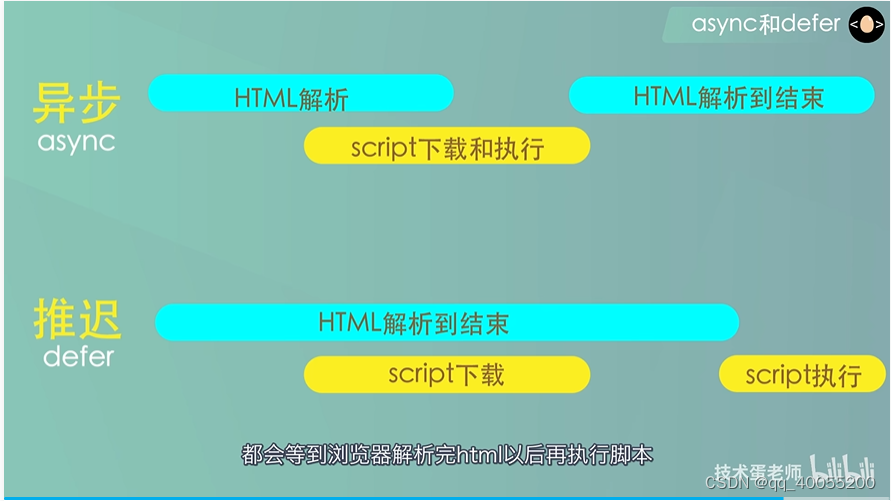
defer和async
如果两个属性浏览器都不兼容,推荐把<script>标签放到底部 一般情况下,浏览器在解析html源文件时,如果遇到外部的<script>标签,解析过程就会先暂停,这时会对script进行加载,执行两个过程&…...
数电实验-----实现74LS139芯片扩展为3-8译码器以及应用(Quartus II )
目录 一、74LS139芯片介绍 芯片管脚 芯片功能表 二、2-4译码器扩展为3-8译码器 1.扩展原理 2.电路图连接 3.仿真结果 三、3-8译码器的应用(基于74ls139芯片) 1.三变量表决器 2.奇偶校验电路 一、74LS139芯片介绍 74LS139芯片是属于2-4译码器…...

洋葱架构、三层架构及两者区别
前言 洋葱架构它的名称来源于洋葱的层次结构,即软件代码的各层次之间的关系。在这种架构中,应用程序的各个组件通过一系列层次结构被逐层包裹在一起,形成一个类似于洋葱的结构。 一、经典三层架构 三层架构是一种软件设计模式,…...
JavaEE进阶学习:Spring 的创建和使用
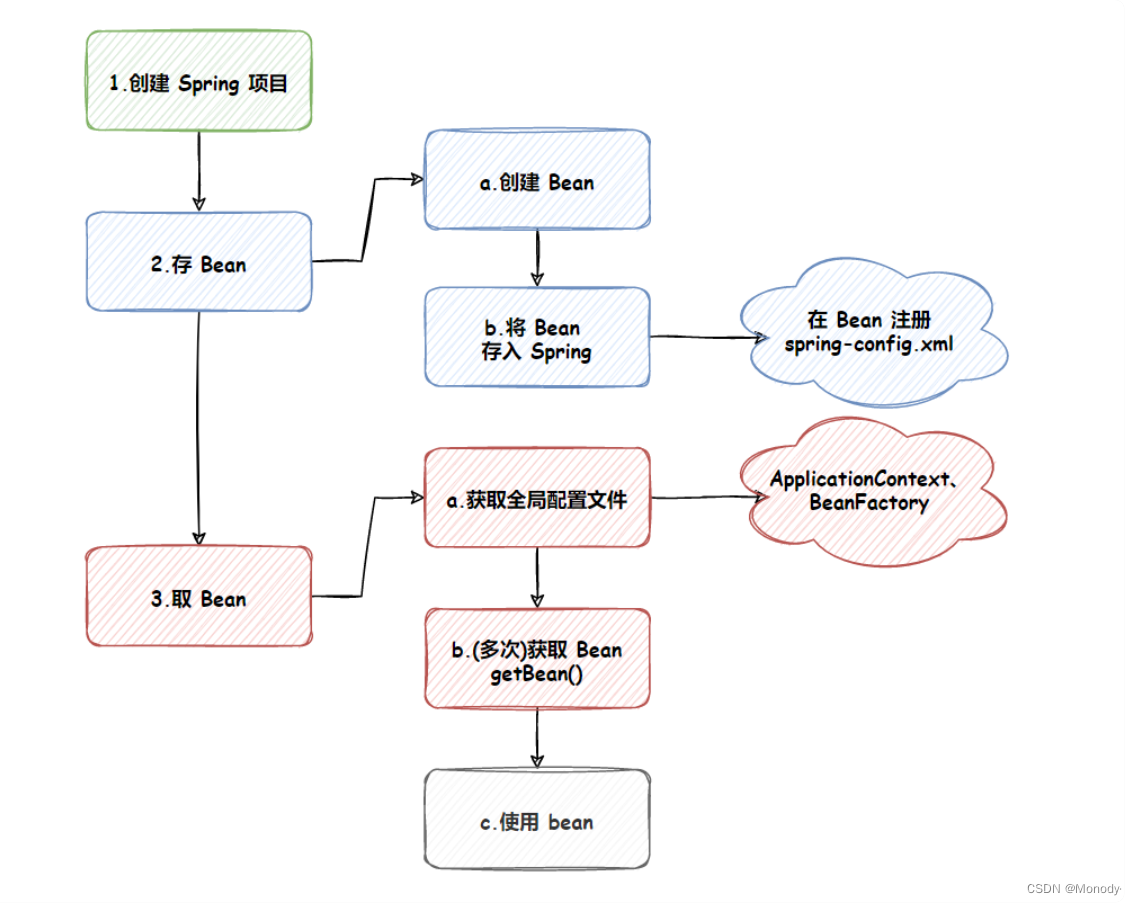
Spring 就是⼀个包含了众多工具方法的 IoC 容器。既然是容器那么它就具备两个最基本的功能: 将对象存储到容器(Spring)中从容器中将对象取出来 接下来使用 Maven 方式来创建一个 Spring 项目,创建 Spring 项目和 Servlet 类似&a…...
)
音视频项目—基于FFmpeg和SDL的音视频播放器解析(十四)
介绍 在本系列,我打算花大篇幅讲解我的 gitee 项目音视频播放器,在这个项目,您可以学到音视频解封装,解码,SDL渲染相关的知识。您对源代码感兴趣的话,请查看基于FFmpeg和SDL的音视频播放器 如果您不理解本…...
Tomcat无法映射到activiti-app导致activiti无法启动页面
原因之一:JDK版本与Tomcat版本不匹配,jdk8 yyds 我使用的是JDK11,Tomcat是9.0的,都是最新的,但还是不行,最后JDK改为8,tomcat的cmd后台没有报错,activiti-pp也可以正常访问了,很神奇…...

c语言常见的面试问题
在C语言编程中,面试官可能会询问你以下一些常见问题: 什么是C语言? C语言是一种通用的、过程式的计算机编程语言,由Dennis Ritchie在1972年创建。它是Unix操作系统的核心语言,也是许多其他编程语言(如Go、…...

image图片之间的间隙消除
多个图片排列展示,水平和垂直方向的间隔如何消除 垂直方向 vertical-align 原因: vertical-align属性主要用于改变行内元素的对齐方式,行内元素默认垂直对齐方式是基线对齐(baseline) 这是因为图片属于行内元素&…...
asp.net心理健康管理系统VS开发sqlserver数据库web结构c#编程计算机网页项目
一、源码特点 asp.net 心理健康管理系统 是一套完善的web设计管理系统,系统具有完整的源代码和数据库,系统主要采用B/S模式开发。 系统视频链接 https://www.bilibili.com/video/BV19w411H7P4/ 二、功能介绍 本系统使用Microsoft Visual Studio…...
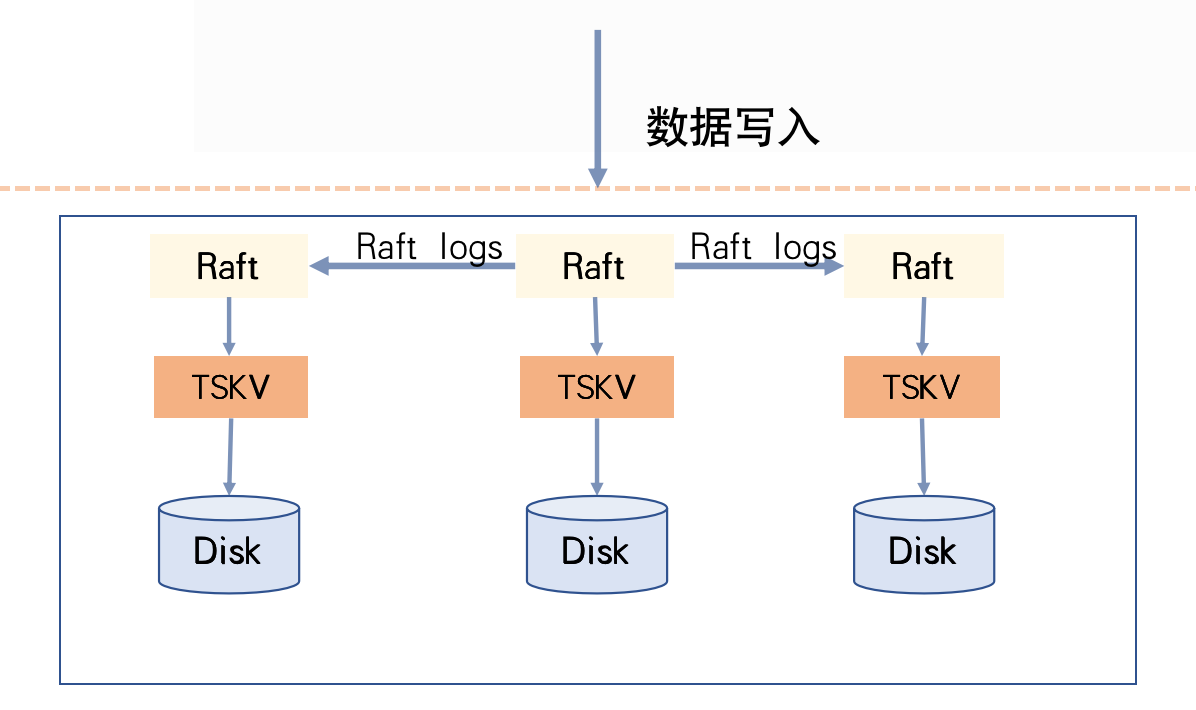
CnosDB有主复制演进历程
分布式存储系统的复杂性涉及数据容灾备份、一致性、高并发请求和大容量存储等问题。本文结合CnosDB在分布式环境下的演化历程,分享如何将分布式理论应用于实际生产,以及不同实现方式的优缺点和应用场景。 分布式系统架构模式 分布式存储系统下按照数据复…...
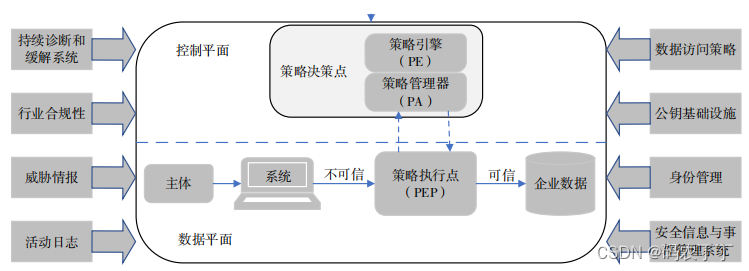
【前沿学习】美国零信任架构发展现状与趋势研究
转自:美国零信任架构发展现状与趋势研究 摘要 为了应对日趋严峻的网络安全威胁,美国不断加大对零信任架构的研究和应用。自 2022 年以来,美国发布了多个零信任战略和体系架构文件,开展了多项零信任应用项目。在介绍美国零信任战略…...
)
Toolformer论文阅读笔记(简略版)
文章目录 引言方法限制结论 引言 大语言模型在zero-shot和few-shot情况下,在很多下游任务中取得了很好的结果。大模型存在的限制:无法获取最新的信息、无法进行精确的数学计算、无法理解时间的推移等。这些限制可以通过扩大模型规模一定程度上解决&…...

Pytorch torch.dot、torch.mv、torch.mm、torch.norm的用法详解
torch.dot的用法: 使用numpy求点积,对于二维的且一个二维的维数为1 torch.mv的用法: torch.mm的用法 torch.norm 名词解释:L2范数也就是向量的模,L1范数就是各个元素的绝对值之和例如:...
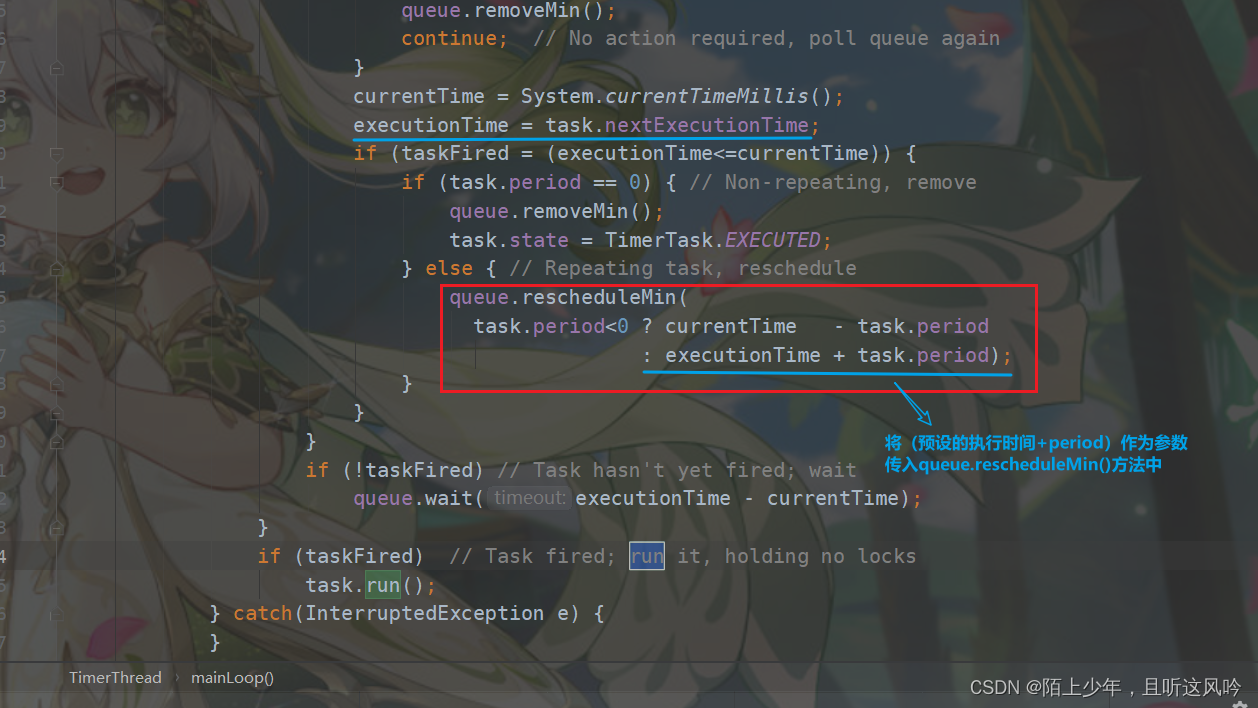
Jave 定时任务:使用Timer类执行定时任务为何会发生任务阻塞?如何解决?
IDE:IntelliJ IDEA 2022.2.3 x64 操作系统:win10 x64 位 家庭版 JDK: 1.8 文章目录 一、Timer类是什么?二、Timer类主要由哪些部分组成?1.TaskQueue2. TimerThread 三、示例代码分析四、自定义TimerTask为什么会发生任务相互阻塞的…...

Visual Studio Code配置c/c++环境
Visual Studio Code配置c/c环境 1.创建项目目录2.vscode打开项目目录3.项目中添加文件4.文件内容5.配置编译器6.配置构建任务7.配置调试设置 1.创建项目目录 d:\>mkdir d:\c语言项目\test012.vscode打开项目目录 3.项目中添加文件 4.文件内容 #include <iostream> u…...

漏洞利用工具的编写
预计更新网络扫描工具的编写漏洞扫描工具的编写Web渗透测试工具的编写密码破解工具的编写漏洞利用工具的编写拒绝服务攻击工具的编写密码保护工具的编写情报收集工具的编写 漏洞利用工具是一种常见的安全工具,它可以利用系统或应用程序中的漏洞来获取系统权限或者窃…...

ChatGPT之父被OpenAI解雇
首席技术官 Mira Murati 任命临时首席执行官领导 OpenAI;山姆阿尔特曼(Sam Altman)离开公司。 阿尔特曼先生的离职是在董事会经过深思熟虑的审查程序之后进行的,审查程序得出的结论是,他在与董事会的沟通中始终不坦诚…...
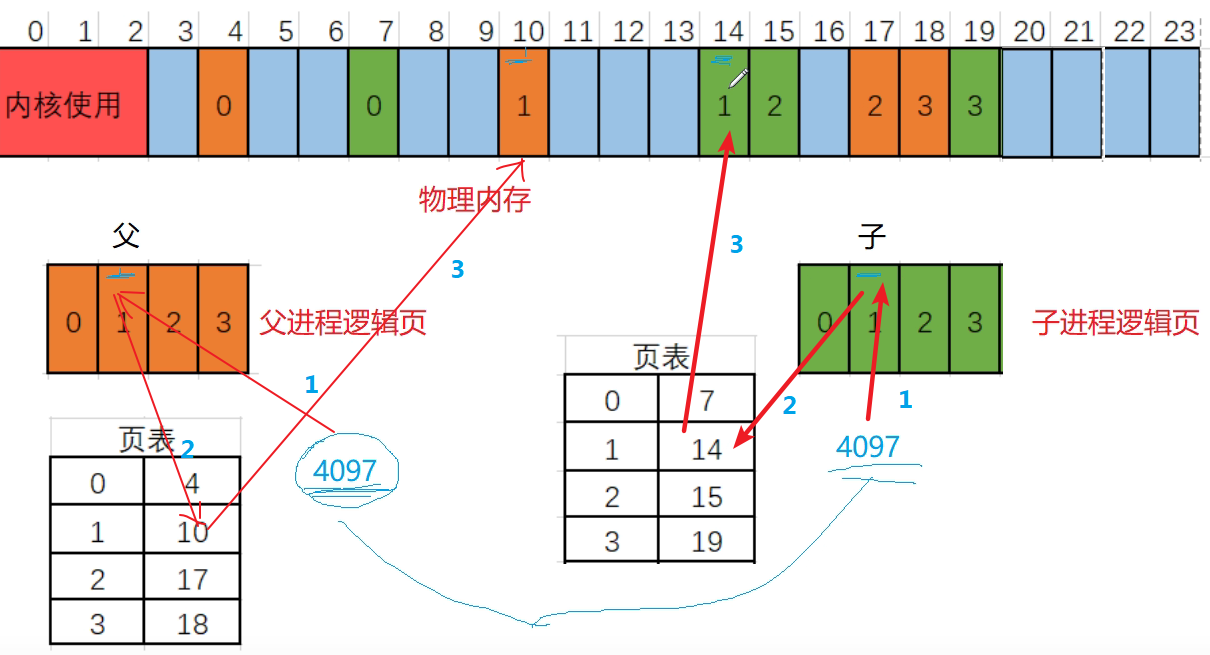
linux中利用fork复制进程,printf隐藏的缓冲区,写时拷贝技术,进程的逻辑地址与物理地址
1.prinf隐藏的缓冲区 1.思考:为什么会有缓冲区的存在? 2.演示及思考? 1).演示缓存区没有存在感 那为什么我们感觉不到缓冲区的存在呢?我们要打印东西直接就打印了呢? 我们用代码演示一下: 比如打开一个main.c,输入内容如下: #include <stdio.h>int main(){printf…...
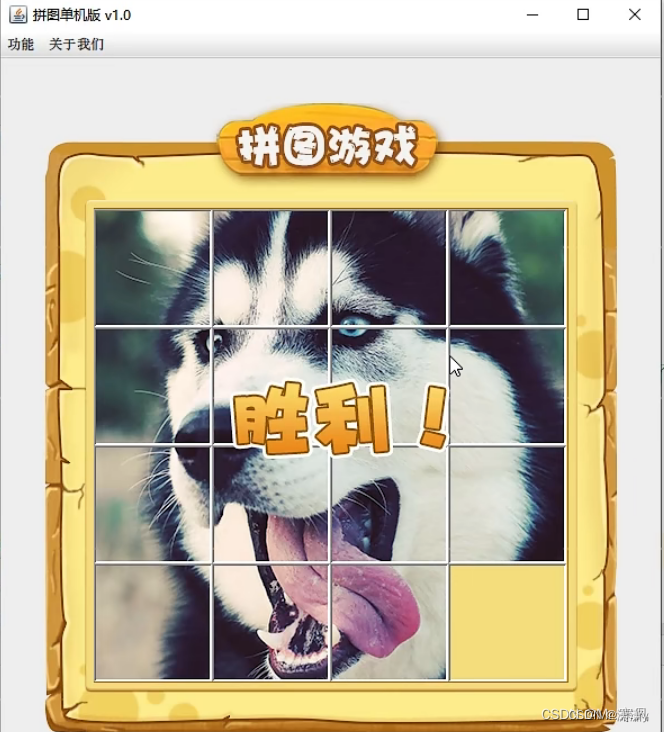
java游戏制作-拼图游戏
一.制作主界面 首先创建一个Java项目命名为puzzlegame 结果:】 二.设置界面 代码: 三.初始化界面 代码: 优化代码: 四.添加图片 先在Java项目中创建图片文件夹,将图片导入其中 管理图片: 五.打乱图片顺序...

NoderCMS开发者手册:扩展功能与自定义模块开发技巧
NoderCMS开发者手册:扩展功能与自定义模块开发技巧 【免费下载链接】nodercms 轻量级内容管理系统,基于 Node.js MongoDB 开发,拥有灵活的内容模型以及完善的权限角色机制。 项目地址: https://gitcode.com/gh_mirrors/no/nodercms N…...

从lsusb输出到硬件信息库:如何查询Linux中USB设备的厂商和型号
从lsusb输出到硬件信息库:Linux下USB设备厂商与型号的深度解析 当你插入一个陌生的USB设备到Linux系统时,终端里 lsusb 命令输出的那一串神秘代码 ID xxxx:xxxx 往往让人摸不着头脑。这些十六进制数字背后隐藏着设备的真实身份——厂商和具体型号。本…...

别再为Unity视频播放发愁了!Video Player从创建到避坑,保姆级教程带你搞定
Unity视频播放全攻略:从基础配置到高级避坑技巧在游戏开发中,视频播放功能看似简单,却暗藏诸多玄机。无论是开场动画、过场剧情还是UI背景,流畅的视频体验直接影响玩家第一印象。本文将带你深入Unity Video Player的每一个细节&am…...

2026 中国 GEO 优化定制技术解析:企业资质代办的核心作用深度测评
随着生成式人工智能技术的快速普及,大语言模型已成为企业获取线上流量、塑造品牌认知的核心渠道。GEO(Generative Engine Optimization,生成引擎优化)作为 AI 时代的新兴优化领域,正在重构企业的线上可见性竞争规则。然…...

深入Linux内核链表:从of_property_read_bool看设备树属性的组织与查找
深入Linux内核链表:从of_property_read_bool看设备树属性的组织与查找 在Linux内核开发中,设备树(Device Tree)作为描述硬件配置的标准方式,其高效解析机制一直是内核开发者关注的焦点。当我们调用 of_property_read_…...

Unity UI实战:Input Field输入框从入门到精通,搞定用户交互与数据获取
Unity UI实战:Input Field输入框从入门到精通,搞定用户交互与数据获取在游戏和应用开发中,用户输入是不可或缺的交互环节。无论是简单的登录界面、复杂的设置面板,还是实时聊天系统,Input Field都是连接用户与程序的关…...

UE Mobility
UE4传统光照模式最求极致性能:静态光源 静态物体;平衡画质与性能:固定光源 静态物体(经典组合,如太阳);完全动态场景:可移动光源 Lumen;静态光源静态物体:…...

Java国密SM2证书Unknown curve异常的三步绕过方案
1. 这不是JDK的bug,是国密算法在Java生态里“没户口”的真实写照你刚把SM2证书集成进Spring Boot服务,调用验签接口时控制台突然炸出一行红字:java.security.InvalidKeyException: Unknown curve。接着堆栈里全是sun.security.ec.ECParameter…...

技术人的职业规划:打造成功的职业生涯
技术人的职业规划:打造成功的职业生涯 引言 作为一名技术人,职业规划是实现职业目标的关键。在快速变化的技术领域,一个清晰的职业规划可以帮助我们明确方向,抓住机会,实现个人价值。 回顾我的职业历程,从一…...

Hermes Agent用户指南通过Taotoken自定义供应商接入大模型
🚀 告别海外账号与网络限制!稳定直连全球优质大模型,限时半价接入中。 👉 点击领取海量免费额度 Hermes Agent用户指南:通过Taotoken自定义供应商接入大模型 本文面向使用Hermes Agent框架的开发者,详细说…...