Kubernetes实战(五)-pod之间网络请求实战
1 同namespace内pod网络请求
1.1 创建namespace ygq
$ kubectl create namespace ygq
namespace/ygq created
1.2 创建svc和deployment
在naemspace ygq下创建两个应用:nginx和nginx-test。
1.2.1 部署应用nginx
$ cat nginx-svc.yaml
apiVersion: v1
kind: Service
metadata:name: nginxnamespace: ygq
spec:selector:app: nginxports:- port: 80type: ClusterIP
$ cat deployment-nginx.yaml
apiVersion: apps/v1
kind: Deployment
metadata:creationTimestamp: nulllabels:app: nginxname: nginxnamespace: ygq
spec:replicas: 1selector:matchLabels:app: nginxtemplate:metadata:creationTimestamp: nulllabels:app: nginxspec:containers:- image: docker.io/library/nginx:latestname: nginximagePullPolicy: IfNotPresentimagePullSecrets:- name: harbor-login$ kubectl apply -f nginx-svc.yaml
$ kubectl apply -f deployment-nginx.yaml
$ kubectl get svc -n ygq
NAME TYPE CLUSTER-IP EXTERNAL-IP PORT(S) AGE
nginx ClusterIP 192.168.245.168 <none> 80/TCP 3d
$ kubectl get pod -n ygq
NAME READY STATUS RESTARTS AGE
nginx-547cc75cb7-j46zl 1/1 Running 0 2d22h1.2.2 部署应用nginx-test
$ cat nginx-test-svc.yaml
apiVersion: v1
kind: Service
metadata:name: nginx-testnamespace: ygq
spec:selector:app: nginx-testports:- port: 80type: ClusterIP
$ cat deployment-nginx-test.yaml
apiVersion: apps/v1
kind: Deployment
metadata:creationTimestamp: nulllabels:app: nginx-testname: nginx-testnamespace: ygq
spec:replicas: 1selector:matchLabels:app: nginx-testtemplate:metadata:creationTimestamp: nulllabels:app: nginx-testspec:containers:- image: docker.io/library/nginx:latestname: nginximagePullPolicy: IfNotPresentimagePullSecrets:- name: harbor-login$ kubectl apply -f nginx-test-svc.yaml
$ kubectl apply -f deployment-nginx-test.yaml
$ kubectl get svc -n ygq
NAME TYPE CLUSTER-IP EXTERNAL-IP PORT(S) AGE
nginx-test ClusterIP 192.168.97.154 <none> 80/TCP 3d
$ kubectl get pod -n ygq
NAME READY STATUS RESTARTS AGE
nginx-test-6c5f4dfc79-2ldhg 1/1 Running 1 (2d23h ago) 3d1.3 测试nginx与nginx-test互相访问
1.3.1 nginx访问nginx-test
1.3.1.1 登录nginx pod
$ kubectl exec -it nginx-547cc75cb7-j46zl /bin/bash -n ygq
kubectl exec [POD] [COMMAND] is DEPRECATED and will be removed in a future version. Use kubectl exec [POD] -- [COMMAND] instead.
1.3.1.2 svc name方式访问nginx-test
root@nginx-547cc75cb7-j46zl:/# curl nginx
<!DOCTYPE html>
<html>
<head>
<title>Welcome to nginx!</title>
<style>
html { color-scheme: light dark; }
body { width: 35em; margin: 0 auto;
font-family: Tahoma, Verdana, Arial, sans-serif; }
</style>
</head>
<body>
<h1>Welcome to nginx!</h1>
<p>If you see this page, the nginx web server is successfully installed and
working. Further configuration is required.</p><p>For online documentation and support please refer to
<a href="http://nginx.org/">nginx.org</a>.<br/>
Commercial support is available at
<a href="http://nginx.com/">nginx.com</a>.</p><p><em>Thank you for using nginx.</em></p>
</body>
</html>
1.3.1.3 pod ip方式访问nginx-test
# kubectl get pod -n ygq -o wide
NAME                          READY   STATUS    RESTARTS        AGE     IP              NODE                      NOMINATED NODE   READINESS GATES
nginx-test-6c5f4dfc79-2ldhg   1/1     Running   1 (2d23h ago)   3d      172.20.176.17   cn-shanghai.10.12.46.85   <none>           <none>
pod ip是172.20.176.17。
root@nginx-547cc75cb7-j46zl:/# curl http://172.20.176.17:80
<!DOCTYPE html>
<html>
<head>
<title>Welcome to nginx!</title>
<style>
html { color-scheme: light dark; }
body { width: 35em; margin: 0 auto;
font-family: Tahoma, Verdana, Arial, sans-serif; }
</style>
</head>
<body>
<h1>Welcome to nginx!</h1>
<p>If you see this page, the nginx web server is successfully installed and
working. Further configuration is required.</p><p>For online documentation and support please refer to
<a href="http://nginx.org/">nginx.org</a>.<br/>
Commercial support is available at
<a href="http://nginx.com/">nginx.com</a>.</p><p><em>Thank you for using nginx.</em></p>
</body>
</html>
1.3.1.4 dns方式访问
k8s 中dns的组成结构为:service_name.namespace_name.svc.cluster.local:port,可简写为service_name.namespace_name.svc:port。
deployment nginx-test的端口为80,其dns为:nginx-test.ygq.svc.cluster.local:80,简写为:nginx-test.ygq.svc:80。
1)完整dns
root@nginx-547cc75cb7-j46zl:/# curl http://nginx-test.ygq.svc.cluster.local:80
<!DOCTYPE html>
<html>
<head>
<title>Welcome to nginx!</title>
<style>
html { color-scheme: light dark; }
body { width: 35em; margin: 0 auto;
font-family: Tahoma, Verdana, Arial, sans-serif; }
</style>
</head>
<body>
<h1>Welcome to nginx!</h1>
<p>If you see this page, the nginx web server is successfully installed and
working. Further configuration is required.</p><p>For online documentation and support please refer to
<a href="http://nginx.org/">nginx.org</a>.<br/>
Commercial support is available at
<a href="http://nginx.com/">nginx.com</a>.</p><p><em>Thank you for using nginx.</em></p>
</body>
</html>
2)简写dns
root@nginx-547cc75cb7-j46zl:/# curl http://nginx-test.ygq.svc:80
<!DOCTYPE html>
<html>
<head>
<title>Welcome to nginx!</title>
<style>
html { color-scheme: light dark; }
body { width: 35em; margin: 0 auto;
font-family: Tahoma, Verdana, Arial, sans-serif; }
</style>
</head>
<body>
<h1>Welcome to nginx!</h1>
<p>If you see this page, the nginx web server is successfully installed and
working. Further configuration is required.</p><p>For online documentation and support please refer to
<a href="http://nginx.org/">nginx.org</a>.<br/>
Commercial support is available at
<a href="http://nginx.com/">nginx.com</a>.</p><p><em>Thank you for using nginx.</em></p>
</body>
</html>
1.3.2 nginx-test访问nginx
1.3.2.1 登录nginx-test pod
$ kubectl exec -it nginx-test-6c5f4dfc79-2ldhg /bin/bash -n ygq
kubectl exec [POD] [COMMAND] is DEPRECATED and will be removed in a future version. Use kubectl exec [POD] -- [COMMAND] instead.
1.3.2.2 svc name方式访问nginx
root@nginx-test-6c5f4dfc79-2ldhg:/# curl nginx
<!DOCTYPE html>
<html>
<head>
<title>Welcome to nginx!</title>
<style>
html { color-scheme: light dark; }
body { width: 35em; margin: 0 auto;
font-family: Tahoma, Verdana, Arial, sans-serif; }
</style>
</head>
<body>
<h1>Welcome to nginx!</h1>
<p>If you see this page, the nginx web server is successfully installed and
working. Further configuration is required.</p><p>For online documentation and support please refer to
<a href="http://nginx.org/">nginx.org</a>.<br/>
Commercial support is available at
<a href="http://nginx.com/">nginx.com</a>.</p><p><em>Thank you for using nginx.</em></p>
</body>
</html>
1.3.2.3 pod ip方式访问nginx
$ kubectl get pod -n ygq -o wide
NAME                          READY   STATUS    RESTARTS        AGE     IP              NODE                      NOMINATED NODE   READINESS GATES
nginx-547cc75cb7-j46zl        1/1     Running   0               2d23h   172.20.176.24   cn-shanghai.10.12.46.85   <none>           <none>
root@nginx-test-6c5f4dfc79-2ldhg:/# curl http://172.20.176.24:80
<!DOCTYPE html>
<html>
<head>
<title>Welcome to nginx!</title>
<style>
html { color-scheme: light dark; }
body { width: 35em; margin: 0 auto;
font-family: Tahoma, Verdana, Arial, sans-serif; }
</style>
</head>
<body>
<h1>Welcome to nginx!</h1>
<p>If you see this page, the nginx web server is successfully installed and
working. Further configuration is required.</p><p>For online documentation and support please refer to
<a href="http://nginx.org/">nginx.org</a>.<br/>
Commercial support is available at
<a href="http://nginx.com/">nginx.com</a>.</p><p><em>Thank you for using nginx.</em></p>
</body>
</html>1.3.2.4 dns方式访问
deployment nginx的端口为80,其dns为:nginx.ygq.svc.cluster.local:80,简写为:nginx.ygq.svc:80。
1)完整dns
root@nginx-test-6c5f4dfc79-2ldhg:/# curl nginx.ygq.svc.cluster.local:80
<!DOCTYPE html>
<html>
<head>
<title>Welcome to nginx!</title>
<style>
html { color-scheme: light dark; }
body { width: 35em; margin: 0 auto;
font-family: Tahoma, Verdana, Arial, sans-serif; }
</style>
</head>
<body>
<h1>Welcome to nginx!</h1>
<p>If you see this page, the nginx web server is successfully installed and
working. Further configuration is required.</p><p>For online documentation and support please refer to
<a href="http://nginx.org/">nginx.org</a>.<br/>
Commercial support is available at
<a href="http://nginx.com/">nginx.com</a>.</p><p><em>Thank you for using nginx.</em></p>
</body>
</html>
2)简写dns
root@nginx-test-6c5f4dfc79-2ldhg:/# curl nginx.ygq.svc:80
<!DOCTYPE html>
<html>
<head>
<title>Welcome to nginx!</title>
<style>
html { color-scheme: light dark; }
body { width: 35em; margin: 0 auto;
font-family: Tahoma, Verdana, Arial, sans-serif; }
</style>
</head>
<body>
<h1>Welcome to nginx!</h1>
<p>If you see this page, the nginx web server is successfully installed and
working. Further configuration is required.</p><p>For online documentation and support please refer to
<a href="http://nginx.org/">nginx.org</a>.<br/>
Commercial support is available at
<a href="http://nginx.com/">nginx.com</a>.</p><p><em>Thank you for using nginx.</em></p>
</body>
</html>
1.4 结论
同namespace下不同pod直接可通过svc name、pod ip及dns互相访问。
pod ip是不固定的,会伴随pod的状态变化发生改变,生产环境不建议使用pod ip作为请求地址。
2 不同namespace间pod网络请求
2.1 创建namespace dev
$ kubectl create namespace dev
namespace/dev created
2.2 创建svc和deployment
在naemspace dev下创建应用:nginx-dev。
2.2.1 部署应用nginx-dev
$ cat deployment-nginx-dev.yaml
apiVersion: apps/v1
kind: Deployment
metadata:creationTimestamp: nulllabels:app: nginx-devname: nginx-devnamespace: dev
spec:replicas: 4selector:matchLabels:app: nginx-devtemplate:metadata:creationTimestamp: nulllabels:app: nginx-devspec:containers:- image: docker.io/library/nginx:latestname: nginximagePullPolicy: IfNotPresentimagePullSecrets:- name: harbor-login
$ cat nginx-dev-svc.yaml
apiVersion: v1
kind: Service
metadata:name: nginx-devnamespace: dev
spec:selector:app: nginx-devports:- port: 80type: ClusterIP$ kubectl apply -f nginx-dev-svc.yaml
$ kubectl apply -f deployment-nginx-dev.yaml
# kubectl get svc -n dev
NAME TYPE CLUSTER-IP EXTERNAL-IP PORT(S) AGE
nginx-dev ClusterIP 192.168.28.113 <none> 80/TCP 3d
$ kubectl get pod -n dev
NAME READY STATUS RESTARTS AGE
nginx-dev-5966c9747d-gbdq4 1/1 Running 1 (3d ago) 3d2.3 测试nginx与nginx-dev互相访问
2.3.1 nginx访问nginx-dev
2.3.1.1 登录nginx pod
$ kubectl exec -it nginx-547cc75cb7-j46zl /bin/bash -n ygq
kubectl exec [POD] [COMMAND] is DEPRECATED and will be removed in a future version. Use kubectl exec [POD] -- [COMMAND] instead.
2.3.1.2 svc name方式访问
root@nginx-547cc75cb7-j46zl:/# curl nginx-dev
curl: (6) Could not resolve host: nginx-dev
2.3.1.3 pod ip方式访问
$ kubectl get pod -n dev -o wide
NAME                         READY   STATUS    RESTARTS     AGE   IP             NODE                      NOMINATED NODE   READINESS GATES
nginx-dev-5966c9747d-gbdq4   1/1     Running   1 (3d ago)   3d    172.20.176.9   cn-shanghai.10.12.46.85   <none>           <none>
root@nginx-547cc75cb7-j46zl:/# curl 172.20.176.9:80
<!DOCTYPE html>
<html>
<head>
<title>Welcome to nginx!</title>
<style>
html { color-scheme: light dark; }
body { width: 35em; margin: 0 auto;
font-family: Tahoma, Verdana, Arial, sans-serif; }
</style>
</head>
<body>
<h1>Welcome to nginx!</h1>
<p>If you see this page, the nginx web server is successfully installed and
working. Further configuration is required.</p><p>For online documentation and support please refer to
<a href="http://nginx.org/">nginx.org</a>.<br/>
Commercial support is available at
<a href="http://nginx.com/">nginx.com</a>.</p><p><em>Thank you for using nginx.</em></p>
</body>
</html>2.3.1.4 dns方式访问
deployment nginx-dev的端口为80,其dns为:nginx-dev.dev.svc.cluster.local:80,简写为:nginx-dev.dev.svc:80。
1)完整dns
root@nginx-547cc75cb7-j46zl:/# curl nginx-dev.dev.svc.cluster.local:80
<!DOCTYPE html>
<html>
<head>
<title>Welcome to nginx!</title>
<style>
html { color-scheme: light dark; }
body { width: 35em; margin: 0 auto;
font-family: Tahoma, Verdana, Arial, sans-serif; }
</style>
</head>
<body>
<h1>Welcome to nginx!</h1>
<p>If you see this page, the nginx web server is successfully installed and
working. Further configuration is required.</p><p>For online documentation and support please refer to
<a href="http://nginx.org/">nginx.org</a>.<br/>
Commercial support is available at
<a href="http://nginx.com/">nginx.com</a>.</p><p><em>Thank you for using nginx.</em></p>
</body>
</html>
2)简写dns
root@nginx-547cc75cb7-j46zl:/# curl nginx-dev.dev.svc:80
<!DOCTYPE html>
<html>
<head>
<title>Welcome to nginx!</title>
<style>
html { color-scheme: light dark; }
body { width: 35em; margin: 0 auto;
font-family: Tahoma, Verdana, Arial, sans-serif; }
</style>
</head>
<body>
<h1>Welcome to nginx!</h1>
<p>If you see this page, the nginx web server is successfully installed and
working. Further configuration is required.</p><p>For online documentation and support please refer to
<a href="http://nginx.org/">nginx.org</a>.<br/>
Commercial support is available at
<a href="http://nginx.com/">nginx.com</a>.</p><p><em>Thank you for using nginx.</em></p>
</body>
</html>
2.3.2 nginx-dev访问nginx
2.3.2.1 登录nginx-dev pod
$ kubectl exec -it nginx-dev-5966c9747d-gbdq4 /bin/bash -n dev
kubectl exec [POD] [COMMAND] is DEPRECATED and will be removed in a future version. Use kubectl exec [POD] -- [COMMAND] instead.
2.3.2.2 svc name方式访问
root@nginx-dev-5966c9747d-gbdq4:/# curl nginx
curl: (6) Could not resolve host: nginx
2.3.2.3 pod ip方式访问
$ kubectl get pod -n ygq -o wide
NAME                          READY   STATUS    RESTARTS     AGE     IP              NODE                      NOMINATED NODE   READINESS GATES
nginx-547cc75cb7-j46zl        1/1     Running   0            2d23h   172.20.176.24   cn-shanghai.10.12.46.85   <none>           <none>
root@nginx-dev-5966c9747d-gbdq4:/# curl 172.20.176.24:80
<!DOCTYPE html>
<html>
<head>
<title>Welcome to nginx!</title>
<style>
html { color-scheme: light dark; }
body { width: 35em; margin: 0 auto;
font-family: Tahoma, Verdana, Arial, sans-serif; }
</style>
</head>
<body>
<h1>Welcome to nginx!</h1>
<p>If you see this page, the nginx web server is successfully installed and
working. Further configuration is required.</p><p>For online documentation and support please refer to
<a href="http://nginx.org/">nginx.org</a>.<br/>
Commercial support is available at
<a href="http://nginx.com/">nginx.com</a>.</p><p><em>Thank you for using nginx.</em></p>
</body>
</html>2.3.2.4 dns方式访问
deployment nginx的端口为80,其dns为:nginx.ygq.svc.cluster.local:80,简写为:nginx.ygq.svc:80。
1)完整dns
root@nginx-dev-5966c9747d-gbdq4:/# curl nginx.ygq.svc.cluster.local:80
<!DOCTYPE html>
<html>
<head>
<title>Welcome to nginx!</title>
<style>
html { color-scheme: light dark; }
body { width: 35em; margin: 0 auto;
font-family: Tahoma, Verdana, Arial, sans-serif; }
</style>
</head>
<body>
<h1>Welcome to nginx!</h1>
<p>If you see this page, the nginx web server is successfully installed and
working. Further configuration is required.</p><p>For online documentation and support please refer to
<a href="http://nginx.org/">nginx.org</a>.<br/>
Commercial support is available at
<a href="http://nginx.com/">nginx.com</a>.</p><p><em>Thank you for using nginx.</em></p>
</body>
</html>
2)简写dns
root@nginx-dev-5966c9747d-gbdq4:/# curl nginx.ygq.svc:80
<!DOCTYPE html>
<html>
<head>
<title>Welcome to nginx!</title>
<style>
html { color-scheme: light dark; }
body { width: 35em; margin: 0 auto;
font-family: Tahoma, Verdana, Arial, sans-serif; }
</style>
</head>
<body>
<h1>Welcome to nginx!</h1>
<p>If you see this page, the nginx web server is successfully installed and
working. Further configuration is required.</p><p>For online documentation and support please refer to
<a href="http://nginx.org/">nginx.org</a>.<br/>
Commercial support is available at
<a href="http://nginx.com/">nginx.com</a>.</p><p><em>Thank you for using nginx.</em></p>
</body>
</html>
2.4 结论
不同namespace下pod直接可通过pod ip及dns互相访问,但不能通过svc name进行访问
pod ip是不固定的,会伴随pod的状态变化发生改变,生产环境不建议使用pod ip作为请求地址。
3 pod name实战
3.1 同一namespace下
3.1.1 deployment
$ kubectl get pod -n ygq  -o wide
NAME                          READY   STATUS    RESTARTS     AGE    IP              NODE                      NOMINATED NODE   READINESS GATES
nginx-547cc75cb7-j46zl        1/1     Running   0            3d     172.20.176.24   cn-shanghai.10.12.46.85   <none>           <none>
nginx-test-6c5f4dfc79-2ldhg   1/1     Running   1 (3d ago)   3d2h   172.20.176.17   cn-shanghai.10.12.46.85   <none>           <none>
$ kubectl create -f deployment-nginx.yaml
Error from server (AlreadyExists): error when creating "deployment-nginx.yaml": deployments.apps "nginx" already exists3.1.2 Service
$ kubectl get svc -n ygq  -o wide
NAME         TYPE        CLUSTER-IP        EXTERNAL-IP   PORT(S)   AGE    SELECTOR
nginx        ClusterIP   192.168.245.168   <none>        80/TCP    3d1h   app=nginx
nginx-test   ClusterIP   192.168.97.154    <none>        80/TCP    3d1h   app=nginx-test
$ kubectl create -f nginx-svc.yaml
Error from server (AlreadyExists): error when creating "nginx-svc.yaml": services "nginx" already exists3.2 不同namespace
3.2.1 deployment
$ kubectl get pod -n dev -o wide
NAME                         READY   STATUS    RESTARTS       AGE    IP              NODE                      NOMINATED NODE   READINESS GATES
nginx-cfcb57f6d-vr79r        1/1     Running   0              10s    172.20.176.28   cn-shanghai.10.12.46.85   <none>           <none>
nginx-dev-5966c9747d-gbdq4   1/1     Running   1 (3d1h ago)   3d1h   172.20.176.9    cn-shanghai.10.12.46.85   <none>           <none>
$ kubectl get pod -n ygq -o wide
NAME READY STATUS RESTARTS AGE IP NODE NOMINATED NODE READINESS GATES
nginx-547cc75cb7-j46zl 1/1 Running 0 3d 172.20.176.24 cn-shanghai.10.12.46.85 <none> <none>
nginx-test-6c5f4dfc79-2ldhg 1/1 Running 1 (3d ago) 3d2h 172.20.176.17 cn-shanghai.10.12.46.85 <none> <none>3.2.2 Service
$ kubectl get svc -n dev -o wide
NAME        TYPE        CLUSTER-IP       EXTERNAL-IP   PORT(S)   AGE    SELECTOR
nginx       ClusterIP   192.168.87.200   <none>        80/TCP    7s     app=nginx
nginx-dev   ClusterIP   192.168.28.113   <none>        80/TCP    3d1h   app=nginx-dev
$ kubectl get svc -n ygq -o wide
NAME TYPE CLUSTER-IP EXTERNAL-IP PORT(S) AGE SELECTOR
nginx ClusterIP 192.168.245.168 <none> 80/TCP 3d1h app=nginx
nginx-test ClusterIP 192.168.97.154 <none> 80/TCP 3d1h app=nginx-test3.3 结论
不同namescpace下可以存在相同名称的资源,同一namespace下不允许有相同名称的资源。
4 总结
- 同一namespace下的应用可以通过svc name、pod ip和dns互相访问,不同namespace下可以通过pod ip和dns互相访问。
- 同一namespace下不允许有相同名称的资源,不同namescpace下可以存在名字一样的资源。
相关文章:
-pod之间网络请求实战)
Kubernetes实战(五)-pod之间网络请求实战
1 同namespace内pod网络请求 1.1 创建namespace ygq $ kubectl create namespace ygq namespace/ygq created 1.2 创建svc和deployment 在naemspace ygq下创建两个应用:nginx和nginx-test。 1.2.1 部署应用nginx $ cat nginx-svc.yaml apiVersion: v1 kind: …...
7年经验之谈 —— 如何高效的开展app的性能测试?
APP性能测试是什么 从网上查了一下,貌似也没什么特别的定义,我这边根据自己的经验给出一个自己的定义,如有巧合纯属雷同。 客户端性能测试就是,从业务和用户的角度出发,设计合理且有效的性能测试场景,制定…...
小程序action-sheet结合自定义tabbar显示
要实现此效果,遇到的问题:背景在电脑端调试的情况正常的情况下,手机端点击事件工单,返回回来的时候action-sheet卡住在屏幕上,点击遮罩层都不消失。更奇怪的是 这种情况并不是每次发生,而是有时候发生&…...
机器学习笔记 - 隐马尔可夫模型的简述
隐马尔可夫模型是一个并不复杂的数学模型,到目前为止,它一直被认为是解决大多数自然语言处理问题最为快速、有效的方法。它成功地解决了复杂的语音识别、机器翻译等问题。看完这些复杂的问题是如何通过简单的模型得到描述和解决,我们会由衷地感叹数学模型之妙。 人类信息交流…...

iOS学习 --- Xcode 15 下载iOS_17.0.1_Simulator失败解决方法
1.去开发者官网下载安装包 https://developer.apple.com/download/all/?qiOS%2017 使用浏览器下载。 2.打开终端通过命令添加到xcode 命令如下: sudo xcode-select -s /Applications/Xcode.app(输入开始密码)xcodebuild -runFirstLaunch (等待一小会)xcrun simctl…...
)
多视图聚类论文阅读(二)
Deep multi-view semi-supervised clustering with sample pairwise constraints 基于样本对约束的深度多视图半监督聚类 1.1 提出的问题 提出问题: 多视图聚类技术多数方法都忽视了弱监督信息的重要性, 提出的解决方法 将自监督学习引入到了多视图…...
Docker在Centos7下的安装
1、卸载旧版本 执行如下指令对旧版本进行卸载: sudo yum remove docker \docker-client \docker-client-latest \docker-common \docker-latest \docker-latest-logrotate \docker-logrotate \docker-engine 执行完毕后,如果输入docker version发现do…...

LLM大模型4位量化实战【GPTQ】
权重量化方面的最新进展使我们能够在消费类硬件上运行大量大型语言模型,例如 RTX 3090 GPU 上的 LLaMA-30B 模型。 这要归功于性能下降最小的新型 4 位量化技术,例如 GPTQ、GGML 和 NF4。 在上一篇文章中,我们介绍了简单的 8 位量化技术和出…...

安装keras、tensorflow
看起来你仍然面临SSL证书验证失败的问题。这可能是由于你的网络环境或代理设置引起的。你可以尝试以下几个步骤: 检查网络连接: 确保你的计算机能够正常访问互联网。 关闭代理: 如果你使用了代理,尝试暂时关闭它,然后…...

ffmpeg知识点整理
使用FFmepg进行视频转码、视频格式转换、图片提取等!_ffmepg -c:v-CSDN博客 中文文档: ffmpeg 中文手册 (beandrewang.github.io) 笔记: 通用规则是,所有选项作用于其后边的第一个文件。因此,顺序是非常重要的&…...
Git 笔记之gitignore
解释为:git ignore 即,此类型的文件将会被忽略掉,从而不会进行管理 具体的模板可以从 GitHub 网站上来进行设置 GitHub - github/gitignore: A collection of useful .gitignore templates Common_gitignore: gitignoregithub开源项目&…...

【配置】Redis常用配置详解
文章目录 IP地址绑定设置密码 IP地址绑定 默认情况下,如果未指定 “bind” 配置指令,Redis 将监听服务器上所有可用的网络接口的连接。 可以使用 “bind” 配置指令来仅监听一个或多个选定的接口,后跟一个或多个 IP 地址 示例:bin…...

Linux(Ubuntu)安装JDK环境
系统环境 Ubuntu20.04 下载JDK压缩包 前往Oracle官网进行后续下载或单击下载JDK压缩包 下拉找到JDK8,在Linux板块下选择适配系统架构的压缩包文件(后缀为tar.gz),系统架构可通过uname -m命令查看 安装JDK 安装环境通常放在/usr/local下,进入…...

OpenCV C++ 张正友相机标定【相机标定原理、相机标定流程、图像畸变矫正】
文章目录 3.1 标定原理3.2 相机标定流程步骤1:采集棋盘格图像,批处理(调整尺寸、重命名)步骤2:提取棋盘格内角点坐标步骤3:进一步提取亚像素角点信息在棋盘标定图上绘制找到的内角点(非必须,仅为了显示)步骤4:相机标定--计算出相机内参数矩阵和畸变系数步骤5:畸变图像…...
SDL2 播放音频(MP4)
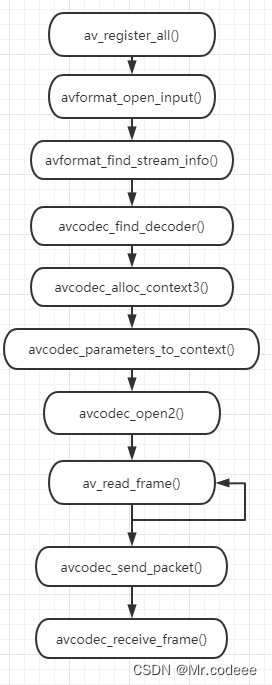
1.简介 这里引入FFmpeg库,获取音频流数据,然后通过FFmpeg将视频流解码成pcm原始数据,再将pcm数据送入到SDL库中实现音频播放。 2.FFmpeg的操作流程 注册API:av_register_all()构建输入AVFormatContext上下文:avform…...

WMS仓库管理系统库位功能
后端 using Infrastructure.Attribute; using Model.Dto.WarehouseManagement; using Model.Page; using Model.WarehouseManagement; using Repository; using Service.Interface.WarehouseManagement; using SqlSugar;namespace Service.WarehouseManagement {[…...
)
vue2组件通信中的一些拓展(props,emit,ref父子双向传参)
说明 我上一篇文章中基本对vue所有的数据通信方法进行了一个整理归纳。 其实我并没有像传统的那样去罗列,比如父传子有props,ref,子传父为emit,兄弟用$bus等等。 因为在我的实际练习和业务开发中,props,emit,ref等可以实现父子数据互传,这里就涉及一个比较重要的编程思维,函…...
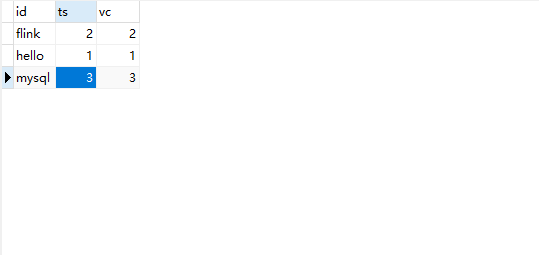
Flink1.17 DataStream API
目录 一.执行环境(Execution Environment) 1.1 创建执行环境 1.2 执行模式 1.3 触发程序执行 二.源算子(Source) 2.1 从集合中读取数据 2.2 从文件读取数据 2.3 从 RabbitMQ 中读取数据 2.4 从数据生成器读取数据 2.5 …...

数据结构中树、森林 与 二叉树的转换
1 树转换为 二叉树 将树转换成二叉树的步骤是: 加线。在所有的兄弟结点之间加一条线。去线。对于树中的每个结点,只保留它与第一个孩子结点的连线,删除该结点其他孩子结点之间的连线。调整。以树的根结点为轴心,将整个树顺时针旋…...

力扣labuladong——一刷day43
提示:文章写完后,目录可以自动生成,如何生成可参考右边的帮助文档 文章目录 前言一、力扣257. 二叉树的所有路径二、力扣129. 求根节点到叶节点数字之和三、力扣199. 二叉树的右视图四、力扣662. 二叉树最大宽度 前言 一般来说,如…...

3大核心突破:用PDFPatcher重塑你的PDF工作流效率
3大核心突破:用PDFPatcher重塑你的PDF工作流效率 【免费下载链接】PDFPatcher PDF补丁丁——PDF工具箱,可以编辑书签、剪裁旋转页面、解除限制、提取或合并文档,探查文档结构,提取图片、转成图片等等 项目地址: https://gitcode…...

【AI Agent医疗落地实战指南】:20年三甲医院IT总监亲授5大不可绕过的合规雷区与3步部署法
更多请点击: https://intelliparadigm.com 第一章:AI Agent医疗落地的战略价值与时代必然性 当全球医疗系统持续面临医生资源紧张、基层诊疗能力不均、慢性病管理低效与患者依从性不足等结构性挑战时,AI Agent已不再仅是技术演进的选项&…...

大学生如何学习AI智能体?从零基础到OPC一人公司
掌握AI智能体能力,是大学生未来就业和创业的核心竞争力。 在AI智能体时代,普通人若能借助模型、智能体和自动化工具完成从任务交付到产品落地的闭环,将成为稀缺人才。智能体来了旗下的OPC中国,为大学生提供了完整的学习、实训和就…...

3个步骤:如何在Windows 11上实现Android应用无缝安装与管理
3个步骤:如何在Windows 11上实现Android应用无缝安装与管理 【免费下载链接】wsa-toolbox A Windows 11 application to easily install and use the Windows Subsystem For Android™ package on your computer. 项目地址: https://gitcode.com/gh_mirrors/ws/ws…...

Wi-Wi:2026 年 NAB 展亮点,实现皮秒级时间同步与毫米级距离测量!
Wi-Wi:实现 1 纳秒级无线时间同步2026 年 5 月 19 日,在 NAB 展会上,能看到 [Wi-Wi STAMP] 的演示。Wi-Wi STAMP 是一种无线时间同步协议,源自日本国立信息通信技术研究所(NICT)。Wi-Wi 技术特点Wi-Wi 即 W…...

ESP32/ESP8266固件备份全攻略:esptool与flash_download_tool实战详解
1. 项目概述:为什么我们需要备份ESP32/8266的固件? 在嵌入式开发或者物联网项目中,ESP32和ESP8266这两款芯片的应用已经非常普遍了。无论是做智能家居、数据采集还是各种DIY小玩意儿,我们经常会在上面编写和烧录固件。但不知道你…...

lin诊断功能寻址和静态电流测试方法
lin诊断功能寻址是不会回响应的,不管正响应还是负响应,而且进入会话必须是10 83这种(不知道是不是项目规定)****************************************************************************************************这个数字电流…...

opencode使用安装
确保已经安装好node npm安装opencode C:\WINDOWS\system32>npm install -g opencode-aiadded 3 packages in 2mC:\WINDOWS\system32>npm安装mcp-chrome C:\WINDOWS\system32>npm...

量子纠错码与逻辑门优化实现技术解析
1. 量子纠错码与逻辑门实现基础量子纠错码是量子计算中确保计算可靠性的核心技术。与经典计算不同,量子态具有相干性和不可克隆性,这使得量子信息在存储和处理过程中极易受到环境噪声的影响。稳定子码(Stabilizer Codes)作为一类重…...

从“能读文档”到“能开会吵架”,技术人英语进阶路线图
在软件测试领域,英语能力早已不是简历上“通过CET-4”的一行小字,而是决定职业天花板的关键变量。对于测试从业者而言,英语学习存在一条隐秘却深刻的分水岭:左边是能借助翻译插件磕磕绊绊读完需求文档的“生存模式”,右…...