【Pytorch】Visualization of Feature Maps(1)

学习参考来自
- CNN可视化Convolutional Features
- https://github.com/wmn7/ML_Practice/blob/master/2019_05_27/filter_visualizer.ipynb
文章目录
- filter 的激活值
filter 的激活值
原理:找一张图片,使得某个 layer 的 filter 的激活值最大,这张图片就是能被这个 filter 所检测的对象。
来个案例,流程:
- 初始化一张图片, 56X56
- 使用预训练好的 VGG16 网络,固定网络参数;
- 若想可视化第 40 层 layer 的第 k 个 filter 的 conv, 我们设置 loss 函数为 (-1*神经元激活值);
- 梯度下降, 对初始图片进行更新;
- 对得到的图片X1.2, 得到新的图片,重复上面的步骤;
其中第五步比较关键,我们可以看到初始化的图片不是很大,只有56X56. 这是因为原文作者在实际做的时候发现,若初始图片较大,得到的特征的频率会较高,即没有现在这么好的显示效果。
import torch
from torch.autograd import Variable
from PIL import Image, ImageOps
import torchvision.transforms as transforms
import torchvision.models as modelsimport numpy as np
import cv2
from cv2 import resize
from matplotlib import pyplot as pltdevice = torch.device("cuda" if torch.cuda.is_available() else "cpu")"initialize input image"
sz = 56
img = np.uint(np.random.uniform(150, 180, (3, sz, sz))) / 255  # (3, 56, 56)
img = torch.from_numpy(img[None]).float().to(device)  # (1, 3, 56, 56)"pretrained model"
model_vgg16 = models.vgg16_bn(pretrained=True).features.to(device).eval()
# downloading /home/xxx/.cache/torch/hub/checkpoints/vgg16_bn-6c64b313.pth, 500M+
# print(model_vgg16)
# print(len(list(model_vgg16.children())))  # 44
# print(list(model_vgg16.children()))"get the filter's output of one layer"
# 使用hook来得到网络中间层的输出
class SaveFeatures():def __init__(self, module):self.hook = module.register_forward_hook(self.hook_fn)def hook_fn(self, module, input, output):self.features = output.clone()def close(self):self.hook.remove()layer = 42
activations = SaveFeatures(list(model_vgg16.children())[layer])"backpropagation, setting hyper-parameters"
lr = 0.1
opt_steps = 25 # 迭代次数
filters = 265 # layer 42 的第 265 个 filter,使其激活值最大
upscaling_steps = 13 # 图像放大次数
blur = 3
upscaling_factor = 1.2 # 放大倍率"preprocessing of datasets"
cnn_normalization_mean = torch.tensor([0.485, 0.456, 0.406]).view(-1, 1, 1).to(device)
cnn_normalization_std = torch.tensor([0.299, 0.224, 0.225]).view(-1, 1, 1).to(device)"gradient descent"
for epoch in range(upscaling_steps):  # scale the image up up_scaling_steps timesimg = (img - cnn_normalization_mean) / cnn_normalization_stdimg[img > 1] = 1img[img < 0] = 0print("Image Shape1:", img.shape)img_var = Variable(img, requires_grad=True)  # convert image to Variable that requires grad"optimizer"optimizer = torch.optim.Adam([img_var], lr=lr, weight_decay=1e-6)for n in range(opt_steps):optimizer.zero_grad()model_vgg16(img_var)  # forwardloss = -activations.features[0, filters].mean()  # max the activationsloss.backward()optimizer.step()"restore the image"print("Loss:", loss.cpu().detach().numpy())img = img_var * cnn_normalization_std + cnn_normalization_meanimg[img>1] = 1img[img<0] = 0img = img.data.cpu().numpy()[0].transpose(1,2,0)sz = int(upscaling_factor * sz)  # calculate new image sizeimg = cv2.resize(img, (sz, sz), interpolation=cv2.INTER_CUBIC)  # scale image upif blur is not None:img = cv2.blur(img, (blur, blur))  # blur image to reduce high frequency patternsprint("Image Shape2:", img.shape)img = torch.from_numpy(img.transpose(2, 0, 1)[None]).to(device)print("Image Shape3:", img.shape)print(str(epoch), ", Finished")print("="*10)activations.close()  # remove the hookimage = img.cpu().clone()
image = image.squeeze(0)
unloader = transforms.ToPILImage()image = unloader(image)
image = cv2.cvtColor(np.asarray(image), cv2.COLOR_RGB2BGR)
cv2.imwrite("res1.jpg", image)
torch.cuda.empty_cache()"""
Image Shape1: torch.Size([1, 3, 56, 56])
Loss: -6.0634975
Image Shape2: (67, 67, 3)
Image Shape3: torch.Size([1, 3, 67, 67])
0 , Finished
==========
Image Shape1: torch.Size([1, 3, 67, 67])
Loss: -7.8898916
Image Shape2: (80, 80, 3)
Image Shape3: torch.Size([1, 3, 80, 80])
1 , Finished
==========
Image Shape1: torch.Size([1, 3, 80, 80])
Loss: -8.730318
Image Shape2: (96, 96, 3)
Image Shape3: torch.Size([1, 3, 96, 96])
2 , Finished
==========
Image Shape1: torch.Size([1, 3, 96, 96])
Loss: -9.697872
Image Shape2: (115, 115, 3)
Image Shape3: torch.Size([1, 3, 115, 115])
3 , Finished
==========
Image Shape1: torch.Size([1, 3, 115, 115])
Loss: -10.190881
Image Shape2: (138, 138, 3)
Image Shape3: torch.Size([1, 3, 138, 138])
4 , Finished
==========
Image Shape1: torch.Size([1, 3, 138, 138])
Loss: -10.315895
Image Shape2: (165, 165, 3)
Image Shape3: torch.Size([1, 3, 165, 165])
5 , Finished
==========
Image Shape1: torch.Size([1, 3, 165, 165])
Loss: -9.73861
Image Shape2: (198, 198, 3)
Image Shape3: torch.Size([1, 3, 198, 198])
6 , Finished
==========
Image Shape1: torch.Size([1, 3, 198, 198])
Loss: -9.503629
Image Shape2: (237, 237, 3)
Image Shape3: torch.Size([1, 3, 237, 237])
7 , Finished
==========
Image Shape1: torch.Size([1, 3, 237, 237])
Loss: -9.488493
Image Shape2: (284, 284, 3)
Image Shape3: torch.Size([1, 3, 284, 284])
8 , Finished
==========
Image Shape1: torch.Size([1, 3, 284, 284])
Loss: -9.100454
Image Shape2: (340, 340, 3)
Image Shape3: torch.Size([1, 3, 340, 340])
9 , Finished
==========
Image Shape1: torch.Size([1, 3, 340, 340])
Loss: -8.699549
Image Shape2: (408, 408, 3)
Image Shape3: torch.Size([1, 3, 408, 408])
10 , Finished
==========
Image Shape1: torch.Size([1, 3, 408, 408])
Loss: -8.90135
Image Shape2: (489, 489, 3)
Image Shape3: torch.Size([1, 3, 489, 489])
11 , Finished
==========
Image Shape1: torch.Size([1, 3, 489, 489])
Loss: -8.838546
Image Shape2: (586, 586, 3)
Image Shape3: torch.Size([1, 3, 586, 586])
12 , Finished
==========Process finished with exit code 0
"""
得到特征图

网上找个图片测试下,看响应是不是最大
测试图片

import torch
from torch.autograd import Variable
from PIL import Image, ImageOps
import torchvision.transforms as transforms
import torchvision.models as modelsimport numpy as np
import cv2
from cv2 import resize
from matplotlib import pyplot as pltdevice = torch.device("cuda" if torch.cuda.is_available() else "cpu")class SaveFeatures():def __init__(self, module):self.hook = module.register_forward_hook(self.hook_fn)def hook_fn(self, module, input, output):self.features = output.clone()def close(self):self.hook.remove()size = (224, 224)
picture = Image.open("./bird.jpg").convert("RGB")
picture = ImageOps.fit(picture, size, Image.ANTIALIAS)loader = transforms.ToTensor()
picture = loader(picture).to(device)
print(picture.shape)cnn_normalization_mean = torch.tensor([0.485, 0.456, 0.406]).view(-1, 1, 1).to(device)
cnn_normalization_std = torch.tensor([0.229, 0.224, 0.225]).view(-1, 1, 1).to(device)picture = (picture-cnn_normalization_mean) / cnn_normalization_stdmodel_vgg16 = models.vgg16_bn(pretrained=True).features.to(device).eval()
print(list(model_vgg16.children())[40])  # Conv2d(512, 512, kernel_size=(3, 3), stride=(1, 1), padding=(1, 1))
print(list(model_vgg16.children())[41])  # BatchNorm2d(512, eps=1e-05, momentum=0.1, affine=True, track_running_stats=True)
print(list(model_vgg16.children())[42])  # ReLU(inplace=True)layer = 42
filters = 265
activations = SaveFeatures(list(model_vgg16.children())[layer])with torch.no_grad():picture_var = Variable(picture[None])model_vgg16(picture_var)
activations.close()print(activations.features.shape)  # torch.Size([1, 512, 14, 14])# 画出每个 filter 的平均值
mean_act = [activations.features[0, i].mean().item() for i in range(activations.features.shape[1])]
plt.figure(figsize=(7,5))
act = plt.plot(mean_act, linewidth=2.)
extraticks = [filters]
ax = act[0].axes
ax.set_xlim(0, 500)
plt.axvline(x=filters, color="gray", linestyle="--")
ax.set_xlabel("feature map")
ax.set_ylabel("mane activation")
ax.set_xticks([0, 200, 400] + extraticks)
plt.show()"""
torch.Size([3, 224, 224])
Conv2d(512, 512, kernel_size=(3, 3), stride=(1, 1), padding=(1, 1))
BatchNorm2d(512, eps=1e-05, momentum=0.1, affine=True, track_running_stats=True)
ReLU(inplace=True)
torch.Size([1, 512, 14, 14])
"""

可以看到,265 特征图对该输入的相应最高
总结:实测了其他 layer 和 filter,画出来的直方图中,对应的 filter 相应未必是最高的,不过也很高,可能找的待测图片并不是最贴合设定 layer 的某个 filter 的特征。
相关文章:
【Pytorch】Visualization of Feature Maps(1)
学习参考来自 CNN可视化Convolutional Featureshttps://github.com/wmn7/ML_Practice/blob/master/2019_05_27/filter_visualizer.ipynb 文章目录 filter 的激活值 filter 的激活值 原理:找一张图片,使得某个 layer 的 filter 的激活值最大,…...

js修改浏览器地址栏里url的方法
1、更新url某一参数的值 function updateQueryStringParameter(uri, key, value) {if (!value) { return uri }var re new RegExp("([?&])" key ".*?(&|$)", "i");var separator uri.indexOf(?) ! -1 ? "&" : &q…...
(韩顺平笔记))
正则表达式(Java)(韩顺平笔记)
正则表达式(Java) 底层实现 package com.hspedu.RegExp;import java.util.regex.Matcher; import java.util.regex.Pattern;public class RegExp00 {public static void main(String[] args) {String content "1998年12月8日,第二代J…...
)
LLVM学习笔记(62)
4.4.3.3.2. 指令处理的设置 4.4.3.3.2.1. 目标机器相关设置 除了基类以外,X86TargetLowering构造函数本身也是一个庞然大物,我们必须要分段来看。V7.0做了不小的改动,改进了代码的结构,修改了一些指令的设置。 100 X86Targ…...
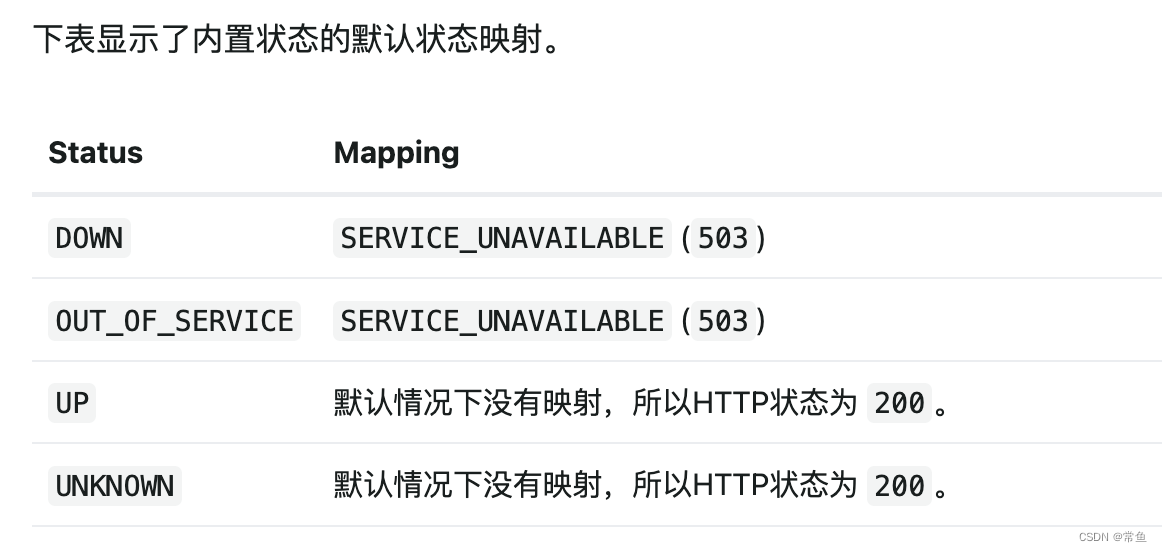
解决Spring Boot应用在Kubernetes上健康检查接口返回OUT_OF_SERVICE的问题
现象 在将Spring Boot应用部署到Kubernetes上时,健康检查接口/healthcheck返回的状态为{"status":"OUT_OF_SERVICE","groups":["liveness","readiness"]},而期望的是返回正常的健康状态。值得注意的…...

Java对象逃逸
关于作者:CSDN内容合伙人、技术专家, 从零开始做日活千万级APP。 专注于分享各领域原创系列文章 ,擅长java后端、移动开发、商业变现、人工智能等,希望大家多多支持。 未经允许不得转载 目录 一、导读二、概览三、相关知识3.1 逃逸…...

Greenplum的数据库年龄检查处理
概述 Greenplum是基于Postgresql数据库的分布式数据库,而PG数据库在事务及多版本并发控制的实现方式上很特别,采用的是递增事务id的方法,事务id大的事务,认为比较新,反之事务id小,认为比较旧。 事务id的上…...
[HCIE] IPSec-VPN (IKE自动模式)
概念: IKE:因特网密钥交换 实验目标:pc1与pc2互通 步骤1:R1与R3配置默认路由 R1: ip route-static 0.0.0.0 0.0.0.0 12.1.1.2 R2: ip route-static 0.0.0.0 0.0.0.0 23.1.1.2 步骤2:配ACL…...

Qt/QML编程学习之心得:一个Qt工程的学习笔记(九)
这里是关于如何使用Qt Widget开发,而Qt Quick/QML的开发是另一种方式。 1、.pro文件 加CONFIG += c++11,才可以使用Lamda表达式(一般用于connect的内嵌槽函数) 2、QWidget 这是Qt新增加的一个类,基类,窗口类,QMainWindow和QDialog都继承与它。 3、Main函数 QApplicati…...

c++ 课程笔记
105课: cpp文件分为 .h .cpp .cpp 文件 110课:124课 深拷贝 浅拷贝 自建拷贝构造解决浅拷贝释放new后堆区析构函数的问题 (浅拷贝 拷贝内存地址, 释放堆区时 导致源数据 释放时,该地址无数据?而报错) 浅拷贝: 拷贝了对方的值和 堆区内存地址(删除 影响原数据堆区) 深拷贝…...
ELK企业级日志分析平台——ES集群监控
启用xpack认证 官网:https://www.elastic.co/guide/en/elasticsearch/reference/7.6/configuring-tls.html#node-certificates 在elk1上生成证书 [rootelk1 ~]# cd /usr/share/elasticsearch/[rootelk1 elasticsearch]# bin/elasticsearch-certutil ca[rootelk1 ela…...
Twincat使用:EtherCAT通信扫描硬件设备链接PLC变量
EtherCAT通信采用主从架构,其中一个主站设备负责整个EtherCAT网络的管理和控制,而从站设备则负责在数据环网上传递数据。 主站设备可以是计算机、工控机、PLC等, 而从站设备可以是传感器、执行器、驱动器等。 EL3102:MDP5001_300_CF8D1684;…...
手机APP-MCP走蓝牙无线遥控智能安全帽~执法记录仪~拍照录像,并可做基础的配置,例如修改服务器IP以及配置WiFi等
手机APP-MCP走蓝牙无线遥控智能安全帽~执法记录仪~拍照录像,并可做基础的配置,例如修改服务器IP以及配置WiFi等 手机APP-MCP走蓝牙无线遥控智能安全帽~执法记录仪~拍照录像,并可做基础的配置,例如修改服务器IP以及配置WiFi等, AIoT万物智联,智能安全帽…...
网络互联与IP地址
目录 网络互联概述网络的定义与分类网络的定义网络的分类 OSI模型和DoD模型网络拓扑结构总线型拓扑结构星型拓扑结构环型拓扑结构 传输介质同轴电缆双绞线光纤 介质访问控制方式CSMA/CD令牌 网络设备网卡集线器交换机路由器总结 IP地址A、B、C类IP地址特殊地址形式 子网与子网掩…...
Android设计模式--模板方法模式
一,定义 定义一个操作中的算法的框架,而将一些步骤延迟到子类中,使得子类可以不改变一个算法的结构即可重定义该算法的某些特定步骤。 在面向对象的开发过程中,通常会遇到这样一个问题,我们知道一个算法所需的关键步…...

大语言模型——BERT和GPT的那些事儿
前言 自然语言处理是人工智能的一个分支。在自然语言处理领域,有两个相当著名的大语言模型——BERT和GPT。两个模型是同一年提出的,那一年BERT以不可抵挡之势,让整个人工智能届为之震动。据说当年BERT的影响力是GPT的十倍以上。而现在&#…...

Docker 命令详解
1. 容器生命周期管理 命令说明文档run创建一个新的容器并运行一个命令Docker run 命令start/stop/restart启动、停止、重启容器Docker start/stop/restart 命令kill杀掉一个运行中的容器Docker kill 命令rm删除一个或多个容器Docker rm 命令pause/unpause暂停 恢复容器中所有的…...

ios打包,证书获取
HBuilderX 打包ios界面: Bundle ID(AppID): 又称应用ID,是每一个ios应用的唯一标识,就像一个人的身份证号码; 每开发一个新应用,首先都需要先去创建一个Bundle ID Bundle ID 格式: 一般为&…...

linux(nginx安装配置,tomcat服务命令操作)
首先进系统文件夹 /usr/lib/systemd/systemLs | grep mysql 查看带有命名有MySQL的文件夹修改tomcat.service文件复制jdk目录替换成我们的路径替换成我们的路径进入这个目录,把修改好的文件拖到我们的工具里面重新刷新系统 systemctl daemon-reload查看tomcat状态…...

jQuery_03 dom对象和jQuery对象的互相转换
dom对象和jQuery对象 dom对象 jQuery对象 在一个文件中同时存在两种对象 dom对象: 通过js中的document对象获取的对象 或者创建的对象 jQuery对象: 通过jQuery中的函数获取的对象。 为什么使用dom或jQuery对象呢? 目的是 要使用dom对象的函数或者属性 以及呢 要…...

如何高效限制ACE-Guard进程资源占用:sguard_limit完整使用指南
如何高效限制ACE-Guard进程资源占用:sguard_limit完整使用指南 【免费下载链接】sguard_limit 限制ACE-Guard Client EXE占用系统资源,支持各种腾讯游戏 项目地址: https://gitcode.com/gh_mirrors/sg/sguard_limit 想要在玩腾讯游戏时获得更流畅…...

GPU算力优化部署Qwen3-4B-Thinking:vLLM显存占用降低40%实操
GPU算力优化部署Qwen3-4B-Thinking:vLLM显存占用降低40%实操 1. 模型简介与优化背景 Qwen3-4B-Thinking-2507-Gemini-2.5-Flash-Distill是一个基于Qwen3-4B架构的文本生成模型,通过在大约5440万个由Gemini 2.5 Flash生成的token上进行训练,…...

Windows 11任务栏拖放功能修复:如何恢复被微软移除的高效操作
Windows 11任务栏拖放功能修复:如何恢复被微软移除的高效操作 【免费下载链接】Windows11DragAndDropToTaskbarFix "Windows 11 Drag & Drop to the Taskbar (Fix)" fixes the missing "Drag & Drop to the Taskbar" support in Window…...

避坑指南:GD32F470的SPI FIFO与DMA刷屏时,为何屏幕会闪烁或花屏?
GD32F470 SPI DMA刷屏异常全解析:从FIFO机制到数据对齐的深度避坑指南 当你在GD32F470上实现SPI DMA刷屏时,是否遇到过屏幕闪烁、花屏或数据错位的诡异现象?这背后往往隐藏着SPI FIFO机制、DMA传输边界、数据宽度匹配等关键技术细节。本文将带…...

别再只盯着算法了!搭建一个高可用的实时配送调度系统,架构设计与工程实践才是关键
高可用实时配送调度系统的架构设计与工程实践 当午间高峰期的外卖订单如潮水般涌入系统,或是"双十一"期间每分钟数万笔配送请求需要处理时,算法模型的理论最优解在工程实践中往往面临严峻挑战。真正决定系统成败的,是能否在每秒数万…...

SkyReels-V2-DF-14B-720P 模型技术白皮书
一、模型简介SkyReels-V2-DF-14B-720P 是由昆仑万维 SkyworkAI 团队于 2025 年 4 月正式开源的全球首款基于 Diffusion-forcing(扩散强迫)架构的无限时长电影级视频生成大模型,作为 SkyReels-V2 系列的旗舰高分辨率版本,以 140 亿…...

目前正规的隔墙板公司价格
在建筑装修领域,隔墙板的使用越来越广泛,它具有安装便捷、隔音隔热等诸多优点。而河北作为建筑材料产业较为发达的地区,有众多正规的隔墙板公司。下面我们就来详细了解一下目前河北正规隔墙板公司的价格情况。一、不同材质隔墙板价格差异1. 石…...

目标检测面试必考:深入理解IoU、GIoU、DIoU损失函数的区别与代码实现
目标检测进阶:从IoU到CIoU的损失函数演进与实战解析 在计算机视觉领域,目标检测任务的核心挑战之一是如何精确评估预测框与真实框之间的匹配程度。传统IoU(Intersection over Union)作为基础指标,虽然直观有效…...
)
STM32驱动BQ40Z50电量计:手把手教你读取电压电流和剩余电量(附完整代码)
STM32与BQ40Z50实战:高精度电池监测系统开发指南 在便携式电子设备、无人机和电动工具等领域,精确的电池状态监测直接关系到用户体验和设备可靠性。BQ40Z50作为TI推出的智能电池管理芯片,配合STM32微控制器,能够构建一套工业级精度…...
调整CUTLASS编译参数与性能测试)
从V100到4090:如何为不同架构GPU(Volta/Ampere)调整CUTLASS编译参数与性能测试
从V100到RTX 4090:跨世代GPU的CUTLASS编译优化与性能调优实战 当实验室同时存在Volta架构的Tesla V100和Ampere架构的RTX 4090时,开发者面临一个现实挑战:如何为不同计算能力的GPU定制CUTLASS编译参数?这不仅关系到能否充分发挥硬…...