OpenMMlab导出yolox模型并用onnxruntime和tensorrt推理
导出onnx文件
直接使用脚本
import torch
from mmdet.apis import init_detector, inference_detectorconfig_file = './configs/yolox/yolox_tiny_8xb8-300e_coco.py'
checkpoint_file = 'yolox_tiny_8x8_300e_coco_20211124_171234-b4047906.pth'
model = init_detector(config_file, checkpoint_file, device='cpu') # or device='cuda:0'
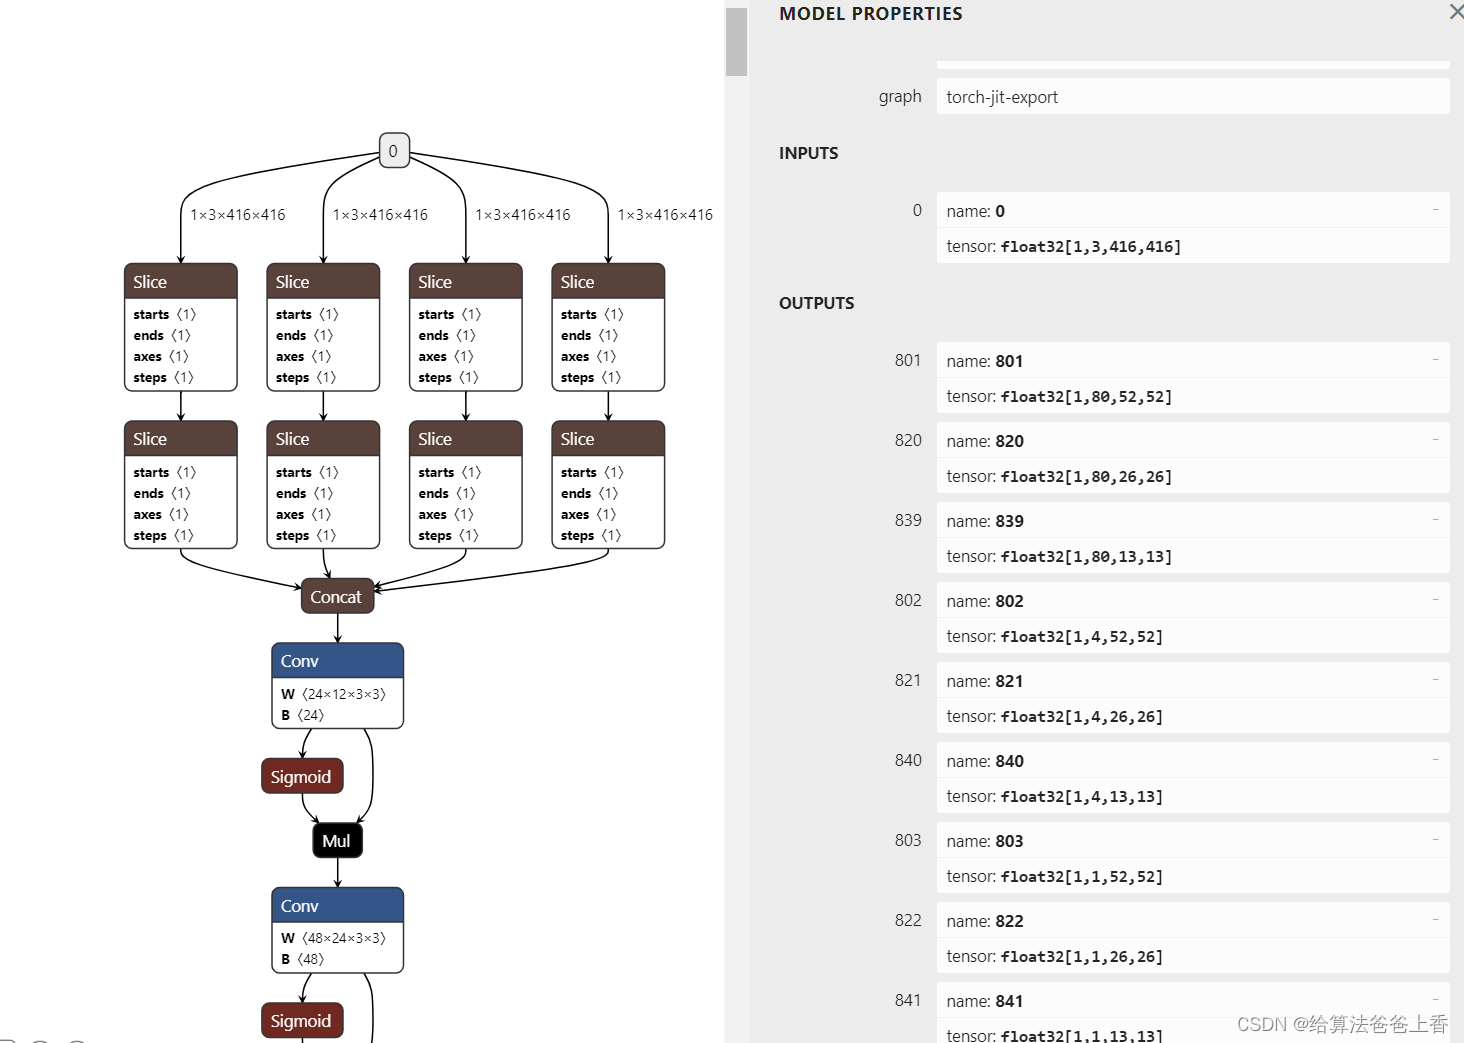
torch.onnx.export(model, (torch.zeros(1, 3, 416, 416),), "yolox.onnx", opset_version=11)
导出的onnx结构如下:
输出是包含多个检测头的输出。若需要合并检测结果,需要修改脚本如下:
import torch
import cv2
import numpy as np
from mmdet.apis import init_detector, inference_detectorconfig_file = './configs/yolox/yolox_tiny_8xb8-300e_coco.py'
checkpoint_file = 'yolox_tiny_8x8_300e_coco_20211124_171234-b4047906.pth'
model = init_detector(config_file, checkpoint_file, device='cpu') # or device='cuda:0'class YOLOX(torch.nn.Module):def __init__(self):super().__init__()self.model = init_detector(config_file, checkpoint_file, device='cpu')self.class_num = 80self.strides = [(8, 8), (16, 16), (32, 32)]def _meshgrid(self, x, y):yy, xx = torch.meshgrid(y, x)return xx.reshape(-1), yy.reshape(-1)def grid_priors(self, featmap_sizes):multi_level_priors = []for i in range(len(featmap_sizes)):feat_h, feat_w = featmap_sizes[i]stride_w, stride_h = self.strides[i]shift_x = torch.arange(0, feat_w) * stride_wshift_y = torch.arange(0, feat_h) * stride_hshift_xx, shift_yy = self._meshgrid(shift_x, shift_y)stride_w = shift_xx.new_full((shift_xx.shape[0], ), stride_w)stride_h = shift_xx.new_full((shift_yy.shape[0], ), stride_h)shifts = torch.stack([shift_xx, shift_yy, stride_w, stride_h], dim=-1) multi_level_priors.append(shifts)return multi_level_priorsdef bbox_decode(self, priors, bbox_preds):xys = (bbox_preds[..., :2] * priors[:, 2:]) + priors[:, :2]whs = bbox_preds[..., 2:].exp() * priors[:, 2:]tl_x = (xys[..., 0] - whs[..., 0] / 2)tl_y = (xys[..., 1] - whs[..., 1] / 2)br_x = (xys[..., 0] + whs[..., 0] / 2)br_y = (xys[..., 1] + whs[..., 1] / 2)decoded_bboxes = torch.stack([tl_x, tl_y, br_x, br_y], -1)return decoded_bboxesdef forward(self, x):x = self.model.backbone(x)x = self.model.neck(x)pred_maps = self.model.bbox_head(x)cls_scores, bbox_preds, objectnesses = pred_maps featmap_sizes = [cls_score.shape[2:] for cls_score in cls_scores] mlvl_priors = self.grid_priors(featmap_sizes)flatten_cls_scores = [cls_score.permute(0, 2, 3, 1).reshape(1, -1, self.class_num) for cls_score in cls_scores]flatten_bbox_preds = [bbox_pred.permute(0, 2, 3, 1).reshape(1, -1, 4) for bbox_pred in bbox_preds]flatten_objectness = [objectness.permute(0, 2, 3, 1).reshape(1, -1) for objectness in objectnesses]flatten_cls_scores = torch.cat(flatten_cls_scores, dim=1).sigmoid()flatten_bbox_preds = torch.cat(flatten_bbox_preds, dim=1)flatten_objectness = torch.cat(flatten_objectness, dim=1).sigmoid()flatten_priors = torch.cat(mlvl_priors)flatten_bboxes = self.bbox_decode(flatten_priors, flatten_bbox_preds)return flatten_bboxes, flatten_objectness, flatten_cls_scoresmodel = YOLOX().eval()
input = torch.zeros(1, 3, 416, 416, device='cpu')
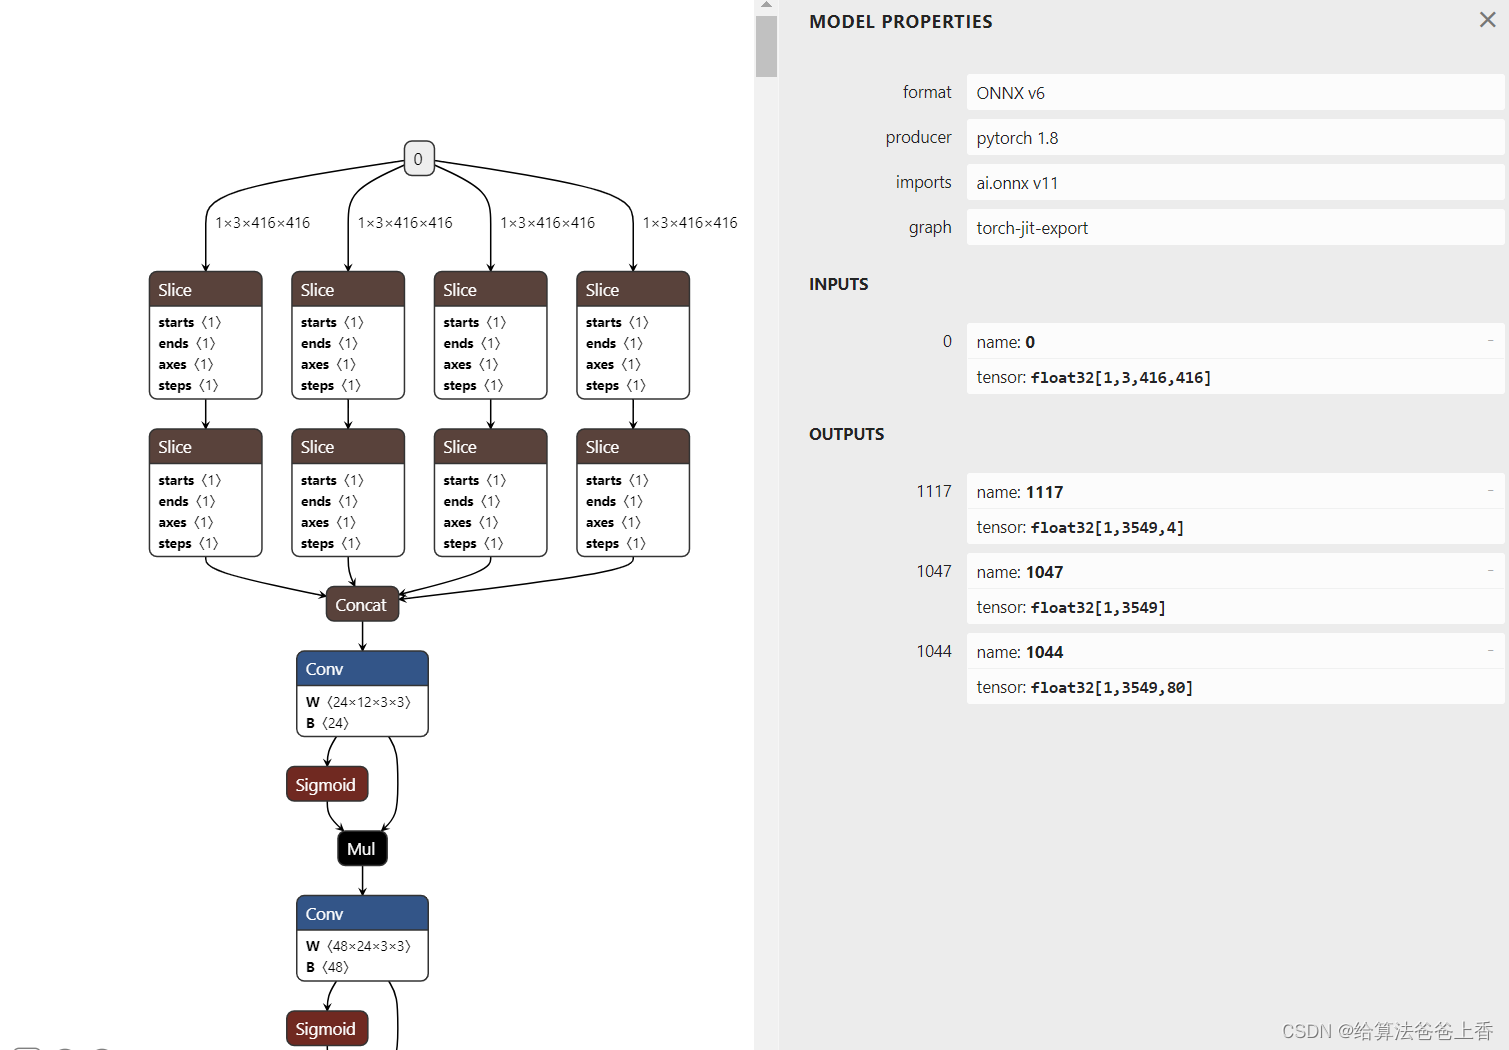
torch.onnx.export(model, input, "yolox.onnx", opset_version=11)
导出的onnx结构如下:
安装mmdeploy的话,可以通过下面脚本导出onnx模型。
from mmdeploy.apis import torch2onnx
from mmdeploy.backend.sdk.export_info import export2SDKimg = 'bus.jpg'
work_dir = './work_dir/onnx/yolox'
save_file = './end2end.onnx'
deploy_cfg = 'mmdeploy/configs/mmdet/detection/detection_onnxruntime_dynamic.py'
model_cfg = 'mmdetection/configs/yolox/yolox_tiny_8xb8-300e_coco.py'
model_checkpoint = 'checkpoints/yolox_tiny_8x8_300e_coco_20211124_171234-b4047906.pth'
device = 'cpu'# 1. convert model to onnx
torch2onnx(img, work_dir, save_file, deploy_cfg, model_cfg, model_checkpoint, device)# 2. extract pipeline info for sdk use (dump-info)
export2SDK(deploy_cfg, model_cfg, work_dir, pth=model_checkpoint, device=device)
onnx模型的结构如下: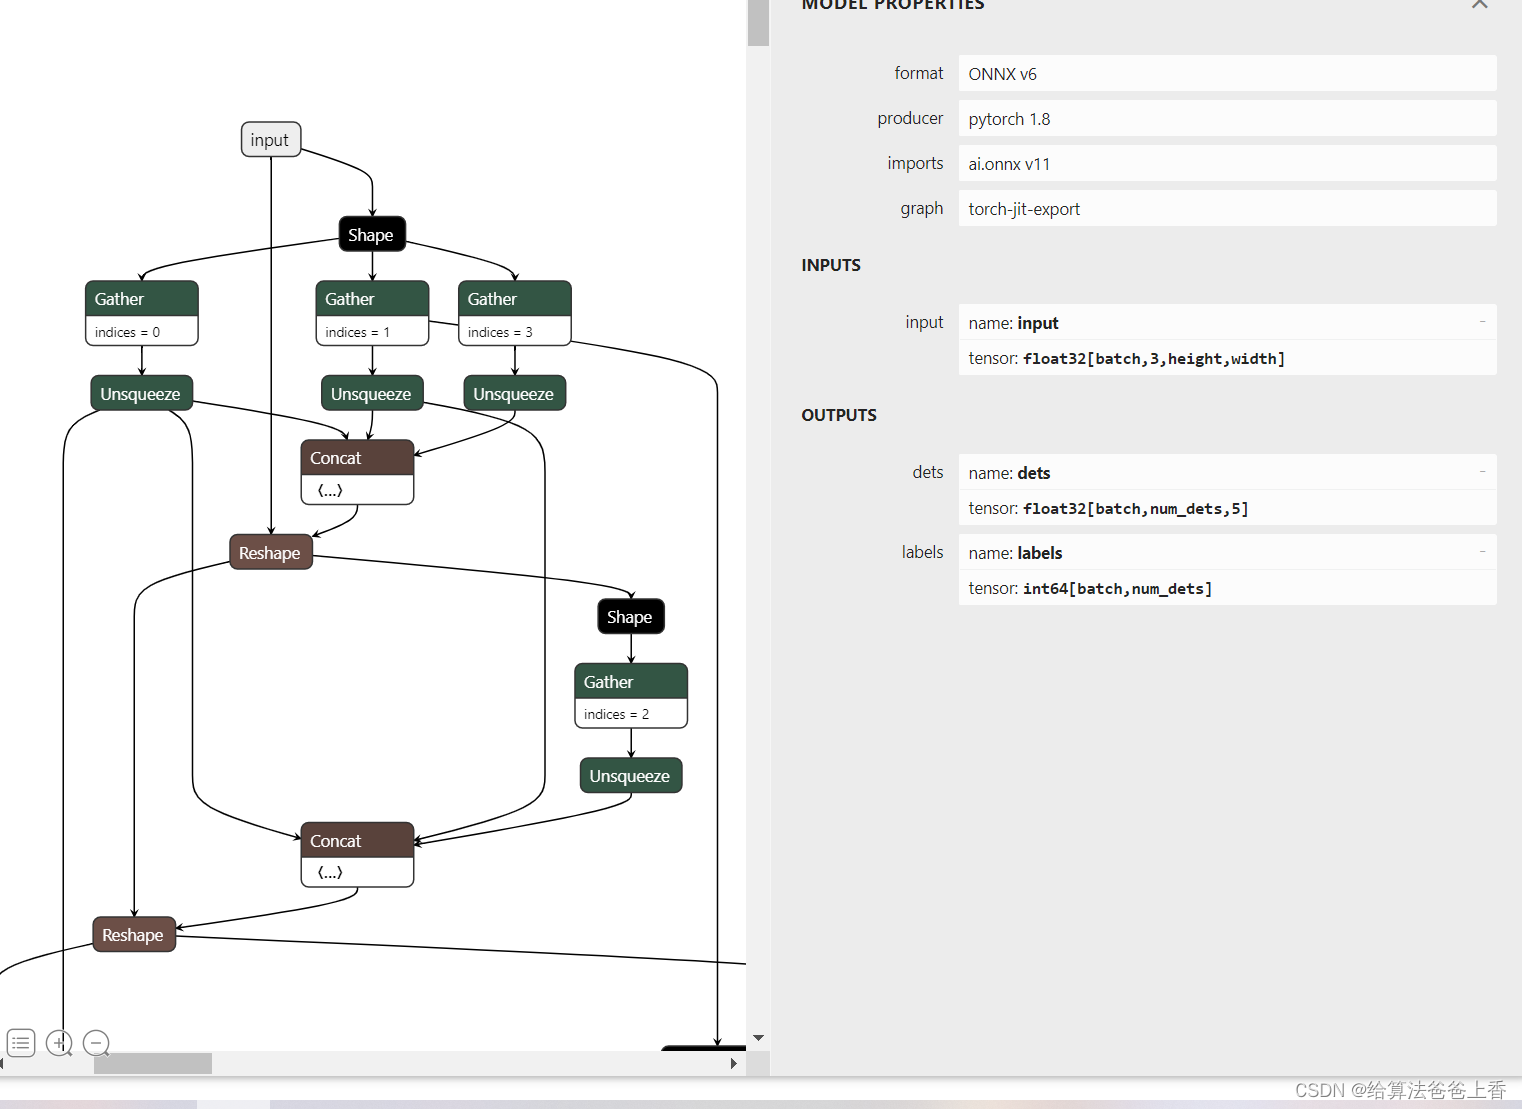
onnxruntime推理
手动导出的onnx模型使用onnxruntime推理:
import cv2
import numpy as np
import onnxruntimeclass_names = ['person', 'bicycle', 'car', 'motorcycle', 'airplane', 'bus', 'train', 'truck', 'boat', 'traffic light','fire hydrant', 'stop sign', 'parking meter', 'bench', 'bird', 'cat', 'dog', 'horse', 'sheep', 'cow','elephant', 'bear', 'zebra', 'giraffe', 'backpack', 'umbrella', 'handbag', 'tie', 'suitcase', 'frisbee','skis', 'snowboard', 'sports ball', 'kite', 'baseball bat', 'baseball glove', 'skateboard', 'surfboard','tennis racket', 'bottle', 'wine glass', 'cup', 'fork', 'knife', 'spoon', 'bowl', 'banana', 'apple','sandwich', 'orange', 'broccoli', 'carrot', 'hot dog', 'pizza', 'donut', 'cake', 'chair', 'couch','potted plant', 'bed', 'dining table', 'toilet', 'tv', 'laptop', 'mouse', 'remote', 'keyboard', 'cell phone','microwave', 'oven', 'toaster', 'sink', 'refrigerator', 'book', 'clock', 'vase', 'scissors', 'teddy bear','hair drier', 'toothbrush'] #coco80类别
input_shape = (416, 416)
score_threshold = 0.2
nms_threshold = 0.5
confidence_threshold = 0.2   def nms(boxes, scores, score_threshold, nms_threshold):x1 = boxes[:, 0]y1 = boxes[:, 1]x2 = boxes[:, 2]y2 = boxes[:, 3]areas = (y2 - y1 + 1) * (x2 - x1 + 1)keep = []index = scores.argsort()[::-1] while index.size > 0:i = index[0]keep.append(i)x11 = np.maximum(x1[i], x1[index[1:]]) y11 = np.maximum(y1[i], y1[index[1:]])x22 = np.minimum(x2[i], x2[index[1:]])y22 = np.minimum(y2[i], y2[index[1:]])w = np.maximum(0, x22 - x11 + 1)                              h = np.maximum(0, y22 - y11 + 1) overlaps = w * hious = overlaps / (areas[i] + areas[index[1:]] - overlaps)idx = np.where(ious <= nms_threshold)[0]index = index[idx + 1]return keepdef filter_box(outputs): outputs0, outputs1, outputs2 = outputsflag = outputs1 > confidence_thresholdoutput0 = outputs0[flag].reshape(-1, 4)output1 = outputs1[flag].reshape(-1, 1)classes_scores = outputs2[flag].reshape(-1, 80)outputs = np.concatenate((output0, output1, classes_scores), axis=1)boxes = []scores = []class_ids = []for i in range(len(classes_scores)):class_id = np.argmax(classes_scores[i])outputs[i][4] *= classes_scores[i][class_id]outputs[i][5] = class_idif outputs[i][4] > score_threshold:boxes.append(outputs[i][:6])scores.append(outputs[i][4])class_ids.append(outputs[i][5])boxes = np.array(boxes)scores = np.array(scores)indices = nms(boxes, scores, score_threshold, nms_threshold) output = boxes[indices]return outputdef letterbox(im, new_shape=(416, 416), color=(114, 114, 114)):# Resize and pad image while meeting stride-multiple constraintsshape = im.shape[:2]  # current shape [height, width]# Scale ratio (new / old)r = min(new_shape[0] / shape[0], new_shape[1] / shape[1])# Compute paddingnew_unpad = int(round(shape[1] * r)), int(round(shape[0] * r))    dw, dh = (new_shape[1] - new_unpad[0])/2, (new_shape[0] - new_unpad[1])/2  # wh padding top, bottom = int(round(dh - 0.1)), int(round(dh + 0.1))left, right = int(round(dw - 0.1)), int(round(dw + 0.1))if shape[::-1] != new_unpad:  # resizeim = cv2.resize(im, new_unpad, interpolation=cv2.INTER_LINEAR)im = cv2.copyMakeBorder(im, top, bottom, left, right, cv2.BORDER_CONSTANT, value=color)  # add borderreturn imdef scale_boxes(boxes, shape):# Rescale boxes (xyxy) from input_shape to shapegain = min(input_shape[0] / shape[0], input_shape[1] / shape[1])  # gain  = old / newpad = (input_shape[1] - shape[1] * gain) / 2, (input_shape[0] - shape[0] * gain) / 2  # wh paddingboxes[..., [0, 2]] -= pad[0]  # x paddingboxes[..., [1, 3]] -= pad[1]  # y paddingboxes[..., :4] /= gainboxes[..., [0, 2]] = boxes[..., [0, 2]].clip(0, shape[1])  # x1, x2boxes[..., [1, 3]] = boxes[..., [1, 3]].clip(0, shape[0])  # y1, y2return boxesdef draw(image, box_data):box_data = scale_boxes(box_data, image.shape)boxes = box_data[...,:4].astype(np.int32) scores = box_data[...,4]classes = box_data[...,5].astype(np.int32)for box, score, cl in zip(boxes, scores, classes):top, left, right, bottom = boxcv2.rectangle(image, (top, left), (right, bottom), (255, 0, 0), 1)cv2.putText(image, '{0} {1:.2f}'.format(class_names[cl], score), (top, left), cv2.FONT_HERSHEY_SIMPLEX, 0.6, (0, 0, 255), 1)if __name__=="__main__":image = cv2.imread('bus.jpg')input = letterbox(image, input_shape)input = cv2.resize(image, input_shape)input = input[:, :, ::-1].transpose(2, 0, 1).astype(dtype=np.float32)  #BGR2RGB和HWC2CHWinput = np.expand_dims(input, axis=0)onnx_session = onnxruntime.InferenceSession('yolox.onnx', providers=['CPUExecutionProvider'])input_name = []for node in onnx_session.get_inputs():input_name.append(node.name)output_name = []for node in onnx_session.get_outputs():output_name.append(node.name)inputs = {}for name in input_name:inputs[name] = inputoutputs = onnx_session.run(None, inputs)boxes = filter_box(outputs)draw(image, boxes)cv2.imwrite('result.jpg', image)
mmdeploy导出的onnx模型使用onnxruntime推理:
import cv2
import numpy as np
import onnxruntimeclass_names = ['person', 'bicycle', 'car', 'motorcycle', 'airplane', 'bus', 'train', 'truck', 'boat', 'traffic light','fire hydrant', 'stop sign', 'parking meter', 'bench', 'bird', 'cat', 'dog', 'horse', 'sheep', 'cow','elephant', 'bear', 'zebra', 'giraffe', 'backpack', 'umbrella', 'handbag', 'tie', 'suitcase', 'frisbee','skis', 'snowboard', 'sports ball', 'kite', 'baseball bat', 'baseball glove', 'skateboard', 'surfboard','tennis racket', 'bottle', 'wine glass', 'cup', 'fork', 'knife', 'spoon', 'bowl', 'banana', 'apple','sandwich', 'orange', 'broccoli', 'carrot', 'hot dog', 'pizza', 'donut', 'cake', 'chair', 'couch','potted plant', 'bed', 'dining table', 'toilet', 'tv', 'laptop', 'mouse', 'remote', 'keyboard', 'cell phone','microwave', 'oven', 'toaster', 'sink', 'refrigerator', 'book', 'clock', 'vase', 'scissors', 'teddy bear','hair drier', 'toothbrush'] #coco80类别
input_shape = (416, 416)
confidence_threshold = 0.2def filter_box(outputs): #删除置信度小于confidence_threshold的BOXflag = outputs[0][..., 4] > confidence_thresholdboxes = outputs[0][flag] class_ids = outputs[1][flag].reshape(-1, 1) output = np.concatenate((boxes, class_ids), axis=1)  return outputdef letterbox(im, new_shape=(416, 416), color=(114, 114, 114)):# Resize and pad image while meeting stride-multiple constraintsshape = im.shape[:2]  # current shape [height, width]# Scale ratio (new / old)r = min(new_shape[0] / shape[0], new_shape[1] / shape[1])# Compute paddingnew_unpad = int(round(shape[1] * r)), int(round(shape[0] * r))    dw, dh = (new_shape[1] - new_unpad[0])/2, (new_shape[0] - new_unpad[1])/2  # wh padding top, bottom = int(round(dh - 0.1)), int(round(dh + 0.1))left, right = int(round(dw - 0.1)), int(round(dw + 0.1))if shape[::-1] != new_unpad:  # resizeim = cv2.resize(im, new_unpad, interpolation=cv2.INTER_LINEAR)im = cv2.copyMakeBorder(im, top, bottom, left, right, cv2.BORDER_CONSTANT, value=color)  # add borderreturn imdef scale_boxes(input_shape, boxes, shape):# Rescale boxes (xyxy) from input_shape to shapegain = min(input_shape[0] / shape[0], input_shape[1] / shape[1])  # gain  = old / newpad = (input_shape[1] - shape[1] * gain) / 2, (input_shape[0] - shape[0] * gain) / 2  # wh paddingboxes[..., [0, 2]] -= pad[0]  # x paddingboxes[..., [1, 3]] -= pad[1]  # y paddingboxes[..., :4] /= gainboxes[..., [0, 2]] = boxes[..., [0, 2]].clip(0, shape[1])  # x1, x2boxes[..., [1, 3]] = boxes[..., [1, 3]].clip(0, shape[0])  # y1, y2return boxesdef draw(image, box_data):box_data = scale_boxes(input_shape, box_data, image.shape)boxes = box_data[...,:4].astype(np.int32) scores = box_data[...,4]classes = box_data[...,5].astype(np.int32)for box, score, cl in zip(boxes, scores, classes):top, left, right, bottom = boxcv2.rectangle(image, (top, left), (right, bottom), (255, 0, 0), 1)cv2.putText(image, '{0} {1:.2f}'.format(class_names[cl], score), (top, left), cv2.FONT_HERSHEY_SIMPLEX, 0.6, (0, 0, 255), 1)if __name__=="__main__":images = cv2.imread('bus.jpg')input = letterbox(images, input_shape)input = input[:, :, ::-1].transpose(2, 0, 1).astype(dtype=np.float32)  #BGR2RGB和HWC2CHWinput = np.expand_dims(input, axis=0)onnx_session = onnxruntime.InferenceSession('../work_dir/onnx/yolox/end2end.onnx', providers=['CPUExecutionProvider'])input_name = []for node in onnx_session.get_inputs():input_name.append(node.name)output_name = []for node in onnx_session.get_outputs():output_name.append(node.name)inputs = {}for name in input_name:inputs[name] = inputoutputs = onnx_session.run(None, inputs)boxes = filter_box(outputs)draw(images, boxes)cv2.imwrite('result.jpg', images)
直接使用mmdeploy的api推理:
from mmdeploy.apis import inference_modelmodel_cfg = 'mmdetection/configs/yolox/yolox_tiny_8xb8-300e_coco.py'
deploy_cfg = 'mmdeploy/configs/mmdet/detection/detection_onnxruntime_dynamic.py'
img = 'bus.jpg'
backend_files = ['work_dir/onnx/yolox/end2end.onnx']
device = 'cpu'result = inference_model(model_cfg, deploy_cfg, backend_files, img, device)
print(result)
或者:
from mmdeploy_runtime import Detector
import cv2# 读取图片
img = cv2.imread('bus.jpg')# 创建检测器
detector = Detector(model_path='work_dir/onnx/yolox', device_name='cpu')# 执行推理
bboxes, labels, _ = detector(img)
# 使用阈值过滤推理结果,并绘制到原图中
indices = [i for i in range(len(bboxes))]
for index, bbox, label_id in zip(indices, bboxes, labels):[left, top, right, bottom], score = bbox[0:4].astype(int),  bbox[4]if score < 0.3:continuecv2.rectangle(img, (left, top), (right, bottom), (0, 255, 0))
cv2.imwrite('result.jpg', img)
导出engine文件
这里通过trtexec转换onnx文件,LZ的版本是TensorRT-8.2.1.8。
./trtexec.exe --onnx=yolox.onnx --saveEngine=yolox.engine --workspace=20480
tensorrt推理
手动导出的模型使用tensorrt推理:
import cv2
import numpy as np
import tensorrt as trt
import pycuda.autoinit
import pycuda.driver as cuda  class_names = ['person', 'bicycle', 'car', 'motorcycle', 'airplane', 'bus', 'train', 'truck', 'boat', 'traffic light','fire hydrant', 'stop sign', 'parking meter', 'bench', 'bird', 'cat', 'dog', 'horse', 'sheep', 'cow','elephant', 'bear', 'zebra', 'giraffe', 'backpack', 'umbrella', 'handbag', 'tie', 'suitcase', 'frisbee','skis', 'snowboard', 'sports ball', 'kite', 'baseball bat', 'baseball glove', 'skateboard', 'surfboard','tennis racket', 'bottle', 'wine glass', 'cup', 'fork', 'knife', 'spoon', 'bowl', 'banana', 'apple','sandwich', 'orange', 'broccoli', 'carrot', 'hot dog', 'pizza', 'donut', 'cake', 'chair', 'couch','potted plant', 'bed', 'dining table', 'toilet', 'tv', 'laptop', 'mouse', 'remote', 'keyboard', 'cell phone','microwave', 'oven', 'toaster', 'sink', 'refrigerator', 'book', 'clock', 'vase', 'scissors', 'teddy bear','hair drier', 'toothbrush'] #coco80类别
input_shape = (416, 416)
score_threshold = 0.2
nms_threshold = 0.5
confidence_threshold = 0.2   def nms(boxes, scores, score_threshold, nms_threshold):x1 = boxes[:, 0]y1 = boxes[:, 1]x2 = boxes[:, 2]y2 = boxes[:, 3]areas = (y2 - y1 + 1) * (x2 - x1 + 1)keep = []index = scores.argsort()[::-1] while index.size > 0:i = index[0]keep.append(i)x11 = np.maximum(x1[i], x1[index[1:]]) y11 = np.maximum(y1[i], y1[index[1:]])x22 = np.minimum(x2[i], x2[index[1:]])y22 = np.minimum(y2[i], y2[index[1:]])w = np.maximum(0, x22 - x11 + 1)                              h = np.maximum(0, y22 - y11 + 1) overlaps = w * hious = overlaps / (areas[i] + areas[index[1:]] - overlaps)idx = np.where(ious <= nms_threshold)[0]index = index[idx + 1]return keepdef filter_box(outputs): outputs0, outputs1, outputs2 = outputsflag = outputs1 > confidence_thresholdoutput0 = outputs0[flag].reshape(-1, 4)output1 = outputs1[flag].reshape(-1, 1)classes_scores = outputs2[flag].reshape(-1, 80)outputs = np.concatenate((output0, output1, classes_scores), axis=1)boxes = []scores = []class_ids = []for i in range(len(classes_scores)):class_id = np.argmax(classes_scores[i])outputs[i][4] *= classes_scores[i][class_id]outputs[i][5] = class_idif outputs[i][4] > score_threshold:boxes.append(outputs[i][:6])scores.append(outputs[i][4])class_ids.append(outputs[i][5])boxes = np.array(boxes)scores = np.array(scores)indices = nms(boxes, scores, score_threshold, nms_threshold) output = boxes[indices]return outputdef letterbox(im, new_shape=(416, 416), color=(114, 114, 114)):# Resize and pad image while meeting stride-multiple constraintsshape = im.shape[:2]  # current shape [height, width]# Scale ratio (new / old)r = min(new_shape[0] / shape[0], new_shape[1] / shape[1])# Compute paddingnew_unpad = int(round(shape[1] * r)), int(round(shape[0] * r))    dw, dh = (new_shape[1] - new_unpad[0])/2, (new_shape[0] - new_unpad[1])/2  # wh padding top, bottom = int(round(dh - 0.1)), int(round(dh + 0.1))left, right = int(round(dw - 0.1)), int(round(dw + 0.1))if shape[::-1] != new_unpad:  # resizeim = cv2.resize(im, new_unpad, interpolation=cv2.INTER_LINEAR)im = cv2.copyMakeBorder(im, top, bottom, left, right, cv2.BORDER_CONSTANT, value=color)  # add borderreturn imdef scale_boxes(boxes, shape):# Rescale boxes (xyxy) from input_shape to shapegain = min(input_shape[0] / shape[0], input_shape[1] / shape[1])  # gain  = old / newpad = (input_shape[1] - shape[1] * gain) / 2, (input_shape[0] - shape[0] * gain) / 2  # wh paddingboxes[..., [0, 2]] -= pad[0]  # x paddingboxes[..., [1, 3]] -= pad[1]  # y paddingboxes[..., :4] /= gainboxes[..., [0, 2]] = boxes[..., [0, 2]].clip(0, shape[1])  # x1, x2boxes[..., [1, 3]] = boxes[..., [1, 3]].clip(0, shape[0])  # y1, y2return boxesdef draw(image, box_data):box_data = scale_boxes(box_data, image.shape)boxes = box_data[...,:4].astype(np.int32) scores = box_data[...,4]classes = box_data[...,5].astype(np.int32)for box, score, cl in zip(boxes, scores, classes):top, left, right, bottom = boxcv2.rectangle(image, (top, left), (right, bottom), (255, 0, 0), 1)cv2.putText(image, '{0} {1:.2f}'.format(class_names[cl], score), (top, left), cv2.FONT_HERSHEY_SIMPLEX, 0.6, (0, 0, 255), 1)if __name__=="__main__":logger = trt.Logger(trt.Logger.WARNING)with open("yolox.engine", "rb") as f, trt.Runtime(logger) as runtime:engine = runtime.deserialize_cuda_engine(f.read())context = engine.create_execution_context()h_input = cuda.pagelocked_empty(trt.volume(context.get_binding_shape(0)), dtype=np.float32)h_output0 = cuda.pagelocked_empty(trt.volume(context.get_binding_shape(1)), dtype=np.float32)h_output1 = cuda.pagelocked_empty(trt.volume(context.get_binding_shape(2)), dtype=np.float32)h_output2 = cuda.pagelocked_empty(trt.volume(context.get_binding_shape(3)), dtype=np.float32)d_input = cuda.mem_alloc(h_input.nbytes)d_output0 = cuda.mem_alloc(h_output0.nbytes)d_output1 = cuda.mem_alloc(h_output1.nbytes)d_output2 = cuda.mem_alloc(h_output2.nbytes)stream = cuda.Stream()image = cv2.imread('bus.jpg')input = letterbox(image, input_shape)input = input[:, :, ::-1].transpose(2, 0, 1).astype(dtype=np.float32)  #BGR2RGB和HWC2CHWinput = np.expand_dims(input, axis=0)  np.copyto(h_input, input.ravel())with engine.create_execution_context() as context:cuda.memcpy_htod_async(d_input, h_input, stream)context.execute_async_v2(bindings=[int(d_input), int(d_output0), int(d_output1), int(d_output2)], stream_handle=stream.handle)cuda.memcpy_dtoh_async(h_output0, d_output0, stream)cuda.memcpy_dtoh_async(h_output1, d_output1, stream)cuda.memcpy_dtoh_async(h_output2, d_output2, stream)stream.synchronize()  h_output = []h_output.append(h_output2.reshape(1, 3549, 4))h_output.append(h_output1.reshape(1, 3549))h_output.append(h_output0.reshape(1, 3549, 80))boxes = filter_box(h_output)draw(image, boxes)cv2.imwrite('result.jpg', image)
使用mmdeploy的api推理:
from mmdeploy.apis import torch2onnx
from mmdeploy.backend.sdk.export_info import export2SDKimg = 'bus.jpg'
work_dir = './work_dir/onnx/yolox'
save_file = './end2end.onnx'
deploy_cfg = 'mmdeploy/configs/mmdet/detection/detection_onnxruntime_dynamic.py'
model_cfg = 'mmdetection/configs/yolox/yolox_tiny_8xb8-300e_coco.py'
model_checkpoint = 'checkpoints/yolox_tiny_8x8_300e_coco_20211124_171234-b4047906.pth'
device = 'cpu'# 1. convert model to onnx
torch2onnx(img, work_dir, save_file, deploy_cfg, model_cfg, model_checkpoint, device)# 2. extract pipeline info for sdk use (dump-info)
export2SDK(deploy_cfg, model_cfg, work_dir, pth=model_checkpoint, device=device)
或者
from mmdeploy_runtime import Detector
import cv2# 读取图片
img = cv2.imread('bus.jpg')# 创建检测器
detector = Detector(model_path='work_dir/trt/yolox', device_name='cuda')# 执行推理
bboxes, labels, _ = detector(img)
# 使用阈值过滤推理结果,并绘制到原图中
indices = [i for i in range(len(bboxes))]
for index, bbox, label_id in zip(indices, bboxes, labels):[left, top, right, bottom], score = bbox[0:4].astype(int),  bbox[4]if score < 0.3:continuecv2.rectangle(img, (left, top), (right, bottom), (0, 255, 0))
cv2.imwrite('result.jpg', img)
相关文章:
OpenMMlab导出yolox模型并用onnxruntime和tensorrt推理
导出onnx文件 直接使用脚本 import torch from mmdet.apis import init_detector, inference_detectorconfig_file ./configs/yolox/yolox_tiny_8xb8-300e_coco.py checkpoint_file yolox_tiny_8x8_300e_coco_20211124_171234-b4047906.pth model init_detector(config_fi…...
CMake语法解读 | Qt6需要用到
CMake 入门CMakeLists.txtmain.cpp编译示例cmake常用参数入门 Hello CMake CMake 是一个用于配置跨平台源代码项目应该如何配置的工具建立在给定的平台上。 ├── CMakeLists.txt # 希望运行的 CMake命令 ├── main.cpp # 带有main 的源文件 ├── include # 头文件目录 …...

jenkins 参数构建
整体思路 依赖环境及工具 GitCentos7及以上GitlabJenkinsshellansible 创建一个jenkins项目 应用保存,测试构建 在gitlab创建新项目,编写index.html [rootjenkins-node1 .ssh]# ssh-keygen Generating public/private rsa key pair. Enter file in …...
DBT踩坑第二弹
总结下dbt-spark踩到的坑,连接方式采用的是thrift连接 Kerberos认证。考虑到开源组件Kyuubi也是基于Hiveserver2,使用的thrift协议,所以采用Kyuubi执行SparkSQL。 官方文档给出的Thrift方式连接示例真的是简单,但是真是用起来真是…...

elasticsearch Connection reset by peer如何处理
如何处理: 代码的心跳代码删除,服务linux内核参数修改 客户端时间要小于服务端时间#异常代码 public RestHighLevelClient elasticsearchClient() {// 初始化 RestClient, hostName 和 port 填写集群的内网 IP 地址与端口 // String[] hosts nod…...
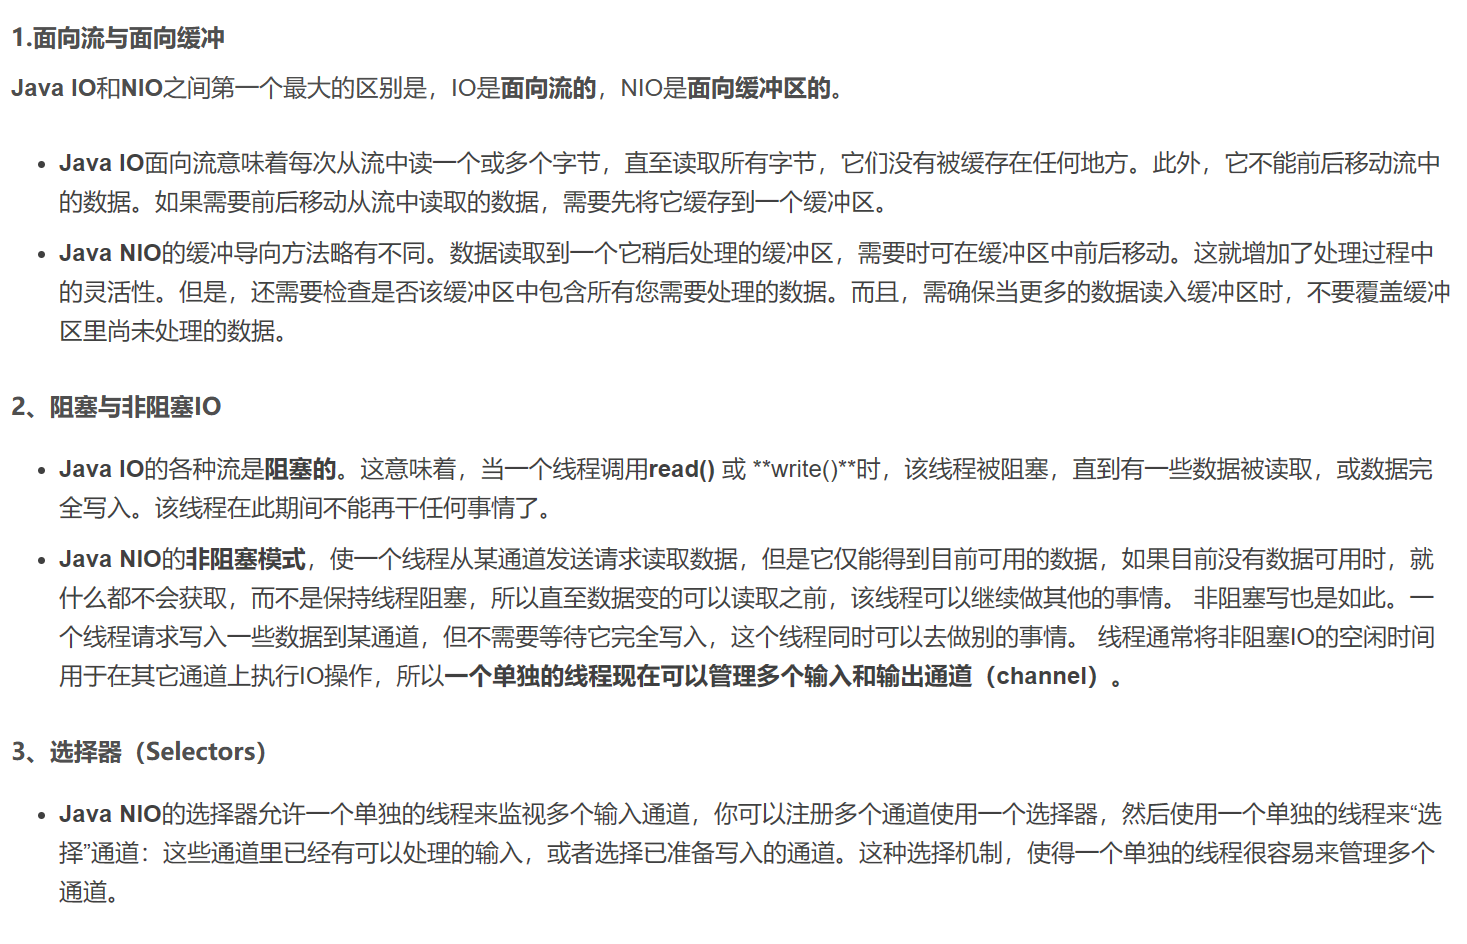
IO和NIO的区别 BIO,NIO,AIO 有什么区别? Files的常用方法都有哪些?
文章目录 IO和NIO的区别BIO,NIO,AIO 有什么区别?Files的常用方法都有哪些? 今天来对java中的io, nio, bio, aio进行了解,有何区别。 IO和NIO的区别 NIO与IO区别 IO是面向流的,NIO是面向缓冲区的Java IO面向流意味着每次从流中读一个或多个字…...
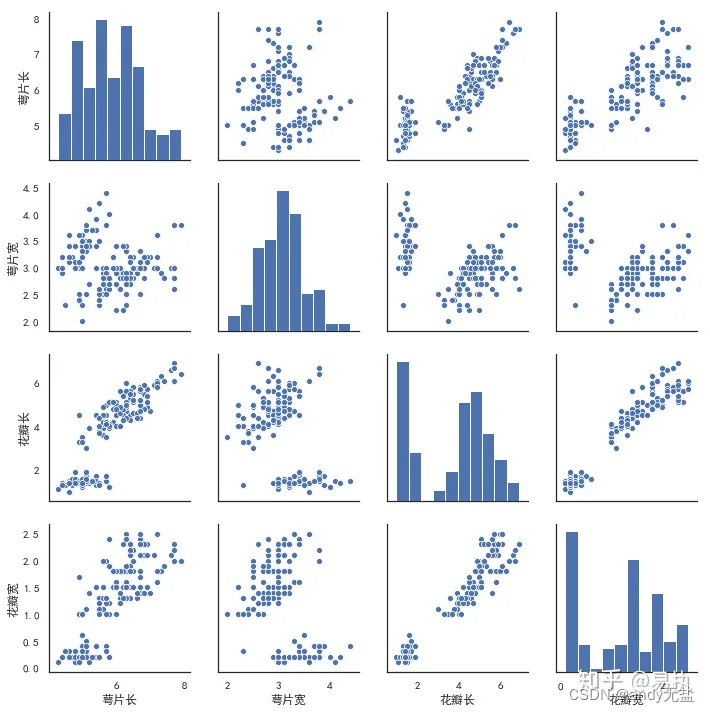
pairplot
Python可视化 | Seaborn5分钟入门(七)——pairplot - 知乎 (zhihu.com) Seaborn是基于matplotlib的Python可视化库。它提供了一个高级界面来绘制有吸引力的统计图形。Seaborn其实是在matplotlib的基础上进行了更高级的API封装,从而使得作图更加容易,不需…...

pytest系列——pytest_collection_modifyitems钩子函数修改测试用例执行顺序
前言 pytest默认执行用例是根据项目下的文件名称按ascii码去收集运行的;文件中的用例是从上往下按顺序执行的。 pytest_collection_modifyitems 这个函数顾名思义就是收集测试用例、改变用例的执行顺序的。 【严格意义上来说,我们在用例设计原则上用例…...
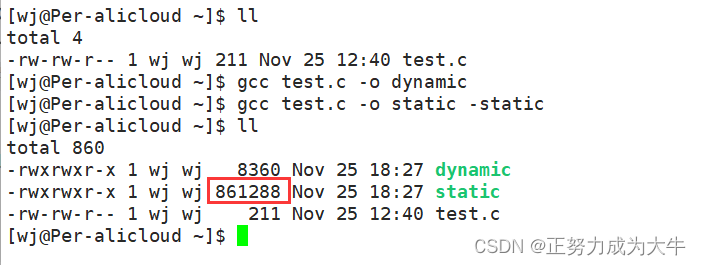
【Linux】gcc和g++
👦个人主页:Weraphael ✍🏻作者简介:目前正在学习c和Linux还有算法 ✈️专栏:Linux 🐋 希望大家多多支持,咱一起进步!😁 如果文章有啥瑕疵,希望大佬指点一二 …...
nginx国密ssl测试
文章目录 文件准备编译部署nginx申请国密数字证书配置证书并测试 文件准备 下载文件并上传到服务器,这里使用centos 7.8 本文涉及的程序文件已打包可以直接下载。 点击下载 下载国密版openssl https://www.gmssl.cn/gmssl/index.jsp 下载稳定版nginx http://n…...

H5 清除浮动
1、为什么要清除浮动? 为了解决块级元素浮动后父元素塌陷问题。 2、为什么会产生 父元素塌陷? 首先父元素没有设置高度,父元素的高度是由子元素中最高的控件决定,撑开 简单可以这样理解,原本是在和父元素在同一层级上…...
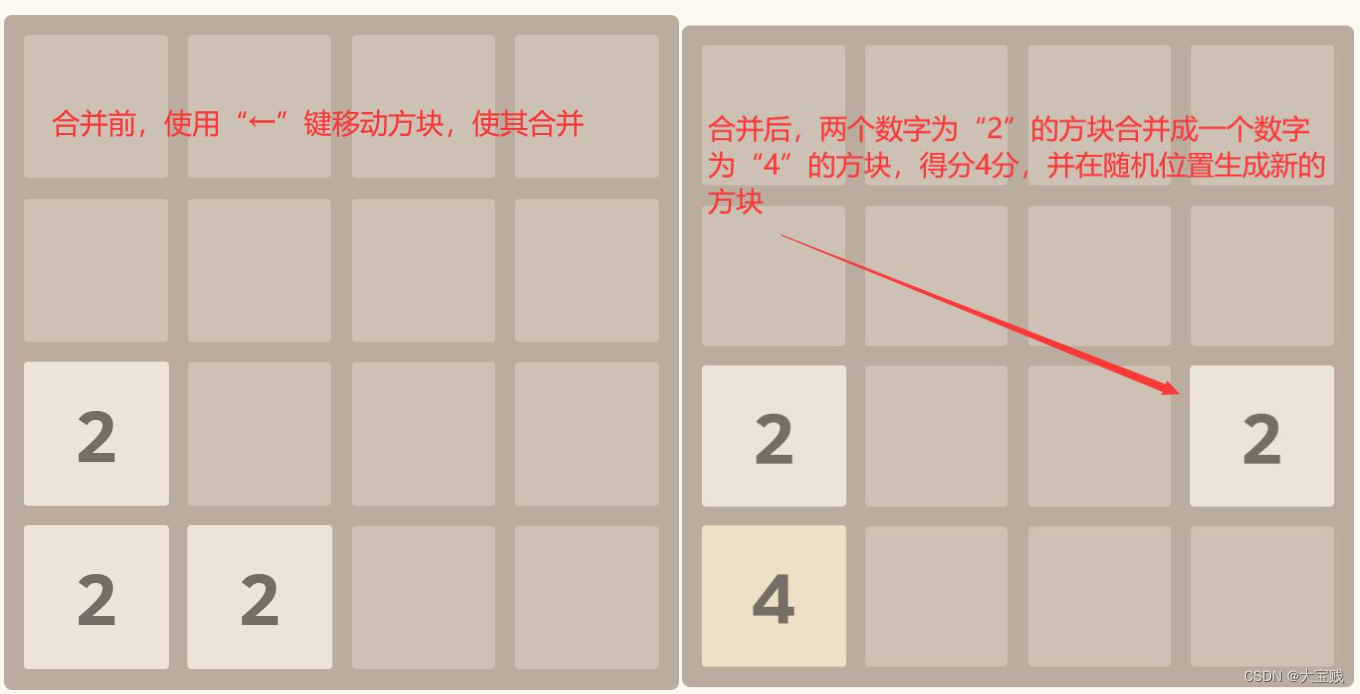
h5小游戏--2048
2048 经典2048小游戏,基于JS、Html5改写版 效果预览 点我下载源代码 下载代码解压后,双击index.html即可开始本游戏。 Game Rule 游戏规则 以下为游戏默认规则,若需要修改规则请修改代码。 移动箭头键来移动方块,当两个相同数…...

随手写了个博客多平台发布脚本:Python自动发布文章到Wordpress
引言 作为一名技术博主,提高博客发布效率是我们始终追求的目标。在这篇文章中,我将分享一个基于Python的脚本,能够实现博客多平台发布,具体来说,是自动发布文章到WordPress。通过这个简单而高效的脚本,…...

通义灵码,你的智能编码助手,免费公测啦!
目录 编辑 1、介绍 2、安装 3、功能介绍 行/函数级实时续写 自然语言生成代码 单元测试生成 代码注释生成 代码解释 研发智能问答 多编程语言、多编辑器全方位支持 4、视频 🍃作者介绍:双非本科大三网络工程专业在读,阿里云专家…...
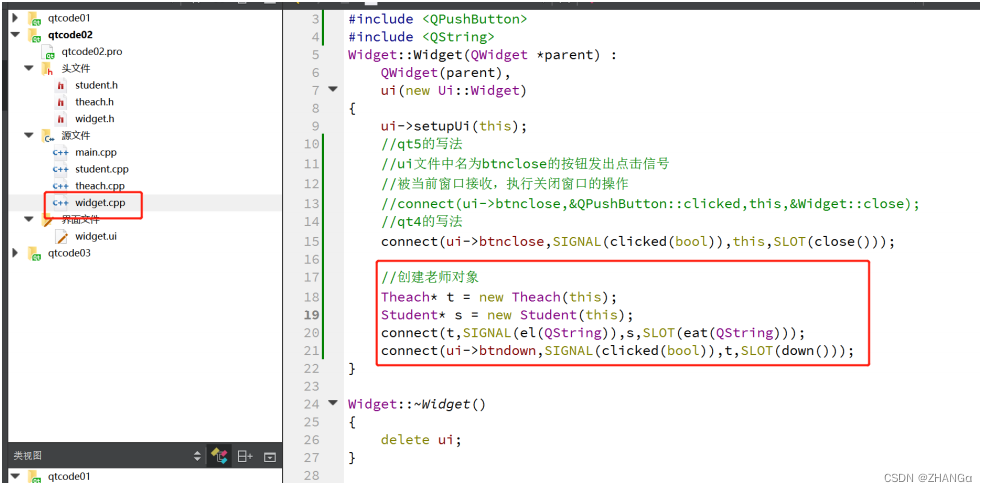
QT Day01 qt概述,创建项目,窗口属性,按钮,信号与槽
1.qt概述 1.什么是qt Qt 是一个跨平台的 C 图形用户界面应用程序框架。它为应用程序开发者提供建立艺 术级图形界面所需的所有功能。它是完全面向对象的,很容易扩展,并且允许真正的组 件编程。 2.支持的平台 Windows – XP 、 Vista 、 Win7 、 Win8…...
在WSL单机搭建Kafka伪集群)
Kafka(一)在WSL单机搭建Kafka伪集群
目录 1 运行Kafka单实例1.1 Windws1.1.1 安装包下载1.1.2 修改环境变量1.1.3 修改配置文件1.1.4 启动Kafka单机版 1.2 Linux1.2.1 安装包下载1.2.2 创建目录1.2.3 添加环境变量1.2.4 修改配置文件1.2.5 运行Kafka1.2.6 停止Kafka 2 搭建Kafka集群2.1 搭建Zookeeper集群2.2 搭建…...

centos7 keepalived 探测哪个是当前节点
前提 nginx 默认页面内容中需要加上各节点的ip nginx web页面修改 nginx配置文件路径:/etc/nginx/nginx.conf,该配置文件引用了/etc/nginx/conf.d/default.conf 打开/etc/nginx/conf.d/default.conf配置文件可以看到html页面的路径 /usr/share/nginx…...

【iOS】数据持久化(二)之归档和解档(iOS 13以后)
在之前介绍的数据存储方法中,不管是NSUserDefaults还是plist文件都不能对自定义对象进行存储,OC提供的解归档恰好解决了这个问题 本片文章对 iOS13 以后的版本 归档和解档 进行介绍。老版本的解归档见这篇文章:【iOS】文件(对象数…...
OpenHarmony模块化编译
一、环境配置 OpenHarmony版本:OpenHarmony 4.0 Release 编译环境:WSL2 Ubuntu 18.04 平台设备:RK3568 二、配置hb OpenHarmony 代码构建有build.sh和hb两种方式: #方式一、build.sh ./build.sh --product-name rk3568 --ccache#方式二、…...
Java游戏制作——王者荣耀
一.准备工作 首先创建一个新的Java项目命名为“王者荣耀”,并在src下创建两个包分别命名为“com.sxt"、”com.stx.beast",在相应的包中创建所需的类。 创建一个名为“img”的文件夹来储存所需的图片素材。 二.代码呈现 package com.sxt;import javax.sw…...

# Linux 磁盘查看命令详解:df 与 du
Linux 磁盘查看命令详解:df 与 du 在 Linux 系统运维中,查看磁盘空间、定位大文件是高频操作。df 和 du 是最核心的两个磁盘相关命令,二者功能相近但用途截然不同。本文从作用、语法、常用参数、实战场景、区别对比等方面详细讲解,…...
中国数学家王虹再获殊荣)
数学周刊第14期(2026年03月30日-04月06日)中国数学家王虹再获殊荣
目录王虹获纽约大学最高荣誉,距菲尔兹奖仅一步之遥香港科大团队首创代码驱动系统参考资料王虹获纽约大学最高荣誉,距菲尔兹奖仅一步之遥 当地时间4月2日,美国纽约大学柯朗数学科学研究所宣布,中国数学家王虹获评该校“银教授”&am…...

用快马平台快速构建密码强度检测器,十分钟完成网络安全原型验证
今天想和大家分享一个快速验证网络安全功能的实战案例——用InsCode(快马)平台十分钟搭建密码强度检测器。作为经常需要处理用户注册功能的开发者,密码强度验证是每个项目都绕不开的基础安全需求,但传统开发流程中,光是搭环境、写基础代码就可…...

新手入门指南:在快马平台上用openclaw重启版本实现首个爬虫项目
最近在学习网络爬虫,发现openclaw重启版本对新手特别友好,于是尝试在InsCode(快马)平台上做了一个简单的新闻头条抓取项目。整个过程比想象中顺利,分享下我的学习路径和踩坑经验。 环境准备与库安装 传统爬虫项目最头疼的就是环境配置&#x…...
)
Java实战:用Hutool和WGS84坐标系精准计算两点间距离与方位角(附避坑指南)
Java实战:用Hutool和WGS84坐标系精准计算两点间距离与方位角(附避坑指南) 在LBS(基于位置的服务)应用开发中,地理空间计算是核心能力之一。无论是外卖配送距离估算、共享单车调度优化,还是运动轨…...

技术对业务的赋能
技术对业务的赋能 技术不只是实现需求,更是提升效率、降低成本、放大增长、控制风险,最终帮业务赚到更多、跑得更快、活得更稳。 1. 提升效率,降本增效 自动化流程:表单、审批、报表自动生成,减少人工重复劳动组件化/低…...
,帮你打造顶级思维外挂,建议收藏!)
告别知识管理焦虑!Karpathy 极简第二大脑实战指南(非常干货),帮你打造顶级思维外挂,建议收藏!
引言:知识管理的陷阱 你有没有这样的经历? • 收藏了 500 篇文章,却从来没看过第二遍• 买了 Notion/Obsidian 会员,花了两周搭建系统,三天后就放弃• 笔记越记越多,找的时候永远想不起来放在哪个文件夹•…...
)
从Llama 3到GPT-4:拆解现代大模型Transformer Block的‘标配’与‘选配’(SwiGLU/Pre-Norm)
从Llama 3到GPT-4:现代大模型Transformer Block的架构进化论 当我们在ChatGPT中输入一个问题,或在Midjourney中生成一幅画作时,背后支撑这些AI能力的核心引擎正是Transformer架构。从2017年原始论文《Attention is All You Need》发表至今&am…...

TYPE3-CAAV5如何革新CATIA中的文本与投影设计流程
1. TYPE3-CAAV5如何改变CATIA设计流程的游戏规则 第一次在CATIA里用TYPE3-CAAV5创建文本时,我盯着屏幕愣了三秒——原来工程软件的操作还能这么流畅!这个看似简单的工具条彻底颠覆了我对CAD文本处理的认知。传统CATIA里需要切换多个模块才能完成的文本操…...

W25Q256JWEIQ 1.8V 低功耗大容量串行 NOR Flash存储器——华邦电子 全新原装芯片IC
W25Q256JWEIQ:1.8V 低功耗大容量串行 NOR Flash——华邦 SpiFlash 系列,为嵌入式系统注入节能存储芯动力 Winbond(华邦电子)推出的 W25Q256JWEIQ 256Mbit 串行 NOR Flash-存储器, 1.7V ~ 1.95V 的低电压供电、133MHz …...