【亚马逊云】基于EC2以 All-in-One 模式快速部署 KubeSphere 和 Kubernetes
文章目录
- 1. 云实例配置说明
- 2. SSH连接云实例
- 3. 查看系统版本
- 4. 修改主机名
- 5. 安装依赖项
- 6. 安全组和DNS修改
- 7. 下载KubeKey
- 8. 同时安装Kubesphere和Kubernetes
- [可选]单独安装Kubernetes
- [可选]单独安装KubeSphere
- 9. 验证KubeSphere安装结果
- 10. 登录KubeSphere控制台
- [可选]安装KubeSphere应用商店
- 图形化操作
- 命令行操作
- 验证安装结果
- 11. 常见问题
- 12. 参考链接
1. 云实例配置说明
若要以 All-in-One 模式进行安装,仅需要准备一台满足需求的云主机实例即可。
(PS:如果系统至少有 8 核 CPU 和 16 GB 内存,则建议启用所有组件。有关更多信息,请参见启用可插拔组件。)
| 操作系统 | 配置信息 | 安全组 | 连接方式 |
|---|---|---|---|
| CentOS Linux release 7.9.2009 (Core) | 8 核 CPU,16 GB 内存,100 GB 磁盘空间 | 允许所有流量 | SSH远程连接 |
云实例节点要求:
- 云实例节点能够SSH远程连接上;
- 节点需要有sudo/curl/openssl/tar等相关命令。
2. SSH连接云实例
C:\Users\xyb>ssh -i xybaws-ningxia-key.pem centos@<公网IP地址>
3. 查看系统版本
[root@ip-172-31-6-245 ~]# cat /etc/redhat-release
CentOS Linux release 7.9.2009 (Core)
[root@ip-172-31-6-245 ~]# cat /etc/os-release
NAME="CentOS Linux"
VERSION="7 (Core)"
ID="centos"
ID_LIKE="rhel fedora"
VERSION_ID="7"
PRETTY_NAME="CentOS Linux 7 (Core)"
ANSI_COLOR="0;31"
CPE_NAME="cpe:/o:centos:centos:7"
HOME_URL="https://www.centos.org/"
BUG_REPORT_URL="https://bugs.centos.org/"CENTOS_MANTISBT_PROJECT="CentOS-7"
CENTOS_MANTISBT_PROJECT_VERSION="7"
REDHAT_SUPPORT_PRODUCT="centos"
REDHAT_SUPPORT_PRODUCT_VERSION="7"
4. 修改主机名
$ sudo hostnamectl set-hostname kubesphere-master
$ sudo bash
$ sudo hostname
kubesphere-master
5. 安装依赖项
$ sudo yum install -y socat conntrack ebtables ebtables ipset ipvsadm
6. 安全组和DNS修改
- 设置云实例的安全组允许所有流量和端口通过【仅实验测试环境,生产环境建议安装最小开放规则设置允许端口放行】。
如果您的网络配置使用防火墙规则或安全组,请务必确保基础设施组件可以通过特定端口相互通信。建议您关闭防火墙。
- 请确保
/etc/resolv.conf中的 DNS 地址可用,否则,可能会导致集群中的 DNS 出现问题。
$ sudo vim /etc/resolv.conf
$ sudo cat /etc/resolv.conf
; generated by /usr/sbin/dhclient-script
search cn-northwest-1.compute.internal
nameserver 8.8.8.8
7. 下载KubeKey
您的集群必须有一个可用的容器运行时。如果您使用 KubeKey 搭建集群,KubeKey 会默认安装最新版本的 Docker。或者,您也可以在创建集群前手动安装 Docker 或其他容器运行时。
KubeKey 是用 Go 语言开发的一款全新的安装工具,代替了以前基于 ansible 的安装程序。KubeKey 为用户提供了灵活的安装选择,可以分别安装 KubeSphere 和 Kubernetes 或二者同时安装,既方便又高效。
# 若访问Github/Googleapis受限,先执行以下命令确保从正确的区域下载KubeKey。
export KKZONE=cn# 再执行以下命令下载 KubeKey。
curl -sfL https://get-kk.kubesphere.io | VERSION=v3.0.13 sh -# 最后为下载下来的 kk 添加可执行权限。
chmod +x kk# 查看下载
# ll
total 112100
-rwxr-xr-x  1 root root 78973328 Nov  7 08:43 kk
drwxr-xr-x  3 root root       18 Nov 19 05:21 kubekey
-rw-r--r--  1 root root 35796470 Nov 19 05:17 kubekey-v3.0.13-linux-amd64.tar.gz

8. 同时安装Kubesphere和Kubernetes
只需执行一个命令即可进行安装,其模板如下所示:
./kk create cluster [--with-kubernetes version] [--with-kubesphere version]
若要同时安装 Kubernetes 和 KubeSphere,可参考以下示例命令:
./kk create cluster --with-kubernetes v1.26.12 --with-kubesphere v3.4.0./kk create cluster --with-kubernetes v1.26.12 --with-kubesphere v3.4.0 --container-manager containerd -y
执行该命令后,KubeKey 将检查安装环境,结果显示在一张表格中。输入 yes 继续安装流程。
[root@kubesphere-master ~]# ./kk create cluster --with-kubernetes v1.22.12 --with-kubesphere v3.4.0_   __      _          _   __
| | / /     | |        | | / /
| |/ / _   _| |__   ___| |/ /  ___ _   _
|    \| | | | '_ \ / _ \    \ / _ \ | | |
| |\  \ |_| | |_) |  __/ |\  \  __/ |_| |
\_| \_/\__,_|_.__/ \___\_| \_/\___|\__, |__/ ||___/05:28:23 UTC [GreetingsModule] Greetings
05:28:27 UTC message: [kubesphere-master]
Greetings, KubeKey!
05:28:27 UTC success: [kubesphere-master]
05:28:27 UTC [NodePreCheckModule] A pre-check on nodes
05:28:43 UTC success: [kubesphere-master]
05:28:43 UTC [ConfirmModule] Display confirmation form
+-------------------+------+------+---------+----------+-------+-------+---------+-----------+--------+--------+------------+------------+-------------+------------------+--------------+
| name              | sudo | curl | openssl | ebtables | socat | ipset | ipvsadm | conntrack | chrony | docker | containerd | nfs client | ceph client | glusterfs client | time         |
+-------------------+------+------+---------+----------+-------+-------+---------+-----------+--------+--------+------------+------------+-------------+------------------+--------------+
| kubesphere-master | y    | y    | y       | y        | y     | y     | y       | y         | y      |        |            | y          |             |                  | UTC 05:28:43 |
+-------------------+------+------+---------+----------+-------+-------+---------+-----------+--------+--------+------------+------------+-------------+------------------+--------------+This is a simple check of your environment.
Before installation, ensure that your machines meet all requirements specified at
https://github.com/kubesphere/kubekey#requirements-and-recommendationsContinue this installation? [yes/no]: yes
安装过程中,输入如下信息,代表Kubernetes集群已经安装完毕!
Your Kubernetes control-plane has initialized successfully!To start using your cluster, you need to run the following as a regular user:mkdir -p $HOME/.kubesudo cp -i /etc/kubernetes/admin.conf $HOME/.kube/configsudo chown $(id -u):$(id -g) $HOME/.kube/configAlternatively, if you are the root user, you can run:export KUBECONFIG=/etc/kubernetes/admin.confYou should now deploy a pod network to the cluster.
Run "kubectl apply -f [podnetwork].yaml" with one of the options listed at:https://kubernetes.io/docs/concepts/cluster-administration/addons/You can now join any number of control-plane nodes by copying certificate authorities
and service account keys on each node and then running the following as root:kubeadm join lb.kubesphere.local:6443 --token qpnirw.gyfdxnceyth942i9 \--discovery-token-ca-cert-hash sha256:8f0739bdfa2fb5a6118b5b6d0e10985641aa7c903fd749e073caf718b350c282 \--control-planeThen you can join any number of worker nodes by running the following on each as root:kubeadm join lb.kubesphere.local:6443 --token qpnirw.gyfdxnceyth942i9 \--discovery-token-ca-cert-hash sha256:8f0739bdfa2fb5a6118b5b6d0e10985641aa7c903fd749e073caf718b350c282
最后结果输出如下信息,代表KubeSphere集群也已经安装完毕!✅🎉
[可选]单独安装Kubernetes
也可以不指定KubeSphere和Kubernetes版本。
./kk create cluster --with-kubernetes
[root@kubesphere-master ~]# ./kk create cluster --with-kubernetes --with-kubesphere_   __      _          _   __
| | / /     | |        | | / /
| |/ / _   _| |__   ___| |/ /  ___ _   _
|    \| | | | '_ \ / _ \    \ / _ \ | | |
| |\  \ |_| | |_) |  __/ |\  \  __/ |_| |
\_| \_/\__,_|_.__/ \___\_| \_/\___|\__, |__/ ||___/05:30:47 UTC [GreetingsModule] Greetings
05:30:47 UTC message: [kubesphere-master]
Greetings, KubeKey!
05:30:47 UTC success: [kubesphere-master]
05:30:47 UTC [NodePreCheckModule] A pre-check on nodes
05:30:48 UTC success: [kubesphere-master]
05:30:48 UTC [ConfirmModule] Display confirmation form
+-------------------+------+------+---------+----------+-------+-------+---------+-----------+--------+--------+------------+------------+-------------+------------------+--------------+
| name              | sudo | curl | openssl | ebtables | socat | ipset | ipvsadm | conntrack | chrony | docker | containerd | nfs client | ceph client | glusterfs client | time         |
+-------------------+------+------+---------+----------+-------+-------+---------+-----------+--------+--------+------------+------------+-------------+------------------+--------------+
| kubesphere-master | y    | y    | y       | y        | y     | y     | y       | y         | y      |        |            | y          |             |                  | UTC 05:30:48 |
+-------------------+------+------+---------+----------+-------+-------+---------+-----------+--------+--------+------------+------------+-------------+------------------+--------------+This is a simple check of your environment.
Before installation, ensure that your machines meet all requirements specified at
https://github.com/kubesphere/kubekey#requirements-and-recommendationsContinue this installation? [yes/no]: yes
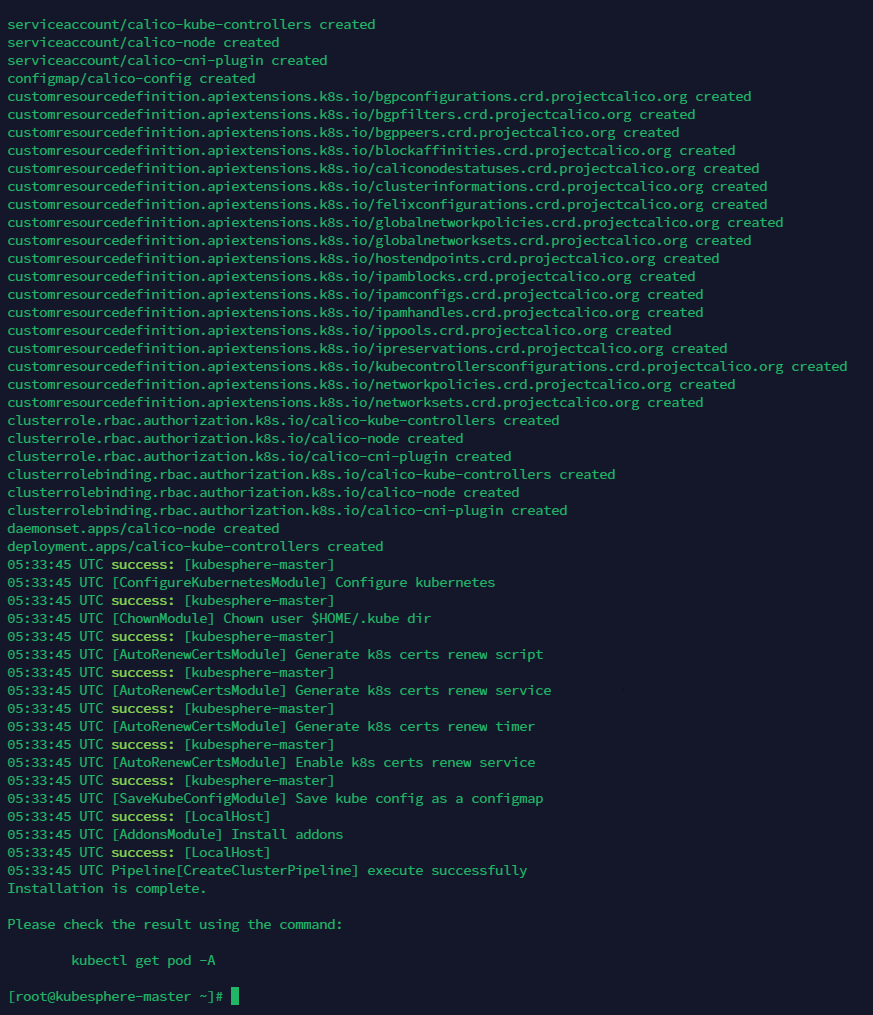
至此,Kubernetes集群完成安装。通过以下命令查看Kubernetes运行情况。
[root@kubesphere-master ~]# kubectl get nodes
NAME                STATUS   ROLES                         AGE     VERSION
kubesphere-master   Ready    control-plane,master,worker   2m14s   v1.23.10
[root@kubesphere-master ~]# kubectl get pod -A
NAMESPACE     NAME                                        READY   STATUS    RESTARTS   AGE
kube-system   calico-kube-controllers-74dbdc644f-rsn8n    1/1     Running   0          2m6s
kube-system   calico-node-p27nq                           1/1     Running   0          2m7s
kube-system   coredns-b7c47bcdc-45mzd                     1/1     Running   0          2m6s
kube-system   coredns-b7c47bcdc-5n5mc                     1/1     Running   0          2m6s
kube-system   kube-apiserver-kubesphere-master            1/1     Running   0          2m17s
kube-system   kube-controller-manager-kubesphere-master   1/1     Running   0          2m17s
kube-system   kube-proxy-xqsl4                            1/1     Running   0          2m7s
kube-system   kube-scheduler-kubesphere-master            1/1     Running   0          2m17s
kube-system   nodelocaldns-m6j69                          1/1     Running   0          2m7s
[可选]单独安装KubeSphere
[root@kubesphere-master ~]# ./kk create cluster --with-kubesphere_   __      _          _   __
| | / /     | |        | | / /
| |/ / _   _| |__   ___| |/ /  ___ _   _
|    \| | | | '_ \ / _ \    \ / _ \ | | |
| |\  \ |_| | |_) |  __/ |\  \  __/ |_| |
\_| \_/\__,_|_.__/ \___\_| \_/\___|\__, |__/ ||___/05:36:52 UTC [GreetingsModule] Greetings
05:36:53 UTC message: [kubesphere-master]
Greetings, KubeKey!
05:36:53 UTC success: [kubesphere-master]
05:36:53 UTC [NodePreCheckModule] A pre-check on nodes
05:36:53 UTC success: [kubesphere-master]
05:36:53 UTC [ConfirmModule] Display confirmation form
+-------------------+------+------+---------+----------+-------+-------+---------+-----------+--------+--------+------------+------------+-------------+------------------+--------------+
| name              | sudo | curl | openssl | ebtables | socat | ipset | ipvsadm | conntrack | chrony | docker | containerd | nfs client | ceph client | glusterfs client | time         |
+-------------------+------+------+---------+----------+-------+-------+---------+-----------+--------+--------+------------+------------+-------------+------------------+--------------+
| kubesphere-master | y    | y    | y       | y        | y     | y     | y       | y         | y      | 24.0.6 | v1.7.3     | y          |             |                  | UTC 05:36:53 |
+-------------------+------+------+---------+----------+-------+-------+---------+-----------+--------+--------+------------+------------+-------------+------------------+--------------+This is a simple check of your environment.
Before installation, ensure that your machines meet all requirements specified at
https://github.com/kubesphere/kubekey#requirements-and-recommendationsContinue this installation? [yes/no]: yes

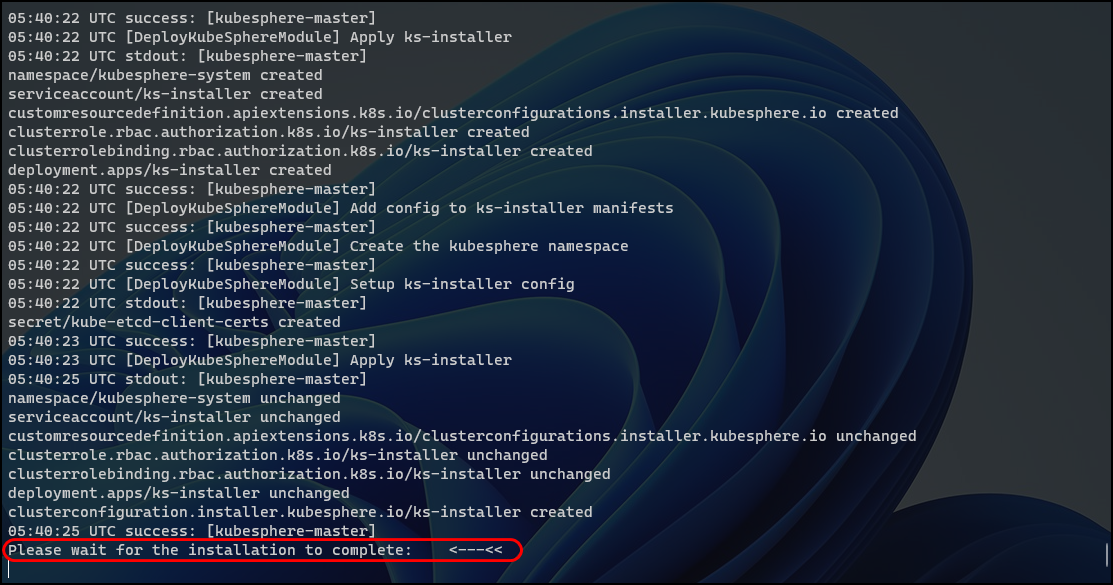
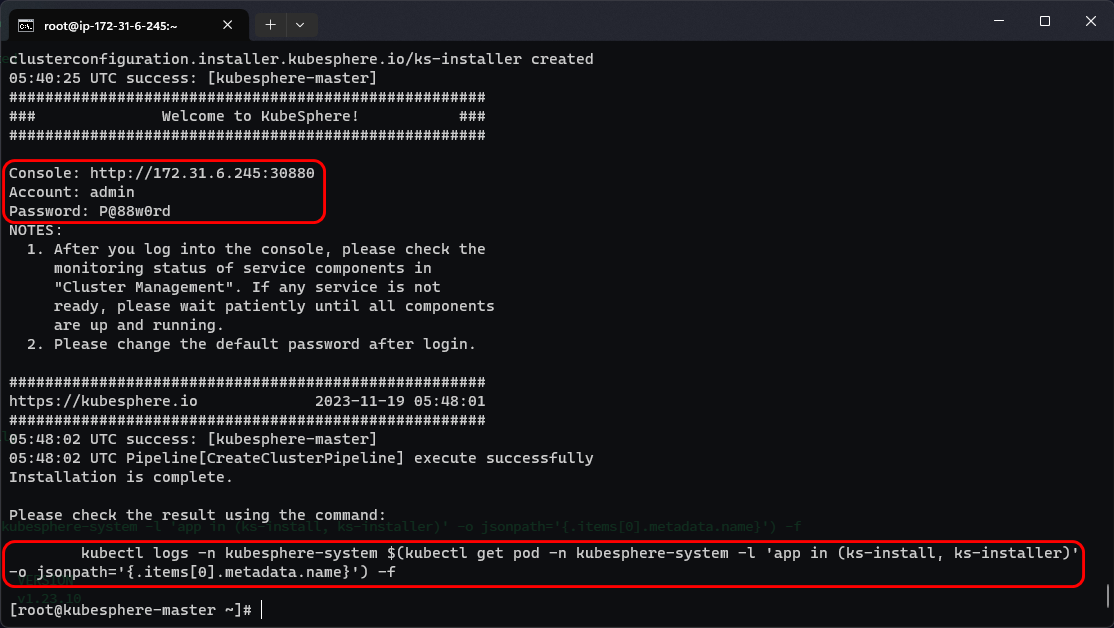
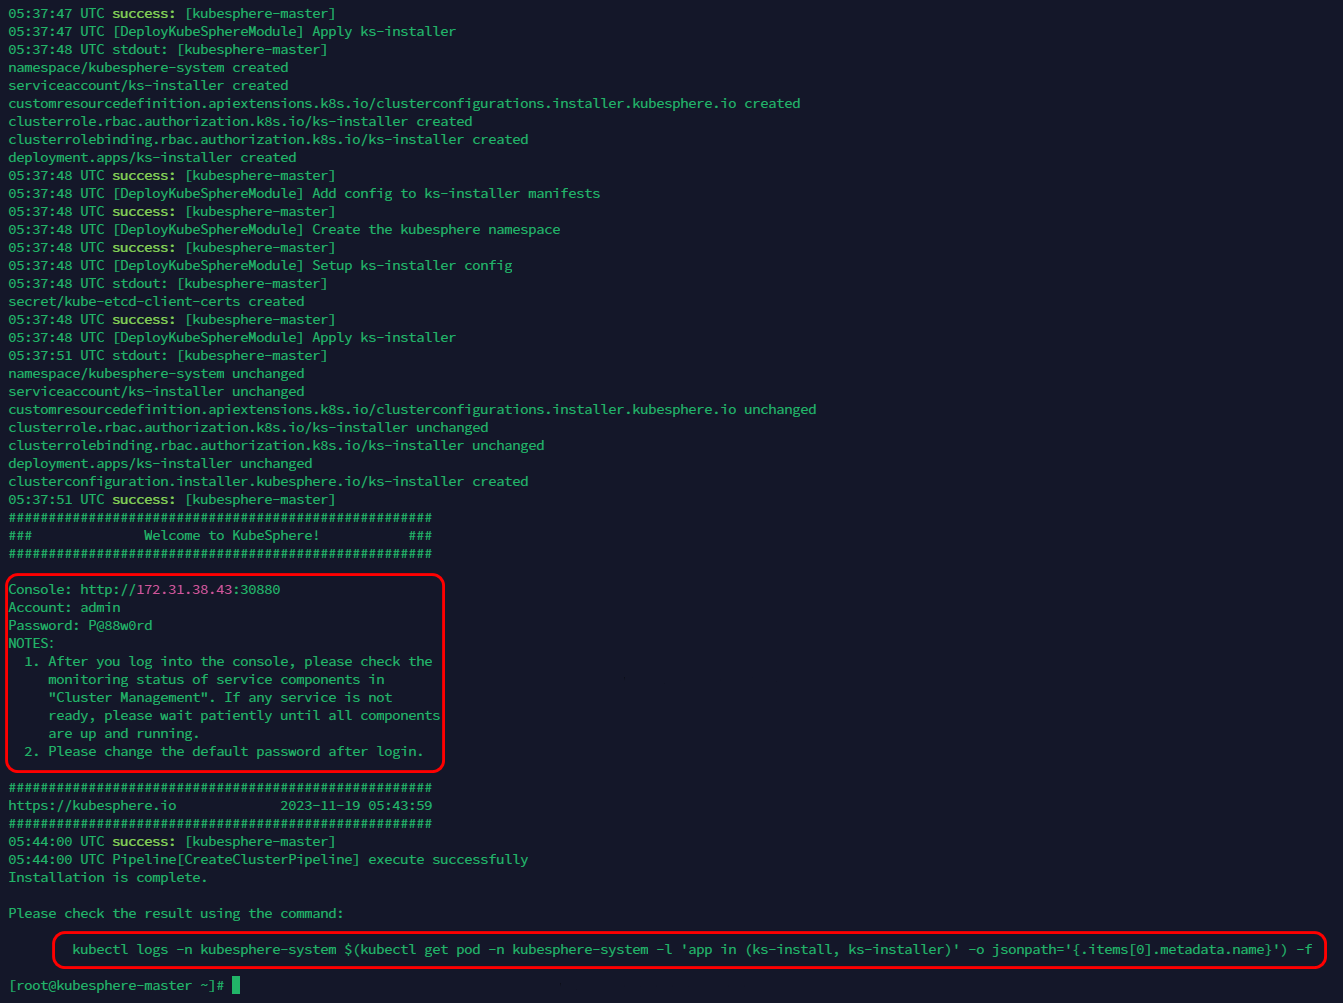
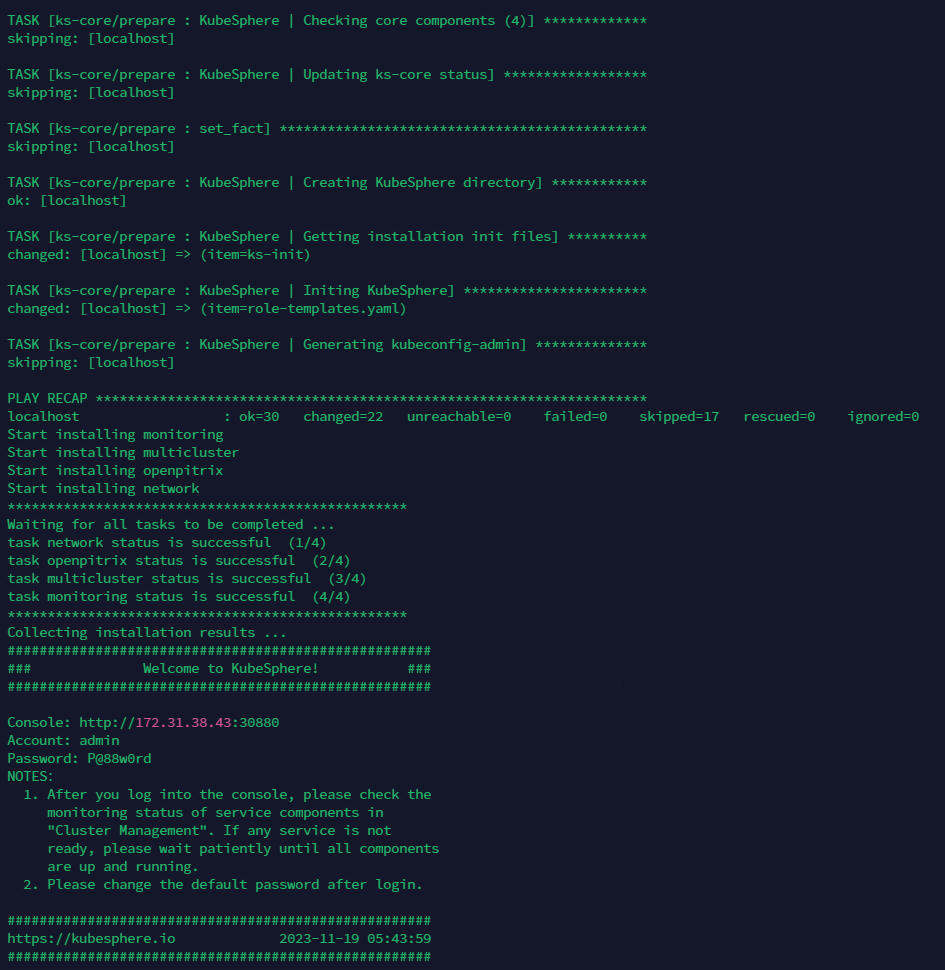
#####################################################
###              Welcome to KubeSphere!           ###
#####################################################Console: http://172.31.38.43:30880
Account: admin
Password: P@88w0rd
NOTES:1. After you log into the console, please check themonitoring status of service components in"Cluster Management". If any service is notready, please wait patiently until all components are up and running.2. Please change the default password after login.#####################################################
https://kubesphere.io             2023-11-19 05:43:59
#####################################################
05:44:00 UTC success: [kubesphere-master]
05:44:00 UTC Pipeline[CreateClusterPipeline] execute successfully
Installation is complete.Please check the result using the command:kubectl logs -n kubesphere-system $(kubectl get pod -n kubesphere-system -l 'app in (ks-install, ks-installer)' -o jsonpath='{.items[0].metadata.name}') -f
[root@kubesphere-master ~]# kubectl get nodes -A
NAME STATUS ROLES AGE VERSION
kubesphere-master Ready control-plane,master,worker 13m v1.23.10
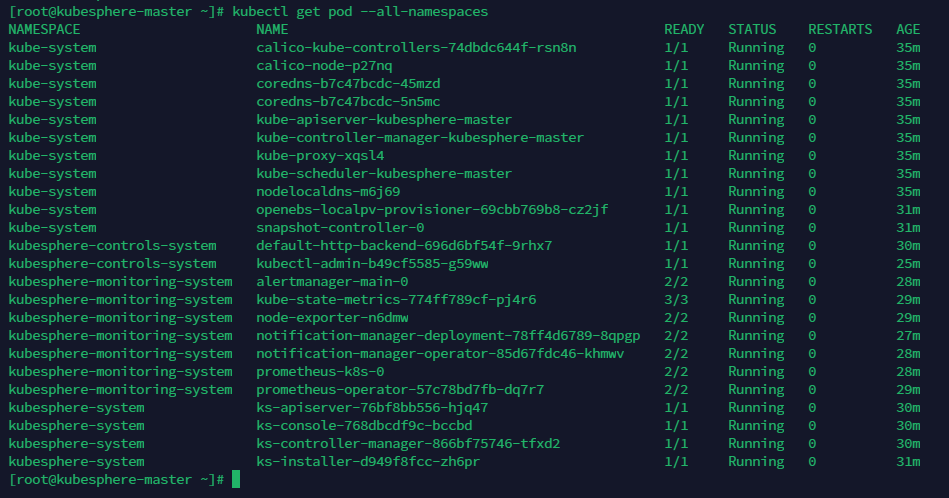
[root@kubesphere-master ~]# kubectl get pods -A
NAMESPACE NAME READY STATUS RESTARTS AGE
kube-system calico-kube-controllers-74dbdc644f-rsn8n 1/1 Running 0 13m
kube-system calico-node-p27nq 1/1 Running 0 13m
kube-system coredns-b7c47bcdc-45mzd 1/1 Running 0 13m
kube-system coredns-b7c47bcdc-5n5mc 1/1 Running 0 13m
kube-system kube-apiserver-kubesphere-master 1/1 Running 0 13m
kube-system kube-controller-manager-kubesphere-master 1/1 Running 0 13m
kube-system kube-proxy-xqsl4 1/1 Running 0 13m
kube-system kube-scheduler-kubesphere-master 1/1 Running 0 13m
kube-system nodelocaldns-m6j69 1/1 Running 0 13m
kube-system openebs-localpv-provisioner-69cbb769b8-cz2jf 1/1 Running 0 9m13s
kube-system snapshot-controller-0 1/1 Running 0 8m28s
kubesphere-controls-system default-http-backend-696d6bf54f-9rhx7 1/1 Running 0 7m33s
kubesphere-controls-system kubectl-admin-b49cf5585-g59ww 1/1 Running 0 3m9s
kubesphere-monitoring-system alertmanager-main-0 2/2 Running 0 5m53s
kubesphere-monitoring-system kube-state-metrics-774ff789cf-pj4r6 3/3 Running 0 6m23s
kubesphere-monitoring-system node-exporter-n6dmw 2/2 Running 0 6m25s
kubesphere-monitoring-system notification-manager-deployment-78ff4d6789-8qpgp 2/2 Running 0 5m16s
kubesphere-monitoring-system notification-manager-operator-85d67fdc46-khmwv 2/2 Running 0 5m31s
kubesphere-monitoring-system prometheus-k8s-0 2/2 Running 0 6m18s
kubesphere-monitoring-system prometheus-operator-57c78bd7fb-dq7r7 2/2 Running 0 6m27s
kubesphere-system ks-apiserver-76bf8bb556-hjq47 1/1 Running 0 7m33s
kubesphere-system ks-console-768dbcdf9c-bccbd 1/1 Running 0 7m33s
kubesphere-system ks-controller-manager-866bf75746-tfxd2 1/1 Running 0 7m33s
kubesphere-system ks-installer-d949f8fcc-zh6pr 1/1 Running 0 9m12s
9. 验证KubeSphere安装结果
输入以下命令以检查安装结果。
kubectl logs -n kubesphere-system $(kubectl get pod -n kubesphere-system -l 'app in (ks-install, ks-installer)' -o jsonpath='{.items[0].metadata.name}') -f
输出信息会显示 Web 控制台的 IP 地址和端口号,默认的 NodePort 是
30880。现在,可以使用默认的帐户和密码 (admin/P@88w0rd) 通过<NodeIP>:30880访问控制台。
10. 登录KubeSphere控制台
- Console: http://<公网IP地址>:30880
- Account: admin
- Password: P@88w0rd
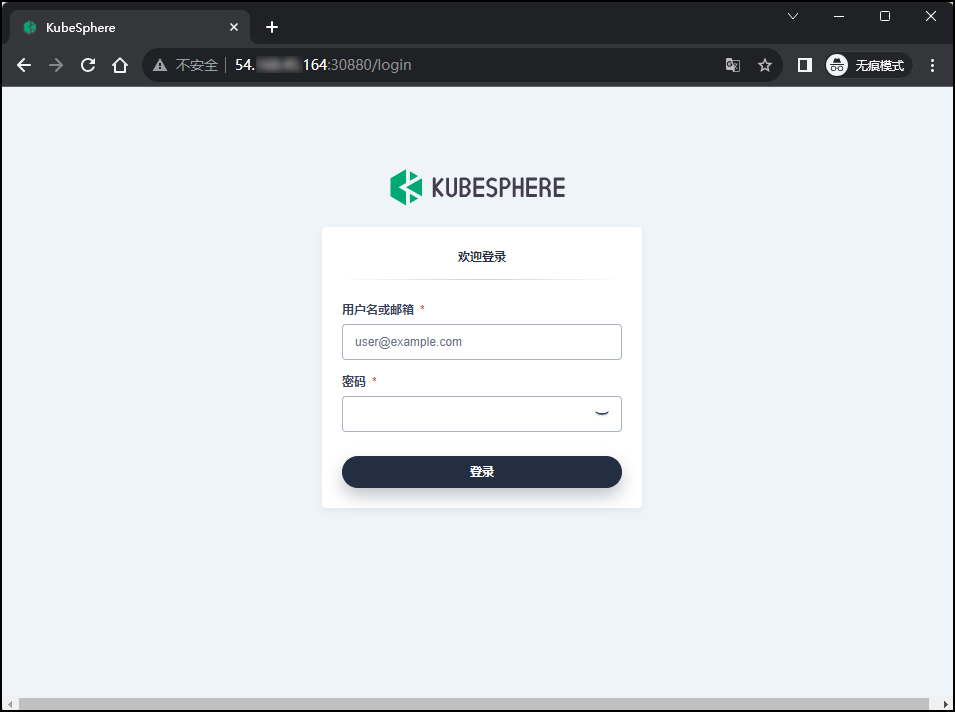
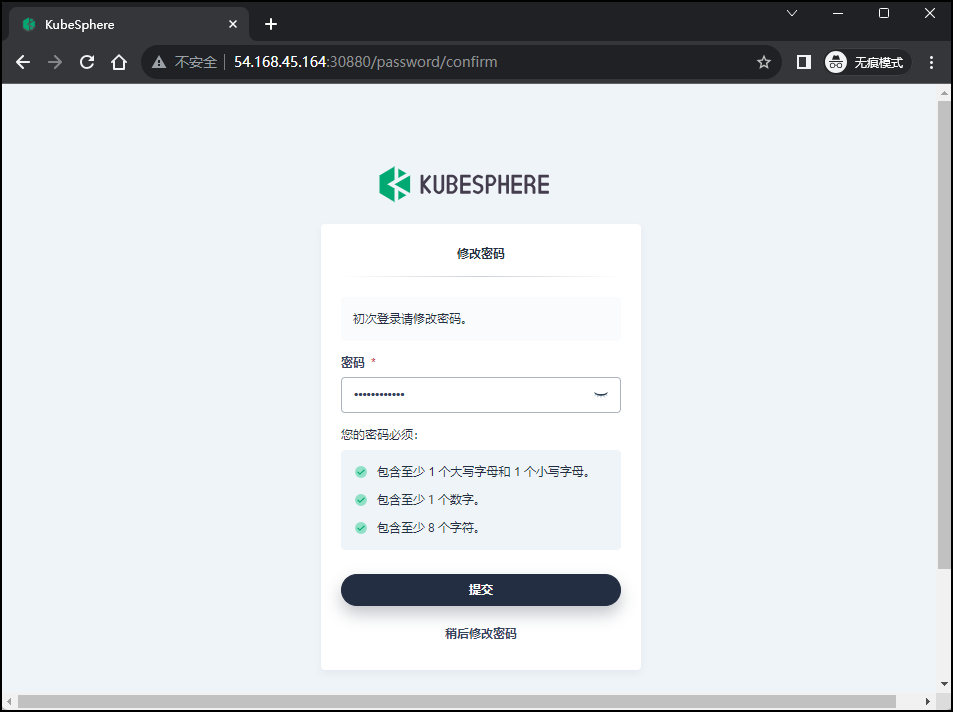
首次登录,提示需要设置新的密码。
进入KubeSphere控制台。
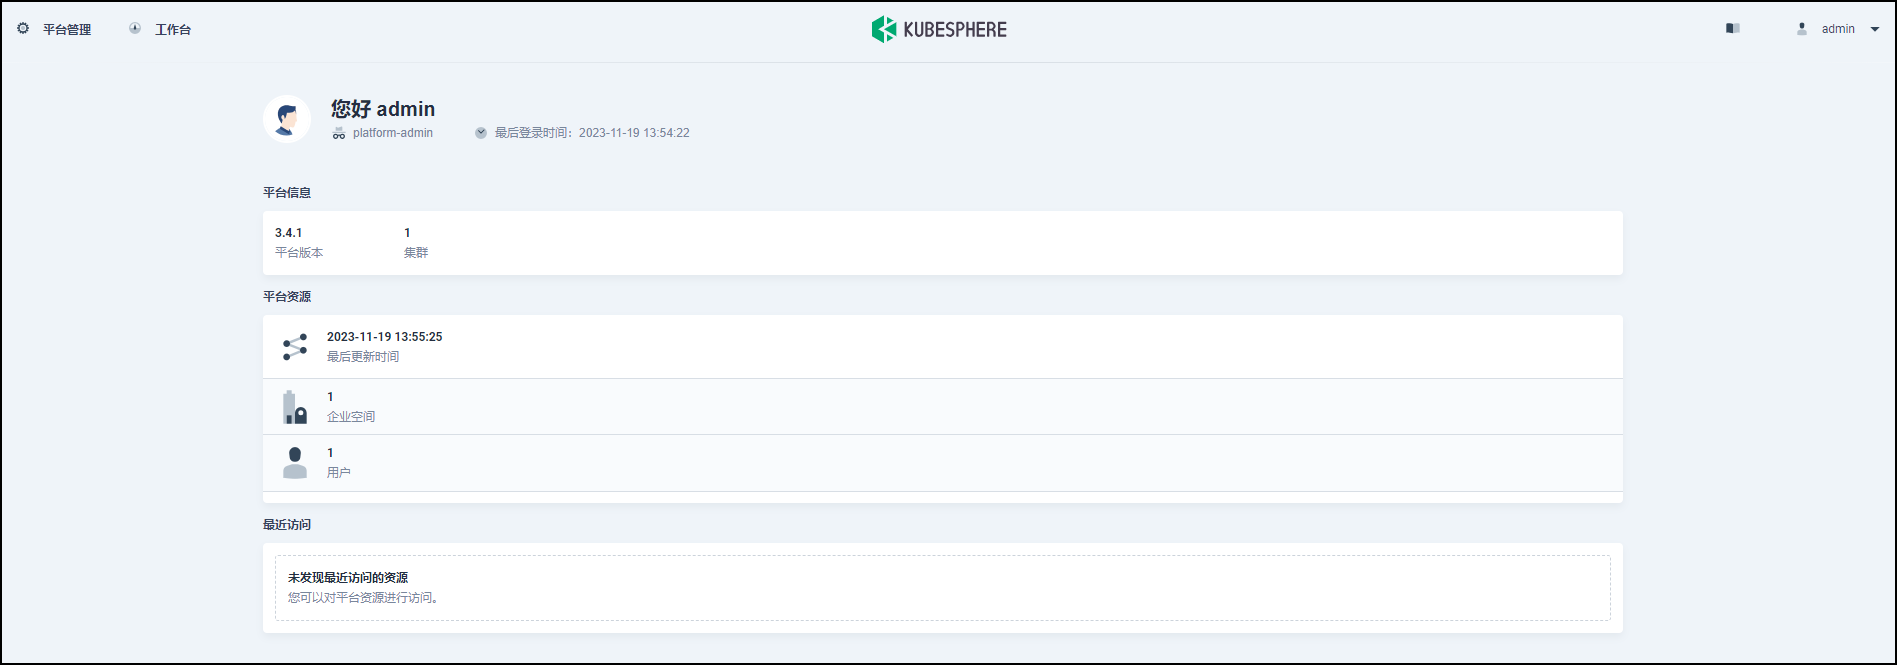
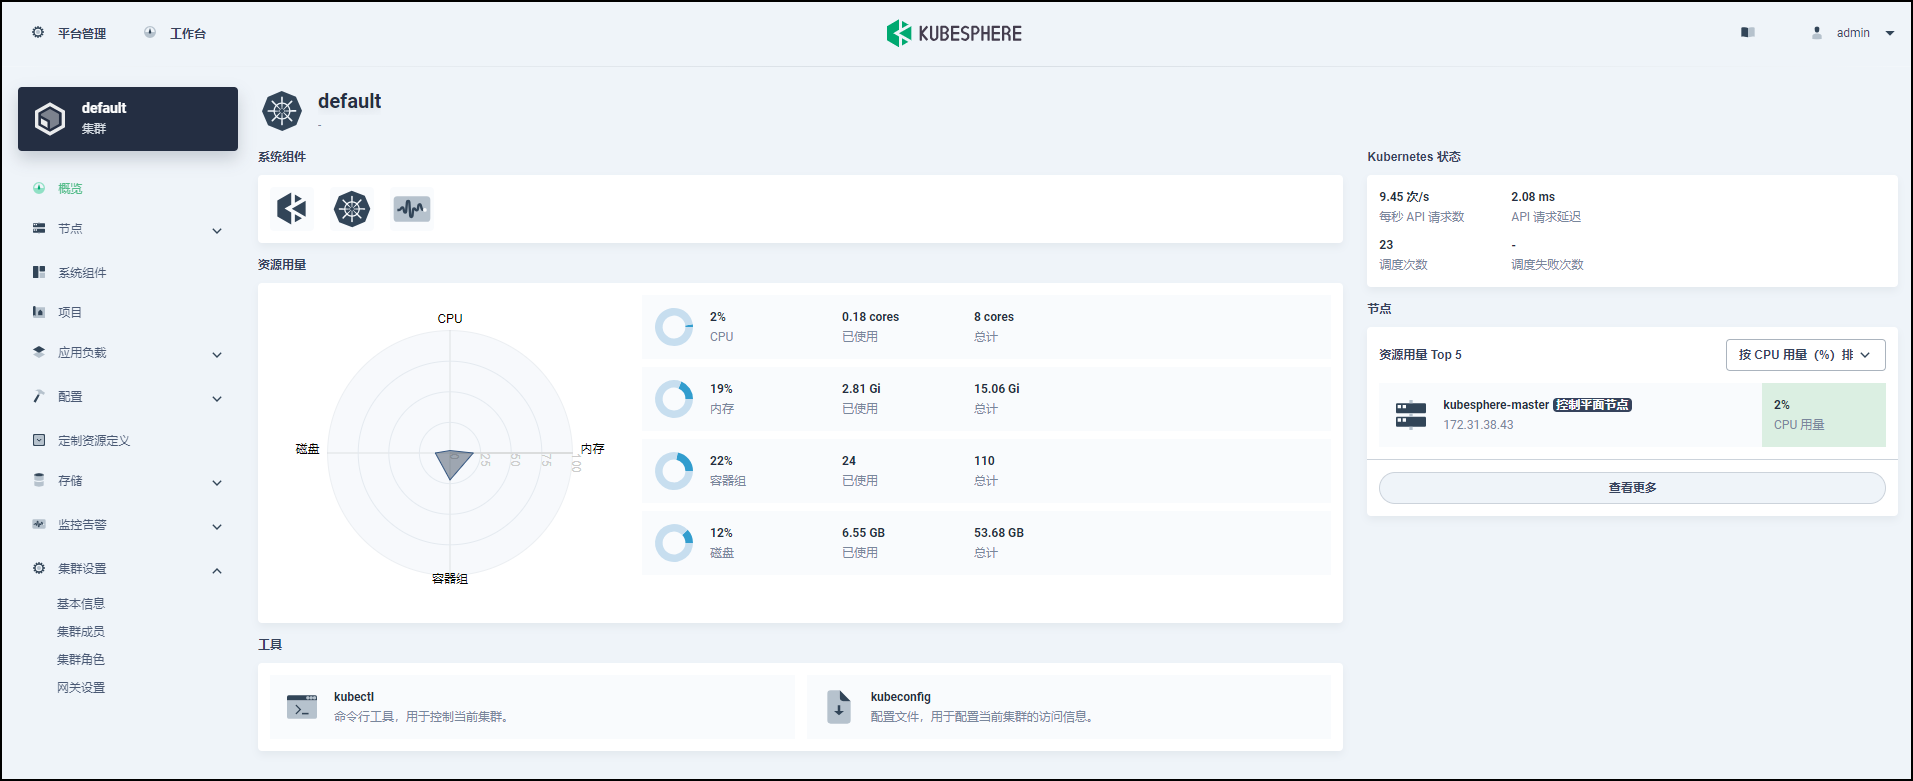
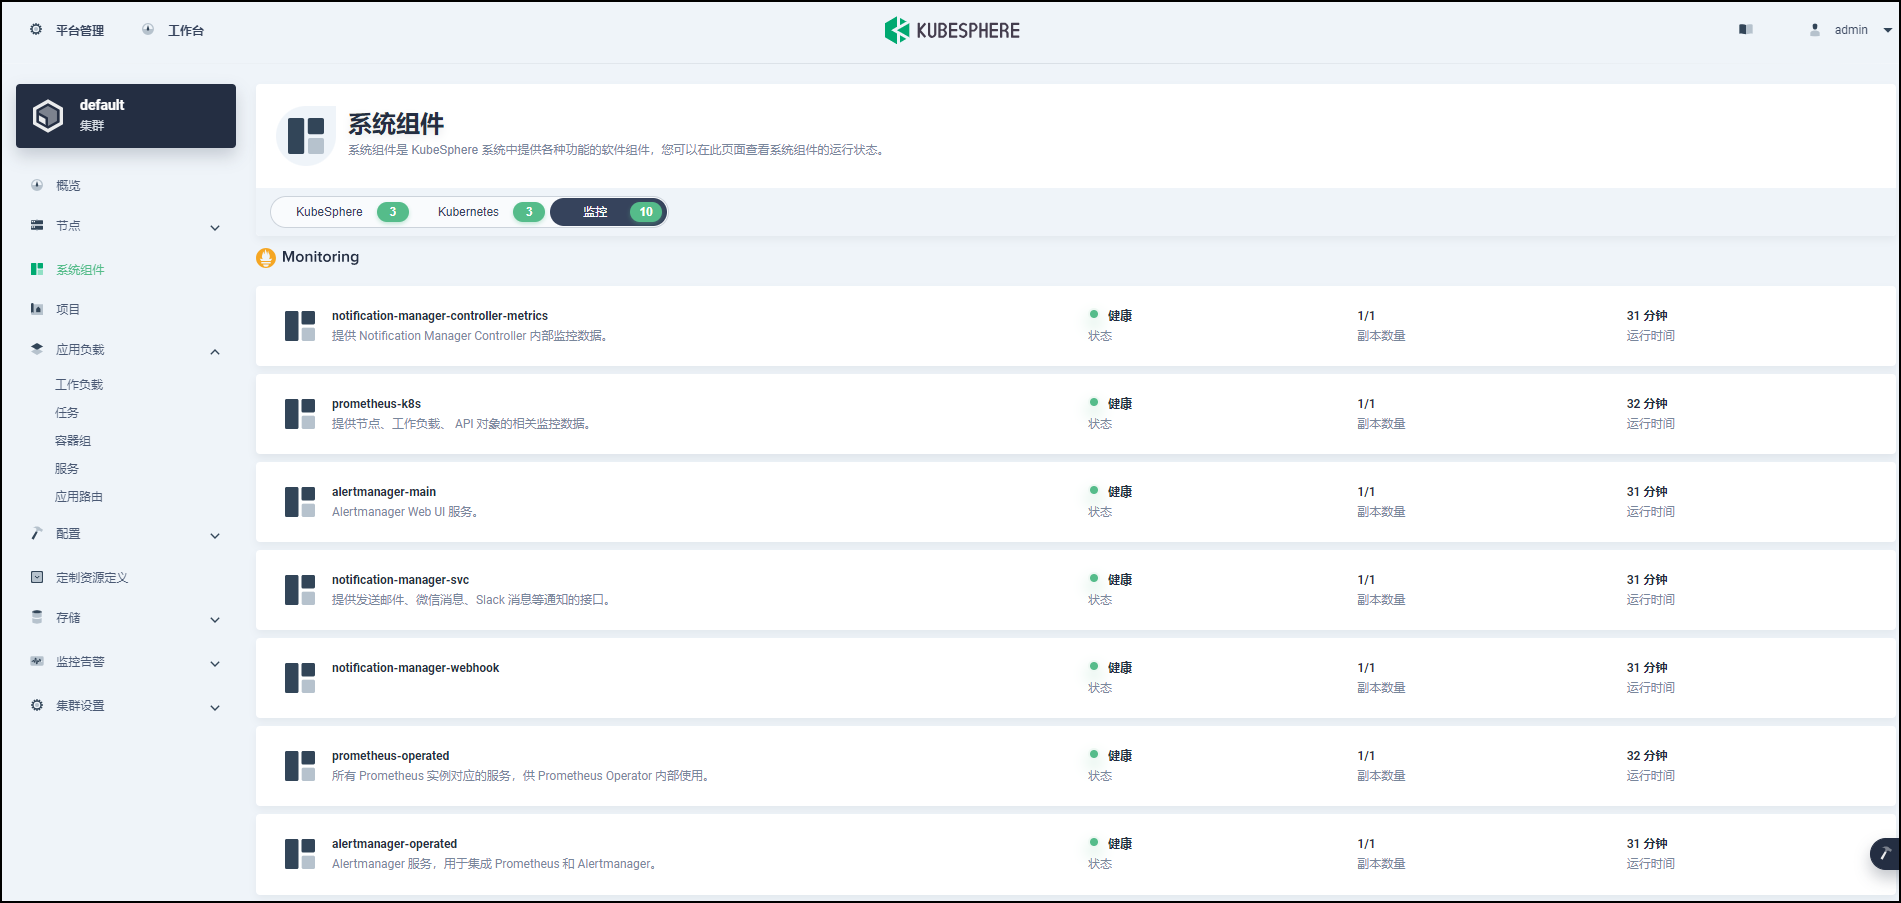
登录至控制台后,您可以在系统组件中查看各个组件的状态。也可以使用
kubectl get pod --all-namespaces来检查 KubeSphere 相关组件的运行状况。
[可选]安装KubeSphere应用商店
图形化操作
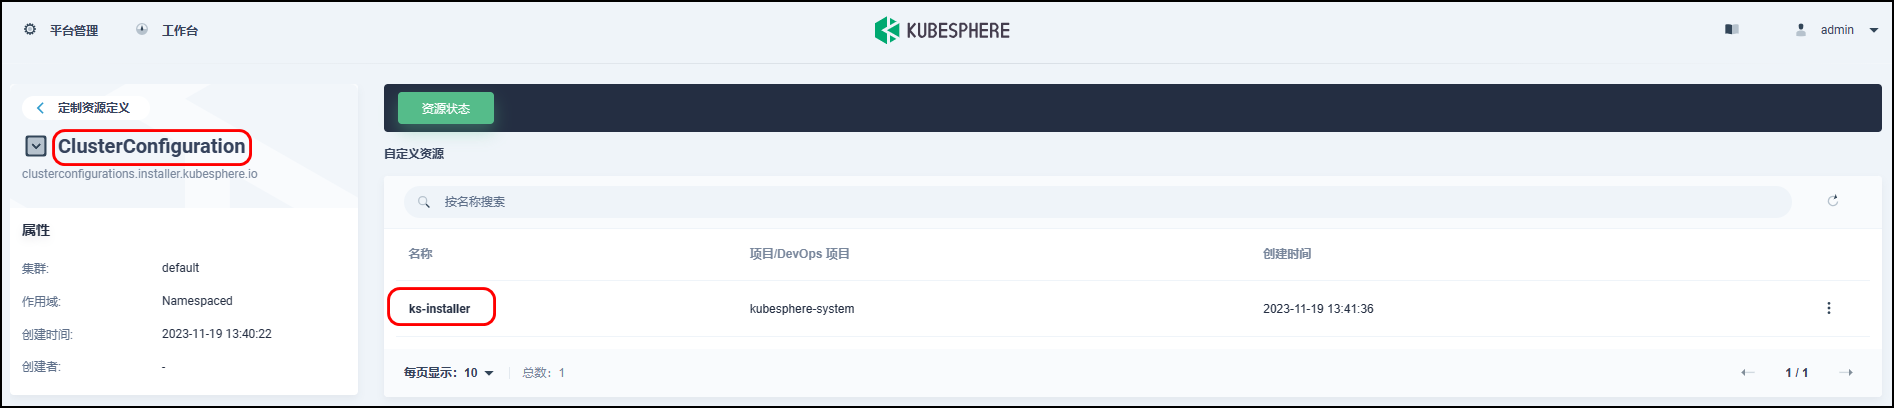
- 使用
admin用户登录控制台,点击左上角的平台管理,选择集群管理。 - 点击定制资源定义**,在搜索栏中输入
clusterconfiguration,点击结果查看其详细页面。** - 在自定义资源中,点击
ks-installer右侧的三个点。选择编辑 YAML。 - 在该 YAML 文件中,搜索
openpitrix,将enabled的false改为true。完成后,点击右下角的确定,保存配置。
openpitrix:store:enabled: true # 将“false”更改为“true”。
- 在 kubectl 中执行以下命令检查安装过程:
kubectl logs -n kubesphere-system $(kubectl get pod -n kubesphere-system -l 'app in (ks-install, ks-installer)' -o jsonpath='{.items[0].metadata.name}') -f
命令行操作
[root@kubesphere-master ~]# kubectl edit cc ks-installer -n kubesphere-system
clusterconfiguration.installer.kubesphere.io/ks-installer edited
验证安装结果
输入
http://<公网IP地址>:30880/apps
11. 常见问题
🔴问题:缺少依赖项。
[root@kubesphere-master ~]# ./kk create cluster --with-kubernetes v1.25.4 --with-kubesphere v3.4.0_   __      _          _   __
| | / /     | |        | | / /
| |/ / _   _| |__   ___| |/ /  ___ _   _
|    \| | | | '_ \ / _ \    \ / _ \ | | |
| |\  \ |_| | |_) |  __/ |\  \  __/ |_| |
\_| \_/\__,_|_.__/ \___\_| \_/\___|\__, |__/ ||___/05:25:34 UTC [GreetingsModule] Greetings
05:25:35 UTC message: [kubesphere-master]
Greetings, KubeKey!
05:25:35 UTC success: [kubesphere-master]
05:25:35 UTC [NodePreCheckModule] A pre-check on nodes
05:25:35 UTC success: [kubesphere-master]
05:25:35 UTC [ConfirmModule] Display confirmation form
+-------------------+------+------+---------+----------+-------+-------+---------+-----------+--------+--------+------------+------------+-------------+------------------+--------------+
| name              | sudo | curl | openssl | ebtables | socat | ipset | ipvsadm | conntrack | chrony | docker | containerd | nfs client | ceph client | glusterfs client | time         |
+-------------------+------+------+---------+----------+-------+-------+---------+-----------+--------+--------+------------+------------+-------------+------------------+--------------+
| kubesphere-master | y    | y    | y       |          | y     |       |         | y         | y      |        |            | y          |             |                  | UTC 05:25:35 |
+-------------------+------+------+---------+----------+-------+-------+---------+-----------+--------+--------+------------+------------+-------------+------------------+--------------+This is a simple check of your environment.
Before installation, ensure that your machines meet all requirements specified at
https://github.com/kubesphere/kubekey#requirements-and-recommendations[Notice]
Incorrect runtime. Please specify a container runtime other than Docker to install Kubernetes v1.24 or later.
You can set "spec.kubernetes.containerManager" in the configuration file to "containerd" or add "--container-manager containerd" to the "./kk create cluster" command.
For more information, see:
https://github.com/kubesphere/kubekey/blob/master/docs/commands/kk-create-cluster.md
https://kubernetes.io/docs/setup/production-environment/container-runtimes/#container-runtimes
https://kubernetes.io/blog/2022/02/17/dockershim-faq/
✅解决:安装缺少的依赖性。
yum install -y ebtables ipset ipvsadm
12. 参考链接
🔴 在 Linux 上以 All-in-One 模式安装 KubeSphere
🟡 KubeSphere 应用商店
相关文章:
【亚马逊云】基于EC2以 All-in-One 模式快速部署 KubeSphere 和 Kubernetes
文章目录 1. 云实例配置说明2. SSH连接云实例3. 查看系统版本4. 修改主机名5. 安装依赖项6. 安全组和DNS修改7. 下载KubeKey8. 同时安装Kubesphere和Kubernetes[可选]单独安装Kubernetes[可选]单独安装KubeSphere9. 验证KubeSphere安装结果10. 登录KubeSphere控制台[可选]安装K…...

使用 ChatGPT 创建 Makefile 构建系统:从 Docker 开始
使用 Docker 搭配 ChatGPT 创建 Makefile 构建系统 Makefile 构建系统是嵌入式软件团队实现其开发流程现代化的基础。构建系统不仅允许开发人员选择各种构建目标,还可以将这些构建集成到持续集成/持续部署 (CI/CD) 流程中。使用诸如 ChatGPT 这样的人工智能 (AI) 工…...

嵌入式设备摄像头基础知识
工作原理 摄像头的工作原理是,当光线通过镜头聚焦到图像传感器上时,传感器会将光信号转换为电信号,并将其传输给处理器进行处理。处理器通过算法对图像信号进行增强、去噪、压缩等操作,并将其转换为数字信号输出给计算机或其他设…...

使用Pytorch从零开始构建Normalizing Flow
归一化流 (Normalizing Flow) (Rezende & Mohamed,2015)学习可逆映射 f : X → Z f: X \rightarrow Z f:X→Z, 在这里X是我们的数据分布,Z是选定的潜在分布。 归一化流是生成模型家族的一部分,其中包括变分自动编…...

一个tomcat中部署的多个war,相当于几个jvm
请直接去看原文 原文链接:一个tomcat有几个jvm-CSDN博客 --------------------------------------------------------------------------------------------------------------------------------- 前几天向unmi提问,今天他答复了。我觉得答复很清楚,…...
2023年第十六届中国系统架构师大会(SACC2023)-核心PPT资料下载
一、峰会简介 本届大会以“数字转型 架构演进”为主题, 涵盖多个热门领域,如多云多活、海量分布式存储、容器、云成本、AIGC大数据等,同时还关注系统架构在各个行业中的应用,如金融、制造业、互联网、教育等。 与往届相比&#…...
高校大学校园后勤移动报修系统 微信小程序uniapp+vue
本文主要是针对线下校园后勤移动报修传统管理方式中管理不便与效率低的缺点,将电子商务和计算机技术结合起来,开发出管理便捷,效率高的基于app的大学校园后勤移动报修app。该系统、操作简单、界面友好、易于管理和维护;而且对后勤…...

docker常见问题汇总
docker常见问题 ❓问题1:启动docker容器时,报错Unknown runtime specified nvidia. 当我启动一个容器时,运行以下命令: docker run --runtimenvidia 。。。。 后面一部分命令没写出来,此时报错的信息如下:…...

JMeter 测试脚本编写技巧
JMeter 是一款开源软件,用于进行负载测试、性能测试及功能测试。测试人员可以使用 JMeter 编写测试脚本,模拟多种不同的负载情况,从而评估系统的性能和稳定性。以下是编写 JMeter 测试脚本的步骤。 第 1 步:创建测试计划 在JMet…...
力扣6:N字形变化
代码: class Solution { public:string convert(string s, int numRows){int lens.size();if(numRows1){return s;}int d2*numRows-2;int count0;string ret;//第一行!for(int i0;i<len;id){rets[i];}//第k行!for(int i1;i<numRows-1;…...
【上海大学数字逻辑实验报告】一、基本门电路
一、 实验目的 熟悉TTL中、小规模集成电路的外形、管脚和使用方法;了解和掌握基本逻辑门电路的输入与输出之间的逻辑关系及使用规则。 二、 实验原理 实现基本逻辑运算和常用逻辑运算的单元电路称为逻辑门电路。门电路通常用高电平VH表示逻辑值“1”,…...

基于xml配置的AOP
目录 xml方式AOP快速入门 xml方式AOP配置详解 xml方式AOP快速入门 xml方式配置AOP的步骤 导入AOP相关坐标 <dependency><groupId>org.aspectj</groupId><artifactId>aspectjweaver</artifactId><version>1.8.13</version></de…...

java学习part12多态
99-面向对象(进阶)-面向对象的特征三:多态性_哔哩哔哩_bilibili 1.多态(仅限方法) 父类引用指向子类对象。 调用重写的方法,就会执行子类重写的方法。 编译看引用表面类型,执行看实际变量类型。 2.父子同名属性是否…...

前置任务之安装jdk
已经安装过很多次了,但是每次安装都要搜好几次才能找到正确的,离大谱。 1.打开 oracle官网 https://www.oracle.com 然后切换到Java archive 下载192版本的,页面搜索ctrlF,【Java SE Development Kit】或者【jdk-8u192-windows-…...

C++ 常见异常
关于C异常(包括但不限于编译器异常)先开个头,有空都记下来吧: 1:_DllMain12 已经在 MSVCRTD.lib(dllmain.obj) 中定义 有效的解决办法: Debug版本: 项目-属性-链接器-输入:忽略特…...

语音识别学习笔记
目录 开源的语音识别项目 端到端的多说话人语音识别序列化训练方法简介 新一代 Kaldi: Two-pass 实时语音识别 开源的语音识别项目 有哪些语音识别的开源项目? - 知乎 端到端的多说话人语音识别序列化训练方法简介 端到端的多说话人语音识别序列化训练方法简介 …...

深入了解Java8新特性-日期时间API
阅读建议 嗨,伙计!刷到这篇文章咱们就是有缘人,在阅读这篇文章前我有一些建议: 本篇文章大概2000多字,预计阅读时间长需要3分钟。本篇文章的实战性、理论性较强,是一篇质量分数较高的技术干货文章&#x…...
【数据结构】二叉树概念 | 满二叉树 | 完全二叉树
二叉树的概念 二叉树在实践中用的很多。 一棵二叉树是结点的一个有限集合,该集合: 或者为空;由一个根结点加上两棵别称为左子树和右子树的二叉树组成。二叉树最多两个孩子。 这里注意:二叉树并不是度为2的树。 二叉树的度最大值是…...
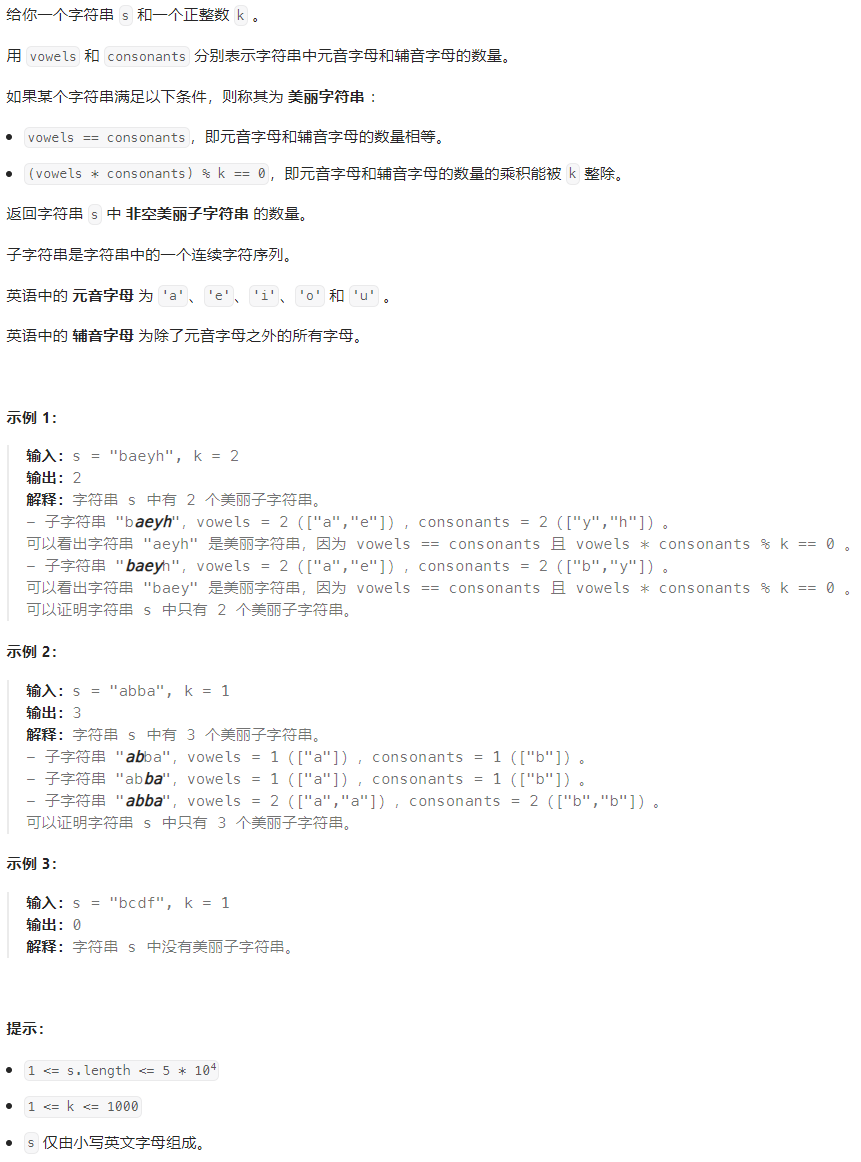
第 373 场 LeetCode 周赛题解
A 循环移位后的矩阵相似检查 模拟 class Solution { public:bool areSimilar(vector<vector<int>> &mat, int k) {int m mat.size(), n mat[0].size();k % n;auto g mat;for (int i 0; i < m; i)if (i & 1)rotate(mat[i].begin(), mat[i].begin() …...

C#,《小白学程序》第二十五课:大数乘法(BigInteger Multiply)的Karatsuba算法及源代码
1 文本格式 /// <summary> /// 《小白学程序》第二十五课:大数(BigInteger)的Karatsuba乘法 /// Multiplies two bit strings X and Y and returns result as long integer /// </summary> /// <param name"a">&…...

WPF按钮样式进阶:从字体图标到动态交互效果全解析
1. 字体图标在WPF按钮中的应用 在WPF开发中,使用字体图标替代传统图片资源已经成为提升界面美观度和性能的最佳实践。阿里巴巴矢量图标库(iconfont)是目前最受欢迎的免费图标资源平台之一,它提供了海量的矢量图标资源,…...

实用高效:B站缓存视频无损转换工具m4s-converter完全指南
实用高效:B站缓存视频无损转换工具m4s-converter完全指南 【免费下载链接】m4s-converter 一个跨平台小工具,将bilibili缓存的m4s格式音视频文件合并成mp4 项目地址: https://gitcode.com/gh_mirrors/m4/m4s-converter 还在为B站缓存视频无法在其…...

AI的jieba分词原理与多模式应用解析
AI的jieba分词原理与多模式应用解析...

InvoiceNet未来展望:AI发票解析技术的发展趋势和社区规划
InvoiceNet未来展望:AI发票解析技术的发展趋势和社区规划 【免费下载链接】InvoiceNet Deep neural network to extract intelligent information from invoice documents. 项目地址: https://gitcode.com/gh_mirrors/in/InvoiceNet InvoiceNet作为一款基于深…...

高效掌控Mem Reduct:智能多语言界面切换完全指南
高效掌控Mem Reduct:智能多语言界面切换完全指南 【免费下载链接】memreduct Lightweight real-time memory management application to monitor and clean system memory on your computer. 项目地址: https://gitcode.com/gh_mirrors/me/memreduct 你是否曾…...

探索MacOS窗口管理新境界:3步掌握Easy Move+Resize高效操作
探索MacOS窗口管理新境界:3步掌握Easy MoveResize高效操作 【免费下载链接】easy-move-resize Adds "modifier key mouse drag" move and resize to OSX 项目地址: https://gitcode.com/gh_mirrors/ea/easy-move-resize Easy MoveResize是一款专为…...

PADS Layout VX.1.2设计规则全解析:从安全间距到布线优化的实战技巧
PADS Layout VX.1.2设计规则全解析:从安全间距到布线优化的实战技巧 在高速PCB设计领域,规则约束如同交通信号灯般重要——它们决定了电流的"通行权"和"避让规则"。作为Mentor Graphics旗下的经典工具,PADS Layout VX.1…...

CentOS 7.6 下 OpenGauss 6.0 极简版安装踩坑实录:从用户权限到远程连接的全流程避坑
CentOS 7.6 下 OpenGauss 6.0 极简版安装实战:从权限配置到远程访问的深度排坑指南 国产数据库的崛起让OpenGauss逐渐成为企业级应用的新选择。但初次部署时,从用户权限到环境变量配置的每个环节都可能成为"拦路虎"。本文将带你穿越安装全流程…...

3分钟搞定Blender VRM插件:从零开始创建你的虚拟角色
3分钟搞定Blender VRM插件:从零开始创建你的虚拟角色 【免费下载链接】VRM-Addon-for-Blender VRM Importer, Exporter and Utilities for Blender 2.93 to 5.0 项目地址: https://gitcode.com/gh_mirrors/vr/VRM-Addon-for-Blender 还在为Blender与VRM格式的…...
)
协程生命周期调试困局破解(含Clang 18.1.0调试信息补丁实测数据)
第一章:协程生命周期调试困局的本质剖析协程的轻量性与异步调度能力在提升并发性能的同时,也悄然瓦解了传统线程调试范式的基础——确定的执行栈、可预测的挂起/恢复点、以及与操作系统线程强绑定的上下文。当开发者试图用 pprof 查看 goroutine 堆栈或在…...