卷积神经网络-3D医疗影像识别
文章目录
- 一、前言
- 二、前期工作
- 1. 介绍
- 2. 加载和预处理数据
- 二、构建训练和验证集
- 三、数据增强
- 四、数据可视化
- 五、构建3D卷积神经网络模型
- 六、训练模型
- 七、可视化模型性能
- 八、对单次 CT 扫描进行预测
一、前言
我的环境:
- 语言环境:Python3.6.5
- 编译器:jupyter notebook
- 深度学习环境:TensorFlow2.4.1
往期精彩内容:
- 卷积神经网络(CNN)实现mnist手写数字识别
- 卷积神经网络(CNN)多种图片分类的实现
- 卷积神经网络(CNN)衣服图像分类的实现
- 卷积神经网络(CNN)鲜花识别
- 卷积神经网络(CNN)天气识别
- 卷积神经网络(VGG-16)识别海贼王草帽一伙
- 卷积神经网络(ResNet-50)鸟类识别
- 卷积神经网络(AlexNet)鸟类识别
- 卷积神经网络(CNN)识别验证码
来自专栏:机器学习与深度学习算法推荐
二、前期工作
1. 介绍
本案例将展示通过构建 3D 卷积神经网络 (CNN) 来预测计算机断层扫描 (CT) 中病毒性肺炎是否存在。 2D 的 CNN 通常用于处理 RGB 图像(3 个通道)。 3D 的 CNN 仅仅是 3D 等价物,我们可以将 3D 图像简单理解成 2D 图像的叠加。3D 的 CNN 可以理解成是学习立体数据的强大模型。
import os,zipfile
import numpy as np
from tensorflow import keras
from tensorflow.keras import layersimport tensorflow as tf
gpus = tf.config.list_physical_devices("GPU")if gpus:tf.config.experimental.set_memory_growth(gpus[0], True)  #设置GPU显存用量按需使用tf.config.set_visible_devices([gpus[0]],"GPU")# 打印显卡信息,确认GPU可用
print(gpus)
2. 加载和预处理数据
数据文件是 Nifti,扩展名为 .nii。我使用nibabel 包来读取文件,你可以通过 pip install nibabel 来安装 nibabel 包。
数据预处理步骤:
- 首先将体积旋转 90 度,确保方向是固定的
- 将 HU 值缩放到 0 和 1 之间。
- 调整宽度、高度和深度。
我定义了几个辅助函数来完成处理数据,这些功能将在构建训练和验证数据集时使用。
import nibabel as nib
from scipy import ndimagedef read_nifti_file(filepath):# 读取文件scan = nib.load(filepath)# 获取数据scan = scan.get_fdata()return scandef normalize(volume):"""归一化"""min = -1000max = 400volume[volume < min] = minvolume[volume > max] = maxvolume = (volume - min) / (max - min)volume = volume.astype("float32")return volumedef resize_volume(img):"""修改图像大小"""# Set the desired depthdesired_depth = 64desired_width = 128desired_height = 128# Get current depthcurrent_depth = img.shape[-1]current_width = img.shape[0]current_height = img.shape[1]# Compute depth factordepth = current_depth / desired_depthwidth = current_width / desired_widthheight = current_height / desired_heightdepth_factor = 1 / depthwidth_factor = 1 / widthheight_factor = 1 / height# 旋转img = ndimage.rotate(img, 90, reshape=False)# 数据调整img = ndimage.zoom(img, (width_factor, height_factor, depth_factor), order=1)return imgdef process_scan(path):# 读取文件volume = read_nifti_file(path)# 归一化volume = normalize(volume)# 调整尺寸 width, height and depthvolume = resize_volume(volume)return volume
读取CT扫描文件的路径
# “CT-0”文件夹中是正常肺组织的CT扫描
normal_scan_paths = [os.path.join(os.getcwd(), "MosMedData/CT-0", x)for x in os.listdir("MosMedData/CT-0")
]# “CT-23”文件夹中是患有肺炎的人的CT扫描
abnormal_scan_paths = [os.path.join(os.getcwd(), "MosMedData/CT-23", x)for x in os.listdir("MosMedData/CT-23")
]print("CT scans with normal lung tissue: " + str(len(normal_scan_paths)))
print("CT scans with abnormal lung tissue: " + str(len(abnormal_scan_paths)))
CT scans with normal lung tissue: 100
CT scans with abnormal lung tissue: 100
# 读取数据并进行预处理
abnormal_scans = np.array([process_scan(path) for path in abnormal_scan_paths])
normal_scans = np.array([process_scan(path) for path in normal_scan_paths])# 标签数字化
abnormal_labels = np.array([1 for _ in range(len(abnormal_scans))])
normal_labels = np.array([0 for _ in range(len(normal_scans))])
二、构建训练和验证集
从类目录中读取扫描并分配标签。对扫描进行下采样以具有 128x128x64 的形状。将原始 HU 值重新调整到 0 到 1 的范围内。最后,将数据集拆分为训练和验证子集。
# 按照7:3的比例划分训练集、验证集
x_train = np.concatenate((abnormal_scans[:70], normal_scans[:70]), axis=0)
y_train = np.concatenate((abnormal_labels[:70], normal_labels[:70]), axis=0)
x_val = np.concatenate((abnormal_scans[70:], normal_scans[70:]), axis=0)
y_val = np.concatenate((abnormal_labels[70:], normal_labels[70:]), axis=0)
print("Number of samples in train and validation are %d and %d."% (x_train.shape[0], x_val.shape[0])
)
Number of samples in train and validation are 140 and 60.
三、数据增强
CT扫描也通过在训练期间在随机角度旋转来增强数据。由于数据存储在Rank-3的形状(样本,高度,宽度,深度)中,因此我们在轴4处添加大小1的尺寸,以便能够对数据执行3D卷积。因此,新形状(样品,高度,宽度,深度,1)。在那里有不同类型的预处理和增强技术,这个例子显示了一些简单的开始。
import random
from scipy import ndimage@tf.function
def rotate(volume):"""不同程度上进行旋转"""def scipy_rotate(volume):# 定义一些旋转角度angles = [-20, -10, -5, 5, 10, 20]# 随机选择一个角度angle = random.choice(angles)volume = ndimage.rotate(volume, angle, reshape=False)volume[volume < 0] = 0volume[volume > 1] = 1return volumeaugmented_volume = tf.numpy_function(scipy_rotate, [volume], tf.float32)return augmented_volumedef train_preprocessing(volume, label):volume = rotate(volume)volume = tf.expand_dims(volume, axis=3)return volume, labeldef validation_preprocessing(volume, label):volume = tf.expand_dims(volume, axis=3)return volume, label
在定义训练和验证数据加载器的同时,训练数据将进行不同角度的随机旋转。训练和验证数据都已重新调整为具有 0 到 1 之间的值。
# 定义数据加载器
train_loader = tf.data.Dataset.from_tensor_slices((x_train, y_train))
validation_loader = tf.data.Dataset.from_tensor_slices((x_val, y_val))batch_size = 2train_dataset = (train_loader.shuffle(len(x_train)).map(train_preprocessing).batch(batch_size).prefetch(2)
)validation_dataset = (validation_loader.shuffle(len(x_val)).map(validation_preprocessing).batch(batch_size).prefetch(2)
)
四、数据可视化
import matplotlib.pyplot as pltdata = train_dataset.take(1)
images, labels = list(data)[0]
images = images.numpy()
image = images[0]
print("Dimension of the CT scan is:", image.shape)
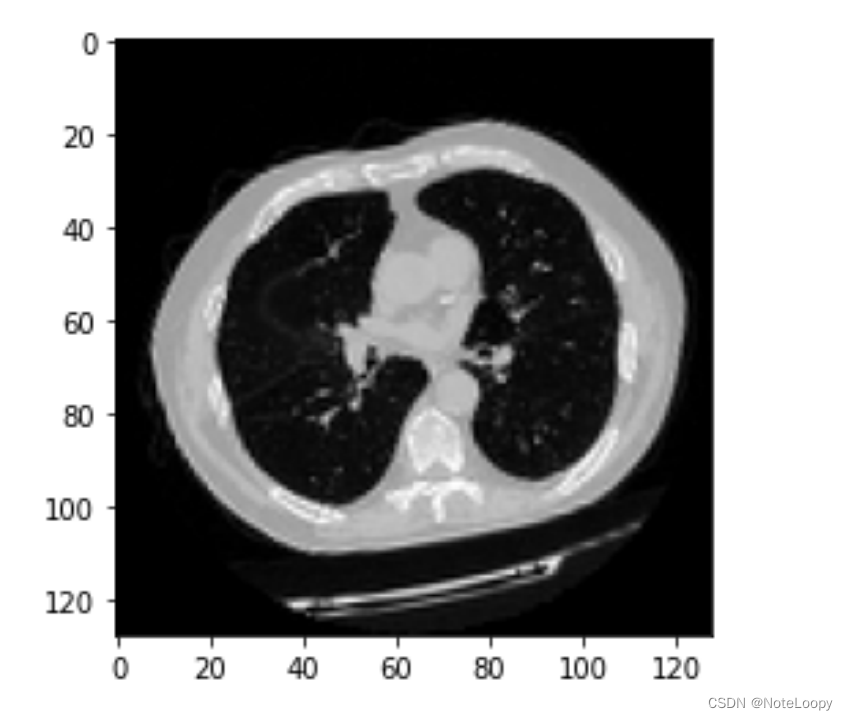
plt.imshow(np.squeeze(image[:, :, 30]), cmap="gray")
Dimension of the CT scan is: (128, 128, 64, 1)
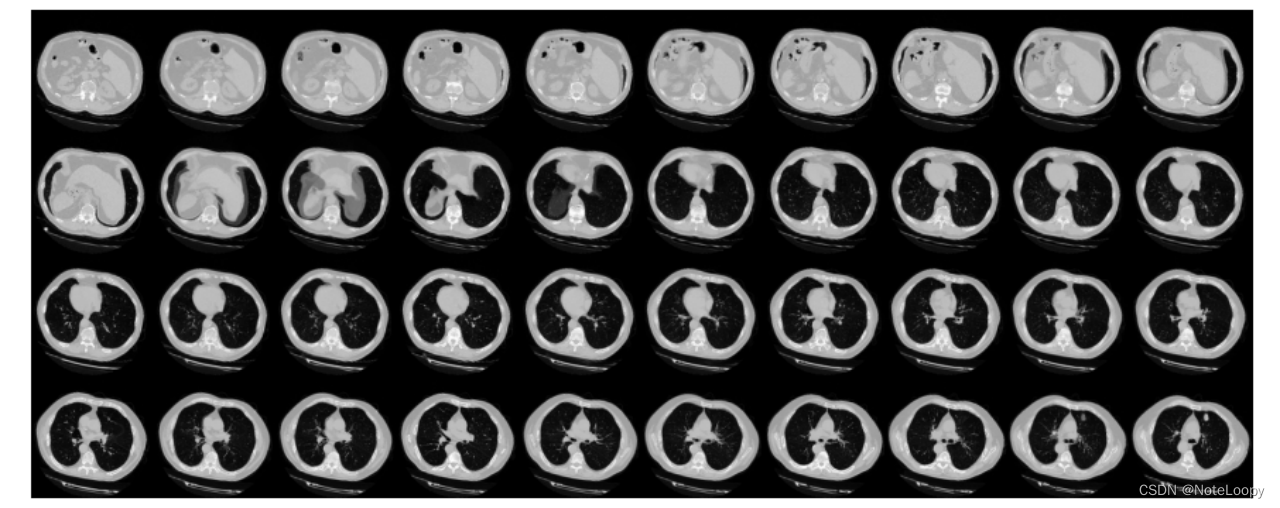
def plot_slices(num_rows, num_columns, width, height, data):"""Plot a montage of 20 CT slices"""data = np.rot90(np.array(data))data = np.transpose(data)data = np.reshape(data, (num_rows, num_columns, width, height))rows_data, columns_data = data.shape[0], data.shape[1]heights = [slc[0].shape[0] for slc in data]widths = [slc.shape[1] for slc in data[0]]fig_width = 12.0fig_height = fig_width * sum(heights) / sum(widths)f, axarr = plt.subplots(rows_data,columns_data,figsize=(fig_width, fig_height),gridspec_kw={"height_ratios": heights},)for i in range(rows_data):for j in range(columns_data):axarr[i, j].imshow(data[i][j], cmap="gray")axarr[i, j].axis("off")plt.subplots_adjust(wspace=0, hspace=0, left=0, right=1, bottom=0, top=1)plt.show()# Visualize montage of slices.
# 4 rows and 10 columns for 100 slices of the CT scan.
plot_slices(4, 10, 128, 128, image[:, :, :40])
五、构建3D卷积神经网络模型
为了使模型更容易理解,我将其构建成块。
def get_model(width=128, height=128, depth=64):"""构建 3D 卷积神经网络模型"""inputs = keras.Input((width, height, depth, 1))x = layers.Conv3D(filters=64, kernel_size=3, activation="relu")(inputs)x = layers.MaxPool3D(pool_size=2)(x)x = layers.BatchNormalization()(x)x = layers.Conv3D(filters=64, kernel_size=3, activation="relu")(x)x = layers.MaxPool3D(pool_size=2)(x)x = layers.BatchNormalization()(x)x = layers.Conv3D(filters=128, kernel_size=3, activation="relu")(x)x = layers.MaxPool3D(pool_size=2)(x)x = layers.BatchNormalization()(x)x = layers.Conv3D(filters=256, kernel_size=3, activation="relu")(x)x = layers.MaxPool3D(pool_size=2)(x)x = layers.BatchNormalization()(x)x = layers.GlobalAveragePooling3D()(x)x = layers.Dense(units=512, activation="relu")(x)x = layers.Dropout(0.3)(x)outputs = layers.Dense(units=1, activation="sigmoid")(x)# 定义模型model = keras.Model(inputs, outputs, name="3dcnn")return model# 构建模型
model = get_model(width=128, height=128, depth=64)
model.summary()
六、训练模型
# 设置动态学习率
initial_learning_rate = 1e-4
lr_schedule = keras.optimizers.schedules.ExponentialDecay(initial_learning_rate, decay_steps=30, decay_rate=0.96, staircase=True
)
# 编译
model.compile(loss="binary_crossentropy",optimizer=keras.optimizers.Adam(learning_rate=lr_schedule),metrics=["acc"],
)
# 保存模型
checkpoint_cb = keras.callbacks.ModelCheckpoint("3d_image_classification.h5", save_best_only=True
)
# 定义早停策略
early_stopping_cb = keras.callbacks.EarlyStopping(monitor="val_acc", patience=15)epochs = 100
model.fit(train_dataset,validation_data=validation_dataset,epochs=epochs,shuffle=True,verbose=2,callbacks=[checkpoint_cb, early_stopping_cb],
)
七、可视化模型性能
fig, ax = plt.subplots(1, 2, figsize=(20, 3))
ax = ax.ravel()for i, metric in enumerate(["acc", "loss"]):ax[i].plot(model.history.history[metric])ax[i].plot(model.history.history["val_" + metric])ax[i].set_title("Model {}".format(metric))ax[i].set_xlabel("epochs")ax[i].set_ylabel(metric)ax[i].legend(["train", "val"])
八、对单次 CT 扫描进行预测
# 加载模型
model.load_weights("3d_image_classification.h5")
prediction = model.predict(np.expand_dims(x_val[0], axis=0))[0]
scores = [1 - prediction[0], prediction[0]]class_names = ["normal", "abnormal"]
for score, name in zip(scores, class_names):print("This model is %.2f percent confident that CT scan is %s"% ((100 * score), name))
This model is 27.88 percent confident that CT scan is normal
This model is 72.12 percent confident that CT scan is abnormal
相关文章:
卷积神经网络-3D医疗影像识别
文章目录 一、前言二、前期工作1. 介绍2. 加载和预处理数据 二、构建训练和验证集三、数据增强四、数据可视化五、构建3D卷积神经网络模型六、训练模型七、可视化模型性能八、对单次 CT 扫描进行预测 一、前言 我的环境: 语言环境:Python3.6.5编译器&a…...
C++基础 -33- 单目运算符重载
单目运算符重载格式 a和a通过形参确定 data1 operator() {this->a;return *this; }data1 operator(int) {data1 temp*this;this->a;return temp; }举例使用单目运算符重载 #include "iostream"using namespace std;class data1 {public :int a;data1(int…...

[传智杯 #3 初赛] 课程报名
题目描述 传智播客推出了一款课程,并进行了一次促销活动。具体来说就是,课程的初始定价为 v 元;每报名 m 个学员,课程的定价就要提升 a 元。由于课程能够容纳的学生有限,因此报名到 n 人的时候就停止报名。 现在老师…...
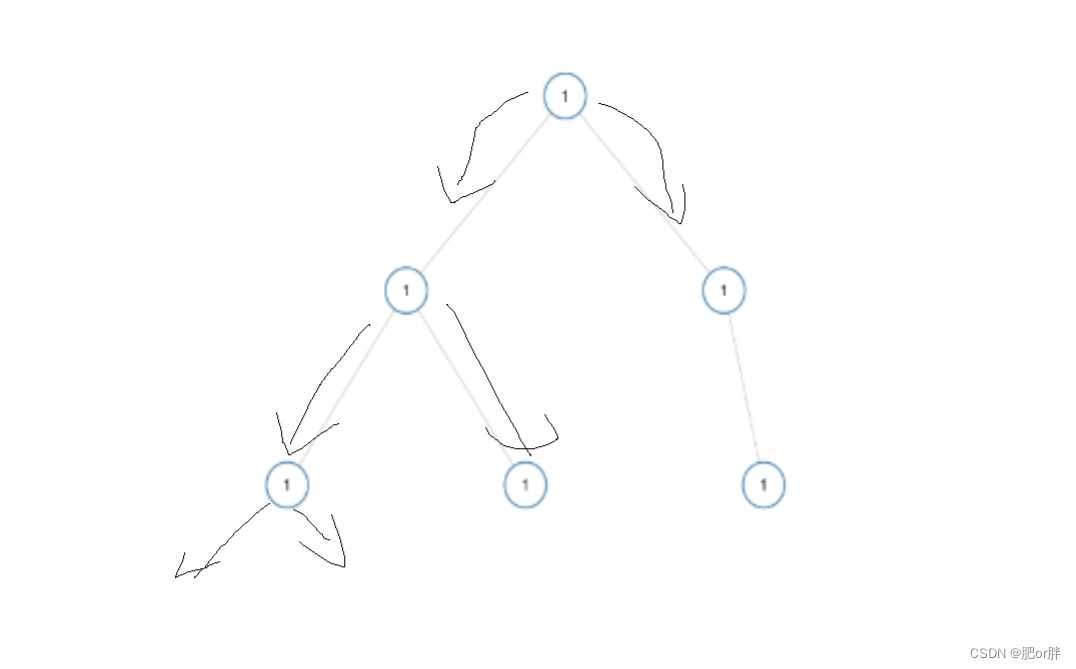
华为OD机试 - 悄悄话(Java JS Python C)
题目描述 给定一个二叉树,每个节点上站一个人,节点数字表示父节点到该节点传递悄悄话需要花费的时间。 初始时,根节点所在位置的人有一个悄悄话想要传递给其他人,求二叉树所有节点上的人都接收到悄悄话花费的时间。 输入描述 给定二叉树 0 9 20 -1 -1 15 7 -1 -1 -1 -1 …...
LeetCode - 965. 单值二叉树(C语言,二叉树,配图)
二叉树每个节点都具有相同的值,我们就可以比较每个树的根节点与左右两个孩子节点的值是否相同,如果不同返回false,否则,返回true。 如果是叶子节点,不存在还孩子节点,则这个叶子节点为根的树是单值二叉树。…...
----哈希表--三数之和)
每日一题(LeetCode)----哈希表--三数之和
每日一题(LeetCode)----哈希表–三数之和 1.题目(15. 三数之和) 给你一个整数数组 nums ,判断是否存在三元组 [nums[i], nums[j], nums[k]] 满足 i ! j、i ! k 且 j ! k ,同时还满足 nums[i] nums[j] nums[k] 0 。请 你返回所…...

DL中的GPU使用问题
写在前面 在使用GPU进行深度学习训练经常会遇到下面几个问题,这里做一个解决方法的汇总。 🐕Q1🐕:在一个多卡服务器上,指定了cuda:1,但是0号显卡显存还是会被占用一定量的显存。 这个问题很经典的出现场景就…...

Linux命令——watch
watch是周期性的执行下个程序,并全屏显示执行结果 用法: vmfedora:~$ watch --helpUsage:watch [options] commandOptions:-b, --beep beep if command has a non-zero exit-c, --color interpret ANSI color and style sequen…...
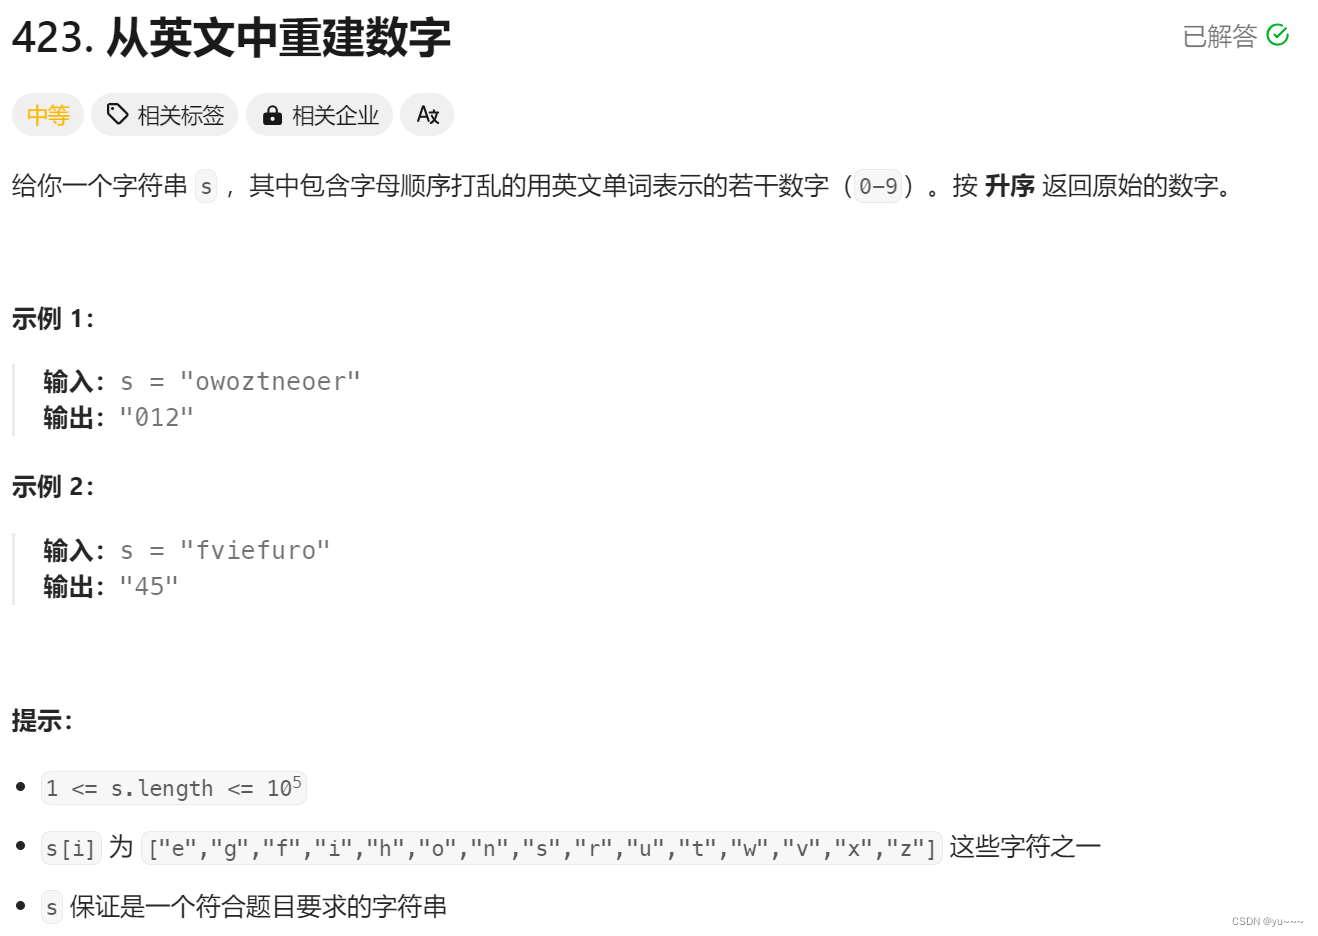
力扣题:字符的统计-12.2
力扣题-12.2 [力扣刷题攻略] Re:从零开始的力扣刷题生活 力扣题1:423. 从英文中重建数字 解题思想:有的单词通过一个字母就可以确定,依次确定即可 class Solution(object):def originalDigits(self, s):""":typ…...
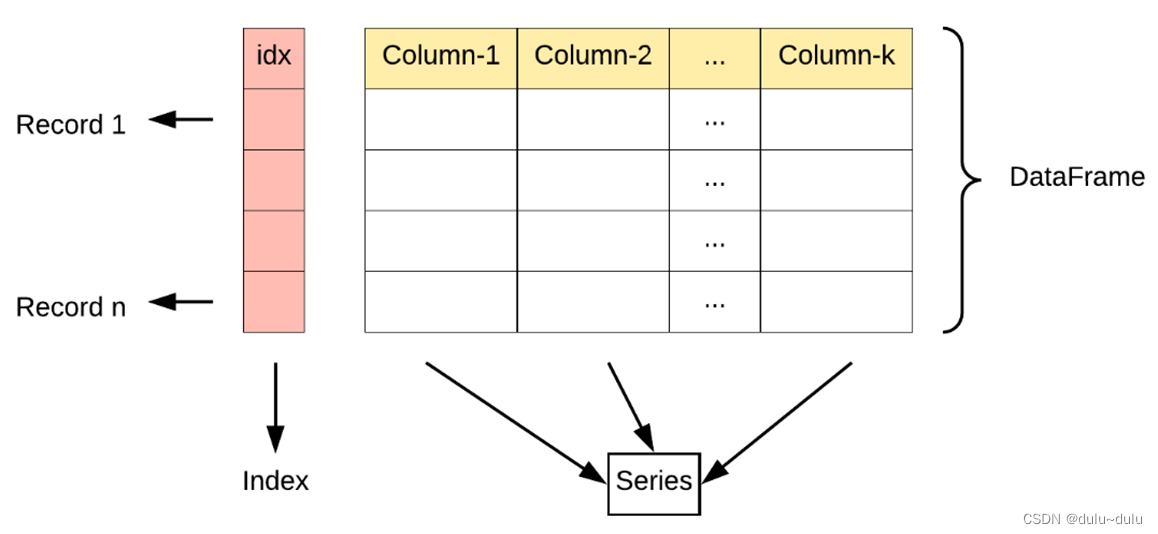
Python----Pandas
目录 Series属性 DataFrame的属性 Pandas的CSV文件 Pandas数据处理 Pandas的主要数据结构是Series(一维数据)与DataFrame(二维数据) Series属性 Series的属性如下: 属性描述pandas.Series(data,index,dtype,nam…...
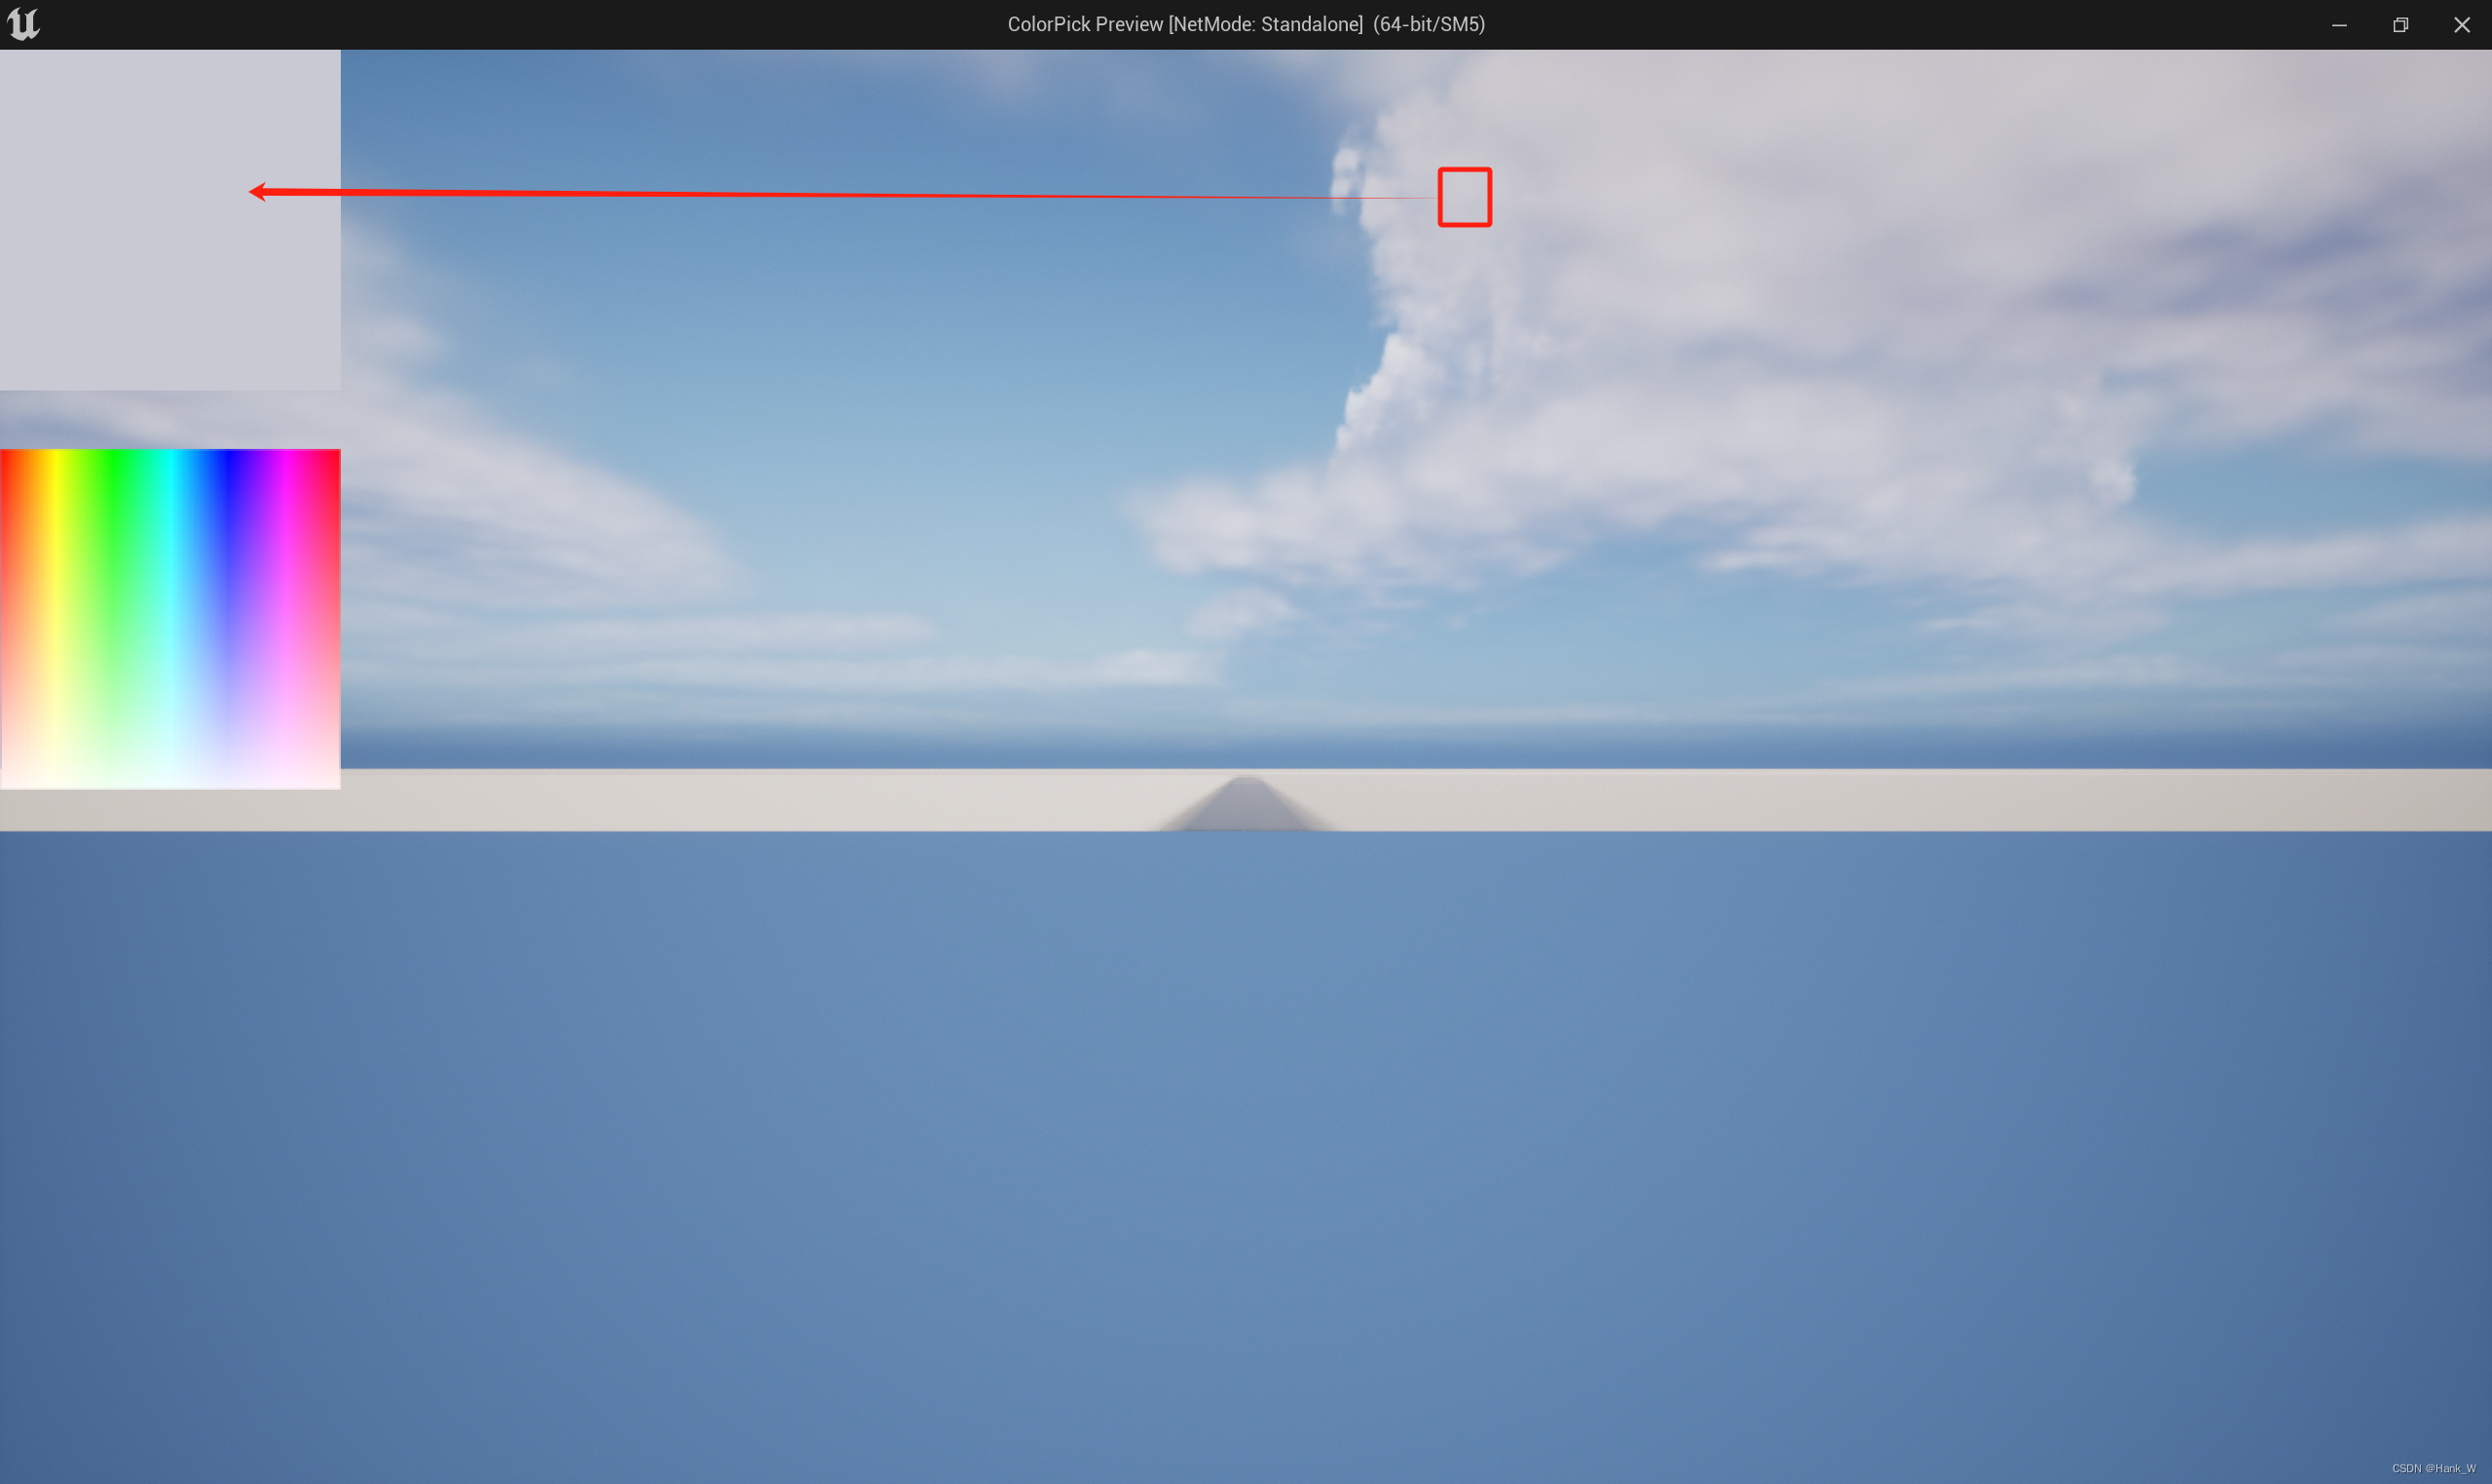
【UE】UEC++获取屏幕颜色GetPixelFromCursorPosition()
目录 【UE】UE C 获取屏幕颜色GetPixelFromCursorPosition() 一、函数声明与定义 二、函数的调用 三、运行结果 【UE】UE C 获取屏幕颜色GetPixelFromCursorPosition() 一、函数声明与定义 创建一个蓝图方法库方法 GetPixelFromCursorPosition(),并给他指定UF…...
数学建模-基于BL回归模型和决策树模型对早产危险因素的探究和预测
整体求解过程概述(摘要) 近年来,全球早产率总体呈上升趋势,在我国,早产儿以每年 20 万的数目逐年递增,目前早产已经成为重大的公共卫生问题之一。据研究,早产是威胁胎儿及新生儿健康的重要因素,可能会造成死亡或智力体…...

接口测试 —— 接口测试的意义
1、接口测试的意义(优势) (1)更早的发现问题: 不少的测试资料中强调,测试应该更早的介入到项目开发中,因为越早的发现bug,修复的成本越低。 然而功能测试必须要等到系统提供可测试…...

一些常见的爬虫库
一些常见的爬虫库,并按功能和用途进行分类: 通用爬虫库: Beautiful Soup:用于解析HTML和XML文档,方便地提取数据。Requests:用于HTTP请求,获取网页内容。Scrapy:一个强大的爬虫框架…...
2023.12.2 做一个后台管理网页(左侧边栏实现手风琴和隐藏/出现效果)
2023.12.2 做一个后台管理网页(左侧边栏实现手风琴和隐藏/出现效果) 网页源码见附件,比较简单,之前用很多种方法实现过该效果,这次的效果相对更好。 实现功能: (1)实现左侧边栏的手…...

【EMFace】《EMface: Detecting Hard Faces by Exploring Receptive Field Pyramids》
arXiv-2021 文章目录 1 Background and Motivation2 Related Work3 Advantages / Contributions4 Method5 Experiments5.1 Datasets and Metrics5.2 Ablation Study5.3 Comparison with State-of-the-Arts 6 Conclusion(own) 1 Background and Motivatio…...
)
详细学习Pyqt5的20种输入控件(Input Widgets)
Pyqt5相关文章: 快速掌握Pyqt5的三种主窗口 快速掌握Pyqt5的2种弹簧 快速掌握Pyqt5的5种布局 快速弄懂Pyqt5的5种项目视图(Item View) 快速弄懂Pyqt5的4种项目部件(Item Widget) 快速掌握Pyqt5的6种按钮 快速掌握Pyqt5的10种容器&…...
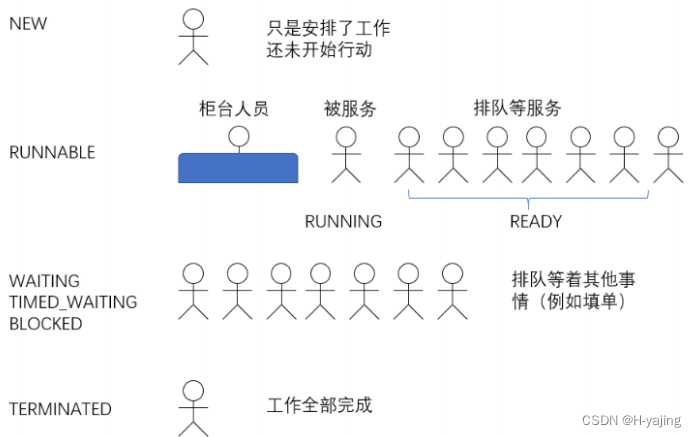
【JavaEE初阶】Thread 类及常见方法、线程的状态
目录 1、Thread 类及常见方法 1.1 Thread 的常见构造方法 1.2 Thread 的几个常见属性 1.3 启动⼀个线程 - start() 1.4 中断⼀个线程 1.5 等待⼀个线程 - join() 1.6 获取当前线程引用 1.7 休眠当前线程 2、线程的状态 2.1 观察线程的所有状态 2.2 线程状态和状…...
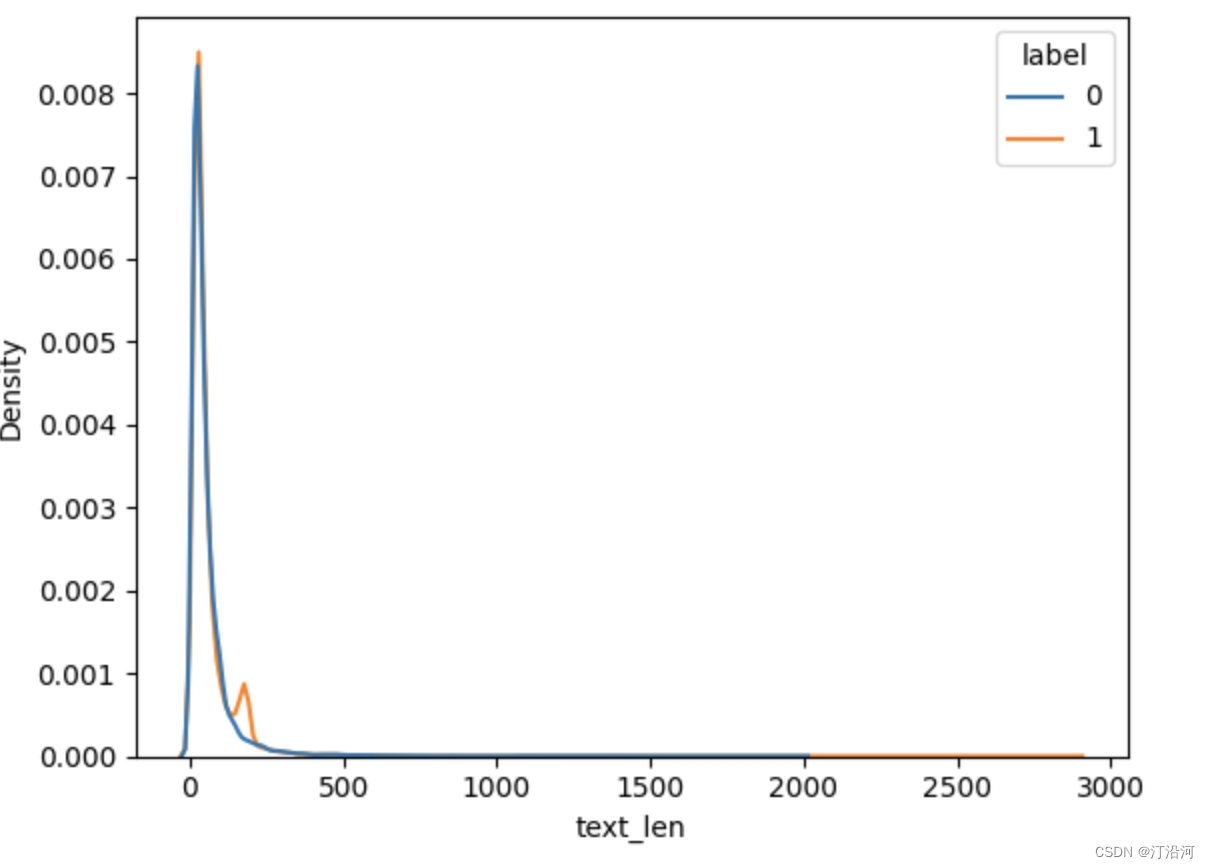
0 NLP: 数据获取与EDA
0数据准备与分析 二分类任务,正负样本共计6W; 数据集下载 https://github.com/SophonPlus/ChineseNlpCorpus/raw/master/datasets/online_shopping_10_cats/online_shopping_10_cats.zip 样本的分布 正负样本中评论字段的长度 ,超过500的都…...
159.库存管理(TOPk问题!)
思路:也是tok的问题,与上篇博客思路一样,只不过是求前k个小的元素! 基于快排分块思路的代码如下: class Solution { public:int getkey(vector<int>&nums,int left,int right){int rrand();return nums[r%…...

PowerInfer:基于热点神经元预测的LLM高性能推理引擎部署指南
1. 项目概述:当推理速度成为AI落地的瓶颈最近在折腾本地大模型推理的朋友,估计都绕不开一个核心痛点:速度。模型效果再好,生成一句话要等上十几秒,那种“卡顿感”足以劝退绝大多数想把它集成到实际应用里的开发者。我自…...

Go语言构建开发者命令行工具箱:navis项目架构与实现解析
1. 项目概述:一个为开发者打造的“导航”工具箱最近在GitHub上看到一个挺有意思的项目,叫navis,作者是NaveenBuidl。光看名字,你可能会联想到“导航”或者“航行”,没错,这个项目的核心定位就是一个为开发者…...

EL电致发光线与3D打印技术打造可穿戴发光骨架服
1. 项目概述:当发光骨架“活”过来每年万圣节,看着满大街的“幽灵”和“僵尸”,我总想搞点不一样的。直到去年,我决定不再满足于商店里千篇一律的服装,而是想自己动手,做一件真正能“发光”的、有科技感的骨…...

基于强化学习的机器人抓取:从PPO/SAC算法到仿真部署全解析
1. 项目概述:一个基于强化学习的机器人抓取开源项目最近在机器人控制领域,强化学习(Reinforcement Learning, RL)的应用越来越火,尤其是在需要高精度、高适应性的任务上,比如机器人抓取。传统的抓取规划方法…...

[具身智能-767]:AMCL全局撒粒子重搜与局部小范围匹配,是否算法过程是相似的,不同的是:粒子的数量、覆盖的区域、最终的精度?
AMCL 全局重搜 VS 局部匹配 详细对比核心定论二者底层算法流程、运算逻辑、执行步骤 100% 完全一致,统一遵循:运动预测→观测权重计算→粒子重采样→位姿融合输出这套粒子滤波逻辑,仅在粒子分布范围、粒子总数、收敛活动区间、定位误差精度四…...

Redis分布式锁进阶第二十二篇拆解
一、本篇前置衔接 第九十二篇我们完成Redisson源码拆解、手写复刻、底层内核穿透,彻底明白分布式锁代码层、脚本层、线程层原理。到此为止,代码、源码、坑点、运维、监控、面试全部讲透。但很多开发最大的困惑依旧存在:不同体量公司为什么锁架…...

Logseq Full House Templates 终极指南:如何用智能模板提升知识管理效率
Logseq Full House Templates 终极指南:如何用智能模板提升知识管理效率 【免费下载链接】logseq13-full-house-plugin Logseq Templates you will really love ❤️ 🏛️ 项目地址: https://gitcode.com/gh_mirrors/lo/logseq13-full-house-plugin …...

嵌入式开发内存优化实战:裁剪IRLib2红外库,释放微控制器Flash空间
1. 项目概述:当红外遥控遇上内存焦虑红外遥控,这个听起来有点“复古”的技术,至今仍是智能家居、玩具和各类嵌入式设备里最经济可靠的无线通信方案之一。它的原理不复杂:用一个特定频率(通常是38kHz)的载波…...

1987年4月26日中午11-13点出生性格、运势和命运
在1987年4月26日中午11 - 13点出生的人,正处于火兔年的特定时段。从性格层面来看,这一时间段出生者往往有着热情似火且积极向上的特质。他们如同正午炽热的阳光,充满活力与冲劲,对生活始终保持着乐观的态度,面对困难时…...

2025届毕业生推荐的AI学术平台推荐榜单
Ai论文网站排名(开题报告、文献综述、降aigc率、降重综合对比) TOP1. 千笔AI TOP2. aipasspaper TOP3. 清北论文 TOP4. 豆包 TOP5. kimi TOP6. deepseek 在学术写作范畴之内,怎样迅速、精确地给论文确定一个既契合规范又能够切实有效吸…...