scrapy的入门和使用
scrapy的入门使用
学习目标:
- 掌握 scrapy的安装
- 应用 创建scrapy的项目
- 应用 创建scrapy爬虫
- 应用 运行scrapy爬虫
- 应用 scrapy定位以及提取数据或属性值的方法
- 掌握 response响应对象的常用属性
1 安装scrapy
命令:
sudo apt-get install scrapy
或者:
pip/pip3 install scrapy
2 scrapy项目开发流程
- 创建项目:
scrapy startproject mySpider - 生成一个爬虫:
scrapy genspider lianjia lianjia.com - 提取数据:
根据网站结构在spider中实现数据采集相关内容 - 保存数据:
使用pipeline进行数据后续处理和保存
3. 创建项目
通过命令将scrapy项目的的文件生成出来,后续步骤都是在项目文件中进行相关操作,下面以抓取传智师资库来学习scrapy的入门使
创建scrapy项目的命令:
scrapy startproject <项目名字>
示例:
scrapy startproject myspider
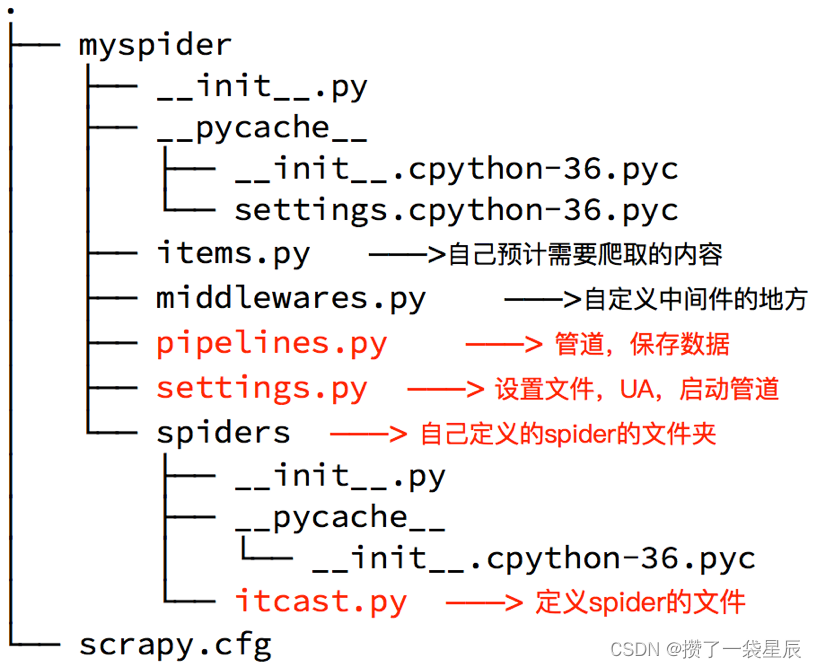
生成的目录和文件结果如下:

对几个py文件做如下说明:
- items.py
# Define here the models for your scraped items# See documentation in:
# https://docs.scrapy.org/en/latest/topics/items.htmlimport scrapy# 实际是一个模板类  主要是用来定义数据存储模型
# 通过这个类实例化 数据实际存到实例(对象)中
class MyspiderItem(scrapy.Item):# 实际是一个模板类(数据建模) 事先定义好你要爬取的字段name = scrapy.Field() # 租房标题content = scrapy.Field() # 详情信息price = scrapy.Field() # 价格link = scrapy.Field() # 详情链接- middlewares.py 用于编写中间件(下载中间件+爬虫中间件) – 无特殊需求,一般不需要编写
 Define here the models for your spider middleware
#
# See documentation in:
# https://docs.scrapy.org/en/latest/topics/spider-middleware.htmlfrom scrapy import signals# useful for handling different item types with a single interface
from itemadapter import is_item, ItemAdapterclass MyspiderSpiderMiddleware:# Not all methods need to be defined. If a method is not defined,# scrapy acts as if the spider middleware does not modify the# passed objects.@classmethoddef from_crawler(cls, crawler):# This method is used by Scrapy to create your spiders.s = cls()crawler.signals.connect(s.spider_opened, signal=signals.spider_opened)return sdef process_spider_input(self, response, spider):# Called for each response that goes through the spider# middleware and into the spider.# Should return None or raise an exception.return Nonedef process_spider_output(self, response, result, spider):# Called with the results returned from the Spider, after# it has processed the response.# Must return an iterable of Request, or item objects.for i in result:yield idef process_spider_exception(self, response, exception, spider):# Called when a spider or process_spider_input() method# (from other spider middleware) raises an exception.# Should return either None or an iterable of Request or item objects.passdef process_start_requests(self, start_requests, spider):# Called with the start requests of the spider, and works# similarly to the process_spider_output() method, except# that it doesn’t have a response associated.# Must return only requests (not items).for r in start_requests:yield rdef spider_opened(self, spider):spider.logger.info('Spider opened: %s' % spider.name)class MyspiderDownloaderMiddleware:# Not all methods need to be defined. If a method is not defined,# scrapy acts as if the downloader middleware does not modify the# passed objects.@classmethoddef from_crawler(cls, crawler):# This method is used by Scrapy to create your spiders.s = cls()crawler.signals.connect(s.spider_opened, signal=signals.spider_opened)return sdef process_request(self, request, spider):# Called for each request that goes through the downloader# middleware.# Must either:# - return None: continue processing this request# - or return a Response object# - or return a Request object# - or raise IgnoreRequest: process_exception() methods of# installed downloader middleware will be calledreturn Nonedef process_response(self, request, response, spider):# Called with the response returned from the downloader.# Must either;# - return a Response object# - return a Request object# - or raise IgnoreRequestreturn responsedef process_exception(self, request, exception, spider):# Called when a download handler or a process_request()# (from other downloader middleware) raises an exception.# Must either:# - return None: continue processing this exception# - return a Response object: stops process_exception() chain# - return a Request object: stops process_exception() chainpassdef spider_opened(self, spider):spider.logger.info('Spider opened: %s' % spider.name)- pipelines.py 管道 – 主要用于编写数据处理步骤 (数据的清洗+保存)
# Define your item pipelines here# Don't forget to add your pipeline to the ITEM_PIPELINES setting
# See: https://docs.scrapy.org/en/latest/topics/item-pipeline.html# useful for handling different item types with a single interface
from itemadapter import ItemAdapterclass MyspiderPipeline:def process_item(self, itemder):return item- settings.py 详细的配置信息(设置文件 UA 启动管道)
 Scrapy settings for mySpider project
#
# For simplicity, this file contains only settings considered important or
# commonly used. You can find more settings consulting the documentation:
#
#     https://docs.scrapy.org/en/latest/topics/settings.html
#     https://docs.scrapy.org/en/latest/topics/downloader-middleware.html
#     https://docs.scrapy.org/en/latest/topics/spider-middleware.htmlBOT_NAME = 'mySpider'SPIDER_MODULES = ['mySpider.spiders']
NEWSPIDER_MODULE = 'mySpider.spiders'# Crawl responsibly by identifying yourself (and your website) on the user-agent
# 需要手动修改成自己浏览器的UA
USER_AGENT = 'mySpider (+http://www.yourdomain.com)'# Obey robots.txt rules
ROBOTSTXT_OBEY = False # 需要手动修改为False# Configure maximum concurrent requests performed by Scrapy (default: 16)
#CONCURRENT_REQUESTS = 32# Configure a delay for requests for the same website (default: 0)
# See https://docs.scrapy.org/en/latest/topics/settings.html#download-delay
# See also autothrottle settings and docs
#DOWNLOAD_DELAY = 3
# The download delay setting will honor only one of:
#CONCURRENT_REQUESTS_PER_DOMAIN = 16
#CONCURRENT_REQUESTS_PER_IP = 16# Disable cookies (enabled by default)
#COOKIES_ENABLED = False# Disable Telnet Console (enabled by default)
#TELNETCONSOLE_ENABLED = False# Override the default request headers:
# 可以写入一些爬虫所需要的身份信息
#DEFAULT_REQUEST_HEADERS = {
#   'Accept': 'text/html,application/xhtml+xml,application/xml;q=0.9,*/*;q=0.8',
#   'Accept-Language': 'en',
#}# Enable or disable spider middlewares
# See https://docs.scrapy.org/en/latest/topics/spider-middleware.html
# SPIDER_MIDDLEWARES = {
#    'mySpider.middlewares.MyspiderSpiderMiddleware': 543,
# }# Enable or disable downloader middlewares
# See https://docs.scrapy.org/en/latest/topics/downloader-middleware.html
#DOWNLOADER_MIDDLEWARES = {
#    'mySpider.middlewares.MyspiderDownloaderMiddleware': 543,
#}# Enable or disable extensions
# See https://docs.scrapy.org/en/latest/topics/extensions.html
#EXTENSIONS = {
#    'scrapy.extensions.telnet.TelnetConsole': None,
#}# Configure item pipelines
# See https://docs.scrapy.org/en/latest/topics/item-pipeline.html
# 开启管道类才能写入数据
ITEM_PIPELINES = {'mySpider.pipelines.MyspiderPipeline': 300,
}# Enable and configure the AutoThrottle extension (disabled by default)
# See https://docs.scrapy.org/en/latest/topics/autothrottle.html
#AUTOTHROTTLE_ENABLED = True
# The initial download delay
#AUTOTHROTTLE_START_DELAY = 5
# The maximum download delay to be set in case of high latencies
#AUTOTHROTTLE_MAX_DELAY = 60
# The average number of requests Scrapy should be sending in parallel to
# each remote server
#AUTOTHROTTLE_TARGET_CONCURRENCY = 1.0
# Enable showing throttling stats for every response received:
#AUTOTHROTTLE_DEBUG = False# Enable and configure HTTP caching (disabled by default)
# See https://docs.scrapy.org/en/latest/topics/downloader-middleware.html#httpcache-middleware-settings
#HTTPCACHE_ENABLED = True
#HTTPCACHE_EXPIRATION_SECS = 0
#HTTPCACHE_DIR = 'httpcache'
#HTTPCACHE_IGNORE_HTTP_CODES = []
#HTTPCACHE_STORAGE = 'scrapy.extensions.httpcache.FilesystemCacheStorage'
4. 创建爬虫
通过命令创建出爬虫文件,爬虫文件为主要的代码作业文件,通常一个网站的爬取动作都会在爬虫文件中进行编写。
命令:
在项目路径下执行:
scrapy genspider <爬虫名字> <允许爬取的域名>
爬虫名字: 作为爬虫运行时的参数
允许爬取的域名: 为对于爬虫设置的爬取范围,设置之后用于过滤要爬取的url,如果爬取的url与允许的域不通则被过滤掉。
示例:
cd myspiderscrapy genspider itcast itcast.cn
生成的目录和文件结果如下:
5. 完善爬虫
在上一步生成出来的爬虫文件中编写指定网站的数据采集操作,实现数据提取
5.1 在/myspider/myspider/spiders/itcast.py中修改内容如下:
import scrapyclass ItcastSpider(scrapy.Spider): # 继承scrapy.spider# 爬虫名字 name = 'itcast' # 允许爬取的范围allowed_domains = ['itcast.cn'] # 开始爬取的url地址start_urls = ['http://www.itcast.cn/channel/teacher.shtml']# 数据提取的方法,接受下载中间件传过来的responsedef parse(self, response): # scrapy的response对象可以直接进行xpathnames = response.xpath('//div[@class="tea_con"]//li/div/h3/text()') print(names)# 获取具体数据文本的方式如下# 分组li_list = response.xpath('//div[@class="tea_con"]//li') for li in li_list:# 创建一个数据字典item = {}# 利用scrapy封装好的xpath选择器定位元素,并通过extract()或extract_first()来获取结果# extract_first()如果没结果就返回None 值只有一个的时候可以选择该方法item['name'] = li.xpath('.//h3/text()').sc_first() # 老师的名字item['level'] = li.xpath('.//h4/text()').extract_first() # 老师的级别item['text'] = li.xpath('.//p/text()').extract_first() # 老师的介绍print(item)# 使用yield返回数据yield temp
注意:
- scrapy.Spider爬虫类中必须有名为parse的解析
- 如果网站结构层次比较复杂,也可以自定义其他解析函数
- 在解析函数中提取的url地址如果要发送请求,则必须属于allowed_domains范围内,但是start_urls中的url地址不受这个限制,我们会在后续的课程中学习如何在解析函数中构造发送请求
- 启动爬虫的时候注意启动的位置,是在项目路径下启动
- parse()函数中使用yield返回数据,注意:解析函数中的yield能够传递的对象只能是:BaseItem, Request, dict, None
5.2 定位元素以及提取数据、属性值的方法
解析并获取scrapy爬虫中的数据: 利用xpath规则字符串进行定位和提取
- response.xpath方法的返回结果是一个类似list的类型,其中包含的是selector对象,操作和列表一样,但是有一些额外的方法
- 额外方法extract():返回一个包含有字符串的列表
- 额外方法extract_first():返回列表中的第一个字符串,列表为空没有返回None
5.3 response响应对象的常用属性
- response.url:当前响应的url地址
- response.request.url:当前响应对应的请求的url地址
- response.headers:响应头
- response.requests.headers:当前响应的请求头
- response.body:响应体,也就是html代码,byte类型
- response.status:响应状态码
6 保存数据
利用管道pipeline来处理(保存)数据
6.1 在pipelines.py文件中定义对数据的操作
- 定义一个管道类
- 重写管道类的process_item方法
- process_item方法处理完item之后必须返回给引擎
import jsonclass ItcastPipeline():# 爬虫文件中提取数据的方法每yield一次item,就会运行一次# 该方法为固定名称函数def process_item(self, item, spider): # 参数item:是爬虫文件中yield的返回的数据对象(引擎会把这个交给管道中的这个item参数)print(item)return item # 默认使用完管道之后需要把数据返回给引擎
6.2 在settings.py配置启用管道
ITEM_PIPELINES = {#      目录文件                      该值的大小决定管道执行的顺序,值越小优先级越高(该值最好 不要大于1000)'myspider.pipelines.lianjiaPipeline': 400
}
配置项中键为使用的管道类,管道类使用.进行分割,第一个为项目目录,第二个为文件,第三个为定义的管道类。
配置项中值为管道的使用顺序,设置的数值约小越优先执行,该值一般设置为1000以内。
7. 运行scrapy
命令:在项目目录下执行scrapy crawl <爬虫名字>
示例:r 【scrapy crawl itcast --nolog 忽略日志信息】
小结
- scrapy的安装:pip install scrapy
- 创建scrapy的项目: scrapy startproject myspider
- 创建scrapy爬虫:在项目目录下执行 scrapy genspider itcast itcast.cn
- 运行scrapy爬虫:在项目目录下执行 scrapy crawl itcast 【scrapy crawl itcast --nolog 忽略日志信息】
- 解析并获取scrapy爬虫中的数据:
- response.xpath方法的返回结果是一个类似list的类型,其中包含的是selector对象,操作和列表一样,但是有一些额外的方法
- extract() 返回一个包含有字符串的列表
- extract_first() 返回列表中的第一个字符串,列表为空没有返回None
- scrapy管道的基本使用:
- 完善pipelines.py中的process_item函数
- 在settings.py中设置开启pipeline
- response响应对象的常用属性
- response.url:当前响应的url地址
- response.request.url:当前响应对应的请求的url地址
- response.headers:响应头
- response.requests.headers:当前响应的请求头
- response.body:响应体,也就是html代码,byte类型
- response.status:响应状态码
相关文章:
scrapy的入门和使用
scrapy的入门使用 学习目标: 掌握 scrapy的安装应用 创建scrapy的项目应用 创建scrapy爬虫应用 运行scrapy爬虫应用 scrapy定位以及提取数据或属性值的方法掌握 response响应对象的常用属性 1 安装scrapy 命令: sudo apt-get install scrapy 或者&#x…...

yolov5单目测距+速度测量+目标跟踪(算法介绍和代码)
要在YOLOv5中添加测距和测速功能,您需要了解以下两个部分的原理: 单目测距算法 单目测距是使用单个摄像头来估计场景中物体的距离。常见的单目测距算法包括基于视差的方法(如立体匹配)和基于深度学习的方法(如神经网…...
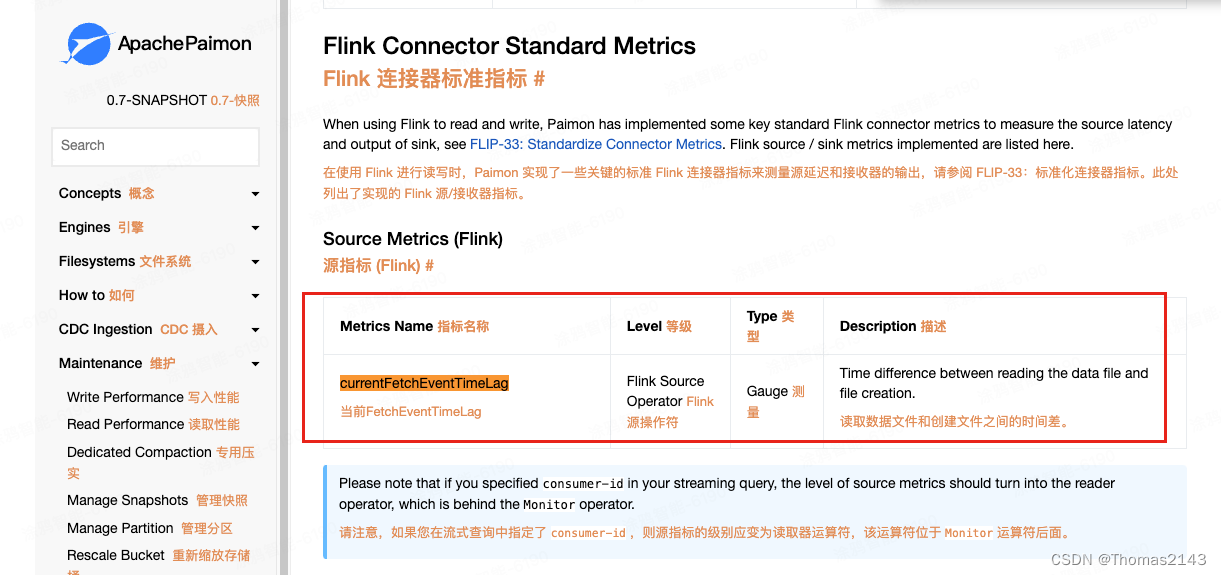
flink 读取 apache paimon表,查看source的延迟时间 消费堆积情况
paimon source查看消费的数据延迟了多久 如果没有延迟 则显示0 官方文档 Metrics | Apache Paimon...

无人机在融合通信系统中的应用
无人驾驶飞机简称“无人机”,是利用无线电遥控设备和自备的程序控制装置操纵的不载人飞行器,现今无人机在航拍、农业、快递运输、测绘、新闻报道多个领域中都有深度的应用。 在通信行业中,无人机广泛应用于交通,救援,消…...
MySQL库的操作
目录 创建数据库创建数据库案例字符集和校验规则查看系统默认字符集以及校验规则查看数据库支持的字符集查看数据库支持的字符集校验规则校验规则对数据库的影响 操纵数据库查看数据库修改数据库删除数据库数据库备份和恢复表的备份和恢复查看连接情况 创建数据库 创建数据库的…...

服务器解析漏洞有哪些?IIS\APACHE\NGINX解析漏洞利用
解析漏洞是指在Web服务器处理用户请求时,对输入数据(如文件名、参数等)进行解析时产生的漏洞。这种漏洞可能导致服务器对用户提供的数据进行错误解析,使攻击者能够执行未经授权的操作。解析漏洞通常涉及到对用户输入的信任不足&am…...

Https图片链接下载问题
1. 获取方法 入参是一个Url, 和一个随机的名称. 返回值是MultipartFile, 这里因为我这里需要调接口传到服务器, 这里也可以直接通过inputStream进行操作. 按需修改 /*** 通过Url获取文件** param url* param fileName 随机产生一个文件名, 可以是uuid等* return* throws Excep…...

Wireshark在移动网络中的应用
第一章:Wireshark基础及捕获技巧 1.1 Wireshark基础知识回顾 1.2 高级捕获技巧:过滤器和捕获选项 1.3 Wireshark与其他抓包工具的比较 第二章:网络协议分析 2.1 网络协议分析:TCP、UDP、ICMP等 2.2 高级协议分析:HTTP…...
)
Leetcode 1901. 寻找峰值 II(Java + 列最大值 + 二分)
题目 1901. 寻找峰值 II 一个 2D 网格中的 峰值 是指那些 严格大于 其相邻格子(上、下、左、右)的元给你一个 从 0 开始编号 的 m x n 矩阵 mat ,其中任意两个相邻格子的值都 不相同 。找出 任意一个 峰值 mat[i][j] 并 返回其位置 [i,j] 。你可以假设整个矩阵周边…...

RabbitMQ 消息持久化
默认情况下,exchange、queue、message 等数据都是存储在内存中的,这意味着如果 RabbitMQ 重启、关闭、宕机时所有的信息都将丢失。 RabbitMQ 提供了持久化来解决这个问题,持久化后,如果 RabbitMQ 发送 重启、关闭、宕机ÿ…...

Opencv实验合集——实验四:图片融合
1.概念 图像融合是将两个或多个图像结合在一起,创建一个新的图像的过程。这个过程的目标通常是通过合并图像的信息来获得比单个图像更全面、更有信息量的结果。图像融合可以在许多领域中应用,包括计算机视觉、遥感、医学图像处理等。 融合的方法有很多…...

Java复习
CH1 Java Fundamentals 1.1 Java Features(java特色) 1.1 Simplicity: simple grammar, rich library 简单好用: 语法简单,库文件丰富 1.2 Pure OO: everything is object! 所有程序都是对象 1.3 Security: memory access,…...
腾讯云微服务11月产品月报 | TSE 云原生 API 网关支持 WAF 对象接入
2023年 11月动态 TSE 云原生 API 网关 1、支持使用私有 DNS 解析 服务来源支持私有 DNS 解析器,用户可以添加自己的 DNS 解析器地址进行私有域名解析,适用于服务配置了私有域名的用户。 2、支持 WAF 对象接入 云原生 API 网关对接 Web 安全防火墙&…...

性能优化-待处理
1 性能优化-循环展开...

Linux: sysctl: network: ip_no_pmtu_disc,容易搞混的参数名称
这个参数的迷惑性在于双重否定,字面意思是关闭PMTU发现的功能。如果设置为1,代表关闭;如果是0,代表不关闭pmtu发现的功能。所以说明里,有disable/enable,就容易搞混。所以要甄别网上的某些博客的说明,不要被误导。 ip_no_pmtu_disc - INTEGER Disable Path MTU Discover…...

关于“Python”的核心知识点整理大全26
目录 10.3.9 决定报告哪些错误 10.4 存储数据 10.4.1 使用 json.dump()和 json.load() number_writer.py number_reader.py 10.4.2 保存和读取用户生成的数据 对于用户生成的数据,使用json保存它们大有裨益,因为如果不以某种方式进行存储…...

Axure中继器完成表格的增删改查的自定义元件(三列表格与十列表格)
目录 一、中继器 1.1 定义 1.2 特点 1.3 适用场景 二、三列表格增删改查 2.1 实现思路 2.2 效果演示 三、十列表格增删改查 3.1 实现思路 3.2 效果演示 一、中继器 1.1 定义 在Axure中,"中继器"通常指的是界面设计中的一个元素,用…...

刚clone下来的项目如何上传到新的仓库
查看当前项目的git信息 git remote -v 查看git目录上传到哪个路径下 拉下的项目如何上传到新的仓库 git clone xxxcd xxxrm -r .git 删除原有的git信息,有问题一直回车git init 初始化gitgit add . git commit -m ‘xxx’git remote add origin 远程库地址&#…...
【ARMstm32】【华清远见西安中心】)
面试题总结(十五)【ARMstm32】【华清远见西安中心】
ARM Cortex-M,Cortex-R,Cortex-A的区别和差异是什么? ARM Cortex-M,Cortex-R和Cortex-A是ARM架构下的不同处理器系列,针对不同的应用领域和需求进行了优化和设计。它们之间的区别和差异主要体现在以下几个方面: 1. 应用领域&#…...

助听器概述
助听器概述 什么是助听器? 助听器是一种放置在耳内或耳后的小型电子设备。助听器可以放大声音,使听力损失的人能够提高他们的听力和言语理解能力。 今天有许多不同类型的助听器,包括处方助听器和非处方 (OTC) 助听器…...

VMware macOS虚拟机终极解锁指南:Unlocker 3.0完全解析与实战应用
VMware macOS虚拟机终极解锁指南:Unlocker 3.0完全解析与实战应用 【免费下载链接】unlocker VMware Workstation macOS 项目地址: https://gitcode.com/gh_mirrors/unloc/unlocker 在虚拟化技术日益普及的今天,许多开发者和技术爱好者希望在Win…...

长期使用Taotoken Token Plan套餐在项目开发中的成本控制体会
🚀 告别海外账号与网络限制!稳定直连全球优质大模型,限时半价接入中。 👉 点击领取海量免费额度 长期使用Taotoken Token Plan套餐在项目开发中的成本控制体会 在中长期AI项目的开发实践中,成本的可预测性与可控性是团…...

新手入门零门槛,Captain AI助你7天玩转Ozon
在俄罗斯跨境电商的风口下,Ozon平台吸引了无数新手商家入局。然而,流程繁琐、经验不足、语言不通三大门槛,让超过60%的新手在入驻前3个月就铩羽而归。据行业数据显示,Ozon新手商家的3个月存活率不足40%,其中80%的失败都…...

低代码平台表单设计器 unione form editor 组件介绍--文件上传
低代码平台表单设计器 unione form editor 组件介绍--文件上传 在企业级低代码表单开发中,文件上传组件是实现“附件提交、资料归档、证据留存”的核心组件,广泛应用于合同上传、简历提交、凭证上传、图片上传等场景。不同于其他输入类组件,文…...

对比不同模型在Taotoken平台上的响应速度与输出质量体感
🚀 告别海外账号与网络限制!稳定直连全球优质大模型,限时半价接入中。 👉 点击领取海量免费额度 对比不同模型在Taotoken平台上的响应速度与输出质量体感 在开发与创作过程中,我们常常面临一个选择:是追求…...
)
基于Javaweb的医院在线挂号系统(10007)
有需要的同学,源代码和配套文档领取,加文章最下方的名片哦 一、项目演示 项目演示视频 二、资料介绍 完整源代码(前后端源代码SQL脚本)配套文档(LWPPT开题报告/任务书)远程调试控屏包运行一键启动项目&…...

资本意志下的工程师生存指南:从高通裁员看技术与商业的博弈
1. 从一封信到四千七百张解雇单:当资本意志敲响工程师的门在科技行业,尤其是半导体这个以创新为生命线的领域,我们常常沉浸于晶体管密度、架构革新和制程竞赛的技术叙事中。然而,2015年夏天,一封来自华尔街的公开信&am…...

避开这些坑!用Unity做Flappy Bird时,我遇到的5个典型问题及解决方案
避开这些坑!用Unity做Flappy Bird时,我遇到的5个典型问题及解决方案 第一次用Unity复现Flappy Bird这类经典小游戏时,本以为跟着教程一步步操作就能顺利完成,结果从素材导入到最终发布的每个环节都暗藏玄机。特别是当教程只展示&q…...

GKD订阅管理实战手册:一站式解决Android自动化规则配置难题
GKD订阅管理实战手册:一站式解决Android自动化规则配置难题 【免费下载链接】GKD_THS_List GKD第三方订阅收录名单 项目地址: https://gitcode.com/gh_mirrors/gk/GKD_THS_List GKD订阅管理是Android自动化工具GKD的第三方订阅收录平台,为GKD用户…...

如何用拯救者工具箱完全掌控联想笔记本:开源硬件管理终极指南
如何用拯救者工具箱完全掌控联想笔记本:开源硬件管理终极指南 【免费下载链接】LenovoLegionToolkit Lightweight Lenovo Vantage and Hotkeys replacement for Lenovo Legion laptops. 项目地址: https://gitcode.com/gh_mirrors/le/LenovoLegionToolkit 你…...