C# Onnx Yolov8 Detect 物体检测 多张图片同时推理
目录
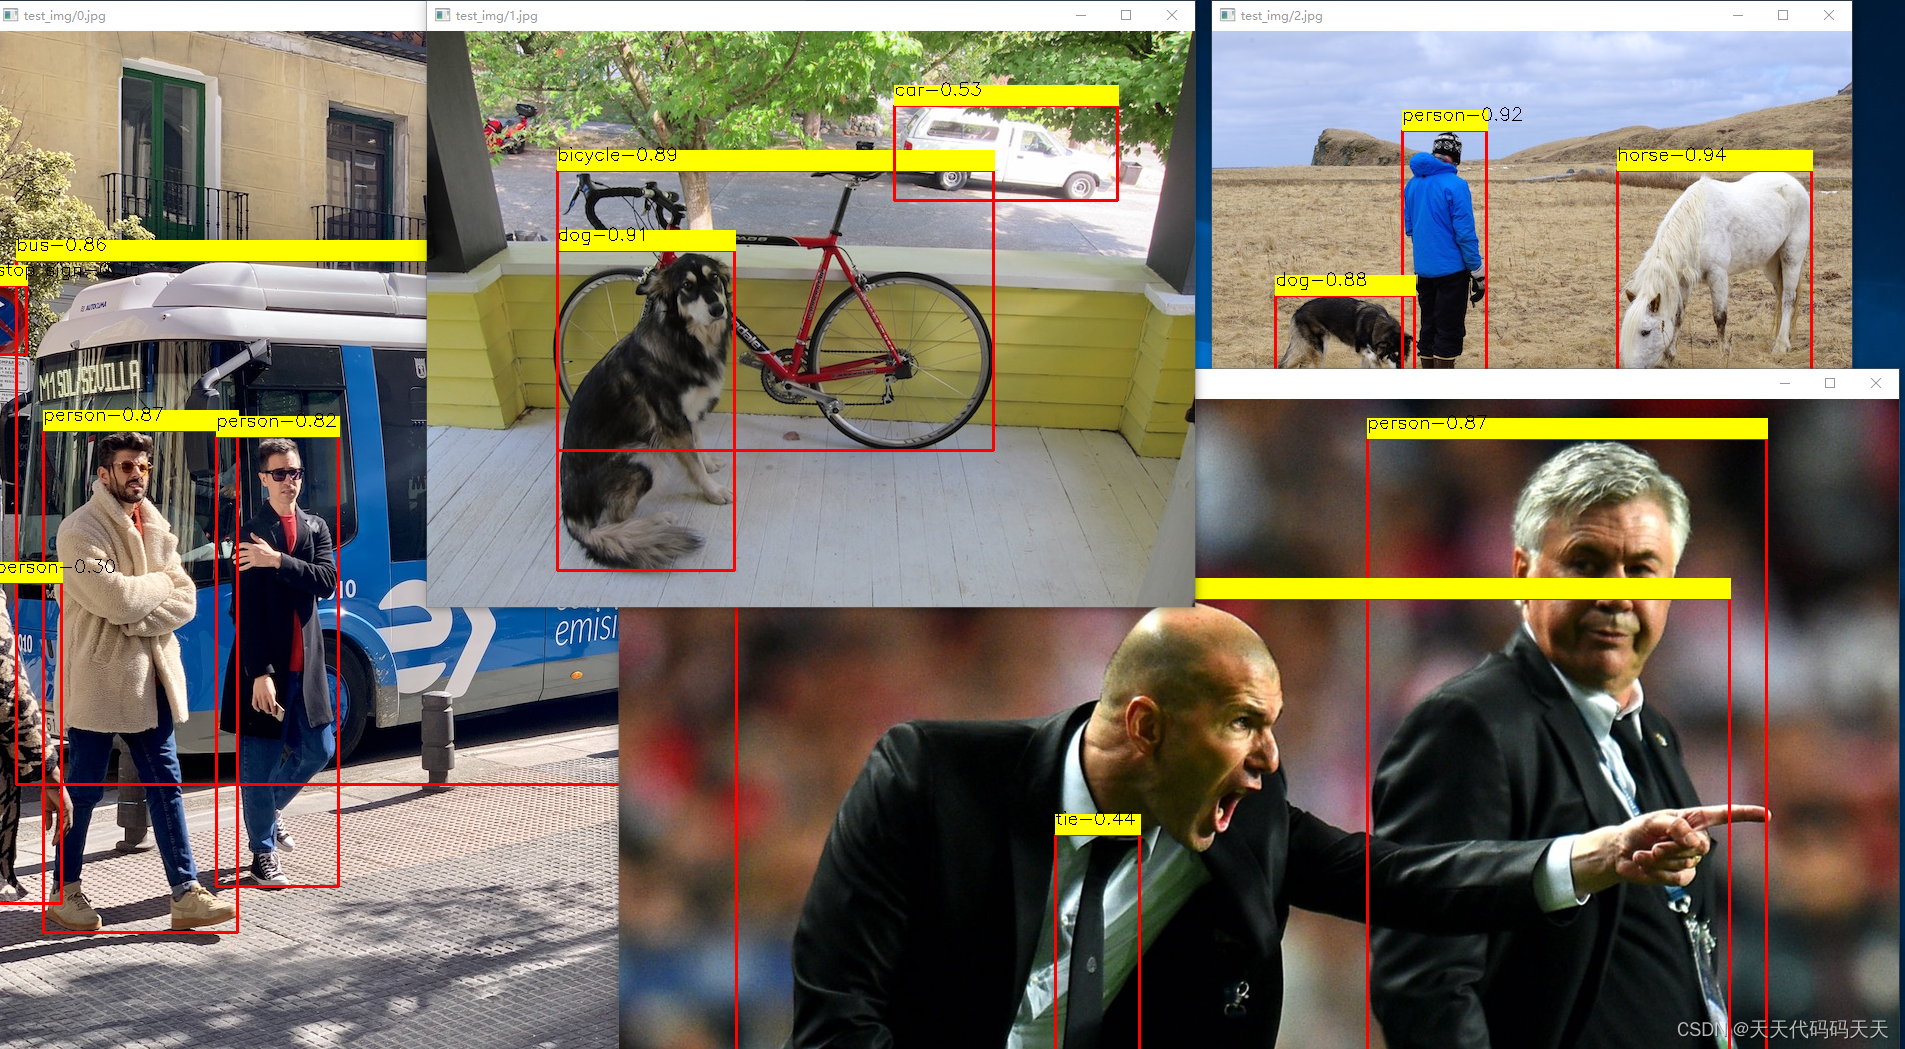
效果
模型信息
项目
代码
下载
C# Onnx Yolov8 Detect 物体检测 多张图片同时推理
效果
模型信息
Model Properties
-------------------------
date:2023-12-18T11:47:29.332397
description:Ultralytics YOLOv8n-detect model trained on coco.yaml
author:Ultralytics
task:detect
license:AGPL-3.0 https://ultralytics.com/license
version:8.0.172
stride:32
batch:4
imgsz:[640, 640]
names:{0: 'person', 1: 'bicycle', 2: 'car', 3: 'motorcycle', 4: 'airplane', 5: 'bus', 6: 'train', 7: 'truck', 8: 'boat', 9: 'traffic light', 10: 'fire hydrant', 11: 'stop sign', 12: 'parking meter', 13: 'bench', 14: 'bird', 15: 'cat', 16: 'dog', 17: 'horse', 18: 'sheep', 19: 'cow', 20: 'elephant', 21: 'bear', 22: 'zebra', 23: 'giraffe', 24: 'backpack', 25: 'umbrella', 26: 'handbag', 27: 'tie', 28: 'suitcase', 29: 'frisbee', 30: 'skis', 31: 'snowboard', 32: 'sports ball', 33: 'kite', 34: 'baseball bat', 35: 'baseball glove', 36: 'skateboard', 37: 'surfboard', 38: 'tennis racket', 39: 'bottle', 40: 'wine glass', 41: 'cup', 42: 'fork', 43: 'knife', 44: 'spoon', 45: 'bowl', 46: 'banana', 47: 'apple', 48: 'sandwich', 49: 'orange', 50: 'broccoli', 51: 'carrot', 52: 'hot dog', 53: 'pizza', 54: 'donut', 55: 'cake', 56: 'chair', 57: 'couch', 58: 'potted plant', 59: 'bed', 60: 'dining table', 61: 'toilet', 62: 'tv', 63: 'laptop', 64: 'mouse', 65: 'remote', 66: 'keyboard', 67: 'cell phone', 68: 'microwave', 69: 'oven', 70: 'toaster', 71: 'sink', 72: 'refrigerator', 73: 'book', 74: 'clock', 75: 'vase', 76: 'scissors', 77: 'teddy bear', 78: 'hair drier', 79: 'toothbrush'}
---------------------------------------------------------------
Inputs
-------------------------
name:images
tensor:Float[4, 3, 640, 640]
---------------------------------------------------------------
Outputs
-------------------------
name:output0
tensor:Float[4, 84, 8400]
---------------------------------------------------------------
项目
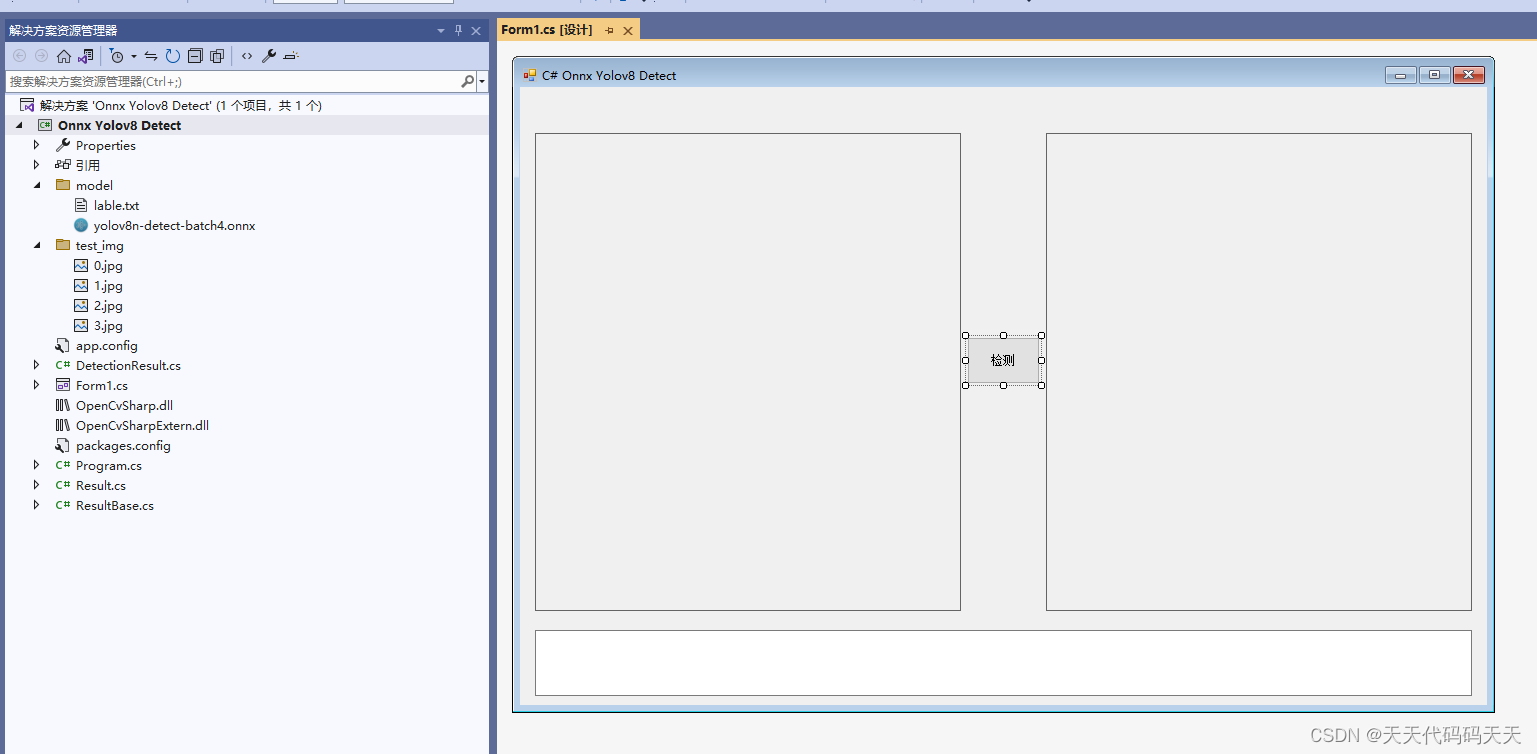
代码
using Microsoft.ML.OnnxRuntime;
using Microsoft.ML.OnnxRuntime.Tensors;
using OpenCvSharp;
using System;
using System.Collections.Generic;
using System.Drawing;
using System.Linq;
using System.Windows.Forms;
namespace Onnx_Yolov8_Demo
{
public partial class Form1 : Form
{
public Form1()
{
InitializeComponent();
}
string image_path = "";
string startupPath;
string classer_path;
DateTime dt1 = DateTime.Now;
DateTime dt2 = DateTime.Now;
string model_path;
Mat image;
DetectionResult result_pro;
Mat result_image;
SessionOptions options;
InferenceSession onnx_session;
Tensor<float> input_tensor;
List<NamedOnnxValue> input_container;
IDisposableReadOnlyCollection<DisposableNamedOnnxValue> result_infer;
DisposableNamedOnnxValue[] results_onnxvalue;
Tensor<float> result_tensors;
private void button2_Click(object sender, EventArgs e)
{
float[] result_array = new float[8400 * 84 * 4];
List<float[]> ltfactors = new List<float[]>();
for (int i = 0; i < 4; i++)
{
image_path = "test_img/" + i.ToString() + ".jpg";
image = new Mat(image_path);
int max_image_length = image.Cols > image.Rows ? image.Cols : image.Rows;
Mat max_image = Mat.Zeros(new OpenCvSharp.Size(max_image_length, max_image_length), MatType.CV_8UC3);
Rect roi = new Rect(0, 0, image.Cols, image.Rows);
image.CopyTo(new Mat(max_image, roi));
float[] factors = new float[2];
factors[0] = factors[1] = (float)(max_image_length / 640.0);
ltfactors.Add(factors);
// 将图片转为RGB通道
Mat image_rgb = new Mat();
Cv2.CvtColor(max_image, image_rgb, ColorConversionCodes.BGR2RGB);
Mat resize_image = new Mat();
Cv2.Resize(image_rgb, resize_image, new OpenCvSharp.Size(640, 640));
// 输入Tensor
for (int y = 0; y < resize_image.Height; y++)
{
for (int x = 0; x < resize_image.Width; x++)
{
input_tensor[i, 0, y, x] = resize_image.At<Vec3b>(y, x)[0] / 255f;
input_tensor[i, 1, y, x] = resize_image.At<Vec3b>(y, x)[1] / 255f;
input_tensor[i, 2, y, x] = resize_image.At<Vec3b>(y, x)[2] / 255f;
}
}
}
input_container.Add(NamedOnnxValue.CreateFromTensor("images", input_tensor));
dt1 = DateTime.Now;
//运行 Inference 并获取结果
result_infer = onnx_session.Run(input_container);
dt2 = DateTime.Now;
results_onnxvalue = result_infer.ToArray();
result_tensors = results_onnxvalue[0].AsTensor<float>();
result_array = result_tensors.ToArray();
for (int i = 0; i < 4; i++)
{
image_path = "test_img/" + i.ToString() + ".jpg";
result_pro = new DetectionResult(classer_path, ltfactors[i]);
float[] temp = new float[8400 * 84];
Array.Copy(result_array, 8400 * 84 * i, temp, 0, 8400 * 84);
Result result = result_pro.process_result(temp);
result_image = result_pro.draw_result(result, new Mat(image_path));
Cv2.ImShow(image_path, result_image);
}
pictureBox2.Image = new Bitmap(result_image.ToMemoryStream());
textBox1.Text = "推理耗时:" + (dt2 - dt1).TotalMilliseconds + "ms";
}
private void Form1_Load(object sender, EventArgs e)
{
startupPath = System.Windows.Forms.Application.StartupPath;
model_path = "model\\yolov8n-detect-batch4.onnx";
classer_path = "model\\lable.txt";
// 创建输出会话,用于输出模型读取信息
options = new SessionOptions();
options.LogSeverityLevel = OrtLoggingLevel.ORT_LOGGING_LEVEL_INFO;
// 设置为CPU上运行
options.AppendExecutionProvider_CPU(0);
// 创建推理模型类,读取本地模型文件
onnx_session = new InferenceSession(model_path, options);//model_path 为onnx模型文件的路径
// 输入Tensor
input_tensor = new DenseTensor<float>(new[] { 4, 3, 640, 640 });
// 创建输入容器
input_container = new List<NamedOnnxValue>();
}
}
}
using Microsoft.ML.OnnxRuntime;
using Microsoft.ML.OnnxRuntime.Tensors;
using OpenCvSharp;
using System;
using System.Collections.Generic;
using System.Drawing;
using System.Linq;
using System.Windows.Forms;namespace Onnx_Yolov8_Demo
{public partial class Form1 : Form{public Form1(){InitializeComponent();}string image_path = "";string startupPath;string classer_path;DateTime dt1 = DateTime.Now;DateTime dt2 = DateTime.Now;string model_path;Mat image;DetectionResult result_pro;Mat result_image;SessionOptions options;InferenceSession onnx_session;Tensor<float> input_tensor;List<NamedOnnxValue> input_container;IDisposableReadOnlyCollection<DisposableNamedOnnxValue> result_infer;DisposableNamedOnnxValue[] results_onnxvalue;Tensor<float> result_tensors;private void button2_Click(object sender, EventArgs e){float[] result_array = new float[8400 * 84 * 4];List<float[]> ltfactors = new List<float[]>();for (int i = 0; i < 4; i++){image_path = "test_img/" + i.ToString() + ".jpg";image = new Mat(image_path);int max_image_length = image.Cols > image.Rows ? image.Cols : image.Rows;Mat max_image = Mat.Zeros(new OpenCvSharp.Size(max_image_length, max_image_length), MatType.CV_8UC3);Rect roi = new Rect(0, 0, image.Cols, image.Rows);image.CopyTo(new Mat(max_image, roi));float[] factors = new float[2];factors[0] = factors[1] = (float)(max_image_length / 640.0);ltfactors.Add(factors);// 将图片转为RGB通道Mat image_rgb = new Mat();Cv2.CvtColor(max_image, image_rgb, ColorConversionCodes.BGR2RGB);Mat resize_image = new Mat();Cv2.Resize(image_rgb, resize_image, new OpenCvSharp.Size(640, 640));// 输入Tensorfor (int y = 0; y < resize_image.Height; y++){for (int x = 0; x < resize_image.Width; x++){input_tensor[i, 0, y, x] = resize_image.At<Vec3b>(y, x)[0] / 255f;input_tensor[i, 1, y, x] = resize_image.At<Vec3b>(y, x)[1] / 255f;input_tensor[i, 2, y, x] = resize_image.At<Vec3b>(y, x)[2] / 255f;}}}input_container.Add(NamedOnnxValue.CreateFromTensor("images", input_tensor));dt1 = DateTime.Now;//运行 Inference 并获取结果result_infer = onnx_session.Run(input_container);dt2 = DateTime.Now;results_onnxvalue = result_infer.ToArray();result_tensors = results_onnxvalue[0].AsTensor<float>();result_array = result_tensors.ToArray();for (int i = 0; i < 4; i++){image_path = "test_img/" + i.ToString() + ".jpg";result_pro = new DetectionResult(classer_path, ltfactors[i]);float[] temp = new float[8400 * 84];Array.Copy(result_array, 8400 * 84 * i, temp, 0, 8400 * 84);Result result = result_pro.process_result(temp);result_image = result_pro.draw_result(result, new Mat(image_path));Cv2.ImShow(image_path, result_image);}pictureBox2.Image = new Bitmap(result_image.ToMemoryStream());textBox1.Text = "推理耗时:" + (dt2 - dt1).TotalMilliseconds + "ms";}private void Form1_Load(object sender, EventArgs e){startupPath = System.Windows.Forms.Application.StartupPath;model_path = "model\\yolov8n-detect-batch4.onnx";classer_path = "model\\lable.txt";// 创建输出会话,用于输出模型读取信息options = new SessionOptions();options.LogSeverityLevel = OrtLoggingLevel.ORT_LOGGING_LEVEL_INFO;// 设置为CPU上运行options.AppendExecutionProvider_CPU(0);// 创建推理模型类,读取本地模型文件onnx_session = new InferenceSession(model_path, options);//model_path 为onnx模型文件的路径// 输入Tensorinput_tensor = new DenseTensor<float>(new[] { 4, 3, 640, 640 });// 创建输入容器input_container = new List<NamedOnnxValue>();}}
}
下载
源码下载
相关文章:
C# Onnx Yolov8 Detect 物体检测 多张图片同时推理
目录 效果 模型信息 项目 代码 下载 C# Onnx Yolov8 Detect 物体检测 多张图片同时推理 效果 模型信息 Model Properties ------------------------- date:2023-12-18T11:47:29.332397 description:Ultralytics YOLOv8n-detect model trained on …...
学习使用js保留两位小数同时去掉小数末尾多余的00
学习使用js保留两位小数同时去掉小数末尾多余的00 前言去除00方法 前言 let number 50000000;let new_number number / 10000;console.log(formatter-new_number, new_number);return new_number.toFixed(2) 万;会发现整数使用toFixed(2),之后会有多余的.00 去…...
linux驱动的学习 驱动开发初识
1 设备的概念 在学习驱动和其开发之前,首先要知道所谓驱动,其对象就是设备。 1.1 主设备号&次设备号: 在Linux中,各种设备都以文件的形式存在/dev目录下,称为设备文件。最上层的应用程序可以打开,关…...

Node.js中npm中ws的WebSocket协议的实现
在Node.js中,ws是一个非常有用的模块,它提供了WebSocket协议的实现。WebSocket协议是一种在Web浏览器和服务器之间进行双向通信的协议,它可以使得Web应用程序更加交互式和实时。在本文中,我们将详细介绍npm中ws的内容。 ws是什么…...

PHP HTTPoxy CGI 应用程序漏洞 CVE-2016-5385
HTTPoxy CGI 应用程序漏洞 CVE-2016-5385 已亲自复现 漏洞名称漏洞描述影响版本 漏洞复现环境搭建漏洞利用 修复建议 漏洞名称 漏洞描述 在Oracle Communications BRM 10.x/12.x(云软件)中发现漏洞。它已经被宣布为关键。此漏洞影响组件用户数据库的未…...
qt-C++笔记之使用QLabel和QPushButton实现一个bool状态的指示灯
qt-C笔记之使用QLabel和QPushButton实现一个bool状态的指示灯 code review! 文章目录 qt-C笔记之使用QLabel和QPushButton实现一个bool状态的指示灯1.QPushButton实现2.QLabel实现2.QLabel实现-对错符号 1.QPushButton实现 运行 代码 #include <QtWidgets>class Ind…...
自动驾驶技术入门平台分享:百度Apollo开放平台9.0全方位升级
目录 平台全方位的升级 全新的架构 工具服务 应用软件(场景应用) 软件核心 硬件设备 更强的算法能力 9.0版本算法升级总结 更易用的工程框架 Apollo开放平台9.0版本的技术升级为开发者提供了许多显著的好处,特别是对于深度开发需求…...

Elementor Pro v3.18.1和(完整模板套件)介绍说明
WordPress 插件:免费下载 Elementor Pro v3.18.1 免费最新版本 [所有功能已激活] Elementor Pro 是一个功能强大的 WordPress 插件,使用户无需编码即可构建和设计网站。它是 Elementor 页面构建器的付费版本,提供额外的功能和小部件来创建更复杂的设计。在这篇博文中,我们将探讨…...
Windows如何安装使用TortoiseSVN客户端并实现公网访问本地SVN Server
文章目录 前言1. TortoiseSVN 客户端下载安装2. 创建检出文件夹3. 创建与提交文件4. 公网访问测试 前言 TortoiseSVN是一个开源的版本控制系统,它与Apache Subversion(SVN)集成在一起,提供了一个用户友好的界面,方便用…...
)
Mybatis配置-映射器(mappers)
现在,我们已经配置了MyBatis的行为,准备定义我们的映射SQL语句。但首先,我们需要告诉MyBatis在哪里找到它们。在这方面,Java并没有提供很好的自动发现机制,所以最好的方法是直接告诉MyBatis在哪里找到映射文件。 您可以…...

python 音视频合并
目录 moviepy ffmpeg命令合成: 添加字幕文件: 添加字幕文本: pipeline添加字幕: moviepy python(opencv pyaudio moviepy)实现录制音视频文件并合并_ubuntu使用python的sounddeviceopencv录制音视频…...

HttpUtils——助力高效网络通信
使用HttpClient发送请求、接收响应很简单,一般需要如下几步即可: 1、创建HttpClient对象。 2、创建请求方法的实例,并指定请求URL。如果需要发送GET请求, 创建HttpGet对象;如果需要发送POST请求,创建HttpPost对象。 3…...

WAF绕过常见方法
前面写了WAF如何检测,现在直接上WAF常见的一些绕过方法。 方法1:变换大小写 实例: 比如WAF拦截了union,那就使用Union、UnloN等方式绕过。 方法2:编码绕过 实例1: WAF检测敏感字~,则可以用Ox7e代替,如extractvalue(1,concat(~…...
SpringCloud微服务 【实用篇】| Docker镜像、容器、数据卷操作
目录 一:Docker基本操作 1. 镜像操作 镜像相关命令 2. 容器操作 容器相关命令 3. 数据卷(容器数据管理) 数据卷 操作数据卷 挂载数据卷 挂载的方式区别 前些天突然发现了一个巨牛的人工智能学习网站,通俗易懂࿰…...
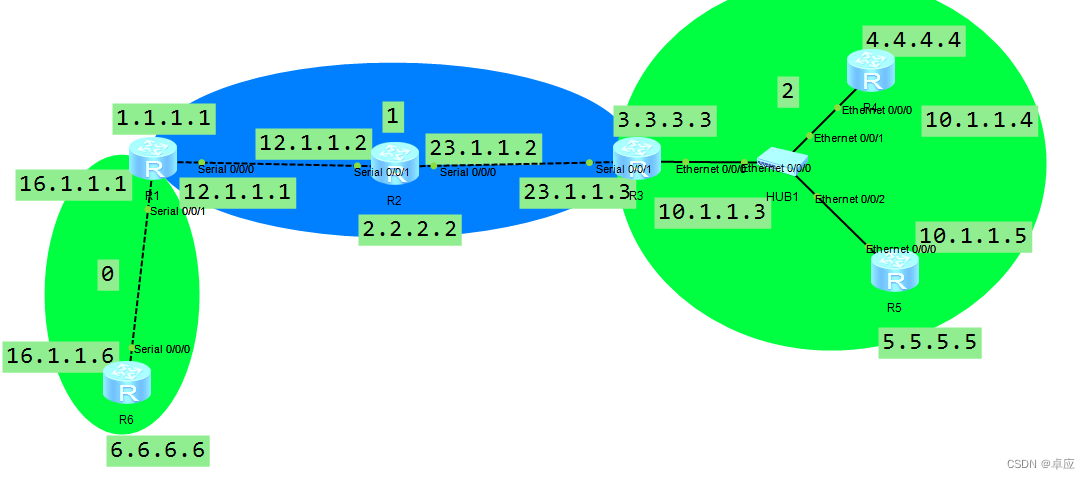
OSPF面试总结
OSPF 基本特点 属于IGP、LS支持无类域间路由没有环路(区域内运行LS、区域间是DV,所以所有的区域要和区域0相连)收敛速度快使用组播发送数据 224.0.0.5、224.0.0.6 什么时候用224.0.0.5?支持多条等价路由支持协议报文认证 OSPF路由的计算过程…...
【算法系列篇】递归、搜索和回溯(四)
文章目录 前言什么是决策树1. 全排列1.1 题目要求1.2 做题思路1.3 代码实现 2. 子集2.1 题目要求2.2 做题思路2.3 代码实现 3. 找出所有子集的异或总和再求和3.1 题目要求3.2 做题思路3.3 代码实现 4. 全排列II4.1 题目要求4.2 做题思路4.3 代码实现 前言 前面我们通过几个题目…...
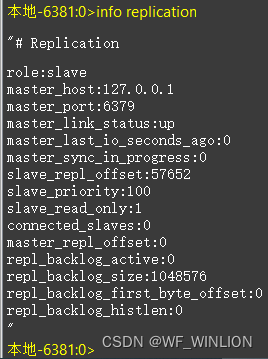
Windows 系统下本地单机搭建 Redis(一主二从三哨兵)
目录 一、Redis环境准备: 1、下载redis 2、Windows下的.msi安装和.zip格式区别: 二、哨兵介绍: 1、一主二从三哨兵理论图: 2.哨兵的主要功能: 3.哨兵用于实现 redis 集群的高可用,本身也是分布式的&…...

数据库访问被拒怎么操作?
就一点: !!!!!! cmd打开命令窗口直接输入 mysql -u root -p 然后加密码打开数据库服务再去试试!! !!!!&…...

Vue 2 生命周期即将结束
本文章翻译自 Vue 2 is Approaching End Of Life 文章原作者 youyuxi 2024 年即将到来,我们想借此机会提醒 Vue 社区,Vue 2 将于 2023 年 12 月 31 日达到生命周期结束 (EOL) Vue 2.0 于 2016 年发布,已有 7 年多的时间。这是 Vue 成为主流框…...
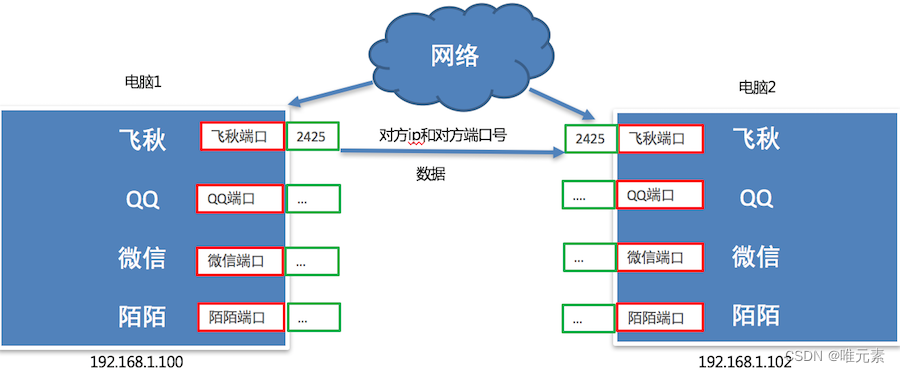
Python---端口和端口号的介绍
1. 问题思考 不同电脑上的飞秋之间进行数据通信,它是如何保证把数据给飞秋而不是给其它软件呢? 其实,每运行一个网络程序都会有一个端口,想要给对应的程序发送数据,找到对应的端口即可。 端口效果图: 2. 什么是端口 端口是传…...

抖音弹幕抓取神器:5分钟快速上手与深度应用指南
抖音弹幕抓取神器:5分钟快速上手与深度应用指南 【免费下载链接】DouyinBarrageGrab 基于系统代理的抖音弹幕wss抓取程序,能够获取所有数据来源,包括chrome,抖音直播伴侣等,可进行进程过滤 项目地址: https://gitcod…...

PPPoE协议全解析:从原理到实践,打通家庭宽带连接第一关
1. 项目概述:从“猫”到世界的旅程每次打开网页、刷起视频,你有没有想过,你家的宽带究竟是怎么连上互联网的?这背后其实是一场从你家客厅到全球数据中心的精密“接力赛”。而这场接力赛的第一棒,也是最关键的一棒&…...
)
从‘点一下’到‘连一连’:Qt6中PushButton信号与槽的5种连接方式详解(含Lambda表达式实战)
从‘点一下’到‘连一连’:Qt6中PushButton信号与槽的5种连接方式详解(含Lambda表达式实战) 在Qt框架中,PushButton作为最基础的交互控件之一,其信号与槽机制是构建响应式用户界面的核心。随着Qt6的发布,信…...

Visual C++运行库终极指南:如何一键修复所有Windows程序依赖问题
Visual C运行库终极指南:如何一键修复所有Windows程序依赖问题 【免费下载链接】vcredist AIO Repack for latest Microsoft Visual C Redistributable Runtimes 项目地址: https://gitcode.com/gh_mirrors/vc/vcredist 你是否曾经遇到过打开软件时突然弹出&…...

如何快速上手CircuitJS1桌面版:离线电路仿真的终极指南
如何快速上手CircuitJS1桌面版:离线电路仿真的终极指南 【免费下载链接】circuitjs1 Standalone (offline) version of the Circuit Simulator with small modifications based on modified NW.js. 项目地址: https://gitcode.com/gh_mirrors/circ/circuitjs1 …...

BEAGLE库终极指南:如何快速实现高性能系统发育分析
BEAGLE库终极指南:如何快速实现高性能系统发育分析 【免费下载链接】beagle-lib general purpose library for evaluating the likelihood of sequence evolution on trees 项目地址: https://gitcode.com/gh_mirrors/be/beagle-lib 你是否在系统发育分析中遇…...

什么是 TRAE IDE?
TRAE IDE 是一款深度融合 AI 能力的开发工具,提供从代码编写、项目理解、调试运行到变更管理的完整开发体验。你可以像使用传统 IDE 一样掌控每一步,也可以把复杂任务交给 AI 智能体规划和执行。使用场景TRAE IDE 覆盖日常开发与复杂工程任务,…...

ARM架构TRFCR_EL2寄存器解析与虚拟化调试应用
1. ARM架构TRFCR_EL2寄存器深度解析在ARMv8/v9体系结构中,TRFCR_EL2(Trace Filter Control Register at EL2)是一个关键的系统寄存器,专门用于管理EL2(Hypervisor)级别的追踪过滤行为。这个寄存器在虚拟化环…...

从RC电路到传递函数:一个实例讲透自动控制原理的建模核心
从RC电路到传递函数:一个实例讲透自动控制原理的建模核心 在自动控制原理的学习中,许多初学者常常陷入理论与实际脱节的困境。他们能够背诵拉氏变换的定义,却不知道如何将一个简单的电路转化为数学模型;他们熟悉传递函数的公式&am…...

Ardb多存储引擎深度解析:RocksDB、LevelDB、LMDB、WiredTiger、PerconaFT、ForestDB全方位对比
Ardb多存储引擎深度解析:RocksDB、LevelDB、LMDB、WiredTiger、PerconaFT、ForestDB全方位对比 【免费下载链接】ardb A redis protocol compatible nosql, it support multiple storage engines as backend like Googles LevelDB, Facebooks RocksDB, OpenLDAPs LM…...