乐意购项目前端开发 #4
一、Home页面组件结构
结构拆分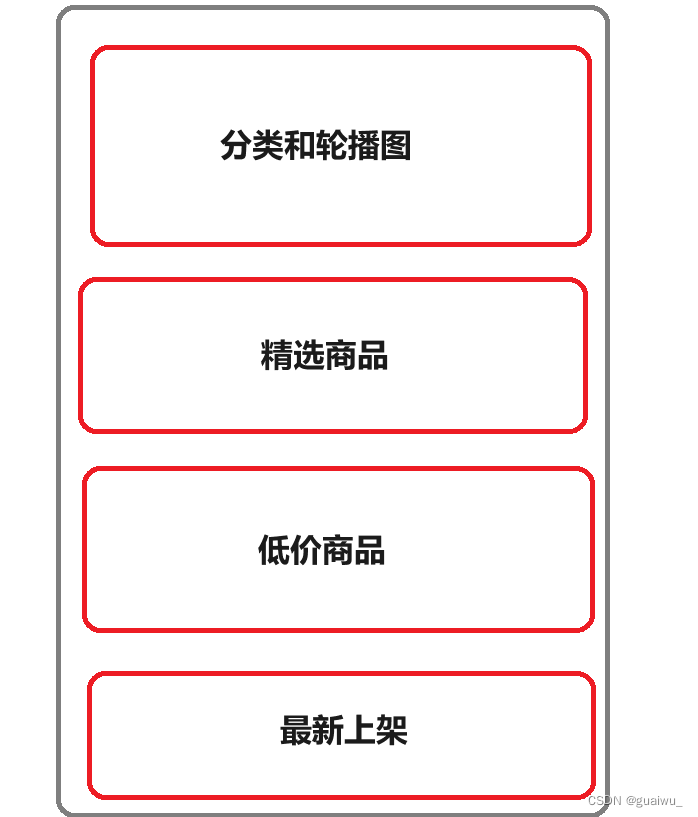
创建组件
在 views/Home 目录下创建component 目录, 然后在该目录下创建5个组件: 左侧分类(HomeCategory.vue)、Banner(HomeBanner.vue)、精选商品(HomeHot.vue)、低价商品(Homecheap.vue)、最新上架(HomeNew.vue)
引用组件
修改 views/Home/index.vue 的代码
<template><div class="container"><HomeCategory></HomeCategory><HomeBanner></HomeBanner></div><HomeHot></HomeHot><HomeCheap></HomeCheap><HomeNew></HomeNew>
</template><script>
import HomeBanner from './component/HomeBanner.vue'
import HomeCategory from './component/HomeCategory.vue'
import HomeHot from './component/HomeHot.vue'
import HomeNew from './component/HomeNew.vue'
import HomeCheap from './component/HomeCheap'
export default {components:{HomeBanner,HomeCategory,HomeHot,HomeNew,HomeCheap}}
</script><style></style>
二、安装Pinia
添加依赖
pinia依赖和持久化插件
npm install pinia
npm install pinia-plugin-persist
创建文件
在 stores 目录下创建 category.js 文件
import { ref } from 'vue'
import { defineStore } from 'pinia'
引入
修改 main.js 文件
import { createApp } from 'vue'
import App from './App.vue'
import router from './router'
import store from './store'
import { createPinia } from 'pinia'
import piniaPersist from 'pinia-plugin-persist'
import ElementPlus from 'element-plus'
import "@/assets/iconfont/iconfont.js"
import "@/assets/iconfont/iconfont.css"// import './styles/element/index.scss'const pinia = createPinia()
pinia.use(piniaPersist)
const app = createApp(App)app.use(store).use(router).use(pinia).use(ElementPlus).mount('#app')
三、分类功能实现

封装接口
在 api 目录下创建 home 目录然后创建 category.js 文件
import http from '@/utils/http'export function getCategoryAPI () {return http({url: '/home/category/list',method: 'get',})
}
前提: 后端要返回相应的数据
修改 /store/category.js
import { ref } from 'vue'
import { defineStore } from 'pinia'
import { getCategoryAPI } from '@/api/home/category'export const useCategoryStore = defineStore('category', () => {// 导航列表数据管理//state 导航列表数据const categoryList = ref([])// action 获取导航数据的方法const getCategory = async () => {const res = await getCategoryAPI();console.log(res);categoryList.value = res.data;}return {categoryList, getCategory}
})
代码示范
HomeCategory.vue
<script setup>
import { useCategoryStore } from '@/store/category'
const categoryStore = useCategoryStore()
console.log(categoryStore);
</script><template><div class="home-category"><ul class="menu"><li v-for="item in categoryStore.categoryList" :key="item.id"><i :class=item.icon></i><router-link to="/">{{ item.categoryName }}</router-link><span class="more"><a href="/">></a></span><!-- 弹层layer位置 --><!-- <div class="layer"><h4>分类推荐 <small>根据您的购买或浏览记录推荐</small></h4><ul><li v-for="i in 5" :key="i"><RouterLink to="/"><img alt="" /><div class="info"><p class="name ellipsis-2">男士外套</p><p class="desc ellipsis">男士外套,冬季必选</p><p class="price"><i>¥</i>200.00</p></div></RouterLink></li></ul></div> --></li></ul></div>
</template><style scoped lang='scss'>
.home-category {width: 250px;height: 500px;background: #f2f2f2;position: relative;z-index: 99;.menu {li {padding-left: 40px;height: 55px;line-height: 55px;text-align: left;padding-right: 15px;border-bottom: solid .1px #000;.iconfont{font-size: 22px;line-height: 55px;margin-right: 10px;top: 5px;color: rgb(0, 110, 255);}&:hover {background: $lygColor;}a {position: absolute;margin-right: 4px;color: #000;&:first-child {font-size: 16px;}}.more{float: right;font-size: 18px;}.layer {width: 990px;height: 500px;background: rgba(255, 255, 255, 0.8);position: absolute;left: 250px;top: 0;display: none;padding: 0 15px;h4 {font-size: 20px;font-weight: normal;line-height: 80px;small {font-size: 16px;color: #666;}}ul {display: flex;flex-wrap: wrap;li {width: 310px;height: 120px;margin-right: 15px;margin-bottom: 15px;border: 1px solid #eee;border-radius: 4px;background: #fff;&:nth-child(3n) {margin-right: 0;}a {display: flex;width: 100%;height: 100%;align-items: center;padding: 10px;&:hover {background: #e3f9f4;}img {width: 95px;height: 95px;}.info {padding-left: 10px;line-height: 24px;overflow: hidden;.name {font-size: 16px;color: #666;}.desc {color: #999;}.price {font-size: 22px;color: $priceColor;i {font-size: 16px;}}}}}}}// 关键样式  hover状态下的layer盒子变成block&:hover {.layer {display: block;}}}}
}
</style>
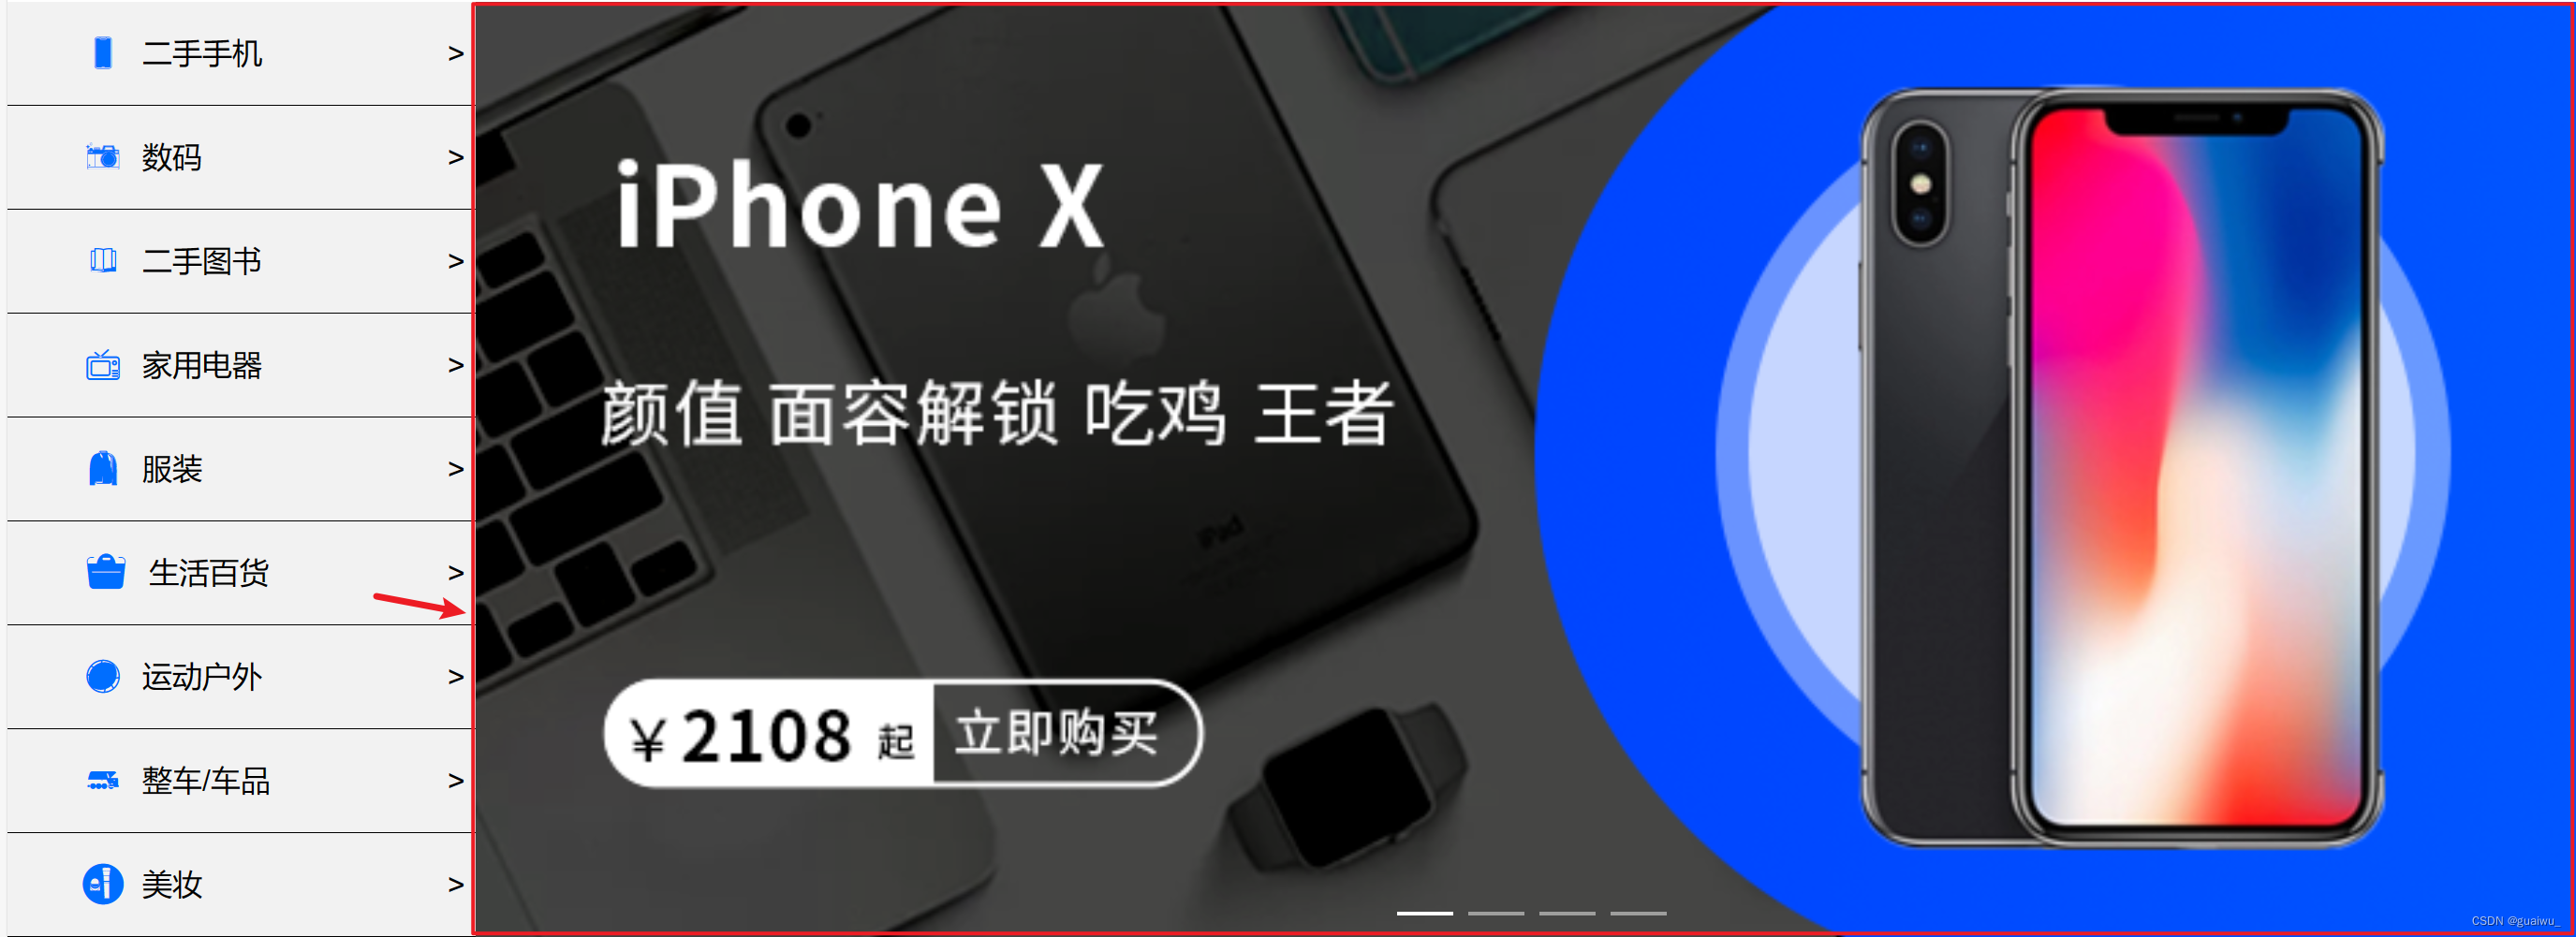
四、banner功能实现
接口封装
在 api 目录下创建 home 目录然后创建 banner.js 文件
import http from '@/utils/http'export function getBannerAPI () {return http({url: '/home/banner/list',method: 'get',})
}
代码示范
HomeBanner.vue
<script setup>
import { getBannerAPI } from '@/api/home/banner'
import { onMounted, ref } from 'vue'const bannerList = ref([])const getBanner = async () => {const res = await getBannerAPI()console.log(res)bannerList.value = res.data
}onMounted(() => getBanner());
console.log(bannerList)
</script><template><div class="home-banner"><el-carousel height="500px"><el-carousel-item v-for="item in bannerList" :key="item.id"><img :src="require(`@/assets/img/${item.img1}.jpg`)" alt=""></el-carousel-item></el-carousel></div>
</template><style scoped lang='scss'>
.home-banner {width: 1127px;height: 500px;position: absolute;left: 250px;top: 185px;z-index: 98;img {width: 100%;height: 500px;}
}
</style>
五、创建公共组件
创建文件
在 views/Home/components 路径下创建 HomePanel.vue 文件

<script setup>
//定义 Props,主标题和副标题
defineProps({title: {type: String},subTitle: {type: String}
})
</script><template><div class="home-panel"><div class="container"><div class="head"><!-- 主标题和副标题 --><h3>{{title}}<small>{{ subTitle }}</small></h3></div><!-- 主体内容区域 插槽--><slot/>
</div></div>
</template><style scoped lang='scss'>
.home-panel {background-color: #fff;.head {padding: 40px 0;display: flex;align-items: flex-end;h3 {flex: 1;font-size: 32px;font-weight: normal;margin-left: 6px;height: 35px;line-height: 35px;small {font-size: 16px;color: #999;margin-left: 20px;}}}
}
</style>
六、精选商品实现

接口封装
在 api 目录下创建 home 目录然后创建 hot.js 文件
代码示范
HomeHot.vue
<script setup>
import HomePanel from './HomePanel.vue';
import { ref, onMounted } from 'vue'
import { getHotAPI } from '@/api/home/hot'const hotList = ref([])
const getHotList = async() => {const res = await getHotAPI()console.log(res)hotList.value = res.data
}onMounted(() => {getHotList()
})
</script><template><HomePanel title="精选商品" sub-title="人气精选 不容错过"><!-- 下面是插槽主体内容模版 --><ul class="goods-list"><li v-for="item in hotList" :key="item.id"><RouterLink to="/"><img :src="require(`@/assets/img/${item.picture1}.jpg`)" :alt="item.alt" /><p class="name">{{ item.goodsName }}</p><p class="price">¥{{ item.price }}</p></RouterLink></li></ul></HomePanel>
</template><style scoped lang='scss'>
.goods-list {display: flex;justify-content: space-between;height: 406px;width: 100%;li {width: 306px;height: 406px;background: #f0f9f4;transition: all .5s;&:hover {transform: translate3d(0, -3px, 0);box-shadow: 0 3px 8px rgb(0 0 0 / 20%);}img {width: 306px;height: 306px;}p {font-size: 22px;padding-top: 12px;text-align: center;text-overflow: ellipsis;overflow: hidden;white-space: nowrap;color: #000;}.price {color: $priceColor;}}
}
</style>
七、低价好物

接口封装
在 api 目录下创建 home 目录然后创建 cheap.js 文件
代码示范
HomeCheap.vue
<script setup>
import HomePanel from './HomePanel.vue';
import { ref, onMounted } from 'vue'
import { getCheapAPI } from '@/api/home/cheap'const cheapList = ref([])
const getCheapList = async() => {const res = await getCheapAPI()console.log(res)cheapList.value = res.data
}onMounted(() => {getCheapList()
})
</script><template><HomePanel title="低价好物" sub-title="价低质不低 不容错过"><!-- 下面是插槽主体内容模版 --><ul class="goods-list"><li v-for="item in cheapList" :key="item.id"><RouterLink to="/"><img :src="require(`@/assets/img/${item.picture1}.jpg`)" :alt="item.alt" /><p class="name">{{ item.goodsName }}</p><p class="price">¥{{ item.price }}</p></RouterLink></li></ul></HomePanel>
</template><style scoped lang='scss'>
.goods-list {display: flex;justify-content: space-between;height: 406px;width: 100%;li {width: 306px;height: 406px;background: #f0f9f4;transition: all .5s;&:hover {transform: translate3d(0, -3px, 0);box-shadow: 0 3px 8px rgb(0 0 0 / 20%);}img {width: 306px;height: 306px;}p {font-size: 22px;padding-top: 12px;text-align: center;text-overflow: ellipsis;overflow: hidden;white-space: nowrap;color: #000;}.price {color: $priceColor;}}
}
</style>
八、最新上架

接口封装
在 api 目录下创建 home 目录然后创建 new.js 文件
代码示范
HomeNew.vue
<script setup>
import HomePanel from './HomePanel.vue';
import { ref, onMounted } from 'vue'
import { getNewAPI } from '@/api/home/new'const newList = ref([])
const getNewList = async() => {const res = await getNewAPI()console.log(res)newList.value = res.data
}onMounted(() => {getNewList()
})
</script><template><HomePanel title="最新上架" sub-title="新鲜出炉 品质保障"><!-- 下面是插槽主体内容模版 --><ul class="goods-list"><li v-for="item in newList" :key="item.id"><RouterLink to="/"><img :src="require(`@/assets/img/${item.picture1}.jpg`)" :alt="item.alt" /><p class="name">{{ item.goodsName }}</p><p class="price">¥{{ item.price }}</p></RouterLink></li></ul></HomePanel>
</template><style scoped lang='scss'>
.goods-list {display: flex;justify-content: space-between;height: 406px;width: 100%;li {width: 306px;height: 406px;background: #f0f9f4;transition: all .5s;&:hover {transform: translate3d(0, -3px, 0);box-shadow: 0 3px 8px rgb(0 0 0 / 20%);}img {width: 306px;height: 306px;}p {font-size: 22px;padding-top: 12px;text-align: center;text-overflow: ellipsis;overflow: hidden;white-space: nowrap;color: #000;}.price {color: $priceColor;}}
}
</style>
相关文章:

乐意购项目前端开发 #4
一、Home页面组件结构 结构拆分 创建组件 在 views/Home 目录下创建component 目录, 然后在该目录下创建5个组件: 左侧分类(HomeCategory.vue)、Banner(HomeBanner.vue)、精选商品(HomeHot.vue)、低价商品(Homecheap.vue)、最新上架(HomeNew.vue) 引用组件 修改 views/Home…...

最安全的飞行器——飞行汽车
飞行汽车采用旋翼机飞行方式,稳定可靠,保证人身安全,可以垂直起降。旋翼机的稳定性在所有航空器中最高的,旋翼机被国际航空界公认为最安全的飞行器!增程器采用斯特林发电机。飞行汽车3D。 固定翼飞机在起飞的时候&…...

java验证ftp地址是否可用
一.前言 在实际开发中我们的业务是我们将订单发到客户的指定的地方, 我们需要验证用户的ftp地址是否真实且有效, 我们根据java程序来进行验证, 步骤和思路应该是. 步骤描述1导入所需要的 java类库(jar包依赖)2创建ftp客户端对象3设置ftp连接服务端的连接参数4建立与ftp的服务…...

多线程(看这一篇就够了,超详细,满满的干货)
多线程 一.认识线程(Thread)1. 1) 线程是什么1. 2) 为啥要有线程1.3) 进程和线程的区别标题1.4) Java的线程和操作系统线程的关系 二.创建线程方法1:继承Thread类方法2:实现Runnable接口方法3:匿名内部类创建Thread子类对象标题方法4:匿名内部类创建Runn…...

爬虫进阶之selenium模拟浏览器
爬虫进阶之selenium模拟浏览器 简介环境配置1、建议先安装conda2、创建虚拟环境并安装对应的包3、下载对应的谷歌驱动以及与驱动对应的浏览器 代码setting.py配置scrapy脚本参考中间件middlewares.py 附录:selenium教程 简介 Selenium是一个用于自动化浏览器操作的…...

props传值
文章目录 props用于父组件向子组件传递数据,从而实现组件之间的通信。 以下是使用props的详细步骤: 父组件中定义 props: 在父组件中,通过在子组件的标签上添加属性来定义要传递的数据。这些属性就是props。 <!-- ParentCompon…...

IaC基础设施即代码:Terraform 使用for_each 创建DNS资源副本
目录 一、实验 1.环境 2.Terraform 使用 for_each 创建资源副本 (DNS) 一、实验 1.环境 (1)主机 表1-1 主机 主机系统软件工具备注jia Windows Terraform 1.6.6VS Code、 PowerShell、 Chocolatey 2.Terraform 使用 for_ea…...

dubbo入门案例!!!
入门案例之前我们先介绍一下:zookeeper。 Zookeeper是Apacahe Hadoop的子项目,可以为分布式应用程序协调服务,适合作为Dubbo服务的注册中心,负责服务地址的注册与查找,相当于目录服务,服务提供者和消费者只…...

sm2和aes加解密
引用maven包 <dependency><groupId>org.bouncycastle</groupId><artifactId>bcprov-jdk18on</artifactId><version>1.72</version></dependency>2.对报文进行加密后生成签名 {// oristr报文 SECRET_KEY加密密钥String encrypt…...

cv2.findContours报错解决
问题引入 原代码: binary, contours, hierarchy cv2.findContours(thresh, cv2.RETR_TREE, cv2.CHAIN_APPROX_NONE) 发生了报错,这是因为我们这里返回了binary, contours, hierarchy三个值 这是opencv2里面的写法,在最新版opencv中只返回2个值 修改 contours, hierarchy c…...
RHEL - 更新升级软件或系统
《OpenShift / RHEL / DevSecOps 汇总目录》 文章目录 小版本软件更新yum update 和 yum upgrade 的区别升级软件和升级系统检查软件包是否可升级指定升级软件使用的发行版本方法1方法2方法3方法4 查看软件升级类型更新升级指定的 RHSA/RHBA/RHEA更新升级指定的 CVE更新升级指定…...

JNPF低代码开发平台总体架构介绍
目录 一、JNPF介绍 二、团队能力 三、技术选型 1.后端技术栈 2.前端技术栈 3.数据库支持 四、JNPF界面示意图 五、开发环境 一、JNPF介绍 JNPF是一款企业级低代码开发平台。基于Springboot、Vue技术,采用微服务、前后端分离架构,基于可视化数据建…...

axios的传参方式
目录 1、data传参 2、使用 params 传递查询参数: 3、使用路径参数传递数据: 在使用 Axios 发送 HTTP 请求时,有三种常见的传参方式:data、params 和路径参数 1、data传参 this.$axios({method: "post",url: "h…...
受电端协议芯片是如何让Type-C接口设备实现快充?
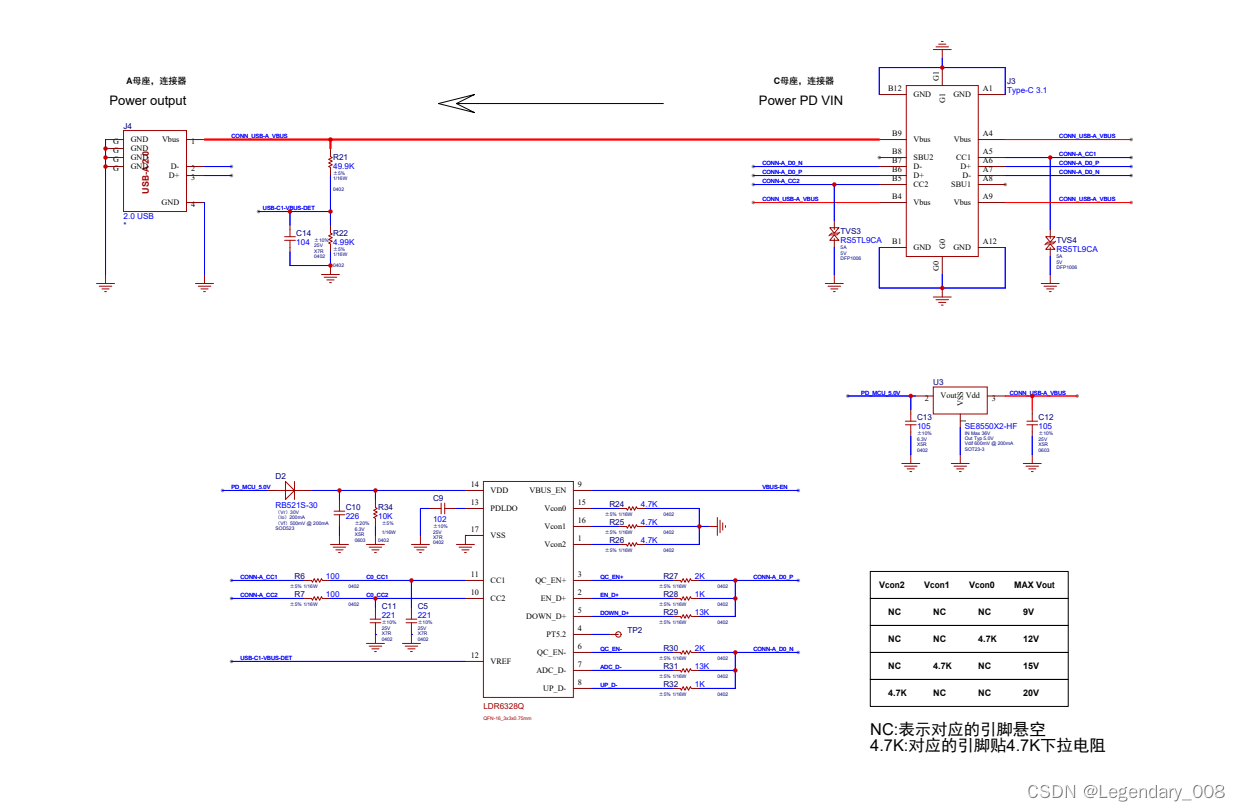
随着科技的不断进步,USB Type-C接口在电子产品中越来越普及。而在这个接口中,Type-c受电端协议芯片起着至关重要的作用。那么,什么是Type-c受电端协议芯片?它又是如何工作的呢?本文将为您揭开Type-c受电端协议芯片的神…...
浪花 - 搜索标签前后端联调
前传:浪花 - 根据标签搜索用户-CSDN博客 目录 一、完善后端搜索标签接口 二、前后端搜索标签接口的对接 1. 使用 Axios 发送请求 2. 解决跨域问题 3. Axios 请求传参序列化 4. 接收后端响应数据 5. 处理后端响应数据格式 6. 搜索结果为空的页面展示 附&am…...
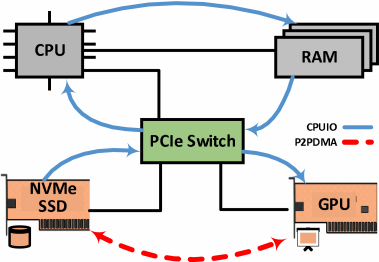
GPU与SSD间的P2P DMA访问机制
基于PCIe(Peripheral Component Interconnect Express)总线连接CPU、独立GPU和NVMe SSD的系统架构。 在该架构中,PCIe Swicth支持GPU与SSD之间快速的点对点直接内存访问(peer-to-peer, p2p DMA)。通常情况下࿰…...
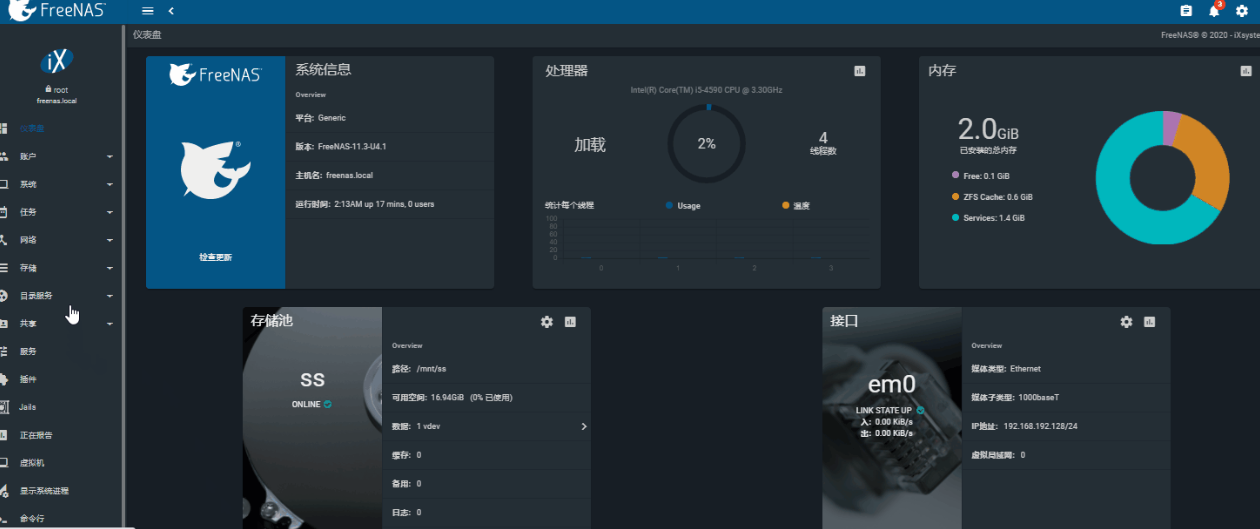
未来的NAS:连接您的数字生活
未来的NAS:连接您的数字生活 引言 网络附加存储(Network Attached Storage,简称NAS)是一种通过网络连接的存储设备,用于集中存储和共享数据。传统的NAS设备通常包含一个或多个硬盘驱动器,可以通过局域网连…...

C++ 设计模式之备忘录模式
【声明】本题目来源于卡码网(题目页面 (kamacoder.com)) 【提示:如果不想看文字介绍,可以直接跳转到C编码部分】 【设计模式大纲】 【简介】 -- 什么是备忘录模式 (第17种模式) 备忘录模式(Meme…...

【项目搭建三】SpringBoot引入redis
添加依赖 本文使用spring data redis访问和操作redis,pom文件中加入以下依赖: <dependency> <groupId>org.springframework.boot</groupId> <artifactId>spring-boot-starter-data-redis</artifactId> </depende…...

漫谈广告机制设计 | 听闻RTA要搞二次竞价了?牛啊!
听闻RTA要搞二次竞价了? 读者群里反馈说,某大厂的RTA支持做二次竞价了。笔者听闻后,竖起了大拇指,牛! RTA RTA(Real Time API), 是一种实时的广告程序接口,用于满足广告主实时个性化的投放需…...
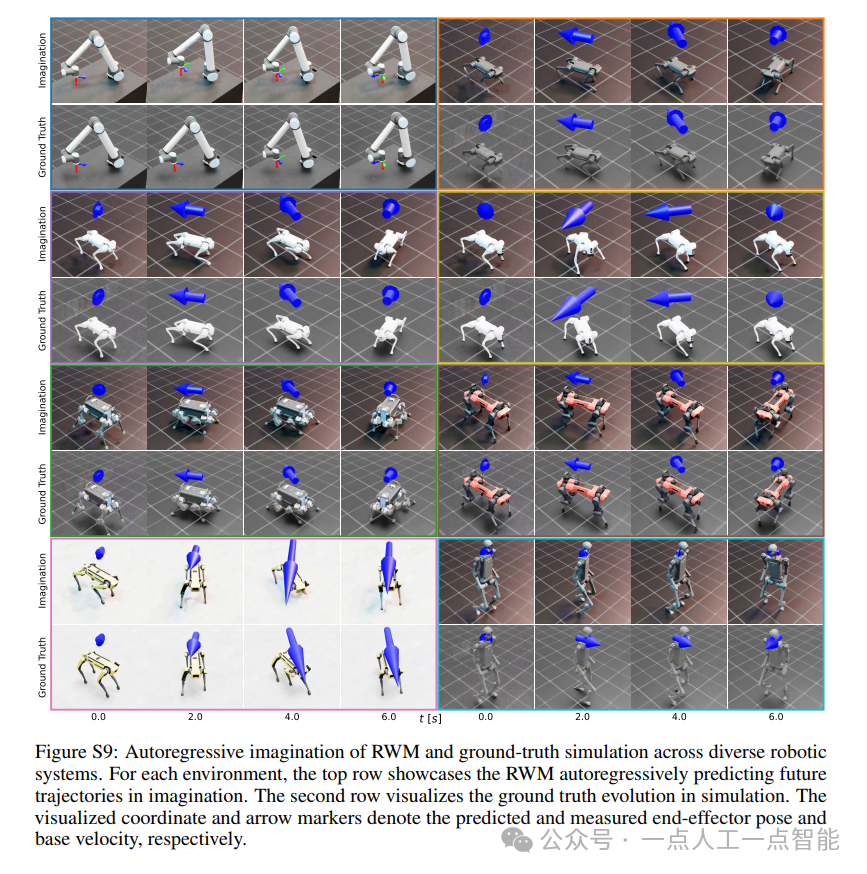
未来机器人的大脑:如何用神经网络模拟器实现更智能的决策?
编辑:陈萍萍的公主一点人工一点智能 未来机器人的大脑:如何用神经网络模拟器实现更智能的决策?RWM通过双自回归机制有效解决了复合误差、部分可观测性和随机动力学等关键挑战,在不依赖领域特定归纳偏见的条件下实现了卓越的预测准…...
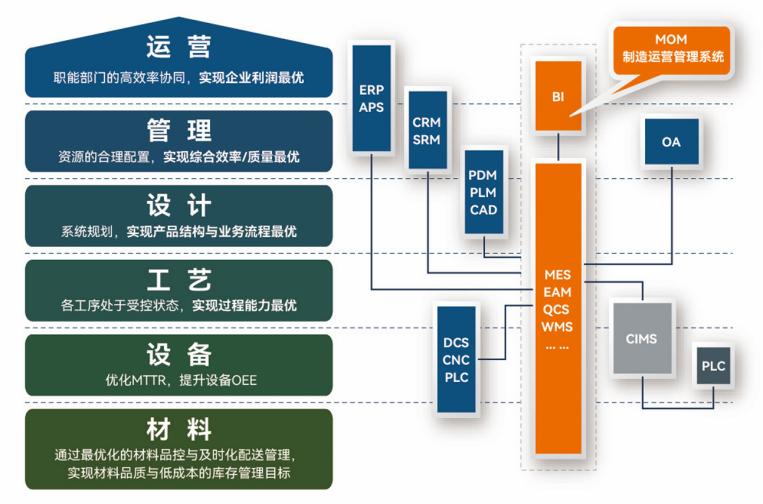
盘古信息PCB行业解决方案:以全域场景重构,激活智造新未来
一、破局:PCB行业的时代之问 在数字经济蓬勃发展的浪潮中,PCB(印制电路板)作为 “电子产品之母”,其重要性愈发凸显。随着 5G、人工智能等新兴技术的加速渗透,PCB行业面临着前所未有的挑战与机遇。产品迭代…...

蓝桥杯 2024 15届国赛 A组 儿童节快乐
P10576 [蓝桥杯 2024 国 A] 儿童节快乐 题目描述 五彩斑斓的气球在蓝天下悠然飘荡,轻快的音乐在耳边持续回荡,小朋友们手牵着手一同畅快欢笑。在这样一片安乐祥和的氛围下,六一来了。 今天是六一儿童节,小蓝老师为了让大家在节…...

【磁盘】每天掌握一个Linux命令 - iostat
目录 【磁盘】每天掌握一个Linux命令 - iostat工具概述安装方式核心功能基础用法进阶操作实战案例面试题场景生产场景 注意事项 【磁盘】每天掌握一个Linux命令 - iostat 工具概述 iostat(I/O Statistics)是Linux系统下用于监视系统输入输出设备和CPU使…...
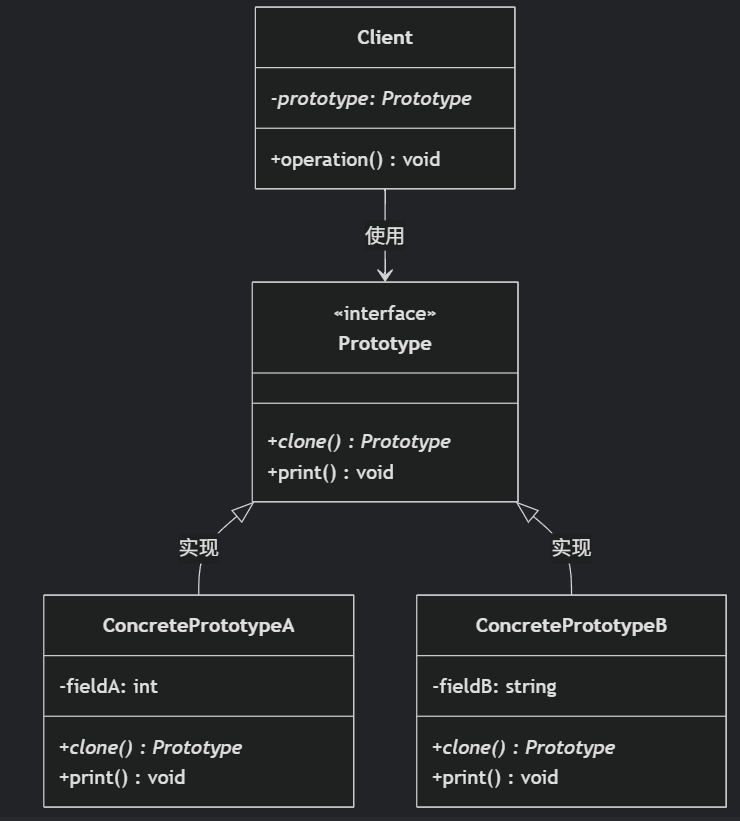
(二)原型模式
原型的功能是将一个已经存在的对象作为源目标,其余对象都是通过这个源目标创建。发挥复制的作用就是原型模式的核心思想。 一、源型模式的定义 原型模式是指第二次创建对象可以通过复制已经存在的原型对象来实现,忽略对象创建过程中的其它细节。 📌 核心特点: 避免重复初…...

第25节 Node.js 断言测试
Node.js的assert模块主要用于编写程序的单元测试时使用,通过断言可以提早发现和排查出错误。 稳定性: 5 - 锁定 这个模块可用于应用的单元测试,通过 require(assert) 可以使用这个模块。 assert.fail(actual, expected, message, operator) 使用参数…...
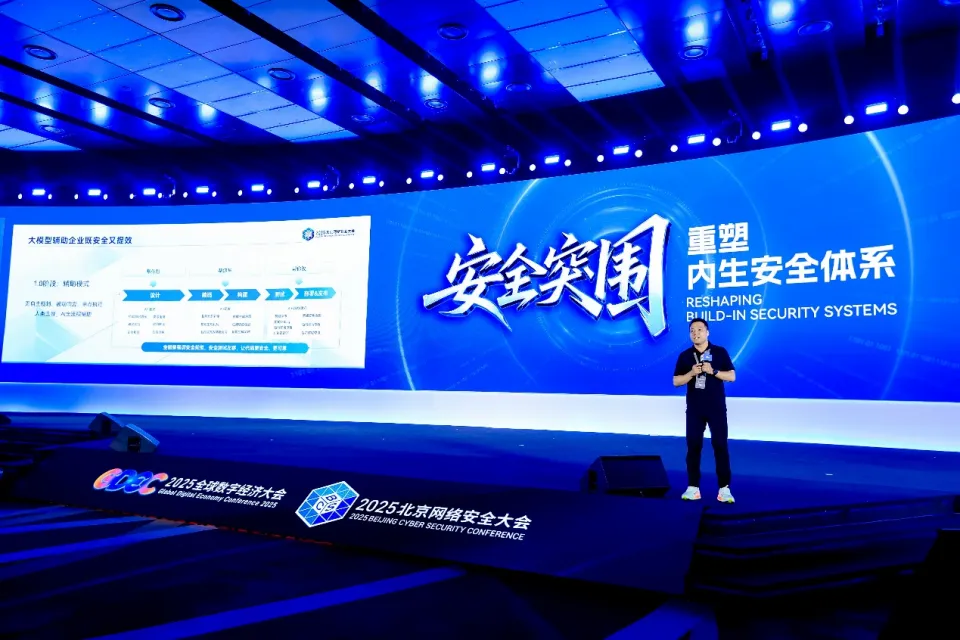
BCS 2025|百度副总裁陈洋:智能体在安全领域的应用实践
6月5日,2025全球数字经济大会数字安全主论坛暨北京网络安全大会在国家会议中心隆重开幕。百度副总裁陈洋受邀出席,并作《智能体在安全领域的应用实践》主题演讲,分享了在智能体在安全领域的突破性实践。他指出,百度通过将安全能力…...

OpenPrompt 和直接对提示词的嵌入向量进行训练有什么区别
OpenPrompt 和直接对提示词的嵌入向量进行训练有什么区别 直接训练提示词嵌入向量的核心区别 您提到的代码: prompt_embedding = initial_embedding.clone().requires_grad_(True) optimizer = torch.optim.Adam([prompt_embedding...

招商蛇口 | 执笔CID,启幕低密生活新境
作为中国城市生长的力量,招商蛇口以“美好生活承载者”为使命,深耕全球111座城市,以央企担当匠造时代理想人居。从深圳湾的开拓基因到西安高新CID的战略落子,招商蛇口始终与城市发展同频共振,以建筑诠释对土地与生活的…...
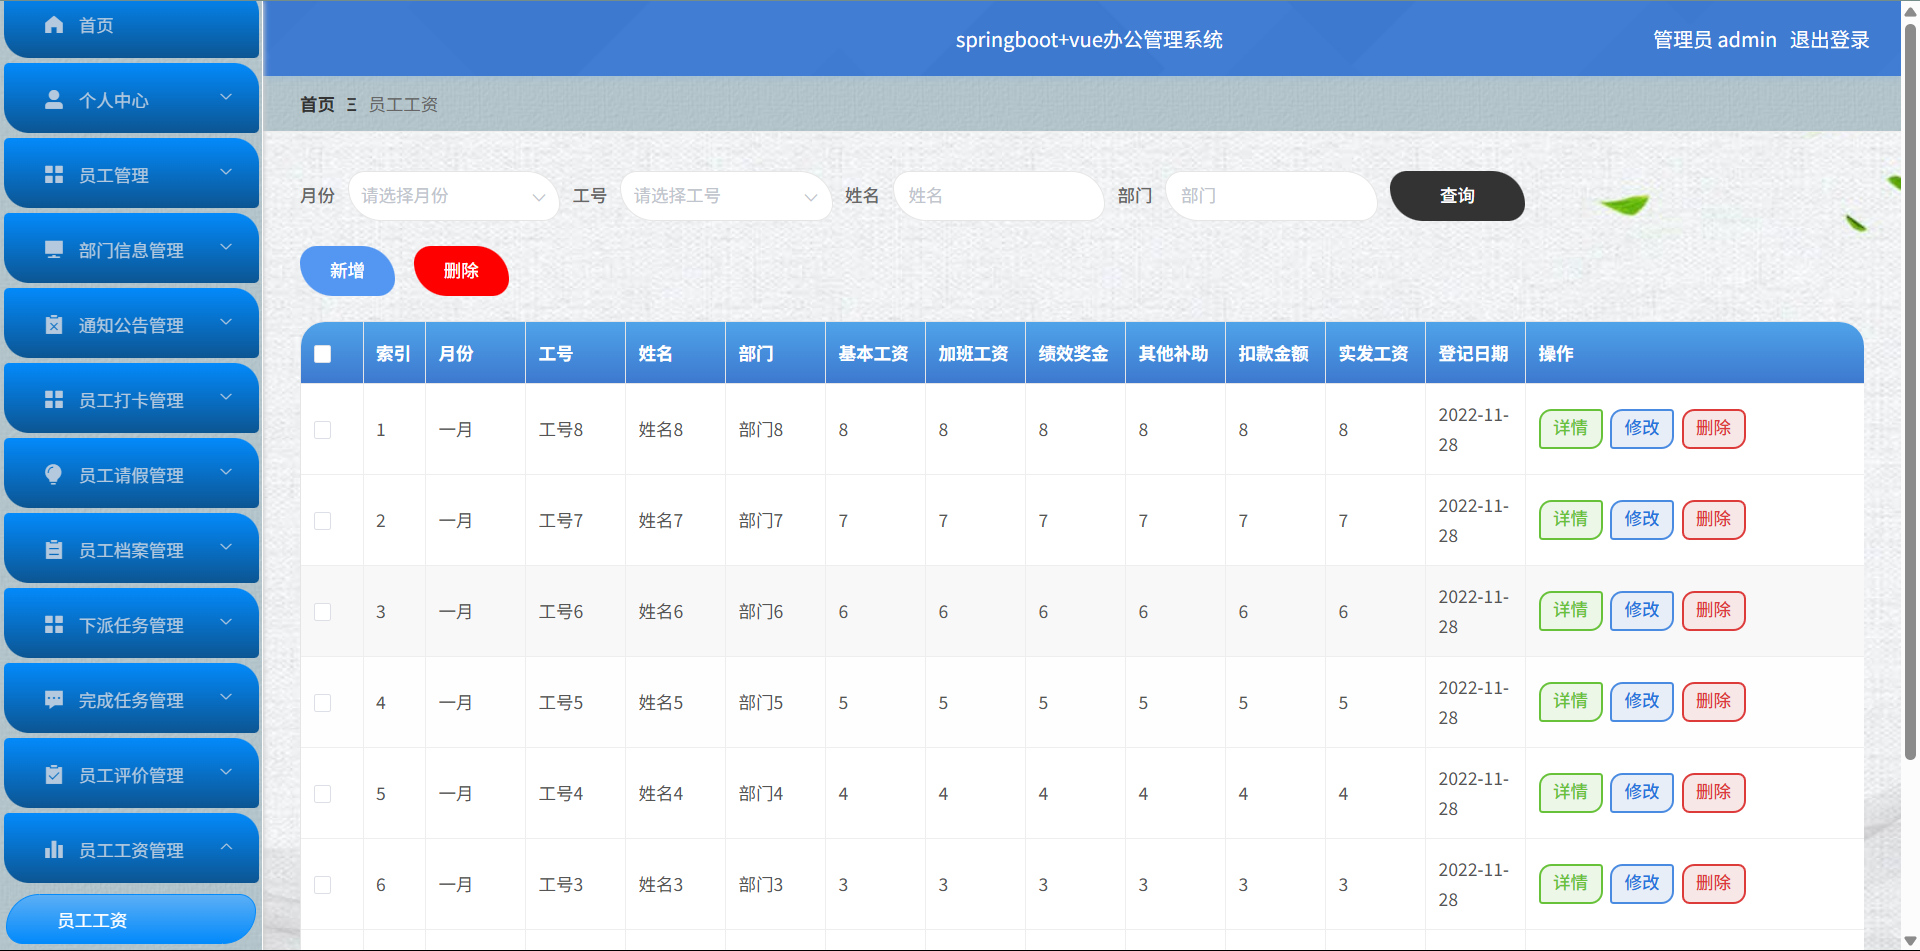
基于Springboot+Vue的办公管理系统
角色: 管理员、员工 技术: 后端: SpringBoot, Vue2, MySQL, Mybatis-Plus 前端: Vue2, Element-UI, Axios, Echarts, Vue-Router 核心功能: 该办公管理系统是一个综合性的企业内部管理平台,旨在提升企业运营效率和员工管理水…...
