Webpack5入门到原理22:提升打包构建速度
HotModuleReplacement
为什么
开发时我们修改了其中一个模块代码,Webpack 默认会将所有模块全部重新打包编译,速度很慢。
所以我们需要做到修改某个模块代码,就只有这个模块代码需要重新打包编译,其他模块不变,这样打包速度就能很快。
是什么
HotModuleReplacement(HMR/热模块替换):在程序运行中,替换、添加或删除模块,而无需重新加载整个页面。
怎么用
基本配置
module.exports = {// 其他省略devServer: {host: "localhost", // 启动服务器域名port: "3000", // 启动服务器端口号open: true, // 是否自动打开浏览器hot: true, // 开启HMR功能(只能用于开发环境,生产环境不需要了)},
};
此时 css 样式经过 style-loader 处理,已经具备 HMR 功能了。
但是 js 还不行。
JS 配置
// main.js
import count from "./js/count";
import sum from "./js/sum";
// 引入资源,Webpack才会对其打包
import "./css/iconfont.css";
import "./css/index.css";
import "./less/index.less";
import "./sass/index.sass";
import "./sass/index.scss";
import "./styl/index.styl";const result1 = count(2, 1);
console.log(result1);
const result2 = sum(1, 2, 3, 4);
console.log(result2);// 判断是否支持HMR功能
if (module.hot) {module.hot.accept("./js/count.js", function (count) {const result1 = count(2, 1);console.log(result1);});module.hot.accept("./js/sum.js", function (sum) {const result2 = sum(1, 2, 3, 4);console.log(result2);});
}
上面这样写会很麻烦,所以实际开发我们会使用其他 loader 来解决。
比如:vue-loader, react-hot-loader。
OneOf
为什么
打包时每个文件都会经过所有 loader 处理,虽然因为 test 正则原因实际没有处理上,但是都要过一遍。比较慢。
是什么
顾名思义就是只能匹配上一个 loader, 剩下的就不匹配了。
怎么用
const path = require("path");
const ESLintWebpackPlugin = require("eslint-webpack-plugin");
const HtmlWebpackPlugin = require("html-webpack-plugin");module.exports = {entry: "./src/main.js",output: {path: undefined, // 开发模式没有输出,不需要指定输出目录filename: "static/js/main.js", // 将 js 文件输出到 static/js 目录中// clean: true, // 开发模式没有输出,不需要清空输出结果},module: {rules: [{oneOf: [{// 用来匹配 .css 结尾的文件test: /\.css$/,// use 数组里面 Loader 执行顺序是从右到左use: ["style-loader", "css-loader"],},{test: /\.less$/,use: ["style-loader", "css-loader", "less-loader"],},{test: /\.s[ac]ss$/,use: ["style-loader", "css-loader", "sass-loader"],},{test: /\.styl$/,use: ["style-loader", "css-loader", "stylus-loader"],},{test: /\.(png|jpe?g|gif|webp)$/,type: "asset",parser: {dataUrlCondition: {maxSize: 10 * 1024, // 小于10kb的图片会被base64处理},},generator: {// 将图片文件输出到 static/imgs 目录中// 将图片文件命名 [hash:8][ext][query]// [hash:8]: hash值取8位// [ext]: 使用之前的文件扩展名// [query]: 添加之前的query参数filename: "static/imgs/[hash:8][ext][query]",},},{test: /\.(ttf|woff2?)$/,type: "asset/resource",generator: {filename: "static/media/[hash:8][ext][query]",},},{test: /\.js$/,exclude: /node_modules/, // 排除node_modules代码不编译loader: "babel-loader",},],},],},plugins: [new ESLintWebpackPlugin({// 指定检查文件的根目录context: path.resolve(__dirname, "../src"),}),new HtmlWebpackPlugin({// 以 public/index.html 为模板创建文件// 新的html文件有两个特点:1. 内容和源文件一致 2. 自动引入打包生成的js等资源template: path.resolve(__dirname, "../public/index.html"),}),],// 开发服务器devServer: {host: "localhost", // 启动服务器域名port: "3000", // 启动服务器端口号open: true, // 是否自动打开浏览器hot: true, // 开启HMR功能},mode: "development",devtool: "cheap-module-source-map",
};
生产模式也是如此配置。
Include/Exclude
为什么
开发时我们需要使用第三方的库或插件,所有文件都下载到 node_modules 中了。而这些文件是不需要编译可以直接使用的。
所以我们在对 js 文件处理时,要排除 node_modules 下面的文件。
是什么
include
包含,只处理 xxx 文件
exclude
排除,除了 xxx 文件以外其他文件都处理
怎么用
const path = require("path");
const ESLintWebpackPlugin = require("eslint-webpack-plugin");
const HtmlWebpackPlugin = require("html-webpack-plugin");module.exports = {entry: "./src/main.js",output: {path: undefined, // 开发模式没有输出,不需要指定输出目录filename: "static/js/main.js", // 将 js 文件输出到 static/js 目录中// clean: true, // 开发模式没有输出,不需要清空输出结果},module: {rules: [{oneOf: [{// 用来匹配 .css 结尾的文件test: /\.css$/,// use 数组里面 Loader 执行顺序是从右到左use: ["style-loader", "css-loader"],},{test: /\.less$/,use: ["style-loader", "css-loader", "less-loader"],},{test: /\.s[ac]ss$/,use: ["style-loader", "css-loader", "sass-loader"],},{test: /\.styl$/,use: ["style-loader", "css-loader", "stylus-loader"],},{test: /\.(png|jpe?g|gif|webp)$/,type: "asset",parser: {dataUrlCondition: {maxSize: 10 * 1024, // 小于10kb的图片会被base64处理},},generator: {// 将图片文件输出到 static/imgs 目录中// 将图片文件命名 [hash:8][ext][query]// [hash:8]: hash值取8位// [ext]: 使用之前的文件扩展名// [query]: 添加之前的query参数filename: "static/imgs/[hash:8][ext][query]",},},{test: /\.(ttf|woff2?)$/,type: "asset/resource",generator: {filename: "static/media/[hash:8][ext][query]",},},{test: /\.js$/,// exclude: /node_modules/, // 排除node_modules代码不编译include: path.resolve(__dirname, "../src"), // 也可以用包含loader: "babel-loader",},],},],},plugins: [new ESLintWebpackPlugin({// 指定检查文件的根目录context: path.resolve(__dirname, "../src"),exclude: "node_modules", // 默认值}),new HtmlWebpackPlugin({// 以 public/index.html 为模板创建文件// 新的html文件有两个特点:1. 内容和源文件一致 2. 自动引入打包生成的js等资源template: path.resolve(__dirname, "../public/index.html"),}),],// 开发服务器devServer: {host: "localhost", // 启动服务器域名port: "3000", // 启动服务器端口号open: true, // 是否自动打开浏览器hot: true, // 开启HMR功能},mode: "development",devtool: "cheap-module-source-map",
};
生产模式也是如此配置。
Cache
为什么
每次打包时 js 文件都要经过 Eslint 检查 和 Babel 编译,速度比较慢。
我们可以缓存之前的 Eslint 检查 和 Babel 编译结果,这样第二次打包时速度就会更快了。
是什么
对 Eslint 检查 和 Babel 编译结果进行缓存。
怎么用
const path = require("path");
const ESLintWebpackPlugin = require("eslint-webpack-plugin");
const HtmlWebpackPlugin = require("html-webpack-plugin");module.exports = {entry: "./src/main.js",output: {path: undefined, // 开发模式没有输出,不需要指定输出目录filename: "static/js/main.js", // 将 js 文件输出到 static/js 目录中// clean: true, // 开发模式没有输出,不需要清空输出结果},module: {rules: [{oneOf: [{// 用来匹配 .css 结尾的文件test: /\.css$/,// use 数组里面 Loader 执行顺序是从右到左use: ["style-loader", "css-loader"],},{test: /\.less$/,use: ["style-loader", "css-loader", "less-loader"],},{test: /\.s[ac]ss$/,use: ["style-loader", "css-loader", "sass-loader"],},{test: /\.styl$/,use: ["style-loader", "css-loader", "stylus-loader"],},{test: /\.(png|jpe?g|gif|webp)$/,type: "asset",parser: {dataUrlCondition: {maxSize: 10 * 1024, // 小于10kb的图片会被base64处理},},generator: {// 将图片文件输出到 static/imgs 目录中// 将图片文件命名 [hash:8][ext][query]// [hash:8]: hash值取8位// [ext]: 使用之前的文件扩展名// [query]: 添加之前的query参数filename: "static/imgs/[hash:8][ext][query]",},},{test: /\.(ttf|woff2?)$/,type: "asset/resource",generator: {filename: "static/media/[hash:8][ext][query]",},},{test: /\.js$/,// exclude: /node_modules/, // 排除node_modules代码不编译include: path.resolve(__dirname, "../src"), // 也可以用包含loader: "babel-loader",options: {cacheDirectory: true, // 开启babel编译缓存cacheCompression: false, // 缓存文件不要压缩},},],},],},plugins: [new ESLintWebpackPlugin({// 指定检查文件的根目录context: path.resolve(__dirname, "../src"),exclude: "node_modules", // 默认值cache: true, // 开启缓存// 缓存目录cacheLocation: path.resolve(__dirname,"../node_modules/.cache/.eslintcache"),}),new HtmlWebpackPlugin({// 以 public/index.html 为模板创建文件// 新的html文件有两个特点:1. 内容和源文件一致 2. 自动引入打包生成的js等资源template: path.resolve(__dirname, "../public/index.html"),}),],// 开发服务器devServer: {host: "localhost", // 启动服务器域名port: "3000", // 启动服务器端口号open: true, // 是否自动打开浏览器hot: true, // 开启HMR功能},mode: "development",devtool: "cheap-module-source-map",
};
Thead
为什么
当项目越来越庞大时,打包速度越来越慢,甚至于需要一个下午才能打包出来代码。这个速度是比较慢的。
我们想要继续提升打包速度,其实就是要提升 js 的打包速度,因为其他文件都比较少。
而对 js 文件处理主要就是 eslint 、babel、Terser 三个工具,所以我们要提升它们的运行速度。
我们可以开启多进程同时处理 js 文件,这样速度就比之前的单进程打包更快了。
是什么
多进程打包:开启电脑的多个进程同时干一件事,速度更快。
需要注意:请仅在特别耗时的操作中使用,因为每个进程启动就有大约为 600ms 左右开销。
怎么用
我们启动进程的数量就是我们 CPU 的核数。
如何获取 CPU 的核数,因为每个电脑都不一样。
// nodejs核心模块,直接使用
const os = require("os");
// cpu核数
const threads = os.cpus().length;
下载包
npm i thread-loader -D使用
const os = require("os");
const path = require("path");
const ESLintWebpackPlugin = require("eslint-webpack-plugin");
const HtmlWebpackPlugin = require("html-webpack-plugin");
const MiniCssExtractPlugin = require("mini-css-extract-plugin");
const CssMinimizerPlugin = require("css-minimizer-webpack-plugin");
const TerserPlugin = require("terser-webpack-plugin");// cpu核数
const threads = os.cpus().length;// 获取处理样式的Loaders
const getStyleLoaders = (preProcessor) => {return [MiniCssExtractPlugin.loader,"css-loader",{loader: "postcss-loader",options: {postcssOptions: {plugins: ["postcss-preset-env", // 能解决大多数样式兼容性问题],},},},preProcessor,].filter(Boolean);
};module.exports = {entry: "./src/main.js",output: {path: path.resolve(__dirname, "../dist"), // 生产模式需要输出filename: "static/js/main.js", // 将 js 文件输出到 static/js 目录中clean: true,},module: {rules: [{oneOf: [{// 用来匹配 .css 结尾的文件test: /\.css$/,// use 数组里面 Loader 执行顺序是从右到左use: getStyleLoaders(),},{test: /\.less$/,use: getStyleLoaders("less-loader"),},{test: /\.s[ac]ss$/,use: getStyleLoaders("sass-loader"),},{test: /\.styl$/,use: getStyleLoaders("stylus-loader"),},{test: /\.(png|jpe?g|gif|webp)$/,type: "asset",parser: {dataUrlCondition: {maxSize: 10 * 1024, // 小于10kb的图片会被base64处理},},generator: {// 将图片文件输出到 static/imgs 目录中// 将图片文件命名 [hash:8][ext][query]// [hash:8]: hash值取8位// [ext]: 使用之前的文件扩展名// [query]: 添加之前的query参数filename: "static/imgs/[hash:8][ext][query]",},},{test: /\.(ttf|woff2?)$/,type: "asset/resource",generator: {filename: "static/media/[hash:8][ext][query]",},},{test: /\.js$/,// exclude: /node_modules/, // 排除node_modules代码不编译include: path.resolve(__dirname, "../src"), // 也可以用包含use: [{loader: "thread-loader", // 开启多进程options: {workers: threads, // 数量},},{loader: "babel-loader",options: {cacheDirectory: true, // 开启babel编译缓存},},],},],},],},plugins: [new ESLintWebpackPlugin({// 指定检查文件的根目录context: path.resolve(__dirname, "../src"),exclude: "node_modules", // 默认值cache: true, // 开启缓存// 缓存目录cacheLocation: path.resolve(__dirname,"../node_modules/.cache/.eslintcache"),threads, // 开启多进程}),new HtmlWebpackPlugin({// 以 public/index.html 为模板创建文件// 新的html文件有两个特点:1. 内容和源文件一致 2. 自动引入打包生成的js等资源template: path.resolve(__dirname, "../public/index.html"),}),// 提取css成单独文件new MiniCssExtractPlugin({// 定义输出文件名和目录filename: "static/css/main.css",}),// css压缩// new CssMinimizerPlugin(),],optimization: {minimize: true,minimizer: [// css压缩也可以写到optimization.minimizer里面,效果一样的new CssMinimizerPlugin(),// 当生产模式会默认开启TerserPlugin,但是我们需要进行其他配置,就要重新写了new TerserPlugin({parallel: threads // 开启多进程})],},// devServer: {//   host: "localhost", // 启动服务器域名//   port: "3000", // 启动服务器端口号//   open: true, // 是否自动打开浏览器// },mode: "production",devtool: "source-map",
};
我们目前打包的内容都很少,所以因为启动进程开销原因,使用多进程打包实际上会显著的让我们打包时间变得很长。
相关文章:

Webpack5入门到原理22:提升打包构建速度
HotModuleReplacement 为什么 开发时我们修改了其中一个模块代码,Webpack 默认会将所有模块全部重新打包编译,速度很慢。 所以我们需要做到修改某个模块代码,就只有这个模块代码需要重新打包编译,其他模块不变,这样…...

EXCEL VBA获取幸运数字号码
EXCELVBA获取幸运数字号码 以下就是VBA幸运号码产生的程序,复制粘贴到VBA代码框即可运行 Option Base 1 Sub 幸运号码()Dim n As Integer, i As Integer, j As IntegerDim l() As Integern Application.InputBox("请输入需要产生幸运号码的数量:…...
【标准IO】fseek函数、ftell函数、fflush函数、getline函数
目录 fseekftellrewindfflushgetline 橙色 当你在文件中写入了10个字符后,又想把这10个字符读出来,该怎么做呢?因为有文件操作符指针的存在,此时该指针已经指在了这10个字符末尾,所以需要把该指针重定向,这…...

VSCODE使用CMAKE显示命令无法找到
背景:使用了code server,安装CMAKE和CMAKE TOOLS,但是通过ctrlshiftp打开命令面板,运行随便一个cmake指令,都出现了指令无法找到。具体为“命令"CMake: 配置"导致错误 (command ‘cmake.configure’ not fou…...
【SpringCloud】微服务框架后端部署详细过程记录20240119
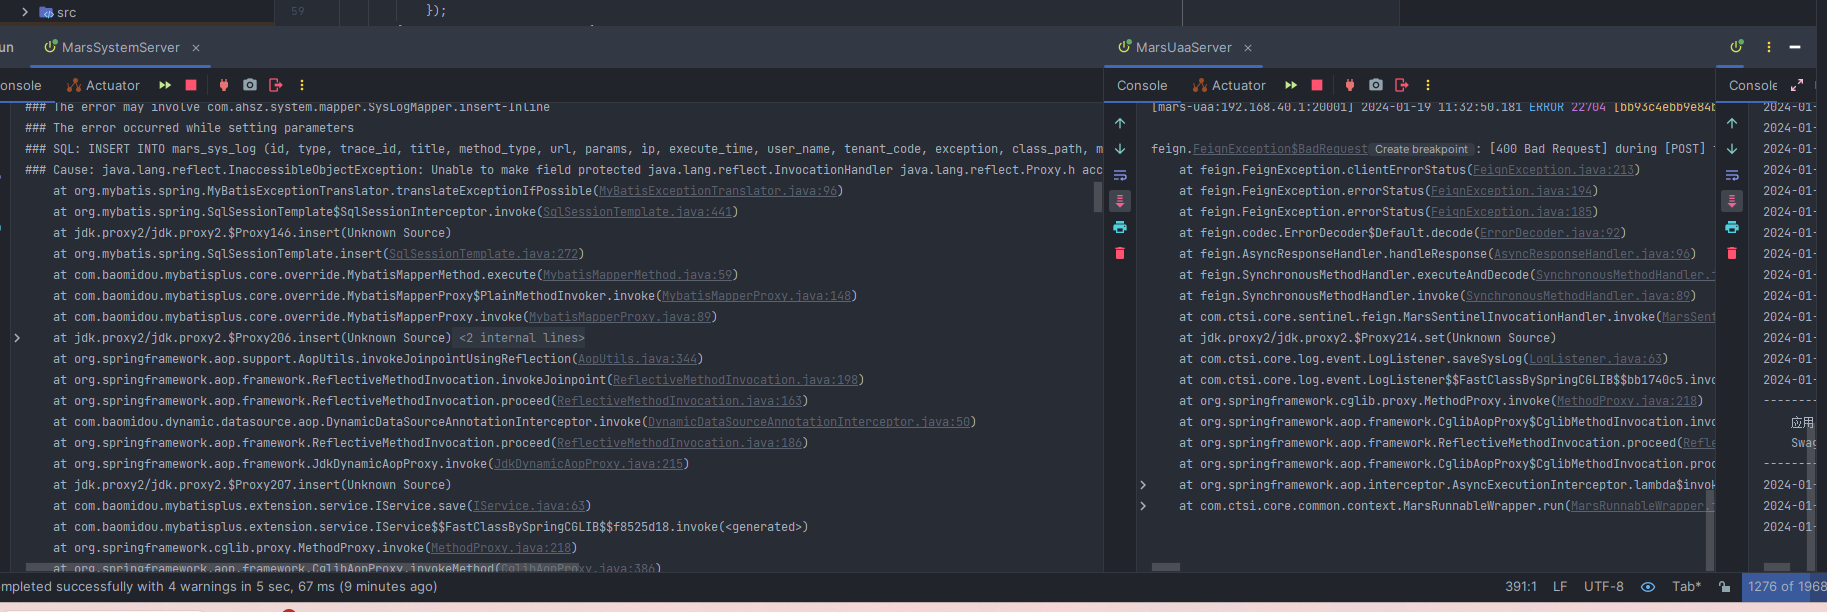
前言:前两天公司接到客户提供的一个微服务框架,导师让我在本地部署验证一下该框架的可用性,借此机会记录一下微服务项目的一个基本部署流程,仅供学习参考,如有不足还请指正! 文件结构 提供的压缩文件共包含…...

《设计模式的艺术》笔记 - 桥接模式
介绍 桥接模式将抽象部分与其实现部分分离,使它们都可以独立地变化。它是一种对象结构型模式,又称为柄体模式或接口模式 实现 myclass.h // // Created by yuwp on 2024/1/12. //#ifndef DESIGNPATTERNS_MYCLASS_H #define DESIGNPATTERNS_MYCLASS_H#…...
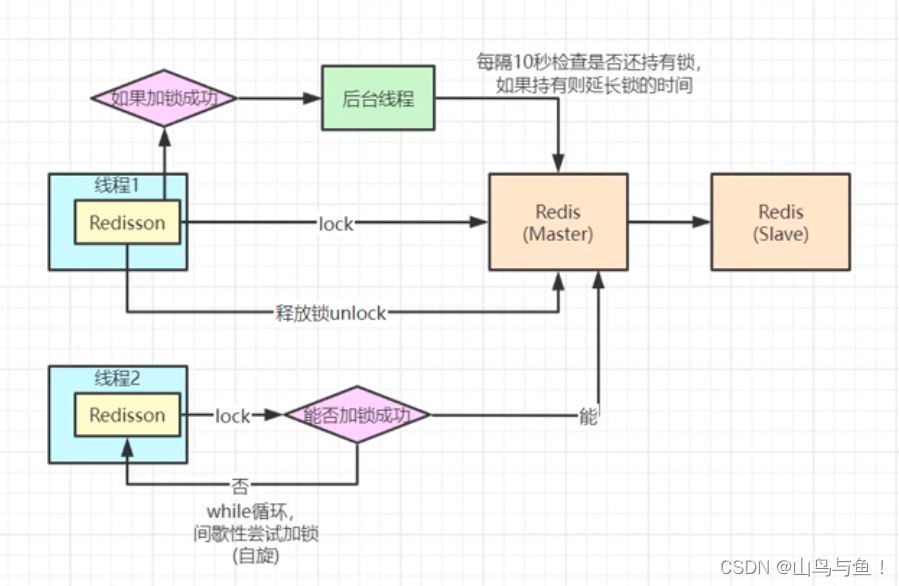
Redis高并发分布式锁
目录 场景描述 订单扣减场景举例 代码调整1 代码调整2 代码调整3 redisson锁续命核心代码 场景描述 订单扣减场景举例 //首先在redis中set stock 300 RequestMapping("/deduct_stock") public String deductStock() {int stock Integer.parseInt(stringRedi…...
)
组件开发遇到的问题(vue的问题)
组件的开发和引用 <template><div class"xx">组件</div> </template> <script>export default {name: viewMore,components: {},data() {return {}}} </script> <style scoped>可以定义组件都有的样式 </style> …...

vue3前端开发,感受一下组合式api和VUE2选项式的差异
vue3前端开发,感受一下组合式api和VUE2选项式的差异!今天开始,正式开始,进入学习Vue3的内容。以后代码,案例分享,都会采用组合式api的模式为大家做展示。 今天是第一节,带大家感受一下,Vue3的组…...
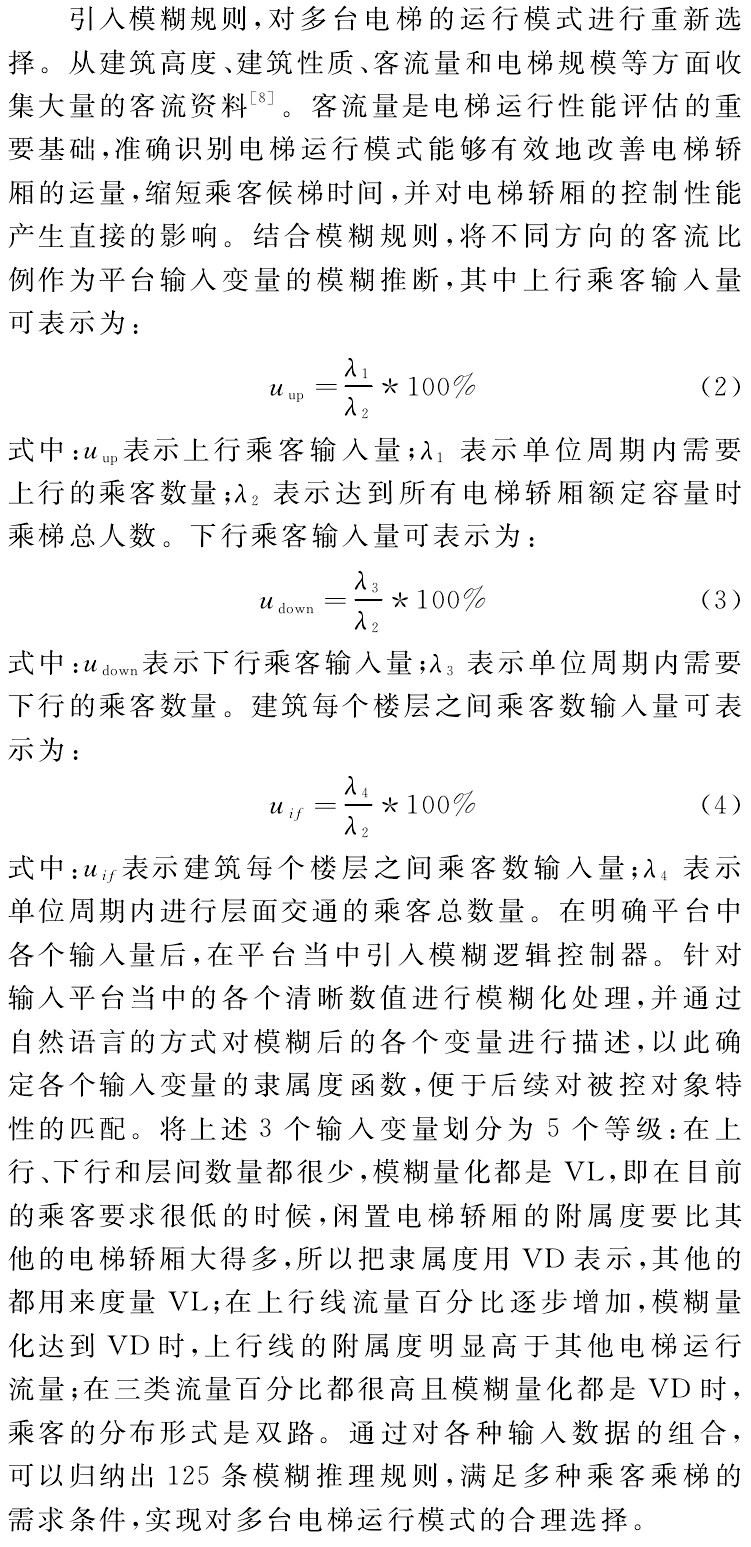
电梯调度问题文献阅读
电梯调度问题文献阅读 文章目录 电梯调度问题文献阅读[toc]文献阅读1. 陈纪龙,孟洪兵,吴刚等.六层电梯模拟系统的研究与实现[J].伊犁师范学院学报(自然科学版),2014,8(01):57-62.2. 陈福兰,杜虹.浅析电梯并联运行的几种调度方法[J].装备制造技术,2012,(10):178-180190.3. 马春江…...
文心一言 VS 讯飞星火 VS chatgpt (183)-- 算法导论13.4 7题
七、用go语言,假设用 RB-INSERT 将一个结点 x 插入一棵红黑树,紧接着又用 RB-DELETE 将它从树中删除。结果的红黑树与初始的红黑树是否一样?证明你的答案。 文心一言: 首先,我们需要明确RB-INSERT和RB-DELETE的基本操…...
ChatGLM vs ChatGPT
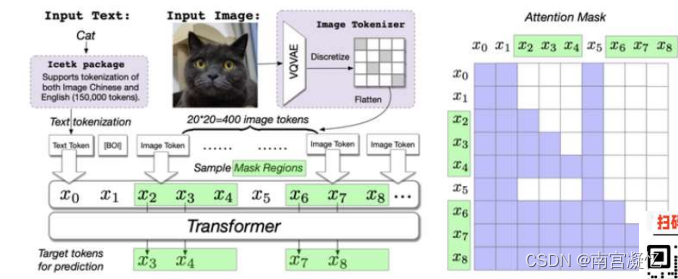
所有的NLP大模型 都是transformer结构 1.Mask attention 的策略不同 2.训练任务目标不同 国内大模型nb公司:百度、清华智谱 一、主流大模型 粉色:Encoder-only。 绿色:Encoder-Decoder,尽头智谱ChatGLM。 蓝色:…...

leetcode热题100.三数之和
Problem: 15. 三数之和 文章目录 题目解题方法复杂度Code 题目 给你一个整数数组 nums ,判断是否存在三元组 [nums[i], nums[j], nums[k]] 满足 i ! j、i ! k 且 j ! k ,同时还满足 nums[i] nums[j] nums[k] 0 。请 你返回所有和为 0 且不重复的三元…...

GitLab服务器忘记root密码处理方式
GitLab服务器忘记root密码处理方式 文章目录 GitLab服务器忘记root密码处理方式1. Gitlab查看用户id号1. 通过api接口查询2. 在Linux终端里直接通过curl命令查询 2. 进入GitLab数据库中查询并修改root密码 1. Gitlab查看用户id号 1. 通过api接口查询 接口查询地址:…...

js-cookie的使用--token的数据实现持久化
1.下载 npm install js-cookie 2.引入 import Cookies from "js-cookie"; 3.使用 // 写入cookie Cookies.set(name, value) // 读取 Cookies.get(name) // > value Cookies.get(nothing) // > undefined // 读取所有可见的cookie Cookies.get() // 删除某项co…...
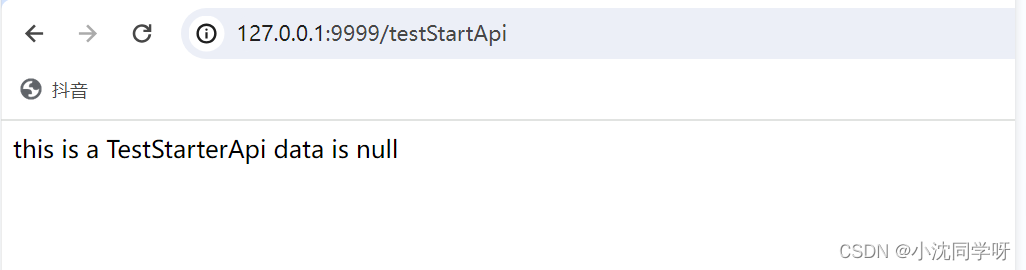
【实战】SpringBoot自定义 starter及使用
文章目录 前言技术积累SpringBoot starter简介starter的开发步骤 实战演示自定义starter的使用写在最后 前言 各位大佬在使用springboot或者springcloud的时候都会根据需求引入各种starter,比如gateway、feign、web、test等等的插件。当然,在实际的业务…...

网络爬虫采集工具
在当今数字化的时代,获取海量数据对于企业、学术界和个人都至关重要。网络爬虫成为一种强大的工具,能够从互联网上抓取并提取所需的信息。本文将专心分享关于网络爬虫采集数据的全面指南,深入探讨其原理、应用场景以及使用过程中可能遇到的挑…...

【协议】XMLHttpRequest的梳理和总结
1. 前言 本篇梳理和总结一下XMLHttpRequest。 2. XMLHttpRequest原型对象的属性和方法 属性和方法说明示例new XMLHttpRequest() 功能:创建XHR对象 输入: 输出:XHR实例化对象 <略> XMLHttpRequest.prototype .open(method, url, asyn…...

AI教我学编程之C#类的基本概念(1)
前言 在AI教我学编程之C#类型 中,我们学习了C#类型的的基础知识,而类正是类型的一种. 目录 区分类和类型 什么是类? 对话AI 追问 实操 追踪属性的使用 AI登场 逐步推进 提出疑问 药不能停 终于实现 探索事件的使用 异步/交互操作 耗时操…...

前端js 数据结构:对象 object、数组Array 、Map 的创建、增删改 / 遍历数据
目录 前端js 数据结构:对象、数组、Map 的使用1 对象(object)1.1 创建对象1.1.1 对象字面量(最常用): {}1.1.2 使用 new 关键字和对象构造函数1.1.3 Object.create() 1.2 修改对象1.2.1 直接赋值:对象的属性名直接赋值1.2.2 点号/…...

Envoy 详解:云原生时代的高性能网络代理
Envoy 详解:云原生时代的高性能网络代理 文章目录Envoy 详解:云原生时代的高性能网络代理前言核心特性架构与设计哲学核心组件与术语xDS 协议:动态配置的基石主要使用场景与其他代理的对比(Envoy vs Nginx)部署模式与未…...

收藏干货:MySQL/PG/人大金仓/达梦语法差异对照表
📌 专栏:国产数据库信创实战🔖 标签: #数据库语法差异 #MySQL转人大金仓 #MySQL转达梦 #PG语法适配 #信创数据库迁移 #SQL兼容改造 #国产数据库适配 #SpringBoot3数据库适配📝 文章摘要信创国产化迁移过程中࿰…...

告别Blob分析:Halcon差异化模型在复杂印刷品检测中的降本增效实践
工业视觉新范式:Halcon差异化模型在精密印刷检测中的实战突破 印刷品质量检测一直是工业视觉领域的硬骨头——那些微米级的墨点缺失、毫厘间的字符偏移,以及生产线上的光影变幻,都在挑战传统算法的极限。当Blob分析遇上多印漏印、位置飘移、…...

终极浏览器资源嗅探指南:解锁网页媒体捕获的完整方案
终极浏览器资源嗅探指南:解锁网页媒体捕获的完整方案 【免费下载链接】cat-catch 猫抓 浏览器资源嗅探扩展 / cat-catch Browser Resource Sniffing Extension 项目地址: https://gitcode.com/GitHub_Trending/ca/cat-catch 在数字内容无处不在的今天&#x…...

如何彻底解决IDM激活问题:开源脚本终极指南
如何彻底解决IDM激活问题:开源脚本终极指南 【免费下载链接】IDM-Activation-Script IDM Activation & Trail Reset Script 项目地址: https://gitcode.com/gh_mirrors/id/IDM-Activation-Script Internet Download Manager激活弹窗困扰着无数用户&#…...

VAP特效动画:跨平台高性能动画播放的终极解决方案
VAP特效动画:跨平台高性能动画播放的终极解决方案 【免费下载链接】vap VAP是企鹅电竞开发,用于播放特效动画的实现方案。具有高压缩率、硬件解码等优点。同时支持 iOS,Android,Web 平台。 项目地址: https://gitcode.com/gh_mirrors/va/vap VAP&…...
)
告别C盘焦虑!保姆级教程:在D盘为VS2013安个家(附阿里云/百度网盘下载)
告别C盘焦虑!VS2013高效安装与磁盘管理全指南 对于刚接触编程的新手来说,Visual Studio 2013(简称VS2013)是一个功能强大且友好的开发环境。然而,许多用户在安装过程中常常忽略了一个关键问题——安装路径的选择。本文…...

2026年主流行工具有何不同?subAgent是趋势还是营销?深度解析!
AI Coding工具中的“subAgent”正从营销词发展为工程抽象,实现上下文、权限、任务和执行的拆分管理。主流工具如Claude Code、Codex、OpenClaw、Gemini CLI均在强化subAgent能力,但设计哲学各异。文章从技术视角解析subAgent的本质、各工具异同及使用选择…...

别再只会用OpenCV的equalizeHist了!用Python实战图像增强,让你的目标检测模型精度提升一个台阶
突破OpenCV基础操作:Python图像增强实战与目标检测精度优化 在目标检测项目的实际开发中,我们常常遇到这样的困境:模型在标准测试集上表现优异,一旦部署到真实场景,面对复杂光照、低对比度的图像时,性能却…...
Pixelle-Video:如何让AI为您的声音创作注入灵魂?
Pixelle-Video:如何让AI为您的声音创作注入灵魂? 【免费下载链接】Pixelle-Video 🚀 AI 全自动短视频引擎 | AI Fully Automated Short Video Engine 项目地址: https://gitcode.com/GitHub_Trending/pi/Pixelle-Video 在AI视频创作的…...