跟着cherno手搓游戏引擎【16】Camera和Uniform变量的封装
相机封装:

OrthographicCamera.h:
#pragma once
#include <glm/glm.hpp>
namespace YOTO {class OrthographicCamera{public:OrthographicCamera(float left,float right , float bottom,float top);const glm::vec3& GetPosition()const { return m_Position; }void SetPosition(const glm::vec3& position) { m_Position = position; RecalculateViewMatrix();}float GetRotation()const { return m_Rotation; }void SetRotation(float rotation) {m_Rotation = rotation; RecalculateViewMatrix();}const glm::mat4& GetProjectionMatrix()const { return m_ProjectionMatrix; }const glm::mat4& GetViewMatrix()const { return m_ViewMatrix; }const glm::mat4& GetViewProjectionMatrix()const { return m_ViewProjectionMatrix; }private:void RecalculateViewMatrix();private:glm::mat4 m_ProjectionMatrix;glm::mat4 m_ViewMatrix;glm::mat4 m_ViewProjectionMatrix;glm::vec3 m_Position = { 0.0f ,0.0f ,0.0f };float m_Rotation = 0.0f;};
}
OrthographicCamera.cpp:
#include "ytpch.h"
#include "OrthographicCamera.h"
#include <glm/gtc/matrix_transform.hpp>
namespace YOTO {OrthographicCamera::OrthographicCamera(float left, float right, float bottom, float top):m_ProjectionMatrix(glm::ortho(left,right,bottom,top)),m_ViewMatrix(1.0f) {m_ViewProjectionMatrix = m_ProjectionMatrix * m_ViewMatrix;}void OrthographicCamera::RecalculateViewMatrix(){glm::mat4 transform = glm::translate(glm::mat4(1.0f), m_Position)*glm::rotate(glm::mat4(1.0f),glm::radians(m_Rotation),glm::vec3(0,0,1));m_ViewMatrix = glm::inverse(transform);m_ViewProjectionMatrix = m_ProjectionMatrix * m_ViewMatrix;}
}
Uniform的封装:
Shader.h:
#pragma once
#include <string>
#include <glm/glm.hpp>
namespace YOTO {class Shader {public:Shader(const std::string& vertexSrc, const std::string& fragmentSrc);~Shader();void Bind()const;void UnBind()const;void UploadUniformMat4(const std::string&name,  const glm::mat4 & matrix);private:uint32_t m_RendererID;}
;
}
Shader.cpp:
#include"ytpch.h"
#include "Shader.h"
#include <glad/glad.h>
#include <YOTO/Log.h>
#include<glm/gtc/type_ptr.hpp>
namespace YOTO {Shader::Shader(const std::string& vertexSrc, const std::string& fragmentSrc){// 1.1.创建顶点着色器对象GLuint vertexShader = glCreateShader(GL_VERTEX_SHADER);// Send the vertex shader source code to GL// Note that std::string's .c_str is NULL character terminated.// 1.2.附加顶点着色器源码到顶点着色器对象中const GLchar* source = vertexSrc.c_str();glShaderSource(vertexShader, 1, &source, 0);// 1.3.编译顶点着色器对象glCompileShader(vertexShader);// 1.4.检查是否编译成功GLint isCompiled = 0;glGetShaderiv(vertexShader, GL_COMPILE_STATUS, &isCompiled);if (isCompiled == GL_FALSE) {// 1.4.2编译失败可以打印报错信息GLint maxLength = 0;glGetShaderiv(vertexShader, GL_INFO_LOG_LENGTH, &maxLength);// The maxLength includes the NULL characterstd::vector<GLchar> infoLog(maxLength);glGetShaderInfoLog(vertexShader, maxLength, &maxLength, &infoLog[0]);// We don't need the shader anymore.glDeleteShader(vertexShader);YT_CORE_ERROR("{0}", infoLog.data());YT_CORE_ASSERT(false, "Vertex shader compilation failure!");return;}// 片段着色器一样// 2.1.创建片段着色器对象GLuint fragmentShader = glCreateShader(GL_FRAGMENT_SHADER);// Send the fragment shader source code to GL// Note that std::string's .c_str is NULL character terminated.// 2.2.附加片段着色器源码到片段着色器对象中source = fragmentSrc.c_str();glShaderSource(fragmentShader, 1, &source, 0);// 2.3.编译片段着色器对象glCompileShader(fragmentShader);// 2.4.检查是否编译成功glGetShaderiv(fragmentShader, GL_COMPILE_STATUS, &isCompiled);if (isCompiled == GL_FALSE) {// 2.4.2编译失败可以打印报错信息GLint maxLength = 0;glGetShaderiv(fragmentShader, GL_INFO_LOG_LENGTH, &maxLength);// The maxLength includes the NULL characterstd::vector<GLchar> infoLog(maxLength);glGetShaderInfoLog(fragmentShader, maxLength, &maxLength, &infoLog[0]);// We don't need the shader anymore.glDeleteShader(fragmentShader);// Either of them. Don't leak shaders.glDeleteShader(vertexShader);YT_CORE_ERROR("{0}", infoLog.data());YT_CORE_ASSERT(false, "Fragment shader compilation failure!");return;}// Vertex and fragment shaders are successfully compiled.// Now time to link them together into a program.// Get a program object.// 3.1创建着色器程序对象m_RendererID = glCreateProgram();GLuint program = m_RendererID;// 3.2附加着色器对象给着色器程序对象glAttachShader(program, vertexShader);glAttachShader(program, fragmentShader);// 3.3链接着色器程序对象glLinkProgram(program);// 3.4可以检查链接是否成功// Note the different functions here: glGetProgram* instead of glGetShader*.GLint isLinked = 0;glGetProgramiv(program, GL_LINK_STATUS, (int*)&isLinked);if (isLinked == GL_FALSE) {GLint maxLength = 0;glGetProgramiv(program, GL_INFO_LOG_LENGTH, &maxLength);// The maxLength includes the NULL characterstd::vector<GLchar> infoLog(maxLength);glGetProgramInfoLog(program, maxLength, &maxLength, &infoLog[0]);// We don't need the program anymore.glDeleteProgram(program);// Don't leak shaders either.glDeleteShader(vertexShader);glDeleteShader(fragmentShader);YT_CORE_ERROR("{0}", infoLog.data());YT_CORE_ASSERT(false, "Shader link failure!");return;}// 4.删除着色器对象// Always detach shaders after a successful link.glDetachShader(program, vertexShader);glDetachShader(program, fragmentShader);}Shader::~Shader(){glDeleteProgram(m_RendererID);}void Shader::Bind() const{glUseProgram(m_RendererID);}void Shader::UnBind() const{glUseProgram(0);}void Shader::UploadUniformMat4(const std::string& name, const glm::mat4& matrix){GLint loacation= glGetUniformLocation(m_RendererID, name.c_str());glUniformMatrix4fv(loacation, 1, GL_FALSE,glm::value_ptr(matrix));}
}
进一步封装ShaderUniform:
Renderer.h:
#pragma once
#include"RenderCommand.h"
#include "OrthographicCamera.h"
#include"Shader.h"
namespace YOTO {class Renderer {public:static void BeginScene(OrthographicCamera &camera);static void EndScene();static void Submit(const std::shared_ptr<Shader>& shader, const std::shared_ptr<VertexArray>& vertexArray);inline static RendererAPI::API GetAPI() {return RendererAPI::GetAPI();}private:struct SceneData {glm::mat4 ViewProjectionMatrix;};static SceneData* m_SceneData;};}
Renderer.cpp:
#include"ytpch.h"
#include"Renderer.h"
namespace YOTO {Renderer::SceneData* Renderer::m_SceneData = new	Renderer::SceneData;void Renderer::BeginScene(OrthographicCamera& camera){m_SceneData->ViewProjectionMatrix = camera.GetViewProjectionMatrix();}void Renderer::EndScene(){}void Renderer::Submit( const std::shared_ptr<Shader>& shader,const std::shared_ptr<VertexArray>& vertexArray){shader->Bind();shader->UploadUniformMat4("u_ViewProjection", m_SceneData->ViewProjectionMatrix);vertexArray->Bind();RenderCommand::DrawIndexed(vertexArray);}
}
调用:
Application.h:
#pragma once
#include"Core.h"
#include"Event/Event.h"
#include"Event/ApplicationEvent.h"
#include "YOTO/Window.h"
#include"YOTO/LayerStack.h"
#include"YOTO/ImGui/ImGuiLayer.h"#include <YOTO/Renderer/Shader.h>
#include <YOTO/Renderer/Buffer.h>
#include <YOTO/Renderer/VertexArray.h>#include "YOTO/Renderer/OrthographicCamera.h"
namespace YOTO {class YOTO_API Application{public:Application();virtual ~Application();void Run();void OnEvent(Event &e);void PushLayer(Layer* layer);void PushOverlay(Layer* layer);inline static Application& Get() {return * s_Instance;}inline Window& GetWindow() { return *m_Window; }private:bool  OnWindowClosed(WindowCloseEvent& e);std::unique_ptr<Window>  m_Window;ImGuiLayer *  m_ImGuiLayer;bool m_Running = true;LayerStack m_LayerStack;//unsigned int m_VertexArray;std::shared_ptr<Shader> m_Shader;std::shared_ptr<VertexArray> m_VertexArray;std::shared_ptr<Shader> m_BlueShader;std::shared_ptr<VertexArray> m_SquareVA;OrthographicCamera m_Camera;private:static Application* s_Instance;};//在客户端定义Application* CreateApplication();
}
Application.cpp:
#include"ytpch.h"
#include "Application.h"#include"Log.h"
#include "YOTO/Renderer/Renderer.h"
#include"Input.h"namespace YOTO {
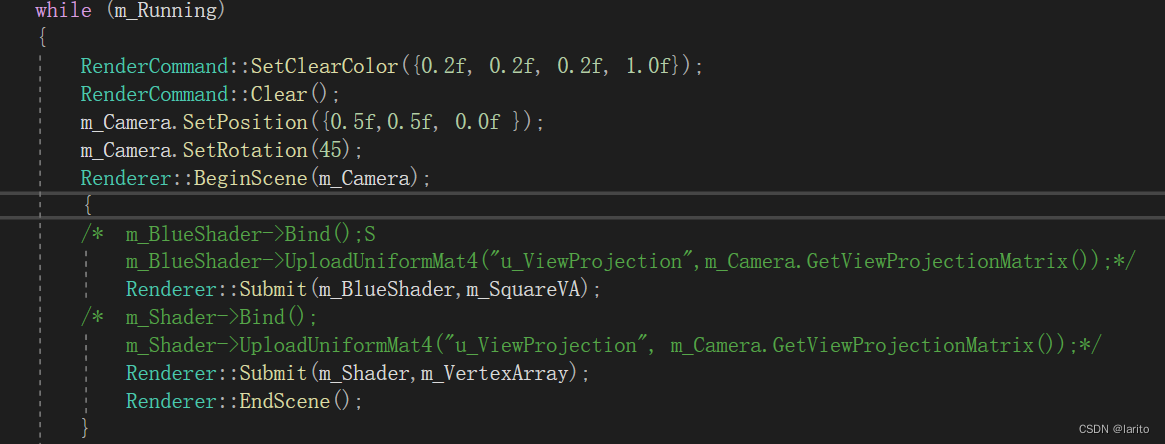
#define BIND_EVENT_FN(x) std::bind(&x, this, std::placeholders::_1)Application* Application::s_Instance = nullptr;Application::Application():m_Camera(-2.0f,2.0f,-2.0f,2.0f){YT_CORE_ASSERT(!s_Instance, "Application需要为空!")s_Instance = this;//智能指针m_Window = std::unique_ptr<Window>(Window::Creat());//设置回调函数m_Window->SetEventCallback(BIND_EVENT_FN(Application::OnEvent));//new一个Layer,放在最后层进行渲染m_ImGuiLayer = new ImGuiLayer();PushOverlay(m_ImGuiLayer); //unsigned int id;//glGenBuffers(1, &id);uint32_t indices[3] = { 0,1,2 };float vertices[3 * 7] = {-0.5f,-0.5f,0.0f, 0.8f,0.2f,0.8f,1.0f,0.5f,-0.5f,0.0f, 0.2f,0.3f,0.8f,1.0f,0.0f,0.5f,0.0f, 0.8f,0.8f,0.2f,1.0f,};m_VertexArray.reset(VertexArray::Create());std::shared_ptr<VertexBuffer> m_VertexBuffer;m_VertexBuffer.reset(VertexBuffer::Create(vertices, sizeof(vertices)));{BufferLayout setlayout = {{ShaderDataType::Float3,"a_Position"},{ShaderDataType::Float4,"a_Color"}};m_VertexBuffer->SetLayout(setlayout);}m_VertexArray->AddVertexBuffer(m_VertexBuffer);std::shared_ptr<IndexBuffer>m_IndexBuffer;m_IndexBuffer.reset(IndexBuffer::Create(indices, sizeof(indices)/sizeof(uint32_t)));m_VertexArray->AddIndexBuffer(m_IndexBuffer);std::string vertexSource = R"(#version 330 corelayout(location = 0) in vec3 a_Position;layout(location = 1) in vec4 a_Color;uniform mat4 u_ViewProjection;out vec3 v_Position;out vec4 v_Color;void main(){v_Position=a_Position;v_Color=a_Color;gl_Position =u_ViewProjection*vec4( a_Position,1.0);})";//绘制颜色std::string fragmentSource = R"(#version 330 corelayout(location = 0) out vec4 color;in vec3 v_Position;in vec4 v_Color;void main(){color=vec4(v_Color);})";m_Shader.reset(new Shader(vertexSource, fragmentSource));///测试/m_SquareVA.reset(VertexArray::Create());float squareVertices[3 * 4] = {-0.5f,-0.5f,0.0f,0.5f,-0.5f,0.0f, 0.5f,0.5f,0.0f,-0.5f,0.5f,0.0f};std::shared_ptr<VertexBuffer> squareVB;squareVB.reset(VertexBuffer::Create(squareVertices, sizeof(squareVertices)));squareVB->SetLayout({{ShaderDataType::Float3,"a_Position"}});m_SquareVA->AddVertexBuffer(squareVB);uint32_t squareIndices[6] = { 0,1,2,2,3,0 };std::shared_ptr<IndexBuffer> squareIB; squareIB.reset((IndexBuffer::Create(squareIndices, sizeof(squareIndices) / sizeof(uint32_t))));m_SquareVA->AddIndexBuffer(squareIB);//测试:std::string BlueShaderVertexSource = R"(#version 330 corelayout(location = 0) in vec3 a_Position;uniform mat4 u_ViewProjection;out vec3 v_Position;void main(){v_Position=a_Position;gl_Position =u_ViewProjection*vec4( a_Position,1.0);})";//绘制颜色std::string BlueShaderFragmentSource = R"(#version 330 corelayout(location = 0) out vec4 color;in vec3 v_Position;void main(){color=vec4(0.2,0.3,0.8,1.0);})";m_BlueShader.reset(new Shader(BlueShaderVertexSource, BlueShaderFragmentSource));}Application::~Application() {}/// <summary>/// 所有的Window事件都会在这触发,作为参数e/// </summary>/// <param name="e"></param>void Application::OnEvent(Event& e) {//根据事件类型绑定对应事件EventDispatcher dispatcher(e);dispatcher.Dispatch<WindowCloseEvent>(BIND_EVENT_FN(Application::OnWindowClosed));//输出事件信息YT_CORE_INFO("Application:{0}",e);for (auto it = m_LayerStack.end(); it != m_LayerStack.begin();) {(*--it)->OnEvent(e);if (e.m_Handled)break;}}bool Application::OnWindowClosed(WindowCloseEvent& e) {m_Running = false;return true;}void Application::Run() {WindowResizeEvent e(1280, 720);if (e.IsInCategory(EventCategoryApplication)) {YT_CORE_TRACE(e);}if (e.IsInCategory(EventCategoryInput)) {YT_CORE_ERROR(e);}while (m_Running){RenderCommand::SetClearColor({0.2f, 0.2f, 0.2f, 1.0f});RenderCommand::Clear();m_Camera.SetPosition({0.5f,0.5f, 0.0f });m_Camera.SetRotation(45);Renderer::BeginScene(m_Camera);{/* m_BlueShader->Bind();m_BlueShader->UploadUniformMat4("u_ViewProjection",m_Camera.GetViewProjectionMatrix());*/Renderer::Submit(m_BlueShader,m_SquareVA);/* m_Shader->Bind();m_Shader->UploadUniformMat4("u_ViewProjection", m_Camera.GetViewProjectionMatrix());*/Renderer::Submit(m_Shader,m_VertexArray);Renderer::EndScene();}for (Layer* layer : m_LayerStack) {layer->OnUpdate();}//将ImGui的刷新放到APP中,与Update分开m_ImGuiLayer->Begin();for (Layer* layer : m_LayerStack) {layer->OnImGuiRender();}m_ImGuiLayer->End();m_Window->OnUpdate();}}void Application::PushLayer(Layer* layer) {m_LayerStack.PushLayer(layer);layer->OnAttach();}void Application::PushOverlay(Layer* layer) {m_LayerStack.PushOverlay(layer);layer->OnAttach();}
}测试:
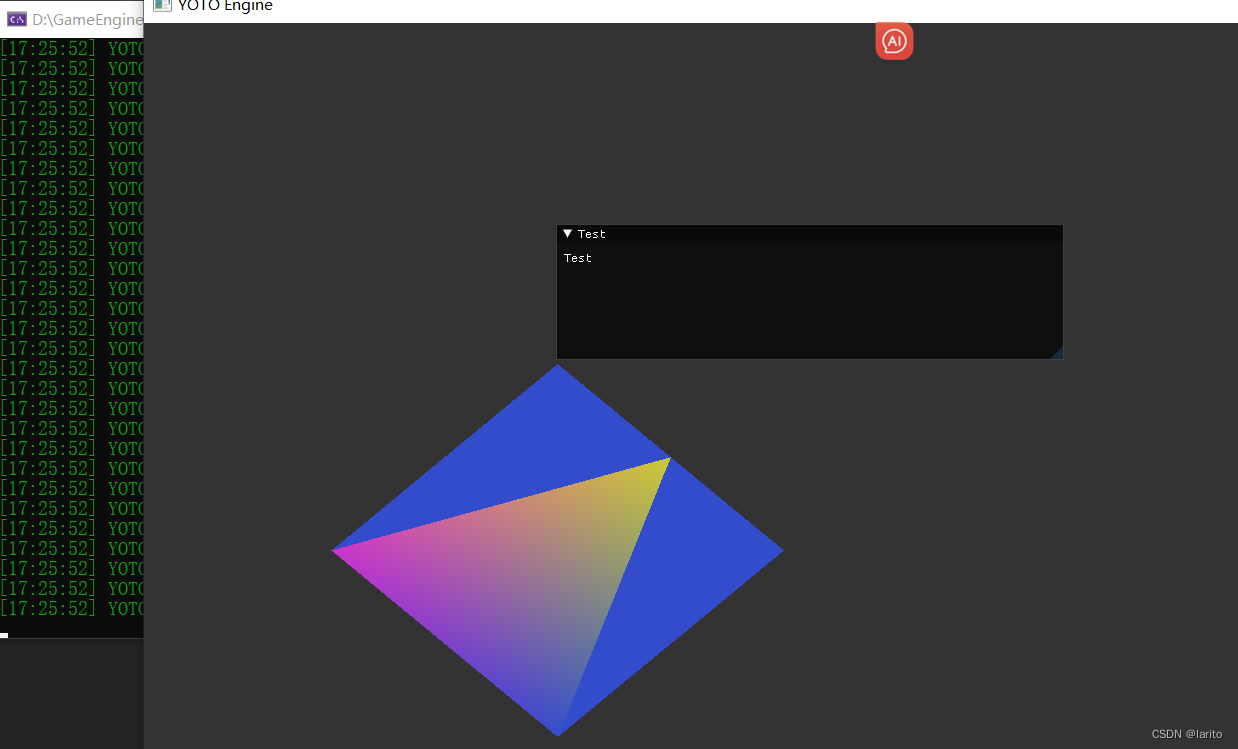
cool!
目前代码比较潦草,甚至有些地方没有注释。计划在渲染出第一个兰伯特模型时对代码架构进行总结。
相关文章:
跟着cherno手搓游戏引擎【16】Camera和Uniform变量的封装
相机封装: OrthographicCamera.h: #pragma once #include <glm/glm.hpp> namespace YOTO {class OrthographicCamera{public:OrthographicCamera(float left,float right , float bottom,float top);const glm::vec3& GetPosition()const { return m_Pos…...
微服务中间件 RabbitMq学习
1、为什么需要Mq 例如在用户注册业务中,用户注册成功后 需要发注册邮件和注册短信,传统的做法有两种 1.串行的方式;2.并行的方式 ; 假设三个业务节点分别使用50ms,串行方式使用时间150ms,并行使用时间10…...

3D Gaussian Splatting-实时辐射场渲染技术
引用自:https://repo-sam.inria.fr/fungraph/3d-gaussian-splatting/3d_gaussian_splatting_high.pdf 概述: 该论文介绍了一种用于实时辐射场渲染的3D高斯点渲染技术。 其基本原理是: 一:首先从SfM校准的图像及其对应的稀疏点云…...
)
vue中nextTick()
在 Vue.js 中,nextTick() 是一个非常有用的方法,用于在下一个 DOM 更新循环结束后执行延迟回调。这在你需要读取或写入刚刚更新的 DOM 时非常有用。 下面是一个简单的示例代码,用于解析 nextTick() 的用法: <template> &…...

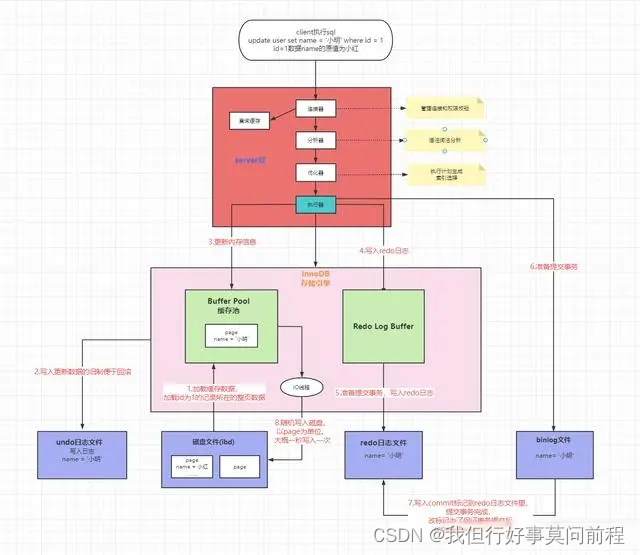
Redis 布隆过滤器
布隆过滤器 这一篇文章主要是记录布隆过滤器的使用和认识 主要参考了如下的blog https://blog.csdn.net/weixin_42972832/article/details/131211665 他讲的还不错 简单的来说,布隆过滤器,实际上就像是一个集合,拿redis的key来举例来说,布隆过滤器的设置就是去过滤不属于redi…...

中国的茶文化:现代生活中的茶文化
中国的茶文化:现代生活中的茶文化 引言 在现代社会的快节奏生活中,茶文化并未随时间流逝而褪色,反而以其独特的方式融入了全球各地人们的日常生活。它超越了饮品本身的范畴,成为一种连接历史、人文与现代生活方式的艺术形式。本文…...
Python正则表达式语法
正则表达式是一种强大的文本处理工具,它可以用来搜索、匹配和替换特定的字符模式。在Python中,正则表达式常常被用于处理字符串数据,例如文本搜索、数据提取、格式验证等任务。本文将深入介绍Python中正则表达式的语法,帮助读者全…...

C++核心编程:文件操作 笔记
5.文件操作 程序运行时产生的数据都属于临时数据,程序一旦允许结束都会被释放。通过文件可以将数据持久化 C中对文件操作需要包含头文件<fstream> 文件类型分为两种: 文本文件 - 文件以文本的ASCII码形式存储在计算机中二进制文件 - 文件以文本…...
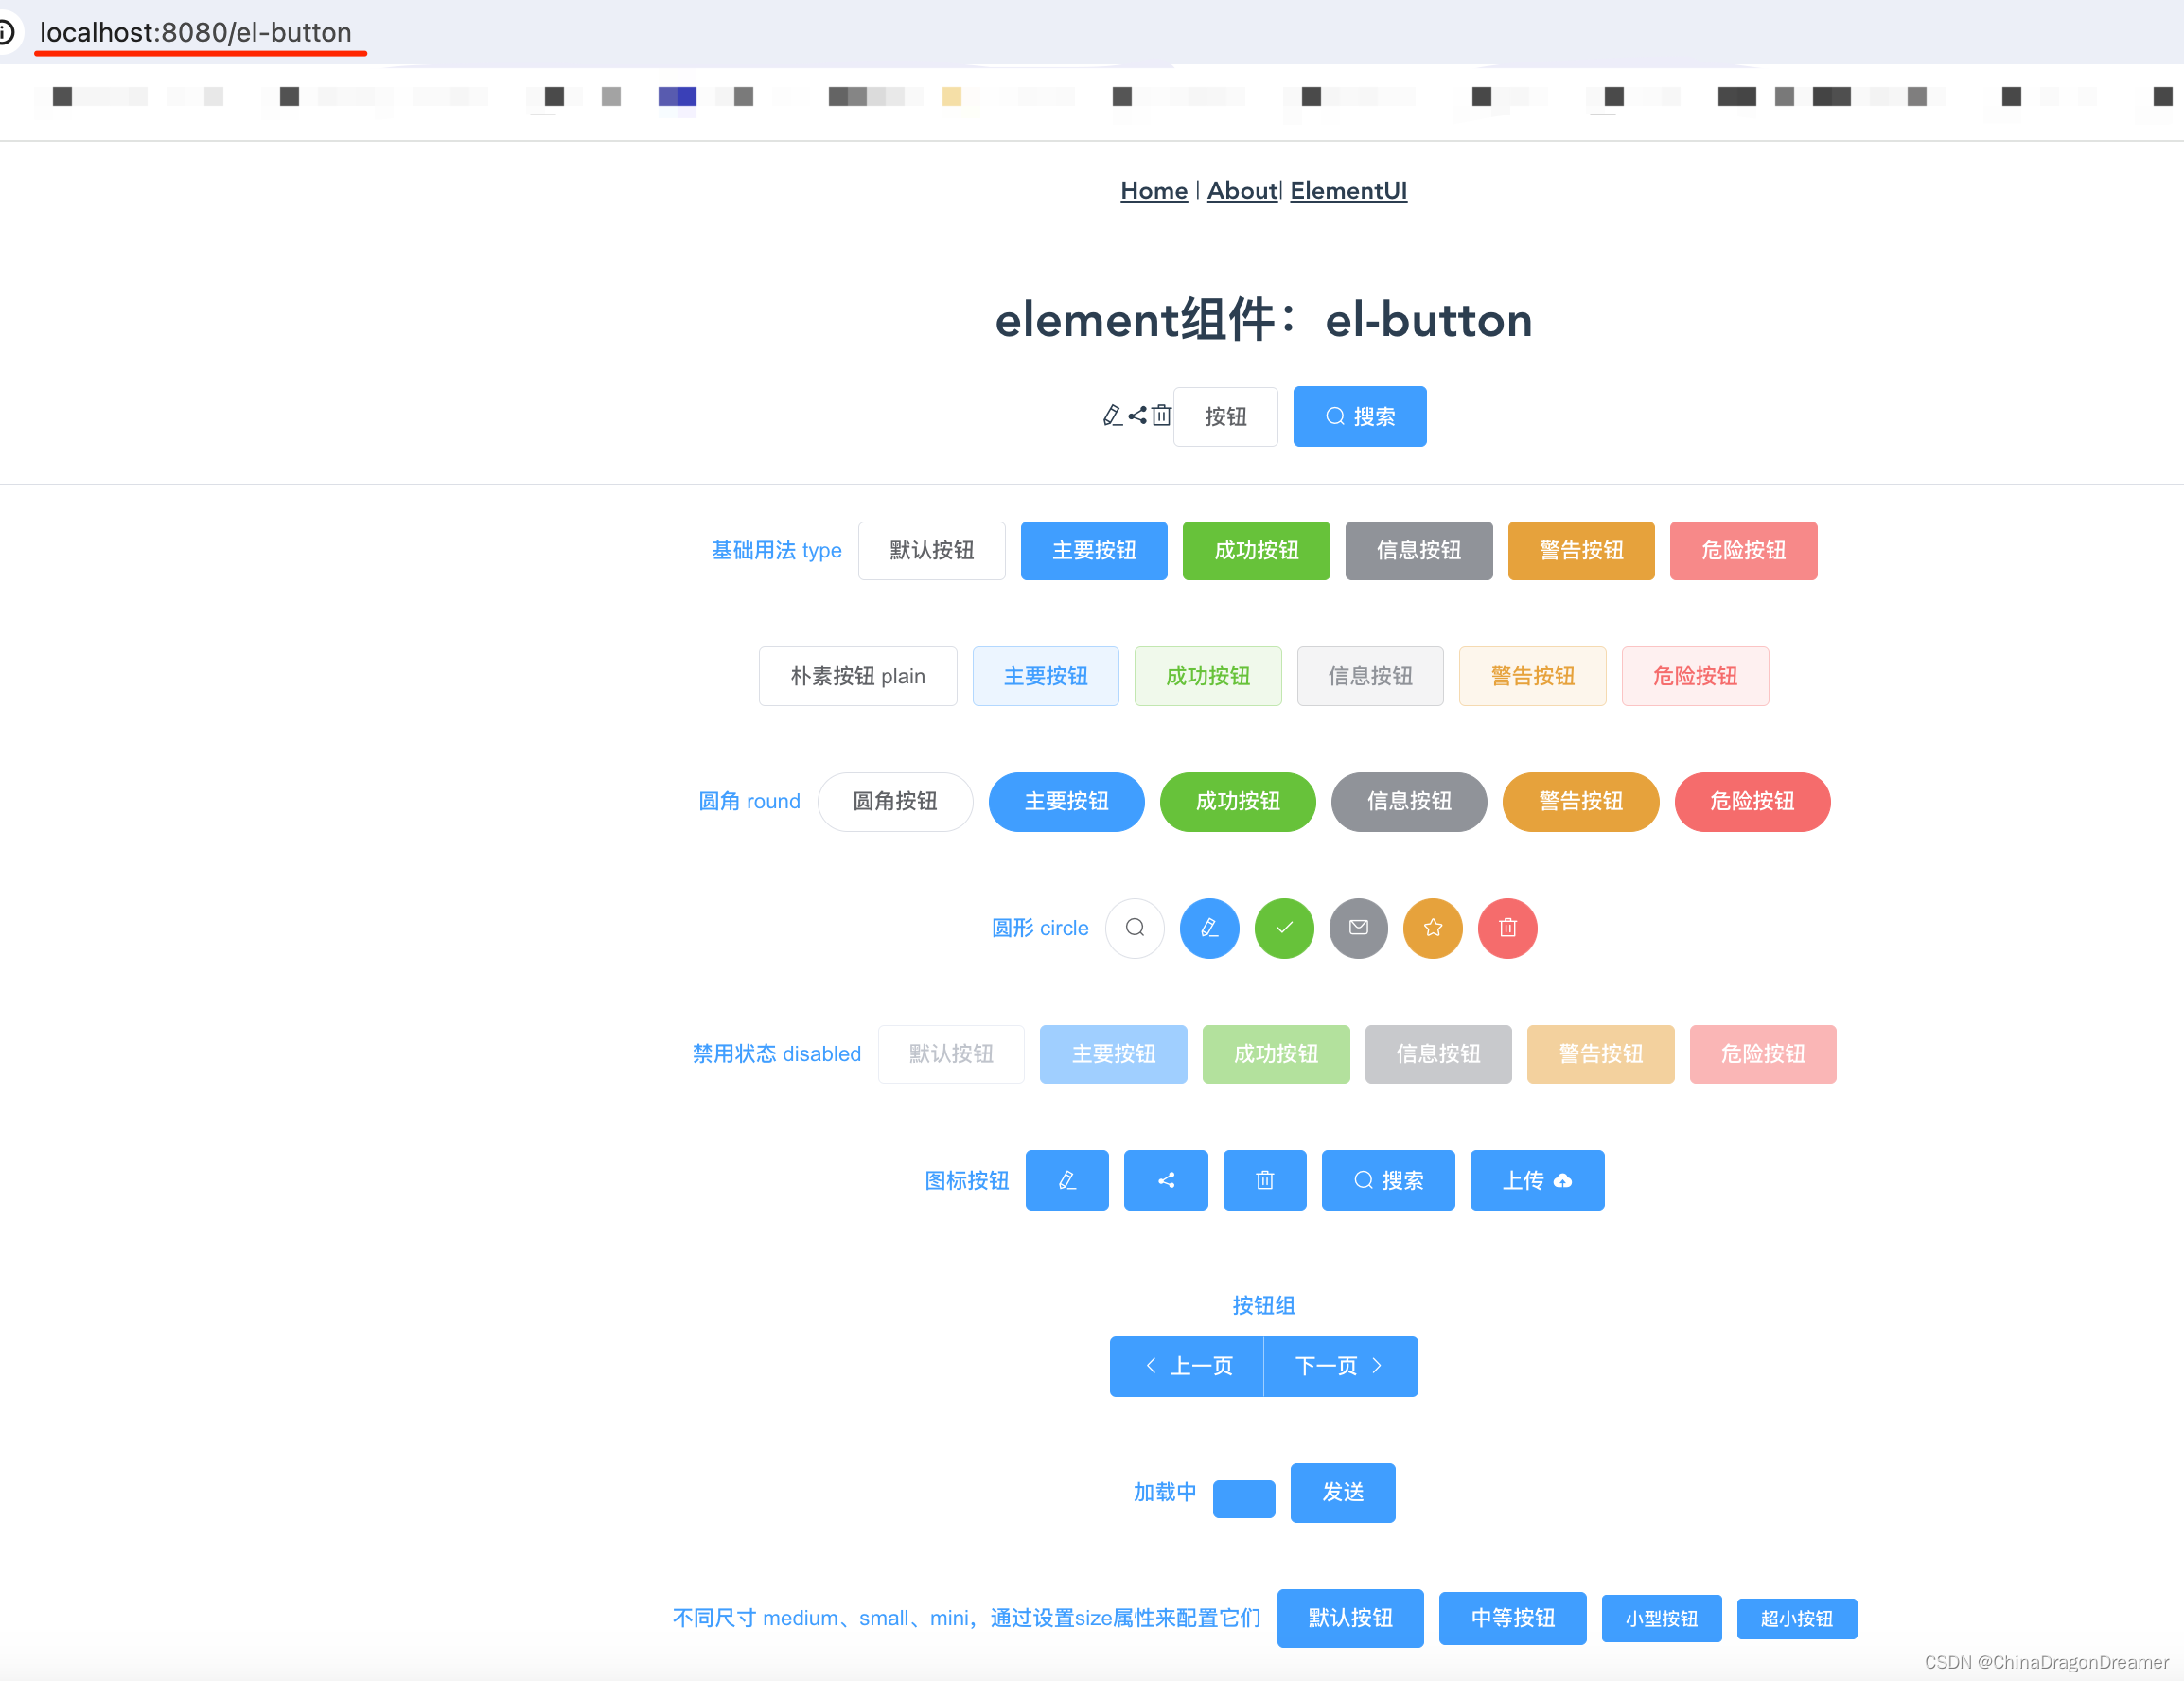
ElementUI组件:Button 按钮
ElementUI安装与使用指南 Button按钮 点击下载learnelementuispringboot项目源码 效果图 el-button.vue页面效果图 项目里el-button.vue代码 <script> export default {name: "el_button",// 注意这里的名称不能和 router inex.js里的name一样methods: {s…...

#RAG|NLP|Jieba|PDF2WORD# pdf转word-换行问题
文档在生成PDF时,文宁都发生了什么。本文讲解了配置对象、resources对象和content对象的作用,以及字体、宇号、坐标、文本摆放等过程。同时,还解释了为什么PDF转word或转文字都是一行一行的以及为什么页眉页脚的问题会加大识别难度。最后提到了文本的编码和PDF中缺少文档结构标…...
solr的原理是什么
1 Java程序里如果有无限for循环的代码导致CPU负载超高,如何排查? 排查Java程序中由于无限循环导致的CPU负载过高的问题,可以按照以下步骤进行: 资源监控: 使用系统命令行工具(如Linux上的top或htop…...

【安装指南】nodejs下载、安装与配置详细教程
目录 🌼一、概述 🍀二、下载node.js 🌷三、安装node.js 🍁四、配置node.js 🌼一、概述 Node.js 是一个基于 Chrome V8 引擎的 JavaScript 运行时,用于构建可扩展的网络应用程序。Node.js 使用事件驱动、…...
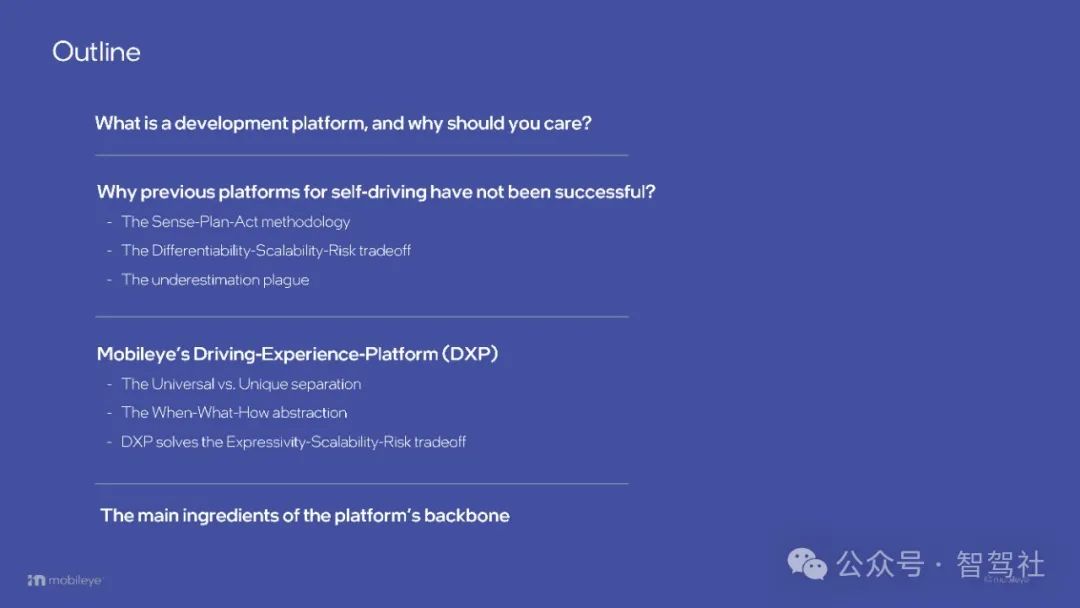
Mobileye CES 2024 自动驾驶新技术新方向
Mobileye亮相2024年国际消费类电子产品展览会推出什么自动驾驶新技术? Mobileye再次亮相CES,展示了我们的最新技术,并推出了Mobileye DXP--我们全新的驾驶体验平台。 与往年一样,Mobileye是拉斯维加斯展会现场的一大亮点,让参观者有机会见证我们对自主未来的愿景。 在…...

【Linux】网络基本配置及网络测试、测试工具
一、网络基本配置 查看网络信息: ifconfigc / ip addr停止网卡eth0: ifconfig eth0 down在本地启动网卡eth0: ifconfig eth0 up改变网卡ip: ifconfig eth0 192.168. .修改子网掩码: ifconfig eth0 (I…...
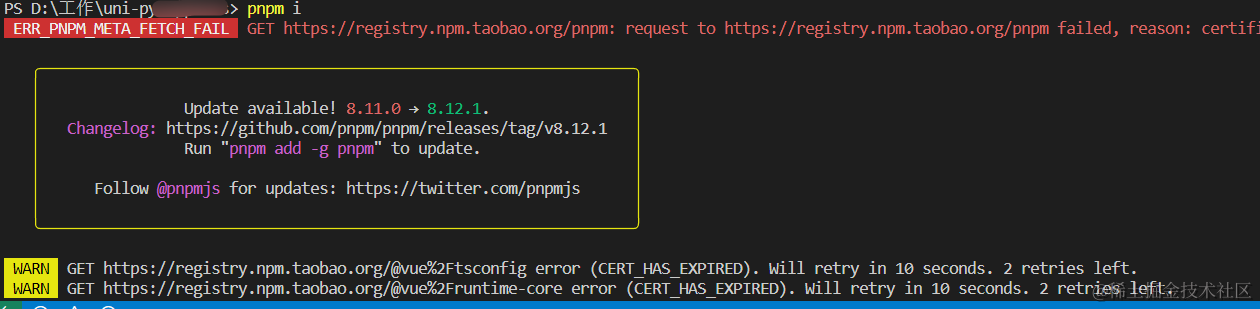
pnpm : 无法加载文件 D:\tool\nvm\nvm\node_global\pnpm.ps1,因为在此系统上禁止运行脚本
你们好,我是金金金。 场景 新创建的项目,在vscode编辑器终端输入 pnpm i,显示报错如上 解决 在终端输入get-ExecutionPolicy(查看执行策略/权限) 输出Restricted(受限的) 终端再次输入Set-ExecutionPolicy -Scope CurrentUser命令给用户赋予…...

Python 类与实例
在面向对象编程中,类(Class)是一种抽象的概念,它描述了对象的属性和行为。类可以看作是创建对象的蓝图或模板,它定义了一组属性和方法,并提供了创建对象的规范。 类包含了对象的属性和方法的定义ÿ…...

2的N次方
题目描述 输入n行,每行一个整数x,输出2的x次方的个位是多少?2的3次方表示3个2相乘,结果是8 输入 输入n行,每行一个整数x 输出 输出n行,每行一个整数,2的x次方的个位。 样例输入 Copy 5 4…...

cobra - 更容易地构建命令行应用
cobra 是什么 cobra 的主要功能是创建强大的现代 cli 应用程序。目前市面上许多的著名的 Go 语言开源项目都是使用 Cobra 来构建的,例如:K8s、Hugo、etcd、Docker 等,是非常可靠的一个开源项目。 没有 cobra 之前用什么 如果不用 cobra&am…...

windows10设置多个jar后台开机自启
1、window10启动多个jar包的脚本 新建一个txt文档,将以下内容复制到文档中: echo off taskkill /f /im javaw.exe //停用之前启动过的所有后台javaw程序 d: //jar包所在盘符 cd saas //jar包所在文件夹 start cmd /c "title 程序…...

数据库||数据库相关知识练习题目与答案
目录 1.只能读取本系学生的信息? 2.要查询选修“Computer”课的男生姓名,将涉及到关系( ) 3.实体完整性规则规定( ) 4.下列有关范式的叙述中正确的是( ) 5.从课程表course&…...

CVE、CNVD、CNNVD、NVD四大漏洞编号体系深度解析
1. 这些字母组合不是密码,而是漏洞世界的“身份证号” 刚入行做安全运维那会儿,我在日报里看到一条告警:“检测到 CVE-2021-44228 漏洞利用尝试”,顺手抄下来准备查资料,结果一搜发现——同一款 Log4j 组件,…...

鸿蒙electron跨端框架PC导出管家实战:把交付前的检查、复制和导出做成一个工坊
前言 欢迎加入鸿蒙PC开发者社区,共同打造开发者工具生态:鸿蒙PC开发者社区 :https://harmonypc.csdn.net/ 项目开源地址:https://AtomGit.com/lqjmac/ele-daochuguanjia 我做 导出管家 时最先确认的,不是颜色和布局…...

Harness与Agent SDK的边界划分:最佳实践
Harness与Agent SDK的边界划分:最佳实践 引言 在云原生软件交付的下半场,企业面临的核心矛盾已经从「有没有工具链」变成了「能不能把工具链用出价值」。作为全球领先的软件交付平台(SDP),Harness凭借开箱即用的CI/CD、Feature Flag、混沌工程、合规治理等能力,已经成为…...

AI系列【仅供参考】:TRAE 支持自定义模型了,配置个 DeepSeek V4 试试
TRAE 支持自定义模型了,配置个 DeepSeek V4 试试TRAE 支持自定义模型了,配置个 DeepSeek V4 试试原因解决方案底下评论问题一:回答一:回答二:回答三:问题二:回答一:问题三࿱…...

通过curl命令调试Taotoken大模型API,快速排查接入问题
🚀 告别海外账号与网络限制!稳定直连全球优质大模型,限时半价接入中。 👉 点击领取海量免费额度 通过curl命令调试Taotoken大模型API,快速排查接入问题 在接入大模型服务时,直接使用HTTP请求进行调试是一种…...
)
【小白快速上手】Windows 系统 OpenClaw v2.7.5 一键部署完整教程(包含安装包)
OpenClaw 一键安装完整教程(2026 最新) 适配系统:Windows10/11 64 位当前版本:v2.7.5(虾壳云版)文件大小:约 58.7MB下载地址:https://xiake.yun/api/download/package/16?promoCod…...

Spring Boot + MyBatis服务启动流程,新增代码跑通流程,映射规则,常见问题定位
一、服务启动流程 零代码(仅需配置文件和依赖)。 顺序固定,由框架保证。 一旦某个步骤失败(如 XML 解析错误),整个启动失败。 二、新增代码跑通流程 全手动,需熟悉 MyBatis 映射规则、Spring…...
)
当大模型遇见嵌入式MCU:RISC-V+TinyML+Agent状态机的超低功耗智能体设计(STM32H7实测待机功耗仅2.1mW)
更多请点击: https://codechina.net 第一章:AI Agent边缘计算应用 AI Agent在边缘计算场景中正从“云端智能”转向“端侧自治”,通过轻量化模型、实时推理与本地决策能力,显著降低延迟、带宽依赖与数据隐私风险。典型应用包括工业…...

排水管网可视化管理平台,免巡检、故障快速定位
城市排水管网线路长、节点多、覆盖范围广,传统人工巡检模式面临诸多痛点:巡检人员需步行逐一排查井盖、泵站、溢流口等关键设施,工作强度大、效率低,且难以保证巡检到位率和覆盖率。此外,人工无法全天候进行监管&#…...

2026年B2B制造业GEO优化服务商推荐:工业品牌AI搜索可见度提升实战指南
摘要:B2B制造业的品牌营销与消费品逻辑完全不同——技术参数、行业资质、项目案例才是AI推荐的核心素材。本文从B2B行业理解深度、结构化内容能力、合规安全保障三个维度,对比泓动数据、百分点科技、赛诺贝斯、大树科技、Laver AI五家服务商在工业制造业…...