QML用ListView实现带section的GridView
QML自带的GridView只能定义delegate,没有section,类似手机相册带时间分组标签的样式就没法做。最简单的方式就是组合ListView+GridView,或者ListView+Flow,但是嵌套View时,子级View一般是完全展开的,只显示该分组几行就得把该分组全部加载了,这样就没有了View在需要时才实例化Item的优势,所以最好还是在单层View实现最终效果。
QML的ListView支持section,可以自定义分组样式,所以可以通过ListView来实现带section的GridView。当然,你也可以直接修改GridView的C++源码给他加上section。
ListView实现GridView的效果无非就是把多行显示到一行。可以让ListView某一行撑高,其他行高度为0;也可以平均分配一行高度。因为delegate会被ListView控制位置,所以相对位置可以在内部嵌套然后设置偏移量,使之看起来在一行上。
本文完整代码:
https://github.com/gongjianbo/MyTestCode/tree/master/Qml/TestQml_20240205_SectionGrid
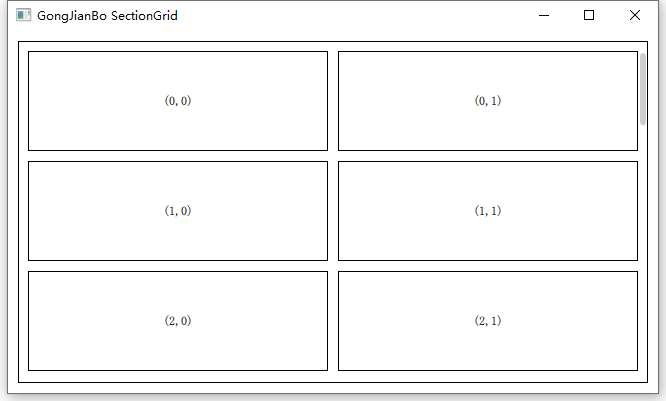
先实现一个不带section的GridView:
import QtQuick 2.15
import QtQuick.Controls 2.15// ListView 实现 GridView 效果
Rectangle {id: controlborder.color: "black"// 边距property int padding: 10// Item 间隔property int spacing: 10// Item 宽property int itemWidth: 300// Item 高property int itemHeight: 100// Delegate 宽property int delegateWidth: itemWidth + spacing// Delegate 高property int delegateHeight: itemHeight + spacing// 列数根据可视宽度和 Item 宽度计算property int columns: (list_view.width + spacing - padding) / delegateWidth < 1? 1: (list_view.width + spacing - padding) / delegateWidth// 套一层 Item clip 剪去 ListView 尾巴上多余的部分不显示出来Item {anchors.fill: parentanchors.margins: control.padding// 右侧留下滚动条位置,所以 columns 里 list_view.width 要减一个 paddinganchors.rightMargin: 0clip: trueListView {id: list_viewwidth: parent.width// 高度多一个 delegate 放置 footer,防止末尾的一行滑倒底部后隐藏// 多出来的一部分会被外部 Item clip 掉height: parent.height + control.delegateHeight + control.spacingflickableDirection: Flickable.HorizontalAndVerticalFlickboundsBehavior: Flickable.StopAtBoundsheaderPositioning: ListView.OverlayHeader// 底部多一个 footer 撑高可显示范围,防止末尾的一行滑倒底部后隐藏footerPositioning: ListView.OverlayFooterScrollBar.vertical: ScrollBar {// padding 加上 ListView 多出来的一部分bottomPadding: padding + (control.delegateHeight + control.spacing)// 常驻显示只是方便调试policy: ScrollBar.AlwaysOn}footer: Item {// 竖向的 ListView 宽度无所谓width: control.delegateWidth// 高度大于等于 delegate 高度才能保证显示height: control.delegateHeight}// 奇数方便测试model: 31delegate: Item {width: control.delegateWidth// 每行第一个 Item 有高度,后面的没高度,这样就能排列到一行// 因为 0 高度 Item 在末尾,超出范围 visible 就置为 false 了,所以才需要 footer 撑高多显示一行的内容// delegate 高度不一致会导致滚动条滚动时长度变化height: (model.index % control.columns === 0) ? control.delegateHeight : 0// 放置真正的内容Rectangle {// 根据列号计算 xx: (model.index % control.columns) * control.delegateWidth// 负高度就能和每行第一个的 y 一样y: (model.index % control.columns !== 0) ? -control.delegateHeight : 0width: control.itemWidthheight: control.itemHeightborder.color: "black"Text {anchors.centerIn: parent// 显示行号列号text: "(%1,%2)".arg(parseInt(model.index / control.columns)).arg(model.index % control.columns)}}}}}
}
如果要带section,就得每个分组有单独的index,这样才能计算分组内的行列号,需要我们自定义一个ListModel:
#pragma once
#include <QAbstractListModel>// 实际数据
struct DataInfo
{int value;// 本例用日期来分组QString date;
};// 分组信息,如 index
struct SectionInfo
{int index;
};class DataModel : public QAbstractListModel
{Q_OBJECT
private:enum ModelRole {ValueRole = Qt::UserRole, GroupNameRole, GroupIndexRole};
public:explicit DataModel(QObject *parent = nullptr);// Model 需要实现的必要接口int rowCount(const QModelIndex &parent = QModelIndex()) const override;QVariant data(const QModelIndex &index, int role = Qt::DisplayRole) const override;QHash<int, QByteArray> roleNames() const override;// 在头部添加一个数据Q_INVOKABLE void appendData(int value, const QString &date);// 根据 model.index 删除一个数据Q_INVOKABLE void removeData(int index);// 加点测试数据void test();private:QVector<DataInfo> datas;QVector<SectionInfo> inners;
};DataModel::DataModel(QObject *parent): QAbstractListModel(parent)
{test();
}int DataModel::rowCount(const QModelIndex &parent) const
{if (parent.isValid())return 0;return datas.size();
}QVariant DataModel::data(const QModelIndex &index, int role) const
{if (!index.isValid())return QVariant();auto &&item = datas.at(index.row());auto &&inner = inners.at(index.row());switch (role){case ValueRole: return item.value;case GroupNameRole: return item.date;case GroupIndexRole: return inner.index;}return QVariant();
}QHash<int, QByteArray> DataModel::roleNames() const
{static QHash<int, QByteArray> names{{ValueRole, "value"}, {GroupNameRole, "groupName"}, {GroupIndexRole, "groupIndex"}};return names;
}void DataModel::appendData(int value, const QString &date)
{// 先判断分组是否相同if (datas.isEmpty() || datas.first().date != date) {// 没有该组,新建一个分组DataInfo item;item.value = value;item.date = date;SectionInfo inner;inner.index = 0;beginInsertRows(QModelIndex(), 0, 0);datas.push_front(item);inners.push_front(inner);endInsertRows();} else {// 已有该组,插入并移动该组后面的 ItemDataInfo item;item.value = value;item.date = date;SectionInfo inner;inner.index = 0;beginInsertRows(QModelIndex(), 0, 0);datas.push_front(item);inners.push_front(inner);endInsertRows();// 刷新该组int update_count = 0;// 0 是新插入,1 是旧 0for (int i = 1; i < inners.size(); i++) {auto &&inner_i = inners[i];if (i > 1 && inner_i.index == 0)break;inner_i.index = i;update_count ++;}emit dataChanged(QAbstractListModel::index(1, 0), QAbstractListModel::index(1 + update_count, 0));}
}void DataModel::removeData(int index)
{if (index < 0 || index >= datas.size())return;beginRemoveRows(QModelIndex(), index, index);datas.removeAt(index);inners.removeAt(index);endRemoveRows();int update_count = 0;for (int i = index; i < inners.size(); i++) {auto &&inner_i = inners[i];if (inner_i.index == 0)break;inner_i.index -= 1;update_count ++;}if (update_count > 0) {emit dataChanged(QAbstractListModel::index(index, 0), QAbstractListModel::index(index + update_count, 0));}
}void DataModel::test()
{DataInfo item;SectionInfo inner;item.date = "2022.2.22";for (int i = 0; i < 11; i++){item.value = i + 1;datas.push_back(item);inner.index = i;inners.push_back(inner);}item.date = "2010.10.10";for (int i = 0; i < 21; i++){item.value = i + 1;datas.push_back(item);inner.index = i;inners.push_back(inner);}item.date = "1999.9.9";for (int i = 0; i < 31; i++){item.value = i + 1;datas.push_back(item);inner.index = i;inners.push_back(inner);}
}
import QtQuick 2.15
import QtQuick.Controls 2.15
import Test 1.0// ListView 实现带 section 分组的 GridView
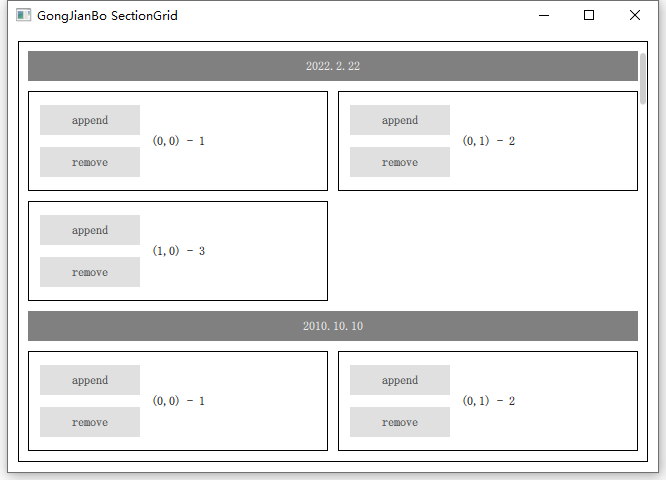
Rectangle {id: controlborder.color: "black"// 边距property int padding: 10// Item 间隔property int spacing: 10// Item 宽property int itemWidth: 300// Item 高property int itemHeight: 100// Delegate 宽property int delegateWidth: itemWidth + spacing// Delegate 高property int delegateHeight: itemHeight + spacing// 列数根据可视宽度和 Item 宽度计算property int columns: (list_view.width + spacing - padding) / delegateWidth < 1? 1: (list_view.width + spacing - padding) / delegateWidth// 套一层 Item clip 剪去 ListView 尾巴上多余的部分不显示出来Item {anchors.fill: parentanchors.margins: control.padding// 右侧留下滚动条位置,所以 columns 里 list_view.width 要减一个 paddinganchors.rightMargin: 0clip: trueListView {id: list_viewwidth: parent.width// 高度多一个 delegate 放置 footer,防止末尾的一行滑倒底部后隐藏// 多出来的一部分会被外部 Item clip 掉height: parent.height + control.delegateHeight + control.spacingflickableDirection: Flickable.HorizontalAndVerticalFlickboundsBehavior: Flickable.StopAtBoundsheaderPositioning: ListView.OverlayHeader// 底部多一个 footer 撑高可显示范围,防止末尾的一行滑倒底部后隐藏footerPositioning: ListView.OverlayFooterScrollBar.vertical: ScrollBar {// padding 加上 ListView 多出来的一部分bottomPadding: padding + (control.delegateHeight + control.spacing)// 常驻显示只是方便调试policy: ScrollBar.AlwaysOn}footer: Item {// 竖向的 ListView 宽度无所谓width: control.delegateWidth// 高度大于等于 delegate 高度才能保证显示height: control.delegateHeight}model: DataModel {id: list_model}section {property: "groupName"criteria: ViewSection.FullStringdelegate: Item {width: list_view.width - control.paddingheight: 40Rectangle {width: parent.widthheight: parent.height - control.spacingcolor: "gray"Text {anchors.centerIn: parenttext: sectioncolor: "white"}}}labelPositioning: ViewSection.InlineLabels}delegate: Item {width: control.delegateWidth// 每行第一个 Item 有高度,后面的没高度,这样就能排列到一行// 因为 0 高度 Item 在末尾,超出范围 visible 就置为 false 了,所以才需要 footer 撑高多显示一行的内容// delegate 高度不一致会导致滚动条滚动时长度变化height: (model.groupIndex % control.columns === 0) ? control.delegateHeight : 0// 放置真正的内容Rectangle {// 根据列号计算 xx: (model.groupIndex % control.columns) * control.delegateWidth// 负高度就能和每行第一个的 y 一样y: (model.groupIndex % control.columns !== 0) ? -control.delegateHeight : 0width: control.itemWidthheight: control.itemHeightborder.color: "black"Text {anchors.centerIn: parent// 显示行号列号text: "(%1,%2) - %3".arg(parseInt(model.groupIndex / control.columns)).arg(model.groupIndex % control.columns).arg(model.value)}Column {x: 12anchors.verticalCenter: parent.verticalCenterspacing: 12Button {width: 100height: 30text: "append"onClicked: {list_model.appendData(model.value, "2222.2.22")}}Button {width: 100height: 30text: "remove"onClicked: {list_model.removeData(model.index)}}}}} // end delegate Item} // end ListView}
}
这里只是实现了一个简单的效果,很多细节还需要调整。
通过添加更多的属性和计算,也可以实现带section的FlowView,即Item的宽高不是固定大小,整体为流式布局。
相关文章:
QML用ListView实现带section的GridView
QML自带的GridView只能定义delegate,没有section,类似手机相册带时间分组标签的样式就没法做。最简单的方式就是组合ListViewGridView,或者ListViewFlow,但是嵌套View时,子级View一般是完全展开的,只显示该…...

docker之程序镜像的制作
目录 一、每种资源的预安装(基础) 安装 nginx安装 redis 二、dockerfile文件制作(基础) 打包 redis 镜像 创建镜像制作空间制作dockerfile 打包 nginx 镜像 三、创建组合镜像(方式一) 生成centos容器并…...

Git - 每次 git pull/push 时需要账号和密码解决方案
问题描述 在提交项目代码或者拉取代码的时候,每次 git 都要输入用户名密码,很烦~ 解决方案 让服务器记下来用户名和密码,此时输入一次,以后再 git push /pull 的时候就不用再输账号和密码了 # 配置 git 记录用户名和密码 git c…...

C语言中在main函数之后运行的函数
在 Linux 平台上,atexit 函数同样是一个用于注册终止处理函数的库函数,它是 C 标准库 <stdlib.h> 的一部分。atexit 函数允许你注册一个或多个函数,这些函数会在 main 函数执行结束后,或者在调用 exit 函数时,由…...
pytorch训练指标记录之tensoboard,wandb
详解Tensorboard及使用教程_tensorboard怎么用-CSDN博客文章浏览阅读5.1w次,点赞109次,收藏456次。目录一、什么是Tensorboard二、配置Tensorboard环境要求安装三、Tensorboard的使用使用各种add方法记录数据单条曲线(scalar)多条曲线(scalars)直方图(hi…...

C语言——oj刷题——实现字符串逆序
当我们需要逆序一个字符串的内容时,可以通过C语言编写一个函数来实现。下面将详细介绍如何通过C语言实现这个功能,并附上代码示例。 1、实现原理 要逆序一个字符串的内容,可以使用两个指针来交换字符串中对应位置的字符。具体实现原理如下&am…...
空气质量预测 | Matlab实现基于SVR支持向量机回归的空气质量预测模型
文章目录 效果一览文章概述源码设计参考资料效果一览 文章概述 政府机构使用空气质量指数 (AQI) 向公众传达当前空气污染程度或预测空气污染程度。 随着 AQI 的上升,公共卫生风险也会增加。 不同国家有自己的空气质量指数,对应不同国家的空气质量标准。 基于支持向量机(Su…...

Vue中的请求拦截器
目录 1 前言 2 使用方法 2.1 创建拦截器 2.2 引入拦截器 1 前言 我们常常会使用JWT令牌来验证登录,因此很多请求都需要携带JWT令牌,我们当然可以用{headers:{Authorization:xx}}的方式,向每个请求中都以这样的方式添加JWT令牌。不过这样…...
Java奠基】对象数组练习
目录 商品对象信息获取 商品对象信息输入 商品对象信息计算 商品对象信息统计 学生数据管理实现 商品对象信息获取 题目要求是这样的: 定义数组存储3个商品对象。 商品的属性:商品的id,名字,价格,库存。 创建三个…...

排序算法---快速排序
原创不易,转载请注明出处。欢迎点赞收藏~ 快速排序是一种常用的排序算法,采用分治的策略来进行排序。它的基本思想是选取一个元素作为基准(通常是数组中的第一个元素),然后将数组分割成两部分,其中一部分的…...
算法||实现典型数据结构的查找、添加和删除数据 并分析其时间和空间复杂度
实现典型数据结构的查找、添加和删除数据 并分析其时间和空间复杂度 线性结构: 数组:是一种线性表数据结构,它用一组连续的内存空间,来存储一组具有相同类型的数据。 查找数据 :随机访问 流程图 /** 查询元素下标…...

【蓝桥杯冲冲冲】Invasion of the Milkweed G
【蓝桥杯冲冲冲】Invasion of the Milkweed G 蓝桥杯备赛 | 洛谷做题打卡day30 文章目录 蓝桥杯备赛 | 洛谷做题打卡day30[USACO09OCT] Invasion of the Milkweed G题目描述输入格式输出格式样例 #1样例输入 #1样例输出 #1 题解代码我的一些话 [USACO09OCT] Invasion of the Mi…...
【JAVA WEB】 百度热榜实现 新闻页面 Chrome 调试工具
目录 百度热榜 新闻页面 Chrome 调试工具 --查看css属性 打开调试工具的方式 标签页含义 百度热榜 实现效果: 实现代码 <!DOCTYPE html> <html lang"en"> <head><meta charset"UTF-8"><meta name"vi…...
Linux——动静态库
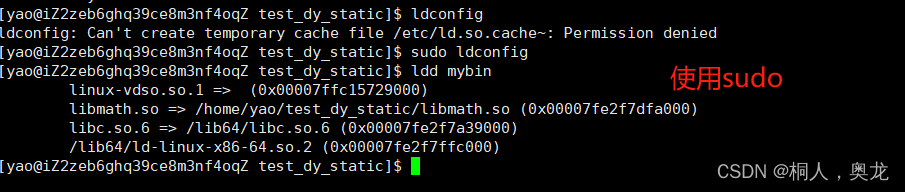
基础知识:动vs静 类型动静加载时机运行时编译时可复用性多个文件只需要加载一份库文件每个文件都需要加载一份文件性能链接次数越多越有优势链接次数越少越有优势 代码编写 静态库 生成静态库 libmath.a:add.o sub.oar -rc $ $^%.o:%.cgcc -c $<使用静态库 头文件和工…...
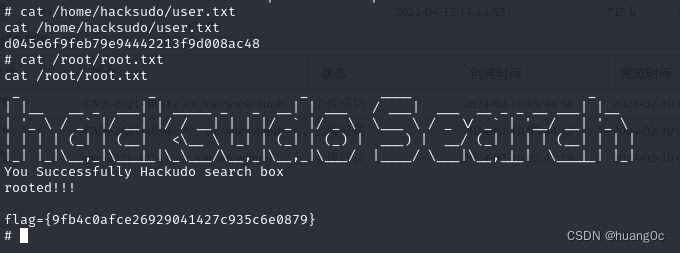
Vulnhub靶机:hacksudo-search
一、介绍 运行环境:Virtualbox 攻击机:kali(10.0.2.15) 靶机:hacksudo-search(10.0.2.50) 目标:获取靶机root权限和flag 靶机下载地址:https://download.vulnhub.co…...

Leetcode 188 买卖股票的最佳时机 IV
题意理解: 给你一个整数数组 prices 和一个整数 k ,其中 prices[i] 是某支给定的股票在第 i 天的价格。 设计一个算法来计算你所能获取的最大利润。你最多可以完成 k 笔交易。也就是说,你最多可以买 k 次,卖 k 次。 注意…...
win32编程系统BUG(Win32 API中的WM_SETTEXT消息)
由于频繁使用Win32 API中的WM_SETTEXT消息,导致内存占用直线上升。 暂未找到有效解决方案。...
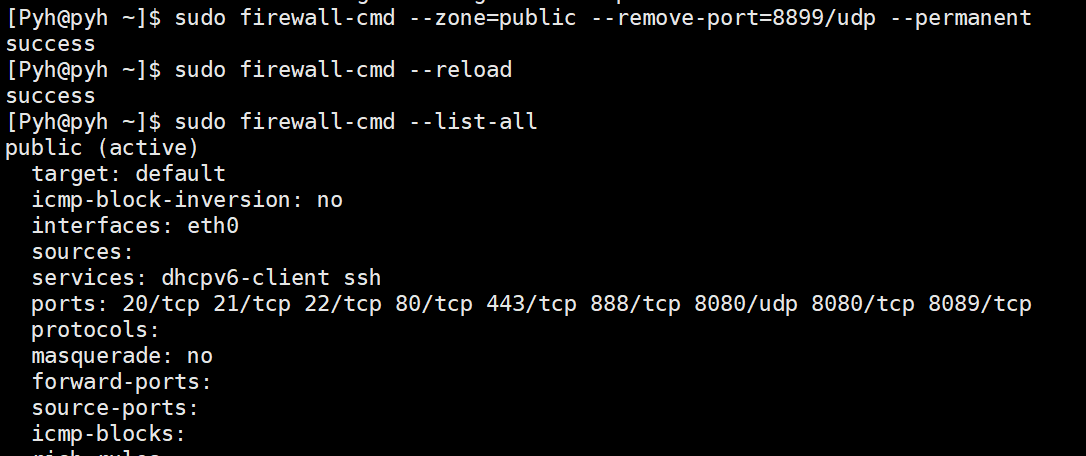
Linux防火墙开放
记录一次问题 写的网络服务无法通信 代码没问题,IP绑定、端口绑定没问题,就是无法进行通信,这里要分2步走。 服务器控制台开放 进入防火墙 添加规则,这里以开放udp的8899端口为例 这里在服务器后台就已经开放了,但此时…...
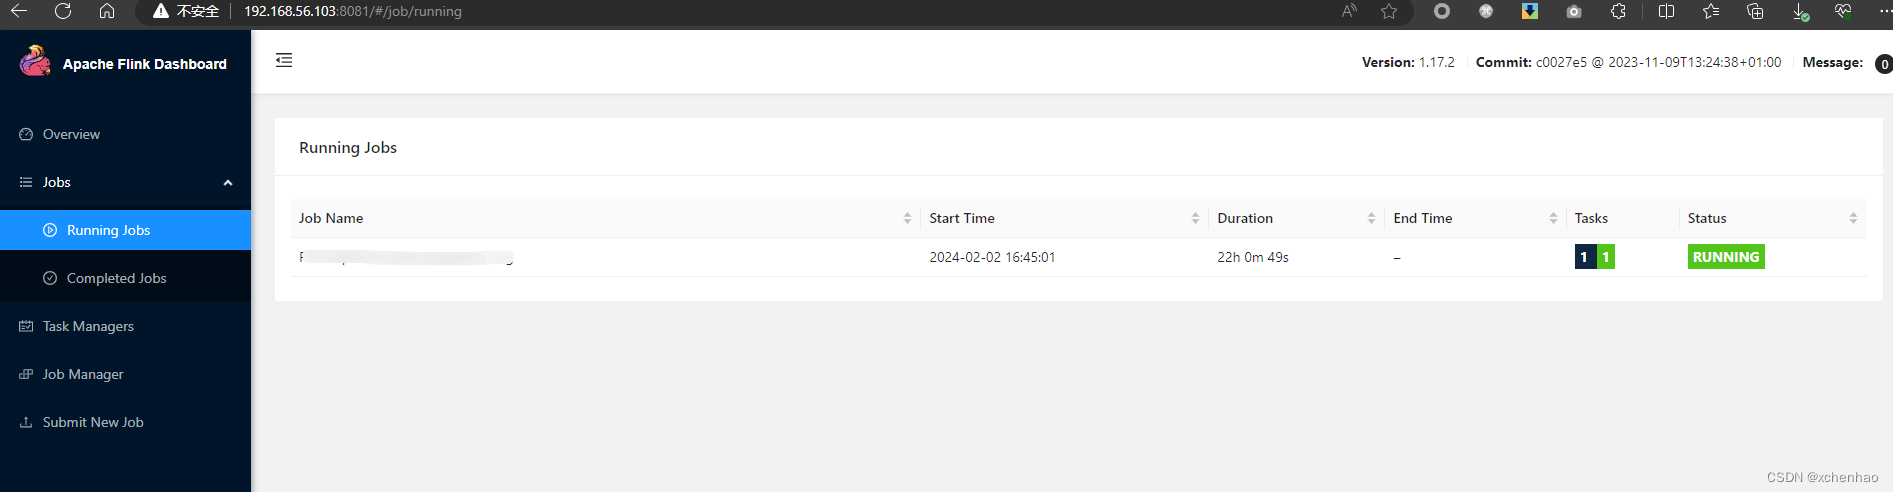
通过 docker-compose 部署 Flink
概要 通过 docker-compose 以 Session Mode 部署 flink 前置依赖 Docker、docker-composeflink 客户端docker-compose.yml version: "2.2" services:jobmanager:image: flink:1.17.2ports:- "8081:8081"command: jobmanagervolumes:- ${PWD}/checkpoin…...
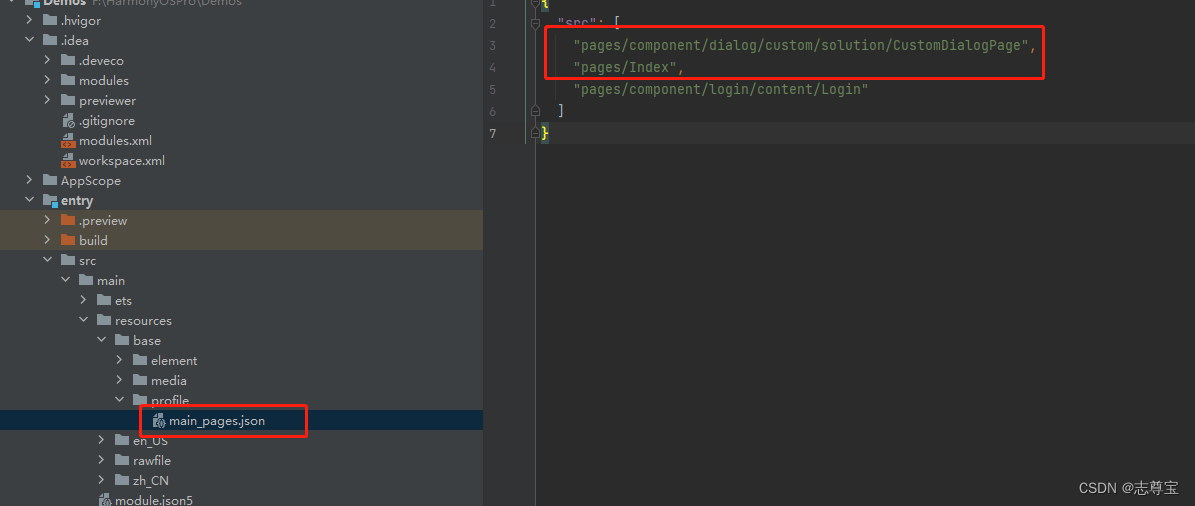
HarmonyOS ArkTS修改App的默认加载的界面(二十)
前言:在Android开发中想要修改默认启动页,只需要在AndroidManifest.xml中设置即可 只需要在启动的activity种添加如下属性即可 <intent-filter><action android:name"android.intent.action.MAIN" /><category android:name&qu…...

dropin-minimal-css框架质量评估标准:如何选择最适合的CSS框架
dropin-minimal-css框架质量评估标准:如何选择最适合的CSS框架 【免费下载链接】dropin-minimal-css Drop-in switcher for previewing minimal CSS frameworks 项目地址: https://gitcode.com/gh_mirrors/dr/dropin-minimal-css 在当今前端开发的世界中&…...

别再只盯着X16了!深入聊聊M.2、Mini-PCIE这些‘变种’接口的电路设计异同与选型指南
别再只盯着X16了!深入聊聊M.2、Mini-PCIE这些‘变种’接口的电路设计异同与选型指南 在高速接口的世界里,X16规格的PCIe插槽往往占据着聚光灯下的位置。但当我们把视线转向紧凑型设备、嵌入式系统或高性能存储解决方案时,M.2和Mini-PCIe这些&…...

PSoC时钟系统深度解析:从架构原理到配置避坑指南
1. 项目概述:为什么PSoC的时钟值得你花时间研究?如果你刚开始接触Cypress(现Infineon)的PSoC系列微控制器,可能会觉得它的开发环境PSoC Creator功能强大但有点复杂。在众多需要配置的模块里,时钟系统往往是…...

新手教程使用curl命令一分钟测试Taotoken的OpenAI兼容API
🚀 告别海外账号与网络限制!稳定直连全球优质大模型,限时半价接入中。 👉 点击领取海量免费额度 新手教程:使用curl命令一分钟测试Taotoken的OpenAI兼容API 本文面向刚获取Taotoken API Key的开发者,目标是…...

Windows HEIC缩略图插件:为什么你的iPhone照片在Windows上无法预览?
Windows HEIC缩略图插件:为什么你的iPhone照片在Windows上无法预览? 【免费下载链接】windows-heic-thumbnails Enable Windows Explorer to display thumbnails for HEIC/HEIF files 项目地址: https://gitcode.com/gh_mirrors/wi/windows-heic-thumb…...

EFFACT架构:全同态加密硬件加速的创新设计
1. EFFACT架构概述:当硬件设计遇上全同态加密在密码学加速器的世界里,我们一直在寻找一个平衡点——如何在有限的芯片面积和功耗预算下,处理那些看似无解的复杂计算?EFFACT架构的诞生,正是为了解决全同态加密ÿ…...
)
告别卡顿!用GDAL+ObjectARX在AutoCAD里丝滑加载百GB遥感影像(附C++源码)
告别卡顿!用GDALObjectARX在AutoCAD里丝滑加载百GB遥感影像(附C源码) 在GIS和测绘工程领域,处理海量遥感影像数据是家常便饭。但当这些GB级甚至TB级的航拍图、卫星图需要导入AutoCAD进行规划设计时,传统的RasterImage对…...

【NotebookLM语言润色功能深度解密】:20年AI写作工具实战者亲授5大未公开润色技巧,92%用户忽略的语义校准开关在哪?
更多请点击: https://intelliparadigm.com 第一章:NotebookLM语言润色功能全景认知 NotebookLM 是 Google 推出的基于用户自有文档的 AI 助手,其语言润色(Language Refinement)功能并非简单替换同义词,而是…...
)
linux内核源码内存管理(7)
一、 引言:冲破冯诺依曼瓶颈的壁障在传统的单处理器(UMA,Uniform Memory Access)架构中,所有CPU核心通过同一条总线平等地访问所有内存。这种对称性带来了编程模型的简洁,但也埋下了致命的可扩展性陷阱&…...

【亲测有效】DeepSeek极简入门与应用_156.[第6章 高级应用技巧] 场景描述型框架:用情境设定让AI进入最佳状态
别再让AI"猜谜"了!一个场景设定,让DeepSeek从"人工智障"秒变"懂王"——这可能是你用过最被低估的Prompt技巧 #mermaid-svg-7MQcGN4wm4OXCgus{font-family:"trebuchet ms",verdana,arial,sans-serif;font-size:1…...