如何利用SpringSecurity进行认证与授权
目录
一、SpringSecurity简介
1.1 入门Demo
二、认证
编辑
2.1 SpringSecurity完整流程
2.2 认证流程详解
2.3 自定义认证实现
2.3.1 数据库校验用户
2.3.2 密码加密存储
2.3.3 登录接口实现
2.3.4 认证过滤器
2.3.5 退出登录
三、授权
3.1 权限系统作用
3.2 授权基本流程
3.3 授权实现
3.2.1 限制访问资源所需权限
3.2.2 封装权限信息
3.2.3 从数据库查询权限信息
3.2.3.1 RBAC权限模型
3.2.3.2 代码实现
四、自定义失败处理
4.1 创建自定义实现类
4.2 将实现类配置给SpringSecurity
五、跨域问题解决方案
六、其他权限校验方法
七、自定义权限校验方法
八、基于配置的权限控制
一、SpringSecurity简介
Spring Security 是 Spring 家族中的一个安全管理框架。相比与另外一个安全框架Shiro,它提供了更丰富的功能,社区资源也比Shiro丰富。
一般来说中大型的项目都是使用SpringSecurity 来做安全框架。小项目有Shiro的比较多,因为相比与SpringSecurity,Shiro的上手更加的简单。
一般Web应用的需要进行认证和授权。
- 认证:验证当前访问系统的是不是本系统的用户,并且要确认具体是哪个用户
- 授权:经过认证后判断当前用户是否有权限进行某个操作
而认证和授权也是SpringSecurity作为安全框架的核心功能。
1.1 入门Demo
依赖如下:
<dependency><groupId>org.springframework.boot</groupId><artifactId>spring-boot-starter-security</artifactId></dependency>引入依赖后我们在尝试去访问之前的接口就会自动跳转到一个SpringSecurity的默认登陆页面,默认用户名是user,密码会输出在控制台。
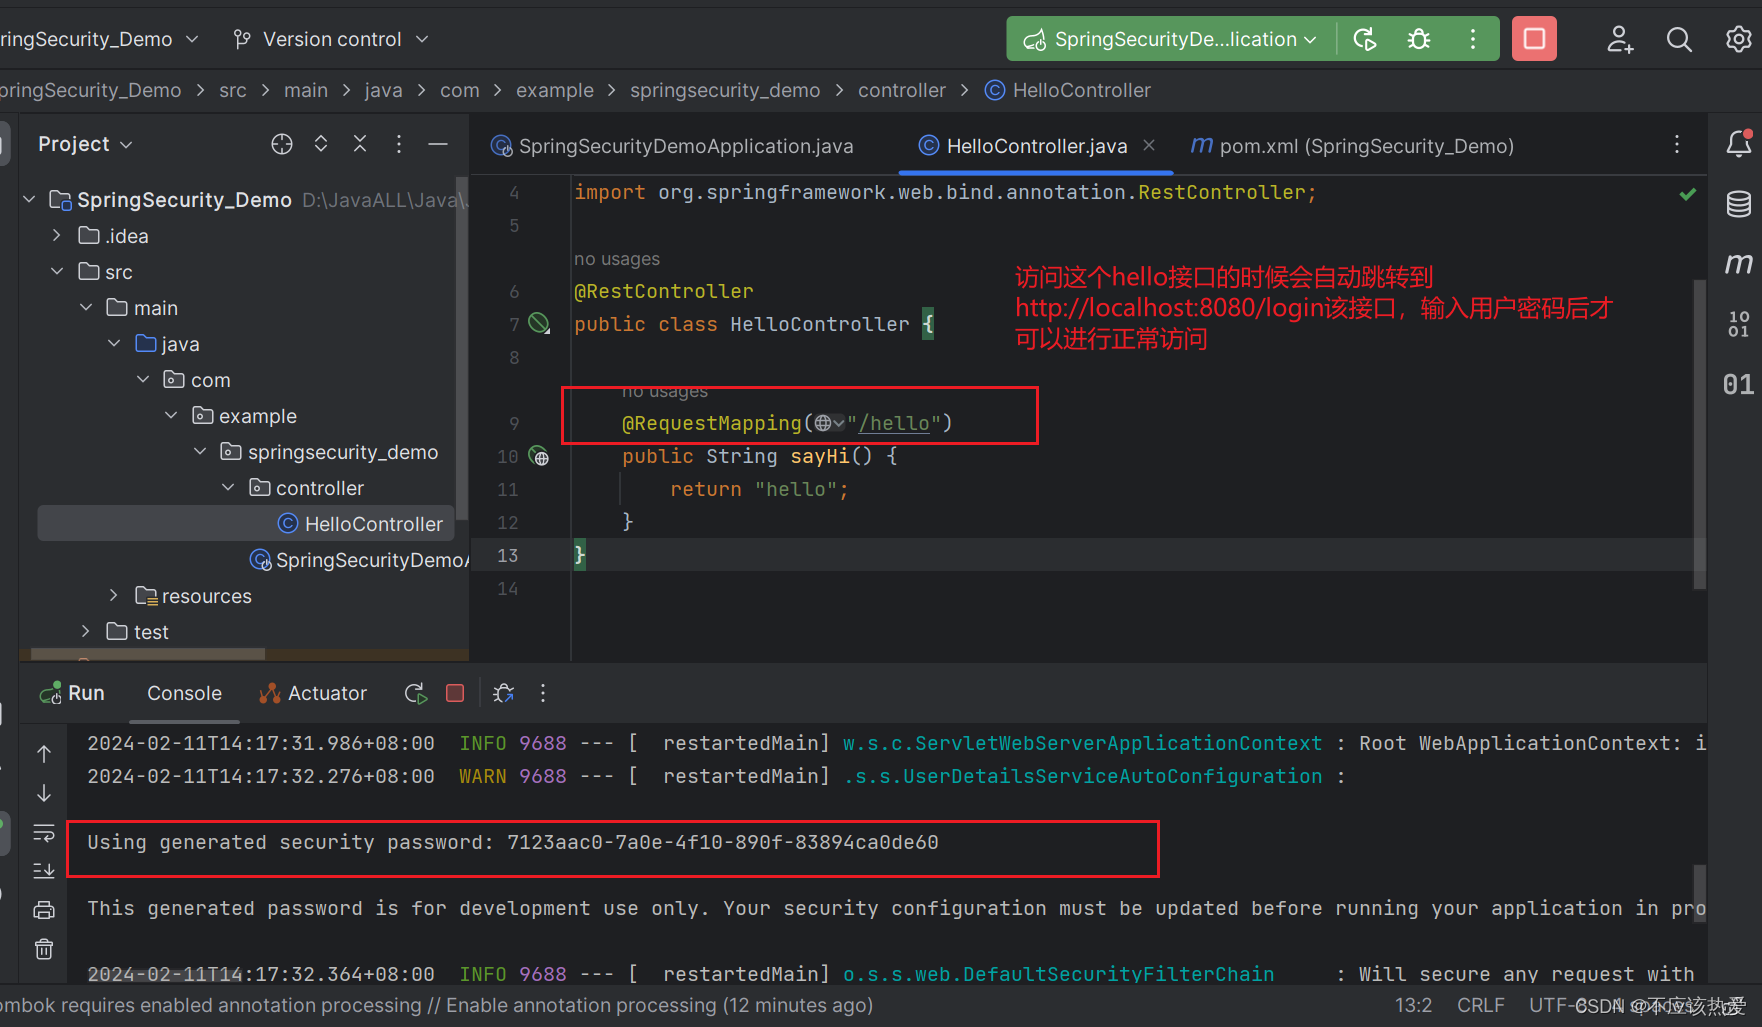
必须登陆之后才能对接口进行访问。

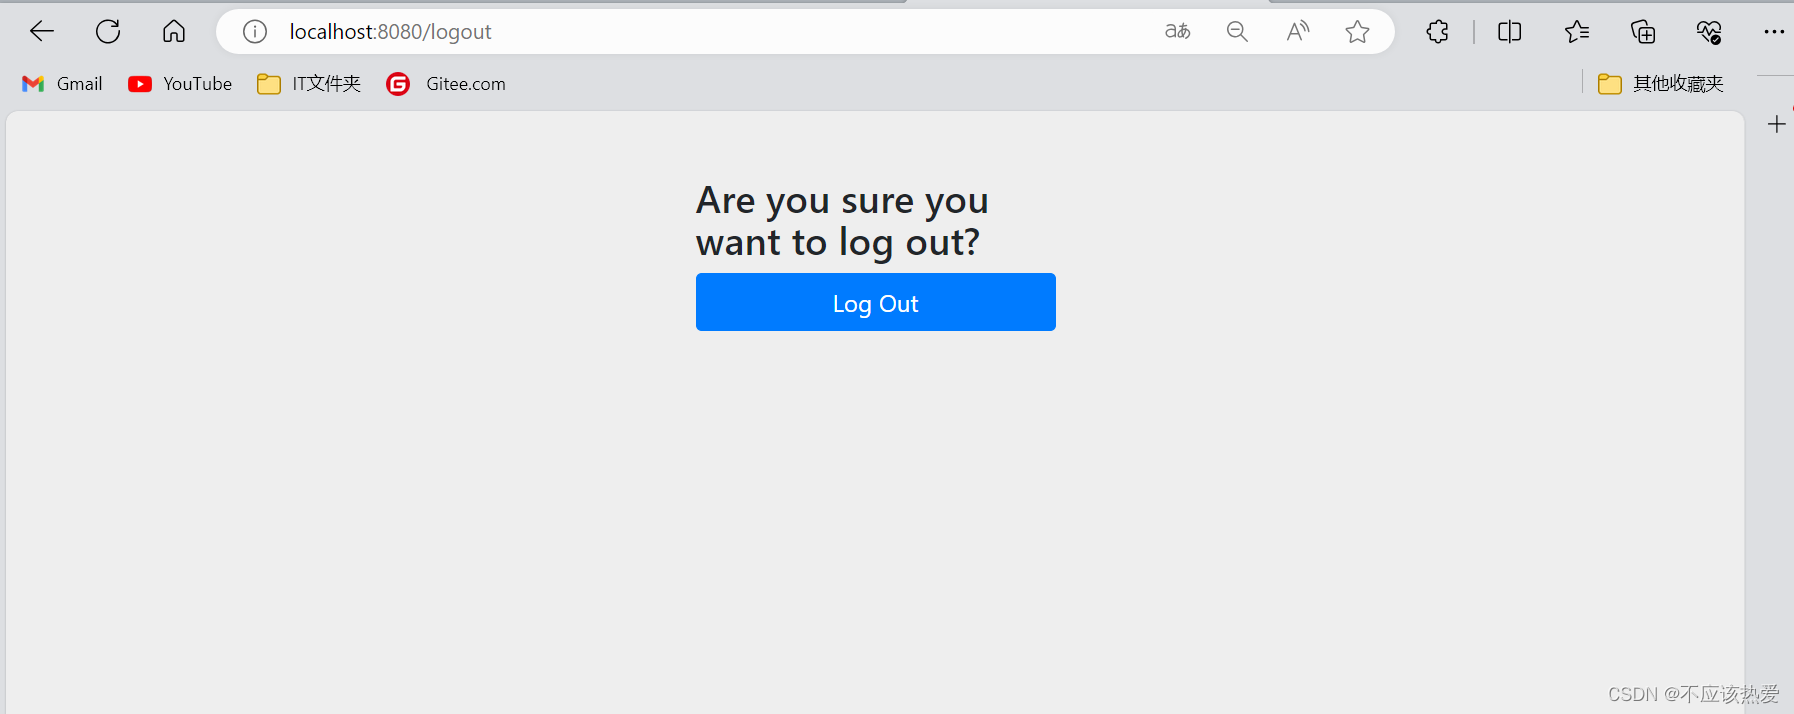
访问 localhost:8080/logout 这个链接可以 对其进行退出操作。
Ps:
以上过程了解即可,因为我们实际Web项目中,一般采用我们自定义的登录验证授权方案,不会采取SpringSecurity框架提供的默认方案。
二、认证
登录校验流程:
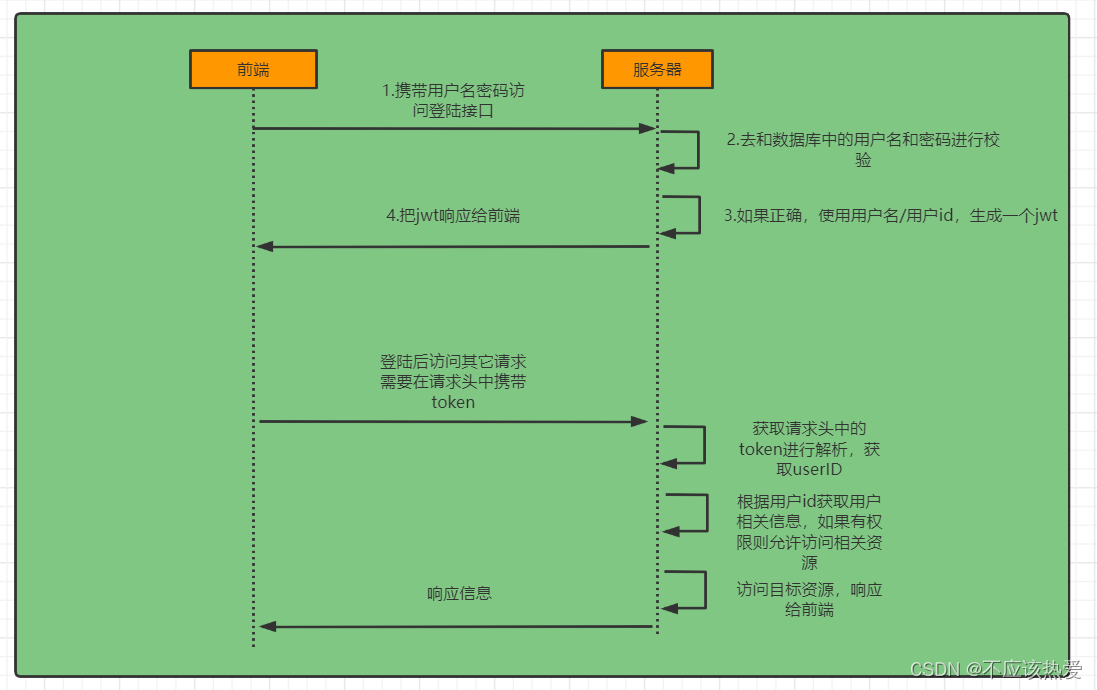
为了实现以上这种过程,我们需要先对SpringSecurity默认的流程进行了解,才可以对其进行修改,实现我们自定义的方案。
2.1 SpringSecurity完整流程
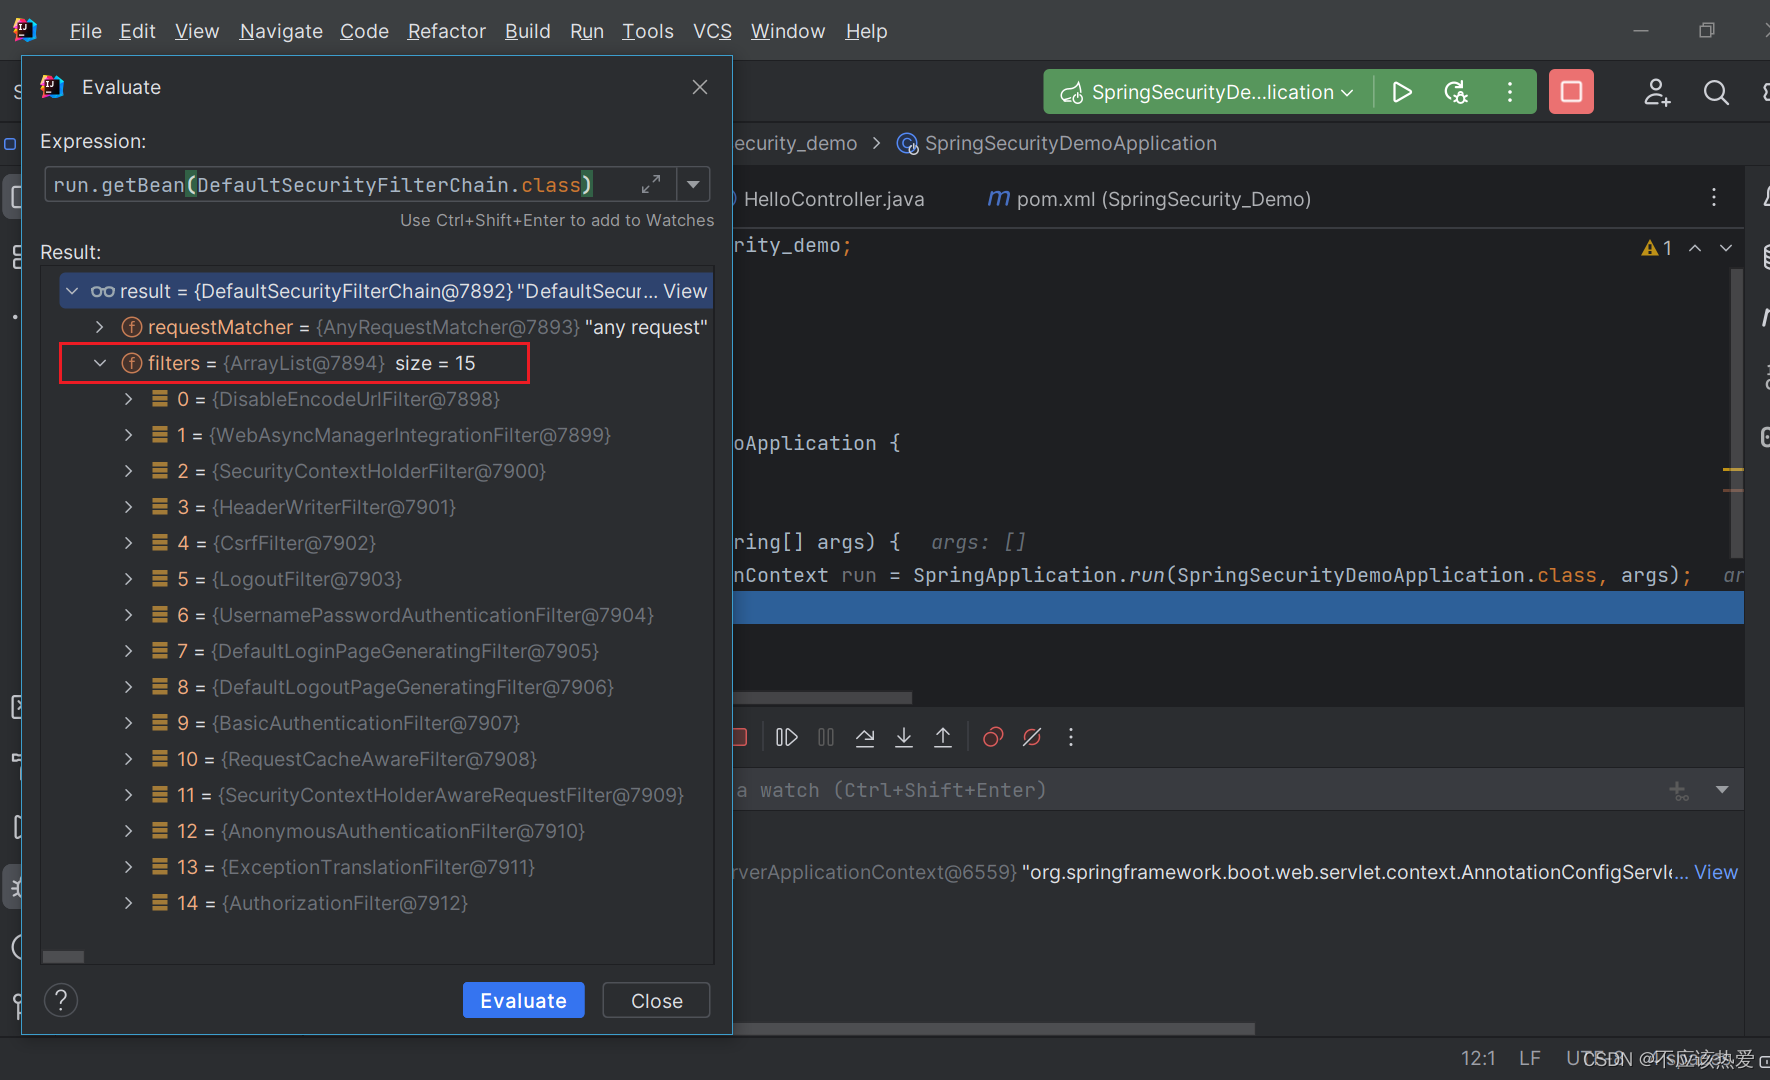
SpringSecurity的原理其实就是一个过滤器链,内部包含了提供各种功能的过滤器。这里我们可以看看入门案例中的过滤器:

图中只展示了核心过滤器,其它的非核心过滤器并没有在图中展示:
- UsernamePasswordAuthenticationFilter:负责处理我们在登陆页面填写了用户名密码后的登陆请求。入门案例的认证工作主要有它负责。
- ExceptionTranslationFilter:处理过滤器链中抛出的任何AccessDeniedException和AuthenticationException 。
- FilterSecurityInterceptor:负责权限校验的过滤器。我们可以通过Debug查看当前系统中SpringSecurity过滤器链中有哪些过滤器及它们的顺序。
如果想查看所有的过滤器,可以通过获取Spring容器,Debug方式来查看:
2.2 认证流程详解
箭头代表该方法属于这个实现类的。

概念速查:
- Authentication接口: 它的实现类,表示当前访问系统的用户,封装了用户相关信息。
- AuthenticationManager接口:定义了认证Authentication的方法
- UserDetailsService接口:加载用户特定数据的核心接口。里面定义了一个根据用户名查询用户信息的方法。
- UserDetails接口:提供核心用户信息。通过UserDetailsService根据用户名获取处理的用户信息要封装成UserDetails对象返回。然后将这些信息封装到Authentication对象中。
2.3 自定义认证实现
登录
①自定义登录接口
调用ProviderManager的方法进行认证 如果认证通过生成jwt 把用户信息存入redis中
②自定义UserDetailsService
在这个实现类中去查询数据库
校验
①定义Jwt 认证过滤器
获取token 解析token获取其中的userid
从redis中获取用户信息
存入SecurityContextHolder

这里为什么要存入 SecurityContextHolder中呢?
我们自定义的JWT过滤器的时候,肯定是需要将这个JWT过滤器放在UsernamePasswordAuthenticationFilter前的,这时我们将从redis获取的用户信息存入SecurityContextHolder才行,否则后续过滤器在进行校验的时候,可能会因为SecurityContextHolder中没有对应的值而判断当前访问用户验证不通过。

2.3.1 数据库校验用户
定义Mapper接口
package com.example.springsecurity_demo.mapper;import com.baomidou.mybatisplus.core.mapper.BaseMapper;
import com.example.springsecurity_demo.domain.User;public interface UserMapper extends BaseMapper<User> {}
定义User实体类
package com.example.springsecurity_demo.domain;import com.baomidou.mybatisplus.annotation.TableId;
import com.baomidou.mybatisplus.annotation.TableName;
import lombok.AllArgsConstructor;
import lombok.Data;
import lombok.NoArgsConstructor;import java.io.Serializable;
import java.util.Date;@Data
@AllArgsConstructor
@NoArgsConstructor
@TableName("sys_user")
public class User implements Serializable {private static final long serialVersionUID = -40356785423868312L;/*** 主键*/@TableIdprivate Long id;/*** 用户名*/private String userName;/*** 昵称*/private String nickName;/*** 密码*/private String password;/*** 账号状态(0正常 1停用)*/private String status;/*** 邮箱*/private String email;/*** 手机号*/private String phonenumber;/*** 用户性别(0男,1女,2未知)*/private String sex;/*** 头像*/private String avatar;/*** 用户类型(0管理员,1普通用户)*/private String userType;/*** 创建人的用户id*/private Long createBy;/*** 创建时间*/private Date createTime;/*** 更新人*/private Long updateBy;/*** 更新时间*/private Date updateTime;/*** 删除标志(0代表未删除,1代表已删除)*/private Integer delFlag;
}
配置Mapper扫描
package com.example.springsecurity_demo;import org.mybatis.spring.annotation.MapperScan;
import org.springframework.boot.SpringApplication;
import org.springframework.boot.autoconfigure.SpringBootApplication;
import org.springframework.context.ConfigurableApplicationContext;@SpringBootApplication
@MapperScan("com.example.springsecurity_demo.mapper")
public class SpringSecurityDemoApplication {public static void main(String[] args) {ConfigurableApplicationContext run = SpringApplication.run(SpringSecurityDemoApplication.class, args);System.out.println(1);}}
核心代码实现
package com.example.springsecurity_demo.service.impl;import com.baomidou.mybatisplus.core.conditions.query.LambdaQueryWrapper;
import com.example.springsecurity_demo.domain.LoginUser;
import com.example.springsecurity_demo.domain.User;
import com.example.springsecurity_demo.mapper.UserMapper;
import org.springframework.beans.factory.annotation.Autowired;
import org.springframework.security.core.userdetails.UserDetails;
import org.springframework.security.core.userdetails.UserDetailsService;
import org.springframework.security.core.userdetails.UsernameNotFoundException;
import org.springframework.stereotype.Service;import java.util.Objects;@Service
public class UserDetailServiceImpl implements UserDetailsService {@Autowiredprivate UserMapper userMapper;@Overridepublic UserDetails loadUserByUsername(String username) throws UsernameNotFoundException {// 查询用户信息LambdaQueryWrapper<User> queryWrapper = new LambdaQueryWrapper<>();queryWrapper.eq(User::getUserName,username);User user = userMapper.selectOne(queryWrapper);// 如果没有查询到用户就抛出异常if (Objects.isNull(user)) {throw new RuntimeException("用户名或者密码错误");}//TODO 查询对应的权限信息return new LoginUser(user);}
}
因为UserDetailsService方法的返回值是UserDetails(接口):

所以需要定义一个类,实现该接口,把用户信息封装在其中。
package com.example.springsecurity_demo.domain;import lombok.AllArgsConstructor;
import lombok.Data;
import lombok.NoArgsConstructor;
import org.springframework.security.core.GrantedAuthority;
import org.springframework.security.core.userdetails.UserDetails;import java.util.Collection;@Data
@NoArgsConstructor
@AllArgsConstructor
public class LoginUser implements UserDetails {private User user;@Overridepublic Collection<? extends GrantedAuthority> getAuthorities() {return null;}@Overridepublic String getPassword() {return user.getPassword();}@Overridepublic String getUsername() {return user.getUserName();}@Overridepublic boolean isAccountNonExpired() {return true;}@Overridepublic boolean isAccountNonLocked() {return true;}@Overridepublic boolean isCredentialsNonExpired() {return true;}@Overridepublic boolean isEnabled() {return true;}
}
注意:如果要测试,需要往用户表中写入用户数据,并且如果你想让用户的密码是明文存储,需要在密码前加{noop}。例如:
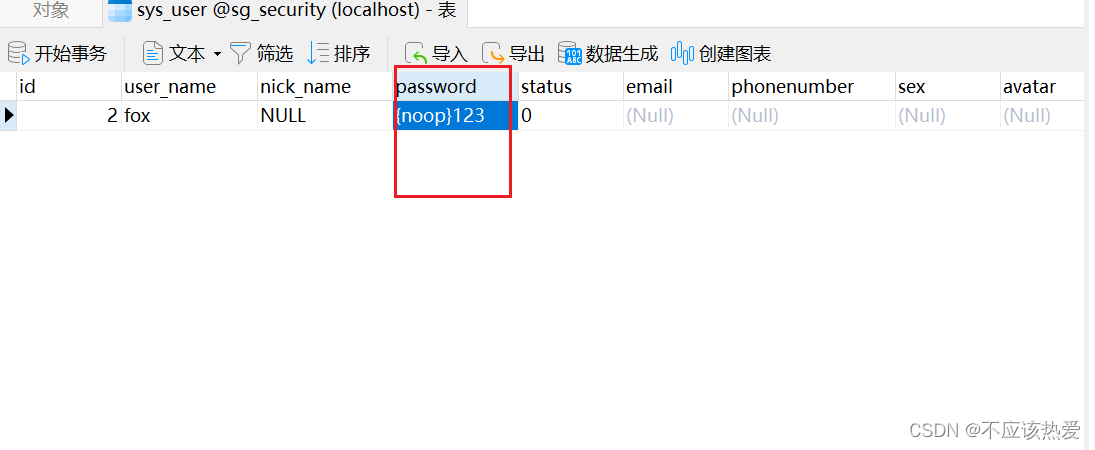
这样登陆的时候就可以用fox作为用户名,123作为密码来登陆了。
2.3.2 密码加密存储
实际项目中我们不会把密码明文存储在数据库中。
默认使用的PasswordEncoder要求数据库中的密码格式为:{id}password 。它会根据id去判断密码的加密方式。但是我们一般不会采用这种方式。所以就需要替换PasswordEncoder。
我们一般使用SpringSecurity为我们提供的BCryptPasswordEncoder。
我们只需要使用把BCryptPasswordEncoder对象注入Spring容器中,SpringSecurity就会使用该
PasswordEncoder来进行密码校验。
我们可以定义一个SpringSecurity的配置类:
低版本配置如下:
@Configuration
public class SecurityConfig extends WebSecurityConfigurerAdapter {@Beanpublic PasswordEncoder passwordEncoder(){return new BCryptPasswordEncoder();}
}
以下是高版本的SpringSecurity(SpringBoot 3 用以下配置):
package com.example.springsecurity_demo.config;import org.springframework.context.annotation.Bean;
import org.springframework.context.annotation.Configuration;
import org.springframework.security.config.annotation.web.configuration.EnableWebSecurity;
import org.springframework.security.crypto.bcrypt.BCryptPasswordEncoder;
import org.springframework.security.crypto.password.PasswordEncoder;@Configuration
@EnableWebSecurity
public class SecurityConfig {@Beanpublic PasswordEncoder passwordEncoder() {return new BCryptPasswordEncoder();}
}
2.3.3 登录接口实现
接下来我们需要自定义登录接口,这里我们需要让SpringSecurity对这个接口放行,让用户访问这个接口的时候不用登录也能访问。(毕竟登录接口如果还需要权限访问,那么就很奇怪了)
在接口中我们通过AuthenticationManager的authenticate方法来进行用户认证,所以需要在SecurityConfig中配置把AuthenticationManager注入容器中。
认证成功的话要生成一个JWT,放入响应中返回,并且为了让用户下回请求时需要通过JWT识别出具体的是哪个用户,我们需要把用户信息存入redis,可以把用户id作为key。
Contorller类如下:
package com.example.springsecurity_demo.controller;import com.example.springsecurity_demo.domain.ResponseResult;
import com.example.springsecurity_demo.domain.User;
import com.example.springsecurity_demo.service.LoginService;
import org.springframework.beans.factory.annotation.Autowired;
import org.springframework.web.bind.annotation.PostMapping;
import org.springframework.web.bind.annotation.RequestBody;
import org.springframework.web.bind.annotation.RestController;@RestController
public class LoginController {@Autowiredprivate LoginService loginService;@PostMapping("/user/login")public ResponseResult login(@RequestBody User user){return loginService.login(user);}}
Ps:
虽然字段声明的类型是 LoginService,但实际上注入的是 LoginServiceImpl。这是因为 LoginServiceImpl 实现了 LoginService 接口,因此它被视为 LoginService 的一种类型。
import org.springframework.context.annotation.Bean;
import org.springframework.context.annotation.Configuration;
import org.springframework.security.authentication.AuthenticationManager;
import org.springframework.security.config.annotation.method.configuration.EnableGlobalMethodSecurity;
import org.springframework.security.config.annotation.web.builders.HttpSecurity;
import org.springframework.security.config.annotation.web.configuration.WebSecurityConfigurerAdapter;
import org.springframework.security.config.http.SessionCreationPolicy;
import org.springframework.security.crypto.bcrypt.BCryptPasswordEncoder;
import org.springframework.security.crypto.password.PasswordEncoder;@Configuration
@EnableGlobalMethodSecurity(prePostEnabled = true)
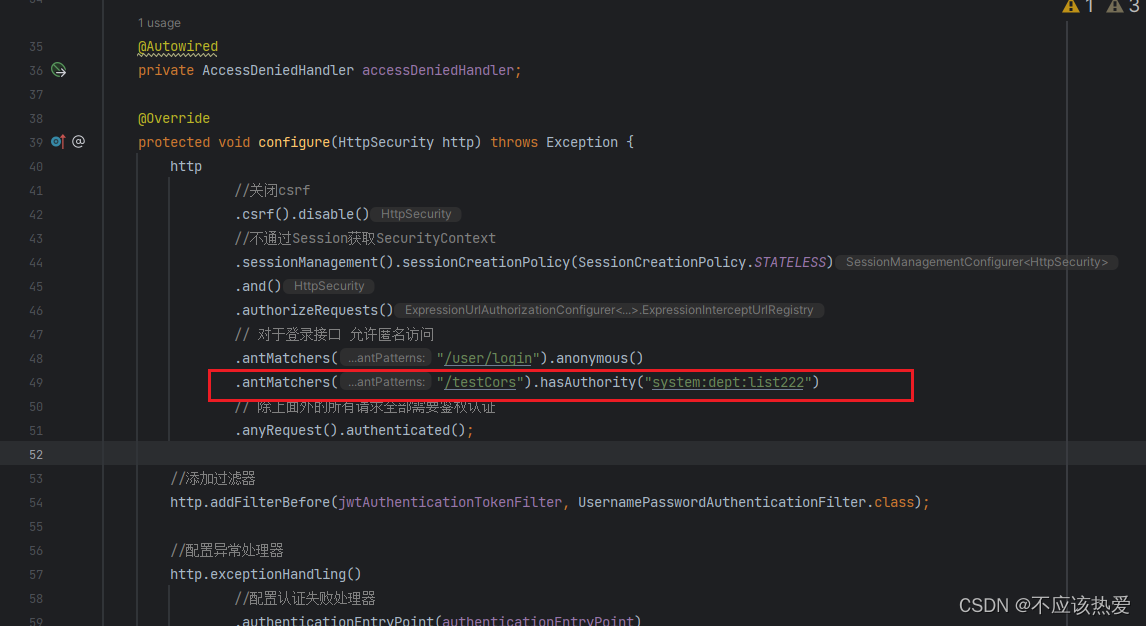
public class SecurityConfig extends WebSecurityConfigurerAdapter {//创建BCryptPasswordEncoder注入容器@Beanpublic PasswordEncoder passwordEncoder(){return new BCryptPasswordEncoder();}@Overrideprotected void configure(HttpSecurity http) throws Exception {http//关闭csrf.csrf().disable()//不通过Session获取SecurityContext.sessionManagement().sessionCreationPolicy(SessionCreationPolicy.STATELESS).and().authorizeRequests()// 对于登录接口 允许匿名访问.antMatchers("/user/login").anonymous()
// .antMatchers("/testCors").hasAuthority("system:dept:list222")// 除上面外的所有请求全部需要鉴权认证.anyRequest().authenticated();
//}@Bean@Overridepublic AuthenticationManager authenticationManagerBean() throws Exception {return super.authenticationManagerBean();}
}
实现类如下:
import com.sangeng.domain.LoginUser;
import com.sangeng.domain.ResponseResult;
import com.sangeng.domain.User;
import com.sangeng.service.LoginServcie;
import com.sangeng.utils.JwtUtil;
import com.sangeng.utils.RedisCache;
import org.springframework.beans.factory.annotation.Autowired;
import org.springframework.security.authentication.AuthenticationManager;
import org.springframework.security.authentication.UsernamePasswordAuthenticationToken;
import org.springframework.security.core.Authentication;
import org.springframework.security.core.context.SecurityContextHolder;
import org.springframework.stereotype.Service;import java.util.HashMap;
import java.util.Map;
import java.util.Objects;@Service
public class LoginServiceImpl implements LoginServcie {@Autowiredprivate AuthenticationManager authenticationManager;@Autowiredprivate RedisCache redisCache;@Overridepublic ResponseResult login(User user) {//AuthenticationManager authenticate进行用户认证UsernamePasswordAuthenticationToken authenticationToken = new UsernamePasswordAuthenticationToken(user.getUserName(),user.getPassword());Authentication authenticate = authenticationManager.authenticate(authenticationToken);//如果认证没通过,给出对应的提示if(Objects.isNull(authenticate)){throw new RuntimeException("登录失败");}//如果认证通过了,使用userid生成一个jwt jwt存入ResponseResult返回LoginUser loginUser = (LoginUser) authenticate.getPrincipal();String userid = loginUser.getUser().getId().toString();String jwt = JwtUtil.createJWT(userid);Map<String,String> map = new HashMap<>();map.put("token",jwt);//把完整的用户信息存入redis  userid作为keyredisCache.setCacheObject("login:"+userid,loginUser);return new ResponseResult(200,"登录成功",map);}}
分析:
这里创建UsernamePasswordAuthenticationToken对象是因为调用authenticationManager.authenticate方法 需要传入Authentication,但是Authentication又是一个接口,所以需要传入其实现类。
2.3.4 认证过滤器
我们需要自定义一个过滤器,这个过滤器会去获取请求头中的token,对token进行解析取出其中的
userid。
使用userid去redis中获取对应的LoginUser对象。
然后封装Authentication对象存入SecurityContextHolder。
import com.sangeng.domain.LoginUser;
import com.sangeng.utils.JwtUtil;
import com.sangeng.utils.RedisCache;
import io.jsonwebtoken.Claims;
import org.springframework.beans.factory.annotation.Autowired;
import org.springframework.security.authentication.UsernamePasswordAuthenticationToken;
import org.springframework.security.core.context.SecurityContextHolder;
import org.springframework.stereotype.Component;
import org.springframework.util.StringUtils;
import org.springframework.web.filter.OncePerRequestFilter;import javax.servlet.FilterChain;
import javax.servlet.ServletException;
import javax.servlet.http.HttpServletRequest;
import javax.servlet.http.HttpServletResponse;
import java.io.IOException;
import java.util.Objects;@Component
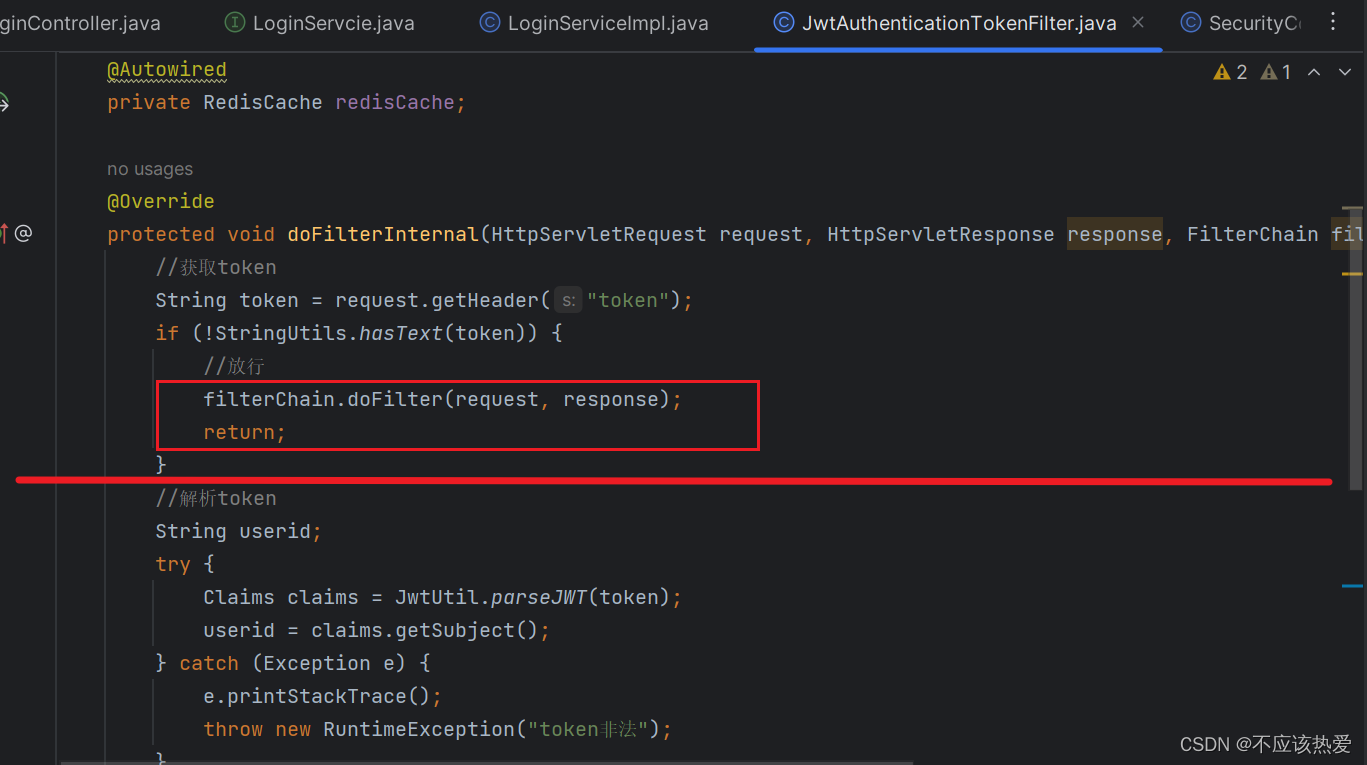
public class JwtAuthenticationTokenFilter extends OncePerRequestFilter {@Autowiredprivate RedisCache redisCache;@Overrideprotected void doFilterInternal(HttpServletRequest request, HttpServletResponse response, FilterChain filterChain) throws ServletException, IOException {//获取tokenString token = request.getHeader("token");if (!StringUtils.hasText(token)) {//放行filterChain.doFilter(request, response);return;}//解析tokenString userid;try {Claims claims = JwtUtil.parseJWT(token);userid = claims.getSubject();} catch (Exception e) {e.printStackTrace();throw new RuntimeException("token非法");}//从redis中获取用户信息String redisKey = "login:" + userid;LoginUser loginUser = redisCache.getCacheObject(redisKey);if(Objects.isNull(loginUser)){throw new RuntimeException("用户未登录");}//存入SecurityContextHolder//TODO 获取权限信息封装到Authentication中UsernamePasswordAuthenticationToken authenticationToken =new UsernamePasswordAuthenticationToken(loginUser,null,loginUser.getAuthorities());SecurityContextHolder.getContext().setAuthentication(authenticationToken);//放行filterChain.doFilter(request, response);}
}
分析:
这里先设置放行最后再使用return是因为,如果该请求无含token,那么就对其进行放行,让请求进入下一个拦截器,后续Security框架还有很多拦截器可以对其进行验证,而使用return是因为后续在进行参数返回的时候,不需要再执行以下代码。
简单来说:图中代码红线以上部分是参数请求时候所执行的部分,红线以下是返回响应体时候所执行的部分。
还有个细节是:这里必须调用三个参数的构造方法,而不是两个,这是因为只有调用三个构造方法的时候,才能保证该主体是认证过的,否则框架检查时候还是会报错:

SecurityConfig如下:
import com.sangeng.filter.JwtAuthenticationTokenFilter;
import org.springframework.beans.factory.annotation.Autowired;
import org.springframework.context.annotation.Bean;
import org.springframework.context.annotation.Configuration;
import org.springframework.http.HttpMethod;
import org.springframework.security.authentication.AuthenticationManager;
import org.springframework.security.config.annotation.method.configuration.EnableGlobalMethodSecurity;
import org.springframework.security.config.annotation.web.builders.HttpSecurity;
import org.springframework.security.config.annotation.web.configuration.WebSecurityConfigurerAdapter;
import org.springframework.security.config.http.SessionCreationPolicy;
import org.springframework.security.crypto.bcrypt.BCryptPasswordEncoder;
import org.springframework.security.crypto.password.PasswordEncoder;
import org.springframework.security.web.AuthenticationEntryPoint;
import org.springframework.security.web.access.AccessDeniedHandler;
import org.springframework.security.web.authentication.UsernamePasswordAuthenticationFilter;@Configuration
@EnableGlobalMethodSecurity(prePostEnabled = true)
public class SecurityConfig extends WebSecurityConfigurerAdapter {//创建BCryptPasswordEncoder注入容器@Beanpublic PasswordEncoder passwordEncoder(){return new BCryptPasswordEncoder();}@Autowiredprivate JwtAuthenticationTokenFilter jwtAuthenticationTokenFilter;@Autowiredprivate AuthenticationEntryPoint authenticationEntryPoint;@Autowiredprivate AccessDeniedHandler accessDeniedHandler;@Overrideprotected void configure(HttpSecurity http) throws Exception {http//关闭csrf.csrf().disable()//不通过Session获取SecurityContext.sessionManagement().sessionCreationPolicy(SessionCreationPolicy.STATELESS).and().authorizeRequests()// 对于登录接口 允许匿名访问.antMatchers("/user/login").anonymous()
//                .antMatchers("/testCors").hasAuthority("system:dept:list222")// 除上面外的所有请求全部需要鉴权认证.anyRequest().authenticated();//添加过滤器http.addFilterBefore(jwtAuthenticationTokenFilter, UsernamePasswordAuthenticationFilter.class);//配置异常处理器http.exceptionHandling()//配置认证失败处理器.authenticationEntryPoint(authenticationEntryPoint).accessDeniedHandler(accessDeniedHandler);//允许跨域http.cors();}@Bean@Overridepublic AuthenticationManager authenticationManagerBean() throws Exception {return super.authenticationManagerBean();}
}
2.3.5 退出登录
我们只需要定义一个登陆接口,然后获取SecurityContextHolder中的认证信息,删除redis中对应的数据即可。
import com.sangeng.domain.LoginUser;
import com.sangeng.domain.ResponseResult;
import com.sangeng.domain.User;
import com.sangeng.service.LoginServcie;
import com.sangeng.utils.JwtUtil;
import com.sangeng.utils.RedisCache;
import org.springframework.beans.factory.annotation.Autowired;
import org.springframework.security.authentication.AuthenticationManager;
import org.springframework.security.authentication.UsernamePasswordAuthenticationToken;
import org.springframework.security.core.Authentication;
import org.springframework.security.core.context.SecurityContextHolder;
import org.springframework.stereotype.Service;import java.util.HashMap;
import java.util.Map;
import java.util.Objects;@Service
public class LoginServiceImpl implements LoginServcie {@Autowiredprivate AuthenticationManager authenticationManager;@Autowiredprivate RedisCache redisCache;@Overridepublic ResponseResult logout() {//获取SecurityContextHolder中的用户idUsernamePasswordAuthenticationToken authentication = (UsernamePasswordAuthenticationToken) SecurityContextHolder.getContext().getAuthentication();LoginUser loginUser = (LoginUser) authentication.getPrincipal();Long userid = loginUser.getUser().getId();//删除redis中的值redisCache.deleteObject("login:"+userid);return new ResponseResult(200,"注销成功");}
}
分析:
这里并不需要删除SecurityContextHolder中的信息,只需要删除redis中所存储的即可,因为在进行认证的时候,需要先在SecurityContextHolder中拿到信息后,再从redis中获取对应信息。
每个请求都对应一个SecurityContextHolder,所以删除SecurityContextHolder中的信息是无效的,需要删除redis中所存储的信息。
三、授权
3.1 权限系统作用
例如一个学校图书馆的管理系统,如果是普通学生登录就能看到借书还书相关的功能,不可能让他看到并且去使用添加书籍信息,删除书籍信息等功能。但是如果是一个图书馆管理员的账号登录了,应该就能看到并使用添加书籍信息,删除书籍信息等功能。
总结起来就是不同的用户可以使用不同的功能。这就是权限系统要去实现的效果。
我们不能只依赖前端去判断用户的权限来选择显示哪些菜单哪些按钮。因为如果只是这样,如果有人知道了对应功能的接口地址就可以不通过前端,直接去发送请求来实现相关功能操作。
所以我们还需要在后台进行用户权限的判断,判断当前用户是否有相应的权限,必须具有所需权限才能进行相应的操作。
3.2 授权基本流程
在SpringSecurity中,会使用默认的FilterSecurityInterceptor来进行权限校验。在
FilterSecurityInterceptor中会从SecurityContextHolder获取其中的Authentication,然后获取其中的
权限信息。当前用户是否拥有访问当前资源所需的权限。
所以我们在项目中只需要把当前登录用户的权限信息也存入Authentication。
然后设置我们的资源所需要的权限即可。
如何将权限信息存入Authentication呢?
回顾之前的代码,我们需要在自定义的认证过滤器中,将Authentication存入SecurityContextHolder中,那么Authentication的信息又是从哪里来呢?
:是从redis中获取到的。

也就是我们当初应该往redis中存入权限信息,而redis中存储的是loginUser,
loginUser是当初我们UserDetail的自定义实现类中所查询到的用户信息(也就是:从数据库中查询的)。

而最终这个loginUser对象会返回给这个authenticate对象,那么authenticate这个对象就会存入redis中。

以上就是整个流程,所以我们最终只需要完成两个步骤即可:
- 在查询数据库的时候获取对应的权限信息。
- 在实现认证过滤器的时候,需要获取当前用户的权限信息,并存入到SecurityContextHolder中。
也就是需要完善上述图片中两个 TODO 标识的代码片段。
3.3 授权实现
3.2.1 限制访问资源所需权限
SpringSecurity为我们提供了基于注解的权限控制方案,这也是我们项目中主要采用的方式。我们可以使用注解去指定访问对应的资源所需的权限。
但是要使用它我们需要先开启相关配置,即在关于SpringSecurity的配置类中添加以下代码:
@EnableGlobalMethodSecurity(prePostEnabled = true)
设置完之后,就可以使用对应的注解:@PreAuthorize。
@RestController
public class HelloController {@RequestMapping("/hello")@PreAuthorize("hasAuthority('test')")public String hello(){return "hello";}
}
分析:
这里的test只供测试,test使用单引号是因为外层已经有了双引号,所以使用单引号来标识这是个字符串,实际上我们通过idea的提示(ctrl+p),也可以知道,这个hasAuthority所需要的参数也是String类型:

3.2.2 封装权限信息
我们前面在写UserDetailsServiceImpl的时候说过,在查询出用户后还要获取对应的权限信息,封装到UserDetails中返回。
我们先直接把权限信息写死封装到UserDetails中进行测试。
我们之前定义了UserDetails的实现类LoginUser,想要让其能封装权限信息就要对其进行修改。
import com.alibaba.fastjson.annotation.JSONField;
import lombok.AllArgsConstructor;
import lombok.Data;
import lombok.NoArgsConstructor;
import org.springframework.security.core.GrantedAuthority;
import org.springframework.security.core.authority.SimpleGrantedAuthority;
import org.springframework.security.core.userdetails.UserDetails;import java.util.ArrayList;
import java.util.Collection;
import java.util.List;
import java.util.stream.Collectors;@Data
@NoArgsConstructor
public class LoginUser implements UserDetails {private User user;private List<String> permissions;public LoginUser(User user, List<String> permissions) {this.user = user;this.permissions = permissions;}@JSONField(serialize = false)private List<SimpleGrantedAuthority> authorities;@Overridepublic Collection<? extends GrantedAuthority> getAuthorities() {if(authorities!=null){return authorities;}//把permissions中String类型的权限信息封装成SimpleGrantedAuthority对象authorities = new ArrayList<>();for (String permission : permissions) {SimpleGrantedAuthority authority = new SimpleGrantedAuthority(permission);authorities.add(authority);}
//        authorities = permissions.stream()
//                .map(SimpleGrantedAuthority::new)
//                .collect(Collectors.toList());return authorities;}@Overridepublic String getPassword() {return user.getPassword();}@Overridepublic String getUsername() {return user.getUserName();}@Overridepublic boolean isAccountNonExpired() {return true;}@Overridepublic boolean isAccountNonLocked() {return true;}@Overridepublic boolean isCredentialsNonExpired() {return true;}@Overridepublic boolean isEnabled() {return true;}
}
分析:
这里我们重写了getAuthorities方法, permission这个属性存储的是权限信息。
在getAuthorities方法中,由于返回值是一个Collection类型,所以我们这里选择List集合。
又因为泛型要求是GrantedAuthority的子类,但是其是一个接口,所以我们通过查找其实现类(ctrl+alt+鼠标左键):

选择了SimpleGrantedAuthority,因为看它名字有个simple,再观察其构造方法,发现只需要传入一个字符串即可,于是我们就需要将我们类属性的permission全部都通过构造方法存入SimpleGrantedAuthority属性中,然后将其一个个遍历,放入list集合中。

还有一个小细节是这里加了@JSONField(serialize = false) 注解防止redis存储loginUser时候序列化出错(报异常),因为SimpleGrantedAuthority是Spring中提供的类。
虽然我们这里不让这个List集合序列化,但是并不影响后续操作,因为在取出来反序列化的时候,我们自定义的permission属性是可以被正常序列化的,那个时候通过它就可以让程序正常运行。

3.2.3 从数据库查询权限信息
3.2.3.1 RBAC权限模型
RBAC权限模型(Role-Based Access Control)即:基于角色的权限控制。这是目前最常被开发者使用也是相对易用、通用权限模型。

3.2.3.2 代码实现
Menu类如下:
import com.baomidou.mybatisplus.annotation.TableId;
import com.baomidou.mybatisplus.annotation.TableName;
import com.fasterxml.jackson.annotation.JsonInclude;
import lombok.AllArgsConstructor;
import lombok.Data;
import lombok.NoArgsConstructor;import java.io.Serializable;
import java.util.Date;/*** 菜单表(Menu)实体类** @author makejava* @since 2021-11-24 15:30:08*/
@TableName(value="sys_menu")
@Data
@AllArgsConstructor
@NoArgsConstructor
@JsonInclude(JsonInclude.Include.NON_NULL)
public class Menu implements Serializable {private static final long serialVersionUID = -54979041104113736L;@TableIdprivate Long id;/*** 菜单名*/private String menuName;/*** 路由地址*/private String path;/*** 组件路径*/private String component;/*** 菜单状态(0显示 1隐藏)*/private String visible;/*** 菜单状态(0正常 1停用)*/private String status;/*** 权限标识*/private String perms;/*** 菜单图标*/private String icon;private Long createBy;private Date createTime;private Long updateBy;private Date updateTime;/*** 是否删除(0未删除 1已删除)*/private Integer delFlag;/*** 备注*/private String remark;
}
mapper如下:
我们只需要根据用户id去查询到其所对应的权限信息即可。
所以我们可以先定义个mapper,其中提供一个方法可以根据userid查询权限信息。
import com.baomidou.mybatisplus.core.mapper.BaseMapper;
import com.sangeng.domain.Menu;import java.util.List;public interface MenuMapper extends BaseMapper<Menu> {List<String> selectPermsByUserId(Long userid);
}
尤其是自定义方法,所以需要创建对应的mapper文件,定义对应的sql语句
<?xml version="1.0" encoding="UTF-8" ?>
<!DOCTYPE mapper PUBLIC "-//mybatis.org//DTD Mapper 3.0//EN" "http://mybatis.org/dtd/mybatis-3-mapper.dtd" >
<mapper namespace="com.fox.mapper.MenuMapper"><select id="selectPermsByUserId" resultType="java.lang.String">SELECTDISTINCT m.`perms`FROMsys_user_role urLEFT JOIN `sys_role` r ON ur.`role_id` = r.`id`LEFT JOIN `sys_role_menu` rm ON ur.`role_id` = rm.`role_id`LEFT JOIN `sys_menu` m ON m.`id` = rm.`menu_id`WHEREuser_id = #{userid}AND r.`status` = 0AND m.`status` = 0</select>
</mapper>
然后我们可以在UserDetailsServiceImpl中去调用该mapper的方法查询权限信息封装到LoginUser对象中即可:
import com.baomidou.mybatisplus.core.conditions.query.LambdaQueryWrapper;
import com.sangeng.domain.LoginUser;
import com.sangeng.domain.User;
import com.sangeng.mapper.MenuMapper;
import com.sangeng.mapper.UserMapper;
import org.springframework.beans.factory.annotation.Autowired;
import org.springframework.security.core.userdetails.UserDetails;
import org.springframework.security.core.userdetails.UserDetailsService;
import org.springframework.security.core.userdetails.UsernameNotFoundException;
import org.springframework.stereotype.Service;import java.util.ArrayList;
import java.util.Arrays;
import java.util.List;
import java.util.Objects;@Service
public class UserDetailsServiceImpl implements UserDetailsService {@Autowiredprivate UserMapper userMapper;@Autowiredprivate MenuMapper menuMapper;@Overridepublic UserDetails loadUserByUsername(String username) throws UsernameNotFoundException {//查询用户信息LambdaQueryWrapper<User> queryWrapper = new LambdaQueryWrapper<>();queryWrapper.eq(User::getUserName,username);User user = userMapper.selectOne(queryWrapper);// 如果没有查询到用户就抛出异常if(Objects.isNull(user)){throw new RuntimeException("用户名或者密码错误");}
//        List<String> list = new ArrayList<>(Arrays.asList("test","admin"));List<String> list = menuMapper.selectPermsByUserId(user.getId());//把数据封装成UserDetails返回return new LoginUser(user,list);}
}
四、自定义失败处理
我们还希望在认证失败或者是授权失败的情况下也能和我们的接口一样返回相同结构的json,这样可以让前端能对响应进行统一的处理。要实现这个功能我们需要知道SpringSecurity的异常处理机制。
在SpringSecurity中,如果我们在认证或者授权的过程中出现了异常会被ExceptionTranslationFilter捕获到。在ExceptionTranslationFilter中会去判断是认证失败还是授权失败出现的异常。
如果是认证过程中出现的异常会被封装成AuthenticationException然后调用
AuthenticationEntryPoint对象的方法去进行异常处理。
如果是授权过程中出现的异常会被封装成AccessDeniedException然后调用AccessDeniedHandler对象的方法去进行异常处理。
所以如果我们需要自定义异常处理,我们只需要自定义AuthenticationEntryPoint和
AccessDeniedHandler然后配置给SpringSecurity即可。
4.1 创建自定义实现类
也就是说,我们只需要创建一个自定义的实现类然后分别去实现AccessDeniedHandler接口和AccessDeniedHandler接口即可,代码如下。
认证失败自定义实现类如下:
import com.alibaba.fastjson.JSON;
import com.sangeng.domain.ResponseResult;
import com.sangeng.utils.WebUtils;
import org.springframework.http.HttpStatus;
import org.springframework.security.core.AuthenticationException;
import org.springframework.security.web.AuthenticationEntryPoint;
import org.springframework.stereotype.Component;import javax.servlet.ServletException;
import javax.servlet.http.HttpServletRequest;
import javax.servlet.http.HttpServletResponse;
import java.io.IOException;@Component
public class AuthenticationEntryPointImpl implements AuthenticationEntryPoint {@Overridepublic void commence(HttpServletRequest request, HttpServletResponse response, AuthenticationException authException) throws IOException, ServletException {ResponseResult result = new ResponseResult(HttpStatus.UNAUTHORIZED.value(),"用户认证失败请查询登录");String json = JSON.toJSONString(result);//处理异常WebUtils.renderString(response,json);}
}
授权失败自定义实现类如下:
import com.alibaba.fastjson.JSON;
import com.sangeng.domain.ResponseResult;
import com.sangeng.utils.WebUtils;
import org.springframework.http.HttpStatus;
import org.springframework.security.access.AccessDeniedException;
import org.springframework.security.web.access.AccessDeniedHandler;
import org.springframework.stereotype.Component;import javax.servlet.ServletException;
import javax.servlet.http.HttpServletRequest;
import javax.servlet.http.HttpServletResponse;
import java.io.IOException;@Component
public class AccessDeniedHandlerImpl implements AccessDeniedHandler {@Overridepublic void handle(HttpServletRequest request, HttpServletResponse response, AccessDeniedException accessDeniedException) throws IOException, ServletException {ResponseResult result = new ResponseResult(HttpStatus.FORBIDDEN.value(),"您的权限不足");String json = JSON.toJSONString(result);//处理异常WebUtils.renderString(response,json);}
}
涉及到的工具类如下:
由于response对象是较为原生的,所以我们需要进行书写状态码,ContentType等。所以我们需要使用工具类对其进行修改。
import javax.servlet.http.HttpServletResponse;
import java.io.IOException;public class WebUtils
{/*** 将字符串渲染到客户端* * @param response 渲染对象* @param string 待渲染的字符串* @return null*/public static String renderString(HttpServletResponse response, String string) {try{response.setStatus(200);response.setContentType("application/json");response.setCharacterEncoding("utf-8");response.getWriter().print(string);}catch (IOException e){e.printStackTrace();}return null;}
}
4.2 将实现类配置给SpringSecurity
注入对应处理器:

然后我们可以使用HttpSecurity对象的方法去配置:

配合类代码如下:
import com.sangeng.filter.JwtAuthenticationTokenFilter;
import org.springframework.beans.factory.annotation.Autowired;
import org.springframework.context.annotation.Bean;
import org.springframework.context.annotation.Configuration;
import org.springframework.http.HttpMethod;
import org.springframework.security.authentication.AuthenticationManager;
import org.springframework.security.config.annotation.method.configuration.EnableGlobalMethodSecurity;
import org.springframework.security.config.annotation.web.builders.HttpSecurity;
import org.springframework.security.config.annotation.web.configuration.WebSecurityConfigurerAdapter;
import org.springframework.security.config.http.SessionCreationPolicy;
import org.springframework.security.crypto.bcrypt.BCryptPasswordEncoder;
import org.springframework.security.crypto.password.PasswordEncoder;
import org.springframework.security.web.AuthenticationEntryPoint;
import org.springframework.security.web.access.AccessDeniedHandler;
import org.springframework.security.web.authentication.UsernamePasswordAuthenticationFilter;@Configuration
@EnableGlobalMethodSecurity(prePostEnabled = true)
public class SecurityConfig extends WebSecurityConfigurerAdapter {//创建BCryptPasswordEncoder注入容器@Beanpublic PasswordEncoder passwordEncoder(){return new BCryptPasswordEncoder();}@Autowiredprivate JwtAuthenticationTokenFilter jwtAuthenticationTokenFilter;@Autowiredprivate AuthenticationEntryPoint authenticationEntryPoint;@Autowiredprivate AccessDeniedHandler accessDeniedHandler;@Overrideprotected void configure(HttpSecurity http) throws Exception {http//关闭csrf.csrf().disable()//不通过Session获取SecurityContext.sessionManagement().sessionCreationPolicy(SessionCreationPolicy.STATELESS).and().authorizeRequests()// 对于登录接口 允许匿名访问.antMatchers("/user/login").anonymous()
//                .antMatchers("/testCors").hasAuthority("system:dept:list222")// 除上面外的所有请求全部需要鉴权认证.anyRequest().authenticated();//添加过滤器http.addFilterBefore(jwtAuthenticationTokenFilter, UsernamePasswordAuthenticationFilter.class);//配置异常处理器http.exceptionHandling()//配置认证失败处理器.authenticationEntryPoint(authenticationEntryPoint).accessDeniedHandler(accessDeniedHandler);//允许跨域http.cors();}@Bean@Overridepublic AuthenticationManager authenticationManagerBean() throws Exception {return super.authenticationManagerBean();}
}
五、跨域问题解决方案
浏览器出于安全的考虑,使用 XMLHttpRequest对象发起 HTTP请求时必须遵守同源策略,否则就是跨域的HTTP请求,默认情况下是被禁止的。 同源策略要求源相同才能正常进行通信,即协议、域名、端口号都完全一致。
前后端分离项目,前端项目和后端项目一般都不是同源的,所以肯定会存在跨域请求的问题。
所以我们就要处理一下,让前端能进行跨域请求。
①先对SpringBoot配置,运行跨域请求
import org.springframework.context.annotation.Configuration;
import org.springframework.web.servlet.config.annotation.CorsRegistry;
import org.springframework.web.servlet.config.annotation.WebMvcConfigurer;@Configuration
public class CorsConfig implements WebMvcConfigurer {@Overridepublic void addCorsMappings(CorsRegistry registry) {// 设置允许跨域的路径registry.addMapping("/**")// 设置允许跨域请求的域名.allowedOriginPatterns("*")// 是否允许cookie.allowCredentials(true)// 设置允许的请求方式.allowedMethods("GET", "POST", "DELETE", "PUT")// 设置允许的header属性.allowedHeaders("*")// 跨域允许时间.maxAge(3600);}
}
②开启SpringSecurity的跨域访问
由于我们的资源都会收到SpringSecurity的保护,所以想要跨域访问还要让SpringSecurity运行跨域访问。

六、其他权限校验方法
我们前面都是使用@PreAuthorize注解,然后在在其中使用的是hasAuthority方法进行校验。
SpringSecurity还为我们提供了其它方法例如:hasAnyAuthority,hasRole,hasAnyRole等。
这里我们先不急着去介绍这些方法,我们先去理解hasAuthority的原理,然后再去学习其他方法你就更容易理解,而不是死记硬背区别。并且我们也可以选择定义校验方法,实现我们自己的校验逻辑。
hasAuthority方法实际是执行到了SecurityExpressionRoot的hasAuthority,大家只要断点调试既可知道它内部的校验原理。
它内部其实是调用authentication的getAuthorities方法获取用户的权限列表。然后判断我们存入的方法参数数据在权限列表中。
hasAnyAuthority方法可以传入多个权限,只有用户有其中任意一个权限都可以访问对应资源。
@RequestMapping("/hello")@PreAuthorize("hasAnyAuthority('admin','test','system:dept:list')")public String hello(){return "hello";}hasRole要求有对应的角色才可以访问,但是它内部会把我们传入的参数拼接上 ROLE_ 后再去比较。所以这种情况下要用用户对应的权限也要有 ROLE_ 这个前缀才可以。
@RequestMapping("/hello")@PreAuthorize("hasRole('system:dept:list')")public String hello(){return "hello";}hasAnyRole 有任意的角色就可以访问。它内部也会把我们传入的参数拼接上 ROLE_ 后再去比较。所以这种情况下要用用户对应的权限也要有 ROLE_ 这个前缀才可以。
@RequestMapping("/hello")@PreAuthorize("hasAnyRole('admin','system:dept:list')")public String hello(){return "hello";}七、自定义权限校验方法
我们也可以定义自己的权限校验方法,在@PreAuthorize注解中使用我们的方法。
import com.fox.domain.LoginUser;
import org.springframework.security.core.Authentication;
import org.springframework.security.core.context.SecurityContextHolder;
import org.springframework.stereotype.Component;import java.util.List;@Component("ex")
public class FoxExpressionRoot {public boolean hasAuthority(String authority){//获取当前用户的权限Authentication authentication = SecurityContextHolder.getContext().getAuthentication();LoginUser loginUser = (LoginUser) authentication.getPrincipal();List<String> permissions = loginUser.getPermissions();//判断用户权限集合中是否存在authorityreturn permissions.contains(authority);}
}
在SPEL表达式中使用 @ex相当于获取容器中bean的名字未ex的对象。然后再调用这个对象的
hasAuthority方法:
@RequestMapping("/hello")@PreAuthorize("@ex.hasAuthority('system:dept:list')")public String hello(){return "hello";}八、基于配置的权限控制
我们也可以在配置类中使用使用配置的方式对资源进行权限控制。
相关文章:
如何利用SpringSecurity进行认证与授权
目录 一、SpringSecurity简介 1.1 入门Demo 二、认证 编辑 2.1 SpringSecurity完整流程 2.2 认证流程详解 2.3 自定义认证实现 2.3.1 数据库校验用户 2.3.2 密码加密存储 2.3.3 登录接口实现 2.3.4 认证过滤器 2.3.5 退出登录 三、授权 3.1 权限系统作用 3.2 授…...
如何简单上手清华AutoGPT并搭建到本地环境
一、准备工作 安装Docker:确保你的本地机器上已经安装了Docker。如果还没有安装,请访问Docker官方网站并按照指引进行安装。--点击进入Docker官网 获取清华AutoGPT的Docker镜像:清华AutoGPT团队可能已经提供了一个Docker镜像,方便…...
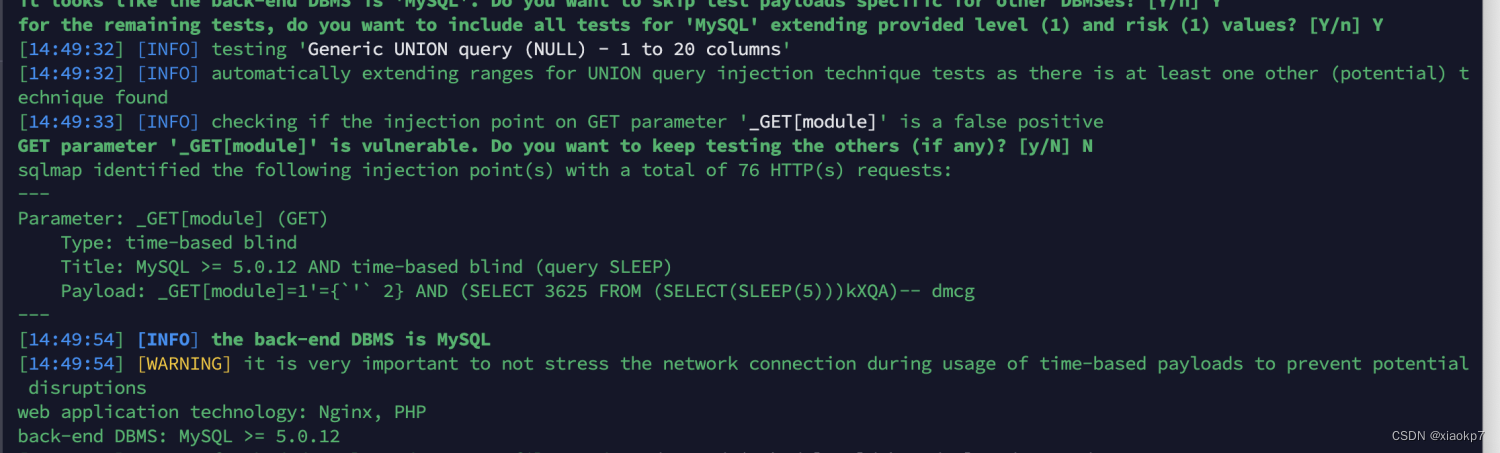
【漏洞复现-通达OA】通达OA share存在前台SQL注入漏洞
一、漏洞简介 通达OA(Office Anywhere网络智能办公系统)是由北京通达信科科技有限公司自主研发的协同办公自动化软件,是与中国企业管理实践相结合形成的综合管理办公平台。通达OA为各行业不同规模的众多用户提供信息化管理能力,包…...

HTML5 Canvas与JavaScript携手绘制动态星空背景
目录 一、程序代码 二、代码原理 三、运行效果 一、程序代码 <!DOCTYPE html> <html> <head> <meta charset"UTF-8"> <title>星空背景</title> </head> <body style"overflow-x:hidden;"><canvas …...

如何优雅地与ChatGPT对话?
ChatGPT已经发布了一年之久了,但你真的会使用ChatGPT吗?同一个问题,不同的问法得到的答案可能千差万别,你可以把ChatGPT当作一个知识面很广的专家,他上知天文下知地理,但他无法直接知道你的意图,…...

AI提示工程实战:从零开始利用提示工程学习应用大语言模型【文末送书-19】
文章目录 背景什么是提示工程?从零开始:准备工作设计提示调用大语言模型 实际应用示例文字创作助手代码生成持续优化与迭代数据隐私与安全性可解释性与透明度总结 AI提示工程实战:从零开始利用提示工程学习应用大语言模型【文末送书-19】⛳粉…...

量子算法入门——3.狄拉克符号与量子态(3)
3. 狄拉克符号的数学基础 左矢是右矢的共轭转置 上标*表示共轭 算符就是对狄拉克符号进行操作,就是相当于矩阵操作向量,算符对应本征值和本征态 本征值:拉伸x、y向量的程度本征态:x、y向量 上标匕首🗡符号…...
list)
c++ STL系列——(三)list
目录 引言 list的特点 list的用法 list与其他容器的比较 结论 引言 在C STL中,list 是一个非常灵活且功能强大的双向链表容器,它允许存储任意类型的元素,并提供了丰富的操作函数,包括插入、删除、排序、查找以及对容器的遍历…...
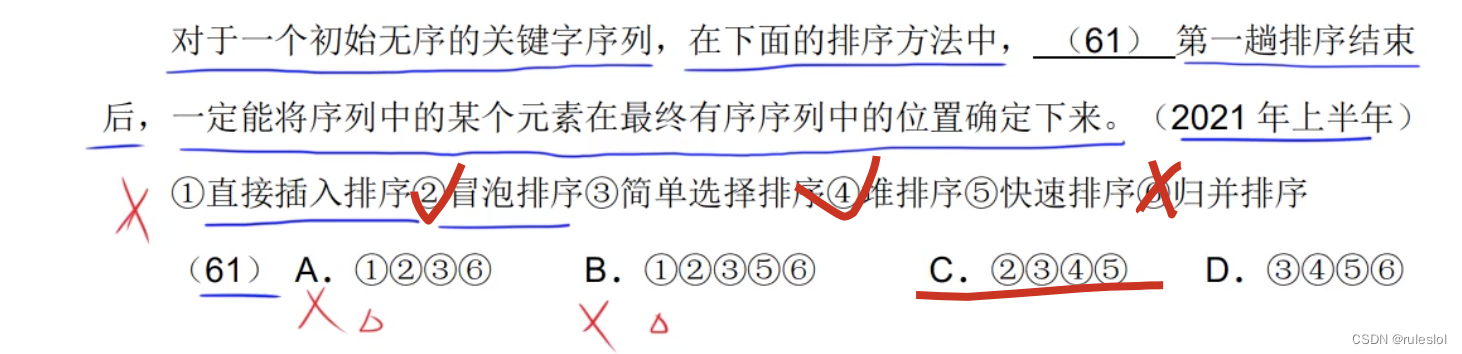
软考29-上午题-排序
一、排序的基本概念 1-1、稳定性 稳定性指的是相同的数据所在的位置经过排序后是否发生变化。若是排序后,次序不变,则是稳定的。 1-2、归位 每一趟排序能确定一个元素的最终位置。 1-3、内部排序 排序记录全部存放在内存中进行排序的过程。 1-4、外部…...

【详细流程】vue+Element UI项目中使用echarts绘制圆环图 折线图 饼图 柱状图
vueElement UI项目中数据分析功能需要用到圆环图 折线图 饼图 柱状图等,可视化图形分析 安装流程及示例 1.安装依赖 npm install echarts --save2.在main.js中引入并挂载echarts import echarts from echarts Vue.prototype.$echarts echarts3.在需要使用echart…...

Unity之XR Interaction Toolkit如何在VR中实现一个可以拖拽的UI
前言 普通的VR项目中,我们常见的UI都是一个3D的UI,放置在场景中的某个位置,方便我们使用射线点击。但是为了更好的体验,我们可能会有跟随头显的UI,或者可拖拽的UI,这样更方便用户去操作。 所以我们今天的需求就是:如何基于XR Interaction Toolkit 插件 在VR中使用手柄射…...

开源项目热度榜单
题目描述 某个开源社区希望将最近热度比较高的开源项目出一个榜单,推荐给社区里面的开发者。对于每个开源项目,开发者可以进行关注(watch)、收藏(star)、fork、提issue、提交合并请求(MR)等。 数据库里面统计了每个开源项目关注、收藏、fork、issue、M…...

Ubuntu系统搭建HadSky论坛并结合内网穿透实现无公网ip远程访问
💝💝💝欢迎来到我的博客,很高兴能够在这里和您见面!希望您在这里可以感受到一份轻松愉快的氛围,不仅可以获得有趣的内容和知识,也可以畅所欲言、分享您的想法和见解。 推荐:kwan 的首页,持续学…...

gowin GW1N4 LED
基于上已篇文章基础上增加LED闪烁的功能 《gowin GW1N4 OSC IP 使用》 gowin GW1N4 OSC IP 使用-CSDN博客 https://blog.csdn.net/wzy15965343032/article/details/136172184?spm1001.2014.3001.5502 代码: module osc_test(input rst_n,output test_clk,output …...
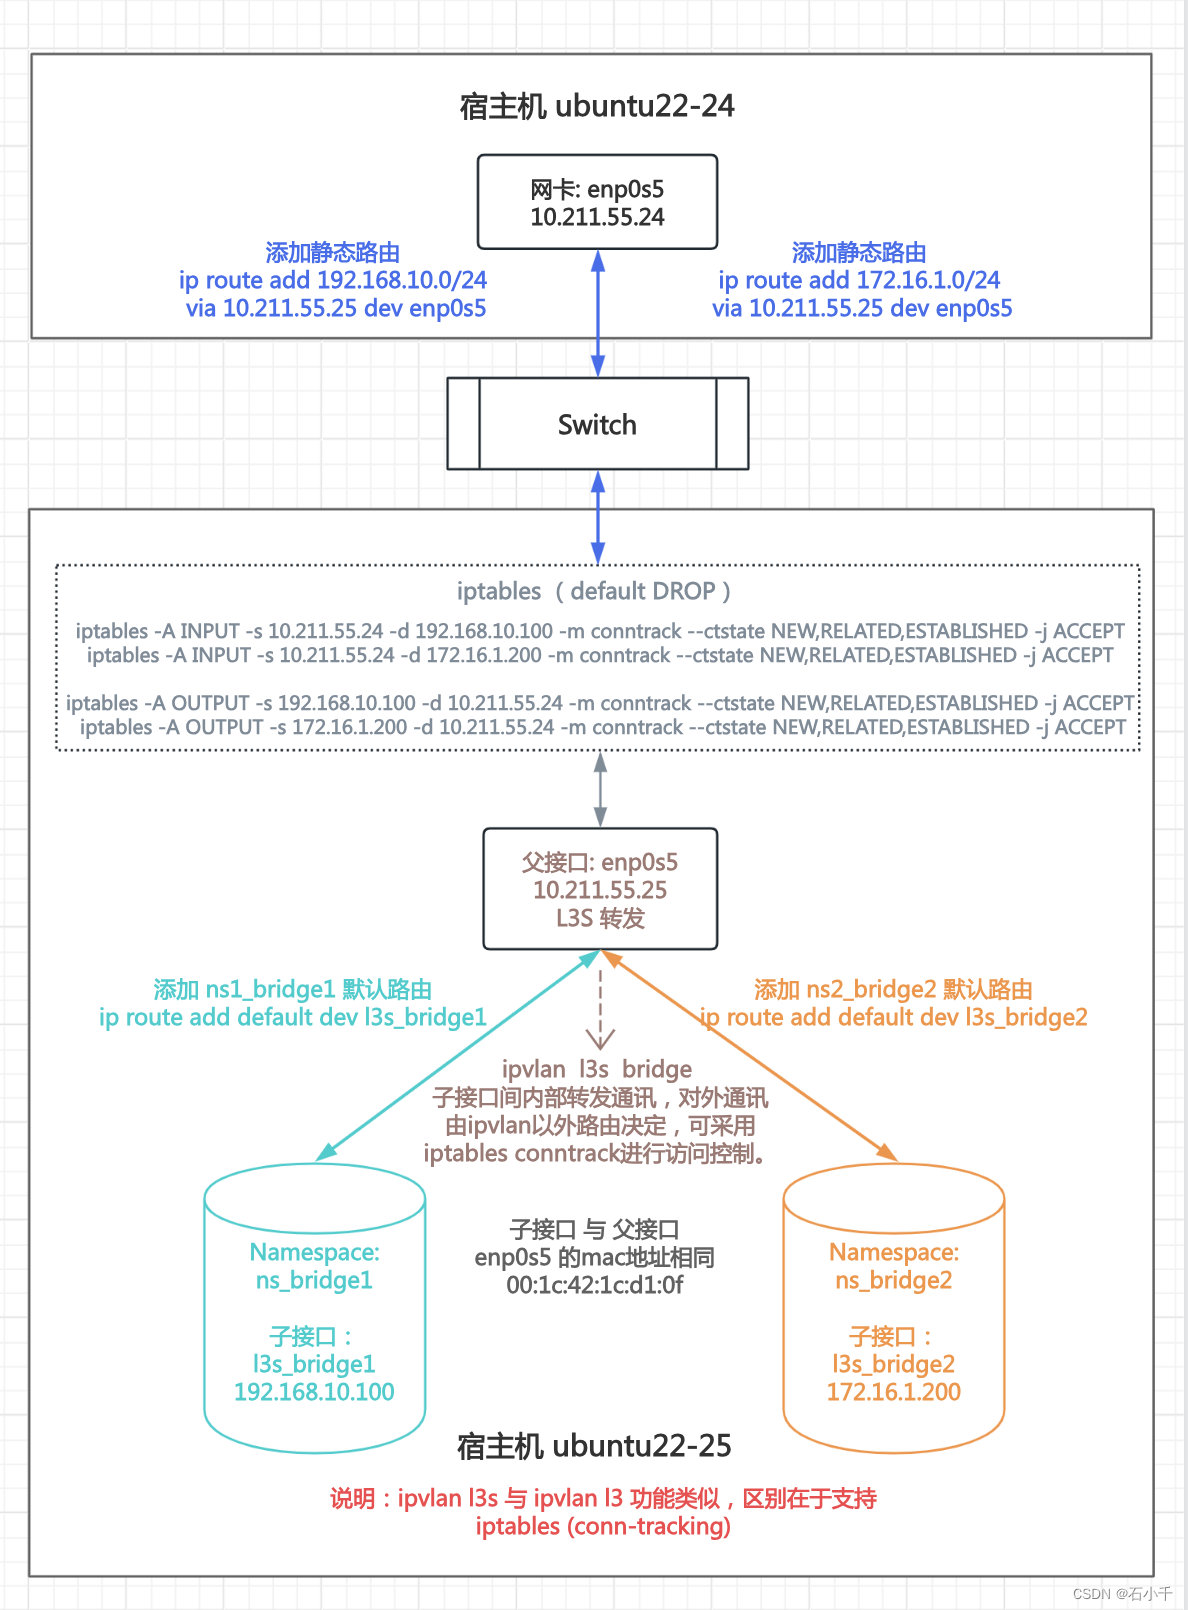
Linux ipvlan详解(l2、l3、l3s和bridge、private和vepa模式)
Linux ipvlan详解,测试l2、l3、l3s和bridge、private和vepa模式。 最近在看Docker的网络,看到关于ipvlan网络的介绍。查阅了相关资料,记录如下。 参考 1.图解几个与Linux网络虚拟化相关的虚拟网卡-VETH/MACVLAN/MACVTAP/IPVLAN 2.IPVlan 详…...

理解并实现OpenCV中的图像平滑技术
导读 图像模糊(也称为图像平滑)是计算机视觉和图像处理中的基本操作之一。模糊图像通常是噪声减少、边缘检测和特征提取等应用的第一步。在本博客中,我们将重点介绍如何使用Python中的OpenCV库应用多种模糊技术。 理论概述: 基本…...
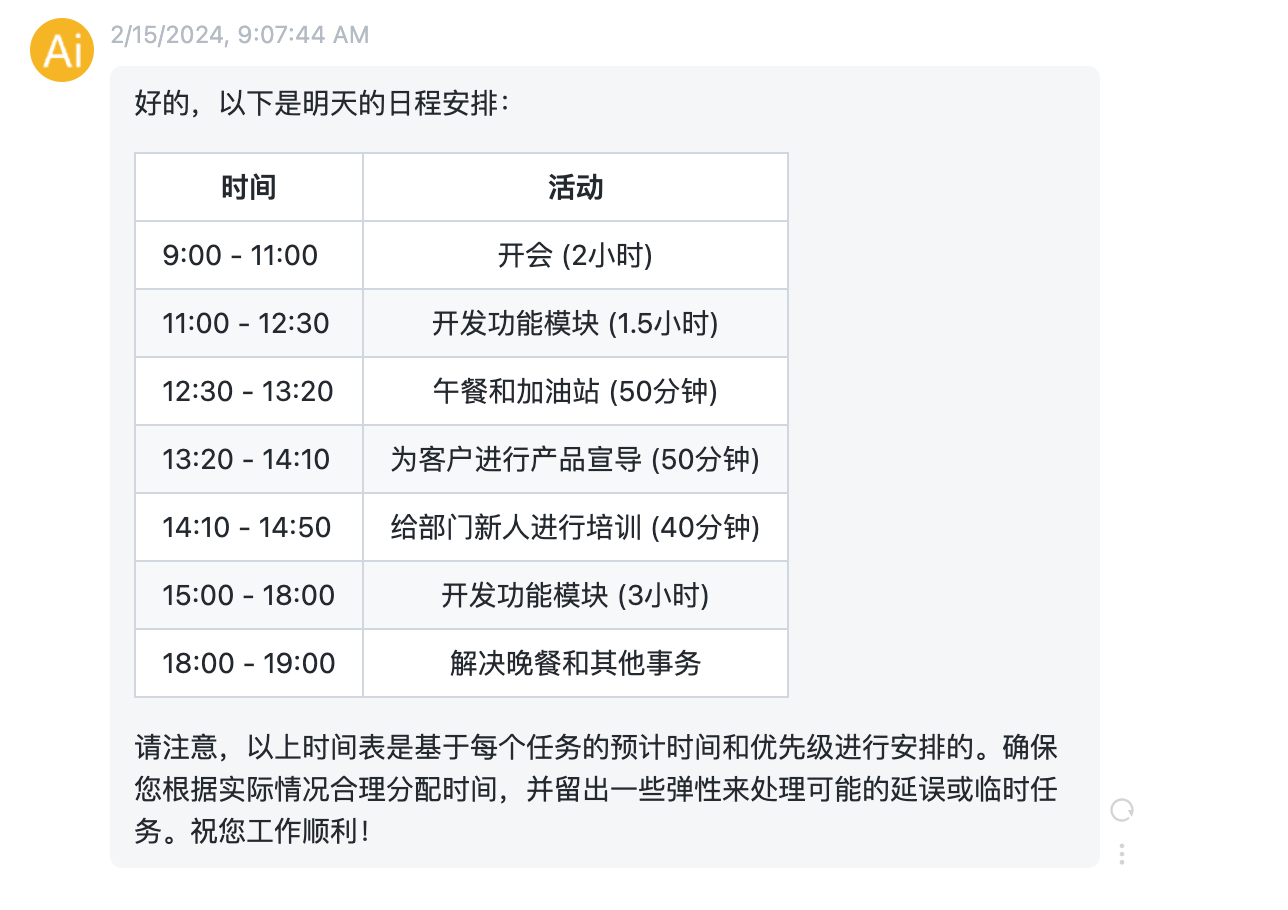
ChatGPT高效提问—prompt实践(白领助手)
ChatGPT高效提问—prompt实践(白领助手) 随着社会的不断发展,白领的比例越来越高。白领的工作通常较为繁忙,需要管理复杂的项目。工作量大、要求高、任务紧急,时间分配不当部分可能导致工作效率低下,任…...

Code Composer Studio (CCS) - Comment (注释)
Code Composer Studio [CCS] - Comment [注释] References Add Block Comment: 选中几行代码 -> 鼠标右键 -> Source -> Add Block Comment shortcut key: Ctrl Shift / Remove Block Comment: 选中几行代码->鼠标右键->Source->Remove Block Comment s…...

springboot/ssm校园菜鸟驿站管理系统Java校园快递取件管理系统
springboot/ssm校园菜鸟驿站管理系统Java校园快递取件管理系统 开发语言:Java 框架:springboot(可改ssm) vue JDK版本:JDK1.8(或11) 服务器:tomcat 数据库:mysql 5.…...

【Mybatis】TypeHandler使用
引言 在使用MyBatis进行项目开发时,我们经常会遇到Java类型与数据库类型不匹配的情况。为了解决这一问题,MyBatis提供了一个强大的机制——TypeHandler。TypeHandler是MyBatis中一个用于处理Java类型和数据库类型转换的组件,它在MyBatis进行…...

终极资源嗅探指南:猫抓浏览器扩展帮你轻松捕获网页媒体资源
终极资源嗅探指南:猫抓浏览器扩展帮你轻松捕获网页媒体资源 【免费下载链接】cat-catch 猫抓 浏览器资源嗅探扩展 / cat-catch Browser Resource Sniffing Extension 项目地址: https://gitcode.com/GitHub_Trending/ca/cat-catch 在当今数字时代,…...

Sunshine虚拟手柄终极指南:解决游戏串流控制难题
Sunshine虚拟手柄终极指南:解决游戏串流控制难题 【免费下载链接】Sunshine Self-hosted game stream host for Moonlight. 项目地址: https://gitcode.com/GitHub_Trending/su/Sunshine 在游戏串流体验中,最令人沮丧的莫过于手柄连接失败、按键映…...
)
保姆级教程:手把手复现4D-CRNN脑电情绪识别模型(基于DEAP/SEED数据集)
4D-CRNN脑电情绪识别模型实战指南:从数据预处理到模型训练在脑机接口与情感计算领域,4D-CRNN模型因其出色的多维度特征提取能力而备受关注。本文将带您从零开始,完整复现这一前沿模型在DEAP和SEED数据集上的实现过程。不同于理论讲解…...

机器人跨模态感知:用视觉替代触觉实现非抓取操作
1. 项目概述:当机器人“看不见”接触时,如何让它“感觉”到?在机器人移动操作领域,尤其是非抓取操作(比如推、拉、滑动物体),精确感知机器人与物体之间的接触状态至关重要。传统的解决方案依赖于…...

量子机器学习在日志异常检测中的应用:QULOG框架解析与实践
1. 项目概述与核心价值日志异常检测(Log-based Anomaly Detection, LogAD)是智能运维(AIOps)的基石,其核心任务是从海量、半结构化、充满噪声的系统日志流中,自动识别出预示着潜在故障或异常行为的模式。随…...

Proxmox断电后启动失败深度复盘:不只是GRUB,LVM卷组损坏才是元凶
Proxmox断电后启动失败深度复盘:不只是GRUB,LVM卷组损坏才是元凶凌晨三点,服务器机房的备用电源耗尽警报响起。当电力恢复后,运维团队发现基于Proxmox VE 7.x的虚拟化平台无法启动——GRUB救援界面不断抛出unknown filesystem和di…...

LeetCode 238:除自身以外数组的乘积 | 前缀积与后缀积
LeetCode 238:除自身以外数组的乘积 | 前缀积与后缀积 引言 除自身以外数组的乘积(Product of Array Except Self)是 LeetCode 第 238 题,难度为 Medium。题目要求在 O(n) 时间内不使用除法计算每个元素除自身以外所有其他元素的乘…...

使用C#进行PDF页面裁剪的多种方法
引言在实际业务场景中,我们经常需要对 PDF 文档进行精细化处理,其中页面裁剪是一项常见需求。无论是移除文档边缘的空白区域、提取页面中的特定内容,还是调整页面尺寸以适应不同展示需求,PDF 页面裁剪都发挥着重要作用。本文将介绍…...

移动端3D高斯泼溅渲染优化:Lumina系统架构解析
1. 移动神经渲染的挑战与机遇在增强现实(AR)和虚拟现实(VR)应用中,实时高质量的3D场景渲染一直是核心技术挑战。传统基于三角形网格的渲染管线虽然效率高,但在处理复杂光照和材质时往往力不从心。神经辐射场…...

AI企业参与国防采购的挑战、机遇与实操路线图
1. 项目概述:当AI遇见国防采购,一场静默的“双向奔赴”在硅谷的咖啡厅和五角大楼的简报室之间,正上演着一场深刻而复杂的对话。话题的核心,是人工智能这项被誉为“新时代电力”的技术,如何融入世界上最庞大、最严谨的采…...