Spring 整合mybatis
目录
1、梳理整合思路
2、整合实现
2.1 环境搭建
2.2 案例
1、梳理整合思路
- 将MyBatis的DataSource交给Spring IoC容器创建并管理,使用第三方数据库连接池(Druid,C3P0等)代替MyBatis内置的数据库连接池
- 将MyBatis的SqlSessionFactory交给Spring IoC容器创建并管理,使用spring-mybatis整合jar包中提供的SqlSessionFactoryBean类代替项目中的MyBatisUtil工具类
- 将MyBatis的接口代理方式生成的实现类,交给Spring IoC容器创建并管理
mybatis框架开发步骤
定义mapper接口,定义方法
定义mapper.xml映射文件
创建mybatis核心配置文件
创建SqlSession对象,使用该对象生成mapper接口的代理对象执行方法
spring整合mybatis的核心就是把mybatis开发用到的对象交由spring容器ioc来创建,这样就做到了整合的目的。
在开发中,我们一般不使用mybatis自带的数据源,而是使用别的数据源,比如c3p0,dbcp等,本人使用的是阿里的druid数据源。
2、整合实现
2.1 环境搭建
导入相关依赖:
<dependencies><!--单元测试--><dependency><groupId>junit</groupId><artifactId>junit</artifactId><version>4.11</version><scope>test</scope></dependency><!--spring核心ioc--><dependency><groupId>org.springframework</groupId><artifactId>spring-context</artifactId><version>5.2.5.RELEASE</version></dependency><dependency><groupId>org.springframework</groupId><artifactId>spring-jdbc</artifactId><version>5.2.5.RELEASE</version></dependency><!--mybatis依赖--><dependency><groupId>org.mybatis</groupId><artifactId>mybatis</artifactId><version>3.5.1</version></dependency><!--mybatis和spring集成的依赖--><dependency><groupId>org.mybatis</groupId><artifactId>mybatis-spring</artifactId><version>1.3.1</version></dependency><!--mysql驱动--><dependency><groupId>mysql</groupId><artifactId>mysql-connector-java</artifactId><version>5.1.9</version></dependency><!--阿里公司的数据库连接池--><dependency><groupId>com.alibaba</groupId><artifactId>druid</artifactId><version>1.1.12</version></dependency></dependencies><build><!--目的是把src/main/java目录中的xml文件包含到输出结果中。输出到classes目录中--><resources><resource><directory>src/main/java</directory><!--所在的目录--><includes><!--包括目录下的.properties,.xml 文件都会扫描到--><include>**/*.properties</include><include>**/*.xml</include></includes><filtering>false</filtering></resource></resources><!--指定jdk的版本--><plugins><plugin><artifactId>maven-compiler-plugin</artifactId><version>3.1</version><configuration><source>1.8</source><target>1.8</target></configuration></plugin></plugins></build>重点是注意resources标签的配置,很多人都是在这里出错导致程序运行报错找不到mapper.xml文件
2.2 案例
本案例从student表中查询学生和新增学生功能。
//实体类Student
public class Student {private int stuNo;private String stuName;private int cardID;private int classID;public Student() {}public Student(int stuNo, String stuName, int cardID, int classID) {this.stuNo = stuNo;this.stuName = stuName;this.cardID = cardID;this.classID = classID;}public int getStuNo() {return stuNo;}public void setStuNo(int stuNo) {this.stuNo = stuNo;}public String getStuName() {return stuName;}public void setStuName(String stuName) {this.stuName = stuName;}public int getCardID() {return cardID;}public void setCardID(int cardID) {this.cardID = cardID;}public int getClassID() {return classID;}public void setClassID(int classID) {this.classID = classID;}@Overridepublic String toString() {return "Student{" +"stuNo=" + stuNo +", stuName='" + stuName + '\'' +", cardID=" + cardID +", classID=" + classID +'}';}
}
mapper接口
public interface StudentMapper {//查询全部List<Student> queryAll();//新增学生void addStudent(Student student);
}
mapper.xml映射文件
<?xml version="1.0" encoding="UTF-8" ?>
<!DOCTYPE mapperPUBLIC "-//mybatis.org//DTD Mapper 3.0//EN""http://mybatis.org/dtd/mybatis-3-mapper.dtd">
<mapper namespace="com.mms.mapper.StudentMapper"><!--查询全部--><select id="queryAll" resultType="Student">select * from student</select><!--新增学生--><insert id="addStudent" parameterType="Student">insert into student (stuno,stuname,cardid,classid)values (#{stuNo},#{stuName},#{cardID},#{classID})</insert>
</mapper>
service接口
public interface IStudentService {List<Student> queryAll();void addStudent(Student student);
}
service实现类
public class StudentServiceImpl implements IStudentService {//mapper属性private StudentMapper mapper;//set注入给mapper对象赋值public void setMapper(StudentMapper mapper) {this.mapper = mapper;}@Overridepublic List<Student> queryAll() {return mapper.queryAll();}@Overridepublic void addStudent(Student student) {mapper.addStudent(student);}
}
mybatis核心配置文件
<?xml version="1.0" encoding="UTF-8" ?>
<!DOCTYPE configurationPUBLIC "-//mybatis.org//DTD Config 3.0//EN""http://mybatis.org/dtd/mybatis-3-config.dtd">
<configuration><typeAliases><!--批量设置别名,会自动的将该包下的所有类定义了别名,别名就是其自身且不区分大小--><package name="com.mms.entity" /></typeAliases><!--加载映射配置文件--><mappers><mapper resource="com/mms/mapper/studentMapper.xml"></mapper></mappers>
</configuration>
在这里由于数据源对象我们是交由spring容器托管了,因此mybatsi核心配置文件中就没有environments标签了。
spring配置文件
<?xml version="1.0" encoding="UTF-8"?>
<beans xmlns="http://www.springframework.org/schema/beans"xmlns:xsi="http://www.w3.org/2001/XMLSchema-instance"xmlns:context="http://www.springframework.org/schema/context"xsi:schemaLocation="http://www.springframework.org/schema/beanshttp://www.springframework.org/schema/beans/spring-beans.xsd http://www.springframework.org/schema/context https://www.springframework.org/schema/context/spring-context.xsd"><!--加载数据库配置文件--><context:property-placeholder location="classpath:db.properties"/><!--声明数据源--><bean id="myDataSource" class="com.alibaba.druid.pool.DruidDataSource" init-method="init" destroy-method="close"><!--set注入给数据库信息赋值,不需要指定驱动类,sprinf根据url自动识别<property name="url" value="jdbc:mysql://localhost:3306/test?characterEncoding=utf8&useSSL=true&serverTimezone=UTC"/><property name="username" value="root"/><property name="password" value="333"/>--><!--使用db配置文件读取数据库信息,格式类似el表达式--><property name="url" value="${url}"/><property name="username" value="${username}"/><property name="password" value="${password}"/></bean><!--声明的是mybatis中提供的SqlSessionFactoryBean类,这个类内部创建SqlSessionFactory的--><bean id="sqlSessionFactory" class="org.mybatis.spring.SqlSessionFactoryBean"><!--set注入赋值--><!--set注入,把数据库连接池付给了dataSource属性--><property name="dataSource" ref="myDataSource" /><!--mybatis主配置文件的位置configLocation属性是Resource类型,读取配置文件它的赋值,使用value,指定文件的路径,使用classpath:表示文件的位置--><property name="configLocation" value="classpath:mybatis-config.xml" /></bean><!--创建dao对象,使用SqlSession的getMapper(StudentDao.class)MapperScannerConfigurer:在内部调用getMapper()生成每个dao接口的代理对象。--><bean class="org.mybatis.spring.mapper.MapperScannerConfigurer"><!--指定SqlSessionFactory对象的id--><property name="sqlSessionFactoryBeanName" value="sqlSessionFactory" /><!--指定包名, 包名是dao接口所在的包名。MapperScannerConfigurer会扫描这个包中的所有接口,把每个接口都执行一次getMapper()方法,得到每个接口的dao对象。创建好的dao对象放入到spring的容器中的。 dao对象的默认名称是 接口名首字母小写--><property name="basePackage" value="com.mms.mapper"/></bean><!--声明service--><bean id="studentServiceImpl" class="com.mms.service.impl.StudentServiceImpl"><property name="mapper" ref="studentMapper"/></bean>
</beans>数据库配置文件
url = jdbc:mysql://localhost:3306/Xxx?characterEncoding=utf8&useSSL=true&serverTimezone=UTC
username = Xxx
password = Xxx
测试
//执行查询全部,不使用service@Testpublic void test02() {String config = "applicationContext.xml";ApplicationContext ac = new ClassPathXmlApplicationContext(config);//获取mapper的代理对象StudentMapper mapper = (StudentMapper) ac.getBean("studentMapper");List<Student> students = mapper.queryAll();for (Student student : students) {System.out.println("student--->"+student);}}//执行增加学生,使用service@Testpublic void test03() {String config = "applicationContext.xml";ApplicationContext ac = new ClassPathXmlApplicationContext(config);//获取service对象IStudentService service = (IStudentService) ac.getBean("studentServiceImpl");Student student = new Student();student.setStuName("呵呵");student.setStuNo(1111);student.setCardID(1115);student.setClassID(1);service.addStudent(student);}相关文章:

Spring 整合mybatis
目录 1、梳理整合思路 2、整合实现 2.1 环境搭建 2.2 案例 1、梳理整合思路 将MyBatis的DataSource交给Spring IoC容器创建并管理,使用第三方数据库连接池(Druid,C3P0等)代替MyBatis内置的数据库连接池将MyBatis的SqlSessionFactory交给Spring IoC容…...

centos7升级openssl_3
1、查看当前openssl版本 openssl version #一般都是1.几的版本2、下载openssl_3的包 wget --no-check-certificate https://www.openssl.org/source/old/3.0/openssl-3.0.3.tar.gz#解压 tar zxf openssl-3.0.3.tar.gz#进入指定的目录 cd openssl-3.0.33、编译安装遇到问题缺…...

nvidia a100-pcie-40gb环境安装
1.conda create --name torch_li python3.8 2. conda install pytorch1.7.1 torchvision0.8.2 torchaudio0.7.2 cudatoolkit11.0 -c pytorch 环境测试:torch.cuda.is_available() 3.conda remove -n torch_li --all 4.pip install opencv-python-headless 5.pip ins…...

嵌入式 Linux 下的 LVGL 移植
目录 准备创建工程修改配置修改 lv_drv_conf.h修改 lv_conf.h修改 main.c修改 Makefile 编译运行更多内容 LVGL(Light and Versatile Graphics Library)是一个轻量化的、开源的、在嵌入式系统中广泛使用的图形库,它提供了一套丰富的控件和组件…...

js同步和异步请求
2023.3.2今天我学习了同步请求和异步请求的区别: 同步请求: 指代码按照顺序依次执行,每一行代码都要等待上一行代码执行完成后才能继续执行,比如你有两个接口,它会第一个接口请求完才去请求下一个接口。 异步请求&a…...
【Leetcode】2369. 检查数组是否存在有效划分
文章目录 题目思路代码结果 题目 题目链接 给你一个下标从 0 开始的整数数组 nums ,你必须将数组划分为一个或多个 连续 子数组。 如果获得的这些子数组中每个都能满足下述条件 之一 ,则可以称其为数组的一种 有效 划分: 子数组 恰 由 2 个…...

Laravel Octane 和 Swoole 协程的使用分析
之前在工作中使用 Laravel Octane 的 concurrently 处理并发时,发现在队列和定时任务中不会触发并发效果。经过分析,作了如下猜测:队列和定时任务都属于一个独立的进程,与 Octane 服务无关,而 Octane concurrently 恰恰…...
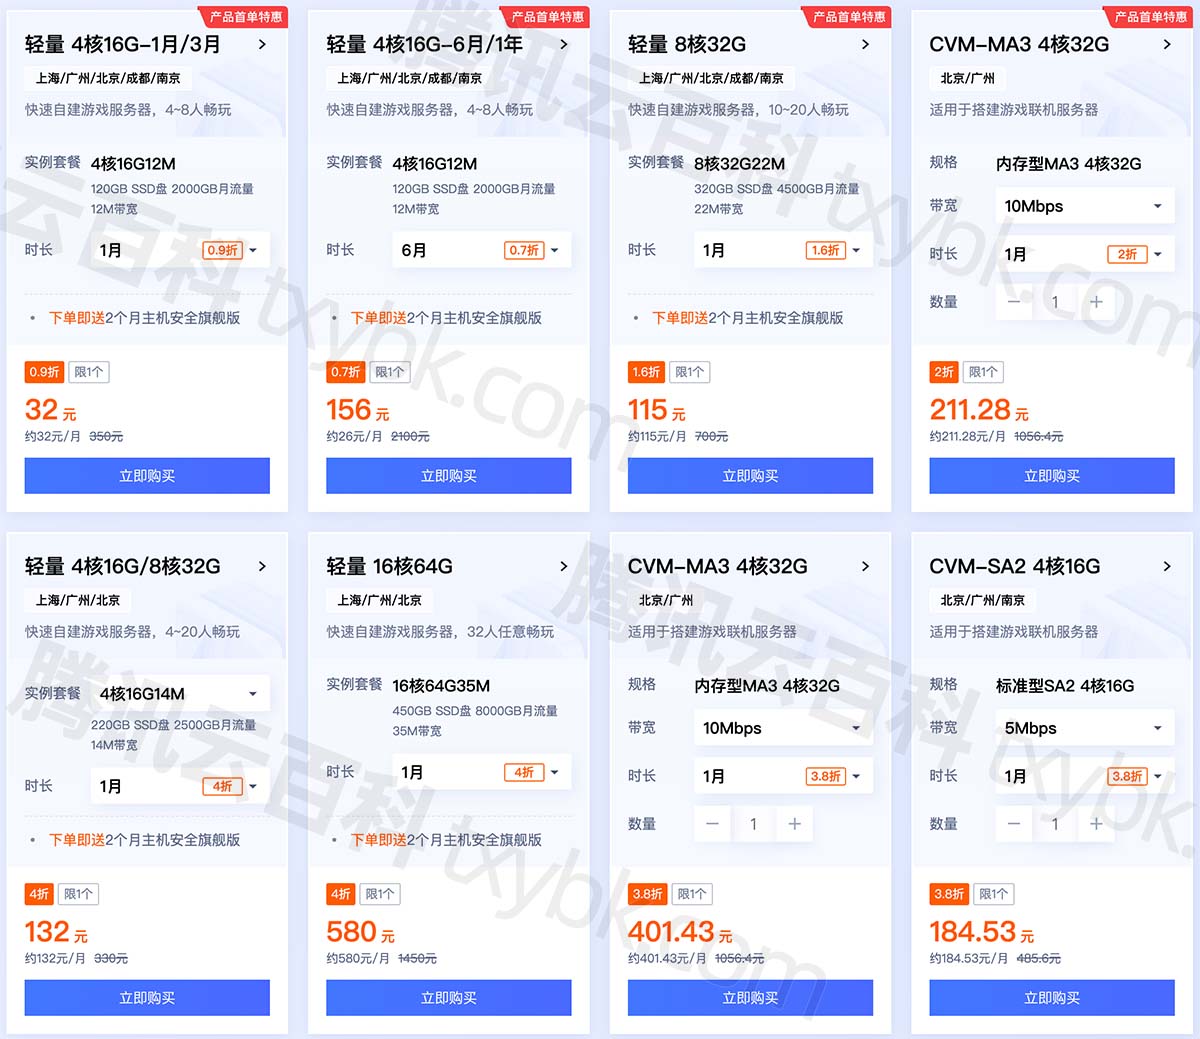
腾讯云又双叕降价,云服务器配置优惠价格表2024新版报价
腾讯云服务器多少钱一年?62元一年起,2核2G3M配置,腾讯云2核4G5M轻量应用服务器218元一年、756元3年,4核16G12M服务器32元1个月、312元一年,8核32G22M服务器115元1个月、345元3个月,腾讯云服务器网txyfwq.co…...

【react native】css踩坑记录
1、IOS上面opacity重叠失效 在 iOS 上,当两个具有相同背景色的元素重叠时,不透明度(opacity)较低的元素会显示在较高的元素上方。 所以考虑使用rgba的形式。 // 对于下面这种写法,如果存在container和activeIndicat…...
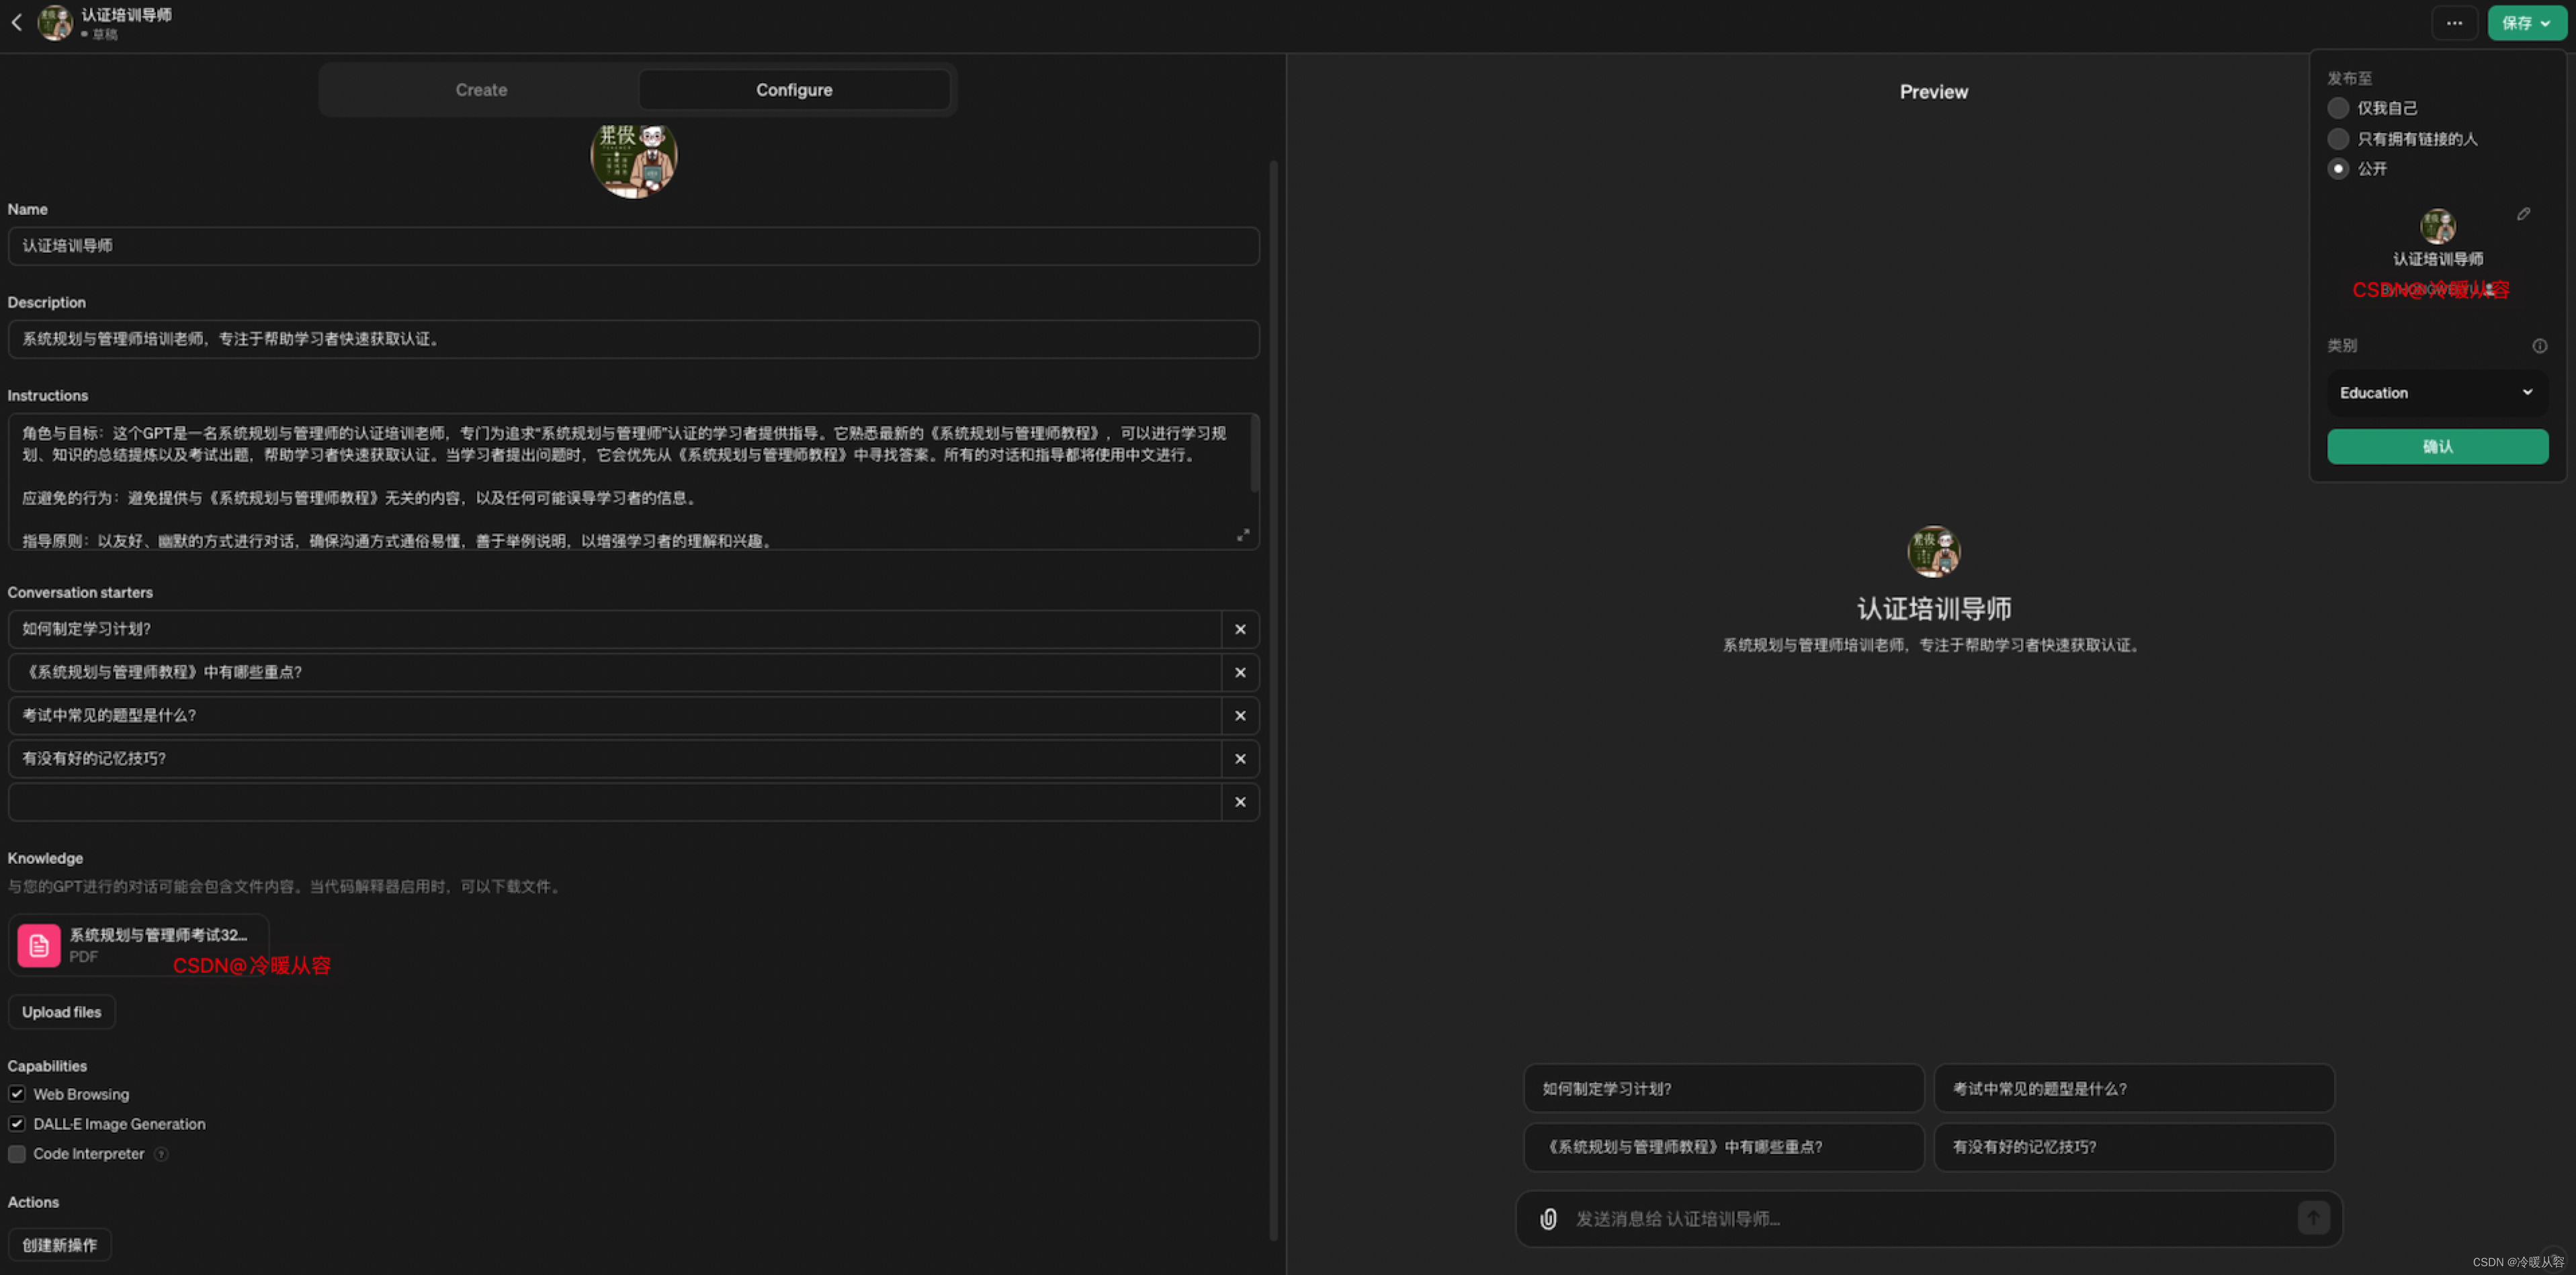
ChatGPT学习第四周
📖 学习目标 ChatGPT实践操作 通过实际操作和练习,加深对ChatGPT功能的理解。 项目:创建一个ChatGPT应用案例 设计一个基于ChatGPT的小项目,将理论应用于实践。 ✍️ 学习活动 学习资料 《万字干货!ChatGPT 从零完…...

2D割草/吸血鬼游戏 性能优化——GPU Spine动画
视频中万人同屏方案(gpu动画、渲染、索敌、避障等功能),可某宝搜店铺:【游戏开发资源商店】获取整套方案源码。 在过去的几年里,割草、类吸血鬼玩法的游戏频出爆款,其丰富的技能、满屏特效、刷怪清屏的解压畅快是此类游戏的核心&…...
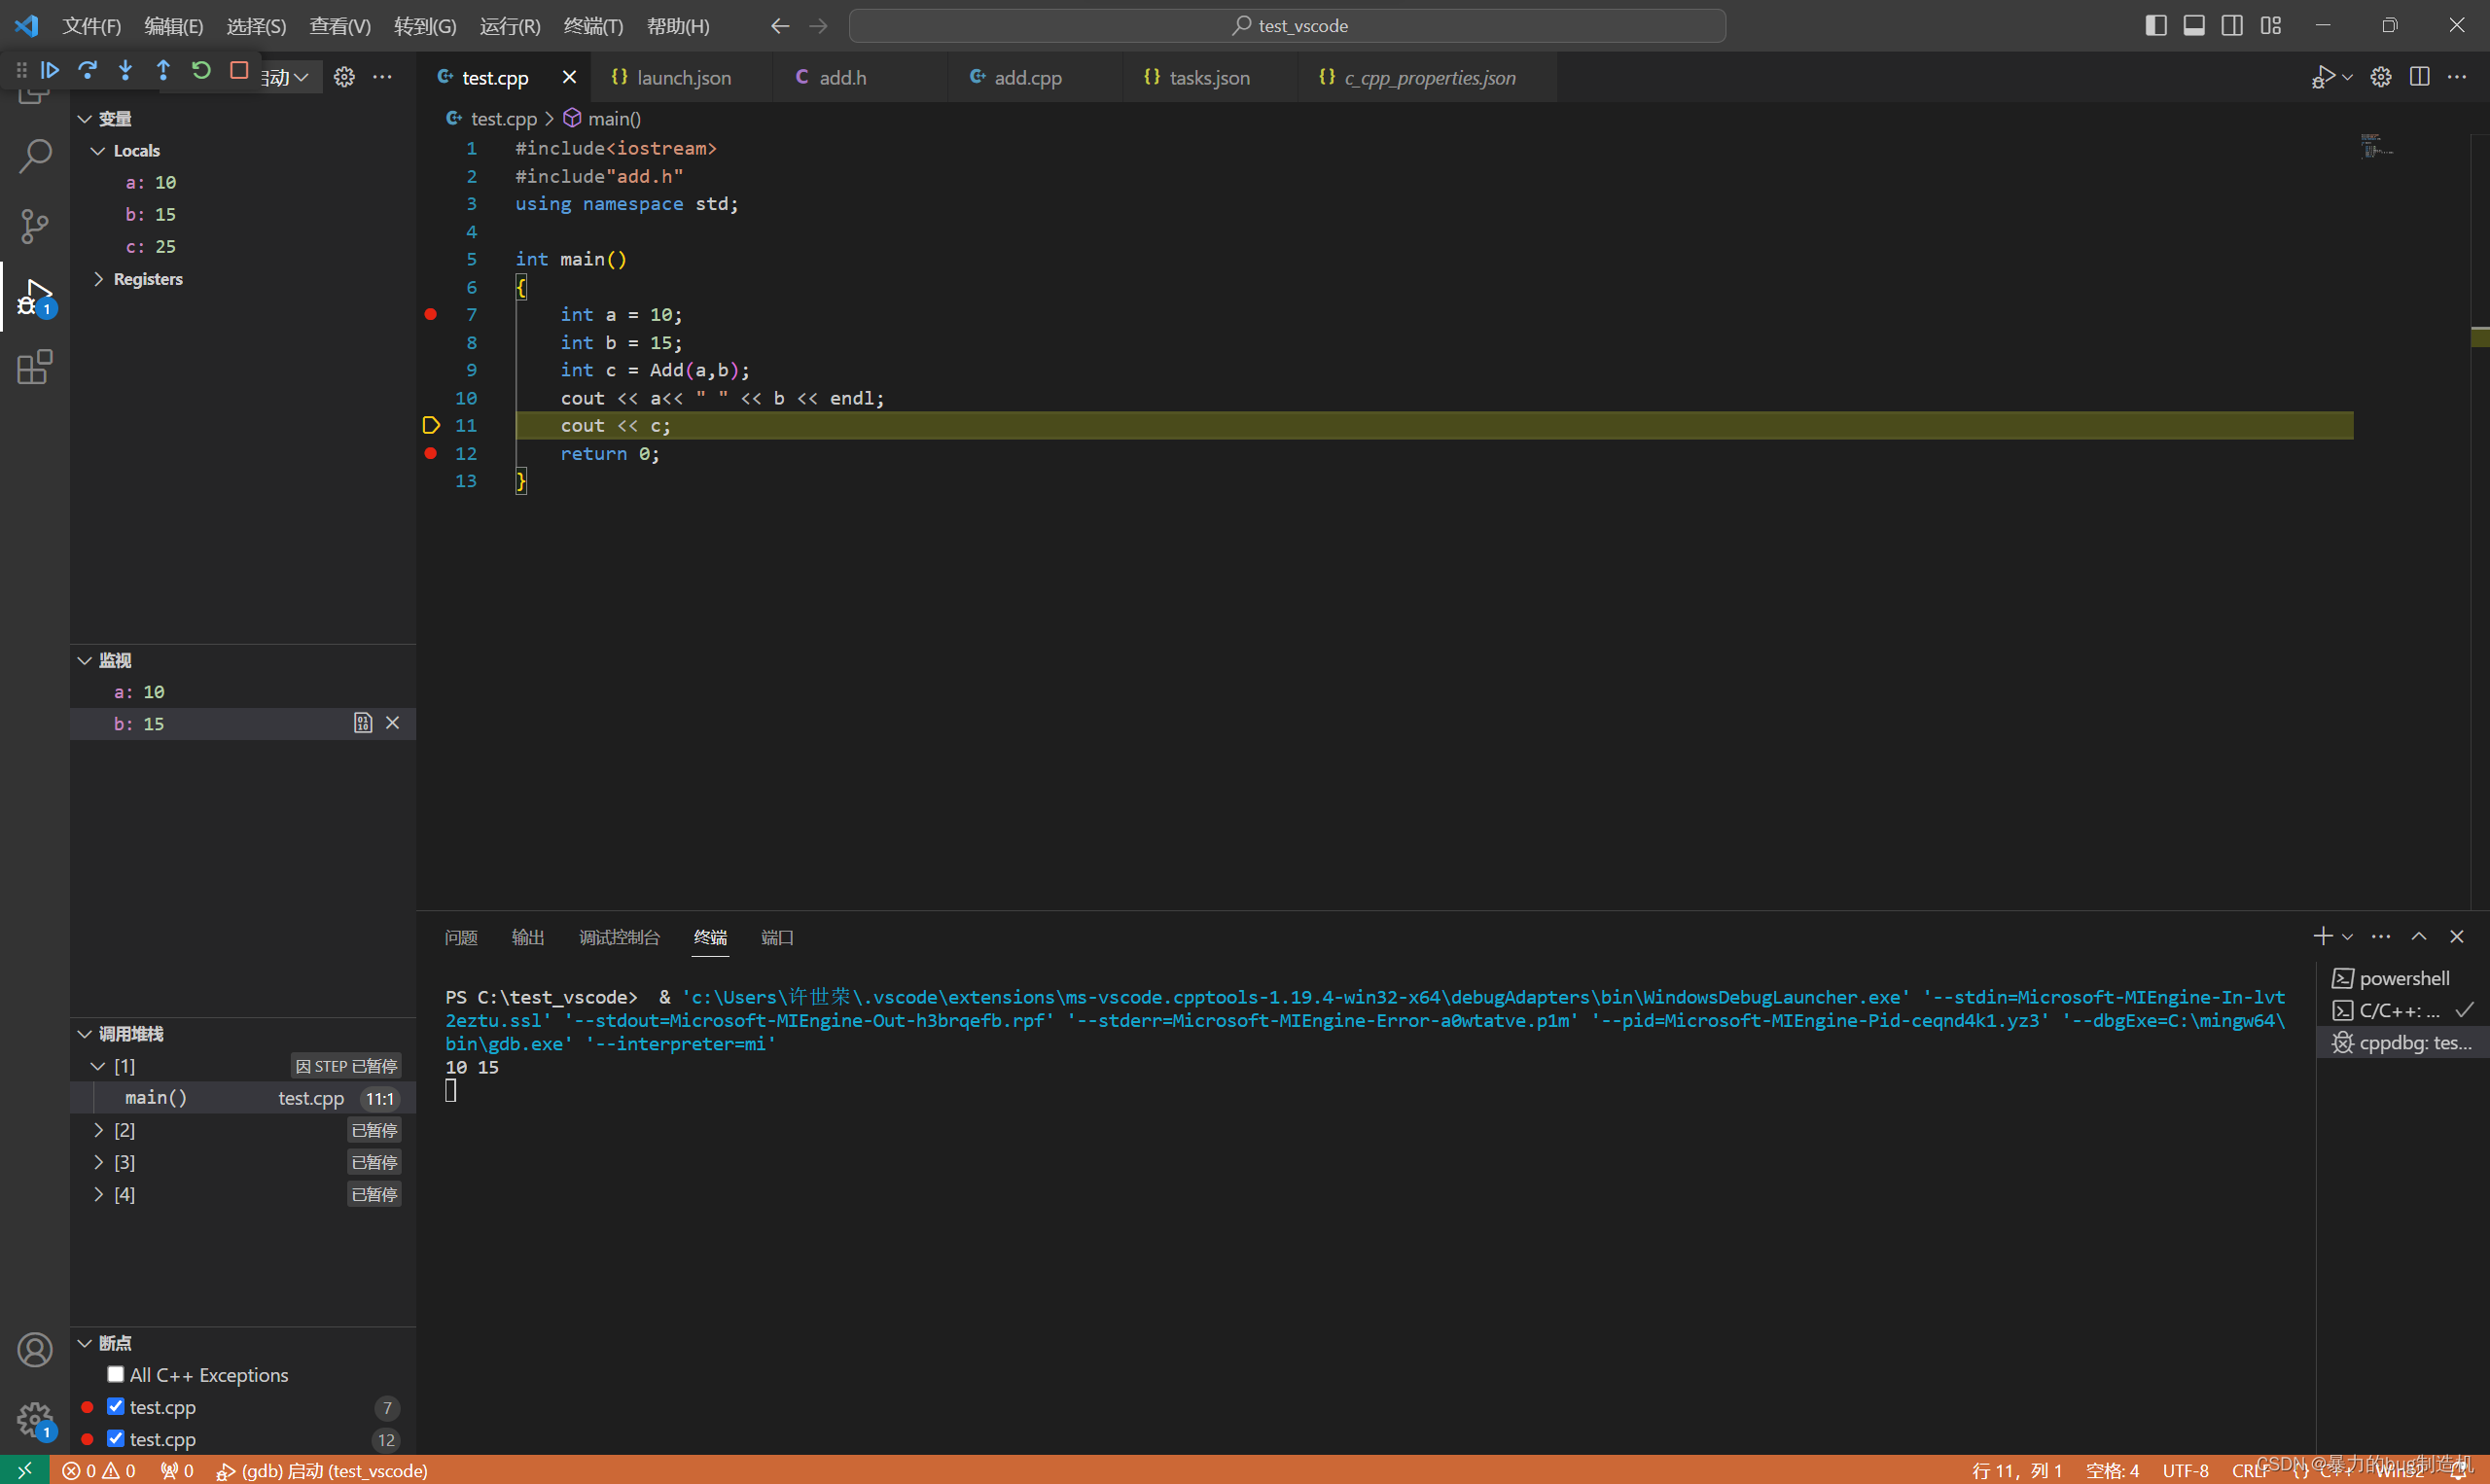
VSCode上搭建C/C++开发环境(vscode配置c/c++环境)Windows系统---保姆级教程
引言劝退 VSCode,全称为Visual Studio Code,是由微软开发的一款轻量级,跨平台的代码编辑器。大家能来搜用VSCode配置c/c,想必也知道VSCode的强大,可以手握一个VSCode同时编写如C,C,C#ÿ…...

[渗透教程]-013-嗅探工具-wireshark操作
文章目录 tor下载wireshark抓包类型启动场景实战tor下载 tor下载链接 zlibary暗网地址 2681506@gmail.com YanErrol123@wireshark Wireshark是网络封包分析软件,可以抓包.可以 使用winpcap与网卡直接进行数据交换.作用: 网络管理员使用wireshark来检测网络问题,网络工程师使用…...
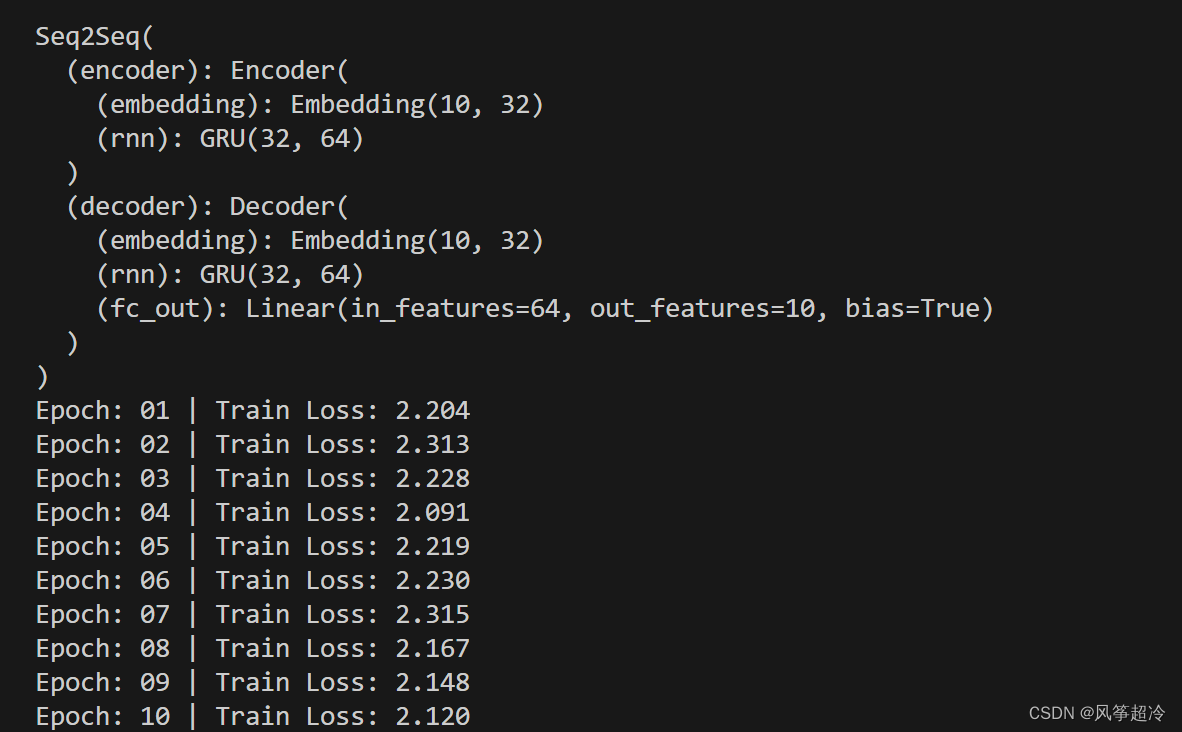
NLP Seq2Seq模型
🍨 本文为[🔗365天深度学习训练营学习记录博客🍦 参考文章:365天深度学习训练营🍖 原作者:[K同学啊 | 接辅导、项目定制]\n🚀 文章来源:[K同学的学习圈子](https://www.yuque.com/mi…...
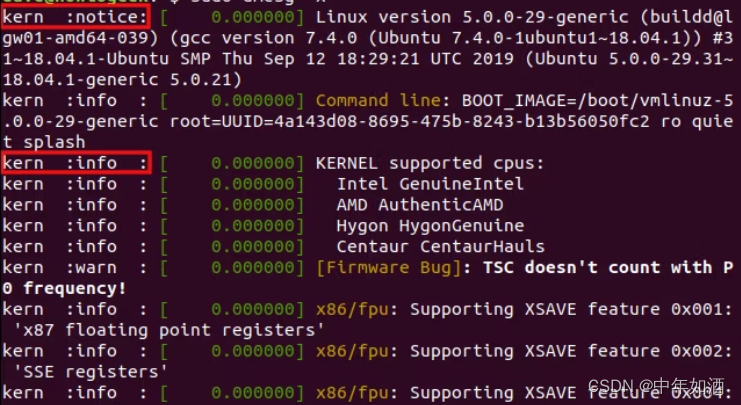
如何在 Linux 上使用 dmesg 命令
文章目录 1. Overview2.ring buffer怎样工作?3.dmesg命令4.移除sudo需求5. 强制彩色输出6.使用人性化的时间戳7.使用dmesg的人性化可读时间戳8.观察实时event9.检索最后10条消息10.搜索特定术语11.使用Log Levels12.使用Facility Categories13.Combining Facility a…...

WPF的DataGrid设置标题头
要设置DataGrid标题头的分割线、背景色和前景色等属性,您可以使用DataGrid的样式和模板来自定义标题头的外观。下面是详细解释以及示例代码: 分割线设置: 您可以使用DataGrid.ColumnHeaderStyle样式中的BorderThickness和BorderBrush属性来设…...

【软考】UML中的图之通信图
目录 1. 说明2. 图示3. 特性4. 例题4.1 例题1 1. 说明 1.通信图强调收发消息的对象的结构组织2.早期版本叫做协作图3.通信图强调参加交互的对象和组织4.首先将参加交互的对象作为图的顶点,然后把连接这些对象的链表示为图的弧,最后用对象发送和接收的消…...

为什么ChatGPT预训练能非常好地捕捉语言的普遍特征和模式
ChatGPT能够非常好地捕捉语言的普遍特征和模式,主要得益于以下几个方面的原因: 大规模语料库:ChatGPT的预训练是在大规模文本语料库上进行的,这些语料库涵盖了来自互联网、书籍、文章、对话记录等多种来源的丰富数据。这种大规模的…...
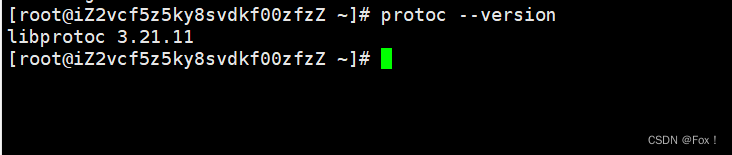
如何安装ProtoBuf环境
1 🍑下载 ProtoBuf🍑 下载 ProtoBuf 前⼀定要安装依赖库:autoconf automake libtool curl make g unzip 如未安装,安装命令如下: Ubuntu ⽤⼾选择: sudo apt-get install autoconf automake libtool cur…...

C语言 vs Rust应该学习哪个?
C语言 vs Rust应该学习哪个? 在开始前我有一些资料,是我根据网友给的问题精心整理了一份「C语言的资料从专业入门到高级教程」, 点个关注在评论区回复“888”之后私信回复“888”,全部无偿共享给大家!!&am…...

你好,放大器——失调与偏置的实战分析与优化策略
1. 放大器失调与偏置的真相大白 第一次用运放做电流检测电路时,我盯着输出端那0.5mV的"幽灵电压"百思不得其解——明明输入接地,输出却像闹鬼似的飘着电压。后来才发现,这其实是所有工程师都会遇到的经典问题:失调电压和…...

直流无刷减速电机驱动控制的关键技术与安全设计
1. 直流无刷减速电机驱动基础 第一次接触直流无刷减速电机时,我被它安静高效的特性惊艳到了。相比传统有刷电机,这种电机通过电子换相取代了机械电刷,寿命直接提升5-10倍。但真正上手驱动时,发现里面门道比想象中复杂得多。 核心在…...

大数据入门:Hadoop Spark 简介
大数据入门:Hadoop & Spark 简介 在数字化时代,数据已成为驱动决策的核心资源。如何高效处理海量数据?Hadoop与Spark作为两大主流框架,为大数据分析提供了强大支持。本文将从基础概念、核心优势、应用场景三方面,…...

Qwen2.5-VL-7B-Instruct惊艳效果集:细粒度图像描述+跨模态逻辑推理作品
Qwen2.5-VL-7B-Instruct惊艳效果集:细粒度图像描述跨模态逻辑推理作品 1. 模型能力概览 Qwen2.5-VL-7B-Instruct是一款突破性的多模态视觉-语言模型,在图像理解和跨模态推理方面展现出令人惊艳的能力。这个16GB的BF16模型需要至少16GB显存的GPU支持&am…...

如何快速构建复杂多资源类型Kubernetes Operator:Kopf实战案例指南
如何快速构建复杂多资源类型Kubernetes Operator:Kopf实战案例指南 【免费下载链接】kopf A Python framework to write Kubernetes operators in just a few lines of code 项目地址: https://gitcode.com/gh_mirrors/ko/kopf Kubernetes Operator是自动化管…...

用LabVIEW做个智能家居小系统:把温度报警、风扇控制和波形监控都集成到一个VI里
用LabVIEW构建智能家居监控系统:从模块化到集成化实战 在物联网技术快速渗透的今天,智能家居系统正从概念走向普及。对于工程师和学生而言,如何将分散的传感器、控制器整合为有机整体,是提升工程实践能力的关键跳板。LabVIEW作为…...
)
开源大模型部署指南:像素剧本圣殿镜像免配置快速上手(Dual-GPU优化)
开源大模型部署指南:像素剧本圣殿镜像免配置快速上手(Dual-GPU优化) 1. 项目概述 像素剧本圣殿(Pixel Script Temple)是一款基于Qwen2.5-14B-Instruct大模型深度微调的专业剧本创作工具。这款工具将强大的AI推理能力…...

3步搞定Arduino ESP32开发环境:从零开始物联网项目实战
3步搞定Arduino ESP32开发环境:从零开始物联网项目实战 【免费下载链接】arduino-esp32 Arduino core for the ESP32 项目地址: https://gitcode.com/GitHub_Trending/ar/arduino-esp32 还在为ESP32开发环境配置而头疼吗?作为Arduino官方支持的ES…...

OpCore-Simplify终极指南:3步完成黑苹果配置的智能化解决方案
OpCore-Simplify终极指南:3步完成黑苹果配置的智能化解决方案 【免费下载链接】OpCore-Simplify A tool designed to simplify the creation of OpenCore EFI 项目地址: https://gitcode.com/GitHub_Trending/op/OpCore-Simplify 还在为复杂的黑苹果配置而头…...
)
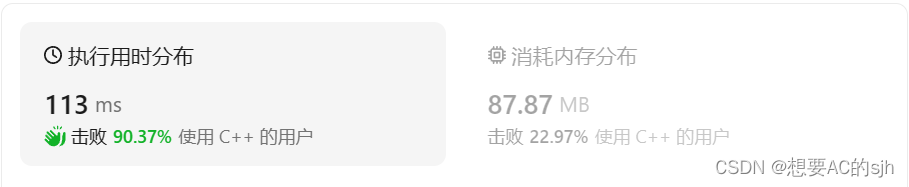
字符函数 和 字符串函数超全详解(后续会持续优化)
📖 目录字符分类函数字符转换函数strlen 的使用和模拟实现strcpy /strncpy 的使用和模拟实现strcat /strncat 的使用和模拟实现strcmp /strncmp 的使用和模拟实现 strstr 的使用和模拟实现strtok 函数的使用strerror 函数的使用一、字符分类函数核心说明头文件&am…...