安卓简单登录
注意
有的朋友不知道登录咋写,这里我就简单给出相应代码,用的本地存储,没用网络请求,有需要可以替换成想要的,废话不多上代码
登录
import androidx.appcompat.app.AppCompatActivity;import android.content.Context;
import android.content.Intent;
import android.content.SharedPreferences;
import android.os.Bundle;
import android.widget.EditText;
import android.widget.TextView;
import android.widget.Toast;public class LoginActivity extends AppCompatActivity {private EditText input_name;private EditText input_pwd;private TextView btn_login;private TextView btn_register;private SharedPreferences sharedPreferences;@Overrideprotected void onCreate(Bundle savedInstanceState) {super.onCreate(savedInstanceState);setContentView(R.layout.activity_main);btn_login = findViewById(R.id.btn_login);input_name = findViewById(R.id.input_name);input_pwd = findViewById(R.id.input_pwd);btn_register = findViewById(R.id.btn_register);// 初始化SharedPreferencessharedPreferences = getSharedPreferences("user_info", Context.MODE_PRIVATE);btn_login.setOnClickListener(v -> {String username = input_name.getText().toString();String password = input_pwd.getText().toString();if (username.isEmpty() || password.isEmpty()) {Toast.makeText(LoginActivity.this, "用户名和密码不能为空", Toast.LENGTH_SHORT).show();} else {// 从SharedPreferences中读取保存的用户名和密码String savedUsername = sharedPreferences.getString("username", "");String savedPassword = sharedPreferences.getString("password", "");if (savedUsername.isEmpty() || savedPassword.isEmpty()) {// 未注册,提示用户先进行注册Toast.makeText(LoginActivity.this, "用户未注册,请先注册", Toast.LENGTH_SHORT).show();} else if (username.equals(savedUsername) && password.equals(savedPassword)) {// 登录成功,跳转到下一个页面Intent intent = new Intent(LoginActivity.this, HomeActivity.class);startActivity(intent);} else {// 登录失败,显示错误信息Toast.makeText(LoginActivity.this, "用户名或密码错误", Toast.LENGTH_SHORT).show();}}});btn_register.setOnClickListener(v -> {Intent intent = new Intent(LoginActivity.this, RegisterActivity.class);startActivity(intent);});}
}
布局
<?xml version="1.0" encoding="utf-8"?>
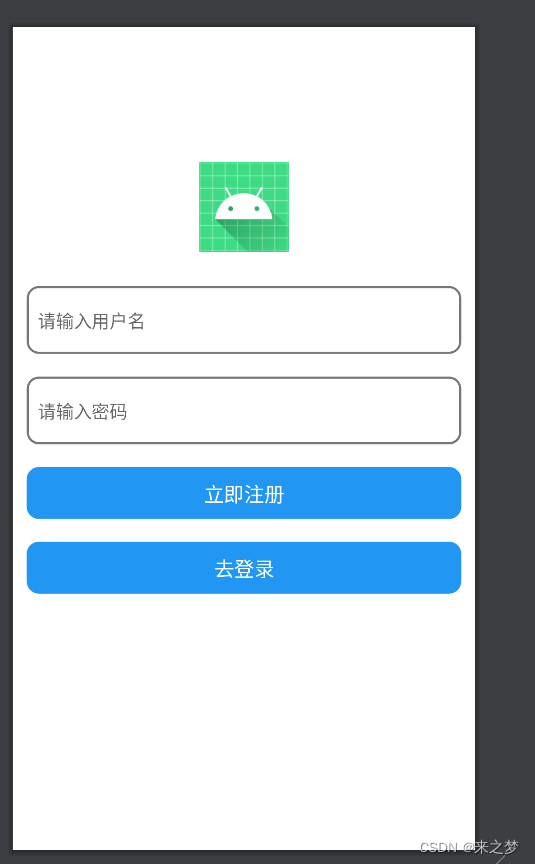
<LinearLayout xmlns:android="http://schemas.android.com/apk/res/android"xmlns:app="http://schemas.android.com/apk/res-auto"xmlns:tools="http://schemas.android.com/tools"android:layout_width="match_parent"android:layout_height="match_parent"android:background="@color/white"android:paddingLeft="12dp"android:paddingRight="12dp"android:orientation="vertical"tools:context=".LoginActivity"><ImageViewandroid:layout_width="80dp"android:layout_gravity="center"android:layout_marginTop="120dp"android:layout_height="80dp"android:src="@mipmap/ic_launcher"/><EditTextandroid:id="@+id/input_name"android:layout_width="match_parent"android:layout_height="60dp"android:hint="请输入用户名"android:textSize="16sp"android:layout_marginTop="30dp"android:maxLines="1"android:inputType="text"android:background="@drawable/rounded_border_shape"android:singleLine="true"android:paddingLeft="10dp"android:textColor="@color/black"/><EditTextandroid:id="@+id/input_pwd"android:layout_width="match_parent"android:layout_height="60dp"android:hint="请输入密码"android:textSize="16sp"android:layout_marginTop="20dp"android:maxLines="1"android:background="@drawable/rounded_border_shape"android:inputType="textPassword"android:paddingLeft="10dp"android:singleLine="true"android:textColor="@color/black"/><TextViewandroid:id="@+id/btn_login"android:layout_width="match_parent"android:layout_height="wrap_content"android:gravity="center"android:paddingTop="10dp"android:paddingBottom="10dp"android:layout_marginTop="20dp"android:textColor="@color/white"android:textSize="18sp"android:background="@drawable/rounded_shape"android:text="登录"/><TextViewandroid:id="@+id/btn_register"android:layout_width="match_parent"android:layout_height="wrap_content"android:gravity="center"android:paddingTop="10dp"android:paddingBottom="10dp"android:layout_marginTop="20dp"android:textColor="@color/white"android:textSize="18sp"android:background="@drawable/rounded_shape"android:text="立即注册"/>
</LinearLayout>效果

下面是注册
import androidx.appcompat.app.AppCompatActivity;import android.content.Context;
import android.content.Intent;
import android.content.SharedPreferences;
import android.os.Bundle;
import android.widget.EditText;
import android.widget.TextView;
import android.widget.Toast;public class RegisterActivity extends AppCompatActivity {private EditText input_name;private EditText input_pwd;private TextView btn_login;private TextView btn_register;private SharedPreferences sharedPreferences;@Overrideprotected void onCreate(Bundle savedInstanceState) {super.onCreate(savedInstanceState);setContentView(R.layout.activity_register);btn_login = findViewById(R.id.btn_login);input_name = findViewById(R.id.input_name);input_pwd = findViewById(R.id.input_pwd);btn_register = findViewById(R.id.btn_register);sharedPreferences = getSharedPreferences("user_info", Context.MODE_PRIVATE);btn_register.setOnClickListener(v -> {String username = input_name.getText().toString();String password = input_pwd.getText().toString();if (username.isEmpty() || password.isEmpty()) {Toast.makeText(RegisterActivity.this, "用户名和密码不能为空", Toast.LENGTH_SHORT).show();} else {// 从SharedPreferences中读取保存的用户名String savedUsername = sharedPreferences.getString("username", "");if (savedUsername.equals(username)) {// 用户名已存在Toast.makeText(RegisterActivity.this, "用户名已存在,请直接登录", Toast.LENGTH_SHORT).show();} else {// 保存用户名和密码到SharedPreferencesSharedPreferences.Editor editor = sharedPreferences.edit();editor.putString("username", username);editor.putString("password", password);editor.apply();Toast.makeText(RegisterActivity.this, "注册成功", Toast.LENGTH_SHORT).show();// 跳转到登录页面Intent loginIntent = new Intent(RegisterActivity.this, LoginActivity.class);startActivity(loginIntent);}}});btn_login.setOnClickListener(v -> {Intent loginIntent = new Intent(RegisterActivity.this, LoginActivity.class);startActivity(loginIntent);});}
}
对应布局
<?xml version="1.0" encoding="utf-8"?>
<LinearLayout xmlns:android="http://schemas.android.com/apk/res/android"xmlns:app="http://schemas.android.com/apk/res-auto"xmlns:tools="http://schemas.android.com/tools"android:layout_width="match_parent"android:layout_height="match_parent"android:background="@color/white"android:paddingLeft="12dp"android:paddingRight="12dp"android:orientation="vertical"tools:context=".LoginActivity"><ImageViewandroid:layout_width="80dp"android:layout_gravity="center"android:layout_marginTop="120dp"android:layout_height="80dp"android:src="@mipmap/ic_launcher"/><EditTextandroid:id="@+id/input_name"android:layout_width="match_parent"android:layout_height="60dp"android:hint="请输入用户名"android:textSize="16sp"android:layout_marginTop="30dp"android:maxLines="1"android:inputType="text"android:background="@drawable/rounded_border_shape"android:singleLine="true"android:paddingLeft="10dp"android:textColor="@color/black"/><EditTextandroid:id="@+id/input_pwd"android:layout_width="match_parent"android:layout_height="60dp"android:hint="请输入密码"android:textSize="16sp"android:layout_marginTop="20dp"android:maxLines="1"android:background="@drawable/rounded_border_shape"android:inputType="textPassword"android:paddingLeft="10dp"android:singleLine="true"android:textColor="@color/black"/><TextViewandroid:id="@+id/btn_register"android:layout_width="match_parent"android:layout_height="wrap_content"android:gravity="center"android:paddingTop="10dp"android:paddingBottom="10dp"android:layout_marginTop="20dp"android:textColor="@color/white"android:textSize="18sp"android:background="@drawable/rounded_shape"android:text="立即注册"/><TextViewandroid:id="@+id/btn_login"android:layout_width="match_parent"android:layout_height="wrap_content"android:gravity="center"android:paddingTop="10dp"android:paddingBottom="10dp"android:layout_marginTop="20dp"android:textColor="@color/white"android:textSize="18sp"android:background="@drawable/rounded_shape"android:text="去登录"/></LinearLayout>
效果图
用户登录成功获取所有用户信息
public class HomeActivity extends AppCompatActivity {private TextView textView;@Overrideprotected void onCreate(Bundle savedInstanceState) {super.onCreate(savedInstanceState);setContentView(R.layout.activity_home);textView = findViewById(R.id.textView);getAllRegisteredUsers();}// 读取所有注册的用户信息private void getAllRegisteredUsers() {SharedPreferences sharedPrefs = getSharedPreferences("user_info", Context.MODE_PRIVATE);Map<String, ?> allEntries = sharedPrefs.getAll();JSONObject jsonObject = new JSONObject();for (Map.Entry<String, ?> entry : allEntries.entrySet()) {try {jsonObject.put(entry.getKey(), entry.getValue());} catch (JSONException e) {e.printStackTrace();}}textView.setText("当前注册的所有用户信息如下\n"+jsonObject.toString());}
}
布局
<?xml version="1.0" encoding="utf-8"?>
<LinearLayout xmlns:android="http://schemas.android.com/apk/res/android"xmlns:app="http://schemas.android.com/apk/res-auto"xmlns:tools="http://schemas.android.com/tools"android:layout_width="match_parent"android:layout_height="match_parent"android:orientation="vertical"tools:context=".HomeActivity"><TextViewandroid:layout_width="wrap_content"android:layout_height="wrap_content"android:layout_centerVertical="true"android:layout_gravity="center"android:text="登录成功"android:layout_marginTop="60dp"android:textSize="30sp" /><TextViewandroid:id="@+id/textView"android:layout_width="wrap_content"android:layout_height="wrap_content"android:layout_centerVertical="true"android:layout_gravity="center"android:text="登录成功"android:textSize="30sp" />
</LinearLayout>
最后加上一个rounded_border_shape.xml
<?xml version="1.0" encoding="utf-8"?>
<shape xmlns:android="http://schemas.android.com/apk/res/android"><solid android:color="#FFFFFF" /> <!-- 填充颜色为白色,可以根据需要更改 --><strokeandroid:width="2dp"android:color="#787676" /><corners android:radius="10dp" />
</shape>
和 rounded_shape.xml
<?xml version="1.0" encoding="utf-8"?>
<shape xmlns:android="http://schemas.android.com/apk/res/android"><solid android:color="#2196F3" /> <!-- 填充颜色为白色,可以根据需要更改 --><strokeandroid:width="2dp"android:color="#2196F3" /><corners android:radius="10dp" />
</shape>
以上就是整个登录注册代码,感激大家支持
相关文章:
安卓简单登录
注意 有的朋友不知道登录咋写,这里我就简单给出相应代码,用的本地存储,没用网络请求,有需要可以替换成想要的,废话不多上代码 登录 import androidx.appcompat.app.AppCompatActivity;import android.content.Context…...

【计算机网络】DNS/ICMP协议/NAT技术
文章目录 一、DNS(Domain Name System)1.DNS背景2.域名3.浏览器中输入url后,发生的事情 二、ICMP协议1.什么是ICMP协议2.ICM功能3.ICMP的报文格式4.ping命令5.traceroute命令 三、NAT技术1.NAT技术背景2.NAT IP转换过程3.NAPT4.NAT技术的缺陷5.NAT和代理服务器 四、TCP/IP五层模…...

2403C++,C++20协程通道
原文 通道是一个可用来连接协程,实现不同协程间通信的并发安全队列. Test fun test know channel() runBlocking<Unit> {val channel Channel<Int>()//生产者val producer GlobalScope.launch {var i 0while (true) {delay(1000)channel.send(i)println("…...

C语言从入门到实战——预处理详解
预处理详解 前言一、预定义符号1.1 __FILE__1.2__LINE__1.3 __DATE__1.4__TIME__1.5__STDC__ 二、 #define定义常量三、 #define定义宏四、 带有副作用的宏参数五、 宏替换的规则六、宏函数的对比七、 #和##7.1 #运算符7.2 ##运算符 八、 命名约定九、 #undef十、命令行定义十一…...

【LabVIEW FPGA】CIC滤波器
一、CIC滤波器应用概述 在通信数字信号上下变频时,经常会用到对数字信号的升采样和降采样,即通过CIC数字速率器实现变采样率。 二、滤波器IP 首先设置滤波器基本参数(filter specification) 滤波器类型(Filter Type…...
砝码称重 蓝桥杯
在C中,fabs()和abs()都用于计算数字的绝对值,但它们之间有一些区别。 fabs(double x):计算浮点数x的绝对值,返回一个double类型的结果。 abs(int x):计算整数x的绝对值,返回一个int类型的结果。 数组的默…...
AmzTrends x TiDB Serverless:通过云原生改造实现全局成本降低 80%
本文介绍了厦门笛卡尔数据(AmzTrends)在面临数据存储挑战时,选择将其数据分析服务迁移到 TiDB Serverless 的思路和实践。通过全托管的数据库服务,AmzTrends 实现了全局成本降低 80% 的效果,同时也充分展示了 TiDB Ser…...
[最佳实践] Windows上构建一个和Linux类似的Terminal
感谢大佬批评指正,现已更新 preview Target:致力打造最赏心悦目Window下的终端,同时能够很接近Linux的使用习惯 key word:windows终端美化 windows terminal windows powershell 类似Linux下的Window终端 Window也能用ll windows…...

租赁系统|手机租赁软件|租赁系统功能开发
当如今的生活用品越来越多、交流更加便捷时,人们的消费需求也变得越来越丰富。不可避免地,我们会遇到这样一种情况:需要新的手机,但资金有限。此时,手机租赁小程序呼之欲出。这种创意不仅使我们能够充分利用各类闲置物…...
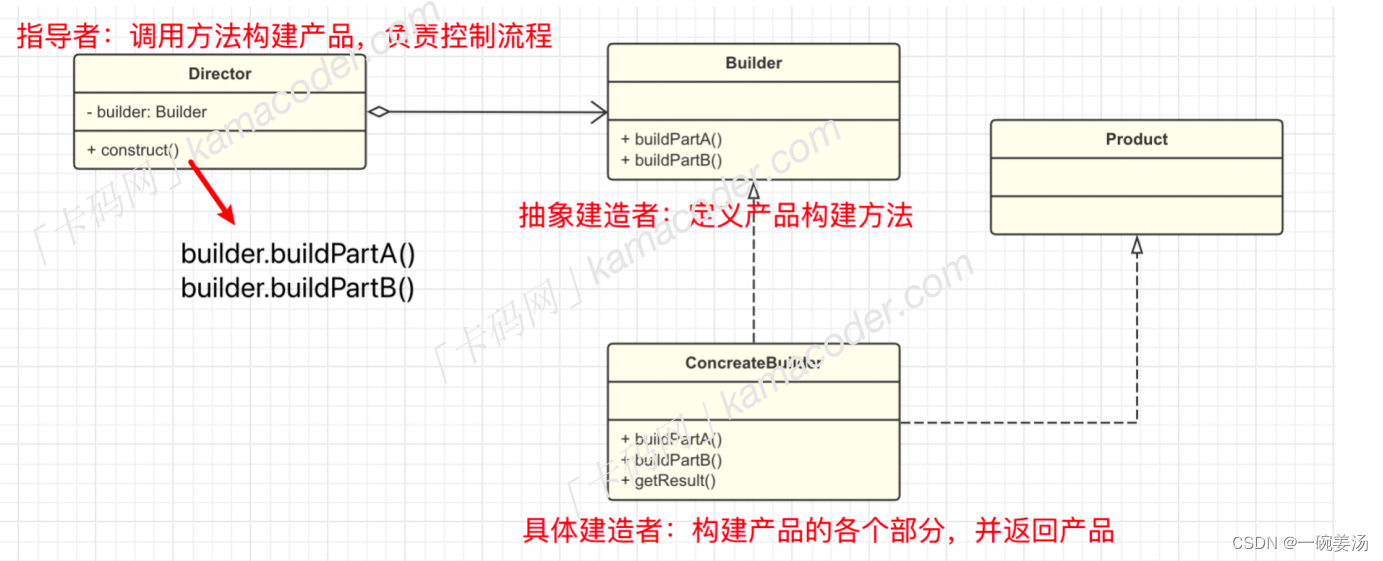
【设计模式 04】建造者模式
如果要构建的对象很复杂,那么可以将整个构建过程拆分成多个步骤,并为每一个步骤定义一个抽象的接口。并添加一个指导者用来控制构建产品的顺序和步骤。 Java实现: // 产品类 class Product {private String part1;private String part2;pub…...

Python使用错误总结
【1】cannot import name ‘ParameterSource’ from ‘click.core’ 其根本原因在于是black模块,其模块版本可能过时,升级black模块版本即可: pip install black --upgrade【2】partially initialized module ‘charset_normalizer’ has n…...
【Java EE初阶三十】JVM的简单学习
1. JVM 内存区域划分 一个运行起来的 Java 进程,就是一个 JVM 虚拟机,需要从操作系统申请一大块内存,就会把这个内存,划分成不同的区域,每个区域都有不同的作用. JVM 申请了一大块内存之后,也会划分成不同的内…...

thinkphp5水平分割表partition,以及查询操作
前言 先交代下背景,在一个项目中,有一个数据表有水平分表的需求。当时想找到一种方法,把对数据库的操作,写到一个模型里,通过去换模型属性中的table来达到代码不变操作的数据表变化的效果。 我们都知道,模型要想关联数据表的话&a…...
docker部署aria2-pro
前言 我平时有一些下载视频和一些资源文件的需求,有时候需要离线下载,也要速度比较快的方式 之前我是用家里的玩客云绝育之后不再写盘当下载机用的,但是限制很多 我发现了aria2 这个下载器非常适合我,而有个大佬又在原来的基础…...
vue中Mixins
使用 Mixins 的主要优点包括: 代码复用: 可以将常用的逻辑封装在 Mixin 中,然后在多个组件中重复使用。逻辑分离: 将不同功能的代码分开管理,使代码更加清晰和易于维护。灵活性: Mixins 允许你在组件中引入多个 Mixin,并且可以根…...
)
linux常用指令(定期更新)
linux常用指令 1.页相关页大小 2.系统参数3.启动参数4.网络参数查询网卡所属numa节点信息网络测速相关iperf测试sar监控网卡流量查看网卡txqueuelen和mtu抓包tcpdump 网络数据收发状态snmp协议栈netstat -i所有网口TX-OK、RX-OKnetstat-s查看各个协议的收发数据ethtool -S单个网…...

【项目】图书管理系统
目录 前言: 项目要求: 知识储备: 代码实现: Main: Books包: Book: BookList: Operate包: Operate: addOperate: deleteOperate: exitOperate: findOperate:…...

华为OD机试 - 疫情扩散时间计算 - 矩阵(Java 2024 C卷 200分)
目录 专栏导读一、题目描述二、输入描述三、输出描述四、解题思路五、Java算法源码六、效果展示1、输入2、输出3、说明 华为OD机试 2024C卷题库疯狂收录中,刷题点这里 专栏导读 本专栏收录于《华为OD机试(JAVA)真题(A卷B卷C卷&am…...
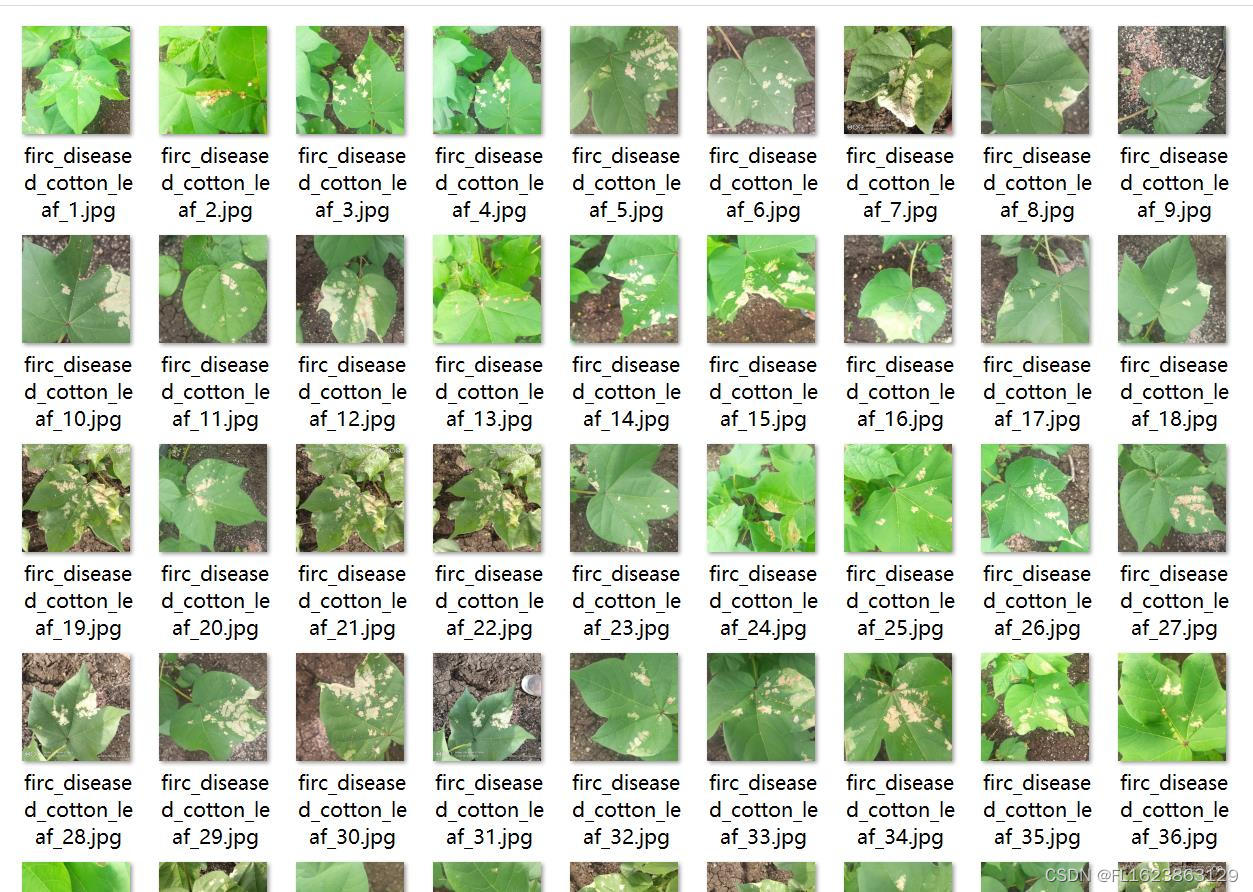
[数据集][图像分类]棉花叶子病害分类数据集2293张4类别
数据集类型:图像分类用,不可用于目标检测无标注文件 数据集格式:仅仅包含jpg图片,每个类别文件夹下面存放着对应图片 图片数量(jpg文件个数):2293 分类类别数:4 类别名称:["diseased_cotton_leaf"…...

《辐射4》是一款什么样的游戏 怎样在mac电脑上玩到《辐射4》辐射4攻略 辐射4开局加点 怎么在Mac电脑玩Steam游戏
辐射4(Fallout 4)是由Bethesda开发的一款动作角色扮演类游戏,为《辐射》系列游戏作品的第四代,于2015年11月10日发行。游戏叙述了主角一家在核爆当天(2077年10月23日),被Vault-Tec(避…...

手持式身份核验测温一体机:从防疫工具到智能终端的深度解析与应用
1. 项目概述:一个被低估的“防疫哨兵”你可能在商场、写字楼、医院或者社区的入口见过它——一个看起来像固定电话机,或者一个带屏幕的扫码盒子,旁边还伸出一个测温探头。这就是我们今天要聊的主角:手持式身份核验测温一体机。很多…...

PIC32MZ EF嵌入式开发实战:硬件FPU与多协议连接方案解析
1. 项目概述:为什么是PIC32MZ EF?在嵌入式开发领域,尤其是涉及复杂控制、实时信号处理或物联网边缘计算时,我们常常面临一个经典矛盾:对计算性能的渴求与对功耗、成本和开发复杂度的现实考量。几年前,当我接…...

Linux内核动态调试技术:pr_debug与dynamic_debug实战指南
1. 动态输出:内核调试的“可控探针”在Linux内核开发与调试的日常里,最让人头疼的莫过于“日志”问题。printk虽然直接,但一旦开启,信息洪流会瞬间淹没控制台,不仅影响性能,更让你在关键信息里大海捞针。更…...

LRC歌词制作终极指南:轻松创建专业级同步歌词的免费工具
LRC歌词制作终极指南:轻松创建专业级同步歌词的免费工具 【免费下载链接】lrc-maker 歌词滚动姬|可能是你所能见到的最好用的歌词制作工具 项目地址: https://gitcode.com/gh_mirrors/lr/lrc-maker 你是否曾经在听歌时想要制作属于自己的歌词文件…...

用Circuit JS在线模拟器,5分钟搞定欧姆定律和LRC振荡电路实验
用Circuit JS在线模拟器,5分钟搞定欧姆定律和LRC振荡电路实验 在电子工程和物理教学中,理论公式与实验验证的结合一直是提升学习效率的关键。传统实验室受限于设备、场地和时间,而Circuit JS这款基于浏览器的开源电路模拟器,恰好填…...

基于ENVI、eCognition与ArcGIS的南京江北新区土地利用变化监测与驱动分析
1. 南京江北新区土地利用变化监测的技术路线 我第一次接触南京江北新区土地利用监测项目时,被这个区域的快速发展震撼到了。作为国家级新区,这里从2015年设立至今,土地利用格局发生了翻天覆地的变化。要准确捕捉这些变化,我们采用…...
模仿学习新思路:拆解ACT算法中的CVAE与Transformer如何联手生成平滑动作序列
模仿学习新范式:ACT算法中CVAE与Transformer的协同进化 在机器人精细操作领域,如何生成连贯平滑的动作序列一直是核心挑战。斯坦福ALOHA团队提出的动作分块算法ACT(Action Chunking with Transformers)通过融合条件变分自编码器&…...

从‘果冻屏’到‘瀑布屏’:OCA全贴合工艺如何悄悄改变了你的视觉体验?
从‘果冻屏’到‘瀑布屏’:OCA全贴合工艺如何悄悄改变了你的视觉体验? 还记得十年前那些让人抓狂的“果冻屏”吗?阳光下泛着彩虹纹,触控时总感觉隔着一层毛玻璃,甚至能清晰看到屏幕边缘积攒的灰尘。如今拿起任何一款旗…...

探索Qt高级停靠系统:打造灵活强大的用户界面
探索Qt高级停靠系统:打造灵活强大的用户界面 【下载地址】Qt-Advanced-Docking-System使用教程与示例代码 Qt-Advanced-Docking-System 使用教程与示例代码本仓库提供了一个关于如何使用 Qt-Advanced-Docking-System 的详细教程及示例代码 项目地址: https://gitc…...

别再为前后端AES加解密头疼了!手把手教你用CryptoJS和Java 8实现无缝对接
跨平台AES加解密实战:打通CryptoJS与Java的密钥对齐与编码陷阱 前后端分离架构下,数据安全传输始终是开发者的核心关切。当看到控制台抛出javax.crypto.BadPaddingException: Given final block not properly padded这类错误时,多数开发者都会…...