华为设备小型园区网方案(有线+无线+防火墙)
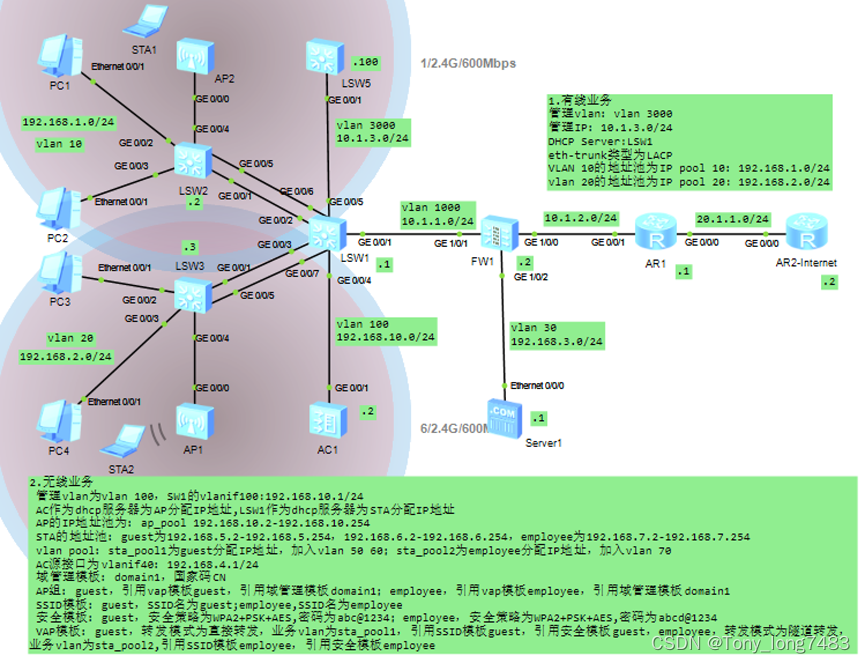
(一)配置有线部分
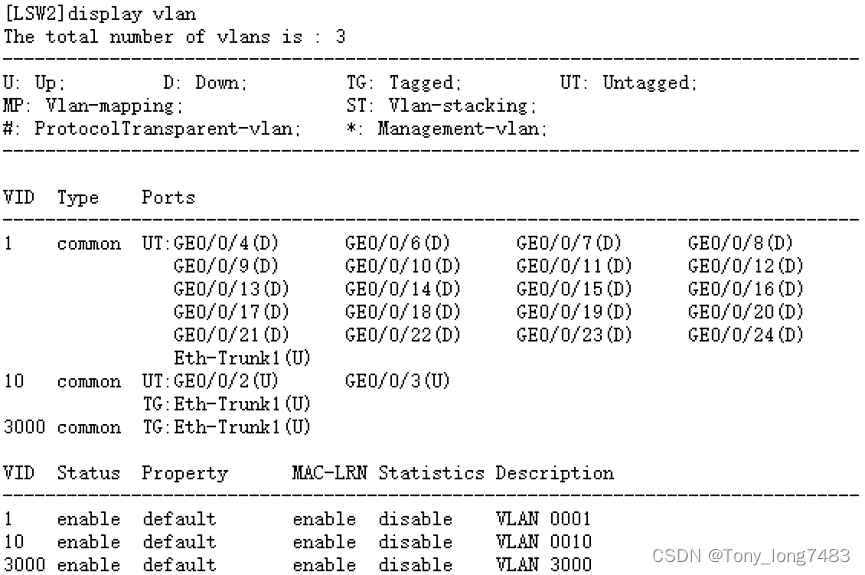
1.配置LSW2
(1)创建相关vlan
[LSW2]vlan batch 10 3000
(2)配置连接LSW1的Eth-Trunk1,透传VLAN 10 3000
[LSW2]int Eth-Trunk 1
[LSW2-Eth-Trunk1]port link-type trunk
[LSW2-Eth-Trunk1]port trunk allow-pass vlan 10 3000
[LSW2-Eth-Trunk1]mode lacp
[LSW2]int g0/0/1
[LSW2-GigabitEthernet0/0/1]eth-trunk 1
[LSW2-GigabitEthernet0/0/1]int g0/0/5
[LSW2-GigabitEthernet0/0/5]eth-trunk 1
(3)配置连接用户的接口,使用户加入VLAN,并将接口配置成边缘端口
[LSW2]int g0/0/2
[LSW2-GigabitEthernet0/0/2]port link-type access
[LSW2-GigabitEthernet0/0/2]port default vlan 10
[LSW2-GigabitEthernet0/0/2]stp edged-port enable
[LSW2-GigabitEthernet0/0/2]int g0/0/3
[LSW2-GigabitEthernet0/0/3]port link-type access
[LSW2-GigabitEthernet0/0/3]port default vlan 10
[LSW2-GigabitEthernet0/0/3]stp edged-port enable
(4)配置BPDU保护功能,加强网络的稳定性
[LSW2]stp bpdu-protection
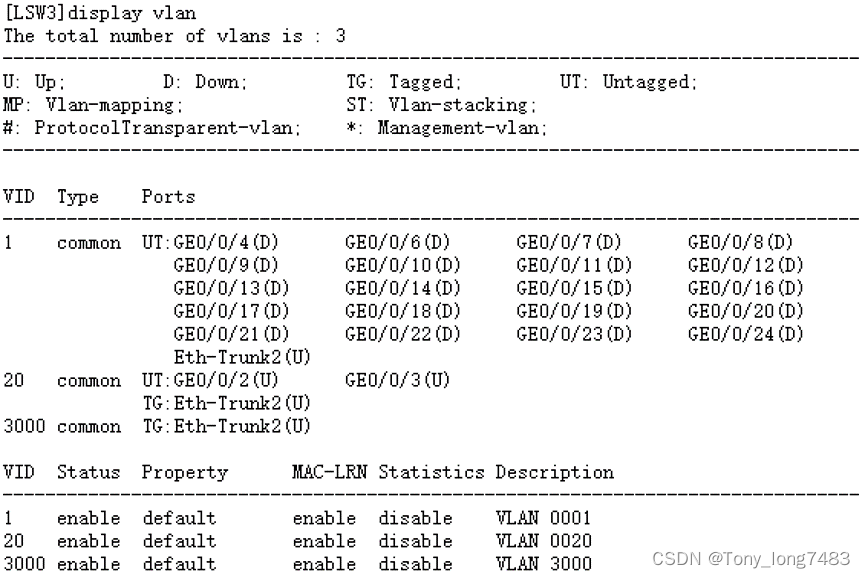
2.配置LSW3,类似LSW2
[LSW3]vlan batch 20 3000
[LSW3]int Eth-Trunk 2
[LSW3-Eth-Trunk2]port link-type trunk
[LSW3-Eth-Trunk2]port trunk allow-pass vlan 20 3000
[LSW3-Eth-Trunk2]mode lacp
[LSW3-Eth-Trunk2]quit
[LSW3]int g0/0/1
[LSW3-GigabitEthernet0/0/1]eth-trunk 2
[LSW3-GigabitEthernet0/0/1]int g0/0/5
[LSW3-GigabitEthernet0/0/5]eth-trunk 2
[LSW3-GigabitEthernet0/0/5]quit
[LSW3]int g0/0/2
[LSW3-GigabitEthernet0/0/2]port link-type access
[LSW3-GigabitEthernet0/0/2]port default vlan 20
[LSW3-GigabitEthernet0/0/2]stp edged-port enable
[LSW3-GigabitEthernet0/0/2]int g0/0/3
[LSW3-GigabitEthernet0/0/3]port link-type access
[LSW3-GigabitEthernet0/0/3]port default vlan 20
[LSW3-GigabitEthernet0/0/3]stp edged-port enable
[LSW3]stp bpdu-protection
3. 配置LSW1
(1)创建相应vlan
[LSW1]vlan batch 10 20 1000 3000
(2)配置与LSW2相连参数
[LSW1]int Eth-Trunk 1
[LSW1-Eth-Trunk1]port link-type trunk
[LSW1-Eth-Trunk1]port trunk allow-pass vlan 10 1000 3000
[LSW1-Eth-Trunk1]mode lacp
[LSW1]int g0/0/2
[LSW1-GigabitEthernet0/0/2]eth-trunk 1
[LSW1-GigabitEthernet0/0/2]int g0/0/6
[LSW1-GigabitEthernet0/0/6]eth-trunk 1
[LSW1]int Vlanif 10
[LSW1-Vlanif10]ip add 192.168.1.1 24
(3)配置与LSW3相连参数
[LSW1]int Eth-Trunk 2
[LSW1-Eth-Trunk2]port link-type trunk
[LSW1-Eth-Trunk2]port trunk allow-pass vlan 20 1000 3000
[LSW1-Eth-Trunk2]mode lacp
[LSW1-Eth-Trunk2]quit
[LSW1]int g0/0/3
[LSW1-GigabitEthernet0/0/3]eth-trunk 2
[LSW1-GigabitEthernet0/0/3]int g0/0/7
[LSW1-GigabitEthernet0/0/7]eth-trunk 2
[LSW1]int Vlanif 20
[LSW1-Vlanif20]ip add 192.168.2.1 24
(4)配置与防火墙相连接口,使园区网络与Internet互通
[LSW1]int g0/0/1
[LSW1-GigabitEthernet0/0/1]port link-type access
[LSW1-GigabitEthernet0/0/1]port default vlan 1000
[LSW1-GigabitEthernet0/0/1]quit
[LSW1]int Vlanif 1000
[LSW1-Vlanif1000]ip add 10.1.1.1 24
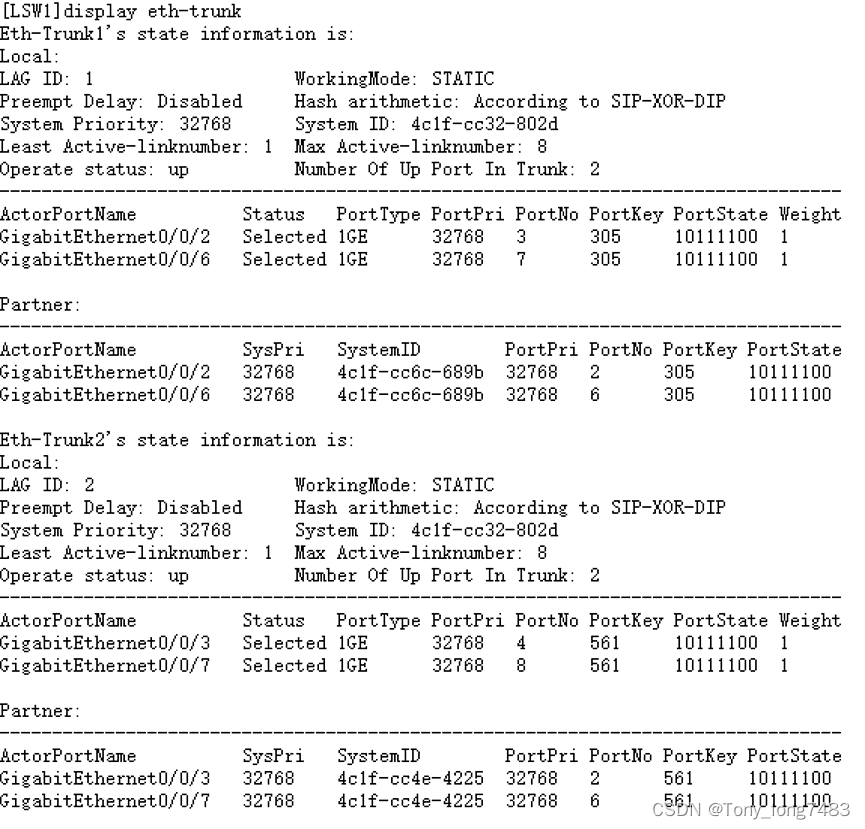
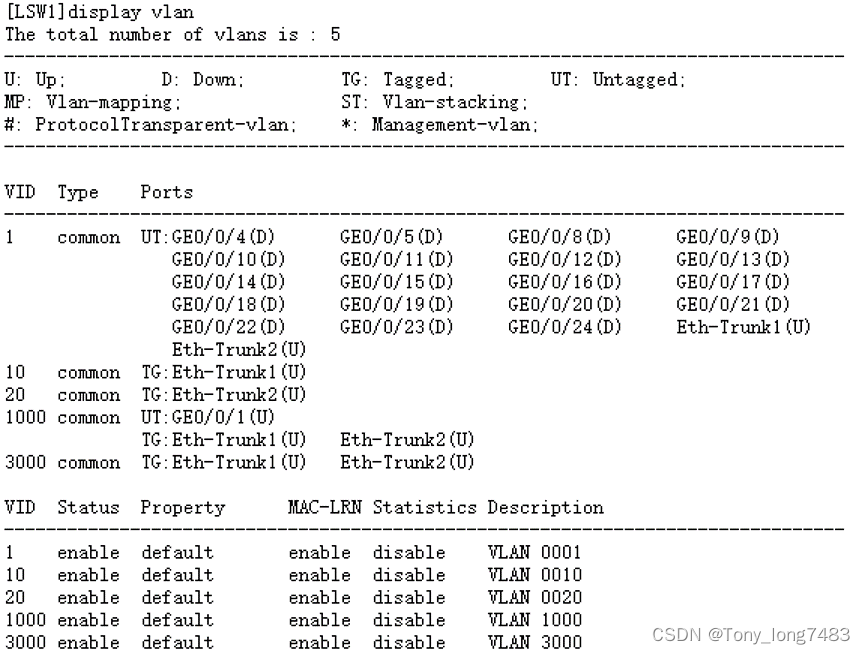
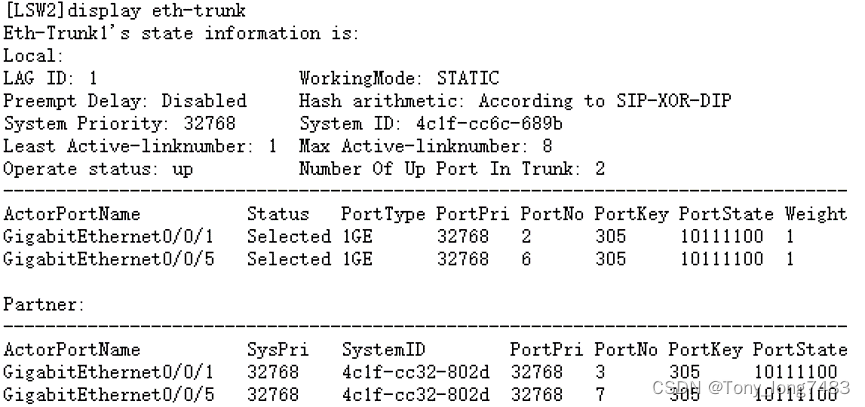
(5)查看配置结果

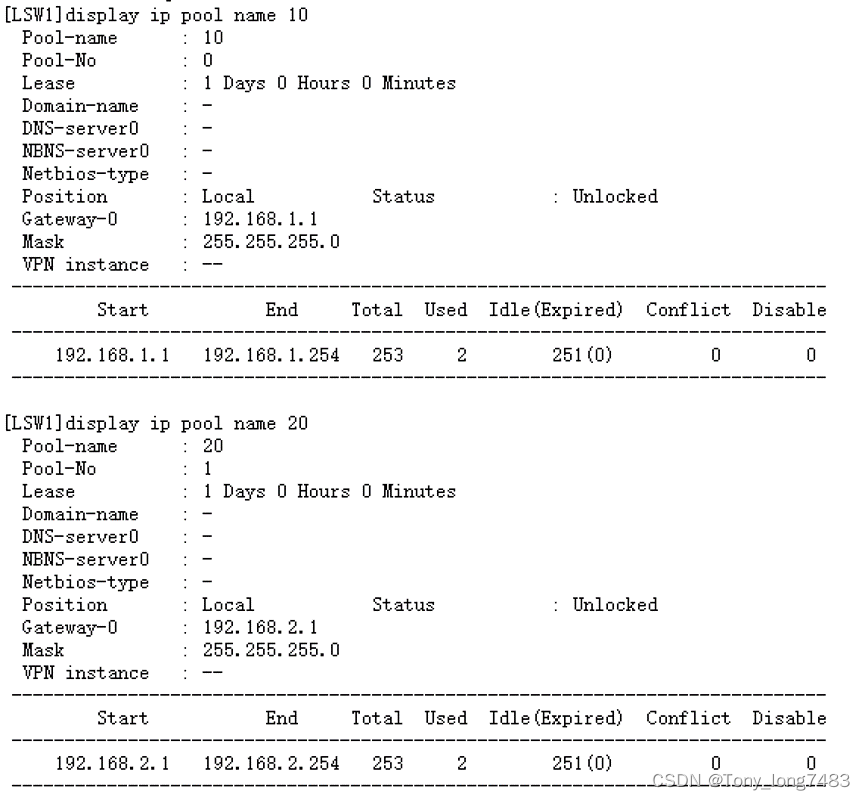
- 配置DHCP:在LSW1上配置DHCP Server,使用户都能获取到正确的IP地址
(1)创建全局地址池,配置出口网关、租期(采用缺省值1天,不需配置)并配置PC3分配固定的IP地址192.168.2.200
[LSW1]dhcp enable
[LSW1]ip pool 10
[LSW1-ip-pool-10]network 192.168.1.0 mask 24
[LSW1-ip-pool-10]gateway-list 192.168.1.1
[LSW1-ip-pool-10]ip pool 20
[LSW1-ip-pool-20]network 192.168.2.0 mask 24
[LSW1-ip-pool-20]gateway-list 192.168.2.1
[LSW1-ip-pool-20]static-bind ip-address 192.168.2.200 mac-address 5489-98B8-805C
(2)配置用户从全局地址池获取IP地址
[LSW1]int Vlanif 10
[LSW1-Vlanif10]dhcp select global
[LSW1-Vlanif10]int Vlanif 20
[LSW1-Vlanif20]dhcp select global
(3)查看全局地址池的配置和使用信息
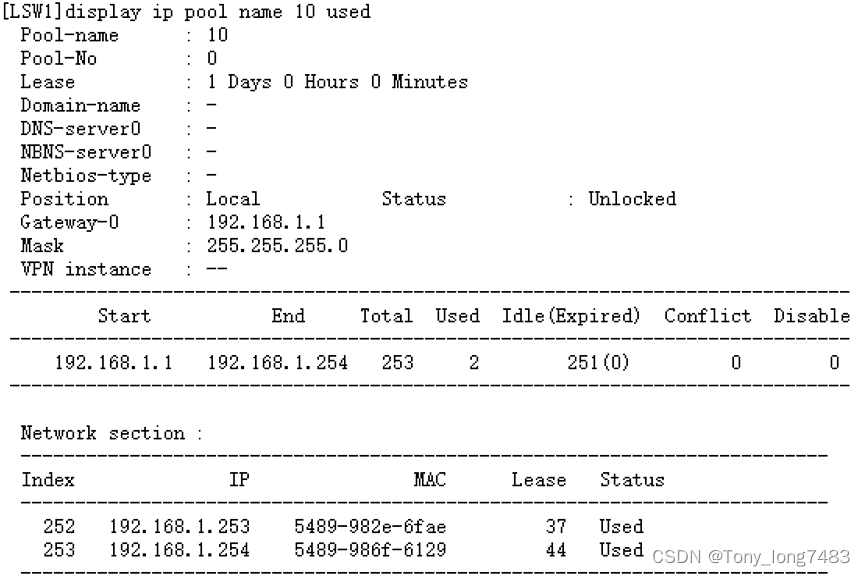
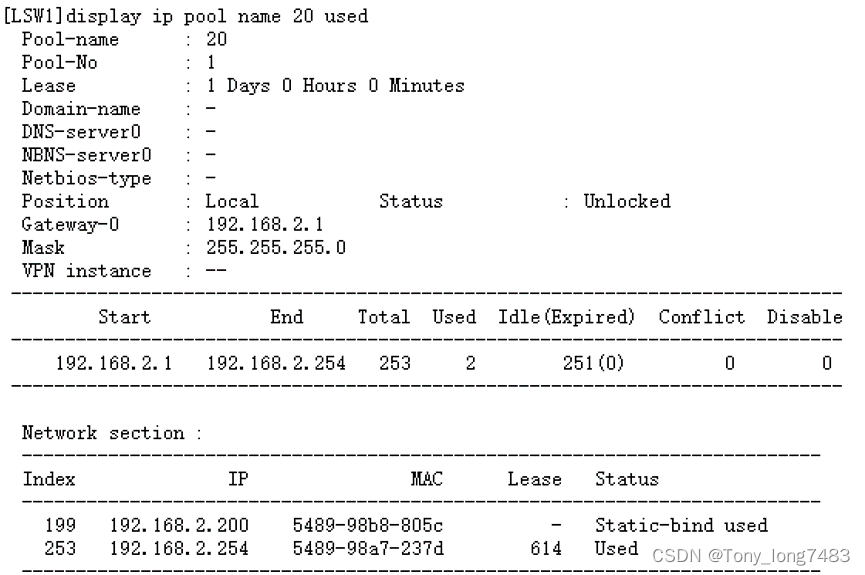
(4)配置完动态分配地址之后,刚开电脑获取地址的时间比较长,这是因为对于开启了生成树协议的交换机,每当有电脑接入之后导致生成树重新收敛,所以需要的时间比较长;通过关闭接口的生成树协议或者把连接终端的交换机接口配置为边缘端口即可解决
[LSW2]int g0/0/2
[LSW2-GigabitEthernet0/0/2]stp edged-port enable
[LSW2-GigabitEthernet0/0/2]int g0/0/3
[LSW2-GigabitEthernet0/0/3]stp edged-port enable
[LSW3]int g0/0/2
[LSW3-GigabitEthernet0/0/2]stp disable
[LSW3-GigabitEthernet0/0/2]int g0/0/3
[LSW3-GigabitEthernet0/0/3]stp disable
5. 配置LSW1路由,使内部网络数据可以发送出去
[LSW1]ip route-static 0.0.0.0 0.0.0.0 10.1.1.2
6. 配置AR1
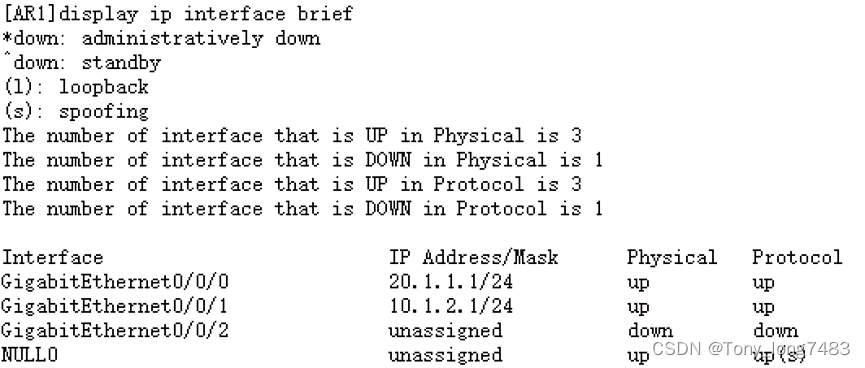
(1)配置IP地址
[AR1]int g0/0/1
[AR1-GigabitEthernet0/0/1]ip add 10.1.2.1 24
[AR1-GigabitEthernet0/0/1]int g0/0/2
[AR1-GigabitEthernet0/0/2]ip add 20.1.1.1 24
(2)配置允许上网的acl,将所有允许访问Internet的用户网段写入该acl
[AR1]acl 2000
[AR1-acl-basic-2000]rule permit source 192.168.1.0 0.0.0.255
[AR1-acl-basic-2000]rule permit source 192.168.2.0 0.0.0.255
[AR1-acl-basic-2000]rule permit source 10.1.1.0 0.0.0.255
[AR1-acl-basic-2000]rule permit source 10.1.2.0 0.0.0.255
(3)在连接Internet的接口配置NAT转换实现内网用户访问Internet
[AR1]int g0/0/0
[AR1-GigabitEthernet0/0/0]nat outbound 2000
(4)配置到内网的明细路由和到公网的静态缺省路由
[AR1]ip route-static 192.168.1.0 24 10.1.2.2
[AR1]ip route-static 192.168.2.0 24 10.1.2.2
[AR1]ip route-static 10.1.1.0 24 10.1.2.2
[AR1]ip route-static 0.0.0.0 0.0.0.0 20.1.1.2
(5)配置DNS地址解析功能,DNS服务器地址为运营商给的
[AR1]dns resolve
[AR1]dns server 8.8.8.8
[AR1]dns proxy enable
7.配置DHCP Snooping和IPSG:配置了DHCP功能之后,用户主机可以自动获取地址。但是为了防止员工在内网私自接一个小路由器并开启DHCP自动分配地址的功能,导致内网合法用户获取到了私接的小路由器分配的地址而不能正常上网,还需要配置DHCP Snooping功能
(1)在LSW2和LSW3上开启DHCP Snooping功能
[LSW2]dhcp enable
[LSW2]dhcp snooping enable
[LSW3]dhcp enable
[LSW3]dhcp snooping enable
(2)在连接DHCP服务器的接口上使能DHCP Snooping功能,并将此接口配置为信任接口
[LSW2]int Eth-Trunk 1
[LSW2-Eth-Trunk1]dhcp snooping enable
[LSW2-Eth-Trunk1]dhcp snooping trusted
[LSW3]int Eth-Trunk 2
[LSW3-Eth-Trunk2]dhcp snooping enable
[LSW3-Eth-Trunk2]dhcp snooping trusted
(3)在连接终端的接口上使能DHCP Snooping功能
[LSW2]int g0/0/2
[LSW2-GigabitEthernet0/0/2]dhcp snooping enable
[LSW2-GigabitEthernet0/0/2]int g0/0/3
[LSW2-GigabitEthernet0/0/3]dhcp snooping enable
[LSW3]int g0/0/2
[LSW3-GigabitEthernet0/0/2]dhcp snooping enable
[LSW3-GigabitEthernet0/0/2]int g0/0/3
[LSW3-GigabitEthernet0/0/3]dhcp snooping enable
(4)在LSW2和LSW3上开启IP报文检查功能:为了防止用户私自更改IP地址后攻击网络,在接入交换机开启DHCP Snooping功能后,还需要开启IP报文检查功能,这样LSW收到报文后会将报文与动态绑定表的表项进行匹配,放行匹配的报文,丢弃不匹配的报文。如果不想对整个VLAN收到的报文进行检查,可以只在连接某个终端的接口上开启IP报文检查功能。
[LSW2]vlan 10
[LSW2-vlan10]ip source check user-bind enable
[LSW3]vlan 20
[LSW3-vlan20]ip source check user-bind enable
8. 配置AR2-Internet
[AR2]int g0/0/0
[AR2-GigabitEthernet0/0/0]ip add 20.1.1.2 24
9.防火墙FW1的配置
(1)配置基本的IP地址
[FW1]int g1/0/1
[FW1-GigabitEthernet1/0/1]ip add 10.1.1.2 24
[FW1-GigabitEthernet1/0/1]int g1/0/0
[FW1-GigabitEthernet1/0/0]ip add 10.1.2.2 24
(2)在接口上开启ping功能后,并将接口加入相关区域,PC可以ping通与防火墙相连的接口
[FW1-GigabitEthernet1/0/0]service-manage enable
[FW1-GigabitEthernet1/0/0]service-manage ping permit
[FW1-GigabitEthernet1/0/0]int g1/0/1
[FW1-GigabitEthernet1/0/1]service-manage enable
[FW1-GigabitEthernet1/0/1]service-manage ping permit
[FW1]firewall zone trust
[FW1-zone-trust]add interface g1/0/1
[FW1-zone-trust]firewall zone untrust
[FW1-zone-untrust]add interface g1/0/0
(3)配置trust和untrust之间的转发策略,使PC3无法访问互联网,其余主机可以访问互联网(配置顺序很重要)
[FW1]security-policy
[FW1-policy-security]rule name deny_internet
[FW1-policy-security-rule-deny_internet]source-zone trust
[FW1-policy-security-rule-deny_internet]source-address 192.168.2.200 32
[FW1-policy-security-rule-deny_internet]destination-zone untrust
[FW1-policy-security-rule-deny_internet]destination-address any
[FW1-policy-security-rule-deny_internet]action deny
[FW1-policy-security]rule name permit_internet
[FW1-policy-security-rule-permit_internet]source-zone trust
[FW1-policy-security-rule-permit_internet]source-address 192.168.1.0 24
[FW1-policy-security-rule-permit_internet]source-address 192.168.2.0 24
[FW1-policy-security-rule-permit_internet]source-address 10.1.1.0 24
[FW1-policy-security-rule-permit_internet]destination-zone untrust
[FW1-policy-security-rule-permit_internet]destination-address any
[FW1-policy-security-rule-permit_internet]action permit
(4)配置防火墙路由
[FW1]ip route-static 192.168.1.0 24 10.1.1.1
[FW1]ip route-static 192.168.2.0 24 10.1.1.1
[FW1]ip route-static 0.0.0.0 0.0.0.0 10.1.2.1
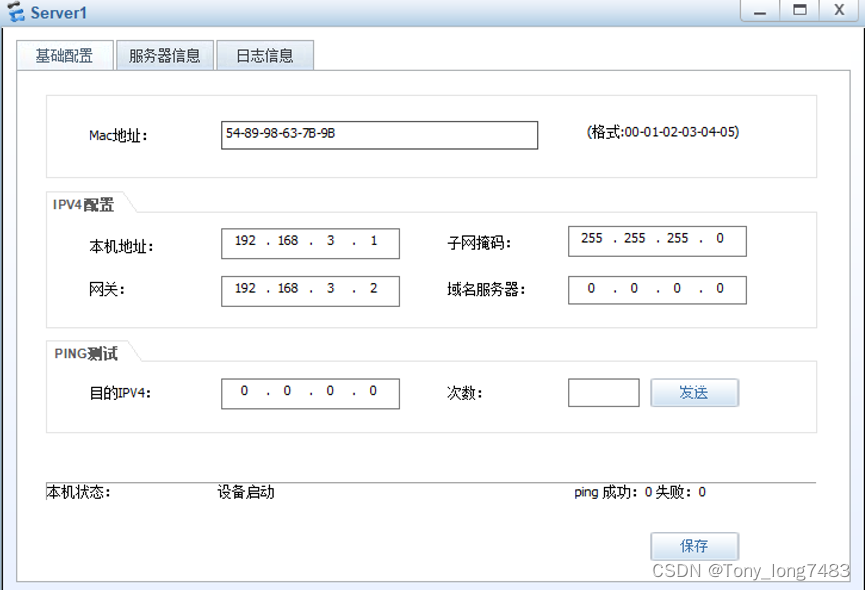
(二)配置服务器
1.配置服务器IP地址
2.配置防火墙IP地址及其区域
[FW1]int g1/0/2
[FW1-GigabitEthernet1/0/2]ip add 192.168.3.2 24
[FW1]firewall zone dmz
[FW1-zone-dmz]add interface g1/0/2
3.配置防火墙策略
(1)配置外网访问DMZ区域
[FW1]security-policy
[FW1-policy-security]rule name untrust_dmz
[FW1-policy-security-rule-untrust_dmz]source-zone untrust
[FW1-policy-security-rule-untrust_dmz]destination-zone dmz
[FW1-policy-security-rule-untrust_dmz]destination-address 192.168.3.0 24
[FW1-policy-security-rule-untrust_dmz]service http
[FW1-policy-security-rule-untrust_dmz]service icmp
[FW1-policy-security-rule-untrust_dmz]action permit
(2)配置内网访问DMZ区域
[FW1-policy-security]rule name trust_dmz
[FW1-policy-security-rule-trust_dmz]source-zone trust
[FW1-policy-security-rule-trust_dmz]source-address 192.168.1.0 24
[FW1-policy-security-rule-trust_dmz]source-address 192.168.2.0 24
[FW1-policy-security-rule-trust_dmz]source-address 10.1.1.0 24
[FW1-policy-security-rule-trust_dmz]destination-zone dmz
[FW1-policy-security-rule-trust_dmz]destination-address 192.168.3.0 24
[FW1-policy-security-rule-trust_dmz]action permit
(3)配置NAT Server
[FW1]nat server server1 protocol tcp global 10.1.2.100 www inside 192.168.3.1 www
[FW1]nat server server2 protocol icmp global 10.1.2.100 inside 192.168.3.1 //配置协议icmp,方便用ping测试
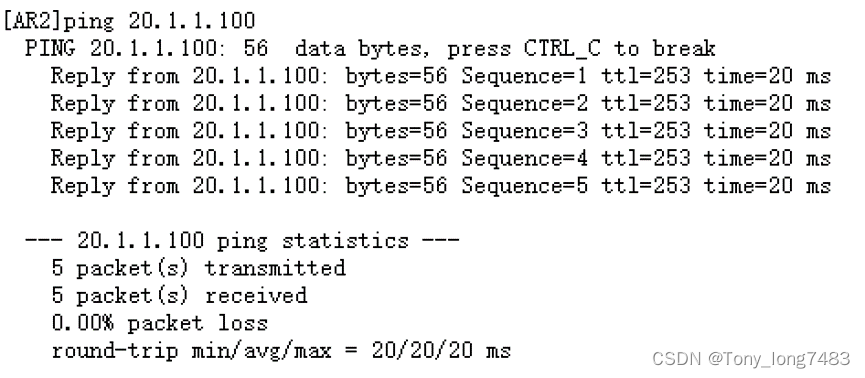
[AR1-GigabitEthernet0/0/0]nat server global 20.1.1.100 inside 10.1.2.100
4.配置外网访问server时的路由
[AR1]ip route-static 192.168.3.0 24 10.1.2.2
5.测试
(三)配置无线部分
-
配置网络互通
(1)配置相关vlan
[LSW2]vlan batch 50 60 70 100
[LSW2]int g0/0/4
[LSW2-GigabitEthernet0/0/4]port link-type trunk
[LSW2-GigabitEthernet0/0/4]port trunk allow-pass vlan 50 60 70 100
[LSW2-GigabitEthernet0/0/4]port trunk pvid vlan 100
[LSW2-GigabitEthernet0/0/4]port-isolate enable
[LSW2]int Eth-Trunk 1
[LSW2-Eth-Trunk1]port link-type trunk
[LSW2-Eth-Trunk1]port trunk allow-pass vlan 50 60 70 100
[LSW3]vlan batch 50 60 70 100
[LSW3]int g0/0/4
[LSW3-GigabitEthernet0/0/4]port link-type trunk
[LSW3-GigabitEthernet0/0/4]port trunk allow-pass vlan 50 60 70 100
[LSW3-GigabitEthernet0/0/4]port trunk pvid vlan 100
[LSW3-GigabitEthernet0/0/4]port-isolate enable
[LSW3]int Eth-Trunk 2
[LSW3-Eth-Trunk2]port link-type trunk
[LSW3-Eth-Trunk2]port trunk allow-pass vlan 50 60 70 100
[LSW1]vlan batch 50 60 70 100
[LSW1]int Eth-Trunk 1
[LSW1-Eth-Trunk1]port link-type trunk
[LSW1-Eth-Trunk1]port trunk allow-pass vlan 50 60 70 100
[LSW1]int Eth-Trunk 2
[LSW1-Eth-Trunk2]port link-type trunk
[LSW1-Eth-Trunk2]port trunk allow-pass vlan 50 60 70 100
[LSW1-GigabitEthernet0/0/4]port link-type trunk
[LSW1-GigabitEthernet0/0/4]port trunk allow-pass vlan 70 100
[AC1]vlan batch 50 60 70 100
[AC1]int g0/0/1
[AC1-GigabitEthernet0/0/1]port link-type trunk
[AC1-GigabitEthernet0/0/1]port trunk allow-pass vlan 70 100
(2)配置IP地址
[LSW1]int Vlanif 100
[LSW1-Vlanif100]ip add 192.168.10.1 24
[LSW1-Vlanif100]int Vlanif 50
[LSW1-Vlanif50]ip add 192.168.5.1 24
[LSW1-Vlanif50]int Vlanif 60
[LSW1-Vlanif60]ip add 192.168.6.1 24
[LSW1-Vlanif60]int Vlanif 70
[LSW1-Vlanif70]ip add 192.168.7.1 24
[AC1]int Vlanif 100
[AC1-Vlanif100]ip add 192.168.10.2 24
(3)配置路由
[FW1]ip route-static 192.168.5.0 24 10.1.1.1
[FW1]ip route-static 192.168.6.0 24 10.1.1.1
[FW1]ip route-static 192.168.7.0 24 10.1.1.1
[FW1]ip route-static 192.168.10.0 24 10.1.1.1
[AC1]ip route-static 192.168.5.0 24 192.168.10.1
[AC1]ip route-static 192.168.6.0 24 192.168.10…1
[AC1]ip route-static 192.168.7.0 24 192.168.10.1
(4)配置NAT
[AR1-GigabitEthernet0/0/0]undo nat outbound 2000
[AR1]acl 2000
[AR1-acl-basic-2000]rule permit source 192.168.5.0 0.0.0.255
[AR1-acl-basic-2000]rule permit source 192.168.6.0 0.0.0.255
[AR1-acl-basic-2000]rule permit source 192.168.7.0 0.0.0.255
[AR1-acl-basic-2000]rule permit source 192.168.10.0 0.0.0.255
[AR1]int g0/0/0
[AR1-GigabitEthernet0/0/0]nat outbound 2000
(5)配置防火墙策略
[FW1-policy-security]rule name permit_internet
[FW1-policy-security-rule-permit_internet]source-address 192.168.5.0 mask 255.255.255.0
[FW1-policy-security-rule-permit_internet]source-address 192.168.6.0 mask 255.255.255.0
[FW1-policy-security-rule-permit_internet]source-address 192.168.7.0 mask 255.255.255.0
[FW1-policy-security-rule-permit_internet]source-address 192.168.10.0 mask 255.255.255.0
[FW1-policy-security]rule name trust_dmz
[FW1-policy-security-rule-trust_dmz]source-address 192.168.5.0 mask 255.255.255.0
[FW1-policy-security-rule-trust_dmz]source-address 192.168.6.0 mask 255.255.255.0
[FW1-policy-security-rule-trust_dmz]source-address 192.168.7.0 mask 255.255.255.0
[FW1-policy-security-rule-trust_dmz]source-address 192.168.10.0 mask 255.255.255.0 -
配置DHCP服务,为AP和STA分配IP地址
(1)配置AC为AP分配IP地址
[AC1]dhcp enable
[AC1]ip pool ap_pool
[AC1-ip-pool-ap_pool]network 192.168.10.0 mask 24
[AC1-ip-pool-ap_pool]gateway-list 192.168.10.1
[LSW1]dhcp enable
[LSW1]int Vlanif 100
[LSW1-Vlanif100]dhcp select relay
[LSW1-Vlanif100]dhcp relay server-ip 192.168.10.2
(2)配置SW1作为DHCP服务器为STA分配IP地址
[LSW1]ip pool guest1
[LSW1-ip-pool-guest1]network 192.168.5.0 mask 24
[LSW1-ip-pool-guest1]gateway-list 192.168.5.1
[LSW1]ip pool guest2
[LSW1-ip-pool-guest2]network 192.168.6.0 mask 24
[LSW1-ip-pool-guest2]gateway-list 192.168.6.1
[LSW1]ip pool employee
[LSW1-ip-pool-employee]network 192.168.7.0 mask 24
[LSW1-ip-pool-employee] gateway-list 192.168.7.1
[LSW1]int Vlanif 50
[LSW1-Vlanif50]dhcp select global
[LSW1-Vlanif50]int Vlanif 60
[LSW1-Vlanif60]dhcp select global
[LSW1-Vlanif60]int Vlanif 70
[LSW1-Vlanif70]dhcp select global
(3)配置VLAN pool,用于作为业务VLAN
[AC1]vlan pool sta_pool1
[AC1-vlan-pool-sta_pool1]vlan 50 60
[AC1-vlan-pool-sta_pool1]assignment hash
[AC1]vlan pool sta_pool2
[AC1-vlan-pool-sta_pool2]vlan 70
[AC1-vlan-pool-sta_pool2]assignment hash -
配置AP上线
(1)创建AP组
[AC1]wlan
[AC1-wlan-view]ap-group name guest
[AC1-wlan-ap-group-guest]quit
[AC1-wlan-view]ap-group name employee
(2)创建域管理模板
[AC1-wlan-view]regulatory-domain-profile name domain1
[AC1-wlan-regulate-domain-domain1]country-code cn
[AC1-wlan-view]ap-group name guest
[AC1-wlan-ap-group-guest]regulatory-domain-profile domain1
[AC1-wlan-view]ap-group name employee
[AC1-wlan-ap-group-employee]regulatory-domain-profile domain1
(3)配置AC源接口
[AC1]capwap source interface Vlanif 100
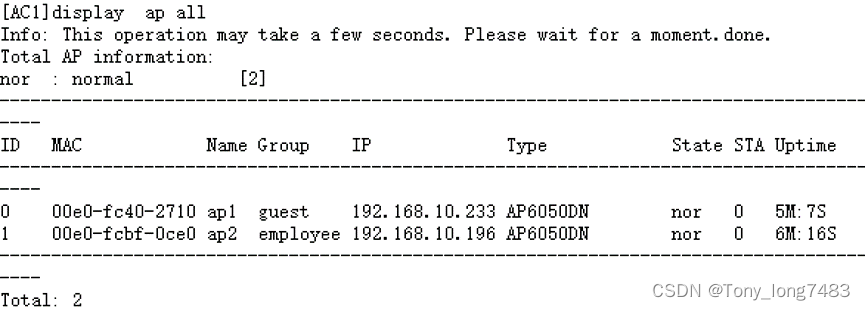
(4)在AC上离线导入AP
[AC1]wlan
[AC1-wlan-view]ap auth-mode mac-auth
[AC1-wlan-view]ap-id 0 ap-mac 00e0-fc40-2710
[AC1-wlan-ap-0]ap-name ap1
[AC1-wlan-ap-0]ap-group guest
[AC1-wlan-view]ap-id 1 ap-mac 00e0-fcbf-0ce0
[AC1-wlan-ap-1]ap-name ap2
[AC1-wlan-ap-1]ap-group employee
-
配置WLAN业务参数
(1)创建安全模板
[AC1]wlan
[AC1-wlan-view]security-profile name guest
[AC1-wlan-sec-prof-guest]security wpa2 psk pass-phrase abc@1234 aes
[AC1-wlan-view]security-profile name employee
[AC1-wlan-sec-prof-employee]security wpa2 psk pass-phrase abcd@1234 aes
(2)创建SSID模板
[AC1-wlan-view]ssid-profile name guest
[AC1-wlan-ssid-prof-guest]ssid guest
[AC1-wlan-view]ssid-profile name employee
[AC1-wlan-ssid-prof-employee]ssid employee
(3)创建VAP模板
[AC1-wlan-view]vap-profile name guest
[AC1-wlan-vap-prof-guest]forward-mode direct-forward
[AC1-wlan-vap-prof-guest]service-vlan vlan-pool sta_pool1
[AC1-wlan-vap-prof-guest]security-profile guest
[AC1-wlan-vap-prof-guest]ssid-profile guest
[AC1-wlan-view]vap-profile name employee
[AC1-wlan-vap-prof-employee]forward-mode tunnel
[AC1-wlan-vap-prof-employee]service-vlan vlan-pool sta_pool2
[AC1-wlan-vap-prof-employee]security-profile employee
[AC1-wlan-vap-prof-employee]ssid-profile employee
(4)配置AP组引用VAP模板,AP上射频使用VAP模板的配置
[AC1-wlan-view]ap-group name guest
[AC1-wlan-ap-group-guest]vap-profile guest wlan 1 radio 0
[AC1-wlan-ap-group-guest]vap-profile guest wlan 1 radio 1
[AC1-wlan-view]ap-group name employee
[AC1-wlan-ap-group-employee]vap-profile employee wlan 1 radio 0
[AC1-wlan-ap-group-employee]vap-profile employee wlan 1 radio 1 -
配置AP射频的信道和功率
[AC1-wlan-view]ap-id 0
[AC1-wlan-ap-0]radio 0
[AC1-wlan-radio-0/0]channel 20mhz 6
[AC1-wlan-radio-0/0]eirp 127
[AC1-wlan-radio-0/0]radio 1
[AC1-wlan-radio-0/1]channel 20mhz 149
[AC1-wlan-radio-0/1]eirp 127
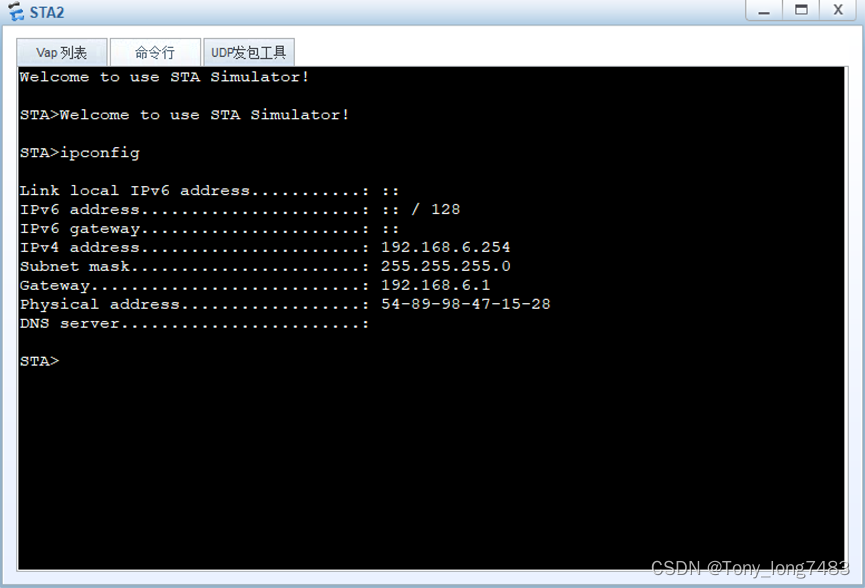
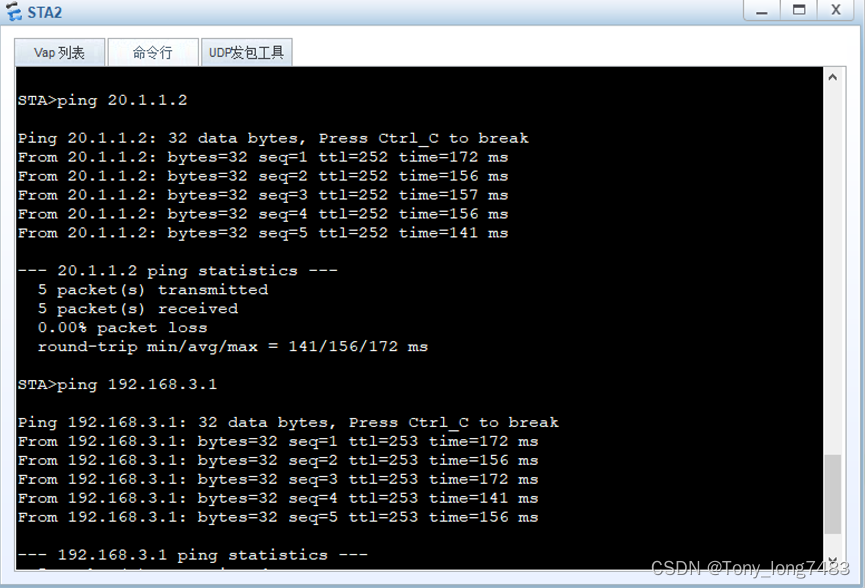
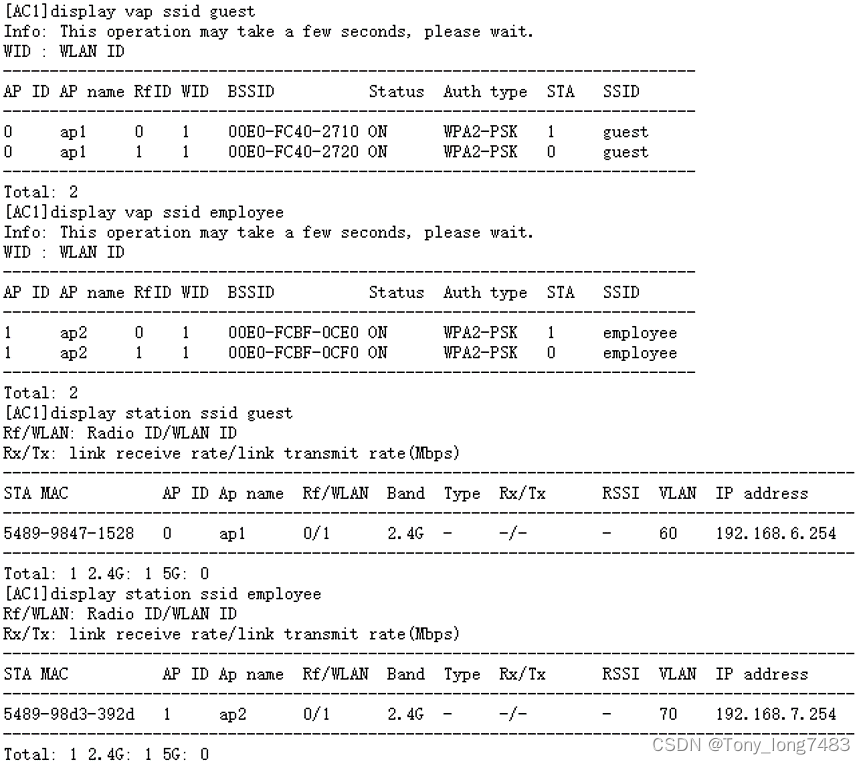
6.验证配置:sta连接AP

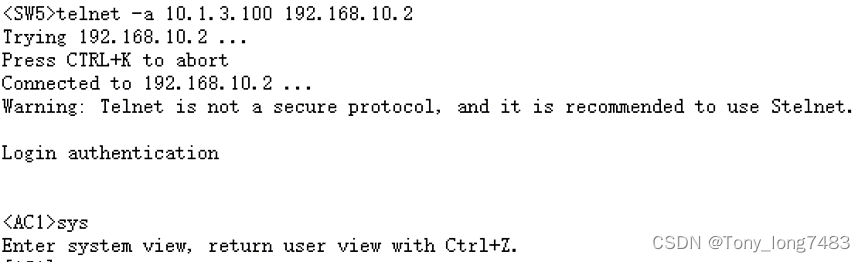
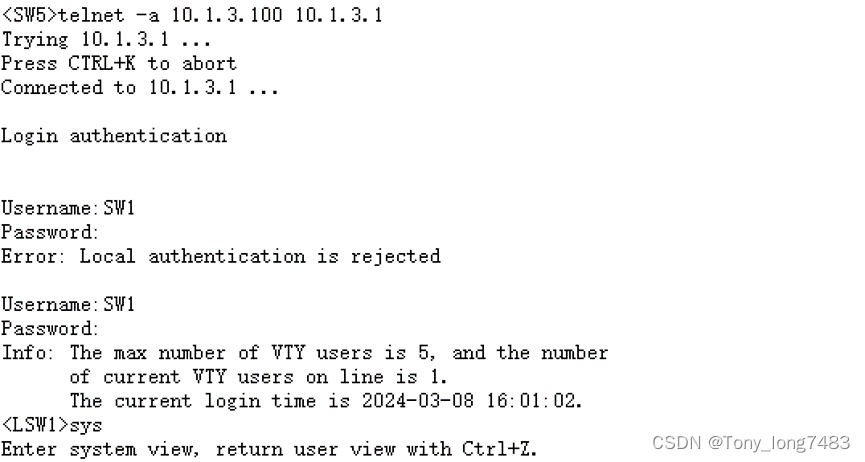
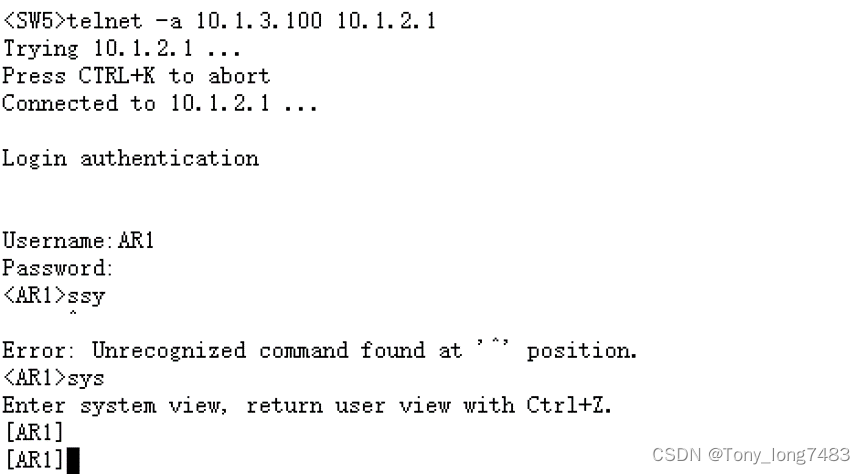
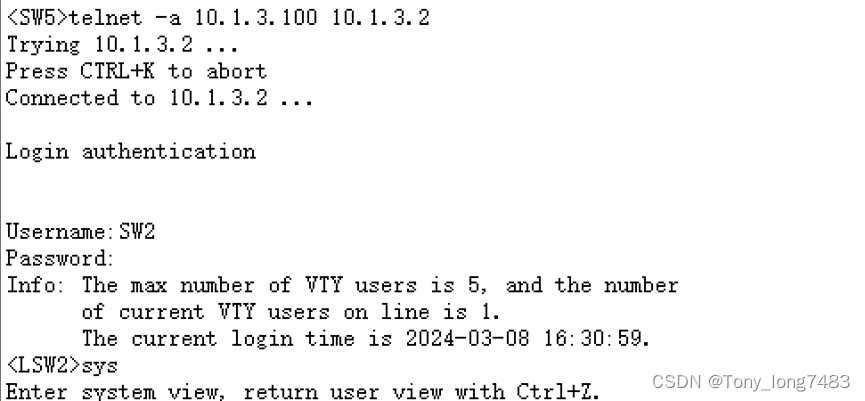
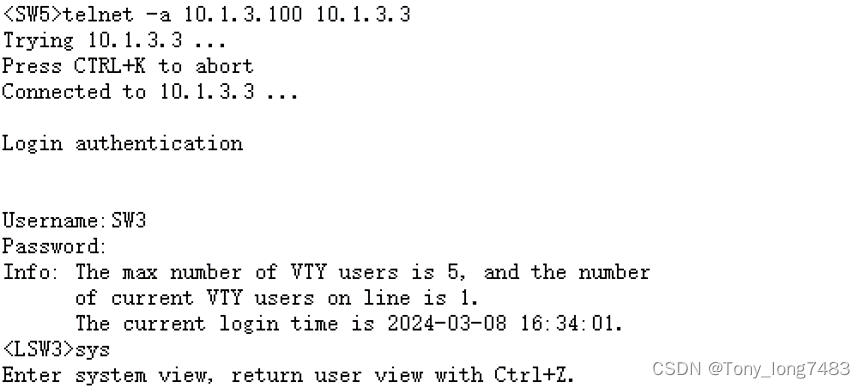
(四)设备Telnet配置:SW5为管理端,用以Telnet其他设备
1.配置相关IP地址
[LSW2]int Vlanif 3000
[LSW2-Vlanif3000]ip add 10.1.3.2 24
[LSW3]int Vlanif 3000
[LSW3-Vlanif3000]ip add 10.1.3.3 24
[LSW1]int g0/0/5
[LSW1-GigabitEthernet0/0/5]port link-type access
[LSW1-GigabitEthernet0/0/5]port default vlan 3000 [LSW1]int Vlanif 3000
[LSW1-Vlanif3000]ip add 10.1.3.1 24
[SW5]int g0/0/1
[SW5-GigabitEthernet0/0/1]port link-type trunk
[SW5-GigabitEthernet0/0/1]port trunk allow-pass vlan 3000
[SW5-GigabitEthernet0/0/1]port trunk pvid vlan 3000
[SW5]vlan 3000
[SW5]int Vlanif 3000
[SW5-Vlanif3000]ip add 10.1.3.100 24
2.配置相关路由
[AC1]ip route-static 10.1.3.0 24 192.168.10.1
[FW1]ip route-static 10.1.3.0 24 10.1.1.1
[AR1]ip route-static 10.1.3.0 24 10.1.2.2
[SW5]ip route-static 0.0.0.0 0.0.0.0 10.1.3.1
3.配置防火墙放行相关流量
[FW1]security-policy
[FW1-policy-security]rule name telnet_AR1
[FW1-policy-security-rule-telnet_AR1]source-zone trust
[FW1-policy-security-rule-telnet_AR1]source-address 10.1.3.100 0.0.0.0
[FW1-policy-security-rule-telnet_AR1]destination-zone untrust
[FW1-policy-security-rule-telnet_AR1]destination-address 10.1.2.0 0.0.0.255
[FW1-policy-security-rule-telnet_AR1]source-zone untrust
[FW1-policy-security-rule-telnet_AR1]source-address 10.1.2.0 24
[FW1-policy-security-rule-telnet_AR1]destination-zone trust
[FW1-policy-security-rule-telnet_AR1]destination-address 10.1.3.100 32
[FW1-policy-security-rule-telnet_AR1]service telnet
[FW1-policy-security-rule-telnet_AR1]action permit
[FW1-policy-security]rule name telnet_FW1
[FW1-policy-security-rule-telnet_FW1]source-zone trust
[FW1-policy-security-rule-telnet_FW1]source-address 10.1.3.100 0.0.0.0
[FW1-policy-security-rule-telnet_FW1]destination-zone local
[FW1-policy-security-rule-telnet_FW1]source-zone local
[FW1-policy-security-rule-telnet_FW1]destination-zone trust
[FW1-policy-security-rule-telnet_FW1]destination-address 10.1.3.100 32
[FW1-policy-security-rule-telnet_FW1]service telnet
[FW1-policy-security-rule-telnet_FW1]action permit
[FW1-policy-security]rule name telnet_dmz
[FW1-policy-security-rule-telnet_dmz]source-zone trust
[FW1-policy-security-rule-telnet_dmz]source-address 10.1.3.100 0.0.0.0
[FW1-policy-security-rule-telnet_dmz]destination-zone dmz
[FW1-policy-security-rule-telnet_dmz]source-zone dmz
[FW1-policy-security-rule-telnet_dmz]destination-zone trust
[FW1-policy-security-rule-telnet_dmz]destination-address 10.1.3.100 32
[FW1-policy-security-rule-telnet_dmz]service telnet
[FW1-policy-security-rule-telnet_dmz]action permit
4.创建相关账号
[AC1]telnet server enable
[AC1]aaa
[AC1-aaa]local-user ac1 password irreversible-cipher abc@1234
[AC1-aaa]local-user ac1 privilege level 3
[AC1-aaa]local-user ac1 service-type telnet
[AC1]user-interface vty 0 4
[AC1-ui-vty0-4]authentication-mode aaa
[AC1-ui-vty0-4]user privilege level 3
[LSW1]aaa
[LSW1-aaa]local-user SW1 password cipher abc@1234
[LSW1-aaa]local-user SW1 service-type telnet
[LSW1-aaa]local-user SW1 privilege level 3
[LSW1-ui-vty4]user-interface vty 0 4
[LSW1-ui-vty0-4]authentication-mode aaa
[LSW1-ui-vty0-4]user privilege level 3
[FW1]telnet server enable
[FW1]int g1/0/1
[FW1-GigabitEthernet1/0/1]service-manage enable
[FW1-GigabitEthernet1/0/1]service-manage telnet permit
[FW1]aaa
[FW1-aaa]manager-user FW1
[FW1-aaa-manager-user-FW1]password cipher abc@1234
[FW1-aaa-manager-user-FW1]service-type telnet
[FW1-aaa-manager-user-FW1]level 3
[FW1]user-interface vty 0 4
[FW1-ui-vty0-4]authentication-mode aaa
[FW1-ui-vty0-4]protocol inbound telnet
[FW1-ui-vty0-4]user privilege level 3
[AR1]aaa
[AR1-aaa]local-user AR1 password cipher abc@1234 privilege level 3
[AR1-aaa]local-user AR1 service-type telnet
[AR1]user-interface vty 0 4
[AR1-ui-vty0-4]authentication-mode aaa
[AR1-ui-vty0-4]user privilege level 3
[AR1-ui-vty0-4]authentication-mode aaa
[LSW2]telnet server enable
[LSW2]aaa
[LSW2-aaa]local-user SW2 password cipher abc@1234 privilege level 3
[LSW2-aaa]local-user SW2 service-type telnet
[LSW2]user-interface vty 0 4
[LSW2-ui-vty0-4]authentication-mode aaa
[LSW2-ui-vty0-4]user privilege level 3
[LSW3]telnet server enable
[LSW3]aaa
[LSW3-aaa]local-user SW3 password cipher abc@1234 privilege level 3
[LSW3-aaa]local-user SW3 service-type telnet
[LSW3]user-interface vty 0 4
[LSW3-ui-vty0-4]authentication-mode aaa
[LSW3-ui-vty0-4]u
[LSW3-ui-vty0-4]user privilege level 3
5.测试

相关文章:
华为设备小型园区网方案(有线+无线+防火墙)
(一)配置有线部分 1.配置LSW2 (1)创建相关vlan [LSW2]vlan batch 10 3000 (2)配置连接LSW1的Eth-Trunk1,透传VLAN 10 3000 [LSW2]int Eth-Trunk 1 [LSW2-Eth-Trunk1]port link-type trunk [LSW2…...

硬件工程师入门基础知识(四)多层陶瓷电容应用(一)
多层陶瓷电容应用(一) 1.多层陶瓷电容器在电子电路中的主要作用以及对应的典型电路图有哪些?1.1 滤波电容1.2 退耦电容1.3 旁路电容1.4 耦合电容1.5 积分电容1.6 微分电容2.多层瓷介电容器能否超类别温度使用?3.瓷介电容器的工作电压如何选择?1.多层陶瓷电容器在电子电路中…...
python的虚拟环境
python的虚拟环境可以为项目创建一个独立的环境,能够解决使用不同版本依赖给项目带来冲突的麻烦。创建虚拟环境的方式有很多种,pipenv会自动帮你管理虚拟环境和依赖文件,并且提供了一系列命令和选项来帮忙你实现各种依赖和环境管理相关的操作…...

设计模式——2_4 中介者(Mediator)
我寄愁心与明月,随风直到夜郎西 ——李白《闻王昌龄左迁龙标遥有此寄》 文章目录 定义图纸一个例子:怎么调度一组地铁站台和地铁开车指挥中心 碎碎念中介者和表单平台思想但是这种平台便利性是要付出代价的变化隔离原则 姑妄言之 定义 用一个中介者对象…...
——输出、数据类型、表达式、条件判断、循环)
C语言教程(一)——输出、数据类型、表达式、条件判断、循环
一个C语言程序必须包含以下代码: int main(void){return 0; } 这是整个C语言程序的入口 输出 输入以下代码并运行(注意分号): #include <stdio.h>int main(void){printf("Hello World\n");return 0; }可以看…...

Prompt Engineering、Finetune、RAG:OpenAI LLM 应用最佳实践
一、背景 本文介绍了 2023 年 11 月 OpenAI DevDay 中的一个演讲,演讲者为 John Allard 和 Colin Jarvis。演讲中,作者对 LLM 应用落地过程中遇到的问题和相关改进方案进行了总结。虽然其中用到的都是已知的技术,但是进行了很好的总结和串联…...
[C语言]——分支和循环(4)
目录 一.随机数生成 1.rand 2.srand 3.time 4.设置随机数的范围 猜数字游戏实现 写⼀个猜数字游戏 游戏要求: (1)电脑自动生成1~100的随机数 (2)玩家猜数字,猜数字的过程中,根据猜测数据的⼤…...
——代码随想录算法训练营Day54)
【LeetCode】392. 判断子序列(简单)——代码随想录算法训练营Day54
题目链接:392. 判断子序列 题目描述 给定字符串 s 和 t ,判断 s 是否为 t 的子序列。 字符串的一个子序列是原始字符串删除一些(也可以不删除)字符而不改变剩余字符相对位置形成的新字符串。(例如,"…...

1. Typescript入门
TS 基础 Typescript 在线编译平台 基础类型 boolean、number 和 string 类型 boolean let isHandsome: boolean true赋值与定义的不一致,会报错,静态类型语言的优势就体现出来了,可以帮助我们提前发现代码中的错误。 let isHandsome: …...

【Git】merge时报错:refusing to merge unrelated histories
文章目录 一、问题二、解决办法1、将feature分支的东西追加到master分支中2、将feature里的东西直接覆盖到master分支中 一、问题 今天将feature分支合并到master时报错:refusing to merge unrelated histories(拒绝合并无关历史) 报错原因&…...

树状数组+离散化求逆序对超详细讲解!
树状数组离散化求逆序对 用一个数组 w [ ] w[] w[]来记录遍历到当前数时,每个数出现的次数 由于只关心每个数前边有多少个数比他大,遍历到 i i i时,求大于 a [ i ] a[i] a[i]的数有多少个,就是对 [ a [ i ] , n ] [a[i], n] [a[i…...
《解密云计算:企业之选》
前言 在当今数字化时代,企业面临着巨大的数据处理压力和信息化需求,传统的IT架构已经无法满足日益增长的业务需求。在这样的背景下,越来越多的企业开始转向云计算,以实现灵活、高效和可扩展的IT资源管理和利用。 云计算 云计算是…...

地址分词 | EXCEL批量进行地址分词,标准化为十一级地址
一 需求 物流需要对用户输入地址进行检查,受用户录入习惯地址可能存在多种问题。 地址标准化是基于地址引擎和地址大数据模型,自动将地址信息标准化为省、市、区市县、街镇、小区、楼栋、单元、楼层、房屋、房间等元素,补充层级缺失数据、构建…...

KubeSphere平台安装系列之二【Linux单节点部署KubeSphere】(2/3)
**《KubeSphere平台安装系列》** 【Kubernetes上安装KubeSphere(亲测–实操完整版)】(1/3) 【Linux单节点部署KubeSphere】(2/3) 【Linux多节点部署KubeSphere】(3/3) **《KubeS…...
网络安全: Kali Linux 使用 docker-compose 部署 openvas
目录 一、实验 1.环境 2.Kali Linux 安装docker与docker-compose 3.Kali Linux 使用docker-compose方式部署 openvas 4. KaliLinux 使用openvas 二、问题 1. 信息安全漏洞库 2.信息安全漏洞共享平台 3.Windows 更新指南与查询 4.CVE 查询 5.docker-compose 如何修改o…...

【学习考试心得】在誉天学习考试RHCE9.0的体验
作为华中第一位参加RHCE9.0线上考试的考生,很荣幸能来写这个心得,和大家分享一下线上的考试的一些体验。 一、学习体验 首先在红帽课程的学习中,跟着杨峰老师的脚步,整个学习过程中都非常有意思。杨峰老师充满磁性的声音和小王老师…...
Flip Clock(not good)
最近体验了一下iOS的翻页时钟app,很想自己做一个,但是效果不好 public class main {public static void main(String[] args) {//psvmnew MyFrame();} }import javax.swing.*; import java.awt.*; import java.io.File; import java.io.IOException; im…...

目标检测——摩托车头盔检测数据集
一、简介 首先,摩托车作为一种交通工具,具有高速、开放和稳定性差的特点,其事故发生率高,伤亡率排在机动车辆损伤的首位。因此,摩托车乘员头盔对于保护驾乘人员头部安全至关重要。在驾乘突发状况、人体受冲击时&#…...
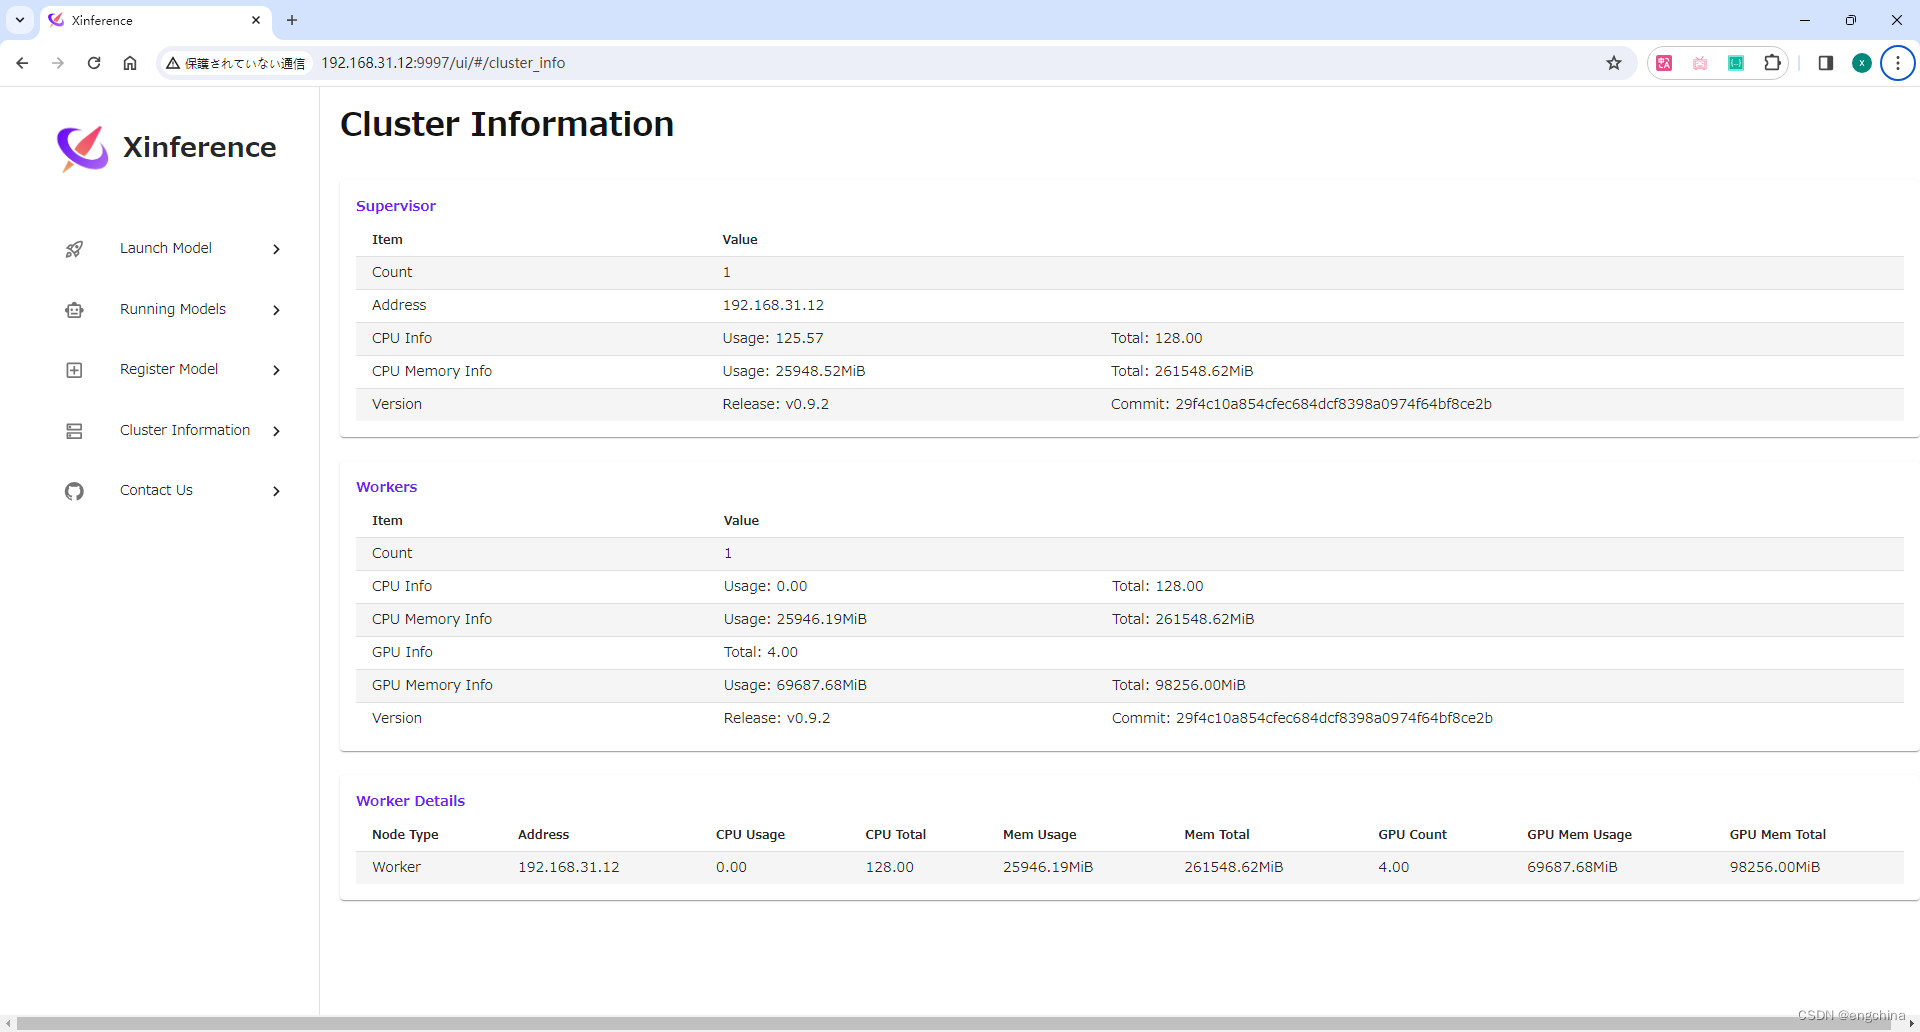
Windows 安装 Xinference
Windows 安装 Xinference 0. 引言1. 创建虚拟环境2. 安装 pytorch3. 安装 llama_cpp_python4. 安装 chatglm-cpp5. 安装 Xinference6. 设置 model 路径7. 启动 Xinference8. 查看 Cluster Information 0. 引言 Xorbits Inference(Xinference)是一个性能…...
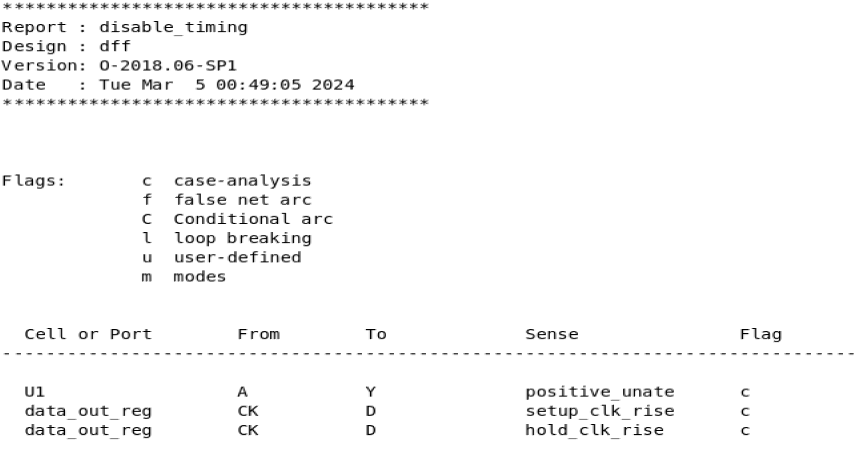
静态时序分析:SDC约束命令set_case_analysis详解
相关阅读 静态时序分析https://blog.csdn.net/weixin_45791458/category_12567571.html?spm1001.2014.3001.5482 目录 指定值 指定端口/引脚列表 简单使用 set_case_analysis命令用于对电路进行特定模式的设定,例如对于一个工作在正常模式下的芯片,…...
)
GD32选型不再纠结:5分钟用官方工具找到最适合你项目的MCU(附实战案例)
GD32选型实战指南:5步精准匹配工业级MCU方案 打开兆易创新官网的产品搜索器页面,工程师们常会面对370余款GD32型号陷入选择困难——主频从48MHz到240MHz不等,Flash容量覆盖16KB到3072KB,外设组合更是千差万别。去年为某工业网关项…...

从模组混乱到游戏秩序:Scarab如何重塑《空洞骑士》的模组体验
从模组混乱到游戏秩序:Scarab如何重塑《空洞骑士》的模组体验 【免费下载链接】Scarab An installer for Hollow Knight mods written in Avalonia. 项目地址: https://gitcode.com/gh_mirrors/sc/Scarab 还记得第一次为《空洞骑士》安装模组时的迷茫吗&…...
)
告别mstsc!用C# WinForm打造一个专属的远程桌面管理工具(支持Win11)
用C# WinForm构建企业级远程桌面管理工具 每次打开Windows自带的远程桌面连接工具mstsc,面对那个简陋的界面和每次都要重复输入的服务器信息,作为.NET开发者的你是否感到效率低下?本文将带你从零开始,用C# WinForm打造一个功能强大…...

Super Breadboard:8位复古计算原型开发板解析
1. Super Breadboard:为8位复古计算打造的全能原型开发板在硬件原型开发领域,面包板一直是电子爱好者和工程师快速验证电路设计的必备工具。但传统面包板存在供电不稳定、缺乏保护电路、信号管理混乱等痛点。Super Breadboard正是为解决这些问题而生的增…...

Upload-Labs第三关踩坑记:PHPStudy 8.1下修改httpd.conf为何不生效?原来是TS/NTS版本在作祟
Upload-Labs第三关环境配置陷阱:PHP线程安全版本的深度解析 当你在深夜调试Upload-Labs靶场时,修改了httpd.conf添加.php3解析却毫无反应,这种挫败感每个安全研究者都经历过。这不是简单的配置错误,而是隐藏在PHPStudy环境下的线程…...

手把手教你玩转English-Corpora.org:从查词频到挖冷门搭配的完整指南
手把手教你玩转English-Corpora.org:从查词频到挖冷门搭配的完整指南 当你在写作中纠结"significant"和"crucial"哪个更学术,或是想找出"break the ice"的地道变体时,英语语料库就是你的秘密武器。不同于传统…...

Qwen3.5-9B-GGUF应用案例:研发团队API文档智能生成实测
Qwen3.5-9B-GGUF应用案例:研发团队API文档智能生成实测 1. 项目背景与技术特点 Qwen3.5-9B-GGUF是基于阿里云开源的Qwen3.5-9B模型经过GGUF格式量化后的轻量级版本。这个90亿参数的稠密模型采用了创新的Gated Delta Networks架构和混合注意力机制(75%线性…...

智读造用|《一人企业》1 :OPC靠这四个特征在大公司的缝隙里活得更好
系列:《一人企业》读书笔记 第1篇 书名:《一人企业:一个人也能赚钱的商业新模式》 作者:保罗贾维斯(Paul Jarvis) 大公司有钱、有人、有品牌,为什么反而在某些市场里追不上OPC公司?…...

我整理了 14 种 GPT-Image-2 的神仙玩法,大家看看效果怎么样!
最近很多人被灰度到了GPT-Image-2。从上周开始,X 和 LINUX DO 上一大批人在晒图,说自己被 GPT-Image-2 灰度到了。抖音直播间截图、手写笔记、中文试卷、城市海报…… 张张都像真的,不像 AI 画的。先说结论:这一代最强它开始理解场…...

PowerToys中文优化终极指南:让微软效率工具箱说“中国话“
PowerToys中文优化终极指南:让微软效率工具箱说"中国话" 【免费下载链接】PowerToys-CN PowerToys Simplified Chinese Translation 微软增强工具箱 自制汉化 项目地址: https://gitcode.com/gh_mirrors/po/PowerToys-CN 你是否曾经面对PowerToys强…...