YOLOv8_pose-Openvino和ONNXRuntime推理【CPU】
纯检测系列:
YOLOv5-Openvino和ONNXRuntime推理【CPU】
YOLOv6-Openvino和ONNXRuntime推理【CPU】
YOLOv8-Openvino和ONNXRuntime推理【CPU】
YOLOv7-Openvino和ONNXRuntime推理【CPU】
YOLOv9-Openvino和ONNXRuntime推理【CPU】
跟踪系列:
YOLOv5/6/7-Openvino-ByteTrack【CPU】
YOLOv8/9-Openvino-ByteTrack【CPU】
分割系列:
YOLOv5_seg-Openvino和ONNXRuntime推理【CPU】
YOLOv8_seg-Openvino和ONNXRuntime推理【CPU】
关键点系列:
YOLOv7_pose-Openvino和ONNXRuntime推理【CPU】
YOLOv8_pose-Openvino和ONNXRuntime推理【CPU】
注:YOLOv5、YOLOv6和YOLOv7代码内容基本一致!YOLOv8和YOLOv9代码内容基本一致!
全部代码Github:https://github.com/Bigtuo/YOLOv8_Openvino
1 环境:
CPU:i5-12500
Python:3.8.18
2 安装Openvino和ONNXRuntime
2.1 Openvino简介
Openvino是由Intel开发的专门用于优化和部署人工智能推理的半开源的工具包,主要用于对深度推理做优化。
Openvino内部集成了Opencv、TensorFlow模块,除此之外它还具有强大的Plugin开发框架,允许开发者在Openvino之上对推理过程做优化。
Openvino整体框架为:Openvino前端→ Plugin中间层→ Backend后端
Openvino的优点在于它屏蔽了后端接口,提供了统一操作的前端API,开发者可以无需关心后端的实现,例如后端可以是TensorFlow、Keras、ARM-NN,通过Plugin提供给前端接口调用,也就意味着一套代码在Openvino之上可以运行在多个推理引擎之上,Openvino像是类似聚合一样的开发包。
2.2 ONNXRuntime简介
ONNXRuntime是微软推出的一款推理框架,用户可以非常便利的用其运行一个onnx模型。ONNXRuntime支持多种运行后端包括CPU,GPU,TensorRT,DML等。可以说ONNXRuntime是对ONNX模型最原生的支持。
虽然大家用ONNX时更多的是作为一个中间表示,从pytorch转到onnx后直接喂到TensorRT或MNN等各种后端框架,但这并不能否认ONNXRuntime是一款非常优秀的推理框架。而且由于其自身只包含推理功能(最新的ONNXRuntime甚至已经可以训练),通过阅读其源码可以解深度学习框架的一些核心功能原理(op注册,内存管理,运行逻辑等)
总体来看,整个ONNXRuntime的运行可以分为三个阶段,Session构造,模型加载与初始化和运行。和其他所有主流框架相同,ONNXRuntime最常用的语言是python,而实际负责执行框架运行的则是C++。
2.3 安装
pip install openvino -i  https://pypi.tuna.tsinghua.edu.cn/simple
pip install onnxruntime -i  https://pypi.tuna.tsinghua.edu.cn/simple
3 YOLOv8介绍
YOLOv8官网
YOLOv8原理
4 基于Openvino和ONNXRuntime推理
下面代码整个处理过程主要包括:预处理—>推理—>后处理—>画图(矩形框和关键点)。
假设图像resize为640×640,
前处理输出结果维度:(1, 3, 640, 640);
推理输出结果维度:(1, 56, 8400),其中56表示4个box坐标信息+1个类别概率+17个关键点信息(x,y,visibility),8400表示80×80+40×40+20×20;
后处理输出结果维度:(-1, 56),其中第一个维度表示检测的目标数量,第二个维度56表示(x1, y1, x2, y2, conf, 17×3);
4.1 全部代码
import argparse
import time
import cv2
import numpy as np
from openvino.runtime import Core  # pip install openvino -i  https://pypi.tuna.tsinghua.edu.cn/simple
import onnxruntime as ort  # 使用onnxruntime推理用上,pip install onnxruntime,默认安装CPU# Pose默认的person类
CLASSES = ['person']class OpenvinoInference(object):def __init__(self, onnx_path):self.onnx_path = onnx_pathie = Core()self.model_onnx = ie.read_model(model=self.onnx_path)self.compiled_model_onnx = ie.compile_model(model=self.model_onnx, device_name="CPU")self.output_layer_onnx = self.compiled_model_onnx.output(0)def predict(self, datas):predict_data = self.compiled_model_onnx([datas])[self.output_layer_onnx]return predict_dataclass KeyPoint_draw(object):def __init__(self):# 定义一个调色板数组,其中每个元素是一个包含RGB值的列表,用于表示不同的颜色self.palette = np.array([[255, 128, 0], [255, 153, 51], [255, 178, 102],[230, 230, 0], [255, 153, 255], [153, 204, 255],[255, 102, 255], [255, 51, 255], [102, 178, 255],[51, 153, 255], [255, 153, 153], [255, 102, 102],[255, 51, 51], [153, 255, 153], [102, 255, 102],[51, 255, 51], [0, 255, 0], [0, 0, 255], [255, 0, 0],[255, 255, 255]])# 定义人体17个关键点的连接顺序,每个子列表包含两个数字,代表要连接的关键点的索引, 1鼻子 2左眼 3右眼 4左耳 5右耳 6左肩 7右肩# 8左肘 9右肘 10左手腕 11右手腕 12左髋 13右髋 14左膝 15右膝 16左踝 17右踝self.skeleton = [[16, 14], [14, 12], [17, 15], [15, 13], [12, 13], [6, 12],[7, 13], [6, 7], [6, 8], [7, 9], [8, 10], [9, 11], [2, 3],[1, 2], [1, 3], [2, 4], [3, 5], [4, 6], [5, 7]]# 通过索引从调色板中选择颜色,用于绘制人体骨架的线条,每个索引对应一种颜色self.pose_limb_color = self.palette[[9, 9, 9, 9, 7, 7, 7, 0, 0, 0, 0, 0, 16, 16, 16, 16, 16, 16, 16]]# 通过索引从调色板中选择颜色,用于绘制人体的关键点,每个索引对应一种颜色self.pose_kpt_color = self.palette[[16, 16, 16, 16, 16, 0, 0, 0, 0, 0, 0, 9, 9, 9, 9, 9, 9]]def plot_skeleton_kpts(self, im, kpts, steps=3):num_kpts = len(kpts) // steps  # 51 / 3 =17# 画点for kid in range(num_kpts):r, g, b = self.pose_kpt_color[kid]x_coord, y_coord = kpts[steps * kid], kpts[steps * kid + 1]conf = kpts[steps * kid + 2]if conf > 0.5:  # 关键点的置信度必须大于 0.5cv2.circle(im, (int(x_coord), int(y_coord)), 10, (int(r), int(g), int(b)), -1)# 画骨架for sk_id, sk in enumerate(self.skeleton):r, g, b = self.pose_limb_color[sk_id]pos1 = (int(kpts[(sk[0] - 1) * steps]), int(kpts[(sk[0] - 1) * steps + 1]))pos2 = (int(kpts[(sk[1] - 1) * steps]), int(kpts[(sk[1] - 1) * steps + 1]))conf1 = kpts[(sk[0] - 1) * steps + 2]conf2 = kpts[(sk[1] - 1) * steps + 2]if conf1 > 0.5 and conf2 > 0.5:  # 对于肢体,相连的两个关键点置信度 必须同时大于 0.5cv2.line(im, pos1, pos2, (int(r), int(g), int(b)), thickness=2)class YOLOv8_pose:"""YOLOv8_pose detection model class for handling inference and visualization."""def __init__(self, onnx_model, imgsz=(640, 640), infer_tool='openvino'):"""Initialization.Args:onnx_model (str): Path to the ONNX model."""self.infer_tool = infer_toolif self.infer_tool == 'openvino':# 构建openvino推理引擎self.openvino = OpenvinoInference(onnx_model)self.ndtype = np.singleelse:# 构建onnxruntime推理引擎self.ort_session = ort.InferenceSession(onnx_model,providers=['CUDAExecutionProvider', 'CPUExecutionProvider']if ort.get_device() == 'GPU' else ['CPUExecutionProvider'])# Numpy dtype: support both FP32 and FP16 onnx modelself.ndtype = np.half if self.ort_session.get_inputs()[0].type == 'tensor(float16)' else np.singleself.classes = CLASSES  # 加载模型类别self.model_height, self.model_width = imgsz[0], imgsz[1]  # 图像resize大小self.color = (0, 0, 255)  # 为类别生成调色板def __call__(self, im0, conf_threshold=0.4, iou_threshold=0.45):"""The whole pipeline: pre-process -> inference -> post-process.Args:im0 (Numpy.ndarray): original input image.conf_threshold (float): confidence threshold for filtering predictions.iou_threshold (float): iou threshold for NMS.Returns:boxes (List): list of bounding boxes."""# 前处理Pre-processt1 = time.time()im, ratio, (pad_w, pad_h) = self.preprocess(im0)print('预处理时间:{:.3f}s'.format(time.time() - t1))# 推理 inferencet2 = time.time()if self.infer_tool == 'openvino':preds = self.openvino.predict(im)else:preds = self.ort_session.run(None, {self.ort_session.get_inputs()[0].name: im})[0]print('推理时间:{:.2f}s'.format(time.time() - t2))# 后处理Post-processt3 = time.time()boxes = self.postprocess(preds,im0=im0,ratio=ratio,pad_w=pad_w,pad_h=pad_h,conf_threshold=conf_threshold,iou_threshold=iou_threshold,)print('后处理时间:{:.3f}s'.format(time.time() - t3))return boxes# 前处理,包括:resize, pad, HWC to CHW,BGR to RGB,归一化,增加维度CHW -> BCHWdef preprocess(self, img):"""Pre-processes the input image.Args:img (Numpy.ndarray): image about to be processed.Returns:img_process (Numpy.ndarray): image preprocessed for inference.ratio (tuple): width, height ratios in letterbox.pad_w (float): width padding in letterbox.pad_h (float): height padding in letterbox."""# Resize and pad input image using letterbox() (Borrowed from Ultralytics)shape = img.shape[:2]  # original image shapenew_shape = (self.model_height, self.model_width)r = min(new_shape[0] / shape[0], new_shape[1] / shape[1])ratio = r, rnew_unpad = int(round(shape[1] * r)), int(round(shape[0] * r))pad_w, pad_h = (new_shape[1] - new_unpad[0]) / 2, (new_shape[0] - new_unpad[1]) / 2  # wh paddingif shape[::-1] != new_unpad:  # resizeimg = cv2.resize(img, new_unpad, interpolation=cv2.INTER_LINEAR)top, bottom = int(round(pad_h - 0.1)), int(round(pad_h + 0.1))left, right = int(round(pad_w - 0.1)), int(round(pad_w + 0.1))img = cv2.copyMakeBorder(img, top, bottom, left, right, cv2.BORDER_CONSTANT, value=(114, 114, 114))  # 填充# Transforms: HWC to CHW -> BGR to RGB -> div(255) -> contiguous -> add axis(optional)img = np.ascontiguousarray(np.einsum('HWC->CHW', img)[::-1], dtype=self.ndtype) / 255.0img_process = img[None] if len(img.shape) == 3 else imgreturn img_process, ratio, (pad_w, pad_h)# 后处理,包括:阈值过滤与NMSdef postprocess(self, preds, im0, ratio, pad_w, pad_h, conf_threshold, iou_threshold):"""Post-process the prediction.Args:preds (Numpy.ndarray): predictions come from ort.session.run().im0 (Numpy.ndarray): [h, w, c] original input image.ratio (tuple): width, height ratios in letterbox.pad_w (float): width padding in letterbox.pad_h (float): height padding in letterbox.conf_threshold (float): conf threshold.iou_threshold (float): iou threshold.Returns:boxes (List): list of bounding boxes."""x = preds  # outputs: predictions (1, 56, 8400),其中56=4+1+17*3,17个关键点(x,y,visibility)# Transpose the first output: (Batch_size, xywh_conf_pose, Num_anchors) -> (Batch_size, Num_anchors, xywh_conf_pose)x = np.einsum('bcn->bnc', x)  # (1, 8400, 56)# Predictions filtering by conf-thresholdx = x[x[..., 4] > conf_threshold]# Create a new matrix which merge these(box, score, pose) into one# For more details about `numpy.c_()`: https://numpy.org/doc/1.26/reference/generated/numpy.c_.htmlx = np.c_[x[..., :4], x[..., 4], x[..., 5:]]# NMS filtering# 经过NMS后的值, np.array([[x, y, w, h, conf, pose], ...]), shape=(-1, 4 + 1 + 17*3)x = x[cv2.dnn.NMSBoxes(x[:, :4], x[:, 4], conf_threshold, iou_threshold)]# 重新缩放边界框,为画图做准备if len(x) > 0:# Bounding boxes format change: cxcywh -> xyxyx[..., [0, 1]] -= x[..., [2, 3]] / 2x[..., [2, 3]] += x[..., [0, 1]]# Rescales bounding boxes from model shape(model_height, model_width) to the shape of original imagex[..., :4] -= [pad_w, pad_h, pad_w, pad_h]x[..., :4] /= min(ratio)# Bounding boxes boundary clampx[..., [0, 2]] = x[:, [0, 2]].clip(0, im0.shape[1])  # clip避免边界框超出图像边界x[..., [1, 3]] = x[:, [1, 3]].clip(0, im0.shape[0])# 关键点坐标映射到原图上,从[:, 5:]开始算num_kpts = x.shape[1] // 3  # 56 // 3 = 18for kid in range(2, num_kpts + 1):x[:, kid * 3 - 1] = (x[:, kid * 3 - 1] - pad_w) / min(ratio)x[:, kid * 3] = (x[:, kid * 3] - pad_h) / min(ratio)return xelse:return []# 绘框def draw_and_visualize(self, im, bboxes, keypoint_draw, vis=False, save=True):"""Draw and visualize results.Args:im (np.ndarray): original image, shape [h, w, c].bboxes (numpy.ndarray): [n, 56], n is number of bboxes.vis (bool): imshow using OpenCV.save (bool): save image annotated.Returns:None"""# Draw rectangles for bbox in bboxes:box, conf, kpts = bbox[:4], bbox[4], bbox[5:]# draw bbox rectanglecv2.rectangle(im, (int(box[0]), int(box[1])), (int(box[2]), int(box[3])),self.color, 1, cv2.LINE_AA)cv2.putText(im, f'{self.classes[0]}: {conf:.3f}', (int(box[0]), int(box[1] - 9)),cv2.FONT_HERSHEY_SIMPLEX, 0.7, self.color, 2, cv2.LINE_AA)# 画关键点,连线keypoint_draw.plot_skeleton_kpts(im, kpts)# Show imageif vis:cv2.imshow('demo', im)cv2.waitKey(0)cv2.destroyAllWindows()# Save imageif save:cv2.imwrite('demo.jpg', im)if __name__ == '__main__':# Create an argument parser to handle command-line argumentsparser = argparse.ArgumentParser()parser.add_argument('--model', type=str, default='weights/yolov8s-pose.onnx', help='Path to ONNX model')parser.add_argument('--source', type=str, default=str('bus.jpg'), help='Path to input image')parser.add_argument('--imgsz', type=tuple, default=(640, 640), help='Image input size')parser.add_argument('--conf', type=float, default=0.25, help='Confidence threshold')parser.add_argument('--iou', type=float, default=0.45, help='NMS IoU threshold')parser.add_argument('--infer_tool', type=str, default='openvino', choices=("openvino", "onnxruntime"), help='选择推理引擎')args = parser.parse_args()# Build modelmodel = YOLOv8_pose(args.model, args.imgsz, args.infer_tool)keypoint_draw = KeyPoint_draw()  # 可视化关键点# Read image by OpenCVimg = cv2.imread(args.source)# Inferenceboxes = model(img, conf_threshold=args.conf, iou_threshold=args.iou)# Visualizeif len(boxes) > 0:model.draw_and_visualize(img, boxes, keypoint_draw, vis=False, save=True)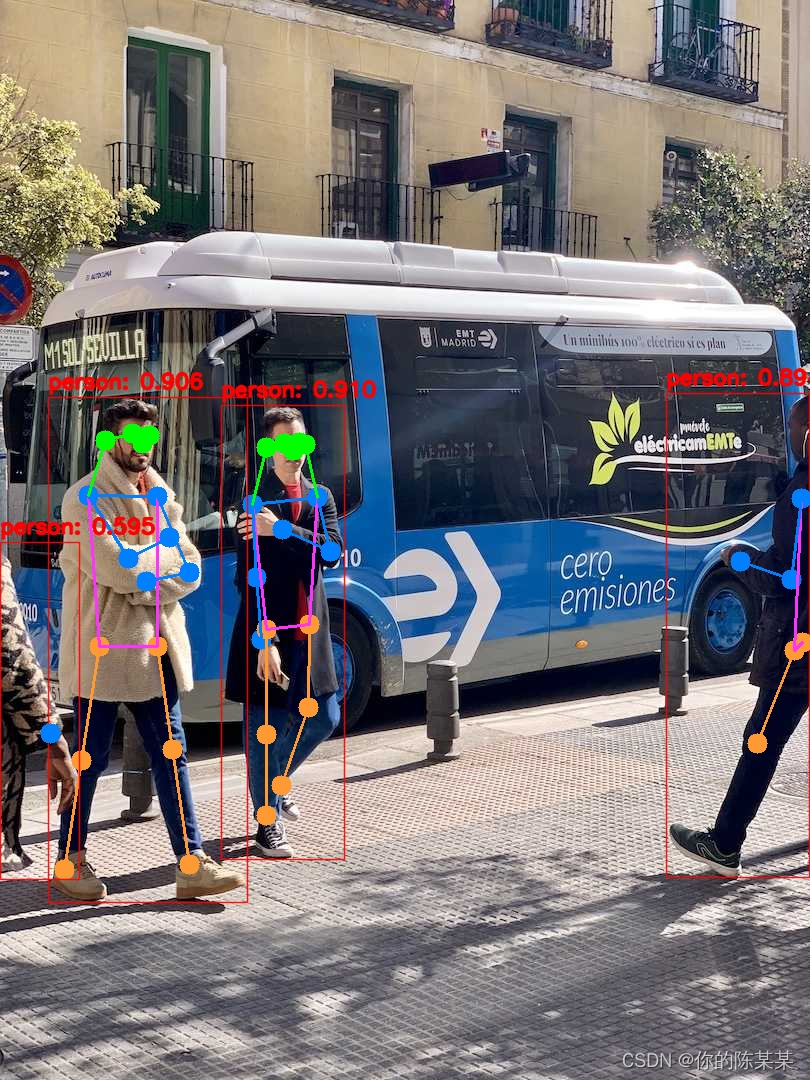
具体时间消耗:
预处理时间:0.005s(包含Pad)
推理时间:0.10s(Openvino)
推理时间:0.11s(ONNXRuntime)
后处理时间:0.001s
注:640×640下。
相关文章:
YOLOv8_pose-Openvino和ONNXRuntime推理【CPU】
纯检测系列: YOLOv5-Openvino和ONNXRuntime推理【CPU】 YOLOv6-Openvino和ONNXRuntime推理【CPU】 YOLOv8-Openvino和ONNXRuntime推理【CPU】 YOLOv7-Openvino和ONNXRuntime推理【CPU】 YOLOv9-Openvino和ONNXRuntime推理【CPU】 跟踪系列: YOLOv5/6/7-O…...

百科 | 光伏电站如何开展运维工作?
从目前太阳能光伏电站的运行管理工作实际经验看,要保证光伏发电系统安全、经济、高效运行,必须建立规范和有效的管理机制,特别是要加强电站的运行维护管理。 一、建立完善的技术文件管理体系 对每个电站都要建立全面完整的技术文件资料档案…...
监听抖音直播间的评论并实现存储
监听抖音直播间评论,主要是动态监听dom元素的变化,如果评论是图片类型的,获取alt的值 主要采用的是MutationObserver:https://developer.mozilla.org/zh-CN/docs/Web/API/MutationObserver index.js如下所示:function getPL() {…...

一体机电脑辐射超标整改
电脑一体机是目前台式机和笔记本电脑之间的一个新型的市场产物,它将主机部分、显示器部分整合到一起的新形态电脑,该产品的创新在于内部元件的高度集成。随着无线技术的发展,电脑一体机的键盘、鼠标与显示器可实现无线链接,机器只…...

重学SpringBoot3-路径匹配机制
更多SpringBoot3内容请关注我的专栏:《SpringBoot3》 期待您的点赞👍收藏⭐评论✍ 重学SpringBoot3-路径匹配机制 AntPathMatcherPathPatternParser 和 PathPattern演示AntPathMatcher 示例PathPattern 示例性能和精确度的提升 选择使用哪一种 在 Spring…...

【贪心算法】摆动序列
如果连续数字之间的差严格地在正数和负数之间交替,则数字序列称为 摆动序列 。第一个差(如果存在的话)可能是正数或负数。仅有一个元素或者含两个不等元素的序列也视作摆动序列。 例如, [1, 7, 4, 9, 2, 5] 是一个 摆动序列 &…...

Unload-labs
function checkFile() {var file document.getElementsByName(upload_file)[0].value;if (file null || file "") {alert("请选择要上传的文件!");return false;}//定义允许上传的文件类型var allow_ext ".jpg|.png|.gif";//提取上传文件的类…...

SRS-220VDC-4Z-10A静态中间继电器 额定电压DC220V 四副转换触点 JOSEF约瑟
系列型号: SRS-24VDC-4Z-8A静态中间继电器;SRS-24VDC-4Z-10A静态中间继电器; SRS-24VDC-4Z-16A静态中间继电器;SRS-24VAC-4Z-8A静态中间继电器; SRS-24VAC-4Z-10A静态中间继电器;SRS-24VAC-4Z-16A静态中…...
解决electron打包vue-element-admin项目页面无法跳转的问题
解决electron打包vue-element-admin项目页面无法跳转的问题 说明之前通过这个教程已经打包成功,但是发现进行账号密码登录后页面无法跳转的问题。现在已经解决,所以记录一下。 1、检查路由模式是否为hash模式,如果不是改成hash模式。 new Ro…...

Uniapp Vue2 image src动态绑定static目录下的图片
报错的static地址写法: this.url ../static/img.png this.url /static/img.png 正确的static地址写法: this.url /static/img.png 动态绑定 <image :src"url"></image>...

【UE5】动画混合空间的基本用法
项目资源文末百度网盘自取 什么是动画混合空间 混合空间分为两种: 通过一个数值控制通过两个数值控制 下面通过演示让大家更直观地了解 在Character文件夹中单击右键,选择动画(Animation),选择旧有的混合空间1D 然后选择骨骼(动画是基于骨骼显示的,所以需要选择…...

用红黑树封装实现map和set
目录 1、map和set的底层 2、map与set中的key关键值 3、红黑树迭代器的实现。 1、操作 2、-- 操作 3、和!操作 4、在红黑树中封装迭代器 5、map和set对迭代器的封装 1、map map中[]的重载 2、set 1、map和set的底层 map和set都是基于红黑树实现的。红黑树是一种自平衡…...
【阿里云系列】-部署ACK集群的POD应用日志如何集成到日志服务(SLS)中
介绍 我们在实际部署应用到阿里云的ACK集群后,由于后期应用服务的持续维护诉求可能需要跟踪排查问题,此时就要具备将应用的历史日志存档便于后期排查问题 处理方式 为了解决以上的普遍需求,需要将ACK中的应用日志采集到SLS的Logstore中,然…...

Vue中给当前页面传递参数并重新加载,vue使用this.$router.push跳转页面,给跳转过去的页面传参不一致时重新加载
vue通过this.$router.push给url传参,改变url但是当前页面不会自动刷新 跳转页面代码 this.$router.push({name: allbusiness,query: {pw_id: item.id} });1.使用 watch 监听 $route 对象的变化,当路由发生变化时重新加载数据或执行其他操作。 2.利用路…...
【扩散模型(一)】综述:扩散模型在文本生成领域应用
一、论文信息 1 标题 Diffusion models in text generation: a survey 2 作者 Qiuhua Yi, Xiangfan Chen, Chenwei Zhang, Zehai Zhou, Linan Zhu, Xiangjie Kong 3 研究机构 1 College of Computer Science and Technology, Zhejiang University of Technology, HangZho…...

K8S Pod
基本概念 Pod是K8S中非常重要的概念之一,是整个K8S架构的基础和核心。Pod是K8S调度的最小单位,是一个不可拆分的独立个体,K8S将多个业务上相关联的容器(Docker容器)合并到一起,组合成一个Pod,这…...

反向传播(backward propagation,BP) python实现
BP算法就是反向传播,要输入的数据经过一个前向传播会得到一个输出,但是由于权重的原因,所以其输出会和你想要的输出有差距,这个时候就需要进行反向传播,利用梯度下降,对所有的权重进行更新,这样…...
简单算命脚本
效果展示 文件内容 main.py文件 import json import random import time# 别挂配置数据 gua_data_path "data.json"# 别卦数据 gua_data_map {} fake_delay 10# 读取别卦数据 def init_gua_data(json_path):with open(gua_data_path, r, encodingutf8) as fp:gl…...

Lua-掌握Lua语言基础1
Lua是一种轻量级的脚本语言,广泛应用于游戏开发、嵌入式系统和其他领域。下面是Lua语言基础的介绍: 数据类型:Lua支持基本的数据类型,包括nil、boolean、number、string和table。其中,table是一种关联数组,…...
python-0003-pycharm开发虚拟环境中的项目
前言 在虚拟环境中创建好了python项目,使用pycharm进行开发 打开项目 使用pycharm打开项目 设置虚拟环境的解释器 File–>Settings–>Project(项目名)–>Python Interpreter–>添加解释器–>添加已经存在的解释器–>选择虚拟环境的解释器 …...
)
跟着 MDN 学CSS day_9:(深入掌握CSS选择器核心技能测试)
在Web开发的学习路径中,CSS选择器是构建一切样式体系的基石。无论你是刚入门的新手,还是有一定经验的开发者,对选择器的理解深度直接决定了你能否高效、精准地控制页面元素的样式表现。MDN Web 文档提供了一套经典的"技能测试࿱…...

DS89C420片上SRAM的启用与配置详解
1. 项目概述:DS89C420片上SRAM的启用与配置 在嵌入式开发领域,Dallas Semiconductor(后被Maxim Integrated收购)的DS89C420系列微控制器因其高性能和丰富的外设资源受到工程师青睐。这款基于8051架构的芯片有一个容易被忽视的特性…...

Kafka 2.8.0到3.4.0滚动升级实录:单副本Topic的可用性挑战与ISR列表监控
Kafka集群升级中的单副本Topic风险治理:ISR监控与高可用实践 引言 在分布式消息系统的世界里,Kafka凭借其高吞吐、低延迟的特性成为企业级数据管道的首选。但当运维团队面临版本升级时,那些隐藏在配置细节中的"定时炸弹"往往成为…...

5分钟掌握Pandoc:终极文档格式转换神器完全指南
5分钟掌握Pandoc:终极文档格式转换神器完全指南 【免费下载链接】pandoc Universal markup converter 项目地址: https://gitcode.com/gh_mirrors/pa/pandoc 你是否曾经为文档格式转换而烦恼?需要将Markdown转换为Word,或者将HTML转换…...

别再只看benchmark!Claude的“类人延迟响应”背后藏着7种语境锚定策略
更多请点击: https://intelliparadigm.com 第一章:类人延迟响应的本质:为什么“慢”才是更高级的智能 人类在面对复杂问题时,并非即时作答,而是经历感知、检索、权衡、修正等多阶段认知循环——这种可观察的“延迟”&…...

四大音乐平台一键解析:免费开源music-api打破会员壁垒
四大音乐平台一键解析:免费开源music-api打破会员壁垒 【免费下载链接】music-api Music API 项目地址: https://gitcode.com/gh_mirrors/mu/music-api 在音乐流媒体平台林立的今天,你是否曾被各大平台的会员壁垒所困扰?想听周杰伦的歌…...

Infineon C167芯片Flash编程与MEMTOOL使用指南
1. C167系列芯片片上Flash编程方法解析在嵌入式系统开发中,片上Flash编程是每个工程师都需要掌握的核心技能。对于使用Infineon C167系列微控制器的开发者来说,了解如何可靠地编程片上Flash存储器尤为重要。本文将详细介绍使用MEMTOOL工具进行C167芯片Fl…...

5个维度深度解析洛雪音乐音源:从技术实现到高效部署的完整指南
5个维度深度解析洛雪音乐音源:从技术实现到高效部署的完整指南 【免费下载链接】lxmusic- lxmusic(洛雪音乐)全网最新最全音源 项目地址: https://gitcode.com/gh_mirrors/lx/lxmusic- 洛雪音乐音源项目作为开源音乐资源聚合解决方案,通过JavaScr…...
)
从零开始用 Python 做销量预测(保姆级教程)
一、为什么要学销量预测?想象你是某连锁奶茶店的运营:备货太少 → 顾客喝不到,差评 😡备货太多 → 过期倒掉,亏钱 😭销量预测(Sales Forecasting) 就是为了解决这个“黄金平衡点”…...

Proteus 8.17安装超详细教程 保姆级教程【附安装包】
电子设计小伙伴们!今天我给大家带来一篇超详细的Proteus 8.17专业版安装教程 !这可是电子工程师和学生党的福音啊!作为PCB设计和单片机仿真的神器,Proteus绝对是你玩转电子设计必备的利器!不会安装?别担心&…...