人像抠图HumanSeg——基于大规模电话会议视频数据集的连接感知人像分割
前言
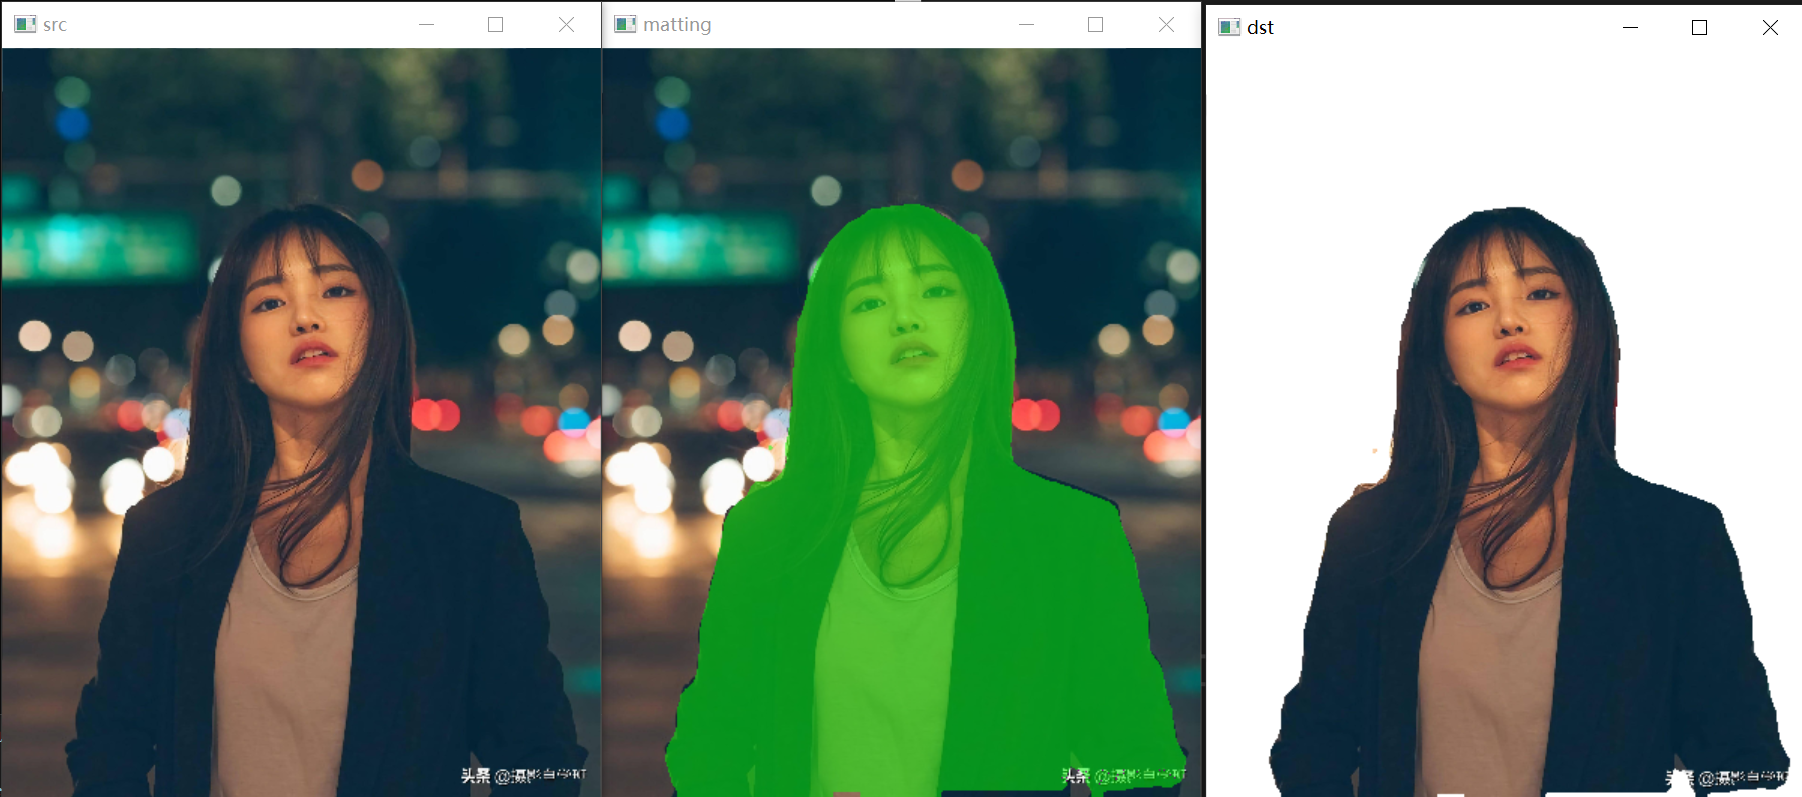
人像抠图将图像中的人物与背景进行像素级别的区分的技术。通过人像分割,可以实现诸如背景虚化、弹幕穿人等各种有趣的功能,为视频通话和影音观看提供更加优质和丰富的体验。由于广泛部署到Web、手机和边缘设备,肖像分割在兼顾分割精度的前提下,需要具有极快的推理速度。
PP-HumanSeg v2人像分割方案是一项重要的突破,采用了深度学习技术,以96.63%的mIoU精度和仅15.86ms的推理耗时,在人像分割领域刷新了SOTA指标。该方案不仅支持商业应用,而且可零成本、开箱即用。
相比于之前的版本,PP-HumanSeg v2在推理速度和精度上都有显著提升,肖像分割模型推理速度提升45.5%,mIoU精度提升3.03%。通用人像分割模型推理速度提升5.7%,mIoU精度提升6.5%。
网络结构
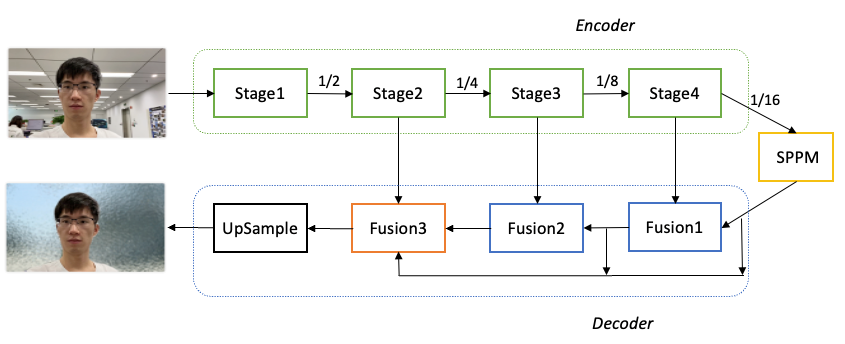
PaddleSeg整体结构如下图所示。具体优化过程如下:
-
骨干网络选择: 为了降低模型的算量要求,选择了MobileNetV3作为骨干网络,用于提取多层特征。
-
参数量优化: 对MobileNetV3进行参数量优化。分析发现MobileNetV3的参数主要集中在最后一个Stage,在不影响分割精度的前提下,保留了MobileNetV3的前四个Stage,成功减少了68.6%的参数量。
-
全局上下文信息汇集: 对于16倍下采样特征图,使用了SPPM(Spatial Pyramid Pooling Module)模块来汇集全局上下文信息,以提高模型对背景和环境的理解能力。
-
特征融合: 使用三个Fusion模块来不断融合深层语义特征和浅层细节特征。这些Fusion模块的作用是将不同层次的特征图进行融合,以获取更加丰富和准确的语义信息。
-
分割结果输出: 最后一个Fusion模块再次汇集不同层次的特征图,并将最终的分割结果输出。
通过以上优化措施,PaddleSeg的肖像分割模型在保证分割精度的情况下,大幅减少了参数量,提高了模型的轻量化程度,并且通过全局上下文信息的汇集和特征融合,进一步提升了模型的语义理解能力和分割效果。
针对肖像分割任务,数据量不足是影响分割精度的一个重要因素。为了解决这一问题,PaddleSeg开源了PP-HumanSeg-14K数据集,其中包含14000张室内场景半身人像的图片,从一定程度上缓解了数据不足的问题。为了进一步提高模型的分割精度和泛化能力,采用了迁移学习的方法。具体来说,首先在大规模的通用人像分割数据集上进行预训练,然后再针对PP-HumanSeg-14K数据集进行微调。
在调整模型的深度和宽度以平衡分割精度和推理速度方面,模型的输入尺寸也是一个需要重视的变量。针对手机和电脑端常见的拍摄尺寸为1028x720的情况,PP-HumanSeg v1肖像分割模型建议将图片缩放为398x224进行预测。为了进一步追求极致的推理速度,PP-HumanSeg v2肖像分割模型将最佳输入尺寸进一步缩小为256x144,从而将推理速度提升了52%(相比输入尺寸398x224)。虽然较小的输入尺寸会减少输入信息量,但由于PP-HumanSeg v2模型具有更强的学习能力,最终也能获得不错的分割效果。
综合考虑上述改进,与PP-HumanSeg v1相比,PP-HumanSeg v2肖像分割模型在推理速度(手机端)提升了45.5%,mIoU精度提升了3.03%,同时具有更佳的可视化效果。此外,该模型还支持手机拍摄的横屏和竖屏输入图像,针对室内场景可以开箱即用,为用户提供了更加便捷和高效的人像分割解决方案。

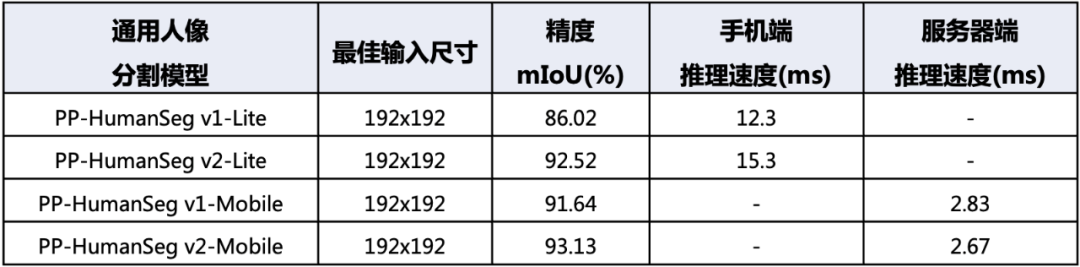
通用人像分割模型
针对通用人像分割任务,我们在PaddleSeg平台上使用了领先的模型,在大规模数据集上进行了训练,并发布了两个型号的PP-HumanSeg v2通用人像分割模型。
首先是PP-HumanSeg v2-Lite通用人像分割模型,它采用了类似于肖像分割模型的结构,并且特别适合在手机端的ARM CPU上进行部署。相比PP-HumanSeg v1-Lite模型,PP-HumanSeg v2-Lite在精度上提升了6.5%的mIoU。这个模型可以有效地应用于移动端的人像分割场景,提供更高质量的分割效果。
其次是PP-HumanSeg v2-Mobile通用人像分割模型,它采用了PaddleSeg自研的PP-LiteSeg模型结构,更适合在服务器端的GPU上进行部署。相比PP-HumanSeg v1-Mobile模型,PP-HumanSeg v2-Mobile在精度上提升了1.49%的mIoU,同时推理速度也提升了5.7%。这个模型适用于对分割精度和推理速度都有要求的场景,为用户提供了更高效和准确的人像分割解决方案。
由于通用人像分割任务的场景变化很大,我们建议用户在实际应用中评估PP-HumanSeg通用人像分割模型的精度。如果模型符合业务要求,用户可以直接使用。如果需要进一步优化,用户也可以基于PP-HumanSeg通用人像分割模型进行定制化优化,以获得更好的效果。
模型部署
PP-HumanSeg 分割模型提供了最终模型和二次训练以其部署的功能代码。使用提供的肖像分割和通用人像分割配置文件,用户只需准备好数据即可开始训练。该模型支持在多种硬件上进行应用部署,包括NVIDIA GPU、X86 CPU、ARM CPU以及浏览器Web。
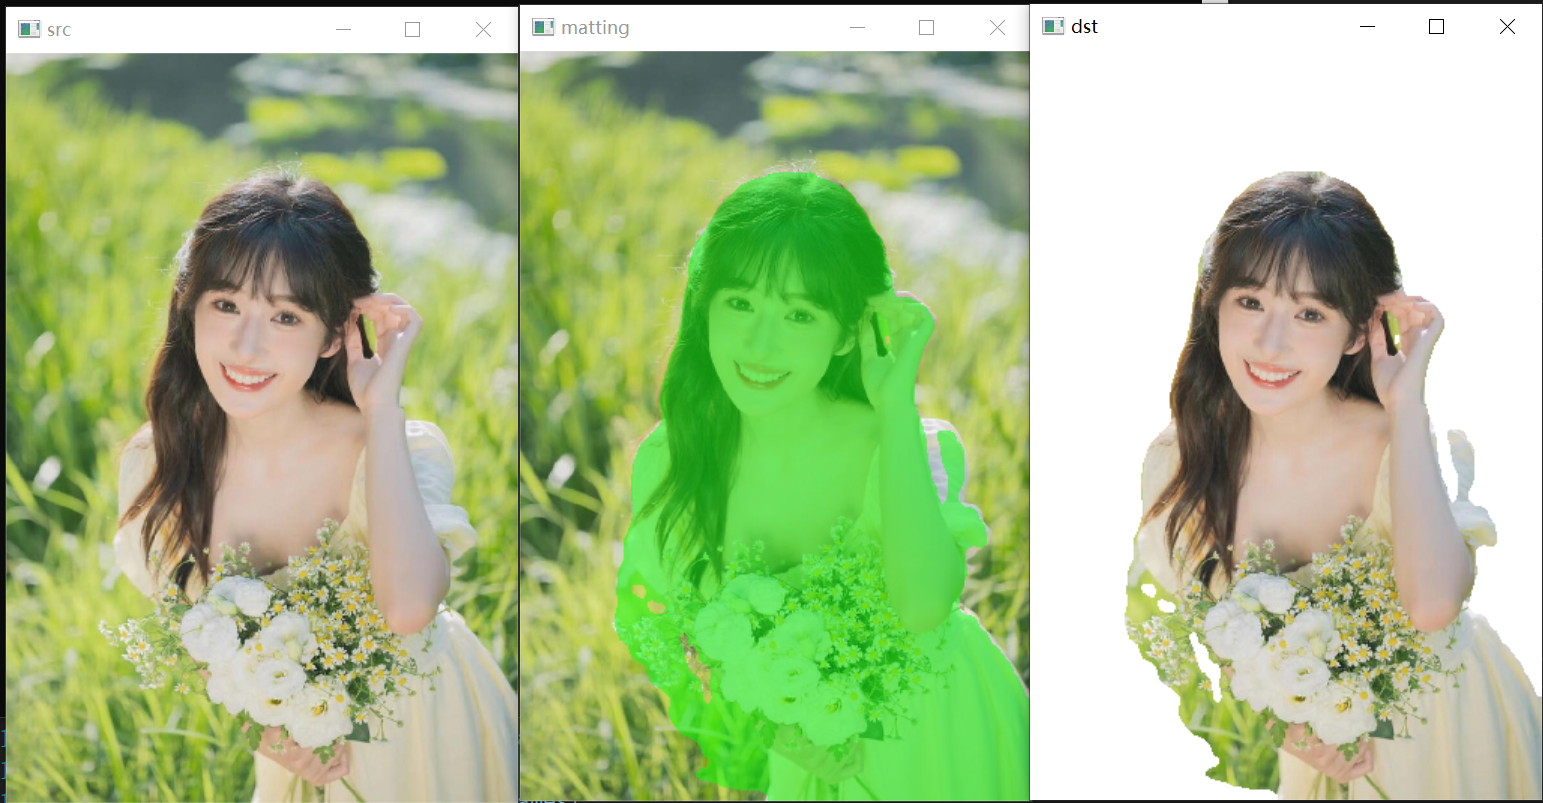
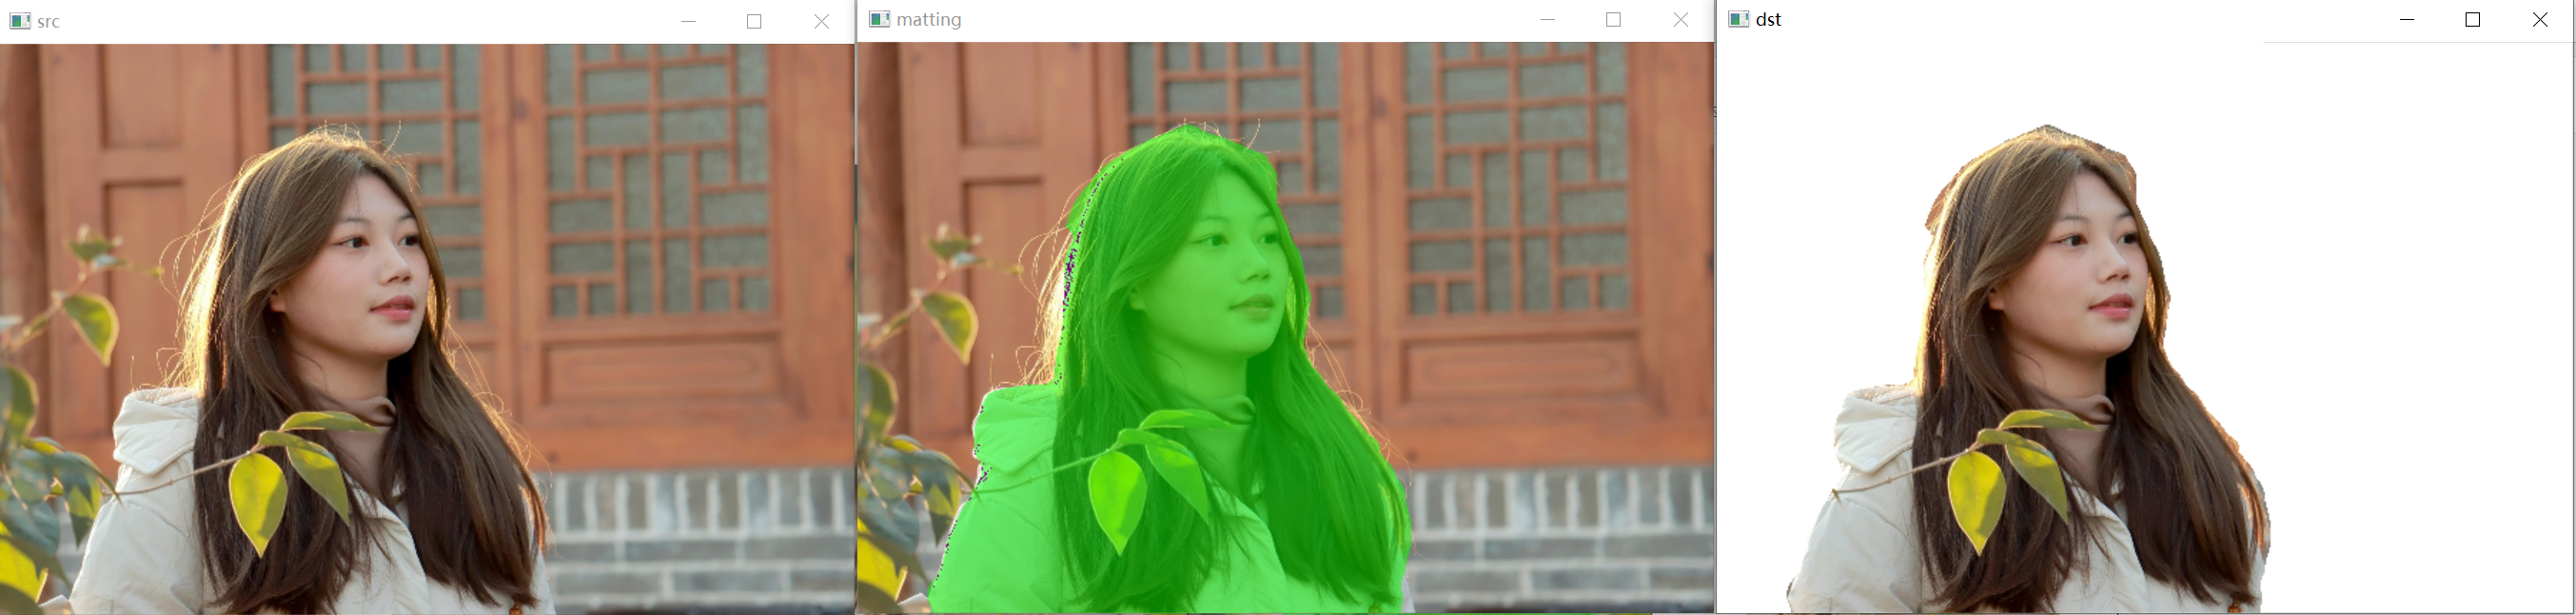
另外,还对模型预测结果进行了形态学后处理操作,以过滤掉背景干扰,保留人像主体。具体流程如下图所示:原始预测图像中每个像素的数值表示其为前景的概率。首先,使用阈值操作来过滤掉概率较小的像素,然后通过腐蚀和膨胀操作来消除细小的噪点。腐蚀操作的核尺寸小于膨胀操作,然后将掩码图像应用于原始预测结果上,得到最终的预测结果。通过形态学后处理,可以有效地提升人像分割的可视化效果,从而使分割结果更加清晰和准确。
C++ onnxruntime推理:
#define _CRT_SECURE_NO_WARNINGS
#include <iostream>
#include <fstream>
#include <string>
#include <opencv2/imgproc.hpp>
#include <opencv2/highgui.hpp>
//#include <cuda_provider_factory.h>  ///使用cuda加速
#include <onnxruntime_cxx_api.h>class pphuman_seg
{
public:pphuman_seg(std::string model_path);void inference(cv::Mat &cv_src, std::vector<cv::Mat>& cv_dsts);
private:void preprocess(cv::Mat &cv_src);int inpWidth;int inpHeight;std::vector<float> input_image_;const float conf_threshold = 0.5;Ort::Env env = Ort::Env(ORT_LOGGING_LEVEL_ERROR, "pphuman");Ort::Session *ort_session = nullptr;Ort::SessionOptions sessionOptions = Ort::SessionOptions();std::vector<char*> input_names;std::vector<char*> output_names;std::vector<std::vector<int64_t>> input_node_dims; // >=1 outputsstd::vector<std::vector<int64_t>> output_node_dims; // >=1 outputs
};pphuman_seg::pphuman_seg(std::string model_path)
{std::wstring widestr = std::wstring(model_path.begin(), model_path.end());  //windows写法//OrtStatus* status = OrtSessionOptionsAppendExecutionProvider_CUDA(sessionOptions, 0);   //使用cuda加速sessionOptions.SetGraphOptimizationLevel(ORT_ENABLE_BASIC);ort_session = new Ort::Session(env, widestr.c_str(), sessionOptions); //windows写法//ort_session = new Session(env, model_path.c_str(), sessionOptions); //linux写法size_t numInputNodes = ort_session->GetInputCount();size_t numOutputNodes = ort_session->GetOutputCount();Ort::AllocatorWithDefaultOptions allocator;for (int i = 0; i < numInputNodes; i++){input_names.push_back(ort_session->GetInputName(i, allocator));Ort::TypeInfo input_type_info = ort_session->GetInputTypeInfo(i);auto input_tensor_info = input_type_info.GetTensorTypeAndShapeInfo();auto input_dims = input_tensor_info.GetShape();input_node_dims.push_back(input_dims);}for (int i = 0; i < numOutputNodes; i++){output_names.push_back(ort_session->GetOutputName(i, allocator));Ort::TypeInfo output_type_info = ort_session->GetOutputTypeInfo(i);auto output_tensor_info = output_type_info.GetTensorTypeAndShapeInfo();auto output_dims = output_tensor_info.GetShape();output_node_dims.push_back(output_dims);}this->inpHeight = input_node_dims[0][2];this->inpWidth = input_node_dims[0][3];
}void pphuman_seg::preprocess(cv::Mat &cv_src)
{cv::Mat dstimg;resize(cv_src, dstimg, cv::Size(this->inpWidth, this->inpHeight), cv::INTER_LINEAR);int row = dstimg.rows;int col = dstimg.cols;this->input_image_.resize(row * col * dstimg.channels());for (int c = 0; c < 3; c++){for (int i = 0; i < row; i++){for (int j = 0; j < col; j++){float pix = dstimg.ptr<uchar>(i)[j * 3 + c];this->input_image_[c * row * col + i * col + j] = (pix / 255.0 - 0.5) / 0.5;}}}
}void pphuman_seg::inference(cv::Mat &cv_src,std::vector<cv::Mat> &cv_dsts)
{this->preprocess(cv_src);std::array<int64_t, 4> input_shape_{1, 3, this->inpHeight, this->inpWidth};auto allocator_info = Ort::MemoryInfo::CreateCpu(OrtDeviceAllocator, OrtMemTypeCPU);Ort::Value input_tensor_ = Ort::Value::CreateTensor<float>(allocator_info, input_image_.data(),input_image_.size(), input_shape_.data(), input_shape_.size());std::vector<Ort::Value> ort_outputs = ort_session->Run(Ort::RunOptions{ nullptr }, input_names.data(),&input_tensor_, 1, output_names.data(), output_names.size());   // 开始推理// post process.																																					Ort::Value &mask_pred = ort_outputs.at(0);const int out_h = this->output_node_dims[0][1];const int out_w = this->output_node_dims[0][2];float *mask_ptr = mask_pred.GetTensorMutableData<float>();cv::Mat segmentation_map;cv::Mat mask_out(out_h, out_w, CV_32FC2, mask_ptr);cv::resize(mask_out, segmentation_map, cv::Size(cv_src.cols, cv_src.rows));cv::Mat cv_dst = cv_src.clone();for (int h = 0; h < cv_src.rows; h++){for (int w = 0; w < cv_src.cols; w++){float pix = segmentation_map.ptr<float>(h)[w * 2 + 1];if (pix > this->conf_threshold){float b = (float)cv_dst.at<cv::Vec3b>(h, w)[0];cv_dst.at<cv::Vec3b>(h, w)[0] = uchar(b * 0.5 + 1);float g = (float)cv_dst.at<cv::Vec3b>(h, w)[1] + 255.0;cv_dst.at<cv::Vec3b>(h, w)[1] = uchar(g * 0.5 + 1);float r = (float)cv_dst.at<cv::Vec3b>(h, w)[2];cv_dst.at<cv::Vec3b>(h, w)[2] = uchar(r * 0.5 + 1);}}}cv_dsts.push_back(cv_dst);cv::Mat cv_matting = cv_src.clone();for (int h = 0; h < cv_src.rows; h++){for (int w = 0; w < cv_src.cols; w++){float pix = segmentation_map.ptr<float>(h)[w * 2 + 1];if (pix > this->conf_threshold){cv_matting.at<cv::Vec3b>(h, w)[0] = (float)cv_src.at<cv::Vec3b>(h, w)[0];cv_matting.at<cv::Vec3b>(h, w)[1] = (float)cv_src.at<cv::Vec3b>(h, w)[1];cv_matting.at<cv::Vec3b>(h, w)[2] = (float)cv_src.at<cv::Vec3b>(h, w)[2];}else{cv_matting.at<cv::Vec3b>(h, w)[0] = 255;cv_matting.at<cv::Vec3b>(h, w)[1] = 255;cv_matting.at<cv::Vec3b>(h, w)[2] = 255;}}}cv_dsts.push_back(cv_matting);
}void show_img(std::string name, const cv::Mat& img)
{cv::namedWindow(name, 0);int max_rows = 500;int max_cols = 600;if (img.rows >= img.cols && img.rows > max_rows) {cv::resizeWindow(name, cv::Size(img.cols * max_rows / img.rows, max_rows));}else if (img.cols >= img.rows && img.cols > max_cols) {cv::resizeWindow(name, cv::Size(max_cols, img.rows * max_cols / img.cols));}cv::imshow(name, img);
}cv::Mat replaceBG(const cv::Mat cv_src, cv::Mat& alpha, std::vector<int>& bg_color)
{int width = cv_src.cols;int height = cv_src.rows;cv::Mat cv_matting = cv::Mat::zeros(cv::Size(width, height), CV_8UC3);float* alpha_data = (float*)alpha.data;for (int i = 0; i < height; i++){for (int j = 0; j < width; j++){float alpha_ = alpha_data[i * width + j];cv_matting.at < cv::Vec3b>(i, j)[0] = cv_src.at < cv::Vec3b>(i, j)[0] * alpha_ + (1 - alpha_) * bg_color[0];cv_matting.at < cv::Vec3b>(i, j)[1] = cv_src.at < cv::Vec3b>(i, j)[1] * alpha_ + (1 - alpha_) * bg_color[1];cv_matting.at < cv::Vec3b>(i, j)[2] = cv_src.at < cv::Vec3b>(i, j)[2] * alpha_ + (1 - alpha_) * bg_color[2];}}return cv_matting;
}int main()
{pphuman_seg pp_net("model_float32.onnx");std::string path = "images";std::vector<std::string> filenames;cv::glob(path, filenames, false);for (auto file_name : filenames){cv::Mat cv_src = cv::imread(file_name);std::vector<cv::Mat> cv_dsts;pp_net.inference(cv_src,cv_dsts);show_img("src", cv_src);show_img("matting", cv_dsts[0]);show_img("dst", cv_dsts[1]);cv::waitKey(0);}
}
python onnxruntimer推理:
#!/usr/bin/env python
# -*- coding: utf-8 -*-
import copy
import argparse
import cv2
import numpy as np
import onnxruntimeclass pphumanseg:def __init__(self, conf_thres=0.5):self.conf_threshold = conf_thres# Initialize modelself.onnx_session = onnxruntime.InferenceSession("model_float32.onnx")self.input_name = self.onnx_session.get_inputs()[0].nameself.output_name = self.onnx_session.get_outputs()[0].nameself.input_shape = self.onnx_session.get_inputs()[0].shapeself.input_height = self.input_shape[2]self.input_width = self.input_shape[3]self.mean = np.array([0.5, 0.5, 0.5], dtype=np.float32).reshape(1,1,3)self.std = np.array([0.5, 0.5, 0.5], dtype=np.float32).reshape(1,1,3)def prepare_input(self, image):input_image = cv2.resize(image, dsize=(self.input_width, self.input_height))input_image = (input_image.astype(np.float32) / 255.0 - self.mean) / self.stdinput_image = input_image.transpose(2, 0, 1)input_image = np.expand_dims(input_image, axis=0)return input_imagedef detect(self, image):input_image = self.prepare_input(image)# Perform inference on the imageresult = self.onnx_session.run([self.output_name], {self.input_name: input_image})# Post process:squeezesegmentation_map = result[0]segmentation_map = np.squeeze(segmentation_map)image_width, image_height = image.shape[1], image.shape[0]dst_image = copy.deepcopy(image)segmentation_map = cv2.resize(segmentation_map,dsize=(image_width, image_height),interpolation=cv2.INTER_LINEAR,)# color listcolor_image_list = []# ID 0:BackGroundbg_image = np.zeros(image.shape, dtype=np.uint8)bg_image[:] = (0, 0, 0)color_image_list.append(bg_image)# ID 1:Humanbg_image = np.zeros(image.shape, dtype=np.uint8)bg_image[:] = (0, 255, 0)color_image_list.append(bg_image)# Overlay segmentation mapmasks = segmentation_map.transpose(2, 0, 1)for index, mask in enumerate(masks):# Threshold check by scoremask = np.where(mask > self.conf_threshold, 0, 1)# Overlaymask = np.stack((mask,) * 3, axis=-1).astype('uint8')mask_image = np.where(mask, dst_image, color_image_list[index])dst_image = cv2.addWeighted(dst_image, 0.5, mask_image, 0.5, 1.0)return dst_imageif __name__ == '__main__':parser = argparse.ArgumentParser()parser.add_argument('--imgpath', type=str, default='images/person.jpg', help="image path")parser.add_argument('--confThreshold', default=0.5, type=float, help='class confidence')parser.add_argument('--use_video', type=int, default=1, help="if use video")args = parser.parse_args()segmentor = pphumanseg(conf_thres=args.confThreshold)if args.use_video != 1:srcimg = cv2.imread(args.imgpath)# Detect Objectsdstimg = segmentor.detect(srcimg)winName = 'pphumanseg in ONNXRuntime'cv2.namedWindow(winName, 0)cv2.imshow(winName, dstimg)cv2.waitKey(0)cv2.destroyAllWindows()else:cap = cv2.VideoCapture(0) while True:ret, frame = cap.read()if not ret:breakdstimg = segmentor.detect(frame)key = cv2.waitKey(1)if key == 27:  # ESCbreakcv2.imshow('pphumanseg Demo', dstimg)cap.release()cv2.destroyAllWindows()
相关文章:
人像抠图HumanSeg——基于大规模电话会议视频数据集的连接感知人像分割
前言 人像抠图将图像中的人物与背景进行像素级别的区分的技术。通过人像分割,可以实现诸如背景虚化、弹幕穿人等各种有趣的功能,为视频通话和影音观看提供更加优质和丰富的体验。由于广泛部署到Web、手机和边缘设备,肖像分割在兼顾分割精度的…...

Qt 项目使用visual studio 进行开发调试
https://marketplace.visualstudio.com/items?itemNameTheQtCompany.QtVisualStudioTools2015 https://devblogs.microsoft.com/cppblog/bring-your-existing-qt-projects-to-visual-studio/ 正常Qt开发中,使用Qt Creator 进行windows下MSVC编译器的调试是一件挺麻…...

Kotlin 中的惰性集合
1 通过序列提高效率 首先看以下代码: val list listOf(1, 2, 3, 4, 5) list.filter { it > 2 }.map { it * 2 }上面的写法很简单,在处理集合时,类似于上面的操作能帮我们解决大部分的问题。但是,当 list 中的元素非常多的时…...
2024年React初学者入门路线指南
在这篇文章中,我们一步一步探索了如何从零基础开始学习React,并逐渐成长为一名初级开发者。通过理解基础概念、实践构建静态和动态项目,最终发展到创建复杂的应用程序并加入到个人作品集中,您现在已经准备好迈向React开发者的职业…...

【Java基础】了解Java安全体系JCA,使用BouncyCastle的ED25519算法生成密钥对、数据签名
文章目录 一.Java安全体系结构二.JCA和JCE三.CSP(加密服务提供程序)与Engine类1.CSP2.Engine类如何使用引擎类 四.查看当前JDK支持的算法服务提供商(Provider)五.BouncyCastle是什么六.如何使用BouncyCastle?七.bouncycastle实现ED25519工具类 一.Java安全体系结构 …...

SQL Server创建存储过程
使用以下语句创建一个存储过程: CREATE PROCEDURE [schema_name.]procedure_nameparameter1 datatype,parameter2 datatype,... AS BEGIN-- 存储过程的逻辑代码-- 可以包含SQL语句、控制流语句、变量声明等-- 示例:查询表中的数据SELECT column1, colum…...

GraphPad Prism 10:一站式数据分析解决方案
GraphPad Prism 10是一款功能强大的数据分析和可视化软件,广泛应用于生命科学研究、医学、生物、化学等多个领域。以下是对其详细功能的介绍: 首先,GraphPad Prism 10具有出色的数据可视化功能。它支持各种类型的图表和图形,包括…...

前端基础篇-深入了解 Ajax 、Axios
🔥博客主页: 【小扳_-CSDN博客】 ❤感谢大家点赞👍收藏⭐评论✍ 文章目录 1.0 Ajax 概述 2.0 Axios 概述 3.0 综合案例 1.0 Ajax 概述 通过 Ajax 可以给服务器发送请求,并获取服务器响应的数据。异步交互是指,可以在不…...
是德科技keysight N1912A双通道功率计
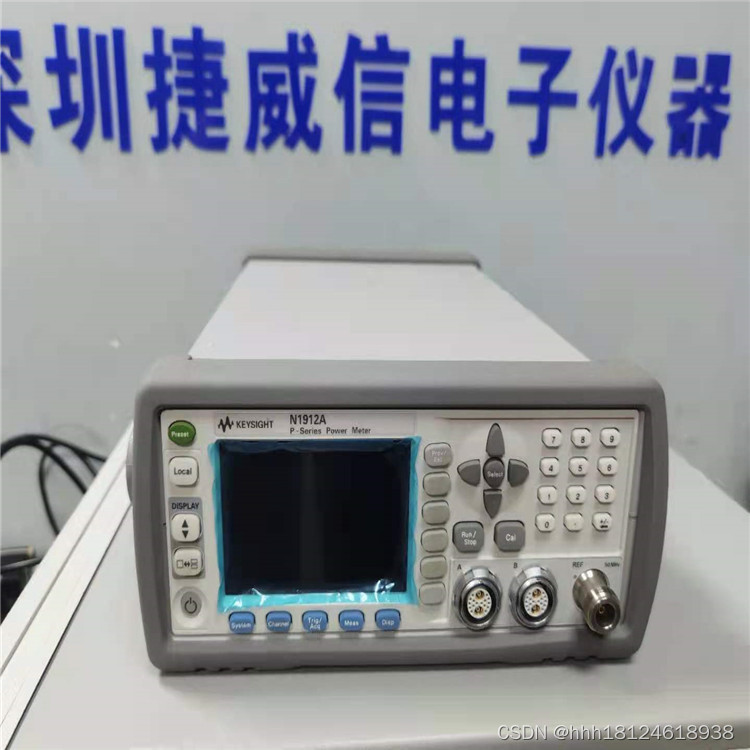
181/2461/8938产品概述: Keysight(原Agilent) N1912A P系列双通道功率计可提供峰值、峰均比、平均功率、上升时间、下降时间、最大功率值、最小功率值以及宽带信号的统计数据。 Keysight(原Agilent) N1912A P系列双通道功率计, 可提供峰值、峰均比、平均功率、上升…...
怿星科技Neptune CHT-S测试系统,让智能座舱测试更加高效便捷
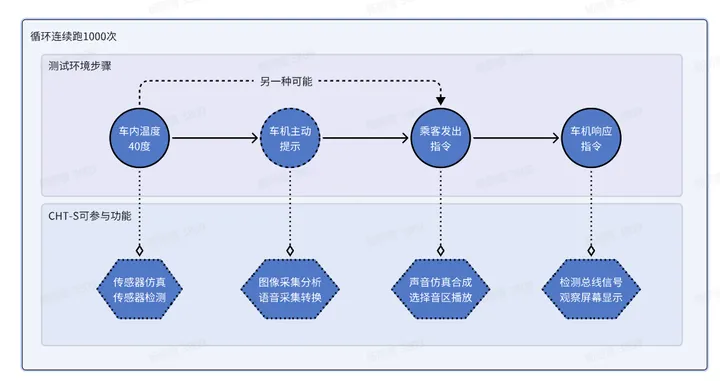
随着汽车“智能化”浪潮的推进,汽车的智能化水平正在持续刷新行业认知。在这股智能化潮流中,智能座舱作为客户体验最为直观的部分,其重要性不言而喻。倘若座舱设备出现死机、黑屏、卡顿等现象,都将对客户的使用体验产生非常大的影…...
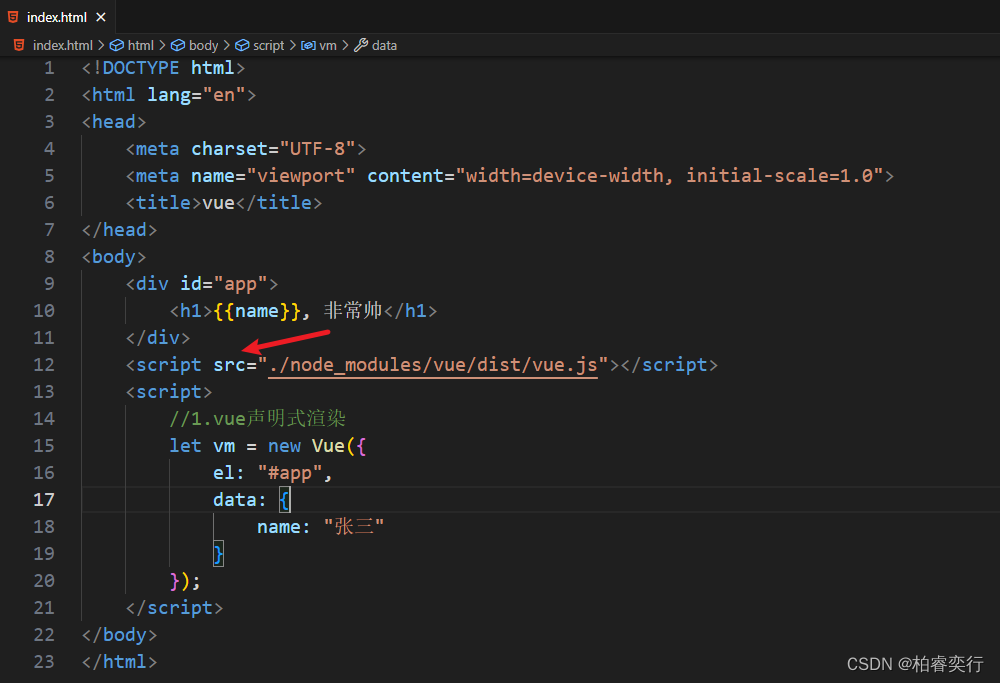
Vscode初建Vue时几个需要注意的问题
首先放图 注意点1.打开文件夹时,可以是VUE2 或者其他,但不能是VUE,会报错 注意点2.终端输入命令“npm init -y" npm init -y -y 的含义:yes的意思,在init的时候省去了敲回车的步骤,生成的默认的packag…...
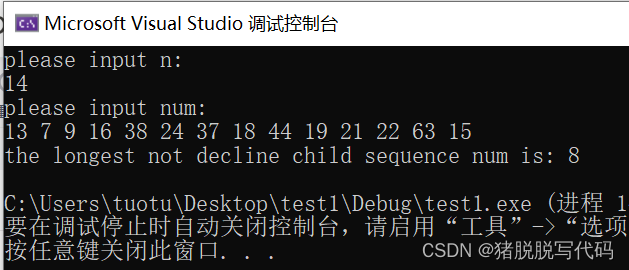
最长不下降子序列
问题描述: 统计一个数组中的最长不下降子序列。 示例: 输入:14 输入:13 7 9 16 38 24 37 18 44 19 21 22 63 15 输出:8(其中是7 9 16 18 19 21 22 63) 方法:借鉴B站UP主T_zhao…...
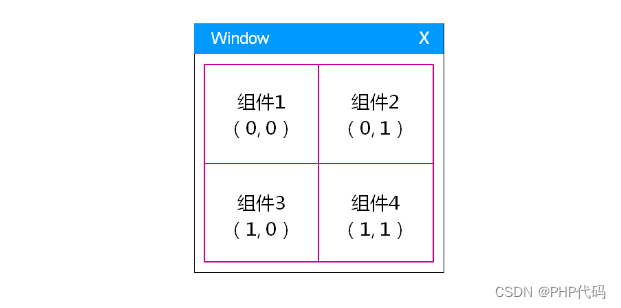
QT gridlayout 循环设置组件,表格也通用 已解决
在需求中。经常遇到,表格 展示需求。 几乎都是json格式的。 // 列表配置文件QJsonArray listJsonArray getCfgJsonData("details_tab_table_config.json");if (listJsonArray.isEmpty()){return;}ui->gridWidget->setMaximumSize(QSize(310, 180)…...

后端前行Vue之路(一):初识Vue
1.Vue是什么 Vue (读音 /vjuː/,类似于 view) 是一套用于构建用户界面的渐进式框架。与其它大型框架不同的是,Vue 被设计为可以自底向上逐层应用。Vue 的核心库只关注视图层,不仅易于上手,还便于与第三方库或既有项目整合。另一方…...

C#、.NET版本、Visual Studio版本对应关系及Visual Studio老版本离线包下载地址
0、写这篇文章的目的 由于电脑的环境不同,对于一个老电脑找到一个适配的vscode环境十分不易。总结一下C#、.NET、Visual Studio版本的对应关系,及各个版本Visual Studio的下载地址供大家参考 1、C#、.NET版本、Visual Studio版本对应关系如下 2、Visua…...
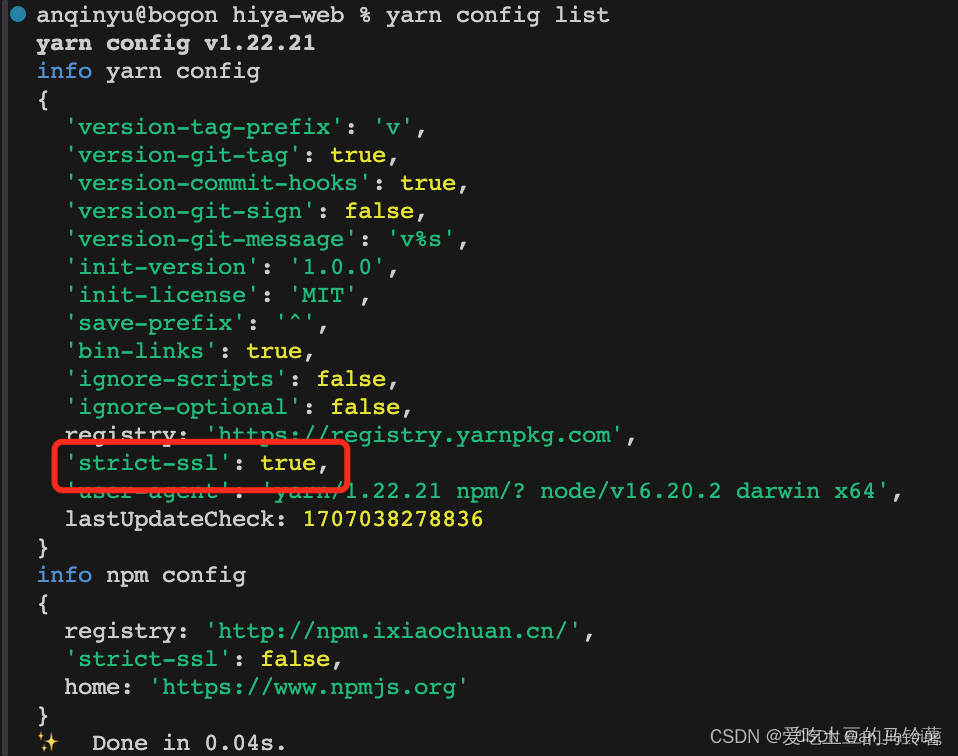
yarn安装包时报错error Error: certificate has expired
安装教程: 配置镜像地址: npm config set registry https://registry.npmmirror.com//镜像:https://developer.aliyun.com/mirror/NPM 安装yarn: npm install --global yarn查看版本: yarn --version卸载ÿ…...
手机可以格式化存储卡吗?格式化以后出现什么情况
随着智能手机的普及,存储卡(如SD卡、MicroSD卡等)已成为手机存储扩展的重要工具。然而,在使用过程中,我们有时可能会遇到需要格式化存储卡的情况。那么,手机能否直接格式化存储卡呢?格式化后存储…...
亚马逊AWS展示高效纠错的全新量子比特!
亚马逊网络服务公司(AWS)在量子计算的纠错技术领域取得了显著成就,极大地简化了量子系统的复杂性和资源需求。他们的研究人员通过采用“双轨擦除”量子比特(dual-rail erasure qubit)技术,有效地克服了量子…...

FEX-Emu在Debian/Ubuntu系统使用
FEX-Emu在Debian/Ubuntu系统使用 1. Debootstrap子系统安装(可选)2. Debian/Ubuntu依赖包安装3. 获取FEX-Emu源码并编译4. 根文件系统RootFS安装5. 基于 FEX-Emu 运行应用 1. Debootstrap子系统安装(可选) sudo apt-get install …...
docker 不同架构镜像融合问题解决
1、背景 docker 作为目前容器的标准之一,但是对于多种架构的平台的混合编译支撑不是很好。因此衍生了镜像融合,分别将多种不同的架构构建好,然后将镜像进行融合上传。拉取镜像的会根据当前系统的架构拉取不同的镜像,也可以通过 -…...

Unity安卓构建实战指南:解决APK真机安装闪退与构建失败
1. 这不是一本“从零开始”的书,而是一份你真正上手Unity安卓游戏开发前必须撕开的说明书我带过三届Unity实习工程师,也帮二十多个独立开发者把Demo打包进Google Play。每次看到新人在“安卓构建失败”报错里反复挣扎,或者对着“IL2CPP编译卡…...
:揭秘那个让虚拟世界“有重量感“的阴影魔法)
环境光遮蔽(Ambient Occlusion):揭秘那个让虚拟世界“有重量感“的阴影魔法
一、一个让我"开窍"的老木匠故事 我有个朋友是传统家具的修复师,他给我讲过一个让我至今难忘的故事。他说他刚入行时跟着一位 70 多岁的老木匠师父学习——师父让他做的第一件事不是雕花、不是榫卯——而是"看阴影"——这个看似奇怪的训练改变了…...

自制射频功率计:基于AD8317芯片,成本43欧元实现1MHz-10GHz测量
1. 项目概述:为什么我要亲手打造一台射频功率计在无人机和模型飞行器的圈子里,尤其是在我们荷兰FMS Spaarnwoude俱乐部,合规飞行是头等大事。我给我的八轴飞行器加装了云台相机和图传系统,工作在5.8GHz频段。根据本地法规…...

十年以上经验的建站公司推荐|策划强、落地稳的网站制作公司盘点
互联网时代,企业官网已从单纯的信息展示窗口升级为集品牌价值传递、用户体验连接与业务高效转化于一体的核心数字阵地。行业报告显示,优质官网可帮助企业线上转化率提升35%-60%,而低效官网则可能导致潜在客户大量流失。面对市场上众多的网站建…...

Redis 客户端连接详解
Redis 客户端连接详解 引言 Redis 是一款高性能的内存数据结构存储系统,常用于缓存、会话管理、实时排行榜等功能。客户端连接是 Redis 生态系统中的重要组成部分,本文将详细介绍 Redis 客户端连接的相关知识,包括连接方式、连接配置、连接管理等方面。 Redis 客户端连接…...

避坑指南:Unity中AABB碰撞检测失效的5种常见原因及解决方法
Unity中AABB碰撞检测失效的深度排查与解决方案在Unity开发中,AABB(轴对齐包围盒)碰撞检测是基础但容易出问题的环节。许多开发者都遇到过这样的情况:明明逻辑正确,测试时却出现物体穿透、碰撞时有时无等诡异现象。本文…...

DeepSeek-R1代码补全实测报告:37个真实项目、8类编程语言、48小时压测后,我删掉了Copilot
更多请点击: https://intelliparadigm.com 第一章:DeepSeek-R1代码补全实测报告总览 DeepSeek-R1 是深度求索(DeepSeek)推出的开源大语言模型,专为代码理解与生成任务优化。本章聚焦其在主流 IDE 环境中代码补全能力的…...

如何用Untrunc拯救损坏视频?2025年终极MP4修复工具完全指南
如何用Untrunc拯救损坏视频?2025年终极MP4修复工具完全指南 【免费下载链接】untrunc Restore a damaged (truncated) mp4, m4v, mov, 3gp video. Provided you have a similar not broken video. 项目地址: https://gitcode.com/gh_mirrors/unt/untrunc 当你…...

如何快速掌握ncmdumpGUI:Windows平台网易云音乐NCM文件转换完整教程
如何快速掌握ncmdumpGUI:Windows平台网易云音乐NCM文件转换完整教程 【免费下载链接】ncmdumpGUI C#版本网易云音乐ncm文件格式转换,Windows图形界面版本 项目地址: https://gitcode.com/gh_mirrors/nc/ncmdumpGUI 你是否曾经下载了网易云音乐的…...

HarmonyOS DateUtil 日期工具入门:格式化、时间戳与今日信息
文章目录背景一、HarmonyOS 日期处理的痛点二、核心方法:getFormatDate三、时间戳自动补位四、核心方法:getFormatDateStr五、今日信息快速获取六、完整 Demo 演示6.1 刷新当前时间6.2 格式化演示6.3 常用格式展示6.4 基础信息 UI6.5 intl.DateTimeForma…...