SpringBoot3+JPA+MySQL实现多数据源的读写分离(基于EntityManagerFactory)
1、简介
在Spring Boot中配置多个数据源并实现自动切换EntityManager,这里我编写了一个RoutingEntityManagerFactory和AOP(面向切面编程)的方式来实现。
这里我配置了两个数据源:primary和secondary,其中primary主数据源用来写入数据,secondary从数据源用来读取数据。
注意1: 使用Springboot3的读写分离,首先要保证主库和从库已经配置好了 数据同步,否则会导致数据不一致。
当然如果仅仅是测试的话,不同步就不影响了
注意2: SpringBoot3的JDK不能低于17
我使用的JDK版本
openjdk version "20.0.2" 2023-07-18
OpenJDK Runtime Environment (build 20.0.2+9-78)
OpenJDK 64-Bit Server VM (build 20.0.2+9-78, mixed mode, sharing)
2、数据库说明
这里我使用了本机的同一个mysql上的两个不同的数据库,在实际环境中这两个库应该是分别处于不同的服务器上,同时应该已经配置好了主从复制或主备,保证了数据的一致性,不然读写分离就没有意义了。
| 数据库名称 | JDBC-URL | 说明 |
|---|---|---|
| primary_db | jdbc:mysql://localhost:3306/primary_db | 这个是主库,设计为写入数据库 |
| secondary_db | jdbc:mysql://localhost:3306/secondary_db | 这个是从库,设计为读取数据库 |
提示:虽然这里我使用的是MySQL数据库,但是在实际的开发过程中,可以替换为Postgresql或oracle等其他关系型数据库,只需要做很小的改动就可以使用了
3、准备工作
3.1、添加依赖
在你的项目里添加如下依赖
<!-- Spring Web -->
<dependency><groupId>org.springframework.boot</groupId><artifactId>spring-boot-starter-web</artifactId>
</dependency><!-- AOP -->
<dependency><groupId>org.springframework.boot</groupId><artifactId>spring-boot-starter-aop</artifactId>
</dependency><!-- JPA -->
<dependency><groupId>org.springframework.boot</groupId><artifactId>spring-boot-starter-data-jpa</artifactId>
</dependency><!-- MySQL -->
<dependency><groupId>com.mysql</groupId><artifactId>mysql-connector-j</artifactId><version>8.3.0</version>
</dependency><!-- druid -->
<dependency><groupId>com.alibaba</groupId><artifactId>druid</artifactId><version>1.2.22</version>
</dependency><dependency><groupId>org.springframework.boot</groupId><artifactId>spring-boot-starter-test</artifactId><scope>test</scope>
</dependency><dependency><groupId>org.projectlombok</groupId><artifactId>lombok</artifactId>
</dependency>
完整的pom.xml文件
下面是我在编写代码时候的完整的pom.xml文件内容
<?xml version="1.0" encoding="UTF-8"?>
<project xmlns="http://maven.apache.org/POM/4.0.0" xmlns:xsi="http://www.w3.org/2001/XMLSchema-instance"xsi:schemaLocation="http://maven.apache.org/POM/4.0.0 https://maven.apache.org/xsd/maven-4.0.0.xsd"><modelVersion>4.0.0</modelVersion><parent><groupId>org.springframework.boot</groupId><artifactId>spring-boot-starter-parent</artifactId><version>3.2.3</version><relativePath/> <!-- lookup parent from repository --></parent><groupId>com.ts</groupId><artifactId>springboot3-jpa-read-write-separation-mysql2</artifactId><version>0.0.1-SNAPSHOT</version><name>springboot3-jpa-read-write-separation-mysql2</name><description>springBoot3 + JPA + MySQL 实现读写分离</description><properties><java.version>17</java.version></properties><dependencies><dependency><groupId>org.springframework.boot</groupId><artifactId>spring-boot-starter-web</artifactId></dependency><!-- Spring Boot Starter AOP for @Transactional annotations --><dependency><groupId>org.springframework.boot</groupId><artifactId>spring-boot-starter-aop</artifactId></dependency><dependency><groupId>org.springframework.boot</groupId><artifactId>spring-boot-starter-data-jpa</artifactId></dependency><!-- MySQL Database --><dependency><groupId>com.mysql</groupId><artifactId>mysql-connector-j</artifactId><version>8.3.0</version></dependency><!-- druid --><dependency><groupId>com.alibaba</groupId><artifactId>druid</artifactId><version>1.2.22</version></dependency><dependency><groupId>org.springframework.boot</groupId><artifactId>spring-boot-starter-test</artifactId><scope>test</scope></dependency><dependency><groupId>org.projectlombok</groupId><artifactId>lombok</artifactId></dependency></dependencies><build><plugins><plugin><groupId>org.springframework.boot</groupId><artifactId>spring-boot-maven-plugin</artifactId></plugin></plugins></build></project>
3.2、准备的SQL
-- 用户表
CREATE TABLE userinfo (id int AUTO_INCREMENT PRIMARY KEY,name varchar(50),age smallint,gender varchar(3),entry_date timestamp
);-- 测试数据
INSERT INTO userinfo(name,age,gender,entry_date) VALUES
('刘峰',24,'男','2024-02-28 12:01:01'),
('舒航',25,'女','2024-02-28 12:01:01'),
('张明',26,'男','2024-02-29 12:01:01'),
('徐媛',28,'女','2024-02-29 12:01:01'),
('舒莱',29,'女','2023-07-30 12:01:01'),
('唐力',30,'男','2023-08-05 12:01:01'),
('唐莉',29,'女','2023-06-05 12:01:01'),
('王乐',27,'男','2023-07-01 12:01:01'),
('张萌',32,'女','2023-07-02 12:01:01'),
('程媛',25,'女','2023-08-02 12:01:01'),
('嫪玉',35,'女','2023-08-01 10:00:00'),
('贾茹',26,'女','2023-10-03 12:01:01'),
('胡安',25,'男','2023-11-09 12:01:01'),
('刘伟',27,'男','2023-07-09 12:01:01');
3.3、application.yml中定义多数据源配置
application.yml中定义每个数据源的连接信息。
spring:jpa:database: mysqlshow-sql: truedatasource:#主数据源 , 写入数据库primary:url: jdbc:mysql://localhost:3306/primary_db?allowMultiQueries=true&useUnicode=true&characterEncoding=UTF-8driver-class-name: com.mysql.jdbc.Driverusername: rootpassword: root# 次数据源 , 读取数据库secondary:url: jdbc:mysql://localhost:3306/secondary_db?allowMultiQueries=true&useUnicode=true&characterEncoding=UTF-8driver-class-name: com.mysql.jdbc.Driverusername: rootpassword: root4、创建动态数据源
4.1、主数据源配置
package com.ts.config;import com.alibaba.druid.pool.DruidDataSource;
import org.springframework.beans.factory.annotation.Autowired;
import org.springframework.boot.autoconfigure.orm.jpa.JpaProperties;
import org.springframework.boot.context.properties.ConfigurationProperties;
import org.springframework.boot.orm.jpa.EntityManagerFactoryBuilder;
import org.springframework.context.annotation.Bean;
import org.springframework.context.annotation.Configuration;
import org.springframework.data.jpa.repository.config.EnableJpaRepositories;
import org.springframework.orm.jpa.JpaTransactionManager;
import org.springframework.orm.jpa.JpaVendorAdapter;
import org.springframework.orm.jpa.LocalContainerEntityManagerFactoryBean;
import org.springframework.orm.jpa.vendor.HibernateJpaVendorAdapter;
import org.springframework.transaction.PlatformTransactionManager;import javax.sql.DataSource;/***  主数据源配置* @author zhouq* @since 15:26 2024/03/21**/
@Configuration(proxyBeanMethods = false)
@EnableJpaRepositories(basePackages = "com.ts.service",entityManagerFactoryRef = "primaryEntityManagerFactory"
)
public class PrimaryDataSourceConfig {@Autowiredprivate JpaProperties jpaProperties;@Bean(name = "primaryDataSource")@ConfigurationProperties(prefix = "spring.datasource.primary")public DataSource primaryDataSource() {//return DataSourceBuilder.create().build();return new DruidDataSource();}//LocalContainerEntityManagerFactoryBean@Beanpublic Object primaryEntityManagerFactory(DataSource primaryDataSource,JpaProperties primaryJpaProperties) {EntityManagerFactoryBuilder builder = createEntityManagerFactoryBuilder(primaryJpaProperties);return builder.dataSource(primaryDataSource).packages("com.ts.model").persistenceUnit("primaryDataSource").build();}private EntityManagerFactoryBuilder createEntityManagerFactoryBuilder(JpaProperties jpaProperties) {JpaVendorAdapter jpaVendorAdapter = createJpaVendorAdapter(jpaProperties);return new EntityManagerFactoryBuilder(jpaVendorAdapter, jpaProperties.getProperties(), null);}private JpaVendorAdapter createJpaVendorAdapter(JpaProperties jpaProperties) {// ... map JPA properties as neededreturn new HibernateJpaVendorAdapter();}}
4.2、次要数据源配置
package com.ts.config;import com.alibaba.druid.pool.DruidDataSource;
import jakarta.persistence.EntityManager;
import org.springframework.beans.factory.annotation.Autowired;
import org.springframework.boot.autoconfigure.orm.jpa.JpaProperties;
import org.springframework.boot.context.properties.ConfigurationProperties;
import org.springframework.boot.jdbc.DataSourceBuilder;
import org.springframework.boot.orm.jpa.EntityManagerFactoryBuilder;
import org.springframework.context.annotation.Bean;
import org.springframework.context.annotation.Configuration;
import org.springframework.data.jpa.repository.config.EnableJpaRepositories;
import org.springframework.orm.jpa.JpaTransactionManager;
import org.springframework.orm.jpa.JpaVendorAdapter;
import org.springframework.orm.jpa.LocalContainerEntityManagerFactoryBean;
import org.springframework.orm.jpa.vendor.HibernateJpaVendorAdapter;
import org.springframework.transaction.PlatformTransactionManager;import javax.sql.DataSource;/*** 次要数据源配置* @author zhouq* @since 15:25 2024/03/21**/
@Configuration
@EnableJpaRepositories(basePackages = "com.ts.service",entityManagerFactoryRef = "secondaryEntityManagerFactory"
)
public class SecondaryDataSourceConfig {@Autowiredprivate JpaProperties jpaProperties;@Bean(name = "secondaryDataSource")@ConfigurationProperties(prefix = "spring.datasource.secondary")public DataSource secondaryDataSource() {//return DataSourceBuilder.create().build();return new DruidDataSource();}// LocalContainerEntityManagerFactoryBean@Beanpublic Object secondaryEntityManagerFactory(DataSource secondaryDataSource,JpaProperties secondaryJpaProperties) {EntityManagerFactoryBuilder builder = createEntityManagerFactoryBuilder(secondaryJpaProperties);return builder.dataSource(secondaryDataSource).packages("com.ts.model").persistenceUnit("secondaryDataSource").build();}private EntityManagerFactoryBuilder createEntityManagerFactoryBuilder(JpaProperties jpaProperties) {JpaVendorAdapter jpaVendorAdapter = createJpaVendorAdapter(jpaProperties);return new EntityManagerFactoryBuilder(jpaVendorAdapter, jpaProperties.getProperties(), null);}private JpaVendorAdapter createJpaVendorAdapter(JpaProperties jpaProperties) {// ... map JPA properties as neededreturn new HibernateJpaVendorAdapter();}}
5、全局EntityManager配置
5.1、创建EntityManager线程工具类
EntityManagerContextHolder是一个用来保存当前线程的EntityManager名称的工具类。
package com.ts.config;/*** 用来保存当前线程的EntityManagerFactory名称 的工具类* @author zhouq* @since 14:29 2024/03/20**/
public class EntityManagerContextHolder {private static final ThreadLocal<String> contextHolder = new ThreadLocal<>();public static void setEntityManagerFactoryType(String entityManagerFactoryType) {contextHolder.set(entityManagerFactoryType);}public static String getEntityManagerFactoryType() {return contextHolder.get();}public static void clearEntityManagerFactoryType() {contextHolder.remove();}
}
5.2、创建数RoutingEntityManagerFactory路由(管理多个EntityManager)
package com.ts.config;import jakarta.persistence.*;
import jakarta.persistence.criteria.CriteriaBuilder;
import jakarta.persistence.metamodel.Metamodel;
import org.springframework.lang.Nullable;
import org.springframework.util.Assert;import java.util.Map;/***  动态切换EntityManagerFactory*  EntityManagerFactory路由类* @author zhouq* @since 14:54 2024/03/21**/
public class RoutingEntityManagerFactory implements EntityManagerFactory{@Nullableprivate Map<String, Object> targetEntityManagerFactorys;@Nullableprivate Object defaultTargetEntityManagerFactory;@Nullablepublic Map<String, Object> getTargetEntityManagerFactorys() {return targetEntityManagerFactorys;}public void setTargetEntityManagerFactorys(@Nullable Map<String, Object> targetEntityManagerFactorys) {this.targetEntityManagerFactorys = targetEntityManagerFactorys;}@Nullablepublic Object getDefaultTargetEntityManagerFactory() {return defaultTargetEntityManagerFactory;}public void setDefaultTargetEntityManagerFactory(@Nullable Object defaultTargetEntityManagerFactory) {this.defaultTargetEntityManagerFactory = defaultTargetEntityManagerFactory;}public String determineCurrentLookupKey() {// 如果不使用读写分离,这里也可以做一个简单的负载均衡策略String entityManagerFactoryType = EntityManagerContextHolder.getEntityManagerFactoryType();//System.out.println("当前使用的数据源是:" + entityManagerFactoryType);return entityManagerFactoryType;}public EntityManagerFactory determineTargetEntityManagerFactory() {Assert.notNull(this.targetEntityManagerFactorys, "targetEntityManagerFactory router not initialized");Object lookupKey = this.determineCurrentLookupKey();EntityManagerFactory entityManagerFactory = (EntityManagerFactory)this.targetEntityManagerFactorys.get(lookupKey);if (entityManagerFactory == null && lookupKey == null) {entityManagerFactory = (EntityManagerFactory)this.defaultTargetEntityManagerFactory;}if (entityManagerFactory == null) {throw new IllegalStateException("Cannot determine target EntityManagerFactory for lookup key [" + lookupKey + "]");} else {return entityManagerFactory;}}//---------------------下面的方法都是EntityManagerFactory接口的实现------------------------------------@Overridepublic EntityManager createEntityManager() {return this.determineTargetEntityManagerFactory().createEntityManager();}@Overridepublic EntityManager createEntityManager(Map map) {return this.determineTargetEntityManagerFactory().createEntityManager(map);}@Overridepublic EntityManager createEntityManager(SynchronizationType synchronizationType) {return this.determineTargetEntityManagerFactory().createEntityManager(synchronizationType);}@Overridepublic EntityManager createEntityManager(SynchronizationType synchronizationType, Map map) {return this.determineTargetEntityManagerFactory().createEntityManager(synchronizationType,map);}@Overridepublic CriteriaBuilder getCriteriaBuilder() {return this.determineTargetEntityManagerFactory().getCriteriaBuilder();}@Overridepublic Metamodel getMetamodel() {return this.determineTargetEntityManagerFactory().getMetamodel();}@Overridepublic boolean isOpen() {return this.determineTargetEntityManagerFactory().isOpen();}@Overridepublic void close() {this.determineTargetEntityManagerFactory().close();}@Overridepublic Map<String, Object> getProperties() {return this.determineTargetEntityManagerFactory().getProperties();}@Overridepublic Cache getCache() {return this.determineTargetEntityManagerFactory().getCache();}@Overridepublic PersistenceUnitUtil getPersistenceUnitUtil() {return this.determineTargetEntityManagerFactory().getPersistenceUnitUtil();}@Overridepublic void addNamedQuery(String s, Query query) {this.determineTargetEntityManagerFactory().addNamedQuery(s,query);}@Overridepublic <T> T unwrap(Class<T> aClass) {return this.determineTargetEntityManagerFactory().unwrap(aClass);}@Overridepublic <T> void addNamedEntityGraph(String s, EntityGraph<T> entityGraph) {this.determineTargetEntityManagerFactory().addNamedEntityGraph(s,entityGraph);}
}
5.3、创建EntityManagerFactory全局配置类
package com.ts.config;import jakarta.persistence.EntityManager;
import jakarta.persistence.EntityManagerFactory;
import org.springframework.beans.factory.annotation.Autowired;
import org.springframework.beans.factory.annotation.Qualifier;
import org.springframework.boot.autoconfigure.orm.jpa.JpaProperties;
import org.springframework.boot.orm.jpa.EntityManagerFactoryBuilder;
import org.springframework.context.annotation.Bean;
import org.springframework.context.annotation.Configuration;
import org.springframework.orm.jpa.JpaTransactionManager;
import org.springframework.orm.jpa.JpaVendorAdapter;
import org.springframework.orm.jpa.LocalContainerEntityManagerFactoryBean;
import org.springframework.orm.jpa.vendor.HibernateJpaVendorAdapter;
import org.springframework.transaction.PlatformTransactionManager;import javax.sql.DataSource;
import java.util.HashMap;
import java.util.Map;/***  全局配置实体管理工厂 EntityManagerFactory*  配置EntityManagerFactory,确定使用的EntityManagerFactory* @author zhouq* @since 10:59 2024/03/21**/
@Configuration
public class EntityManagerFactoryConfig {@Autowired@Qualifier("primaryEntityManagerFactory")private Object primaryEntityManagerFactory;@Autowired@Qualifier("secondaryEntityManagerFactory")private Object secondaryEntityManagerFactory;@Beanpublic EntityManagerFactory entityManager(){String dataSourceType = EntityManagerContextHolder.getEntityManagerFactoryType();RoutingEntityManagerFactory routingEntityManagerFactory = new RoutingEntityManagerFactory();Map<String, Object> targetEntityManagerFactorys = new HashMap<String, Object>();targetEntityManagerFactorys.put("primary", primaryEntityManagerFactory);  //主实体管理工厂targetEntityManagerFactorys.put("secondary", secondaryEntityManagerFactory); //次要实体管理工厂routingEntityManagerFactory.setTargetEntityManagerFactorys(targetEntityManagerFactorys);// 配置实体管理工厂routingEntityManagerFactory.setDefaultTargetEntityManagerFactory(primaryEntityManagerFactory);// 设置默认实体管理工厂return routingEntityManagerFactory;}@Beanpublic PlatformTransactionManager transactionManager() {JpaTransactionManager tm = new JpaTransactionManager();tm.setEntityManagerFactory(entityManager());return tm;}}
6、使用AOP实现EntityManager自动切换
6.1、创建AOP切面注入EntityManager类型
通过AOP在方法执行前设置EntityManagerFactory,并在方法执行后清除。
package com.ts.config;import lombok.extern.slf4j.Slf4j;
import org.aspectj.lang.JoinPoint;
import org.aspectj.lang.annotation.After;
import org.aspectj.lang.annotation.Aspect;
import org.aspectj.lang.annotation.Before;
import org.springframework.stereotype.Component;/*** 使用AOP注入EntityManager类型* 通过AOP在方法执行前设置EntityManager,并在方法执行后清除。* @author zhouq* @since 14:25 2024/03/20**/
@Aspect
@Component
public class EntityManagerFactoryAspect {@Before("@annotation(dataSource)")public void switchDataSource(JoinPoint point, DataSourceSwitch dataSource) {//log.info("使用的数据源是:" + dataSource.value());System.out.println("使用的数据源是:" + dataSource.value());EntityManagerContextHolder.setEntityManagerFactoryType(dataSource.value());}@After("@annotation(dataSource)")public void restoreDataSource(JoinPoint point, DataSourceSwitch dataSource) {EntityManagerContextHolder.clearEntityManagerFactoryType();}
}
6.2、创建自定义注解用于标注所使用的的
DataSourceSwitch是一个自定义注解,用来标识需要切换数据源的方法。
package com.ts.config;import java.lang.annotation.ElementType;
import java.lang.annotation.Retention;
import java.lang.annotation.RetentionPolicy;
import java.lang.annotation.Target;/*** 自定义注解,用来标识需要切换数据源的方法* @author zhouq* @since 14:31 2024/03/20**/
@Target({ElementType.METHOD})
@Retention(RetentionPolicy.RUNTIME)
public @interface DataSourceSwitch {String value() default "primary";
}
7、创建实体类
package com.ts.model;import jakarta.persistence.*;
import lombok.*;
import lombok.experimental.Accessors;
import java.util.Date;@Setter
@Getter
@Accessors(chain = true)
@AllArgsConstructor // 全参构造方法
@NoArgsConstructor // 无参构造方法
//@RequiredArgsConstructor
@ToString
@Entity
@Table(name = "userinfo")
public class Userinfo implements java.io.Serializable{@Id@GeneratedValue(strategy=GenerationType.IDENTITY)private int id;private String name;private int age;private String gender;private Date entry_date;}
8、创建Service
创建UserService接口
package com.ts.service;import com.ts.model.Userinfo;
import java.util.List;public interface UserService {/***  获取所有* @author zhouq* @since 13:33 2024/03/20* @return java.util.List<com.ts.model.Userinfo>**/List<Userinfo> getAll();/*** 查找包含姓名的用户* @author zhouq* @since 13:34 2024/03/20* @param name 姓名* @return java.util.List<com.ts.model.Userinfo>**/List<Userinfo> queryWithName(String name);/***  添加用户* @author zhouq* @since 13:39 2024/03/20* @return java.util.List<com.ts.model.Userinfo>**/void addUser(Userinfo userinfo);/*** 按照id删除* @author zhouq* @since 13:55 2024/03/20**/void deleteUser(int id);}
创建UserService接口实现类
package com.ts.service.impl;import com.ts.config.DataSourceSwitch;
import com.ts.model.Userinfo;
import com.ts.service.UserService;
import jakarta.persistence.EntityManager;
import jakarta.persistence.Query;
import org.springframework.beans.factory.annotation.Autowired;
import org.springframework.data.jpa.repository.Modifying;
import org.springframework.stereotype.Service;
import org.springframework.transaction.annotation.Transactional;import java.util.List;/***  基于EntityManager的实现*  这里使用 primary主数据源写入数据,secondary从数据源读取数据* @author zhouq* @since 11:08 2024/03/21**/
@Service
public class UserServiceEntityManagerImpl implements UserService {@Autowiredprivate EntityManager entityManager;/*** 获取所有用户* 这里使用   @DataSourceSwitch("secondary")  指定 读取的数据源* @author zhouq* @since 11:21 2024/03/21* @return java.util.List<com.ts.model.Userinfo>**/@Override@DataSourceSwitch("secondary")public List<Userinfo> getAll() {return  entityManager.createQuery("select u from Userinfo u").getResultList();}/*** 查询用户,模糊查询* @author zhouq* @since 11:20 2024/03/21* @return java.util.List<com.ts.model.Userinfo>**/@Override@DataSourceSwitch("secondary")public List<Userinfo> queryWithName(String name) {Query query = entityManager.createQuery("select u from Userinfo u where u.name like :name");query.setParameter("name", "%" + name +"%");return query.getResultList();}/*** 添加用户* 这里使用   @DataSourceSwitch("primary")  指定写入的数据源* @author zhouq* @since 11:20 2024/03/21**/@Override@DataSourceSwitch("primary")  //或者 @DataSourceSwitch@Modifying@Transactionalpublic void addUser(Userinfo userinfo) {//使用本地原生SQL查询Query nativeQuery = entityManager.createNativeQuery("insert into Userinfo(id,name,age,gender) values(:id,:name,:age,:gender)");nativeQuery.setParameter("id",userinfo.getId());nativeQuery.setParameter("name",userinfo.getName());nativeQuery.setParameter("age",userinfo.getAge());nativeQuery.setParameter("gender",userinfo.getGender());//执行查询int i = nativeQuery.executeUpdate();if ( i<= 0 ) {throw new RuntimeException("添加用户失败!");}}/*** 删除用户* 这里使用   @DataSourceSwitch("primary")  指定写入的数据源* @author zhouq* @since 11:19 2024/03/21**/@Override@DataSourceSwitch("primary")  //或者 @DataSourceSwitch@Modifying@Transactionalpublic void deleteUser(int id) {//使用本地原生SQL查询Query nativeQuery = entityManager.createNativeQuery("delete from Userinfo where id = :id");nativeQuery.setParameter("id",id);//执行int i = nativeQuery.executeUpdate();if ( i<= 0 ) {throw new RuntimeException("删除用户失败!");}}}
9、编写测试类
package com.ts;import com.ts.model.Userinfo;
import com.ts.service.UserService;
import org.junit.jupiter.api.Test;
import org.springframework.beans.factory.annotation.Autowired;
import org.springframework.boot.test.context.SpringBootTest;import java.util.Date;@SpringBootTest
public class UserServiceTest {@Autowiredprivate UserService service;// 测试使用从库读取  查询用户@Testpublic void testGetAll() {service.getAll().forEach(System.out::println);//System.out.println(service);}// 测试使用从库读取  查询用户@Testpublic void testQuery() {service.queryWithName("张").forEach(System.out::println);}// 测试使用主库写入  添加用户@Testpublic void testAddUser() {service.addUser(new Userinfo(100,"测试用户",25,"男",new Date()));System.out.println("添加用户完成");}// 测试使用主库写入  删除用户@Testpublic void testDelete() {service.deleteUser(100);System.out.println("删除用户完成");}}
小结
关于读写分离网上的示例很多,但是都比较杂乱,而且很多的方法都是基于SpringBoot2或者SpringBoot1的,我这个是基于SpringBoot3.2.3版本实现了,
上面的代码所有的都亲自测试通过,有什么疑问可以留言评论。
几个截图:
1、查询所有
可以看到 使用的数据源是:secondary 使用的是 读 数据源

2、模糊查询

3、添加用户
看到 使用的数据源是:primary 使用的是 写 数据源

4、删除用户

相关文章:
SpringBoot3+JPA+MySQL实现多数据源的读写分离(基于EntityManagerFactory)
1、简介 在Spring Boot中配置多个数据源并实现自动切换EntityManager,这里我编写了一个RoutingEntityManagerFactory和AOP(面向切面编程)的方式来实现。 这里我配置了两个数据源:primary和secondary,其中primary主数…...

10万+SRC高质量稀有明星人脸素材唐嫣杨紫金晨倪妮蔡卓妍张雨绮合集
素材下载:点击下载 DFL模型训练用,高质量SRC素材合集: 【唐嫣_WF】6000张src人脸素材【金鱼基础模型库】用于补全SRC极限角度范冰冰 WF 512 苹果稀有死亡角度.zip王鸥_WF_512 多部电影 有死亡角度和张嘴的,5000多张.rar杨紫 108…...

目标检测中的mAP计算原理和源码实现
简介 在目标检测任务中,mAP(mean Average Precision,平均精度均值)是一个非常重要的评价指标,用于衡量模型在多个类别上的平均性能。它综合考虑了模型在不同召回率下的精确率,能够全面反映模型在检测任务中…...
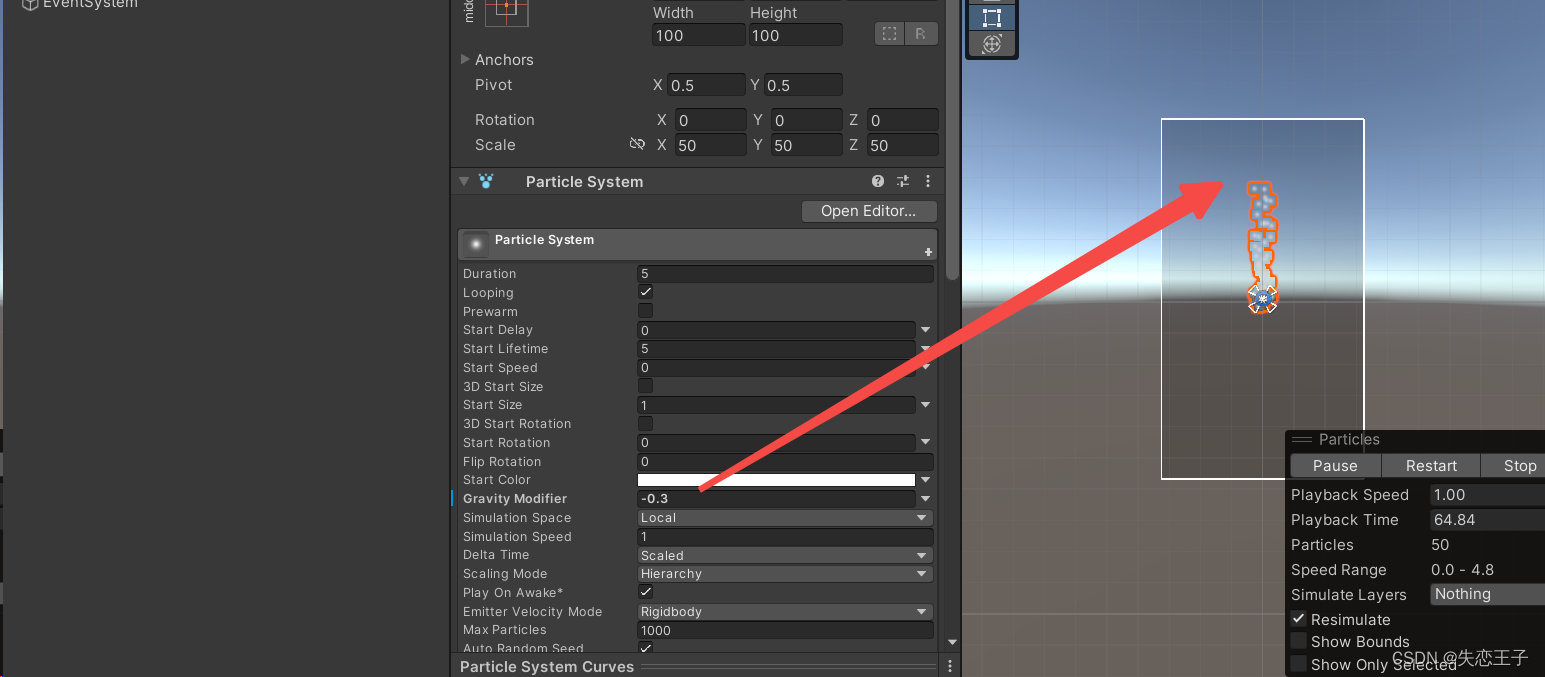
Unity 粒子在UI中使用时需要注意的地方
最近项目中要在UI中挂载粒子特效,美术给过来的粒子直接放到UI中会有一些问题,查询一些资料后,总结了一下 一: 粒子的大小发生变化,与在预制件编辑中设计的大小不同 在预制件编辑模式下,大小正常 实际使用的时候特别大或者特别小 经过检查,发现预制件编辑模式下,默认画布的Rend…...
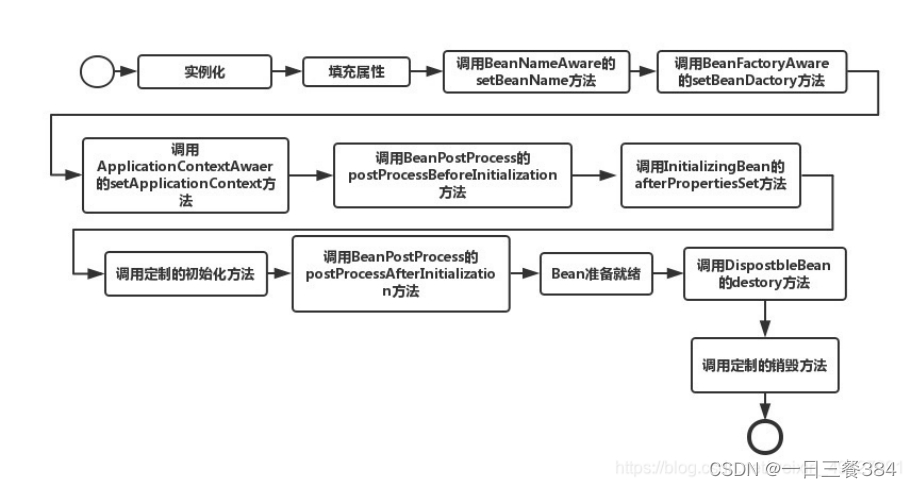
了解Spring:Java开发的利器
Spring是一款开源的轻量级Java开发框架,旨在提高开发人员的效率和系统的可维护性。本文将介绍Spring的基本概念、使用优势、设计模式以及与Spring MVC和Spring Boot的关联。 什么是Spring? Spring是一款开源的轻量级Java开发框架,它由多个模…...

【Hive】with 语法 vs cache table 语法
语法分别如下: cache table table_name as (select ... from ... )with table_name as (select ... from ... )需要注意,with语法只相当于一个视图,并不会将数据缓存;如果要将数据缓存,需要使用cache table语法。 参考…...
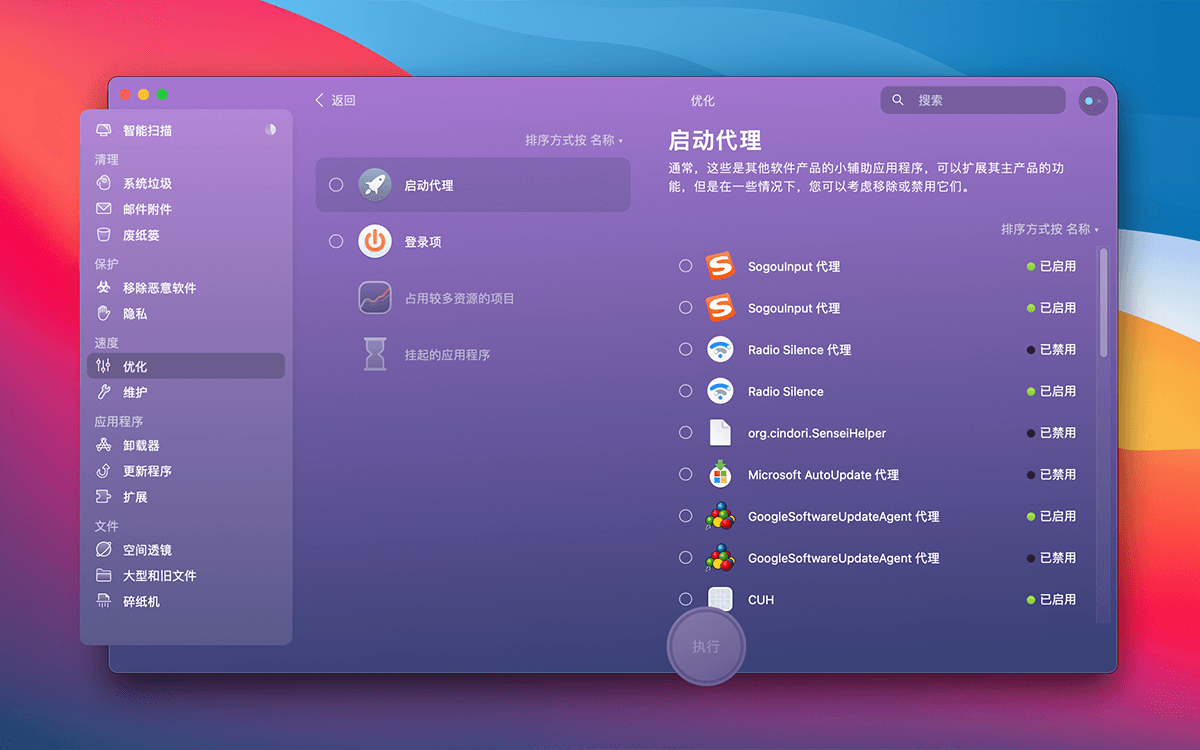
CleanMyMac X 4.15.1 for Mac 最新中文破解版 系统优化垃圾清理工具
CleanMyMac X for Mac 是一款功能更加强大的系统优化清理工具,相比于 CleanMyMac 4.15.1来说,功能增加了不少,此版本为4.15.1官方最新中英文正式破解版本,永久使用,解决了打开软件崩溃问题,最新版4.15.1版本…...

查看Linux系统重启的四种基本命令
目录 前言1. last2. uptime3. journalctl4. dmesg 前言 对于排查其原因推荐阅读:详细分析服务器自动重启原因(涉及Linux、Window) 在Linux中,有多种命令可以查看系统重启的信息 以下是其中一些常用的命令及其解释: …...

I/O多路复用:select/poll/epoll
最基本的 Socket 模型 要想客户端和服务器能在网络中通信,那必须得使用 Socket 编程,它是进程间通信里比较特别的方式,特别之处在于它是可以跨主机间通信。 Socket 的中文名叫作插口,咋一看还挺迷惑的。事实上,双方要…...
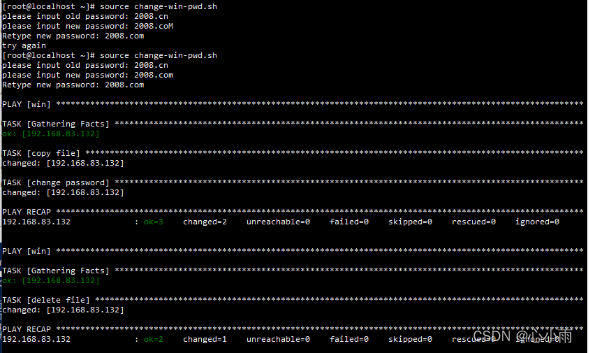
使用ansible批量修改操作系统管理员账号密码
一、ansible server端配置 1、对于Linux主机配置免密登录ssh-copy-id -i ~/.ssh/id_rsa.pub rootremote_ip 2、在/etc/ansible/hosts文件中添加相应主机IP 3、对于Windows主机需要在/etc/ansible/hosts文件中进行以下配置 192.168.83.132 ansible_ssh_useradministrator an…...
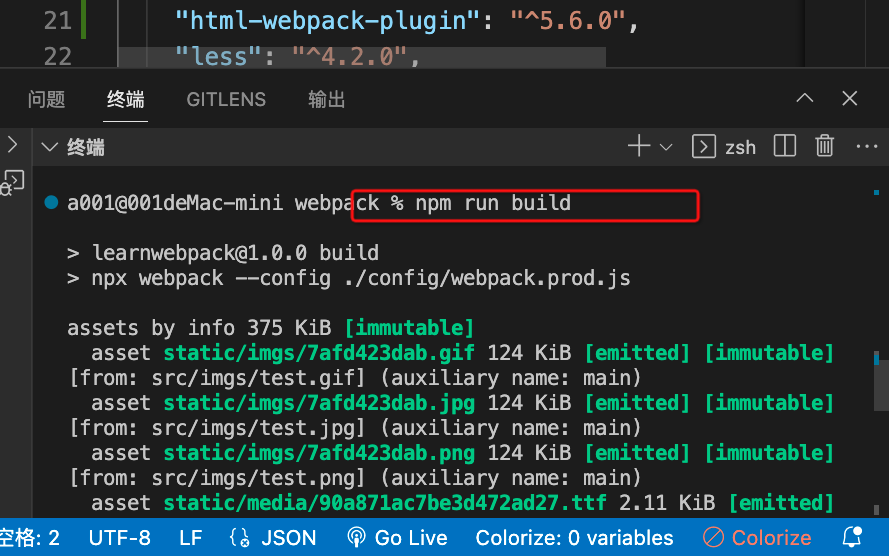
webpack5零基础入门-13生产模式
1.生产模式介绍 生产模式是开发完成代码后,我们需要得到代码将来部署上线。 这个模式下我们主要对代码进行优化,让其运行性能更好。 优化主要从两个角度出发: 优化代码运行性能优化代码打包速度 2.生产模式准备 我们分别准备两个配置文件来放不同的…...
一篇复现Docker镜像操作与容器操作
华子目录 Docker镜像操作创建镜像方式1docker commit示例 方式2docker import示例1:从本地文件系统导入示例2:从远程URL导入注意事项 方式3docker build示例1:构建镜像并指定名称和标签示例2:使用自定义的 Dockerfile 路径构建镜像…...

【LevelDB】memtable、immutable memtable的切换源码
本文主要分析leveldb项目的MakeRoomForWrite方法及延伸出的相关方法。 努力弄清memtable 和 immutable memtable的切换过程细节, 背景总结: LevelDB 是一个基于 Log-Structured Merge-Tree (LSM Tree) 的高性能键值存储系统。 在 LevelDB 中࿰…...
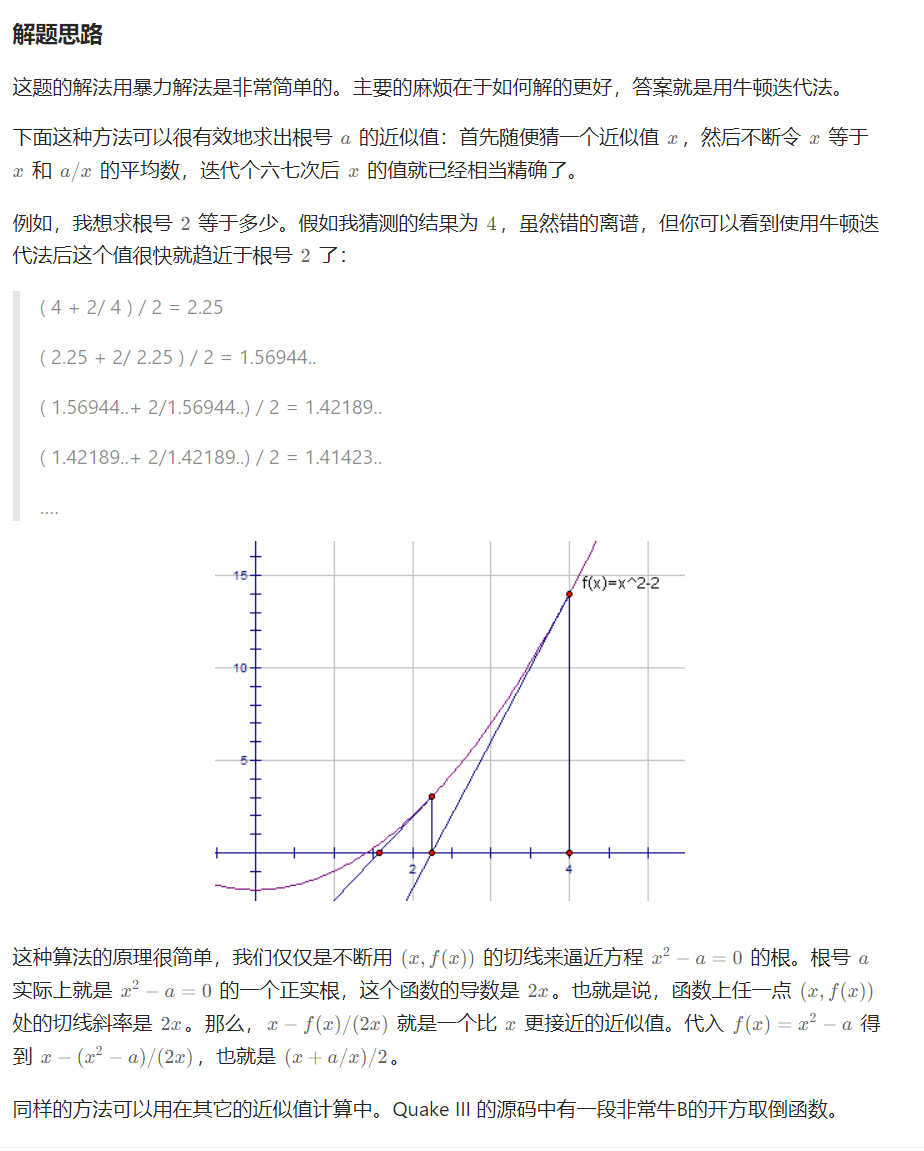
力扣面试150 x 的平方根 二分 换底法 牛顿迭代法 一题多解
Problem: 69. x 的平方根 思路 👨🏫 参考题解 💖 袖珍计算器算法 class Solution {public int mySqrt(int x){if (x 0)return 0; // Math.exp(3):e的三次方int ans (int) Math.exp(0.5 * Math.log(x));return (long) (an…...
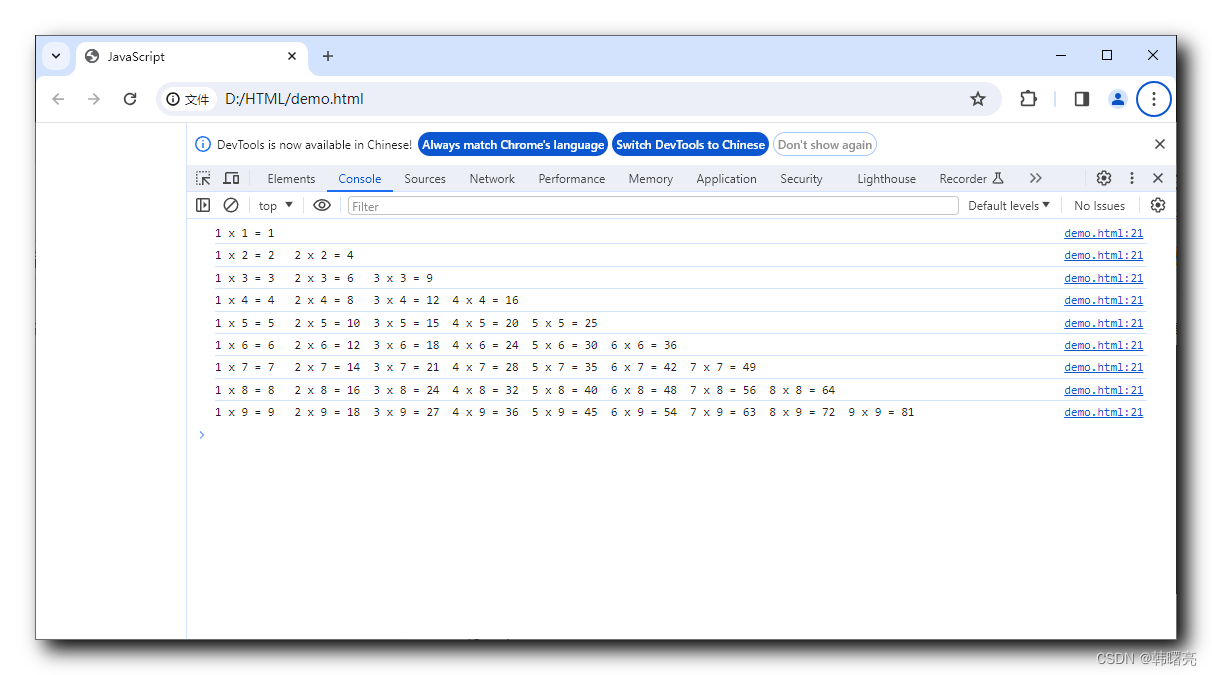
【JavaScript】JavaScript 程序流程控制 ⑤ ( 嵌套 for 循环 | 嵌套 for 循环概念 | 嵌套 for 循环语法结构 )
文章目录 一、嵌套 for 循环1、嵌套 for 循环概念2、嵌套 for 循环语法结构 二、嵌套 for 循环案例1、打印三角形2、打印乘法表 一、嵌套 for 循环 1、嵌套 for 循环概念 嵌套 for 循环 是一个 嵌套的 循环结构 , 其中一个 for 循环 位于另一个 for 循环的内部 , 分别是 外层 f…...

情感计算:大模型在情感识别与交互优化中的作用
情感计算:大模型在情感识别与交互优化中的作用 1. 背景介绍 情感计算(Affective Computing)是人工智能领域的一个重要分支,它致力于使计算机能够识别、理解、处理和模拟人类的情感。随着深度学习、大数据和计算能力的飞速发展&a…...
集合系列(十四) -ConcurrentHashMap详解
一、摘要 在之前的集合文章中,我们了解到 HashMap 在多线程环境下操作可能会导致程序死循环的线上故障! 既然在多线程环境下不能使用 HashMap,那如果我们想在多线程环境下操作 map,该怎么操作呢? 想必阅读过小编之前…...
数据结构面试题
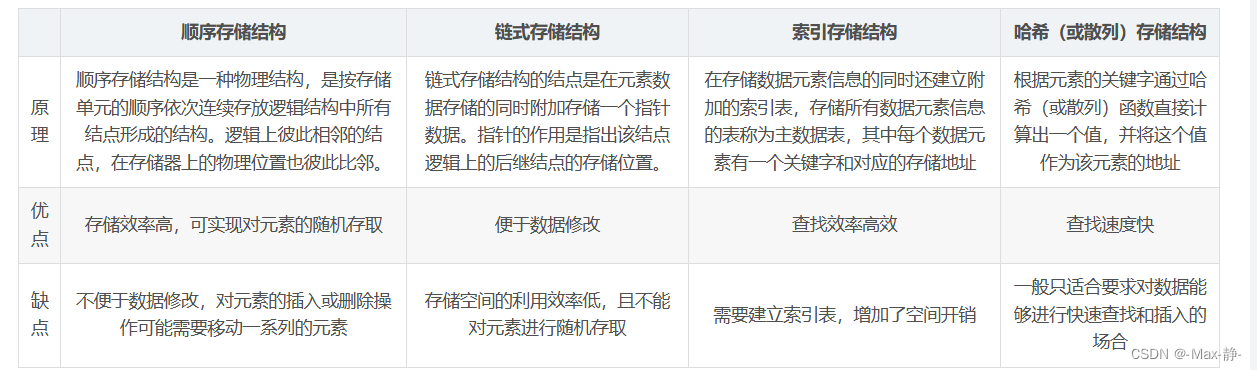
1、数据结构三要素? 逻辑结构、物理结构、数据运算 2、数组和链表的区别? 数组的特点: 数组是将元素在内存中连续存放,由于每个元素占用内存相同,可以通过下标迅速访问数组中任何元素。数组的插入数据和删除数据效率低…...
python爬虫之xpath入门
文章目录 一、前言参考文档: 二、xpath语法-基础语法常用路径表达式举例说明 三、xpath语法-谓语表达式举例注意 四、xpath语法-通配符语法实例 五、选取多个路径实例 六、Xpath Helper安装使用说明例子: 七、python中 xpath 的使用安装xpath 的依赖包xm…...
TikTok云手机是什么原理?
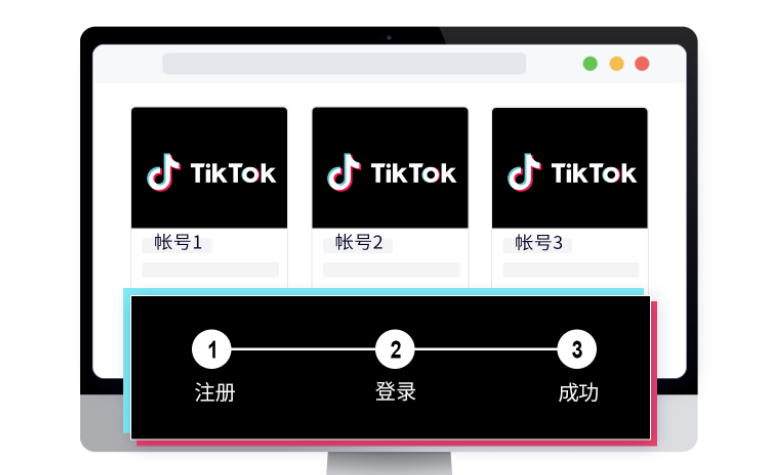
社交媒体的快速发展和普及,TikTok已成为全球最受欢迎的短视频平台之一,吸引了数以亿计的用户。在TikTok上,许多用户和内容创作者都希望能够更灵活地管理和运营多个账号,这就需要借助云手机技术。那么,TikTok云手机究竟…...

Unity-MCP协议:可嵌入、可协商的AI上下文通信标准
1. 这不是又一个“AI插件”,而是Unity开发工作流的底层重定义你有没有过这样的时刻:在Unity里反复调整Animator Controller的过渡条件,只为让角色转身动画不穿模;写完一段NavMesh寻路逻辑,却要花两小时调试Agent卡在斜…...

2026年LLM推理加速全景:量化、投机解码与KV Cache工程实战
大语言模型推理速度慢、成本高,是阻碍AI大规模落地的核心障碍之一。一个7B参数的模型,在标准配置下每秒只能生成约30个token,对于需要实时响应的应用来说几乎无法接受。但2026年,一系列推理加速技术的成熟,让这一局面发…...

基于ESP32与MQTT的家庭环境监测系统:从传感器选型到数据可视化实战
1. 项目概述与核心价值最近几年,我身边越来越多的朋友开始关注家里的空气质量、温湿度这些看不见摸不着,但又实实在在影响生活舒适度和健康的环境指标。从新装修的房子担心甲醛,到有老人小孩的家庭在意PM2.5和二氧化碳浓度,再到南…...

flameshow性能优化技巧:如何快速定位Go程序中的CPU热点
flameshow性能优化技巧:如何快速定位Go程序中的CPU热点 【免费下载链接】flameshow A terminal Flamegraph viewer. 项目地址: https://gitcode.com/gh_mirrors/fl/flameshow 🔥 想要快速定位Go程序中的性能瓶颈吗?flameshow是一个强大…...

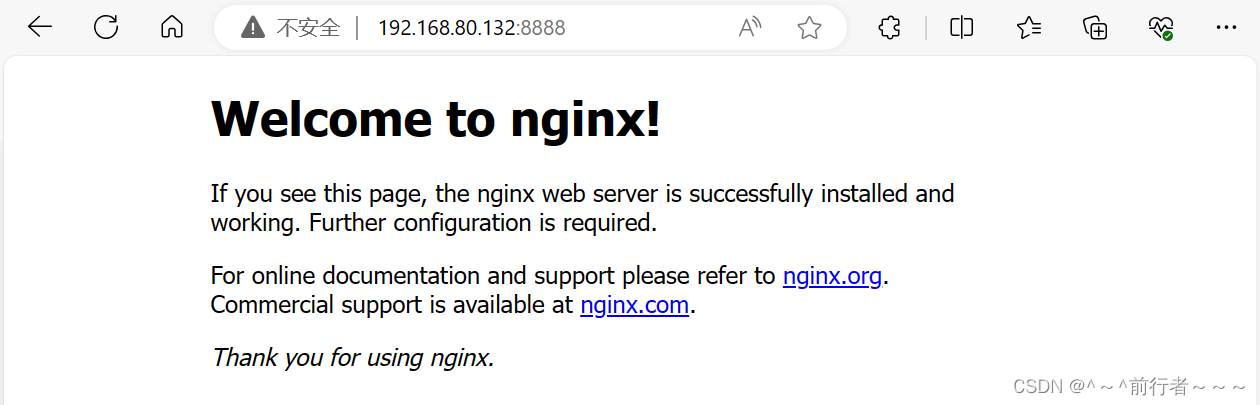
从安装到排错:手把手解决Linux服务器上Nacos启动失败的十大常见问题
从安装到排错:手把手解决Linux服务器上Nacos启动失败的十大常见问题当你在Linux服务器上部署Nacos时,是否遇到过启动失败却无从下手的困境?作为阿里巴巴开源的服务发现和配置管理平台,Nacos在微服务架构中扮演着重要角色。然而&am…...

如何在3分钟内为任何活动搭建专业级滚动抽奖系统?Magpie-LuckyDraw全平台开源方案深度解析
如何在3分钟内为任何活动搭建专业级滚动抽奖系统?Magpie-LuckyDraw全平台开源方案深度解析 【免费下载链接】Magpie-LuckyDraw 🏅A fancy lucky-draw tool supporting multiple platforms💻(Mac/Linux/Windows/Web/Docker) 项目地址: https…...

Ubuntu经常安装软件
1、垃圾清理工具stacer sudo apt updatesudo apt install stacer apt cleanapt autocleanapt autoremove 2、类似与everything的工具Fsearcch 1sudo add-apt-repository ppa:christian-boxdoerfer/fsearch-stable 2sudo apt update 3sudo apt install fsearch (注…...

DeepSeek重复代码识别失效了?5个被90%团队忽略的AST解析盲区及修复清单
更多请点击: https://codechina.net 第一章:DeepSeek代码重复检测失效的真相与影响 DeepSeek-R1 模型在代码理解任务中表现出色,但其内置的代码重复检测机制在特定场景下存在系统性失效。根本原因在于模型对语义等价但语法结构差异显著的代…...

Redis 客户端连接详解
Redis 客户端连接详解 引言 Redis 是一款高性能的内存数据结构存储系统,常用于缓存、会话管理、实时排行榜等功能。客户端连接是 Redis 生态系统中的重要组成部分,本文将详细介绍 Redis 客户端连接的相关知识,包括连接方式、连接配置、连接管理等方面。 Redis 客户端连接…...

别再乱建索引了!用Explain的key_len字段,一眼看穿你的MySQL联合索引到底生效了几个字段
解密MySQL联合索引:用key_len精准判断索引生效范围 在数据库性能优化领域,联合索引的使用一直是个既基础又容易踩坑的话题。很多开发者虽然知道"最左匹配原则"这个名词,但在实际业务场景中,面对复杂的查询条件组合时&a…...