跟着cherno手搓游戏引擎【29】Batch简单合批
思路:
CPU和GPU都开辟同样大小的一大块内存(为了存储顶点信息)
索引在程序运行时生成对应规则后绑定到索引缓冲中
动态生成顶点信息(现在改成Drawquad只是确定图形顶点的位置)
然后在Endscene,将CPU的动态生成的顶点数据上传给GPU,然后再绘制出来
所以,就是根据所绘制的物体,动态生成索引缓冲区,然后根据索引缓冲区一次性绘制多个物体。
实现:
Renderer2D.h:
#pragma once
#include "OrthographicCamera.h"
#include"Texture.h"
namespace YOTO {class Renderer2D{public://为什么渲染器是静态的:static void Init();static void ShutDown();static void BeginScene(const OrthographicCamera& camera);static void EndScene();static void Flush();static void DrawQuad(const glm::vec2& position, const glm::vec2& size ,const glm::vec4& color);static void DrawQuad(const glm::vec3& position, const glm::vec2& size ,const glm::vec4& color);static void DrawQuad(const glm::vec2& position, const glm::vec2& size ,const Ref<Texture2D> texture,float tilingFactor=1.0f,const glm::vec4& tintColor=glm::vec4(1.0f));static void DrawQuad(const glm::vec3& position, const glm::vec2& size ,const Ref<Texture2D> texture,float tilingFactor=1.0f,const glm::vec4& tintColor=glm::vec4(1.0f));static void DrawRotatedQuad(const glm::vec2& position, const glm::vec2& size, float rotation,const glm::vec4& color);static void DrawRotatedQuad(const glm::vec3& position, const glm::vec2& size, float rotation,const glm::vec4& color);static void DrawRotatedQuad(const glm::vec2& position, const glm::vec2& size, float rotation,const Ref<Texture2D> texture, float tilingFactor = 1.0f,  const glm::vec4& tintColor = glm::vec4(1.0f));static void DrawRotatedQuad(const glm::vec3& position, const glm::vec2& size, float rotation,const Ref<Texture2D> texture, float tilingFactor = 1.0f, const glm::vec4& tintColor = glm::vec4(1.0f));};
}
Renderer2D.cpp:
#include "ytpch.h"
#include "Renderer2D.h"
#include"VertexArray.h"
#include"Shader.h"
//#include "Platform/OpenGL/OpenGLShader.h"
#include <glm/gtc/matrix_transform.hpp>
#include "RenderCommand.h"
namespace YOTO {/// <summary>/// 为什么QuadVertex的指针可以作为void*data传入glBufferSubData:/// SetLayout配置的就是这三个的顺序,因为glm内部用float实现/// 相当于前三个float是Position,之后四个float组成的Color,/// 最后是两个float组成的TexCoord/// </summary>struct QuadVertex {glm::vec3 Position;glm::vec4 Color;glm::vec2 TexCoord;//,纹理Id,};struct  Renderer2DData {const uint32_t MaxQuads = 10000;const uint32_t MaxVertices = MaxQuads * 4;const uint32_t MaxIndices = MaxQuads * 6;//顶点数组Ref<VertexArray> QuadVertexArray;//定带你缓冲Ref<VertexBuffer> QuadVertexBuffer;//Ref<Shader> FlatColorShader;//ShaderRef<Shader> TextureShader;//纹理Ref<Texture2D> WhiteTexture;//记录索引uint32_t QuadIndexCount =0;QuadVertex* QuadVertexBufferBase=nullptr;QuadVertex* QuadVertexBufferPtr= nullptr;};//CPU开辟的大内存static Renderer2DData s_Data;void Renderer2D::Init(){YT_PROFILE_FUNCTION();//---------------------顶点数组--------------------------//创建顶点数组s_Data.QuadVertexArray = VertexArray::Create();// 创建顶点缓冲区,先在GPU开辟一块s_Data.MaxVertices * sizeof(QuadVertex)大小的内存// 与cpu对应大,是为了传输顶点数据//---------------------顶点缓冲区--------------------------s_Data.QuadVertexBuffer =VertexBuffer::Create(s_Data.MaxVertices*sizeof(QuadVertex));s_Data.QuadVertexBuffer->SetLayout({{ShaderDataType::Float3,"a_Position"},{ShaderDataType::Float4,"a_Color"},{ShaderDataType::Float2,"a_TexCoord"}});//顶点数组添加顶点缓冲区,并且在这个缓冲区中设置布局s_Data.QuadVertexArray->AddVertexBuffer(s_Data.QuadVertexBuffer);// 在CPU开辟存储s_Data.MaxVertices个的QuadVertex的内存s_Data.QuadVertexBufferBase = new QuadVertex[s_Data.MaxVertices];//---------------------索引缓冲区--------------------------//开辟一块索引缓冲区uint32_t* quadIndices = new uint32_t[s_Data.MaxIndices];uint32_t offset = 0;	//配置索引for (uint32_t i = 0; i < s_Data.MaxIndices; i += 6) {quadIndices[i + 0] = offset + 0;quadIndices[i + 1] = offset + 1;quadIndices[i + 2] = offset + 2;quadIndices[i + 3] = offset + 2;quadIndices[i + 4] = offset + 3;quadIndices[i + 5] = offset + 0;offset += 4;}//创建索引缓冲区Ref<IndexBuffer> quardIB;quardIB =IndexBuffer::Create(quadIndices, s_Data.MaxIndices);s_Data.QuadVertexArray->AddIndexBuffer(quardIB);delete[] quadIndices;	// cpu上传到gpu上了可以删除cpu的索引数据块了//---------------------纹理--------------------------// 创建一个白色Textures_Data.WhiteTexture = Texture2D::Create(1, 1);uint32_t whiteTextureData = 0xffffffff;s_Data.WhiteTexture->SetData(&whiteTextureData, sizeof(uint32_t));//---------------------着色器--------------------------//加载shader,并传入shader参数s_Data.TextureShader= Shader::Create("assets/shaders/Texture.glsl");s_Data.TextureShader->Bind();s_Data.TextureShader->SetInt("u_Texture", 0);}void Renderer2D::ShutDown(){YT_PROFILE_FUNCTION();//delete s_Data;}void Renderer2D::BeginScene(const OrthographicCamera& camera){YT_PROFILE_FUNCTION();s_Data.TextureShader->Bind();s_Data.TextureShader->SetMat4("u_ViewProjection", camera.GetViewProjectionMatrix());// 相当于初始化此帧要绘制的索引数量,上传的顶点数据s_Data.QuadIndexCount = 0;//指针指向首部s_Data.QuadVertexBufferPtr = s_Data.QuadVertexBufferBase;}void Renderer2D::EndScene(){YT_PROFILE_FUNCTION();// 计算当前绘制需要多少个顶点数据,注意这里是8!!!!!!uint32_t dataSize = (uint8_t*)s_Data.QuadVertexBufferPtr - (uint8_t*)s_Data.QuadVertexBufferBase;// 截取部分CPU的顶点数据上传OpenGL,s_Data.QuadVertexBuffer->SetData(s_Data.QuadVertexBufferBase, dataSize);Flush();}void Renderer2D::Flush(){RenderCommand::DrawIndexed(s_Data.QuadVertexArray, s_Data.QuadIndexCount);}void Renderer2D::DrawQuad(const glm::vec2& position, const glm::vec2& size, const glm::vec4& color){DrawQuad({ position.x,position.y,0.0f }, size, color);}void Renderer2D::DrawQuad(const glm::vec3& position, const glm::vec2& size, const glm::vec4& color){YT_PROFILE_FUNCTION();//s_Data.FlatColorShader->Bind();//s_Data.FlatColorShader->SetFloat4("u_Color", color);//s_Data.TextureShader->Bind();s_Data.QuadVertexBufferPtr->Position = position;s_Data.QuadVertexBufferPtr->Color = color;s_Data.QuadVertexBufferPtr->TexCoord = {0.0f,0.0f};s_Data.QuadVertexBufferPtr++;s_Data.QuadVertexBufferPtr->Position = { position.x+size.x,position.y,0.0f};s_Data.QuadVertexBufferPtr->Color = color;s_Data.QuadVertexBufferPtr->TexCoord = { 1.0f,0.0f };s_Data.QuadVertexBufferPtr++;s_Data.QuadVertexBufferPtr->Position = { position.x + size.x,position.y + size.y,0.0f };s_Data.QuadVertexBufferPtr->Color = color;s_Data.QuadVertexBufferPtr->TexCoord = { 1.0f,1.0f };s_Data.QuadVertexBufferPtr++;s_Data.QuadVertexBufferPtr->Position = { position.x,position.y+size.y,0.0f };s_Data.QuadVertexBufferPtr->Color = color;s_Data.QuadVertexBufferPtr->TexCoord = { 0.0f,1.0f };s_Data.QuadVertexBufferPtr++;s_Data.QuadIndexCount += 6;/*s_Data.TextureShader->SetFloat4("u_Color", color);s_Data.TextureShader->SetFloat("m_TilingFactor", 1.0f);s_Data.WhiteTexture->Bind();*///glm::mat4 transform = glm::translate(glm::mat4(1.0f), position) /**rotation*/ * glm::scale(glm::mat4(1.0f), {size.x,size.y,1.0f});//s_Data.TextureShader->SetMat4("u_Transform", transform);//s_Data.QuadVertexArray->Bind();//RenderCommand::DrawIndexed(s_Data.QuadVertexArray);}void Renderer2D::DrawQuad(const glm::vec2& position, const glm::vec2& size, const Ref<Texture2D> texture,  float tilingFactor, const glm::vec4& tintColor){DrawQuad({ position.x,position.y,0.0f }, size, texture, tilingFactor, tintColor);}void Renderer2D::DrawQuad(const glm::vec3& position, const glm::vec2& size, const Ref<Texture2D> texture, float tilingFactor, const glm::vec4& tintColor){YT_PROFILE_FUNCTION();//s_Data.TextureShader->Bind();s_Data.TextureShader->SetFloat4("u_Color", tintColor);s_Data.TextureShader->SetFloat("m_TilingFactor",tilingFactor);texture->Bind();glm::mat4 transform = glm::translate(glm::mat4(1.0f), position) /**rotation*/ * glm::scale(glm::mat4(1.0f), { size.x,size.y,1.0f });s_Data.TextureShader->SetMat4("u_Transform", transform);s_Data.QuadVertexArray->Bind();RenderCommand::DrawIndexed(s_Data.QuadVertexArray);}void Renderer2D::DrawRotatedQuad(const glm::vec2& position, const glm::vec2& size, float rotation, const glm::vec4& color){DrawRotatedQuad({ position.x,position.y,0.0f }, size, rotation,color);}void Renderer2D::DrawRotatedQuad(const glm::vec3& position, const glm::vec2& size, float rotation, const glm::vec4& color){YT_PROFILE_FUNCTION();s_Data.TextureShader->SetFloat4("u_Color", color);s_Data.TextureShader->SetFloat("m_TilingFactor", 1.0f);s_Data.WhiteTexture->Bind();glm::mat4 transform = glm::translate(glm::mat4(1.0f), position) * glm::rotate(glm::mat4(1.0f), rotation, {0.0f,0.0f,1.0f}) * glm::scale(glm::mat4(1.0f), { size.x,size.y,1.0f });s_Data.TextureShader->SetMat4("u_Transform", transform);s_Data.QuadVertexArray->Bind();RenderCommand::DrawIndexed(s_Data.QuadVertexArray);}void Renderer2D::DrawRotatedQuad(const glm::vec2& position, const glm::vec2& size, float rotation, const Ref<Texture2D> texture, float tilingFactor, const glm::vec4& tintColor){DrawRotatedQuad({ position.x,position.y,0.0f }, size, rotation, texture, tilingFactor, tintColor);}void Renderer2D::DrawRotatedQuad(const glm::vec3& position, const glm::vec2& size, float rotation, const Ref<Texture2D> texture, float tilingFactor, const glm::vec4& tintColor){YT_PROFILE_FUNCTION();//s_Data.TextureShader->Bind();s_Data.TextureShader->SetFloat4("u_Color", tintColor);s_Data.TextureShader->SetFloat("m_TilingFactor", tilingFactor);texture->Bind();glm::mat4 transform = glm::translate(glm::mat4(1.0f), position) * glm::rotate(glm::mat4(1.0f), rotation, { 0.0f,0.0f,1.0f }) * glm::scale(glm::mat4(1.0f), { size.x,size.y,1.0f });s_Data.TextureShader->SetMat4("u_Transform", transform);s_Data.QuadVertexArray->Bind();RenderCommand::DrawIndexed(s_Data.QuadVertexArray);}
}
Buffer.h:添加SetData和Create方法:
#pragma once
namespace YOTO {enum class ShaderDataType{None=0,Float,Float2,Float3,Float4,Mat3,Mat4,Int,Int2,Int3,Int4,Bool,};static uint32_t  ShaderDataTypeSize(ShaderDataType type) {switch (type){case YOTO::ShaderDataType::Float:return 4;break;case YOTO::ShaderDataType::Float2:return 4*2;break;case YOTO::ShaderDataType::Float3:return 4*3;break;case YOTO::ShaderDataType::Float4:return 4*4;break;case YOTO::ShaderDataType::Mat3:return 4*3*3;break;case YOTO::ShaderDataType::Mat4:return 4*4*4;break;case YOTO::ShaderDataType::Int:return 4;break;case YOTO::ShaderDataType::Int2:return 4*2;break;case YOTO::ShaderDataType::Int3:return 4*3;break;case YOTO::ShaderDataType::Int4:return 4*4;break;case YOTO::ShaderDataType::Bool:return 1;break;}YT_CORE_ASSERT(false, "未知的ShaderDataType!");return 0;}struct BufferElement {std::string Name;ShaderDataType Type;uint32_t Size;uint32_t Offset;bool Normalized;BufferElement(){}BufferElement(ShaderDataType type, const std::string& name,bool normalized=false):Name(name), Type(type), Size(ShaderDataTypeSize(type)), Offset(0), Normalized(normalized){}uint32_t GetComponentCount() const{switch (Type){case YOTO::ShaderDataType::Float:return 1;break;case YOTO::ShaderDataType::Float2:return 2;break;case YOTO::ShaderDataType::Float3:return 3;break;case YOTO::ShaderDataType::Float4:return 4;break;case YOTO::ShaderDataType::Mat3:return 3*3;break;case YOTO::ShaderDataType::Mat4:return 4*4;break;case YOTO::ShaderDataType::Int:return 1;break;case YOTO::ShaderDataType::Int2:return 2;break;case YOTO::ShaderDataType::Int3:return 3;break;case YOTO::ShaderDataType::Int4:return 4;break;case YOTO::ShaderDataType::Bool:return 1;break;default:break;}YT_CORE_ASSERT(false, "未知的ShaderDataType!");return 0;}};class BufferLayout {public:BufferLayout(){}BufferLayout(const std::initializer_list<BufferElement>elements):m_Elements(elements) {CalculateOffsetAndStride();} inline uint32_t GetStride()const { return m_Stride; }inline const std::vector<BufferElement>& GetElements()const {return m_Elements;}std::vector<BufferElement>::iterator begin() { return m_Elements.begin(); }std::vector<BufferElement>::iterator end() { return m_Elements.end(); }std::vector<BufferElement>::const_iterator begin() const { return m_Elements.begin(); }std::vector<BufferElement>::const_iterator end() const { return m_Elements.end(); }private:void CalculateOffsetAndStride() {uint32_t offset = 0;m_Stride = 0;for (auto& element : m_Elements) {element.Offset = offset;offset += element.Size;m_Stride += element.Size;}}private:std::vector<BufferElement> m_Elements;uint32_t m_Stride = 0;};class VertexBuffer {public:virtual~VertexBuffer() {}virtual void Bind() const = 0;virtual void UnBind() const = 0;virtual void SetData(const void* data, uint32_t size) = 0;virtual void SetLayout(const BufferLayout& layout) = 0;virtual const BufferLayout& GetLayout()const = 0;static  Ref<VertexBuffer> Create(float* vertices, uint32_t size);static  Ref<VertexBuffer> Create(uint32_t size);};/// <summary>/// 目前索引仅支持32位的索引缓冲区/// </summary>class IndexBuffer {public:virtual~IndexBuffer(){}virtual void Bind() const = 0;virtual void UnBind() const = 0;virtual uint32_t GetCount() const = 0;static  Ref<IndexBuffer> Create(uint32_t* indices, uint32_t count);};
}
Buffer.cpp:
#include"ytpch.h"
#include"Buffer.h"
#include "Renderer.h"#include "Platform/OpenGL/OpenGLBuffer.h"namespace YOTO {Ref<VertexBuffer> VertexBuffer::Create(uint32_t size){switch (Renderer::GetAPI()){case RendererAPI::API::None:YT_CORE_ASSERT(false, "Buffer:API为None不支持");return nullptr;case RendererAPI::API::OpenGL:return std::make_shared<OpenGLVertexBuffer>(size);}YT_CORE_ASSERT(false, "Buffer:未知API");return nullptr;}Ref<VertexBuffer> VertexBuffer::Create(float* vertices, uint32_t size){switch (Renderer::GetAPI()){case RendererAPI::API::None:YT_CORE_ASSERT(false,"Buffer:API为None不支持");return nullptr;case RendererAPI::API::OpenGL:return std::make_shared<OpenGLVertexBuffer>(vertices,size);}YT_CORE_ASSERT(false,"Buffer:未知API");return nullptr;}Ref<IndexBuffer> IndexBuffer::Create(uint32_t* indices, uint32_t count){switch (Renderer::GetAPI()){case RendererAPI::API::None:YT_CORE_ASSERT(false, "Buffer:API为None不支持");return nullptr;case RendererAPI::API::OpenGL:return std::make_shared < OpenGLIndexBuffer>(indices, count);}YT_CORE_ASSERT(false, "Buffer:未知API");return nullptr;}}
OpenGLBuffer.cpp: 实现继承自Buffer的方法
#include"ytpch.h"
#include"OpenGLBuffer.h"
#include <glad/glad.h>
namespace YOTO {// VertexBuffer OpenGLVertexBuffer::OpenGLVertexBuffer(uint32_t size){YT_PROFILE_FUNCTION();glCreateBuffers(1, &m_RendererID);glBindBuffer(GL_ARRAY_BUFFER, m_RendererID);glBufferData(GL_ARRAY_BUFFER, size, nullptr, GL_DYNAMIC_DRAW);}OpenGLVertexBuffer::OpenGLVertexBuffer(float* vertices, uint32_t size){	 YT_PROFILE_FUNCTION();glCreateBuffers(1, &m_RendererID);glBindBuffer(GL_ARRAY_BUFFER, m_RendererID);glBufferData(GL_ARRAY_BUFFER, size, vertices, GL_STATIC_DRAW);}OpenGLVertexBuffer::~OpenGLVertexBuffer(){YT_PROFILE_FUNCTION();glDeleteBuffers(1, &m_RendererID);}void OpenGLVertexBuffer::Bind() const{YT_PROFILE_FUNCTION();glBindBuffer(GL_ARRAY_BUFFER, m_RendererID);}void OpenGLVertexBuffer::UnBind() const{glBindBuffer(GL_ARRAY_BUFFER, 0);}void OpenGLVertexBuffer::SetData(const void* data, uint32_t size){glBindBuffer(GL_ARRAY_BUFFER, m_RendererID);// 用来更新一个已有缓冲区对象中的一部分数据,//data:一个指向新数据源的指针,将新的数据源拷贝到缓冲区对象中完成更新glBufferSubData(GL_ARRAY_BUFFER,0,size,data);}// IndexBuffer /OpenGLIndexBuffer::OpenGLIndexBuffer(uint32_t* indices, uint32_t count):m_Count(count){YT_PROFILE_FUNCTION();glCreateBuffers(1, &m_RendererID);glBindBuffer(GL_ELEMENT_ARRAY_BUFFER, m_RendererID);glBufferData(GL_ELEMENT_ARRAY_BUFFER, count*sizeof(uint32_t), indices, GL_STATIC_DRAW);}OpenGLIndexBuffer::~OpenGLIndexBuffer(){YT_PROFILE_FUNCTION();glDeleteBuffers(1, &m_RendererID);}void OpenGLIndexBuffer::Bind() const{YT_PROFILE_FUNCTION();glBindBuffer(GL_ELEMENT_ARRAY_BUFFER, m_RendererID);}void OpenGLIndexBuffer::UnBind() const{YT_PROFILE_FUNCTION();glBindBuffer(GL_ELEMENT_ARRAY_BUFFER, 0);}
}
RenderAPI.h:创建DrawIndexed方法根据索引绘制图像:
#pragma once
#include<glm/glm.hpp>
#include "VertexArray.h"
namespace YOTO {class RendererAPI{public:enum class API {None = 0,OpenGL = 1};public:virtual void Init() = 0;virtual void SetClearColor(const glm::vec4& color)=0;virtual void SetViewport(uint32_t x, uint32_t y, uint32_t width, uint32_t height) = 0;virtual void Clear() = 0;virtual void DrawIndexed(const Ref<VertexArray>& vertexArray,uint32_t indexCount = 0)=0;inline static API GetAPI() { return s_API; }private:static API s_API;};
}
OpenGLRendererAPI.cpp:
#include "ytpch.h"
#include "OpenGLRendererAPI.h"
#include <glad/glad.h>
namespace YOTO {void OpenGLRendererAPI::Init(){YT_PROFILE_FUNCTION();//启用混合glEnable(GL_BLEND);//设置混合函数glBlendFunc(GL_SRC_ALPHA,GL_ONE_MINUS_SRC_ALPHA);//深度测试glEnable(GL_DEPTH_TEST);}void OpenGLRendererAPI::SetViewport(uint32_t x, uint32_t y, uint32_t width, uint32_t height){glViewport(x, y, width, height);}void OpenGLRendererAPI::SetClearColor(const glm::vec4& color){glClearColor(color.r, color.g, color.b, color.a);}void OpenGLRendererAPI::Clear(){glClear(GL_COLOR_BUFFER_BIT | GL_DEPTH_BUFFER_BIT);}void OpenGLRendererAPI::DrawIndexed(const Ref<VertexArray>& vertexArray, uint32_t indexCount){uint32_t count = indexCount ? vertexArray->GetIndexBuffer()->GetCount() : indexCount;glDrawElements(GL_TRIANGLES, count, GL_UNSIGNED_INT, nullptr);glBindTexture(GL_TEXTURE_2D, 0);}
}
RenderCommand.h: 对API的DrawIndexed封装:
#pragma once
#include"RendererAPI.h"
namespace YOTO {class RenderCommand{public:inline static void Init() {s_RendererAPI->Init();}inline static void SetViewport(uint32_t x, uint32_t y, uint32_t width, uint32_t height) {s_RendererAPI->SetViewport(x,y,width,height);}inline static void SetClearColor(const glm::vec4& color) {s_RendererAPI->SetClearColor(color);}inline static void Clear() {s_RendererAPI->Clear();}inline static void DrawIndexed(const Ref<VertexArray>& vertexArray,uint32_t count=0) {s_RendererAPI->DrawIndexed(vertexArray, count);}private:static RendererAPI* s_RendererAPI;};}
调用:
Texture.glsl:先改下shader
#type vertex
#version 330 corelayout(location = 0) in vec3 a_Position;
layout(location = 1) in vec4 a_Color;
layout(location = 2) in vec2 a_TexCoord;uniform mat4 u_ViewProjection;
// uniform mat4 u_Transform;out vec4 v_Color;
out vec2 v_TexCoord;void main() {v_Color = a_Color;v_TexCoord = a_TexCoord;// 由规则动态生成的顶点位置(基于本地空间)没有涉及transform变换顶点位置// gl_Position = u_ViewProjection * u_Transform * vec4(a_Position, 1.0); gl_Position = u_ViewProjection * vec4(a_Position, 1.0);
}
#type fragment
#version 330 corelayout(location = 0) out vec4 color;in vec4 v_Color;
in vec2 v_TexCoord;uniform vec4 u_Color;
uniform float u_TilingFactor;uniform sampler2D u_Texture;void main() {color = v_Color;
}
Sandbox2D.cpp:
#include "Sandbox2D.h"
#include <imgui/imgui.h>
#include <glm/gtc/matrix_transform.hpp>
//#include <Platform/OpenGL/OpenGLShader.h>
#include <glm/gtc/type_ptr.hpp>
#include<vector>
#include<chrono>
template<typename Fn>
class Timer {
public:Timer(const char* name, Fn&&func):m_Name(name),m_Func(func),m_Stopped(false){m_StartTimepoint = std::chrono::high_resolution_clock::now();}~Timer() {if (!m_Stopped) {Stop();}}void Stop() {auto endTimepoint= std::chrono::high_resolution_clock::now();long long start = std::chrono::time_point_cast<std::chrono::microseconds>(m_StartTimepoint).time_since_epoch().count();long long end = std::chrono::time_point_cast<std::chrono::microseconds>(endTimepoint).time_since_epoch().count();m_Stopped = true;float duration = (end - start)*0.001f;m_Func({m_Name,duration});//std::cout << "Timer:"<< m_Name << "时差:" << duration << "ms" << std::endl;}
private:const char* m_Name;std::chrono::time_point<std::chrono::steady_clock>m_StartTimepoint;bool m_Stopped;Fn m_Func;
};
//未找到匹配的重载:auto的问题,改回原来的类型就好了
#define PROFILE_SCOPE(name) Timer timer##__LINE__(name,[&](ProfileResult profileResult) {m_ProfileResults.push_back(profileResult);})
Sandbox2D::Sandbox2D()
:Layer("Sandbox2D"), m_CameraController(1280.0f / 720.0f, true)
{
}
void Sandbox2D::OnAttach()
{YT_PROFILE_FUNCTION();m_CheckerboardTexture = YOTO::Texture2D::Create("assets/textures/Checkerboard.png");}
void Sandbox2D::OnDetach()
{YT_PROFILE_FUNCTION();
}void Sandbox2D::OnUpdate(YOTO::Timestep ts)
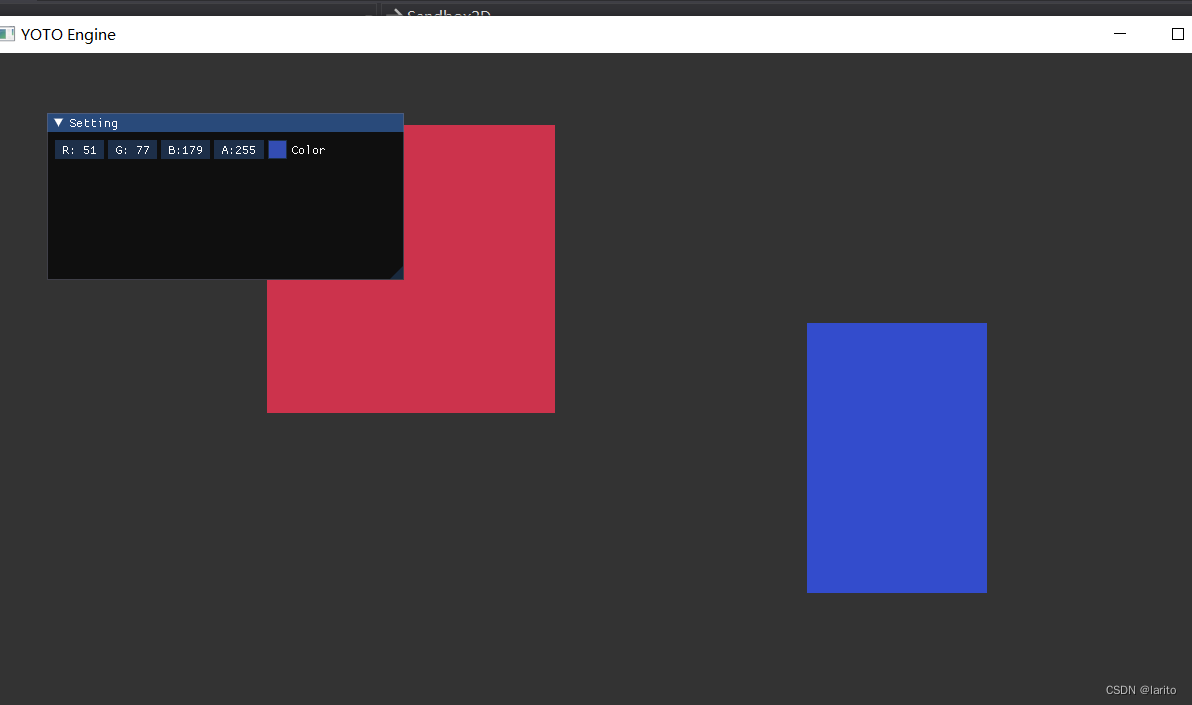
{YT_PROFILE_FUNCTION();//updatem_CameraController.OnUpdate(ts);{YT_PROFILE_SCOPE("Sandbox2D::Renderer Prep");//RenderYOTO::RenderCommand::SetClearColor({ 0.2f, 0.2f, 0.2f, 1.0f });YOTO::RenderCommand::Clear();}{YT_PROFILE_SCOPE("Sandbox2D::Renderer Draw");YOTO::Renderer2D::BeginScene(m_CameraController.GetCamera());{/* static glm::mat4 scale = glm::scale(glm::mat4(1.0f), glm::vec3(0.1f));glm::vec4 redColor(0.8f, 0.3f, 0.3f, 1.0f);glm::vec4 blueColor(0.2f, 0.3f, 0.8f, 1.0f);*//*std::dynamic_pointer_cast<YOTO::OpenGLShader>(m_FlatColorShader)->Bind();std::dynamic_pointer_cast<YOTO::OpenGLShader>(m_FlatColorShader)->UploadUniformFloat4("u_Color", m_SquareColor);YOTO::Renderer::Submit(m_FlatColorShader, m_SquareVA, glm::scale(glm::mat4(1.0f), glm::vec3(1.5f)));*/// YOTO::Renderer2D::DrawRotatedQuad({ -1.0f,0.0f }, { 0.8f,0.8f }, glm::radians(45.0f),{ 0.8f,0.2f,0.3f,1.0f });YOTO::Renderer2D::DrawQuad({ -1.0f,0.0f }, { 0.8f,0.8f }, { 0.8f,0.2f,0.3f,1.0f });YOTO::Renderer2D::DrawQuad({ 0.5f,-0.5f }, { 0.5f,0.75f }, { 0.2f,0.3f,0.8f,1.0f });//YOTO::Renderer2D::DrawQuad({ 0.0f,0.0f,-0.1f }, { 10.0f,10.0f }, m_CheckerboardTexture,10.0f,glm::vec4(1.0f,0.9f,0.9f,1.0f));YOTO::Renderer2D::EndScene();}}}
void Sandbox2D::OnImGuiRender()
{YT_PROFILE_FUNCTION();ImGui::Begin("Setting");ImGui::ColorEdit4("Color", glm::value_ptr(m_SquareColor));for (auto& res : m_ProfileResults) {char lable[50];strcpy(lable, "%.3fms ");strcat(lable, res.Name);ImGui::Text(lable, res.Time);}m_ProfileResults.clear();ImGui::End();
}void Sandbox2D::OnEvent(YOTO::Event& e)
{YT_PROFILE_FUNCTION();m_CameraController.OnEvent(e);
}
cool!
相关文章:
跟着cherno手搓游戏引擎【29】Batch简单合批
思路: CPU和GPU都开辟同样大小的一大块内存(为了存储顶点信息) 索引在程序运行时生成对应规则后绑定到索引缓冲中 动态生成顶点信息(现在改成Drawquad只是确定图形顶点的位置) 然后在Endscene,将CPU的动…...
粘包/半包及解决方案
一、粘包/半包介绍 1:粘包 粘包(Packet Concatenation)通常发生在基于流式传输协议(如 TCP)的通信中,因为 TCP 是面向流的传输协议,它不保证数据包的边界,而是将数据视为连续的字节…...

2024华为软件精英挑战赛记录
前言 本次主要是记录自己第一次参加华为软件挑战赛的经历。第一次参加比赛还是缺少经验,训练赛中拿到赛区的20多名,最后在正式赛中被反超了,只拿了40多名,实在是感到可惜。 题目:本次题目是一个智慧港口的问题。10个机…...

数据可视化艺术:Matplotlib与Seaborn实战
目录 1.Matplotlib基础绘图与定制化 1.1. 基础绘图 1.2. 定制化 2.Seaborn高级图表类型与样式设定 2.1. 高级图表类型 2.2. 样式设定 3.实战:绘制多维度数据可视化报告 4.总结 1. 前言 在数据科学领域,数据可视化扮演着至关重要的角色。通过图形化…...
python初级第一次作业
一、 dayint(input("enter today day")) fdayint(input("enter num of day since today")) c((fday%7)day)%7 if c0:print("sunday") elif c1:print("monday") elif c2:print("tuesday") elif c3:print("wendnsday&quo…...

Spring Boot整合Camunda打造高效工作流程
🎉🎉欢迎来到我的CSDN主页!🎉🎉 🏅我是尘缘,一个在CSDN分享笔记的博主。📚📚 👉点击这里,就可以查看我的主页啦!👇&#x…...

2.8、下拉刷新与上拉加载
页面的下拉刷新与上拉加载功能在移动应用中十分常见,例如,新闻页面的内容刷新和加载。这两种操作的原理都是通过响应用户的触摸事件,在顶部或者底部显示一个刷新或加载视图,完成后再将此视图隐藏。 实现思路 以下拉刷新为例,其实现主要分成三步: 监听手指按下事件,记录…...
java Web餐馆订单管理系统用eclipse定制开发mysql数据库BS模式java编程jdbc
一、源码特点 JSP 餐馆订单管理系统是一套完善的web设计系统,对理解JSP java 编程开发语言有帮助,系统具有完整的源代码和数据库,系统主要采用B/S模式开发。开发环境为TOMCAT7.0,eclipse开发,数据库为Mysql5.0,使…...

小程序从入门到入坑:事件系统
前言 哈喽大家好,我是 SuperYing,本文是小程序从入门到入坑系列的第 3 篇,将比较详尽的讲解 小程序事件系统 的相关知识点,欢迎小伙伴阅读。 读完本文您将收获: 了解小程序事件及基础使用。了解小程序事件分类及多种的…...
(把Windows电脑模拟成蓝牙鼠标和蓝牙键盘等设备))
Windows蓝牙驱动开发之模拟HID设备(二)(把Windows电脑模拟成蓝牙鼠标和蓝牙键盘等设备)
by fanxiushu 2024-03-24 转载或引用请注明原作者 接上文,当我们建立了蓝牙链接请求之后,就该传输数据了, 其实传输数据比起上章阐述的创建SDP和建立连接要简单许多。 使用类型 BRB_L2CA_ACL_TRANSFER 的BRB请求,就可以实现接收和发送操作, 至于具体是接收还是发送,根据设…...

快速区分清楚图形渲染中的AABB,KD树和BVH这些概念
快速区分清楚图形渲染中的AABB,KD树和BVH这些概念 主要想形象去区分好这些术语,目的是扫盲,先开好坑,内容持续填充。 0.先摆出这些词的全称 AABB: 原名:axis aligned bounding box;中文直译名…...

Rust 的 HashMap 特定键值元素值的累加方法
在Rust中,如果你想要对HashMap中特定键对应的值进行累加操作,你需要首先检查该键是否已存在。如果存在,则取出其值,进行累加,然后将结果存回HashMap。如果不存在,则可能需要插入一个新的键值对,…...
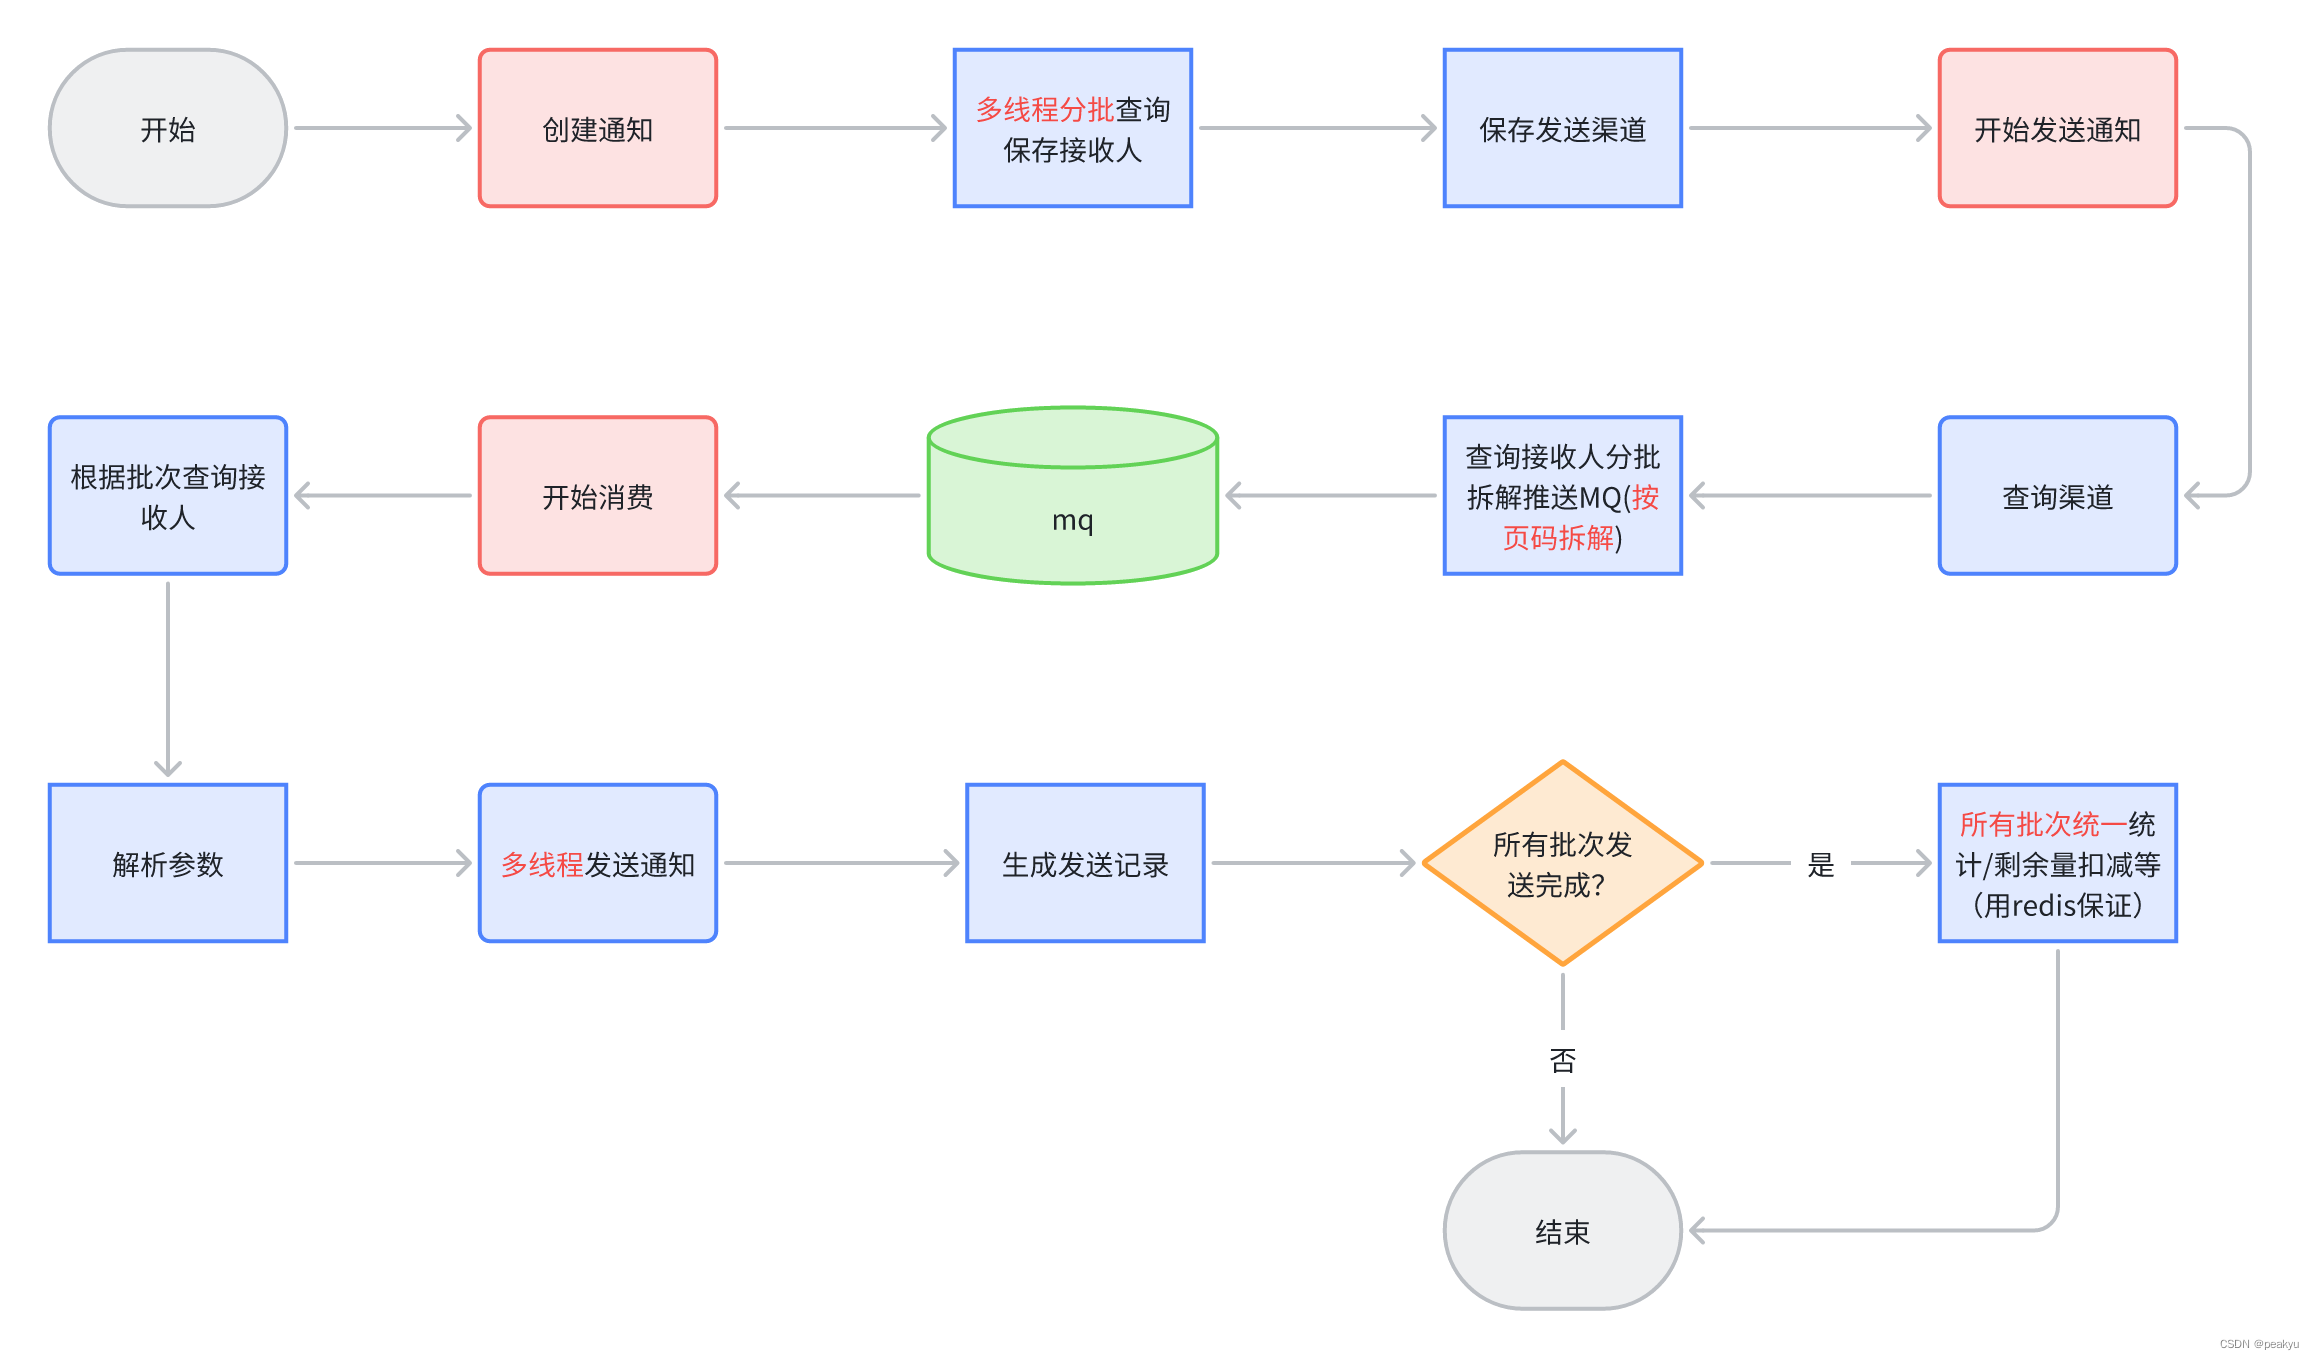
Java后端项目性能优化实战-群发通知
背景 公司群发通知模块性能存在问题,我进行全面的系统调优,系统处理能力大幅提升。 原发送流程 优化后的发送流程 优化的点 说明:以下问题基本都是压测过程遇到的,有些问题普通的功能测试暴露不了。优化目标:保证高…...

5、Jenkins持续集成-Maven和Tomcat的安装与配置
文章目录 一、Maven的安装与配置1、安装maven并配置环境2、全局工具配置关联jdk和maven3、添加Jenkins全局变量4、修改settings.xml文件5、测试是否配置成功二、Tomcat的安装与配置1、安装tomcat8+2、配置Tomcat用户角色权限3、测试是否配置成功一、Maven的安装与配置 在Jenki…...
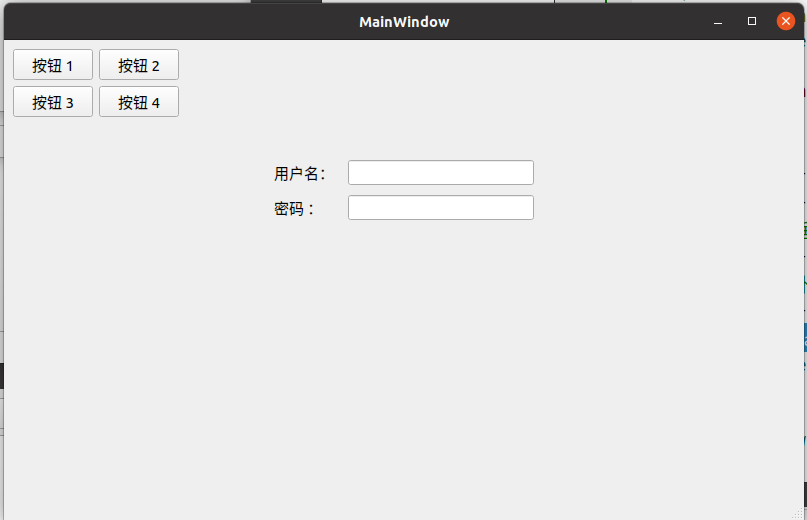
Qt教程 — 3.7 深入了解Qt 控件: Layouts部件
目录 2 如何使用Layouts部件 2.1 QBoxLayout组件-垂直或水平布局 2.2 QGridLayout组件-网格布局 2.3 QFormLayout组件-表单布局 在Qt中,布局管理器(Layouts)是用来管理窗口中控件位置和大小的重要工具。布局管理器可以确保窗口中的控件在…...

自动驾驶的几种名词
1. 自适应巡航控制(ACC) 自适应巡航控制(Adaptive Cruise Control,ACC)是一种汽车驾驶辅助系统,它可以根据前方车辆的速度和距离自动调整车辆的速度,以保持与前车的安全距离。ACC系统由控制层和…...
)
华为全套企业管理资料合集(21专题)
华为全套企业管理资料合集-知识星球下载 1.绩效考核 华为内训绝密资料:绩效管理与绩效考核.ppt 华为绩效管理与绩效考核制度.docx 华为公司实用性各种绩效图表汇总.doc 华为公司考勤管理制度.doc 华为IPD模式中跨部门团队成员的考核激励制度.doc 2.企业管理 华为公司人力资源…...
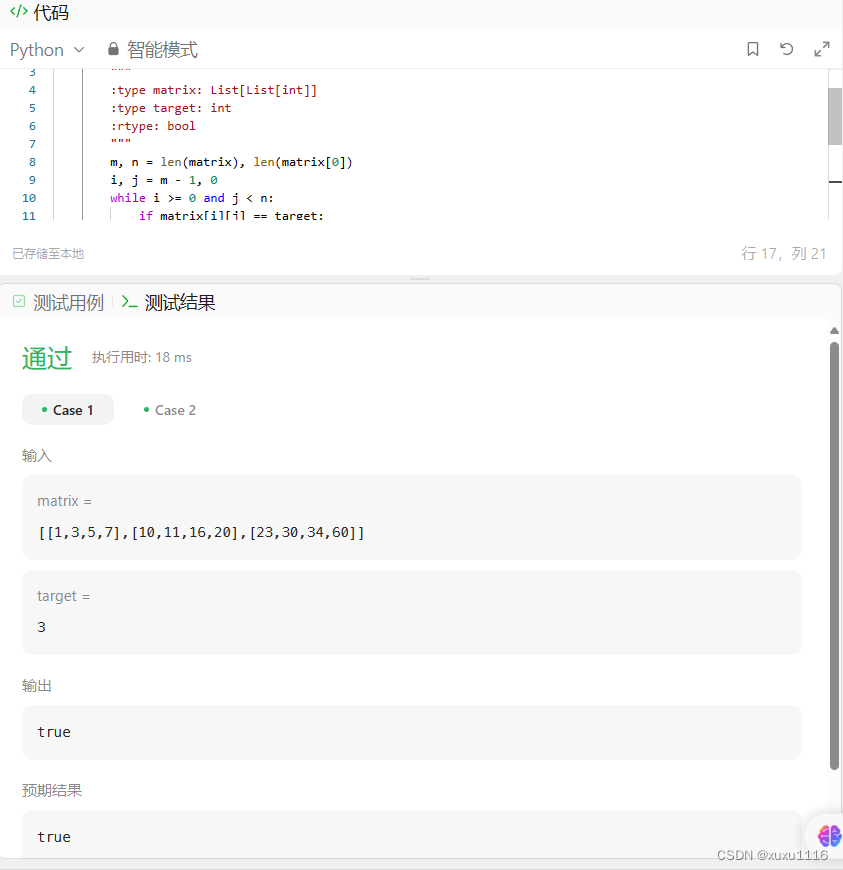
LeetCode Python - 74. 搜索二维矩阵
目录 题目描述解法方法一:二分查找方法二:从左下角或右上角搜索 运行结果方法一方法二 题目描述 给你一个满足下述两条属性的 m x n 整数矩阵: 每行中的整数从左到右按非严格递增顺序排列。每行的第一个整数大于前一行的最后一个整数。 给…...
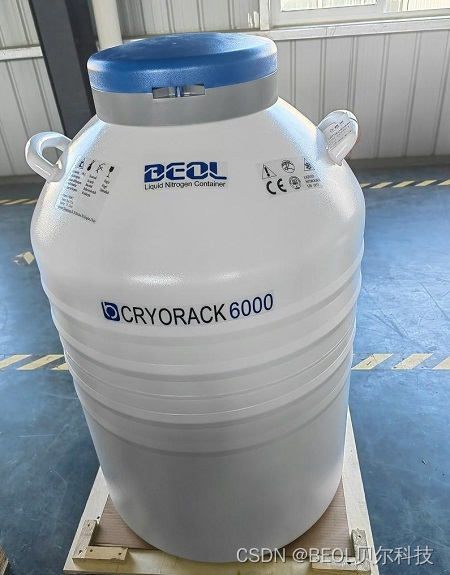
如何安全地添加液氮到液氮罐中
液氮是一种极低温的液体,它在许多领域广泛应用,但在处理液氮时需谨慎小心。添加液氮到液氮罐中是一个常见的操作,需要遵循一些安全准则以确保操作人员的安全和设备的完整性。 选择合适的液氮容器 选用专业设计用于存储液氮的容器至关重要。…...
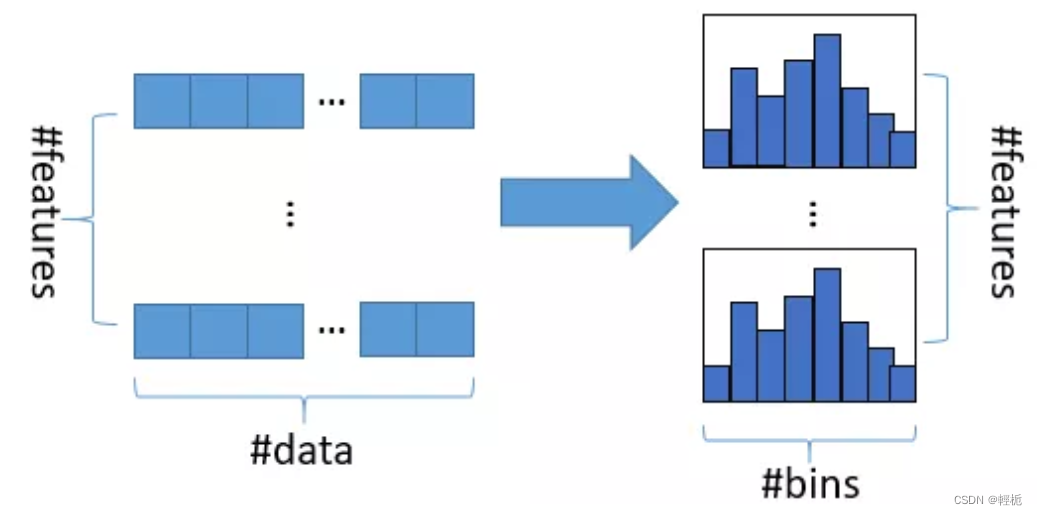
LGBM算法 原理
简介 GBDT (Gradient Boosting Decision Tree) 是机器学习中一个长盛不衰的模型,其主要思想是利用弱分类器(决策树)迭代训练以得到最优模型,该模型具有训练效果好、不易过拟合等优点。GBDT不仅在工业界应用广泛,通常被…...

第一次写 Ascend C 算子?先了解 asc-devkit 工具链
前言 当你第一次尝试为昇腾 NPU 写算子的时候,大概率会被一堆概念搞得头大:Kernel 怎么写?CPU 侧代码怎么写?算子怎么注册到框架里去?编译怎么弄?单元测试怎么写? 昇腾 CANN 生态中的 asc-dev…...

图片马与文件包含漏洞:Webshell渗透链路深度解析
1. 为什么一张普通图片能执行PHP代码?——从“图片马”开始讲清Web渗透的底层逻辑你有没有遇到过这样的场景:上传一张JPG格式的图片到网站头像系统,结果服务器返回了500 Internal Server Error,但用Burp Suite抓包一看,…...

Unity新手第一课:从创建立方体理解场景驱动开发
1. 这不是“Hello World”,而是你和Unity第一次真正握手很多人点开Unity,新建一个空项目,盯着灰蒙蒙的Scene视图发呆——光标悬停在空白画布上,不知道该点哪里,更不知道点下去会发生什么。我带过几十个零基础学员&…...

深入理解RAG中的嵌入模型Embedding Model
前言在当前流行的RAG引擎(例如RAGFlow、Qanything、Dify、FastGPT等)中,嵌入模型(Embedding Model)是必不可少的关键组件。在RAG引擎中究竟扮演着怎样的角色呢?本文笔者进行了总结,与大家分享~什…...

多极球谐函数:统一机器学习势函数描述符的数学基石
1. 项目概述:从原子环境到机器学习势函数在材料科学和计算化学领域,我们这些做模拟的人,每天都在和原子打交道。一个核心的挑战是:如何让计算机“理解”一个由几十、几百甚至上万个原子构成的复杂体系,并准确预测它的能…...

Keil C51中绝对地址变量初始化问题解析
1. 问题背景与核心需求在嵌入式开发中,特别是使用Keil C51这类经典工具链时,开发者经常需要将变量精确分配到特定的内存地址。这种需求在硬件寄存器映射、共享内存区域或特定外设控制等场景下尤为常见。最近我在一个8051项目开发中就遇到了这样的需求&am…...

告别SystemTap:为什么Linux内核开发者更偏爱ftrace?从原理到实战对比
告别SystemTap:为什么Linux内核开发者更偏爱ftrace?从原理到实战对比在Linux内核开发与性能优化领域,调试工具的选型往往决定了问题排查的效率与系统稳定性。当面对偶发的调度延迟或难以复现的内核异常时,开发人员需要在低开销、高…...

量子计算误差缓解技术:从原理到实践
1. 量子计算误差缓解技术概述量子计算正从实验室走向实际应用,但噪声问题始终是制约其发展的关键瓶颈。在NISQ(噪声中等规模量子)时代,量子比特数量虽已突破百位大关,但错误率仍居高不下。误差缓解技术(Err…...

:输入你的GPU型号/任务类型/预算,3步锁定最优解)
DeepSeek模型版本选择终极决策树(2024Q3权威更新):输入你的GPU型号/任务类型/预算,3步锁定最优解
更多请点击: https://codechina.net 第一章:DeepSeek模型版本选择终极决策树(2024Q3权威更新):输入你的GPU型号/任务类型/预算,3步锁定最优解 选择适配的 DeepSeek 模型版本是高效落地大模型应用的关键前提…...