elasticdump之python脚本
参考文章目录
elasticdump之shell备份脚本
前言
在企业实际生产环境中,避免不了要对es集群进行迁移、数据备份与恢复,以此来确保数据的可用性及完整性。因此,就涉及到了数据备份与恢复。本章主要以elasticdump+python为主,实现es集群索引备份、es集群索引恢复、两个网络互通的es集群直接迁移索引(通过nc命令判断网络是否互通)。其余备份和恢复方法见elasticsearch博客目录,总结来自于生产实战。
提示:以下是本篇文章正文内容,下面案例可供参考
一、脚本阅读注意事项
0、注意事项:a、python3.11版本b、es 6.8.13版本(其余版本es没有演练过)c、该脚本全程通过elasticdump插件进行索引的备份与恢复d、依赖的模块在requirements.txt文件中,在新机器中执行pip3 install -r requirements.txt 安装即可1、esdump_back.py脚本的作用:a、实现es集群索引备份b、实现es集群索引恢复c、实现两个网络互通的es集群直接迁移索引(通过nc命令判断网络是否互通)2、具体功能:a、将相关配置写入到json文件中,通过解析json文件拿到配置配置文件包含源(目的)es集群以下配置:用户名密码地址需要迁移的索引名称需要迁移的索引相关类型(例如索引的analyzer、mapping、data、settings...)存放备份好的索引数据目录日志文件b、有两种模式a、判断源es与目的es是否互通,如果通,则执行脚本时调用配置文件中pong配置b、如果不通,则在源机器上执行脚本时调用配置文件esdump_source配置,自行下载上传备份文件至目标机器后,在目标机器上执行脚本时调用配置文件esdump_dest配置c、支持迁移索引时,将迁移的索引名、大小保存到日志文件中3、执行步骤:a、源es与目的es网络互通python3 esdump_backup.py pongb、源es与目的es网络不通源es执行索引备份: python3 esdump_backup.py esdump_source目的es执行索引恢复: python3 esdump_backup.py esdump_dest4、日志文件:随着脚本的启动产生日志文件位置: 与脚本同级位置日志文件名称: esdump.log
二、模块文件的产生与安装
模块导出到requirements.txt文件pip freeze > requirements.txt
安装requirements.txt文件pip install -r requirements.txt
三、脚本依赖的配置文件详解
config.json
可以在配置文件中添加对应的配置,执行简单
{"pong" : {                                             #两个网络互通的es集群直接迁移索引时,脚本的位置参数"source": {"source_index": ["xxx-search-test-v1"],        #源索引名称(有几个,添加几个。格式["xx","xxx"])"source_type": ["analyzer","mapping","data"],  #源索引依赖的类型(需要什么添加什么就行,例如分词、mapping、data、settings...)"endpoints": "xx.xx.xx.xx:9200",               #源es地址"es_user": "xx",                            #源es用户"es_password": "xx"                         #源es密码},"dest": {"es_user": "xx",                            #目的es用户"es_password": "xx",                        #目的es密码"dest_type": ["analyzer","mapping","data"],    #目的es索引依赖的类型(源es索引有什么类型,目的索引也必要有)"endpoints": "xxx.xxx.xxx.xx:9200"             #目的es地址}},"esdump_source": {                                     #源es执行索引备份时,脚本的位置参数"source_index": ["xxx-search-test-v1"],"source_type": ["analyzer","mapping","data"],"endpoints": "xxx.xxx.xxx.xx:9200","es_user": "xx","es_password": "xx","source_backupdir": "/export/backup/"              #源es索引备份后存放的目录},"esdump_dest": {                                       #目的es执行索引恢复时,脚本的位置参数"es_user": "xx","es_password": "xx","dest_type": ["analyzer","mapping","data"],"endpoints": "xxx.xxx.xxx.xx:9200","dest_backupdir": "/export/backup/"               #源es执行索引备份后上传到目的服务器的目录位置}
}
四、python代码
代码如下(示例)esdump_back.py :
#!/usr/bin/env python
# -*- coding: utf-8 -*-
#author: wxd
#date: 2024/04/13 20:08:13
import json
import os
import subprocess
import sys
import logging
import requests
from requests.auth import HTTPBasicAuth
from elasticsearch import Elasticsearch
from elasticsearch.client import IndicesClientelasdump_dir = "/usr/local/bin/elasticdump"
nc_dir="/usr/bin/nc"
# 配置日志记录
logging.basicConfig(filename='esdump.log', level=logging.INFO, format='%(asctime)s - %(levelname)s - %(message)s')
# 连接es集群
def connect_es(value):url = "http://{}".format(value["endpoints"])es = Elasticsearch([url], http_auth=(value["es_user"], value["es_password"]),verify_certs=False)return es
# 检查并安装elasticdump工具
def check_and_install_tool():try:# 检查工具是否存在if not os.path.exists(elasdump_dir) and not os.path.exists(nc_dir):logging.info("elasticdump和nc 工具未找到,开始安装...")install_esdump = "yum -y install npm nodejs nc && npm config set registry https://registry.npmmirror.com/ && npm install elasticdump -g"install_result = subprocess.run(install_esdump, shell=True, capture_output=True, text=True)if install_result.returncode != 0:logging.error("安装 elasticdump、nc 工具失败: %s", install_result.stderr)return Falseelse:logging.info("elasticdump、nc 工具安装成功")return Trueelse:logging.info("elasticdump、nc 工具已安装")return Trueexcept Exception as e:logging.error("安装工具异常: %s", e)return False
#获取索引信息
def get_index_stats(endpoint, index_name,user,password):try:url = f"http://{endpoint}/{index_name}/_stats"response = requests.get(url,auth=HTTPBasicAuth(user, password))if response.status_code == 200 and response.status_code < 400:stats = response.json()#总文档数total_docs = stats["_all"]["primaries"]["docs"]["count"]#索引大小index_size = stats["_all"]["primaries"]["store"]["size_in_bytes"]return total_docs, index_sizeelse:logging.error(f"Failed to get stats for index {index_name}: {response.text}")return None, Noneexcept Exception as e:logging.error(f"获取索引信息异常: {e}")return None, None#索引备份操作
def esdump_back(value):# exist_ok=True 当设置为True时,如果目标目录已经存在,os.makedirs()函数不会引发错误,而是静默地忽略这种情况。如果设置为False(默认值),并且目标目录已经存在,那么会引发FileExistsError异常try:os.makedirs(value["source_backupdir"], exist_ok=True)# 执行备份脚本for item in value["source_index"]:for items in value["source_type"]:url = f'http://{value["es_user"]}:{value["es_password"]}@{value["endpoints"]}/{item}'dir=os.path.join(value["source_backupdir"],items)os.makedirs(dir,exist_ok=True)output_file = f'{dir}/{item}_{items}.json'commands = f'{elasdump_dir} --input {url} --output {output_file} --type={items} --limit=10000'result = subprocess.run(commands, shell=True, stdout=subprocess.PIPE, stderr=subprocess.PIPE)if result.returncode == 0:logging.info(f"{items}备份命令 {commands} 执行成功")else:logging.error(f"{items}备份命令 {commands} 执行失败")logging.error(f'{items}命令失败原因是{result.stderr.decode("utf-8")}')except Exception as e:logging.error("备份索引异常: %s", e)return False#索引备份入口
def esdump_source(file):try:# 检查配置文件中是否存在 esdump_sourceif "esdump_source" not in file:logging.error("配置文件中未找到 'esdump_source' 键")return#判断es集群连接是否成功value = file["esdump_source"]es = connect_es(value)if not  es.ping():logging.error("ES集群连接失败")return# 判断工具安装是否成功if not check_and_install_tool():logging.error("未检测到所需工具或安装失败")return#执行索引备份入口logging.info("开始备份~~~")esdump_back(value)for idx in value["source_index"]:if es.indices.exists(idx):# 获取索引统计信息total_docs, index_size = get_index_stats(value["endpoints"], idx,value["es_user"],value["es_password"])if total_docs is not None and index_size is not None:logging.info(f"索引 '{idx}' 的总文档数: {total_docs}")logging.info(f"索引 '{idx}' 的大小: {index_size} bytes")else:logging.error(f"索引 '{idx}' 不存在")except Exception as e:logging.error("开启索引备份异常: %s", e)return False#索引恢复操作
def esdump_restore(value):try:#判断是否已存在索引恢复目录if not os.path.exists(value["dest_backupdir"]):logging.error(f'恢复索引备份失败 {value["dest_backupdir"]} 不存在')return#执行恢复脚本url = f'http://{value["es_user"]}:{value["es_password"]}@{value["endpoints"]}'# 读取配置中的类型列表types = value["dest_type"]for type_idx in types:dir_path = os.path.join(value["dest_backupdir"], type_idx)for file in os.listdir(dir_path):if file.endswith(f"_{type_idx}.json"):index_name = file.split("_")[0]input_file = os.path.join(dir_path, file)output_url = f"{url}/{index_name}"command = [elasdump_dir, "--input", input_file, "--output", output_url, f"--type={type_idx}","--limits=10000"]result =subprocess.run(command,stdout=subprocess.PIPE, stderr=subprocess.PIPE)if result.returncode == 0:logging.info(f"{type_idx}恢复命令 {command} 执行成功")else:logging.error(f"{type_idx}备份命令 {command} 执行失败:")logging.error(f'{type_idx}命令失败原因是{result.stderr.decode("utf-8")}')total_docs, index_size = get_index_stats(value["endpoints"], index_name,value["es_user"],value["es_password"])if total_docs is not None and index_size is not None:logging.info(f"索引 '{index_name}' 的总文档数: {total_docs}")logging.info(f"索引 '{index_name}' 的大小: {index_size} bytes")except Exception as e:logging.error("索引恢复异常: %s", e)return False
#将本地备份拷贝到目标机器,恢复入口
def esdump_dest(file):try:# 检查配置文件中是否存在 esdump_destif "esdump_dest" not in file:logging.error("配置文件中未找到 'esdump_dest' 键")return#判断es集群连接是否成功value = file["esdump_dest"]es = connect_es(value)if not es.ping():logging.error("ES集群连接失败")return#判断工具安装是否成功if not check_and_install_tool():logging.error("未检测到所需工具或安装失败")return#索引恢复入口logging.info("开始恢复~~~")esdump_restore(value)except Exception as e:logging.error("恢复索引异常: %s", e)return False#两台服务器网络相通,走这个索引迁移函数
def migrate_index(source_url, dest_url, source_index, source_type,source_es_user,source_es_password,dest_es_user,dest_es_password):try:# 执行索引迁移的逻辑commands = f'{elasdump_dir} --input http://{source_es_user}:{source_es_password}@{source_url}/{source_index} \--output http://{dest_es_user}:{dest_es_password}@{dest_url}/{source_index} --type={source_type} --limit=10000'result = subprocess.run(commands, shell=True, stdout=subprocess.PIPE, stderr=subprocess.PIPE)if result.returncode != 0:logging.error(f"索引: {source_index}  命令: {commands} 执行失败")logging.error(f'索引: {source_index}  命令失败原因是: {result.stderr.decode("utf-8")}')return Falselogging.info(f"索引: {source_index}   命令: {commands} 执行成功")return Trueexcept Exception as e:logging.error("migrate_index函数迁移索引异常: %s", e)return Falsedef pong(file):try:# 检查配置文件中是否存在 esdump_sourceif "pong" not in file:logging.error("配置文件中未找到 'pong' 键")return#判断es集群连接是否成功value = file["pong"]source_es = connect_es(value["source"])dest_es= connect_es(value["dest"])if not source_es.ping() or not dest_es.ping():logging.error("源ES或目的ES集群连接失败")return# 判断工具安装是否成功if not check_and_install_tool():logging.error("未检测到所需工具或安装失败")return# 判断源es和目的es网络是否互通nc_command=f'{nc_dir} -zv {value["dest"]["endpoints"].split(":")[0]} {value["dest"]["endpoints"].split(":")[1]}'result_nc = subprocess.run(nc_command, shell=True, stdout=subprocess.PIPE, stderr=subprocess.PIPE)if result_nc.returncode != 0:logging.error(f"命令: {nc_command} 执行失败,网络不通")logging.error(f'命令失败返回的结果是: {result_nc.stderr.decode("utf-8")}')return#执行索引迁移for source_index in value["source"]["source_index"]:if source_es.indices.exists(source_index):# 获取源索引统计信息total_docs, index_size = get_index_stats(value["source"]["endpoints"],source_index,value["source"]["es_user"],value["source"]["es_password"])if total_docs is not None and index_size is not None:logging.info(f"源索引 '{source_index}' 的总文档数: {total_docs}")logging.info(f"源索引 '{source_index}' 的大小: {index_size} bytes")for source_type in value["source"]["source_type"]:success=migrate_index(value["source"]["endpoints"],value["dest"]["endpoints"],source_index,source_type,value["source"]["es_user"],value["source"]["es_password"],value["dest"]["es_user"],value["dest"]["es_password"])if success:logging.info("等待索引迁移完毕...")# 获取迁移后索引的信息total_docs, index_size = get_index_stats(value["dest"]["endpoints"],source_index,value["dest"]["es_user"],value["dest"]["es_password"])if total_docs is not None and index_size is not None:logging.info(f"目的索引 '{source_index}' 迁移后的总文档数: {total_docs}")logging.info(f"目的索引 '{source_index}' 迁移后的大小: {index_size} bytes")else:logging.error("索引迁移失败")except Exception as e:logging.error("不同集群间迁移索引异常: %s", e)return Falseif __name__ == "__main__":if len(sys.argv) != 2:print("Usage: python script.py pong|esdump_source|esdump_dest")else:with open("config.json", "r") as file:response_file = json.load(file)command = sys.argv[1]if command == "pong" and "pong" in response_file:pong(response_file)if command == "esdump_source" and "esdump_source" in response_file:esdump_source(response_file)if command == "esdump_dest" and "esdump_dest" in response_file:esdump_dest(response_file)
五、执行脚本示例
源es与目的es网络互通[root@python1 esdump]# python3 esdump_backup.py pong #此处的pong就是config.json文件中第一行指定的key[root@python1 esdump]# tail -f esdump.log2024-04-13 18:22:43,694 - INFO - HEAD http://xxx.xxx.xxx.xxx:9200/ [status:200 request:0.003s]2024-04-13 18:22:43,694 - INFO - elasticdump、nc 工具已安装2024-04-13 18:22:43,709 - INFO - HEAD http://xxx.xxx.xxx.xxx:9200/xxx-search-test-v1 [status:200 request:0.003s]2024-04-13 18:22:43,721 - INFO - 源索引 'xxx-search-test-v1' 的总文档数: 14372024-04-13 18:22:43,721 - INFO - 源索引 'xxx-search-test-v1' 的大小: 17846006 bytes2024-04-13 18:23:14,688 - INFO - 索引: xxx-search-test-v1 命令: /usr/local/bin/elasticdump --input http://xx:xx@xxx.xxx.xxx.xxx:9200/xxx-search-test-v1 --output http://xx:xx@xxx.xxx.xxx.xxx:9200/xxx-search-test-v1 --type=analyzer --limit=10000 执行成功2024-04-13 18:23:15,609 - INFO - 索引: xxx-search-test-v1 命令: /usr/local/bin/elasticdump --input http://xx:xx@xxx.xxx.xxx.xxx:9200/xxx-search-test-v1 --output http://xx:xx@xxx.xxx.xxx.xxx:9200/xxx-search-test-v1 --type=mapping --limit=10000 执行成功2024-04-13 18:23:25,345 - INFO - 索引: xxx-search-test-v1 命令: /usr/local/bin/elasticdump --input http://xx:xx@xxx.xxx.xxx.xxx:9200/xxx-search-test-v1 --output http://xx:xx@xxx.xxx.xxx.xxx:9200/xxx-search-test-v1 --type=data --limit=10000 执行成功2024-04-13 18:23:25,345 - INFO - 等待索引迁移完毕...2024-04-13 18:23:25,374 - INFO - 目的索引 'xxx-search-test-v1' 迁移后的总文档数: 14372024-04-13 18:23:25,374 - INFO - 目的索引 'xxx-search-test-v1' 迁移后的大小: 15417346 bytes
源es与目的es网络不通源es执行索引备份:[root@python1 esdump]# python3 esdump_backup.py esdump_source[root@python1 esdump]# tail -f esdump.log2024-04-13 18:24:25,542 - INFO - HEAD http://xxx.xxx.xxx.xxx:9200/ [status:200 request:0.009s]2024-04-13 18:24:25,542 - INFO - elasticdump、nc 工具已安装2024-04-13 18:24:25,542 - INFO - 开始备份~~~2024-04-13 18:24:26,319 - INFO - analyzer备份命令 /usr/local/bin/elasticdump --input http://xx:xx@xxx.xxx.xxx.xxx:9200/xxx-search-test-v1 --output /export/backup/analyzer/xxx-search-test-v1_analyzer.json --type=analyzer --limit=10000 执行成功2024-04-13 18:24:27,278 - INFO - mapping备份命令 /usr/local/bin/elasticdump --input http://xx:xx@xxx.xxx.xxx.xxx:9200/xxx-search-test-v1 --output /export/backup/mapping/xxx-search-test-v1_mapping.json --type=mapping --limit=10000 执行成功2024-04-13 18:24:28,613 - INFO - data备份命令 /usr/local/bin/elasticdump --input http://xx:xx@xxx.xxx.xxx.xxx:9200/xxx-search-test-v1 --output /export/backup/data/xxx-search-test-v1_data.json --type=data --limit=10000 执行成功2024-04-13 18:24:28,618 - INFO - HEAD http://xxx.xxx.xxx.xxx:9200/xxx-search-test-v1 [status:200 request:0.004s]2024-04-13 18:24:28,644 - INFO - 索引 'xxx-search-test-v1' 的总文档数: 14372024-04-13 18:24:28,645 - INFO - 索引 'xxx-search-test-v1' 的大小: 17846006 bytes
源es与目的es网络不通目的es执行索引恢复:[root@python1 esdump]# python3 esdump_backup.py esdump_dest[root@python1 esdump]# tail -f esdump.log2024-04-13 18:25:05,002 - INFO - HEAD http://xxx.xxx.xxx.xxx:9200/ [status:200 request:0.004s]2024-04-13 18:25:05,002 - INFO - elasticdump、nc 工具已安装2024-04-13 18:25:05,002 - INFO - 开始恢复~~~2024-04-13 18:25:36,020 - INFO - analyzer恢复命令 ['/usr/local/bin/elasticdump', '--input', '/export/backup/analyzer/xxx-search-test-v1_analyzer.json', '--output', 'http://xx:xx@xxx.xxx.xxx.xxx:9200/xxx-search-test-v1', '--type=analyzer', '--limits=10000'] 执行成功2024-04-13 18:25:36,728 - INFO - mapping恢复命令 ['/usr/local/bin/elasticdump', '--input', '/export/backup/mapping/xxx-search-test-v1_mapping.json', '--output', 'http://xx:xx@xxx.xxx.xxx.xxx:9200/xxx-search-test-v1', '--type=mapping', '--limits=10000'] 执行成功2024-04-13 18:25:57,440 - INFO - data恢复命令 ['/usr/local/bin/elasticdump', '--input', '/export/backup/data/xxx-search-test-v1_data.json', '--output', 'http://xx:xx@xxx.xxx.xxx.xxx:9200/huizhanyun-search-test-v1', '--type=data', '--limits=10000'] 执行成功2024-04-13 18:25:57,458 - INFO - 索引 'xxx-search-test-v1' 的总文档数: 14372024-04-13 18:25:57,458 - INFO - 索引 'xxx-search-test-v1' 的大小: 17456898 bytes
总结
以上就是今天的python脚本内容分享,因为最近刚好在学python,趁此机会强化一下自身的python基础,夯实自身.多了解一些python自动化运维常用的模块及json序列化,加油,奥里给!!!
相关文章:

elasticdump之python脚本
参考文章目录 elasticdump之shell备份脚本 前言 在企业实际生产环境中,避免不了要对es集群进行迁移、数据备份与恢复,以此来确保数据的可用性及完整性。因此,就涉及到了数据备份与恢复。本章主要以elasticdumppython为主,实现es集群索引备…...

Hystrix应用:如何在Spring Boot中使用Hystrix?
Hystrix应用:如何在Spring Boot中使用Hystrix? 引言 在微服务架构的发展过程中,面对复杂的服务依赖和不可预见的系统故障,如何提升系统的容错能力成为了一个非常急迫且重要的能力。 由 Netflix(网飞)公司…...

js的常用方法
js的常用方法已经使用过的实例 JavaScript有许多基本方法,这些方法可用于执行各种操作,包括字符串操作、数组操作、数学运算等。以下是一些常用的JavaScript基本方法及简单示例: 一、字符串方法 1、toUpperCase():将字符串转换为…...

基于SpringBoot实现的在线拍卖系统
系统开发环境 编程语言:Java数据库:MySQL容器:Tomcat工具:IDEA/Ecilpse、Navicat、Maven 系统实现 管理员功能模块 首页 修改密码 用户管理 商品类型管理 拍卖商品 竞拍公告 轮播图 历史竞拍管理 竞拍订单管理 留言板管理 用户…...

React 组件生命周期对比:Class vs. 函数式
在 React 中,Class 组件和函数式组件的生命周期存在一些差异。通过对 React 中 Class 组件和函数式组件的生命周期进行对比,详细探讨了它们在设计哲学、生命周期管理和开发技巧上的异同。全面了解 React 中两种组件类型的生命周期特点,以及如…...

Ubuntu去除烦人的顶部【活动】按钮
文章目录 一、需求说明二、打开 extensions 网站三、安装 GNOME Shell 插件四、安装本地连接器五、安装 Hide Activities Button 插件六、最终效果七、卸载本地连接器命令参考 本文所使用的 Ubuntu 系统版本是 Ubuntu 22.04 ! 一、需求说明 使用 Ubuntu 的过程中,屏…...
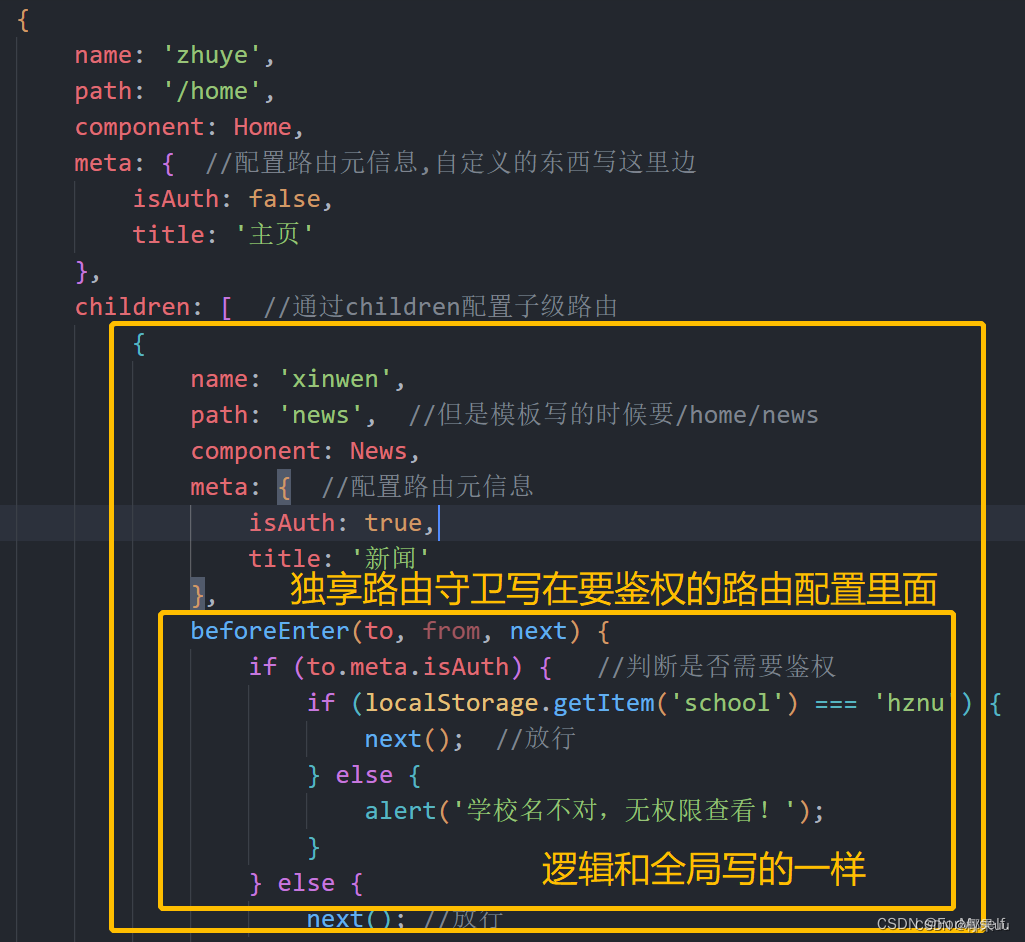
Vue2(十五):replace属性、编程式路由导航、缓存路由组件、路由组件独有钩子、路由守卫、history与hash
一、router-link的replace属性 1、作用:控制路由跳转时操作浏览器历史记录的模式 2、浏览器的历史记录有两种写入方式:分别为push和replace,push是追加历史记录,replace是替换当前记录。路由跳转时候默认为push 3、如何开启repla…...
智慧污水井物联网远程监控案例
智慧污水井物联网远程监控案例 在当今数字化转型的浪潮中,智慧水务已成为城市基础设施建设的重要组成部分。其中,基于物联网技术的智慧污水井远程监控系统以其高效、精准、实时的特性,在提升污水处理效能、保障城市水环境安全、实现精细化管…...

程序员Java.vue,python前端后端爬虫开发资源分享
bat面试资料 bat面试题汇总 提取码:724z 更多资料...

PCL:基于法线微分分割
1.介绍 在三维点云处理中,法线微分分割(Difference of Normals,简称DoN)是一种常用的分割方法,用于将点云中的物体或者场景进行分割成不同的部分或者簇。通过计算点云中每个点的法线向量,以及法线向量的变化率(差异),可以有效地分割出具有明显形状差异的部分,从而实现…...
生产事故:线程管理不善诱发P0故障
背景 处于业务诉求,需要建立一个统一的调度平台,最终是基于 Dolphinscheduler 的 V1.3.6 版本去做二次开发。在平台调研建立时,这个版本是最新的版本 命运之轮开始转动 事故 表象 上班后业务部门反馈工作流阻塞,登录系统发现大…...

WPF —— GDI画板
定义绘制对象 Graphics g; 起始点坐标 Point start; 画笔颜色 Color c1 Color.Black; 是否开始绘制 当flagtrue开始绘制,结束绘 private void Form1_MouseDown(object sender, MouseEventArgs e) {if (e.Button MouseButtons.Left) //点击了鼠标左键{start …...

C++:基于范围的for循环
使用迭代器遍历容器在遍历的过程中需要给出容器的两端:开头(begin)和结尾(end),因为这种遍历方式不是基于范围来设计的。在基于范围的for循环中,不需要再传递容器的两端,循环会自动以…...

引领智能互联时代,紫光展锐赋能百业创新发展
随着5G技术的快速发展,各行各业对通信技术的需求也在不断升级。紫光展锐持续深耕5G垂直行业,不断推进5G标准演进,从R15到R16,再到R17,展锐携手生态合作伙伴,不断推出创新性解决方案,在5G RedCap…...
lv_micropython to download and building
想要在ESP32-C3使用Micropython开发GUI,所以需要编译lv_micropython,当前github上的版本是9.1.0。 一、开发环境 因为编译lv_micropython需要在linux系统下,但是我的电脑是windows系统,所以我在windows系统上安装了VMware虚拟机&…...

二叉树练习day.9
669.修剪二叉搜索树 链接:. - 力扣(LeetCode) 题目描述: 给你二叉搜索树的根节点 root ,同时给定最小边界low 和最大边界 high。通过修剪二叉搜索树,使得所有节点的值在[low, high]中。修剪树 不应该 改变…...

2024年第十七届“认证杯”数学中国数学建模网络挑战赛B题思路
B题 神经外科手术的定位与导航 人的大脑结构非常复杂,内部交织密布着神经和血管,所以在大脑内做手术具有非常高的精细和复杂程度。例如神经外科的肿瘤切除手术或血肿清除手术,通常需要将颅骨打开一个(或几个)圆形窗口,将病变部位暴露在术野中。但当病变部位较深时,就必…...
【vue】slot 匿名插槽 / 具名插槽
slot父组件向子组件传递数据 匿名插槽–直接写 具名插槽–指定名称 父组件中 子组件中: 代码 App.vue <template><h2>App.vue</h2><!-- 匿名插槽 --><Header><a href"1234567890.com">1234567890</a>&…...

FFmpeg: 自实现ijkplayer播放器-02环境搭建
文章目录 安装环境项目工程配置库文件 安装环境 IDE: Qt5.12 库: ffmpeg-4.2.1-win32SDL 项目工程配置 pro文件 TEMPLATE app TARGET SimpleIJKPlayer DESTDIR bin QT core gui widgets #CONFIG debug #DEFINES _UNICODE WIN64 QT_WIDGETS_LIBwin32 { LIBS -L$$PW…...
Redis从入门到精通(十七)多级缓存(二)Lua语言入门、OpenResty集群的安装与使用
文章目录 前言6.4 Lua语法入门6.4.1 初识Lua6.4.2 Hello World6.4.3 变量6.4.3.1 Lua的数据类型6.4.3.2 声明变量 6.4.4 循环6.4.5 函数6.4.6 条件控制 6.5 实现多级缓存6.5.1 安装和启动OpenResty6.5.2 实现ajax请求反向代理至OpenResty集群6.5.2.1 反向代理配置6.5.2.2 OpenR…...

博彩业税收支持STEM教育的风险与可持续筹资方案探讨
1. 项目概述:当教育经费与博彩业挂钩作为一名长期关注科技教育领域发展的从业者,我时常需要追踪全球范围内STEM(科学、技术、工程和数学)教育的政策与资金动向。最近在梳理历史资料时,一篇2012年的旧文再次引起了我的注…...

消息队列选型对比
目录消息队列选型对比:从核心原理到场景化决策一、快速选型:一张表看懂核心差异二、深入解读:每款 MQ 的设计哲学与适用边界2.1 RabbitMQ:灵活路由的企业级消息代理2.2 Apache Kafka:吞吐为王的日志流平台2.3 Apache R…...

为什么你的Windows任务栏需要一次彻底的美学革命?
为什么你的Windows任务栏需要一次彻底的美学革命? 【免费下载链接】TranslucentTB A lightweight utility that makes the Windows taskbar translucent/transparent. 项目地址: https://gitcode.com/gh_mirrors/tr/TranslucentTB 你是否曾经盯着Windows桌面…...
)
仅限内部测试者知晓:Midjourney未公开的--detail boost隐式指令(实测使睫毛/织物/金属反光细节识别率提升3.2倍)
更多请点击: https://intelliparadigm.com 第一章:Midjourney图像放大与细节增强 Midjourney v6 及后续版本原生支持高分辨率图像生成与智能细节增强,其核心能力不仅依赖于模型权重,更通过 --zoom 2、--style raw 和 --s 750 等参…...

SpringBoot+Vue的牙科诊所预约平台毕业设计源码
博主介绍:✌ 专注于Java,python,✌关注✌私信我✌具体的问题,我会尽力帮助你。一、研究目的本研究旨在构建一个基于Spring Boot与Vue框架的牙科诊所预约平台以解决传统医疗预约模式中存在的信息不对称问题和资源分配效率低下问题。随着数字化医疗技术的快…...

新手入门零门槛,Captain AI助你7天玩转Ozon
在俄罗斯跨境电商的风口下,Ozon平台吸引了无数新手商家入局。然而,流程繁琐、经验不足、语言不通三大门槛,让超过60%的新手在入驻前3个月就铩羽而归。据行业数据显示,Ozon新手商家的3个月存活率不足40%,其中80%的失败都…...

别再傻傻分不清!用Python+Matplotlib手把手教你画出NBI和WBI的频谱与时频图
用PythonMatplotlib实战解析NBI与WBI的频谱与时频特性 在信号处理领域,窄带干扰(NBI)和宽带干扰(WBI)的区分对雷达系统、通信工程等应用至关重要。理论教材中复杂的数学公式常常让初学者望而生畏,而可视化呈现能瞬间让抽象概念变得直观可感。本文将带您用…...

低代码平台表单设计器 unione form editor 组件介绍--文件上传
低代码平台表单设计器 unione form editor 组件介绍--文件上传 在企业级低代码表单开发中,文件上传组件是实现“附件提交、资料归档、证据留存”的核心组件,广泛应用于合同上传、简历提交、凭证上传、图片上传等场景。不同于其他输入类组件,文…...

告别MQTT!用Python Socket自建轻量数据通道,ESP32直连MySQL并更新网页状态
告别MQTT!用Python Socket自建轻量数据通道,ESP32直连MySQL并更新网页状态 在物联网项目开发中,MQTT协议因其轻量级和发布-订阅模式而广受欢迎。然而,当我们需要更精细地控制数据传输流程、减少中间件依赖或优化资源使用时&#x…...

Python 异步HTTP客户端实战:aiohttp深度解析
Python 异步HTTP客户端实战:aiohttp深度解析 引言 在现代Python后端开发中,异步HTTP客户端是构建高性能服务的关键组件。作为一名从Rust转向Python的后端开发者,我深刻体会到异步编程在处理大量并发请求时的优势。aiohttp作为Python生态中最流…...