Vue从入门到实战Day04
一、组件的三大组成部分(结构/样式/逻辑)
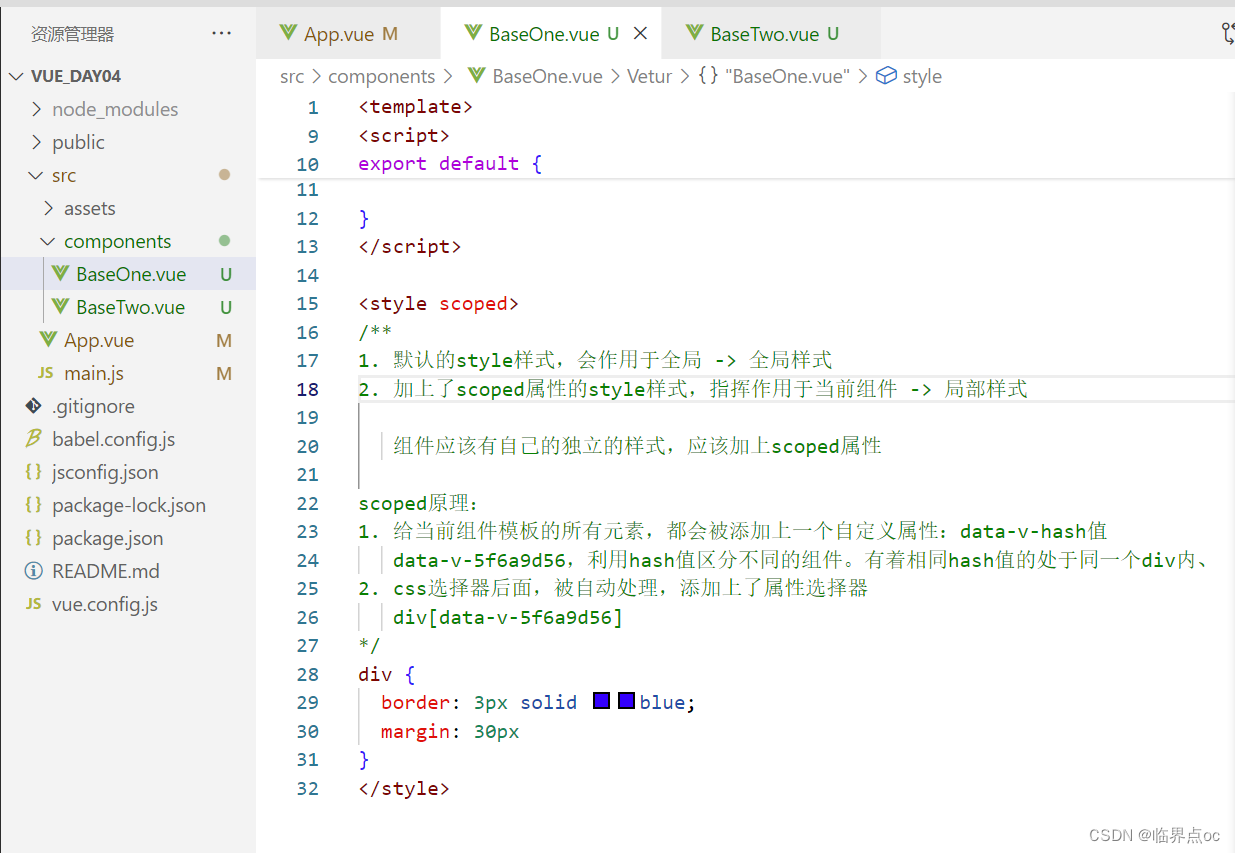
1. scoped样式冲突

默认情况:写在组件中的样式会全局生效 -> 因此很容易造成多个组件之间的样式冲突问题。
1. 全局样式:默认组件中的样式会作用到全局
2. 局部样式:可以给组件加上scoped属性,可以让样式只作用于当前组件
scoped的原理:
1. 当前组件内部标签都被添加data-v-hash值 的属性
2. CSS选择器都被添加[data-v-hash值] 的属性选择器
最终效果:必须是当前组件的元素,才会有这个自定义属性,才会被这个样式作用到
示例:
components/BaseOne.vue
components/BaseTwo.vue
<template><div class="base-one">BaseTwo</div>
</template><script>
export default {}
</script><style scoped>
div {border: 3px solid red;margin: 30px;
}
</style>
App.vue
<template><div id="app"><BaseOne></BaseOne><BaseTwo></BaseTwo></div>
</template><script>
import BaseOne from './components/BaseOne'
import BaseTwo from './components/BaseTwo'
export default {name: 'App',components: {BaseOne,BaseTwo}
}
</script>
效果:

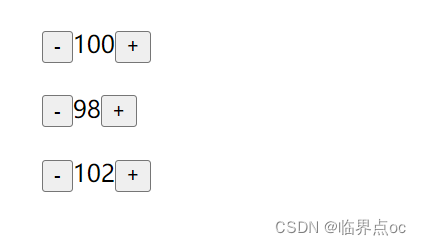
2. data是一个函数
一个组件的data选项必须是一个函数。 -> 保证每个组件实例,维护独立的一份数据对象。
每次创建新的组件实例,都会执行一次data函数得到一个新对象
data() {return {count: 100}
},
示例:
components/BaseCount.vue
<template><div class="base-count"><button @click="count--">-</button><span>{{ count }}</span><button @click="count++">+</button></div>
</template><script>
export default {data() {return {count: 100,}},
}
</script><style>
.base-count {margin: 20px;
}
</style>
App.vue
<template><div class="app"><baseCount></baseCount><baseCount></baseCount><baseCount></baseCount></div>
</template><script>
import baseCount from './components/BaseCount'
export default {components: {baseCount,},
}
</script><style>
</style>
效果:
二、组件通信
组件通信,就是指组件与组件之间的数据传递。
- 组件的数据是独立的,无法直接访问其他组件的数据。
- 想用其他组件的数据 -> 组件通信。
不同的组件关系 和 组件通信方案分类
组件关系分类:
1. 父子关系
2. 非父子关系

1. 组件通信语法

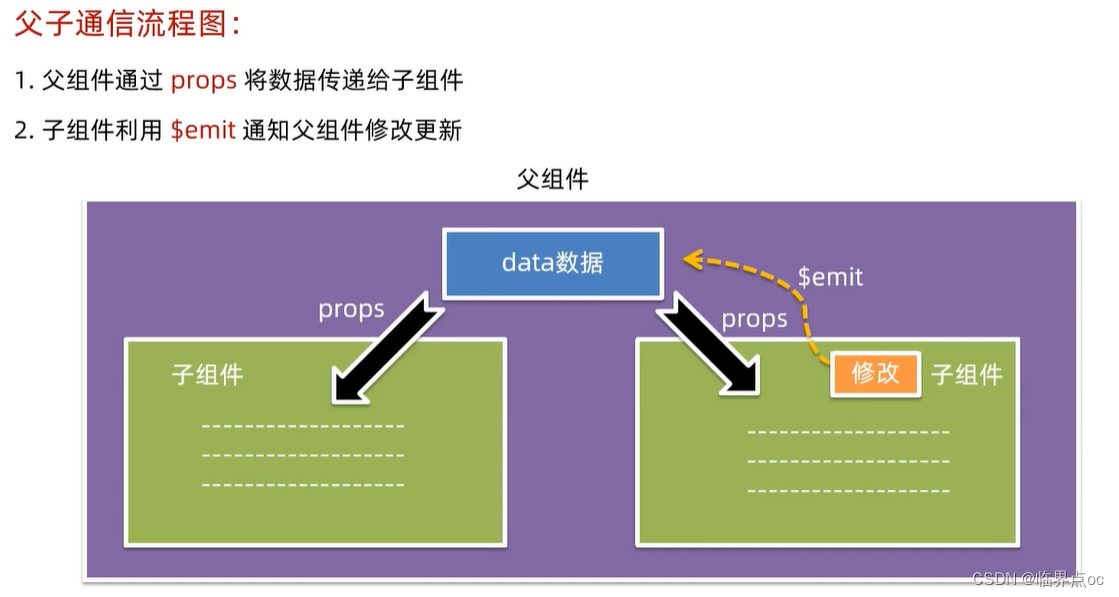
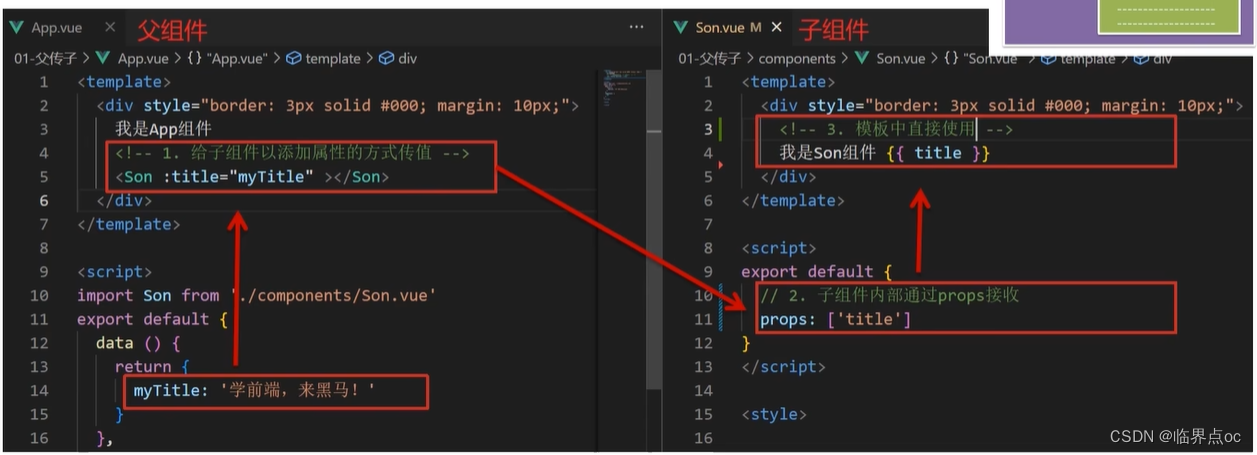
2. 父传子
父组件通过 props 将数据传递给子组件
- ①父组件:给组件添加标签,添加属性的方式,传值
- ②子组件:通过props进行接收
- ③子组件:渲染使用
示例:
效果:

什么是 prop
Prop定义:组件上 注册的一些自定义属性
Prop作用:向子组件传递数据
特点:
- 可以传递任意数量的prop
- 可以传递任意类型的prop
示例:
App.vue
<template><div class="app"><UserInfo:username="username":age="age":isSingle="isSingle":car="car":hobby="hobby"></UserInfo></div>
</template><script>
import UserInfo from './components/UserInfo.vue'
export default {data() {return {username: '小帅',age: 28,isSingle: true,car: {brand: '宝马',},hobby: ['篮球', '足球', '羽毛球'],}},components: {UserInfo,},
}
</script><style>
</style>
components/UserInfo.vue
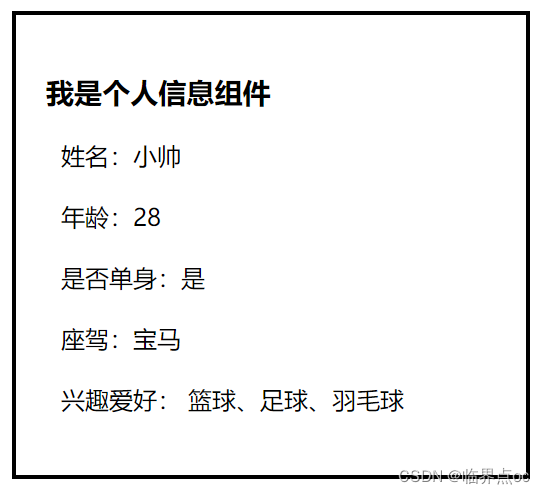
<template><div class="userinfo"><h3>我是个人信息组件</h3><div>姓名:{{ username }}</div><div>年龄:{{ age }}</div><div>是否单身:{{ isSingle ? '是' : '否'}}</div><div>座驾:{{ car.brand }}</div><div>兴趣爱好: {{ hobby.join('、') }}</div></div>
</template><script>
export default {props: ['username', 'age', 'isSingle', 'car', 'hobby']
}
</script><style>
.userinfo {width: 300px;border: 3px solid #000;padding: 20px;
}
.userinfo > div {margin: 20px 10px;
}
</style>
效果:
props校验
思考:组件的prop可以乱传吗?
作用:为组件的prop指定验证要求,不符合要求,控制台就会有错误提示 -> 帮助开发者,快速发现错误
语法:
①类型校验
props: {校验的属性名:类型  // Number String Boolean···
},
②非空校验
③默认值
④自定义校验
props: {校验的属性名: {type: 类型,  // Number String Boolean···required: true,  // 是否必填default: 默认值,  // 默认值validator (value) {// 自定义校验逻辑return 是否通过校验}}
},
示例:
App.vue
<template><div class="app"><BaseProgress :w="width"></BaseProgress></div>
</template><script>
import BaseProgress from './components/BaseProgress.vue'
export default {data() {return {width: 30,}},components: {BaseProgress,},
}
</script><style>
</style>
components/BaseProgress.vue
<template><div class="base-progress"><div class="inner" :style="{ width: w + '%' }"><span>{{ w }}%</span></div></div>
</template><script>
export default {// props: ["w"],// 1.基础写法(类型校验)// props: {//   // 类型校验//   w: Number// }// 2.完整写法(类型、是否必填、默认值、自定义校验)props: {w: {type: Number,required: true,default: 0,validator (value) {// console.log(value)if(value >= 0 && value <= 100) {return true} else {console.error('传入的prop w必须是0-100的数字')return false}}}}}
</script><style scoped>
.base-progress {height: 26px;width: 400px;border-radius: 15px;background-color: #272425;border: 3px solid #272425;box-sizing: border-box;margin-bottom: 30px;
}
.inner {position: relative;background: #379bff;border-radius: 15px;height: 25px;box-sizing: border-box;left: -3px;top: -2px;
}
.inner span {position: absolute;right: 0;top: 26px;
}
</style>
效果:

prop & data 单向数据流
共同点: 都可以给组件提供数据
区别:
- data的数据是自己的 -> 随便改
- prop的数据是外部的 -> 不能直接改,要遵循单向数据流
单向数据流:父组件的prop的数据更新,会单向的向下流动,影响到子组件。这个数据流动是单向的。
示例:
App.vue
<template><div class="app"><BaseCount :count="count"@changeCount="handleChange"></BaseCount></div>
</template><script>
import BaseCount from './components/BaseCount.vue'
export default {components:{BaseCount},data(){return {count:100}},methods:{handleChange(newCount) {this.count = newCount}}
}
</script><style></style>
components/BaseCount.vue
<template><div class="base-count"><button @click="handleSub">-</button><span>{{ count }}</span><button @click="handleAdd">+</button></div>
</template><script>
export default {// 1.自己的数据随便修改  (谁的数据 谁负责)// data () {//   return {//     count: 100,//   }// },// 2.外部传过来的数据 不能随便修改// 单向数据流:父组件的prop更新,会单向的向下流动,影响到子组件props: {count: Number },methods: {handleAdd() {this.$emit('changeCount', this.count + 1)},handleSub() {this.$emit('changeCount', this.count - 1)}}}
</script><style>
.base-count {margin: 20px;
}
</style>
3. 子传父
子组件利用 $emit 通知父组件,进行修改更新
- ①子组件:$emit发送消息;
- ②父组件:给子组件添加消息监听;
- ③父组件:实现处理函数。
示例:
components/Son.vue
<template><div class="son" style="border:3px solid #000;margin:10px">我是Son组件 {{ title }}<button @click="changeFn">修改title</button></div>
</template><script>
export default {name: 'Son-Child',props: ['title'],methods: {changeFn() {// 1. 通过$emit,向父组件发送消息通知this.$emit('changeTitle', '传智教育')}}
}
</script><style></style>
App.vue
<template><div class="app" style="border: 3px solid #000; margin: 10px">我是APP组件<!-- 2. 父组件,对消息进行监听 --><Son :title="myTitle" @changeTitle="handleChange"></Son></div>
</template><script>
import Son from "./components/Son.vue"
export default {name: "App",components: {Son,},data() {return {myTitle: "学前端,就来黑马程序员",}},methods: {// 提供对应的处理函数,提供逻辑handleChange(newTitle) {// console.log(newTitle)this.myTitle = newTitle}}
}
</script><style>
</style>
效果:

4. 非父子(拓展)— event bus 事件总线
作用:非父子组件之间,进行简易消息传递。(复杂场景 -> Vuex)
1. 创建一个都能访问到的事件总线(空Vue实例) -> utils/EventBus.js
import Vue from 'vue'
const Bus = new Vue()
export default Bus
2. A组件(接收方),监听Bus实例的事件
created() {Bus.$on('sendMsg', (msg) => {this.msg = msg})
}
3. B组件(发送方),触发Bus实例的事件
Bus.$emit('sendMsg', '这是一个消息')
示例:
创建一个都能访问到的事件总线(空Vue示例) -> src/utils/EventBus.js
import Vue from 'vue'// 1. 创建一个都能访问到的事件总线(空的Vue实例)
const Bus  =  new Vue()export default Bus
src/components/BaseA.vue:接收方
<template><div class="base-a">我是A组件(接收方)<p>{{msg}}</p>  </div>
</template><script>
import Bus from '../utils/EventBus'
export default {data() {return {msg: '',}},created() {// 在A组件(接收方),进行监听Bus的事件(订阅消息)Bus.$on('sendMsg', (msg) => {// console.log(msg)this.msg = msg})},
}
</script><style scoped>
.base-a {width: 200px;height: 200px;border: 3px solid #000;border-radius: 3px;margin: 10px;
}
</style>
src/components/BaseB.vue:发送方
<template><div class="base-b"><div>我是B组件(发布方)</div><button @click="sendMsgFn">发送消息</button></div>
</template><script>
import Bus from '../utils/EventBus'
export default {methods: {sendMsgFn() {// 3. B组件(发送方),触发事件的方式传递参数// 任何监听了这个消息的组件都可以接收到对应的消息Bus.$emit('sendMsg', '今天天气不错,适合旅游')},},
}
</script><style scoped>
.base-b {width: 200px;height: 200px;border: 3px solid #000;border-radius: 3px;margin: 10px;
}
</style>
src/components/BaseC.vue:接收方
<template><div class="base-c">我是C组件(接收方)<p>{{msg}}</p>  </div>
</template><script>
import Bus from '../utils/EventBus'
export default {data() {return {msg: '',}},created() {Bus.$on('sendMsg', (msg) => {// console.log(msg)this.msg = msg})},
}
</script><style scoped>
.base-c {width: 200px;height: 200px;border: 3px solid #000;border-radius: 3px;margin: 10px;
}
</style>
App.vue
<template><div class="app"><BaseA></BaseA><BaseB></BaseB><BaseC></BaseC></div>
</template><script>
import BaseA from './components/BaseA.vue'
import BaseB from './components/BaseB.vue'
import BaseC from './components/BaseC.vue'
export default {components:{BaseA,BaseB,BaseC}
}
</script><style></style>
5. 非父子通信(拓展) — provide & inject
provide & inject作用:跨层级共享数据。
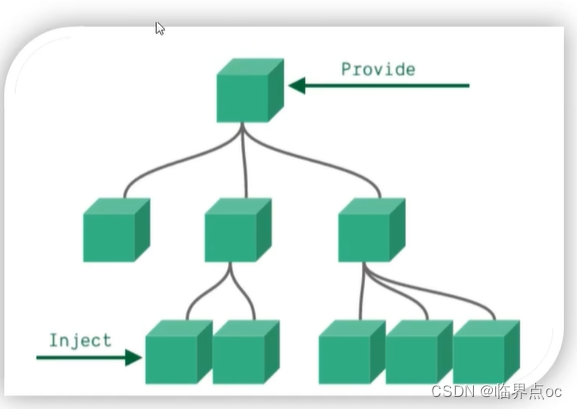
1. 父组件provide提供数据
export default {provide() {return {// 普通类型【非响应式】color: this.color,// 复杂类型 【响应式】userInfo: this.userInfo,}}
}
2. 子 / 孙组件 inject 取值使用
export default {inject: ['color', 'userInfo'],created() {console.log(this.color, this.userInfo)}
}
示例:
App.vue
<template><div class="app">我是APP组件<button @click="change">修改数据</button><SonA></SonA><SonB></SonB></div>
</template><script>
import SonA from './components/SonA.vue'
import SonB from './components/SonB.vue'
export default {provide() {return {// 简单类型 是非响应式的color: this.color,// 复杂类型 是响应式的userInfo: this.userInfo,}},data() {return {color: 'pink',userInfo: {name: 'zs',age: 18,},}},methods: {change() {this.color = 'red'this.userInfo.name = 'ls'},},components: {SonA,SonB,},
}
</script><style>
.app {border: 3px solid #000;border-radius: 6px;margin: 10px;
}
</style>
components/SonA.vue
<template><div class="SonA">我是SonA组件<GrandSon></GrandSon></div>
</template><script>
import GrandSon from '../components/GrandSon.vue'
export default {components:{GrandSon}
}
</script><style>
.SonA {border: 3px solid #000;border-radius: 6px;margin: 10px;height: 200px;
}
</style>
components/SonB.vue
<template><div class="SonB">我是SonB组件</div>
</template><script>
export default {}
</script><style>
.SonB {border: 3px solid #000;border-radius: 6px;margin: 10px;height: 200px;
}
</style>
components/GrandSon.vue
<template><div class="grandSon">我是GrandSon{{ color }} -{{ userInfo.name }} -{{ userInfo.age }}</div>
</template><script>
export default {inject: ['color', 'userInfo'],
}
</script><style>
.grandSon {border: 3px solid #000;border-radius: 6px;margin: 10px;height: 100px;
}
</style>
效果:

三、综合案例:小黑记事本(组件版)
需求说明:
①拆分基础组件
新建组件 -> 拆分存放结构 -> 导入注册使用

②渲染待办任务
提供数据(公共父组件) -> 父传子传递list -> v-for渲染
③添加任务
收集数据 v-model -> 监听事件 -> 子传父传递任务 -> 父组件unshift
④删除任务
监听删除携带id -> 子传父传递id -> 父组件filter删除
⑤底部合计 和 清空功能
底部合计:父传子传递list -> 合计展示
清空功能:监听点击 -> 子传父通知父组件 -> 父组件清空
⑥持久化存储
watch监视数据变化,持久化到本地
TodoHeader.vue
<template><!-- 输入框 --><header class="header"><h1>小黑记事本</h1><input@keyup.enter="handleAdd" placeholder="请输入任务" class="new-todo" v-model="todoName"/><button class="add" @click="handleAdd">添加任务</button></header>
</template><script>
export default {data() {return {todoName: ''}},methods: {handleAdd() {// console.log(this.todoName)// 非空判断if(this.todoName.trim() === '') {alert('任务名称不能为空!')return}this.$emit('add', this.todoName)this.todoName = ''}}
};
</script><style>
</style>
TodoMain.vue
<template><!-- 列表区域 --><section class="main"><ul class="todo-list"><li class="todo" v-for="(item, index) in list" :key="item.id"><div class="view"><span class="index">{{ index + 1 }}.</span> <label>{{ item.name }}</label><button class="destroy" @click="handleDel(item.id)"></button></div></li></ul></section>
</template><script>
export default {props: {list: Array,},methods: {handleDel(id) {this.$emit('delete', id)}}
};
</script><style>
</style>
TodoFooter.vue
<template><!-- 统计和清空 --><footer class="footer"><!-- 统计 --><span class="todo-count">合 计:<strong> {{ list.length }} </strong></span><!-- 清空 --><button class="clear-completed" @click="clear">清空任务</button></footer>
</template><script>
export default {props: {list: Array},methods: {clear() {this.$emit('clear')}}
};
</script><style>
</style>
App.vue
<template><!-- 主体区域 --><section id="app"><TodoHeader @add="handleAdd"></TodoHeader><TodoMain :list="list" @delete="handleDel"></TodoMain><TodoFooter :list="list" @clear="handleClear"></TodoFooter></section>
</template><script>
import TodoHeader from "./components/TodoHeader.vue";
import TodoMain from "./components/TodoMain.vue";
import TodoFooter from "./components/TodoFooter.vue";// 渲染功能:
// 1. 提供数据:提供在公共的父组件 App.vue
// 2, 通过父传子,将数据传递给TodoMain
// 3. 利用v-for渲染// 添加功能
// 1. 收集表单数据 v-model
// 2. 进行监听事件(回车 + 点击 都要进行添加)
// 3. 子传父,将任务名称传递给父组件App.vue
// 4. 进行添加unshift(自己的数据自己负责)// 删除功能
// 1. 监听事件(监听删除的点击) 携带id
// 2. 子传父,将任务id传递给父组件App.vue
// 3. 进行删除 filter(自己的数据自己负责)// 底部合计
// 1. 父传子传list
// 2. 数据统计// 清空功能
// 1. 子传父,通知到父组件
// 2. 由父组件进行清空// 持久化存储
// 1. watch深度监视list的变化,往本地存储,进入页面优先读取本地export default {data() {return {list: JSON.parse(localStorage.getItem("list")) || [{ id: 1, name: "打篮球" },{ id: 2, name: "跳绳" },{ id: 3, name: "打羽毛球" },{ id: 4, name: "游泳" },],};},components: {TodoHeader,TodoMain,TodoFooter,},watch: {// 对list进行监视list: {deep: true,handler(newValue) {localStorage.setItem("list", JSON.stringify(newValue));}},},methods: {// 删除handleDel(id) {this.list = this.list.filter((res) => res.id !== id);},// 添加handleAdd(todoName) {// console.log(todoName)this.list.unshift({id: +new Date(),name: todoName,});},// 清空handleClear() {this.list = [];},},
};
</script><style>
</style>
效果:

四、进阶语法
1. v-model原理
原理:v-model本质上是一个语法糖。例如应用在输入框上,就是value属性 和 input事件的合写。
作用:提供数据的双向绑定
①数据变化,视图跟着变 :value
②视图变,数据跟着变 @input
注意:$event用于在模板中,获取事件的形参
<template><div id="app"><input v-model="msg" type="text"><input :value="msg" @input="msg = $event.target.value" type="text"></div>
</template>
示例:
App.vue
<template><div class="app"><input type="text" v-model="msg1"/><br /><!-- 模板中获取事件的形参 -> $event 获取 --><input type="text" :value="msg2" @input="msg = $event.target.value"></div>
</template><script>
export default {data() {return {msg1: '',msg2: ''}},
}
</script><style>
</style>
效果:

2. v-model应用于组件
表单类组件封装 & v-model简化代码
1. 表单类组件 封装
①父传子:数据应该是父组件 props 传递过来的,v-model 拆解 绑定数据
②子传父:监听输入,子传父传值给父组件修改

App.vue
<template><div class="app"><BaseSelect :cityId="selectId"@changeId="selectId = $event"></BaseSelect></div>
</template><script>
import BaseSelect from './components/BaseSelect.vue'
export default {data() {return {selectId: '102',}},components: {BaseSelect,},methods: {handleChange(e) {console.log(e);this.selectId = e}}
}
</script><style>
</style>
components/BaseSelect.vue
<template><div><select :value="cityId" @change="handleChange" ><option value="101">北京</option><option value="102">上海</option><option value="103">武汉</option><option value="104">广州</option><option value="105">深圳</option></select></div>
</template><script>
export default {props: {cityId: String},methods: {handleChange(e) {// console.log(e.target.value)this.$emit('changeId', e.target.value)}}
}
</script><style>
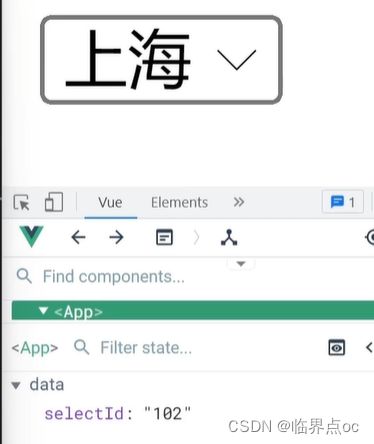
</style>效果:
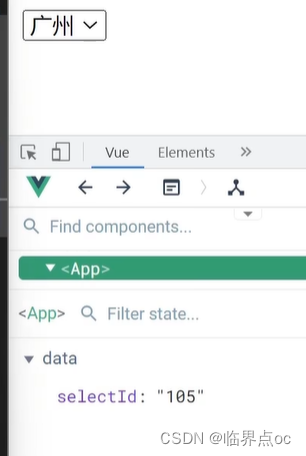
2. 父组件v-model简化代码,实现子组件和父组件数据双向绑定
①子组件中:props通过value接收,事件触发input
②父组件中:v-model给组件直接绑定数据(:value + @input)

示例:
BaseSelect.vue
<template><div><select :value="value" @change="handleChange" ><option value="101">北京</option><option value="102">上海</option><option value="103">武汉</option><option value="104">广州</option><option value="105">深圳</option></select></div>
</template><script>
export default {props: {value: String},methods: {handleChange(e) {// console.log(e.target.value)this.$emit('input', e.target.value)}}
}
</script><style>
</style>
App.vue
<template><div class="app"><BaseSelect v-model="selectId"></BaseSelect></div>
</template><script>
import BaseSelect from './components/BaseSelect.vue'
export default {data() {return {selectId: '103',}},components: {BaseSelect,},methods: {handleChange(e) {console.log(e);this.selectId = e}}
}
</script><style>
</style>
效果:
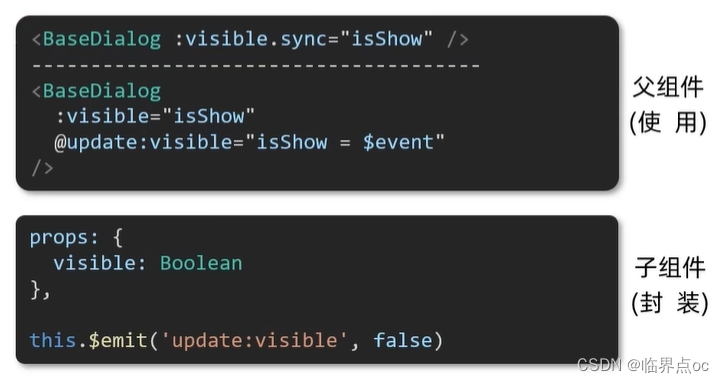
3. .sync修饰符
作用:可以实现子组件和父组件数据的双向绑定,简化代码
特点:prop属性名,可以自定义,非固定为value
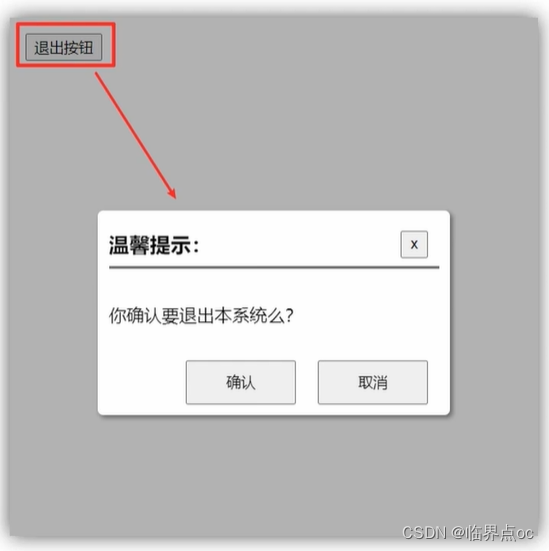
场景:封装弹框类的基础组件,visible属性:true显示,false因此
本质:就是 :属性名 和 @update:属性名 合写
示例:
App.vue
<template><div class="app"><button class="logout"@click="isShow = true">退出按钮</button><!-- :visible.sync 等价于 :visible + @update:visible --><BaseDialog :visible.sync="isShow"></BaseDialog></div>
</template><script>
import BaseDialog from "./components/BaseDialog.vue"
export default {data() {return {isShow: false}},methods: {},components: {BaseDialog,},
}
</script><style>
</style>
BaseDialog.vue
<template><div class="base-dialog-wrap" v-show="visible"><div class="base-dialog"><div class="title"><h3>温馨提示:</h3><button class="close" @click="close">x</button></div><div class="content"><p>你确认要退出本系统么?</p></div><div class="footer"><button @click="close">确认</button><button @click="close">取消</button></div></div></div>
</template><script>
export default {props: {visible: Boolean},methods: {close() {this.$emit('update:visible', false)}}
}
</script><style scoped>
.base-dialog-wrap {width: 300px;height: 200px;box-shadow: 2px 2px 2px 2px #ccc;position: fixed;left: 50%;top: 50%;transform: translate(-50%, -50%);padding: 0 10px;
}
.base-dialog .title {display: flex;justify-content: space-between;align-items: center;border-bottom: 2px solid #000;
}
.base-dialog .content {margin-top: 38px;
}
.base-dialog .title .close {width: 20px;height: 20px;cursor: pointer;line-height: 10px;
}
.footer {display: flex;justify-content: flex-end;margin-top: 26px;
}
.footer button {width: 80px;height: 40px;
}
.footer button:nth-child(1) {margin-right: 10px;cursor: pointer;
}
</style>
效果:
4. ref 和 $refs / $nextTick
作用:利用ref 和 $refs可以用于获取dom元素,或 组件实例
特点:查找范围 -> 当前组件内(更精确稳定)

①获取dom:
1. 目标标签 — 添加ref属性
<div ref="chartRef">我是渲染图表的容器</div>2. 恰当时机,通过this.$refs.xxx,获取目标标签
mounted() {console.log(this.$refs.chartRef)
),
示例:
App.vue
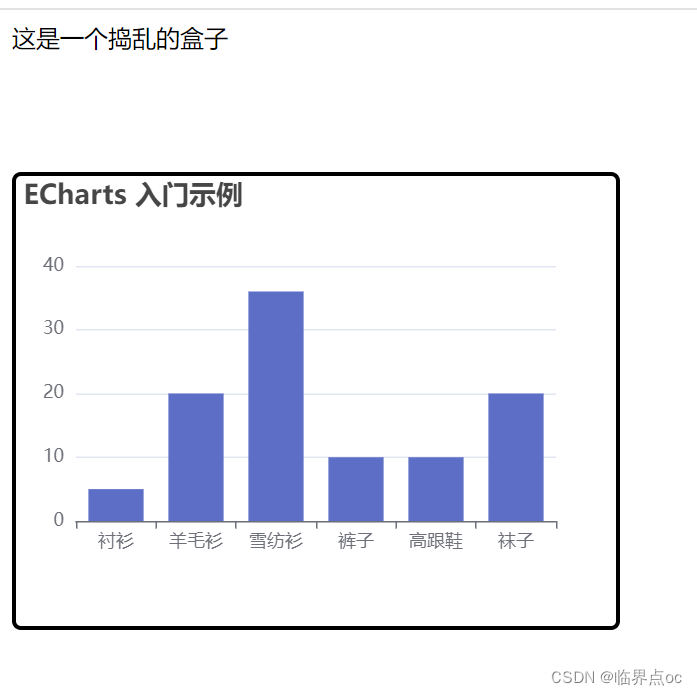
<template><div class="app"><div class="base-chart-box">这是一个捣乱的盒子</div><BaseChart></BaseChart></div>
</template><script>
import BaseChart from './components/BaseChart.vue'
export default {components:{BaseChart}
}
</script><style>
.base-chart-box {width: 200px;height: 100px;
}
</style>
BaseChart.vue
<template><div ref="mychart" class="base-chart-box">子组件</div>
</template><script>
import * as echarts from 'echarts'export default {mounted() {// 基于准备好的dom,初始化echarts实例// const myChart = echarts.init(document.querySelector('.base-chart-box'))const myChart = echarts.init(this.$refs.mychart)// console.log(this.$refs.mychart)// 指定图表的配置项和数据const option = {title: {text: 'ECharts 入门示例',},tooltip: {},xAxis: {data: ['衬衫', '羊毛衫', '雪纺衫', '裤子', '高跟鞋', '袜子'],},yAxis: {},series: [{name: '销量',type: 'bar',data: [5, 20, 36, 10, 10, 20],},],}// 使用刚指定的配置项和数据显示图表myChart.setOption(option)},
}
</script><style scoped>
.base-chart-box {width: 400px;height: 300px;border: 3px solid #000;border-radius: 6px;
}
</style>
效果:
②获取组件:
1.目标组件 — 添加ref属性
<BaseForm ref="baseForm"></BaseForm>2. 恰当时机,通过this.$refs.xxx,获取目标组件,就可以调用组件对象里面的方法
this.$refs.baseForm.组件方法()示例:
BaseForm.vue
<template><div class="app"><div>账号: <input v-model="username" type="text"></div><div>密码: <input v-model="password" type="text"></div></div>
</template><script>
export default {data() {return {username: 'admin',password: '123456',}},methods: {// 收集表单数据,返回一个对象getValues() {return {username: this.username,password: this.password}},// 重置表单resetValues() {this.username = ''this.password = ''}}
}
</script><style scoped>
.app {border: 2px solid #ccc;padding: 10px;
}
.app div{margin: 10px 0;
}
.app div button{margin-right: 8px;
}
</style>
App.vue
<template><div class="app"><BaseForm ref="baseForm"></BaseForm><button @click="handleGet">获取数据</button><button @click="handleReset">重置数据</button></div>
</template><script>
import BaseForm from './components/BaseForm.vue'
export default {data() {return {}},components: {BaseForm,},methods: {handleGet() {console.log(this.$refs.baseForm.getValues())},handleReset() {this.$refs.baseForm.resetValues()}}
}
</script><style>
</style>
效果:

5. Vue异步更新、$nextTick
$nextTick:等DOM更新后,才会触发执行此方法里的函数体
语法:this.$nextTick(函数体)
this.$nextTick(() => {// 业务逻辑
})
需求:编辑标题,编辑框自动聚焦
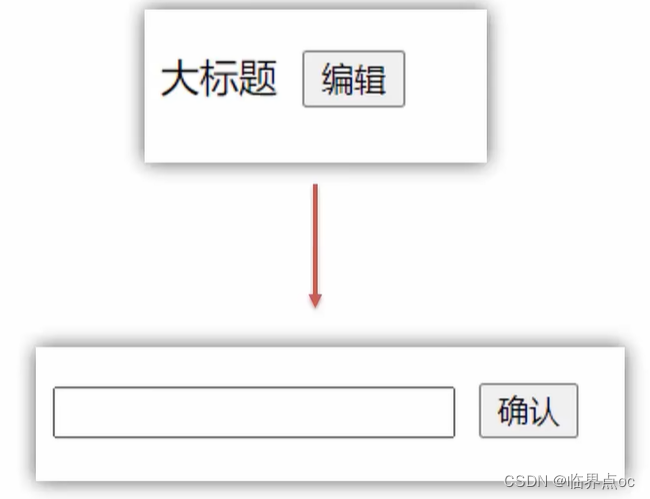
1. 点击编辑,显示编辑框
2. 让编辑框,立刻获取焦点
this.isShowEdit = true  // 显示输入框
this.$refs.inp.focus()  // 获取焦点
问题:”显示之后“,立刻获取焦点是不能成功的!
原因:Vue是异步更新DOM(提升性能)
this.$nextTick(() => {this.$refs.inp.focus()
})
示例代码:
App.vue
<template><div class="app"><div v-if="isShowEdit"><input type="text" v-model="editValue" ref="inp" /><button>确认</button></div><div v-else><span>{{ title }}</span><button @click="handleEdit">编辑</button></div></div>
</template><script>
export default {data() {return {title: '大标题',isShowEdit: false,editValue: '',}},methods: {handleEdit() {// 1. 显示输入框(异步DOM更新)this.isShowEdit = true// 2. 让输入框 获取焦点($nextTick等DOM更新完, 立刻去执行指定的函数体)this.$nextTick(() => {this.$refs.inp.focus()})}},
}
</script><style>
</style>
效果:点击编辑后,显示输入框,并获取焦点

相关文章:
Vue从入门到实战Day04
一、组件的三大组成部分(结构/样式/逻辑) 1. scoped样式冲突 默认情况:写在组件中的样式会全局生效 -> 因此很容易造成多个组件之间的样式冲突问题。 1. 全局样式:默认组件中的样式会作用到全局 2. 局部样式:可以…...
Linux学习笔记:信号
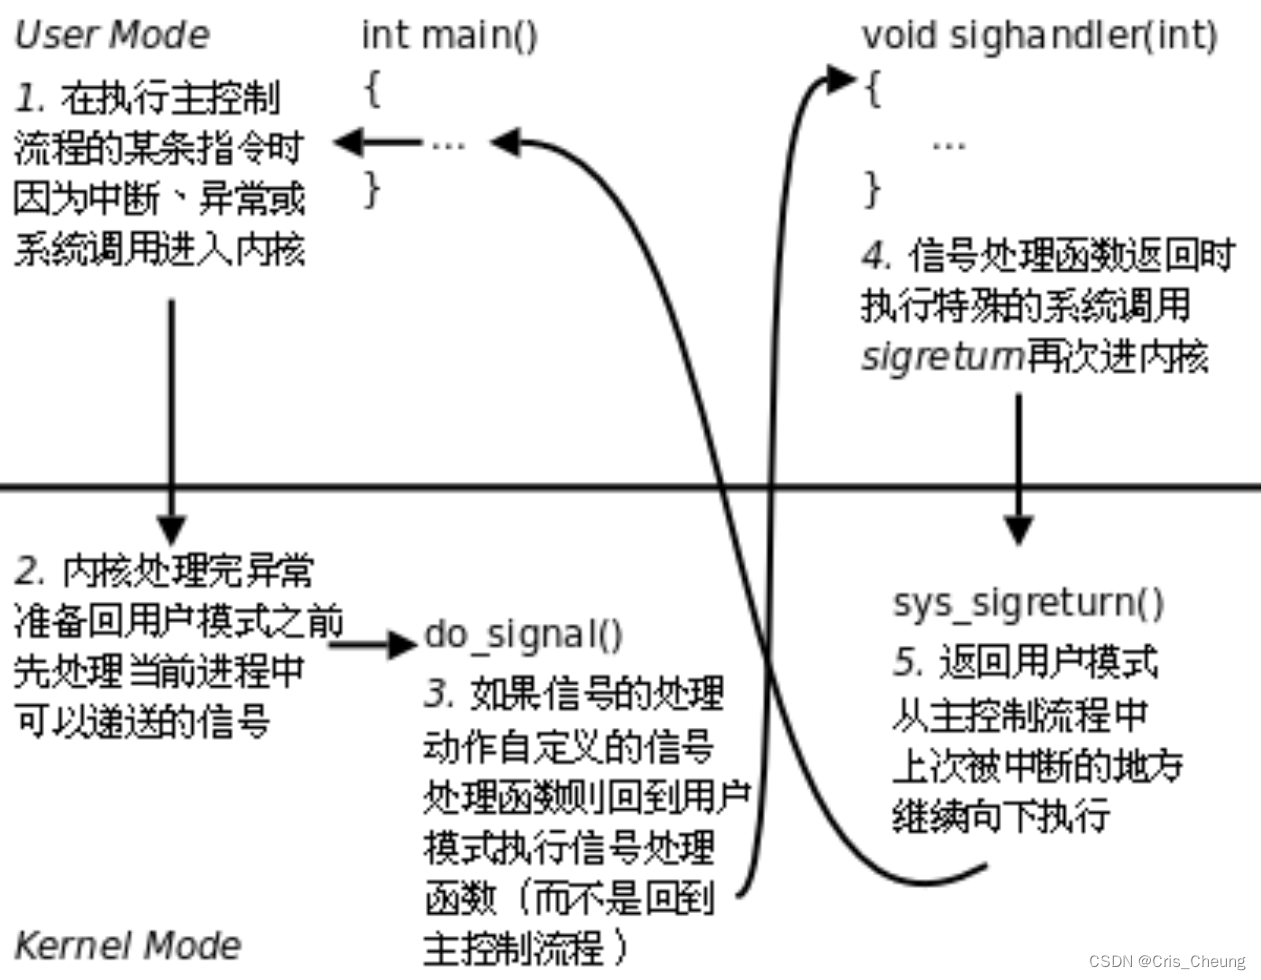
信号 在Linux中什么是信号信号的产生方式硬件产生的信号软件产生的信号异常产生的信号 进程对信号的处理信号的保存信号方法更改函数signal信号处理的更改恢复默认信号忽略 信号的管理信号集 sigset_t对信号集的操作 信号的捕捉过程 在Linux中什么是信号 在 Linux 系统中&…...

C#中的隐式类型转换和显式类型转换
在C#中,类型转换分为隐式类型转换(Implicit Type Conversion)和显式类型转换(Explicit Type Conversion),也称为隐式转换和强制转换。 隐式类型转换(Implicit Type Conversion) 隐…...

linux上如何排查JVM内存过高?
在Linux上排查JVM内存过高的问题,可以采用以下几种方法: 1. **使用top命令查看进程**:通过top命令可以观察到系统中资源占用情况,包括CPU和内存。当收到内存过高的报警时,可以使用top命令来查看是哪个进程的内存使用率…...
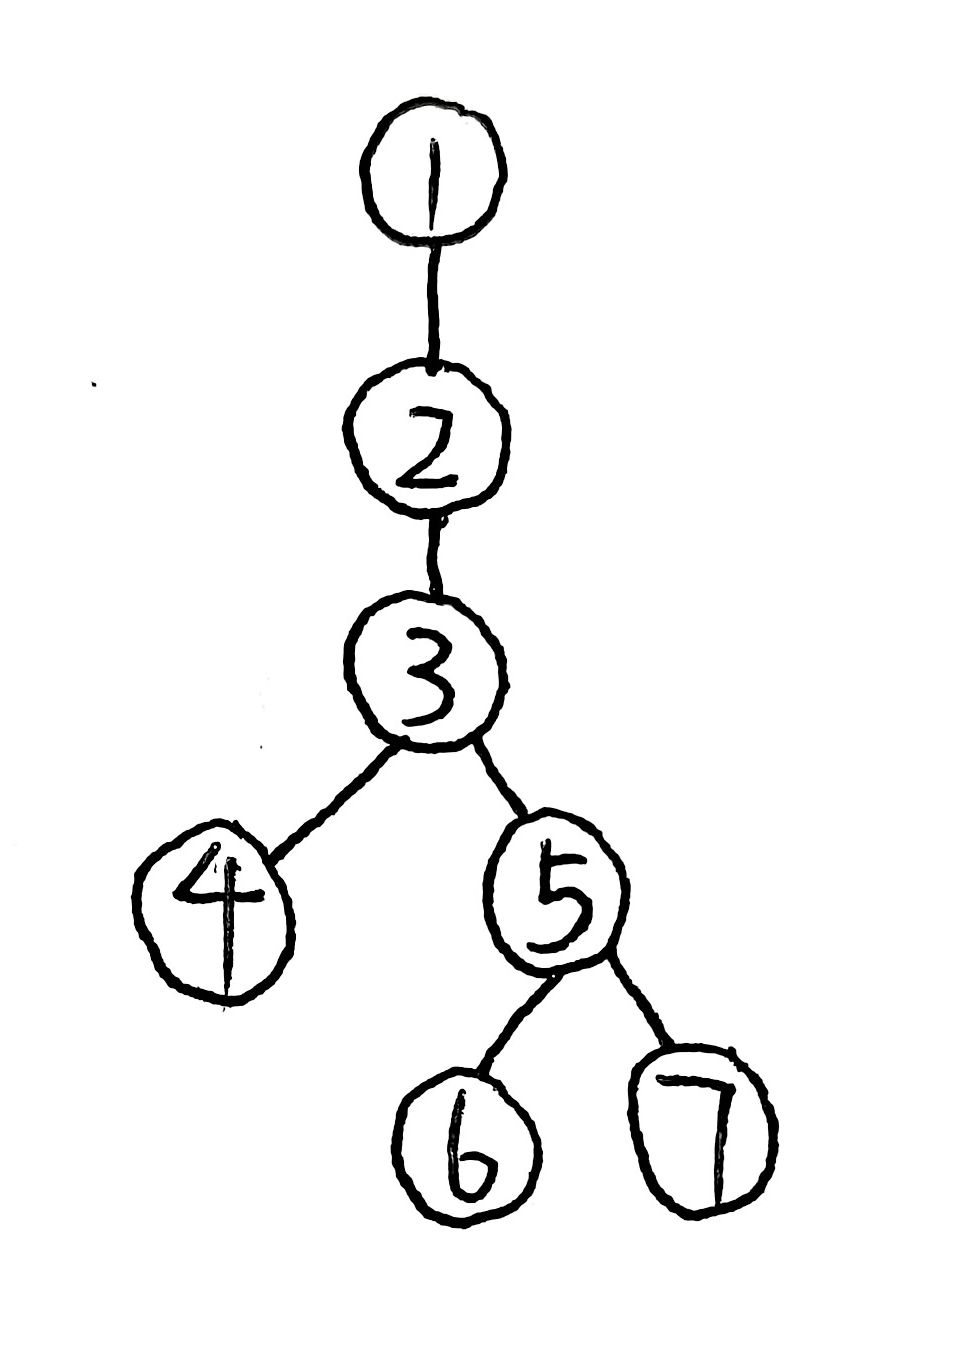
第四届上海理工大学程序设计全国挑战赛 J.上学 题解 DFS 容斥
上学 题目描述 usst 小学里有 n 名学生,他们分别居住在 n 个地点,第 i 名学生居住在第 i 个地点,这些地点由 n−1 条双向道路连接,保证任意两个地点之间可以通过若干条双向道路抵达。学校则位于另外的第 0 个地点,第…...
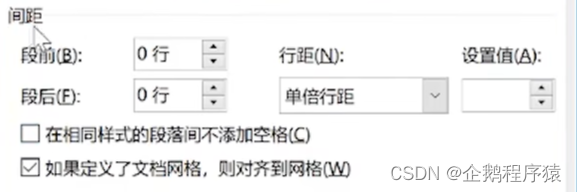
word-排版文本基本格式
1、文本的基本格式:字体格式、段落格式 2、段落:word排版的基本控制单位 3、每敲一次回车,为一个段落标记,注意区分换行符和段落标记,换行符为指向下的箭头,段落标记为带拐弯的箭头,换行符&…...
)
目标检测YOLO实战应用案例100讲-无监督领域自适应目标检测方法研究与应用(五)
目录 多源无监督领域自适应目标检测方法 4.1研究现状及问题形成 4.2相关工作详述...
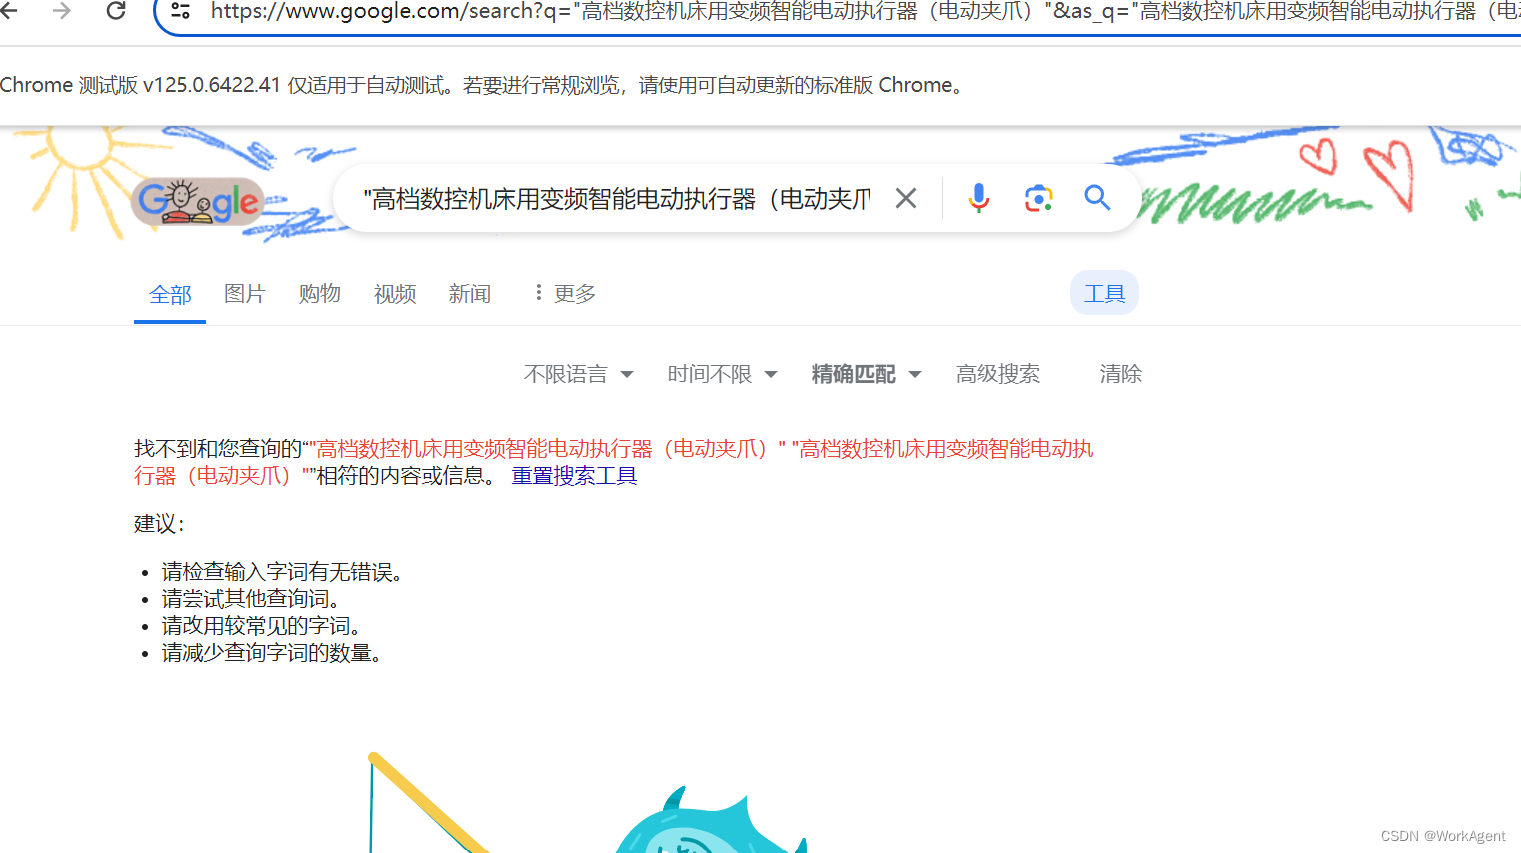
通过python实现Google的精准搜索
问题背景: 我想通过Google或者其他网站通过精准搜索确认该产品是否存在,但是即使该产品不存在Google也会返回一些相关的url链接,现在想通过python实现搜索结果的精准匹配以确认该产品是否为正确的名称【可以通过google搜索到,如果…...
Nios-II编程入门实验
文章目录 一 Verilog实现流水灯二 Nios实现流水灯2.1 创建项目2.2 SOPC添加模块2.3 SOPC输入输出连接2.4 Generate2.5 软件部分2.6 运行结果 三 Verilog实现串口3.1 代码3.2 引脚3.3 效果 四 Nios2实现串口4.1 sopc硬件设计4.2 top文件4.3 软件代码4.4 实现效果 五 参考资料六 …...
从0开始学python(七)
目录 前言 1 break、continue和pass函数 1.1 break 1.2 continue 1.3 pass 2、序列的索引及切片操作 2.1字符串的索引和切片 2.1.1 字符串索引 2.1.2 字符串切片 总结 前言 上一篇文章我们介绍了python中的循环结构,包括for和while的使用。本章接着往下讲。…...

【二叉树算法题记录】404. 左叶子之和
题目描述 给定二叉树的根节点 root ,返回所有左叶子之和。 题目分析 其实这题无论是迭代法还是递归法,最重要的是要明确判断左叶子的条件:当前节点有左孩子,且这个左孩子没有它的左孩子和右孩子。 迭代法 感觉只要二叉树相关…...
面试集中营—Spring篇
Spring 框架的好处 1、轻量:spring是轻量的,基本的版本大约2MB; 2、IOC:控制反转,Spring的IOC机制使得对象之间的依赖不再需要我们自己来控制了,而是由容易来控制,一个字:爽…...
Lia 原理
训练阶段 论文流程: 具体实现: 通过latent space传递运动信息,实现分两部分。 1)image space->latent space 将源图像映射到隐空间编码。X_s (source image )映射到编码Z_sr,通过W_rd方向上的变化,得到新的编码Z…...

文本批量操作技巧:内容查找不再繁琐,自动化批量移动至指定文件夹
在文本处理和信息管理的日常工作中,我们经常需要处理大量的文件和数据。面对这些海量的信息,如何快速而准确地查找特定的内容,并将它们批量移动至指定的文件夹,成为了一项关键的技能。本文将介绍办公提效工具一些实用的文本批量操…...

[数据结构]动画详解单链表
💖💖💖欢迎来到我的博客,我是anmory💖💖💖 又和大家见面了 欢迎来到动画详解数据结构系列 用通俗易懂的动画的动画使数据结构可视化 先来自我推荐一波 个人网站欢迎访问以及捐款 推荐阅读 如何低…...
图片批量管理迈入智能新时代:一键输入关键词,自动生成并保存惊艳图片,轻松开启创意之旅!
在数字化时代,图片已成为我们表达创意、记录生活、传递信息的重要工具。然而,随着图片数量的不断增加,如何高效、便捷地管理这些图片,却成为了一个令人头疼的问题。 第一步,进入首助编辑高手主页面,在上方…...
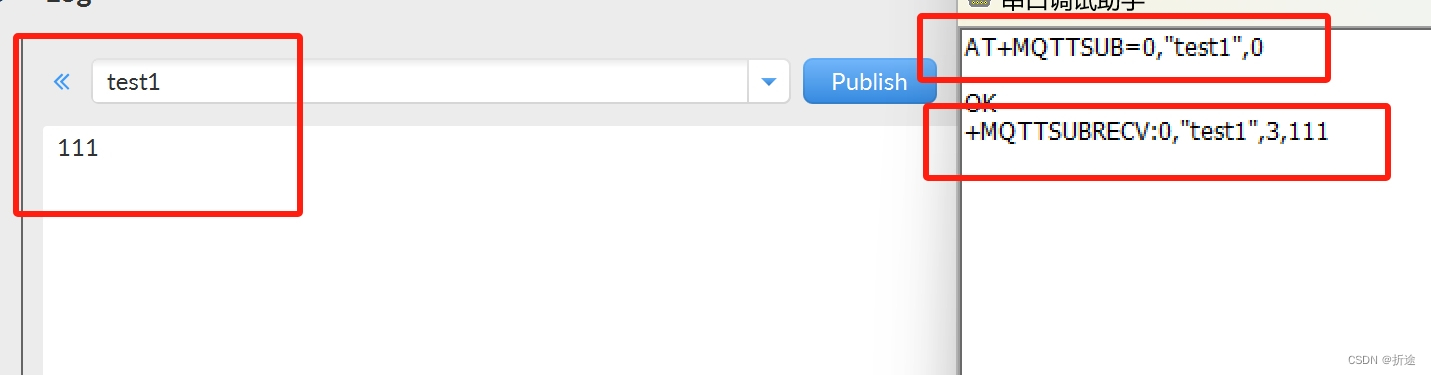
【硬件模块】ESP-01SWiFi模块基于AT指令详解(WiFi,TCP/IP,MQTT)
ESP-01S ESP-01S是由安信可科技开发的一款Wi-Fi模块。其核心处理器是ESP8266,该处理器在较小尺寸的封装中集成了业界领先的Tensilica L106超低功耗32位微型MCU,带有16位精简模式,主频支持80MHz和160MHz,并集成了Wi-Fi MAC/BB/RF/P…...
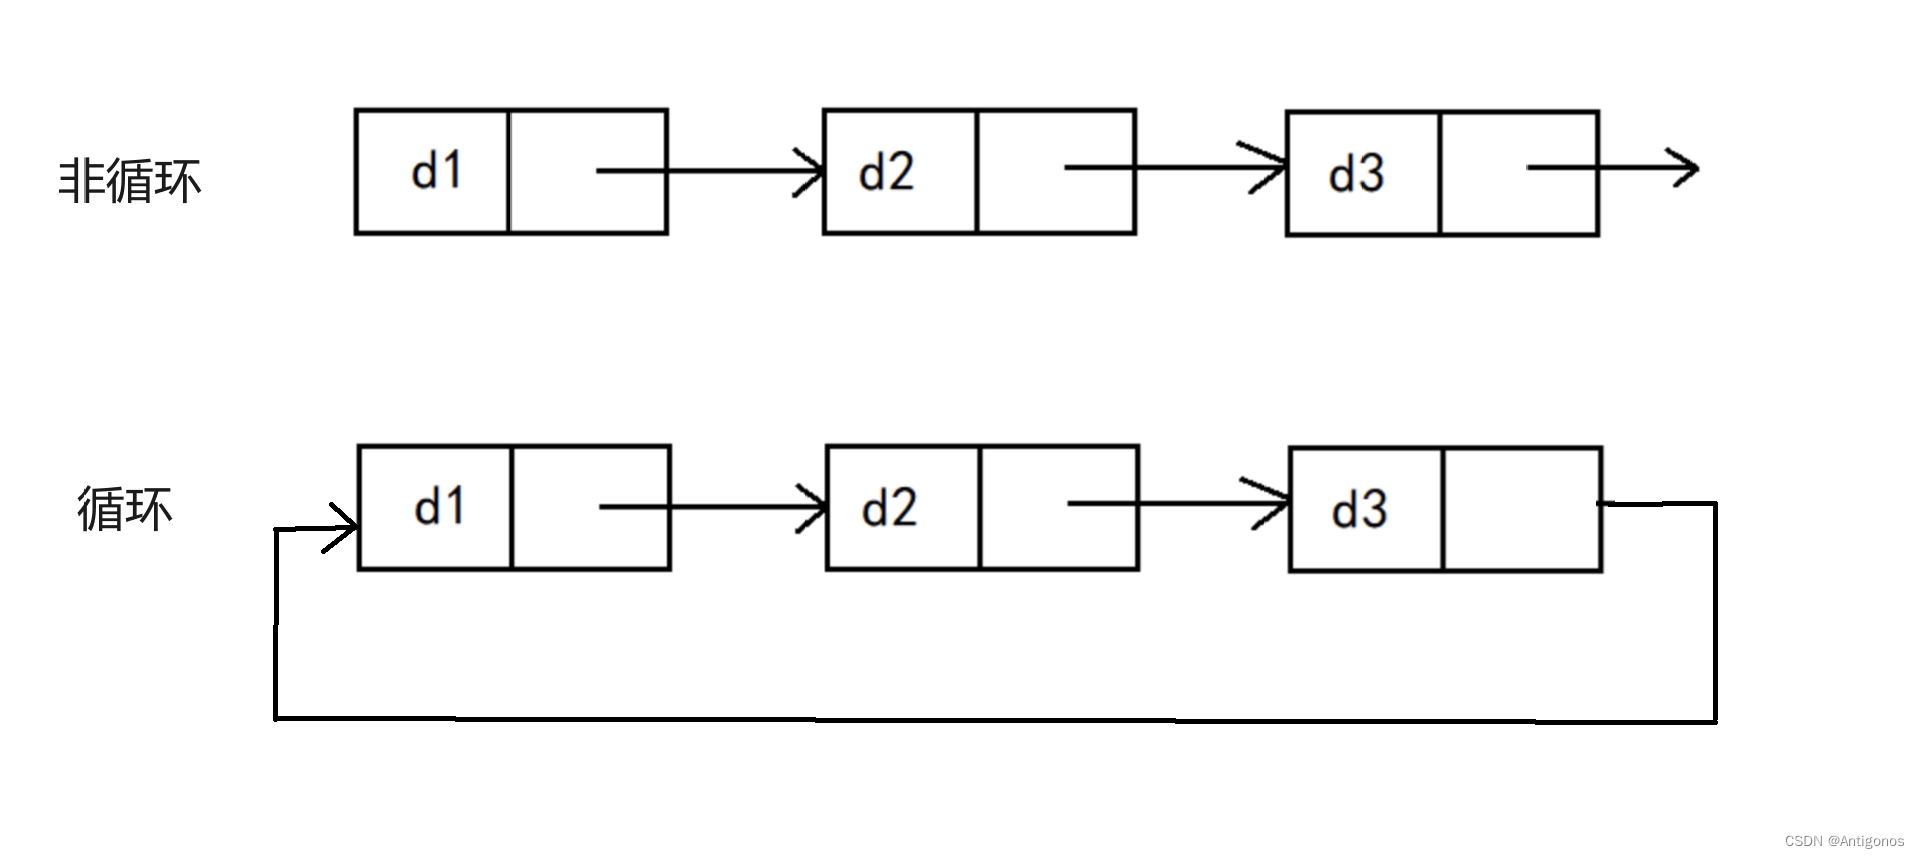
数据结构之单单单——链表
目录 一.链表 1)链表的概念 2)链表的结构 二.单链表的实现 三.链表的分类 1)单向或者双向 2)带头或不带头 3)循环或非循环 一.链表 1)链表的概念 链表(Linked List)是一种…...

【Linux笔记】 基础指令(二)
风住尘香花已尽 日晚倦梳头 重命名、剪切指令 -- mv 简介: mv 命令是 move 的缩写,可以用来移动文件或者将文件改名,是 Linux 系统下常用的命令,经常用来备份文件或者目录 语法: mv [选项] 源文件或目录 目标文件或目录…...
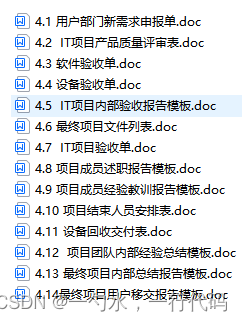
软件全套资料梳理(需求、开发、实施、运维、安全、测试、交付、认证、评审、投标等)
软件全套精华资料包清单部分文件列表: 工作安排任务书,可行性分析报告,立项申请审批表,产品需求规格说明书,需求调研计划,用户需求调查单,用户需求说明书,概要设计说明书,…...
)
Delphi 终极实战:将自定义控件打包成 BPL,安装到 Delphi 工具栏(组件库实战)
前面我们手写了专属 UI 组件库(MyUIClass.pas),但如果你想在以后的项目中一键调用这些控件,而不是每次都复制粘贴代码,那就必须将它们打包成 Delphi 组件包(BPL 文件)。学会这篇,你将…...

大模型应用开发:从Demo到生产,小白程序员必看!收藏这份实战指南
本文深入剖析了将大模型应用从原型阶段推向生产环境所面临的关键挑战,涵盖数据处理(格式多样性、切块策略、数据更新)、检索质量(找不到、找不准、找太多)、生成阶段(幻觉、引用溯源)、规模化工…...

终极指南:如何在macOS上打造智能桌面歌词显示体验
终极指南:如何在macOS上打造智能桌面歌词显示体验 【免费下载链接】Lyrics Swift-based iTunes plug-in to display lyrics on the desktop. 项目地址: https://gitcode.com/gh_mirrors/lyr/Lyrics LyricsX是一款专为macOS用户设计的桌面歌词显示工具&#x…...

别再只看灰度图了!用功率谱给你的AI生成图像质量把把脉
功率谱分析:AI生成图像质量评估的隐藏利器 当我们在评估AI生成的图像时,常常会陷入主观判断的陷阱——肉眼观察虽然直观,但缺乏量化标准。而功率谱分析这一源自信号处理的技术,正悄然成为AI图像质量评估领域的一把精准尺子。不同于…...

提升开发效率与视觉舒适度:LxgwWenKai字体全场景配置指南
提升开发效率与视觉舒适度:LxgwWenKai字体全场景配置指南 【免费下载链接】LxgwWenKai LxgwWenKai: 这是一个开源的中文字体项目,提供了多种版本的字体文件,适用于不同的使用场景,包括屏幕阅读、轻便版、GB规范字形和TC旧字形版。…...

5维精准配准:医学影像分析的SyN算法实践指南
5维精准配准:医学影像分析的SyN算法实践指南 【免费下载链接】ANTs Advanced Normalization Tools (ANTs) 项目地址: https://gitcode.com/gh_mirrors/ant/ANTs 医学影像分析中,不同设备、不同时间采集的图像往往存在空间差异,如何实…...

什么是分段锁
面试 线程只锁自己要用的那一段代码,不同段可以同时操作。这样可以减少锁竞争、提高并发。...

天理与上帝——东西情理的源初图腾
天理与上帝——东西情理的源初图腾---摘要东西方文明在情理结构的根本差异,可以追溯到各自的“源初图腾”——天理与上帝。本文基于AI元人文“自感痕迹论”的框架,将天理与上帝重新理解为两种不同的“源初痕迹”或“自感显影的定向模式”。天理是“天人合…...

5倍效率提升:GIMP批量图像处理插件BIMP全攻略
5倍效率提升:GIMP批量图像处理插件BIMP全攻略 【免费下载链接】gimp-plugin-bimp 项目地址: https://gitcode.com/gh_mirrors/gi/gimp-plugin-bimp 在数字内容创作领域,批量图像处理是提升效率的关键环节。GIMP作为免费开源的图像编辑软件&#…...

3个关键步骤:Smiley Sans字体技术优化指南
3个关键步骤:Smiley Sans字体技术优化指南 【免费下载链接】smiley-sans 得意黑 Smiley Sans:一款在人文观感和几何特征中寻找平衡的中文黑体 项目地址: https://gitcode.com/gh_mirrors/smi/smiley-sans 在当今数字化时代,网页性能直…...