【B站 heima】小兔鲜Vue3 项目学习笔记Day02
文章目录
- Pinia
- 1.使用
- 2. pinia-计数器案例
- 3. getters实现
- 4. 异步action
- 5. storeToRefsx 数据解构保持响应式
- 6. pinia 调试
- 项目起步
- 1.项目初始化和git管理
- 2. 使用ElementPlus
- 3. ElementPlus 主题色定制
- 4. axios 基础配置
- 5. 路由设计
- 6. 静态资源初始化和 Error lens安装
- 7.scss自动导入
- 8. Layout静态模板结构搭建
- 9. Layout字体图标引入
- 10.Layout一级导航渲染
- 11. layout - 吸顶导航
- 12. layout - Pinia优化重复请求
- 小结
Pinia
1.使用
vue专属状态管理库,vuex的替代
优势:
- 提供了更简单的
API,去掉了mutation - 提供了组合式
API - 去掉了
modules,每个store都是独立的模块 - 搭配
TS一起使用提供可靠的类型判断
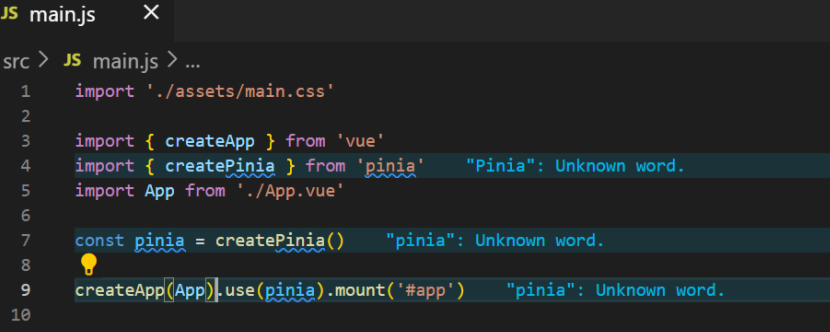
Pinia添加到vue项目中:
- 创建一个新
vue项目:create init vue@latest,装依赖,项目跑起来 - 打开
pinia官方文档,是个小菠萝。点击开始,有个安装选项

- 我是使用
npm安装:npm install pinia
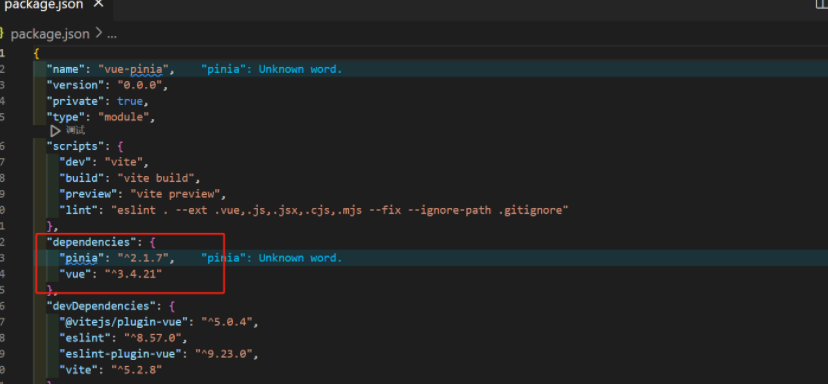
- 按照文档使用 pinia
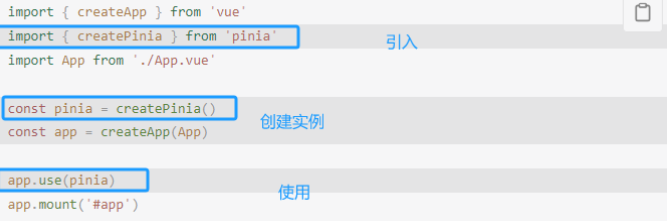
- 在项目中实际应用(记不住看文档使用即可
2. pinia-计数器案例
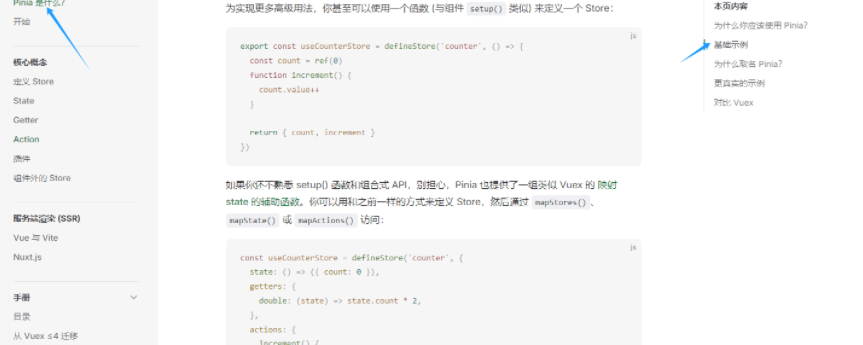
看官方文档的基础实例学习如何使用
找和vue3语法相似的语法进行使用
- 创建一个
store( state+action )
在src添加一个stores文件夹,新建文件counter.js
//counter.js
// 导入一个方法 defineStore
import { defineStore } from 'pinia'
import {ref} form 'vue'// 参数:标识 回调函数
//!!变量名字需保持规范:use+函数名
//useCounterStore是一个方法,需执行才能得到真是store实例对象
export const useCounterStore = defineStore('counter', () => {//1.定义数据stateconst count = ref(0)// 2.定义修改数据的方法(action 同步+异步)const increment = () => {count.value++}// 3.以对象的方式return供组件使用return {count,increment}
})- 组件使用
store
<script setup>
//1.导入use 打头的方法
import { useCounterStore } from './stores/counter';
//2.执行方法获得store实例对象
const counterStore = useCounterStore();
// console.log(counterStore)  打印看看里面是否有count和increment
</script><template><button @click="counterStore.increment">{{ counterStore.count }}</button>
</template>
3. getters实现
pinia中的getters直接使用computed函数进行模拟
//counter.js
// 导入一个方法 defineStore
import { defineStore } from 'pinia'
import { computed, ref } from 'vue'//定义并暴露一个函数useCounterStore 参数:标识 回调函数
export const useCounterStore = defineStore('counter', () => {//1.定义数据stateconst count = ref(0)// 2.定义修改数据的方法(action 同步+异步)const increment = () => {count.value++}// --  --  getters实现  --   --const doubleCount = computed(() => count.value * 2)// 3.以对象的方式return供组件使用return {count,increment,doubleCount}
})
这时useCountStore中就有了doubleCount这个方法了
<!--App.vue-->
<template><button @click="counterStore.increment">{{ counterStore.count }}</button>{{ counterStore.doubleCount }}
</template>

4. 异步action
action中实现异步和组件中定义数据和方法的风格完全一致
安装axios: npm install axios
举个获取数据列表 的栗子,获取数据接口地址:http://geek.itheima.net/v1_0/channels
//counter.jsconst list = ref([])  //存放列表数据
//异步actionconst getList = async () => {const res = await axios.get('http://geek.itheima.net/v1_0/channels');}//返回,让组件可以拿到return{list,getList}
<script setup>
//1.导入use 打头的方法
import { onMounted } from 'vue';
import { useCounterStore } from './stores/counter';
//2.执行方法获得store实例对象
const counterStore = useCounterStore();
// console.log(counterStore)
onMounted(() => {//获取数据counterStore.getList()
})
</script>
看一下网页的网络
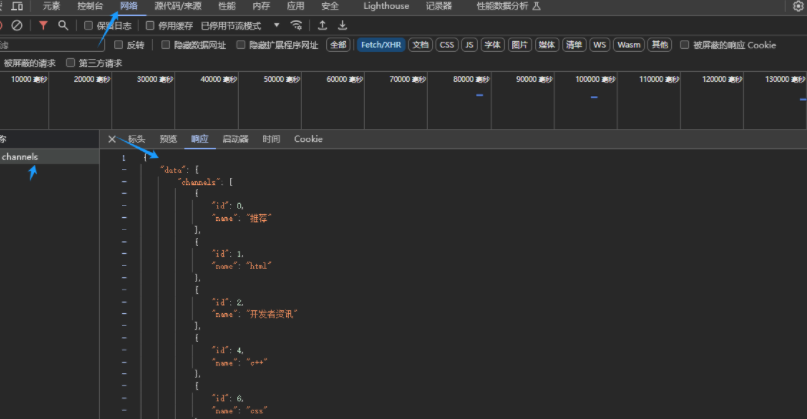
给list赋值
//异步actionconst getList = async () => {const res = await axios.get('http://geek.itheima.net/v1_0/channels');list.value = res.data.data.channels}
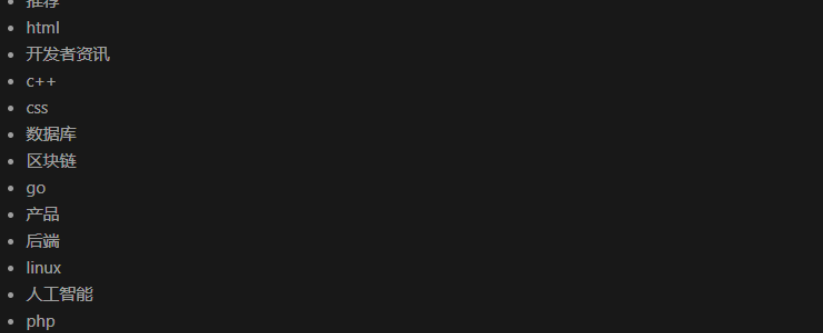
渲染在页面上,使用v-for
<template><button @click="counterStore.increment">{{ counterStore.count }}</button>{{ counterStore.doubleCount }}<ul><li v-for="item in counterStore.list" :key="item.id">{{ item.name }}</li></ul>
</template>
效果:
5. storeToRefsx 数据解构保持响应式
辅助保持数据(state+getter)的响应式解构
方法可以正常解构赋值哈
const {count,doubleCount} = counterStore
这样解构是不可以的,会造成响应式丢失,也就是数据变化页面不会更新。
我们可以这样写:
const {count,doubleCount} = storeToRefs(counterStore);
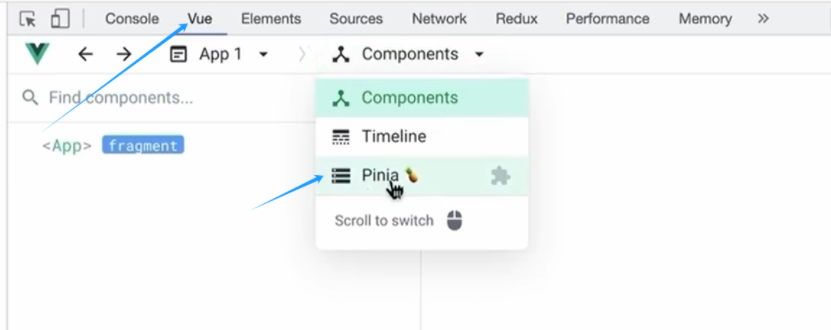
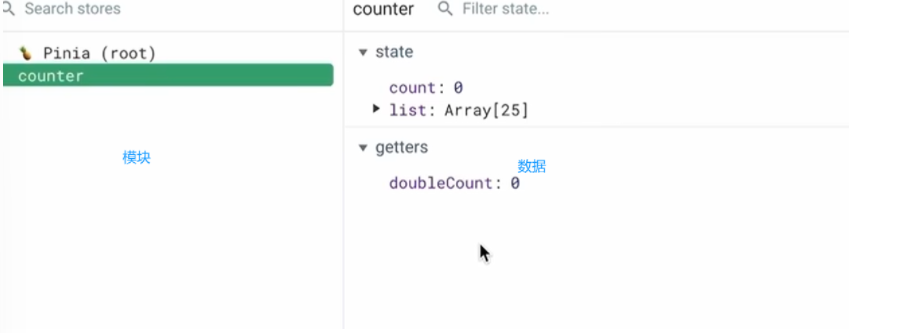
6. pinia 调试
使用之前使用的devtools调试工具
项目起步
1.项目初始化和git管理
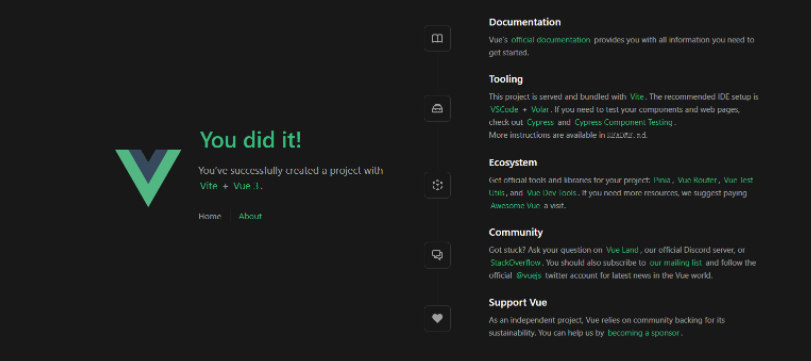
创建并打开,将项目运行起来(按照绿色的来做):
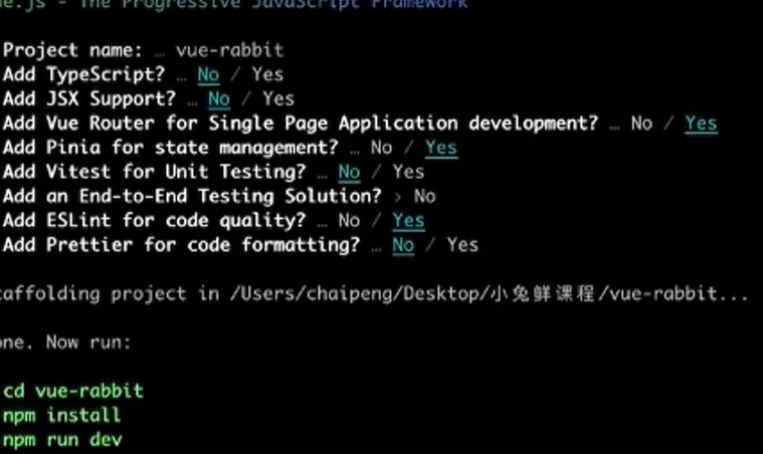
这样说明成功
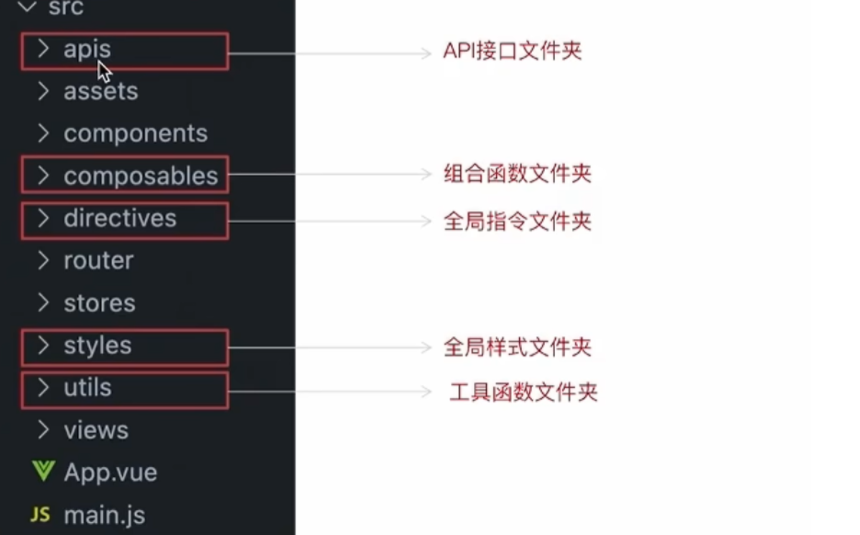
下面我们看一下 小兔鲜 需要哪些基础目录,
我们按照下面的图片在刚创建好的项目中创建文件夹。
componsables组合函数文件夹:存放通用的函数
使用git管理项目,手动初始化
执行命令并完成手动提交
git init
git add .
git commit -m "init"
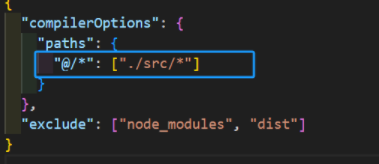
配置别名路径联想提示
编写代码,一旦输入
@/,vscode会立刻联想出src所有的子目录和文件,统一文件路径,不容易出错。步骤:1.根目录新增
jsconfig.json文件 2.添加配置项
2. 使用ElementPlus
我们在这个项目中使用了通用性组件,由ElementPlus提供
步骤:安装 - 按需引入 - 测试组件
看文档
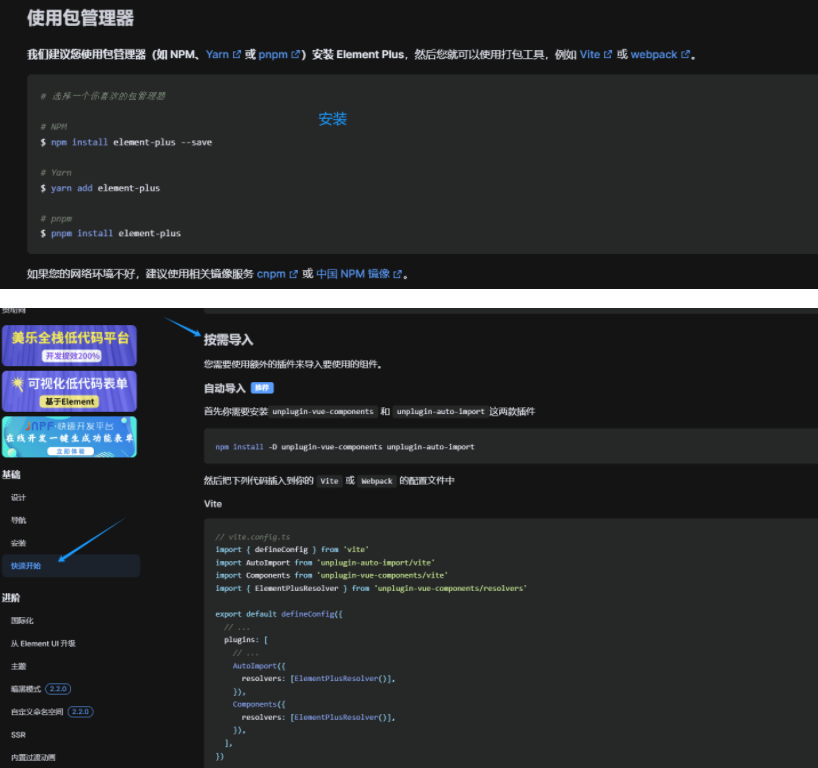
安装elementPlus:npm install element-plus --save
安装两个插件:npm install -D unplugin-vue-components unplugin-auto-import
安装之后我们来依照文档配置这两个插件
//vite.config.js//按需导入element Plus插件
import AutoImport from 'unplugin-auto-import/vite'
import Components from 'unplugin-vue-components/vite'
import { ElementPlusResolver } from 'unplugin-vue-components/resolvers'// https://vitejs.dev/config/
export default defineConfig({plugins: [  //插件配置文件vue(),//elementPlus插件AutoImport({resolvers: [ElementPlusResolver()],}),Components({resolvers: [ElementPlusResolver()],}),],
配置文件写好后,重启项目
做个测试,看看组件能不能使用
<template><el-button type="primary">elementPlus</el-button>
</template>

生效就OK
3. ElementPlus 主题色定制
小免鲜主题色和elementPlus默认的主题色存在冲突
通过定制主题让elementPlus的主题色和小兔鲜项目保持一致
步骤:
-
安装sass:
npm i sass -D

-
准备定制文件 :
styles/element/index.scss
/* 只需要重写你需要的即可 */
@forward 'element-plus/theme-chalk/src/common/var.scss' with ($colors: ('primary': (// 主色'base': #27ba9b,),'success': (// 成功色'base': #1dc779,),'warning': (// 警告色'base': #ffb302,),'danger': (// 危险色'base': #e26237,),'error': (// 错误色'base': #cf4444,),)
)
- 对
ElementPlus样式进行覆盖:通知Element使用scss语言,自动导入定制的scss文件覆盖。
//vite.config.jsimport { fileURLToPath, URL } from 'node:url'import { defineConfig } from 'vite'
import vue from '@vitejs/plugin-vue'//按需导入element Plus插件
import AutoImport from 'unplugin-auto-import/vite'
import Components from 'unplugin-vue-components/vite'
import { ElementPlusResolver } from 'unplugin-vue-components/resolvers'// https://vitejs.dev/config/
export default defineConfig({plugins: [  //插件配置文件vue(),//elementPlus插件AutoImport({// 1.配置elementPlus采用sass样式配色系统resolvers: [ElementPlusResolver()],}),Components({resolvers: [ElementPlusResolver({ importStyle: 'sass' })],}),],resolve: {alias: {'@': fileURLToPath(new URL('./src', import.meta.url))}},css: {preprocessorOptions: {scss: {//2.自动导入定制化样式文件进行样式覆盖additionalData: `@use "@/styles/element/index.scss" as *;`}}}
})
4. axios 基础配置
安装:npm i axios
配置基础实例(统一接口实例)
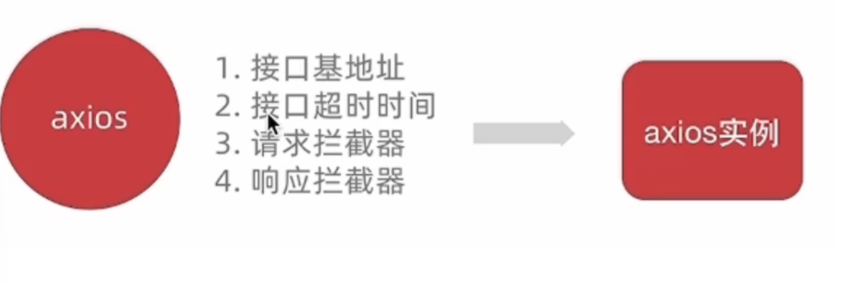
在utils创建一个http.js
//axios基础封装
import axios from "axios";const httpInstance = axios.create({baseURL: 'http://pcapi-xiaotuxian-front-devtest.itheima.net',timeout: '5000'           //5s
})//拦截器,默认先这样写着,后面有需求再配置
// axios请求拦截器
instance.interceptors.request.use(config => {return config
}, e => Promise.reject(e))// axios响应式拦截器
instance.interceptors.response.use(res => res.data, e => {return Promise.reject(e)
})export default httpInstance
扩展:如果项目里面不同的业务模块需要的接口基地址不同,该如何来做?
答:
axios.create()方法可以执行多次,每次执行就会生成一个新
的实例const http1 = axios.create({baseURL:'url1'}) const http1 = axios.create({baseURL:'url2'})
5. 路由设计
-
设计首页和登录页的路由(一级路由)
路由设计规则:找内容切换的区域,如果是页面整体切换,则为一级路由
eslintrc.cjs配置,避免命名报错:
/* eslint-env node */
module.exports = {root: true,'extends': ['plugin:vue/vue3-essential','eslint:recommended'],parserOptions: {ecmaVersion: 'latest'},rules: {'vue/multi-word-component-names':0, //不再强制要求组件命名}
}
删除views文件夹下的组件,创建两个新文件夹Login和Layout,分别创建一个index.vue文件,写入一些代码。
<template>
<h2>我是注册页/首页</h2>
</template>
打开router文件夹的index.js,删掉默认的代码。导入login和layout组件,在routes中配置path、component属性
import { createRouter, createWebHistory } from 'vue-router'
import Login from '@/views/Login/index.vue'
import Layout from '@/views/Layout/index.vue'
// createRouter:创建router实例对象
// createWebHistory:创建history模式的路由const router = createRouter({history: createWebHistory(import.meta.env.BASE_URL),routes: [{path: '/',component: Layout},{path: '
App.vue中写入一级路由出口组件
<script setup>
import { RouterLink, RouterView } from 'vue-router'</script><template><!-- 一级路由出口组件 --><RouterView />
</template>
项目运行效果:
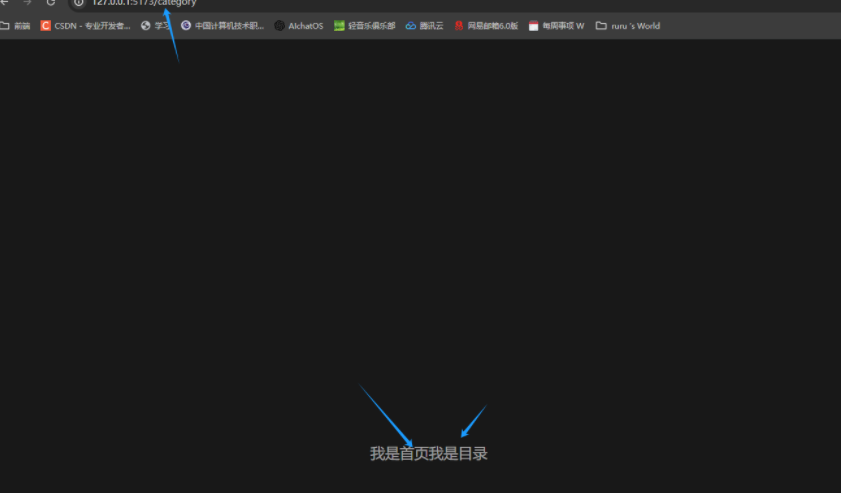
- 设计分类页和默认
Home页路由(二级路由)
路由设计原则:找内容切换的区域,如果是在一级路由页的内部切换,则为二级路由
和上面一样,在views新增两个文件夹,一个Home,一个Category,分别创建一个index.vue,随便写点内容
//router index.js
import { createRouter, createWebHistory } from 'vue-router'
import Login from '@/views/Login/index.vue'
import Layout from '@/views/Layout/index.vue'
import Home from '@/views/Home/index.vue'
import Category from '@/views/Category/index.vue'
// createRouter:创建router实例对象
// createWebHistory:创建history模式的路由const router = createRouter({history: createWebHistory(import.meta.env.BASE_URL),routes: [{path: '/',component: Layout,children: [{path: '',component: Home},{path: 'category',component: Category}]},{path: '/login',component: Login}]
})export default router这两个二级路由要在Layout组件里给准备路由出口
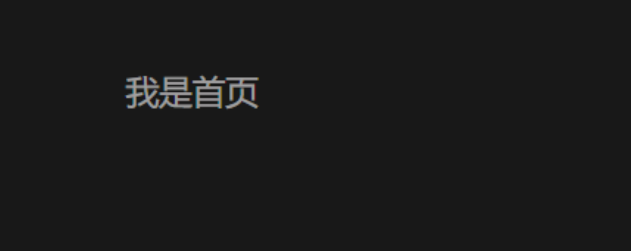
<!--Layout index.vue-->
<template><h2>我是首页</h2><!-- 二级路由出口 --><RouterView />
</template>
效果:
6. 静态资源初始化和 Error lens安装
图片资源 - 把images文件夹放到assets目录下
样式资源 - 把common.scss文件放到styles目录下(这个文件在资源里面,自己拿)。
在main.js中引入common.scss
//main.js
//引入初始化样式文件
import '@/styles/common.scss'
error lens是一个实时提供错误警告信息的VScode插件,方便开发,在扩展程序里搜索然后安装就可以了。
7.scss自动导入
在项目里一些组件共享的色值会以scss变量的方式统一放到一个名为var.scss 的文件中。
正常组件中使用,需要先导入scss文件,再使用内部的变量,比较繁琐,自动导入可以免去手动导入的步骤,直接使用内部的变量。
配置步骤:
- 新增一个
var.scss文件,存入色值变量
$xtxColor: #27ba9b;
$helpColor: #e26237;
$sucColor: #1dc779;
$warnColor: #ffb302;
$priceColor: #cf4444;
- 通过
vite.config.js配置自动导入文件
css: {preprocessorOptions: {scss: {//2.自动导入定制化样式文件进行样式覆盖additionalData: `@use "@/styles/element/index.scss" as *;@use "@/styles/var.scss" as *;`,}}}
8. Layout静态模板结构搭建
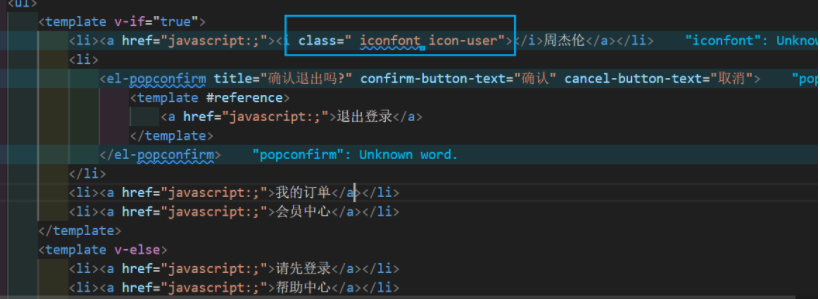
Layout文件夹创建一个components文件夹,创建LayoutFooter.vue、LayoutHeader.vue、LayoutNav.vue组件。
<!--LayoutNav.vue-->
<script setup></script><template><nav class="app-topnav"><div class="container"><ul><template v-if="true"><li><a href="javascript:;""><i class="iconfont icon-user"></i>周杰伦</a></li><li><el-popconfirm title="确认退出吗?" confirm-button-text="确认" cancel-button-text="取消"><template #reference><a href="javascript:;">退出登录</a></template></el-popconfirm></li><li><a href="javascript:;">我的订单</a></li><li><a href="javascript:;">会员中心</a></li></template><template v-else><li><a href="javascript:;">请先登录</a></li><li><a href="javascript:;">帮助中心</a></li><li><a href="javascript:;">关于我们</a></li></template></ul></div></nav>
</template><style scoped lang="scss">
.app-topnav {background: #333;ul {display: flex;height: 53px;justify-content: flex-end;align-items: center;li {a {padding: 0 15px;color: #cdcdcd;line-height: 1;display: inline-block;i {font-size: 14px;margin-right: 2px;}&:hover {color: $xtxColor;}}~li {a {border-left: 2px solid #666;}}}}
}
</style>
<!--LayoutHeader.vue-->
<script setup></script><template><header class='app-header'><div class="container"><h1 class="logo"><RouterLink to="/">小兔鲜</RouterLink></h1><ul class="app-header-nav"><li class="home"><RouterLink to="/">首页</RouterLink></li><li> <RouterLink to="/">居家</RouterLink> </li><li> <RouterLink to="/">美食</RouterLink> </li><li> <RouterLink to="/">服饰</RouterLink> </li></ul><div class="search"><i class="iconfont icon-search"></i><input type="text" placeholder="搜一搜"></div><!-- 头部购物车 --></div></header>
</template><style scoped lang='scss'>
.app-header {background: #fff;.container {display: flex;align-items: center;}.logo {width: 200px;a {display: block;height: 132px;width: 100%;text-indent: -9999px;background: url('@/assets/images/logo.png') no-repeat center 18px / contain;}}.app-header-nav {width: 820px;display: flex;padding-left: 40px;position: relative;z-index: 998;li {margin-right: 40px;width: 38px;text-align: center;a {font-size: 16px;line-height: 32px;height: 32px;display: inline-block;&:hover {color: $xtxColor;border-bottom: 1px solid $xtxColor;}}.active {color: $xtxColor;border-bottom: 1px solid $xtxColor;}}}.search {width: 170px;height: 32px;position: relative;border-bottom: 1px solid #e7e7e7;line-height: 32px;.icon-search {font-size: 18px;margin-left: 5px;}input {width: 140px;padding-left: 5px;color: #666;}}.cart {width: 50px;.curr {height: 32px;line-height: 32px;text-align: center;position: relative;display: block;.icon-cart {font-size: 22px;}em {font-style: normal;position: absolute;right: 0;top: 0;padding: 1px 6px;line-height: 1;background: $helpColor;color: #fff;font-size: 12px;border-radius: 10px;font-family: Arial;}}}
}
</style>
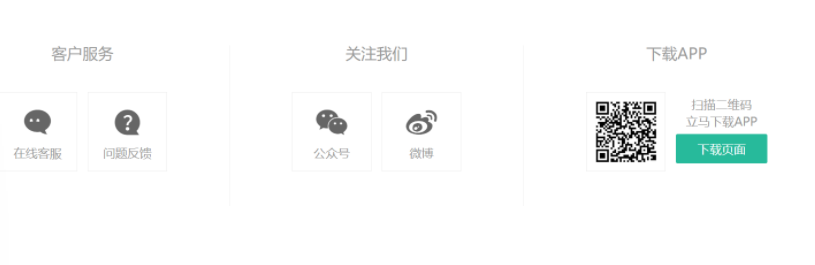
<!--LayoutFooter.vue-->
<template><footer class="app_footer"><!-- 联系我们 --><div class="contact"><div class="container"><dl><dt>客户服务</dt><dd><i class="iconfont icon-kefu"></i> 在线客服</dd><dd><i class="iconfont icon-question"></i> 问题反馈</dd></dl><dl><dt>关注我们</dt><dd><i class="iconfont icon-weixin"></i> 公众号</dd><dd><i class="iconfont icon-weibo"></i> 微博</dd></dl><dl><dt>下载APP</dt><dd class="qrcode"><img src="@/assets/images/qrcode.jpg" /></dd><dd class="download"><span>扫描二维码</span><span>立马下载APP</span><a href="javascript:;">下载页面</a></dd></dl><dl><dt>服务热线</dt><dd class="hotline">400-0000-000 <small>周一至周日 8:00-18:00</small></dd></dl></div></div><!-- 其它 --><div class="extra"><div class="container"><div class="slogan"><a href="javascript:;"><i class="iconfont icon-footer01"></i><span>价格亲民</span></a><a href="javascript:;"><i class="iconfont icon-footer02"></i><span>物流快捷</span></a><a href="javascript:;"><i class="iconfont icon-footer03"></i><span>品质新鲜</span></a></div><!-- 版权信息 --><div class="copyright"><p><a href="javascript:;">关于我们</a><a href="javascript:;">帮助中心</a><a href="javascript:;">售后服务</a><a href="javascript:;">配送与验收</a><a href="javascript:;">商务合作</a><a href="javascript:;">搜索推荐</a><a href="javascript:;">友情链接</a></p><p>CopyRight © 小兔鲜儿</p></div></div></div></footer>
</template><style scoped lang='scss'>
.app_footer {overflow: hidden;background-color: #f5f5f5;padding-top: 20px;.contact {background: #fff;.container {padding: 60px 0 40px 25px;display: flex;}dl {height: 190px;text-align: center;padding: 0 72px;border-right: 1px solid #f2f2f2;color: #999;&:first-child {padding-left: 0;}&:last-child {border-right: none;padding-right: 0;}}dt {line-height: 1;font-size: 18px;}dd {margin: 36px 12px 0 0;float: left;width: 92px;height: 92px;padding-top: 10px;border: 1px solid #ededed;.iconfont {font-size: 36px;display: block;color: #666;}&:hover {.iconfont {color: $xtxColor;}}&:last-child {margin-right: 0;}}.qrcode {width: 92px;height: 92px;padding: 7px;border: 1px solid #ededed;}.download {padding-top: 5px;font-size: 14px;width: auto;height: auto;border: none;span {display: block;}a {display: block;line-height: 1;padding: 10px 25px;margin-top: 5px;color: #fff;border-radius: 2px;background-color: $xtxColor;}}.hotline {padding-top: 20px;font-size: 22px;color: #666;width: auto;height: auto;border: none;small {display: block;font-size: 15px;color: #999;}}}.extra {background-color: #333;}.slogan {height: 178px;line-height: 58px;padding: 60px 100px;border-bottom: 1px solid #434343;display: flex;justify-content: space-between;a {height: 58px;line-height: 58px;color: #fff;font-size: 28px;i {font-size: 50px;vertical-align: middle;margin-right: 10px;font-weight: 100;}span {vertical-align: middle;text-shadow: 0 0 1px #333;}}}.copyright {height: 170px;padding-top: 40px;text-align: center;color: #999;font-size: 15px;p {line-height: 1;margin-bottom: 20px;}a {color: #999;line-height: 1;padding: 0 10px;border-right: 1px solid #999;&:last-child {border-right: none;}}}
}
</style>
修改一下Layout的index.vue
<script setup>
import LayoutNav from './components/LayoutNav.vue'
import LayoutHeader from './components/LayoutHeader.vue'
import LayoutFooter from './components/LayoutFooter.vue'
</script><template><LayoutNav /><LayoutHeader /><RouterView /><LayoutFooter />
</template>
效果:
9. Layout字体图标引入
这里的图标没有引入,我们使用的是阿里的字体图标库,使用 font-class 引用的方式
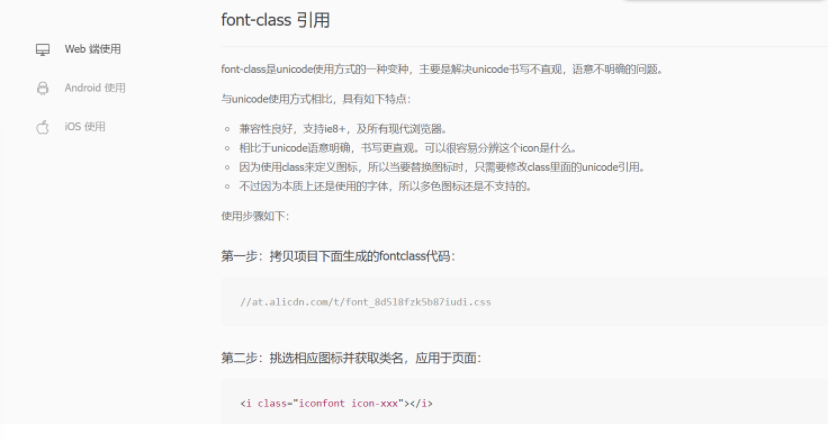
将这个加入到index.html文件中
<link rel="stylesheet" href="//at.alicdn.com/t/font_2143783_iq6z4ey5vu.css">
效果:
看下面这个周杰伦旁边的小人儿

它对应的代码如下
10.Layout一级导航渲染
静态结构已经全部搭建好了,我们要使用后端接口渲染 渲染一级导航路由,也就是这:

实现步骤:
- 根据接口文档封装接口函数
- 发生请求获取数据列表
v-for渲染页面
在apis文件夹下创建layout.js文件,封装接口
import httpInstance from '@/utils/http.js'//获取目录
export function getCategoryAPI() {return httpInstance({url: '/home/category/head'})
}来到LayoutHeader组件,引入接口
封装一个函数getCategory,返回的是promise对象,使用async/await。
在挂载完成之后(onMounted)调用函数getCategory。
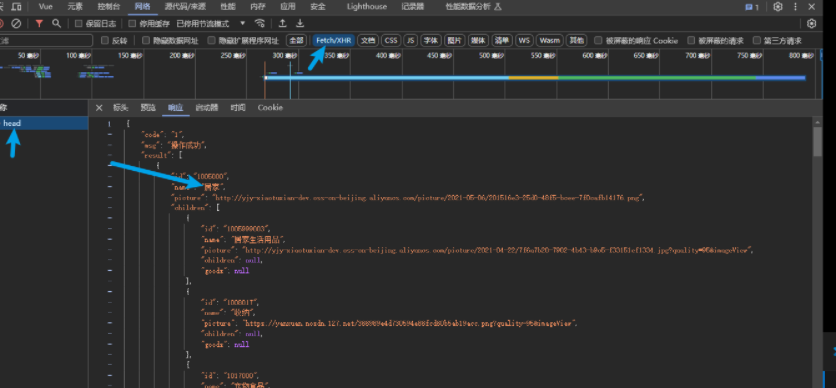
打印res看一下请求的数据,定义一个响应式空数组categoryList接收后台传入的数据。
将 请求 封装进 函数 中是因为方便书写请求前后的逻辑
<script setup>
import { getCategoryAPI } from '@/apis/layout'
import { onMounted, ref } from 'vue'const categoryList = ref([])
const getCategory = async () => {const res = await getCategoryAPI()categoryList.value = res.result// console.log(res)
}onMounted(() => getCategory())</script>
获取数据成功之后,使用v-for渲染数据
<ul class="app-header-nav"><li class="home" v-for="item in categoryList" :key="item.id"><RouterLink to="/">{{ item.name }}</RouterLink></li></ul>
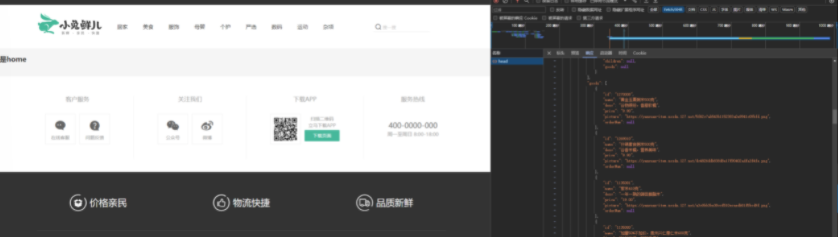
效果:
11. layout - 吸顶导航
需求:浏览器上下滚动过程中,如果距离顶部的滚动距离大于78px,吸顶导航显示,小于78px隐藏
步骤:
- 准备吸顶导航组件
- 获取滚动距离
- 滚动距离作判断条件控制组件盒子展示或隐藏
吸顶导航组件
<script setup></script><template><div class="app-header-sticky"><div class="container"><RouterLink class="logo" to="/" /><!-- 导航区域 --><ul class="app-header-nav "><li class="home"><RouterLink to="/">首页</RouterLink></li><li><RouterLink to="/">居家</RouterLink></li><li><RouterLink to="/">美食</RouterLink></li><li><RouterLink to="/">服饰</RouterLink></li><li><RouterLink to="/">母婴</RouterLink></li><li><RouterLink to="/">个护</RouterLink></li><li><RouterLink to="/">严选</RouterLink></li><li><RouterLink to="/">数码</RouterLink></li><li><RouterLink to="/">运动</RouterLink></li><li><RouterLink to="/">杂项</RouterLink></li></ul><div class="right"><RouterLink to="/">品牌</RouterLink><RouterLink to="/">专题</RouterLink></div></div></div>
</template><style scoped lang='scss'>
.app-header-sticky {width: 100%;height: 80px;position: fixed;left: 0;top: 0;z-index: 999;background-color: #fff;border-bottom: 1px solid #e4e4e4;// 此处为关键样式!!!// 状态一:往上平移自身高度 + 完全透明transform: translateY(-100%);opacity: 0;// 状态二:移除平移 + 完全不透明&.show {transition: all 0.3s linear;transform: none;opacity: 1;}.container {display: flex;align-items: center;}.logo {width: 200px;height: 80px;background: url("@/assets/images/logo.png") no-repeat right 2px;background-size: 160px auto;}.right {width: 220px;display: flex;text-align: center;padding-left: 40px;border-left: 2px solid $xtxColor;a {width: 38px;margin-right: 40px;font-size: 16px;line-height: 1;&:hover {color: $xtxColor;}}}
}.app-header-nav {width: 820px;display: flex;padding-left: 40px;position: relative;z-index: 998;li {margin-right: 40px;width: 38px;text-align: center;a {font-size: 16px;line-height: 32px;height: 32px;display: inline-block;&:hover {color: $xtxColor;border-bottom: 1px solid $xtxColor;}}.active {color: $xtxColor;border-bottom: 1px solid $xtxColor;}}
}
</style>
在Layout文件夹下的index.vue中引入这个组件,使用起来
<script setup>
import LayoutNav from './components/LayoutNav.vue'
import LayoutHeader from './components/LayoutHeader.vue'
import LayoutFooter from './components/LayoutFooter.vue'
import LayoutFixed from './LayoutFixed.vue'
</script><template><LayoutNav /><LayoutHeader /><RouterView /><LayoutFooter /><LayoutFixed />
</template>
关键样式(LayoutFixed中):
.app-header-sticky {width: 100%;height: 80px;position: fixed;left: 0;top: 0; //置顶z-index: 999;background-color: #fff;border-bottom: 1px solid #e4e4e4;// 此处为关键样式!!!// 状态一:往上平移自身高度 + 完全透明transform: translateY(-100%); //平移出页面opacity: 0; //透明度为0// 状态二:移除平移 + 完全不透明//想让组件显示出来只需要加上class = "show" 即可&.show { transition: all 0.3s linear;transform: none;opacity: 1; //完全不透明}
获取滚动距离,不自己写了,使用一个vueUse插件,安装一下
安装:npm i @vueuse/core
滚动使用的是useScroll,解构的这个y就是垂直方向滚动的距离。
import { useScroll } from '@vueuse/core'
const { y } = useScroll(window)
当y>78时,show生效,我们使用 vue 的动态类实现方式
<div class="app-header-sticky" :class="{ show: y > 78 }">
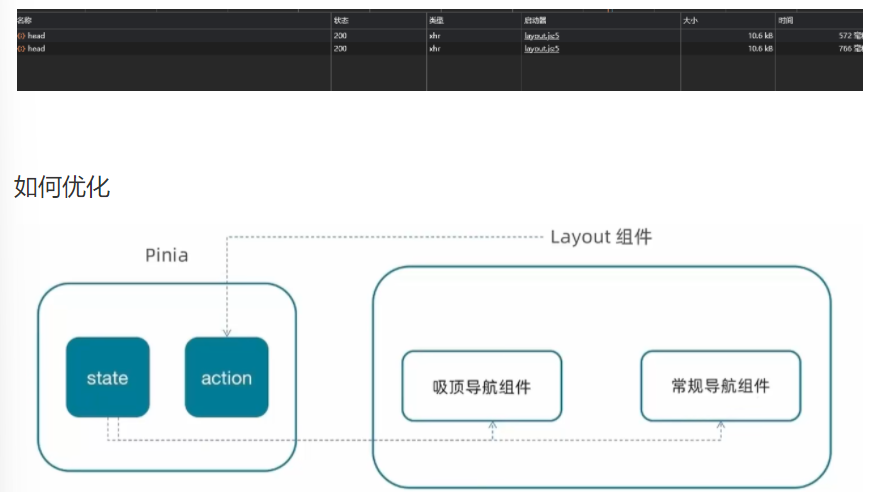
12. layout - Pinia优化重复请求

我们要把 吸顶导航 组件也转化成数据动态获取的,修改完后我们发现请求了两次数据
<!-- LayoutFixed -->
<script setup>
import { useScroll } from '@vueuse/core'
import { getCategoryAPI } from '@/apis/layout'
import { onMounted, ref } from 'vue'const categoryList = ref([])  //目录数据列表
const { y } = useScroll(window)  //获取滚动距离
const getCategory = async () => {const res = await getCategoryAPI()categoryList.value = res.result// console.log(res)
}onMounted(() => getCategory())</script><template><div class="app-header-sticky" :class="{ show: y > 78 }"><div class="container"><RouterLink class="logo" to="/" /><!-- 导航区域 --><ul class="app-header-nav"><li class="home" v-for="item in categoryList" :key="item.id"><RouterLink to="/">{{ item.name }}</RouterLink></li></ul><div class="right"><RouterLink to="/">品牌</RouterLink><RouterLink to="/">专题</RouterLink></div></div></div>
</template><style scoped lang='scss'>
.app-header-sticky {width: 100%;height: 80px;position: fixed;left: 0;top: 0;z-index: 999;background-color: #fff;border-bottom: 1px solid #e4e4e4;// 此处为关键样式!!!// 状态一:往上平移自身高度 + 完全透明transform: translateY(-100%);opacity: 0;// 状态二:移除平移 + 完全不透明&.show {transition: all 0.3s linear;transform: none;opacity: 1;}.container {display: flex;align-items: center;}.logo {width: 200px;height: 80px;background: url("@/assets/images/logo.png") no-repeat right 2px;background-size: 160px auto;}.right {width: 220px;display: flex;text-align: center;padding-left: 40px;border-left: 2px solid $xtxColor;a {width: 38px;margin-right: 40px;font-size: 16px;line-height: 1;&:hover {color: $xtxColor;}}}
}.app-header-nav {width: 820px;display: flex;padding-left: 40px;position: relative;z-index: 998;li {margin-right: 40px;width: 38px;text-align: center;a {font-size: 16px;line-height: 32px;height: 32px;display: inline-block;&:hover {color: $xtxColor;border-bottom: 1px solid $xtxColor;}}.active {color: $xtxColor;border-bottom: 1px solid $xtxColor;}}
}
</style>
<!-- LayoutHeader -->
<script setup>
import { getCategoryAPI } from '@/apis/layout'
import { onMounted, ref } from 'vue'const categoryList = ref([])
const getCategory = async () => {const res = await getCategoryAPI()categoryList.value = res.result// console.log(res)
}onMounted(() => getCategory())</script><template><header class='app-header'><div class="container"><h1 class="logo"><RouterLink to="/">小兔鲜~</RouterLink></h1><ul class="app-header-nav"><li class="home" v-for="item in categoryList" :key="item.id"><RouterLink to="/">{{ item.name }}</RouterLink></li></ul><div class="search"><i class="iconfont icon-search"></i><input type="text" placeholder="搜一搜"></div><!-- 头部购物车 --></div></header>
</template>
<style scoped lang='scss'>
.app-header {background: #fff;.container {display: flex;align-items: center;}.logo {width: 200px;a {display: block;height: 132px;width: 100%;text-indent: -9999px;background: url('@/assets/images/logo.png') no-repeat center 18px / contain;}}.app-header-nav {width: 820px;display: flex;padding-left: 40px;position: relative;z-index: 998;li {margin-right: 40px;width: 38px;text-align: center;a {font-size: 16px;line-height: 32px;height: 32px;display: inline-block;&:hover {color: $xtxColor;border-bottom: 1px solid $xtxColor;}}.active {color: $xtxColor;border-bottom: 1px solid $xtxColor;}}}.search {width: 170px;height: 32px;position: relative;border-bottom: 1px solid #e7e7e7;line-height: 32px;.icon-search {font-size: 18px;margin-left: 5px;}input {width: 140px;padding-left: 5px;color: #666;}}.cart {width: 50px;.curr {height: 32px;line-height: 32px;text-align: center;position: relative;display: block;.icon-cart {font-size: 22px;}em {font-style: normal;position: absolute;right: 0;top: 0;padding: 1px 6px;line-height: 1;background: $helpColor;color: #fff;font-size: 12px;border-radius: 10px;font-family: Arial;}}}
}
</style>
stores新增category.js
import { ref } from 'vue'
import { defineStore } from 'pinia'
import { getCategoryAPI } from '@/apis/layout'
export const useCategoryStore = defineStore('category', () => {// 导航列表的数据管理// state 导航列表数据const categoryList = ref([])// action 获取导航数据的方法const getCategory = async () => {const res = await getCategoryAPI()categoryList.value = res.result}return {categoryList,getCategory}
})
使用:
Login文件夹的index.vue
<script setup>
//出发获取导航列表的action
import { useCategoryStore } from '@/stores/category.js'
import { onMounted } from 'vue'const categoryStore = useCategoryStore()onMounted(() => categoryStore.getCategory())
</script>
删掉(注释)LoginFixed和LoginHeader中相关的代码
<!-- LayoutFixed -->
<script setup>
import { useScroll } from '@vueuse/core'
// import { getCategoryAPI } from '@/apis/layout'
// import { onMounted, ref } from 'vue'// const categoryList = ref([])  //目录数据列表
const { y } = useScroll(window)  //获取滚动距离
// const getCategory = async () => {
//     const res = await getCategoryAPI()
//     categoryList.value = res.result
//     // console.log(res)
// }// onMounted(() => getCategory())// 使用pinia中的数据
import { useCategoryStore } from '@/stores/category.js'const categoryStore = useCategoryStore()</script>
<template><ul class="app-header-nav"><li class="home" v-for="item in categoryStore.categoryList" :key="item.id"><RouterLink to="/">{{ item.name }}</RouterLink></li></ul>
</template>
<script setup>
import { useCategoryStore } from '@/stores/category.js'
// import { getCategoryAPI } from '@/apis/layout'
// import { onMounted, ref } from 'vue'// const categoryList = ref([])
// const getCategory = async () => {
//     const res = await getCategoryAPI()
//     categoryList.value = res.result
//     // console.log(res)
// }// onMounted(() => getCategory())
const categoryStore = useCategoryStore()</script>
<template><ul class="app-header-nav"><li class="home" v-for="item in categoryStore.categoryList" :key="item.id"><RouterLink to="/">{{ item.name }}</RouterLink></li></ul>
</template>
OK,没问题
小结
本篇文章,主要学习了Pinia管理数据,以及Layout的相关知识
私密马赛,图片有亿点糊,我是在typra上面写的,截到csdn上就糊掉了呜呜
祝大家学习顺利!!

相关文章:
【B站 heima】小兔鲜Vue3 项目学习笔记Day02
文章目录 Pinia1.使用2. pinia-计数器案例3. getters实现4. 异步action5. storeToRefsx 数据解构保持响应式6. pinia 调试 项目起步1.项目初始化和git管理2. 使用ElementPlus3. ElementPlus 主题色定制4. axios 基础配置5. 路由设计6. 静态资源初始化和 Error lens安装7.scss自…...

RedisTemplate 实现基于 Value 操作的简易锁机制
在高并发场景下,确保操作的原子性和避免竞态条件至关重要。Redis 提供了丰富的数据结构和操作,是实现分布式锁的一个高效选择。本文将介绍如何使用 RedisTemplate 的 opsForValue().setIfAbsent() 方法来实现一种简单的锁机制,并提供一个示例…...
其它高阶数据结构⑦_Skiplist跳表_概念+实现+对比
目录 1. Skiplist跳表的概念 2. Skiplist跳表的效率 3. Skiplist跳表的实现 3.1 力扣1206. 设计跳表 3.2 Skiplist的初始化和查找 3.3 Skiplist的增加和删除 3.4 Skiplist的源码和OJ测试 4. 跳表和平衡搜索树/哈希表的对比 本篇完。 1. Skiplist跳表的概念 skiplist是…...
力扣230. 二叉搜索树中第K小的元素
Problem: 230. 二叉搜索树中第K小的元素 文章目录 题目描述思路复杂度Code 题目描述 思路 直接利用二叉搜索树中序遍历为一个有序序列的特性: 记录一个int变量rank,在中序遍历时若当前rank k则返回当前节点值 复杂度 时间复杂度: O ( n ) O(n) O(n);其…...

Linux_应用篇(07) 系统信息与系统资源
在应用程序当中,有时往往需要去获取到一些系统相关的信息,譬如时间、日期、以及其它一些系统相关信息,本章将向大家介绍如何通过 Linux 系统调用或 C 库函数获取系统信息, 譬如获取系统时间、日期以及设置系统时间、日期等&#x…...
基于Vue的验证码实现
一、验证码核心实现 创建slide-verify.vue,代码如下: <template><divclass"slide-verify":style"{ width: w px }"id"slideVerify"onselectstart"return false;"><!-- 图片加载遮蔽罩 -->&…...

P4【力扣217,389,496】【数据结构】【哈希表】C++版
【217】存在重复元素 给你一个整数数组 nums 。如果任一值在数组中出现 至少两次 ,返回 true ;如果数组中每个元素互不相同,返回 false 。 示例 1: 输入:nums [1,2,3,1] 输出:true 示例 2:…...
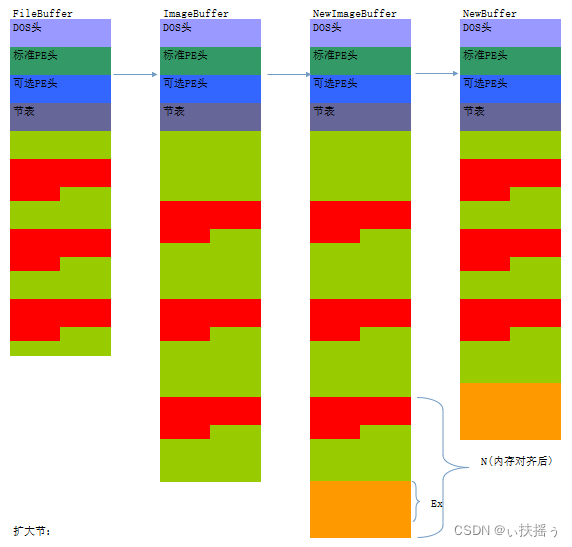
PE文件(六)新增节-添加代码作业
一.手动新增节添加代码 1.当预备条件都满足,节表结尾没有相关数据时: 现在我们将ipmsg.exe用winhex打开,在节的最后新增一个节用于存放我们要增加的数据 注意:飞鸽的文件对齐和内存对齐是一致的 先判断节表末尾到第一个节之间…...
ICRA 2024: NVIDIA 联合多伦多大学、加州大学伯克利分校、苏黎世联邦理工学院等研究人员开发了精细操作的手术机器人
英伟达(NVIDIA)正与学术研究人员合作,研究手术机器人。 NVIDIA 联合多伦多大学、加州大学伯克利分校、苏黎世联邦理工学院和佐治亚理工学院的研究人员开发了 ORBIT-Surgical,一个训练机器人的模拟框架,可以提高手术团…...

探索Go语言的原子操作秘籍:sync/atomic.Value全解析
引言 在并发编程的世界里,数据的一致性和线程安全是永恒的话题。Go语言以其独特的并发模型——goroutine和channel,简化了并发编程的复杂性。然而,在某些场景下,我们仍然需要一种机制来保证操作的原子性。这就是sync/atomic.V…...

【java深入学习第3章】利用 Spring Boot 和 Screw 快速生成数据库设计文档
免费多模型AI网站,支持豆包、GPT-4o、谷歌Gemini等AI模型,无限制使用,快去白嫖👉海鲸AI🔥🔥🔥 在开发过程中,数据库设计文档是非常重要的,它可以帮助开发者理解数据库结构࿰…...
继“三级淋巴结”之后,再看看“单细胞”如何与AI结合【医学AI|顶刊速递|05-25】
小罗碎碎念 24-05-25文献速递 今天想和大家分享的是肿瘤治疗领域的另一个热点——单细胞技术,我们一起来看看,最新出炉的顶刊,是如何把AI与单细胞结合起来的。 另外,今天是周末,所以会有两篇文章——一篇文献速递&…...
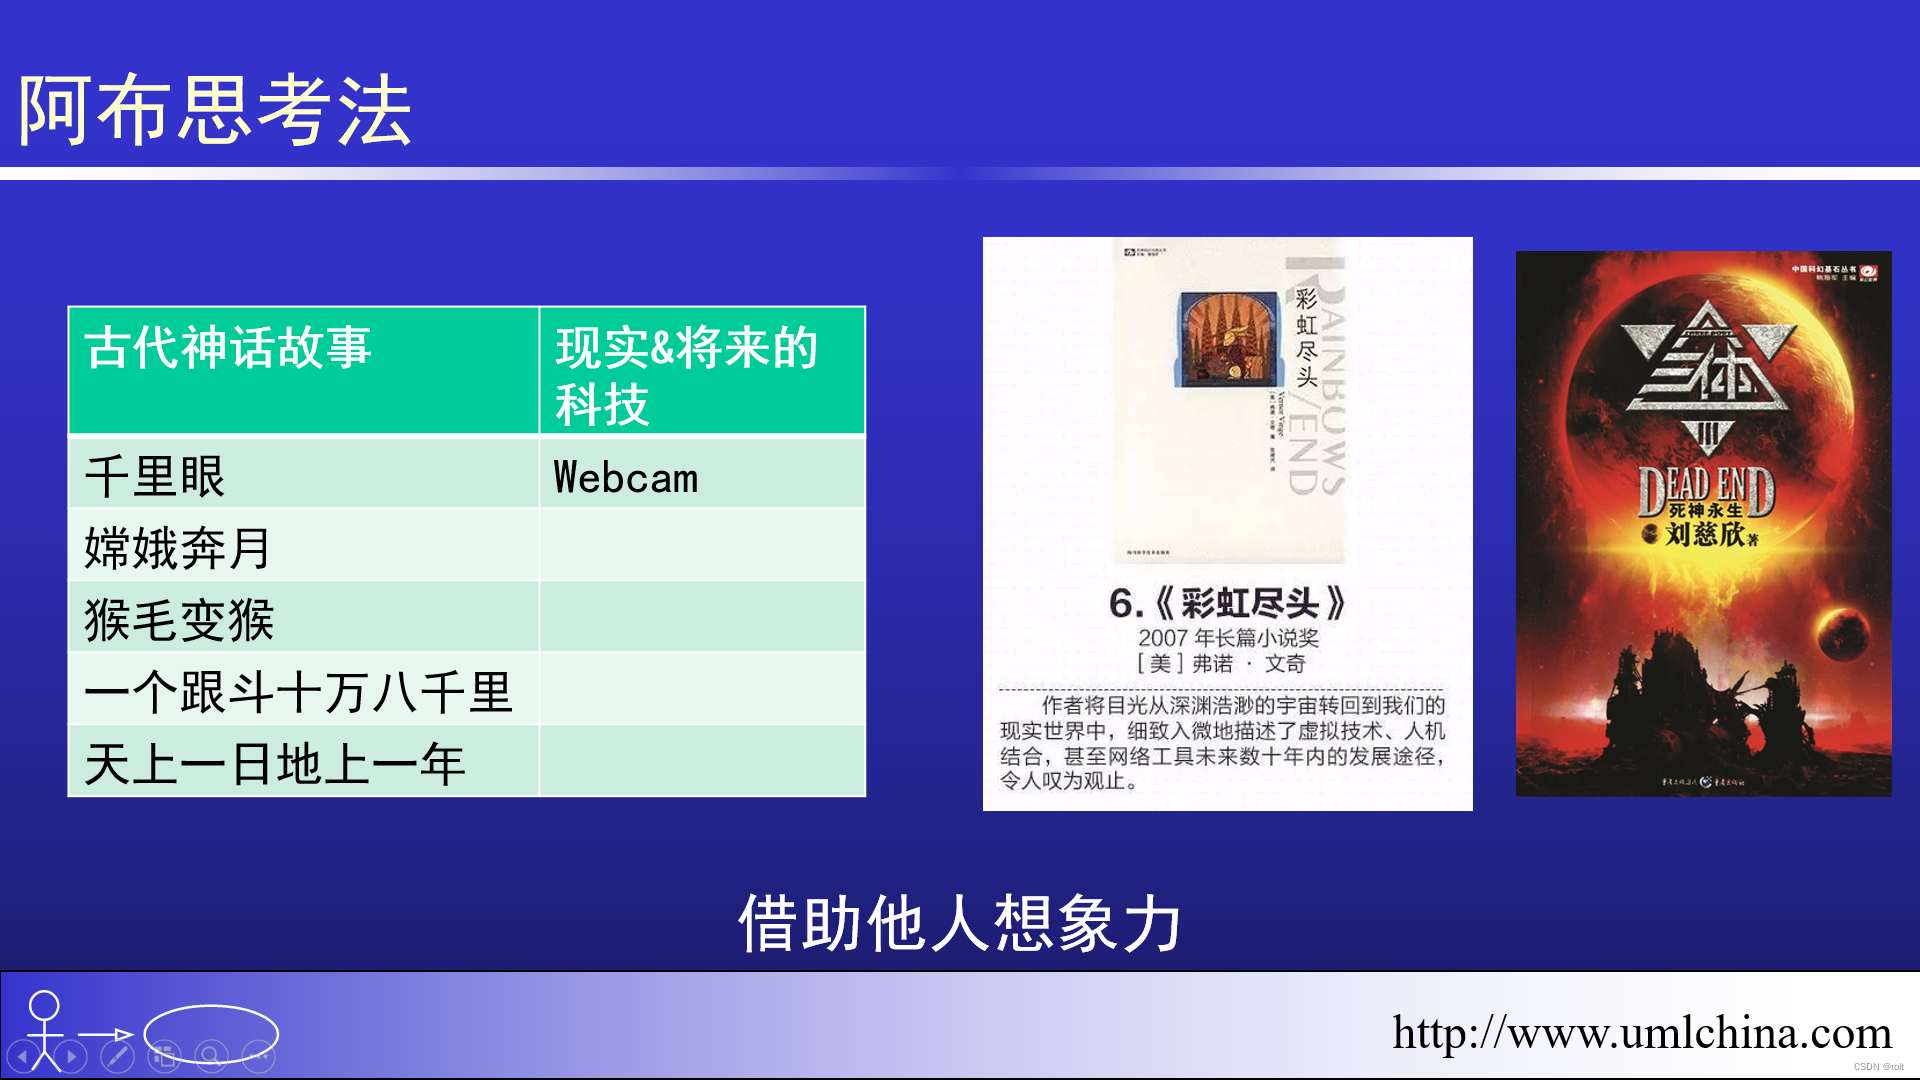
[图解]产品经理创新之阿布思考法
0 00:00:00,000 --> 00:00:01,900 那刚才我们讲到了 1 00:00:02,730 --> 00:00:03,746 业务序列图 2 00:00:03,746 --> 00:00:04,560 然后怎么 3 00:00:05,530 --> 00:00:06,963 画现状,怎么改进 4 00:00:06,963 --> 00:00:09,012 然后改进的模式…...
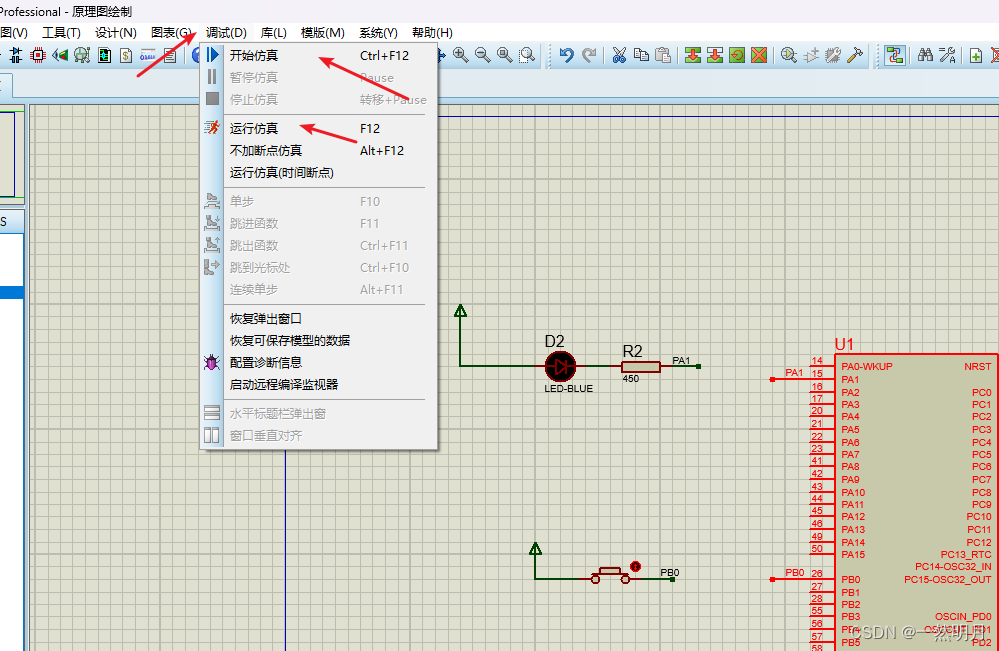
Proteus仿真小技巧(隔空连线)
用了好几天Proteus了.总结一下使用的小技巧. 目录 一.隔空连线 1.打开添加网络标号 2.输入网络标号 二.常用元件 三.运行仿真 四.总结 一.隔空连线 引出一条线,并在末尾点一下. 1.打开添加网络标号 选择添加网络标号, 也可以先点击按钮,再去选择线(注意不要点端口) 2.…...
抖音极速版:抖音轻量精简版本,新人享大福利
和快手一样,抖音也有自己的极速版,可视作抖音的轻量精简版,更专注于刷视频看广告赚钱,收益比抖音要高,可玩性更佳。 抖音极速版简介 抖音极速版是一个提供短视频创业和收益任务的平台,用户可以通过观看广…...

leetCode-hot100-数组专题之双指针
数组双指针专题 1.同向双指针1.1例题26.删除有序数组中的重复项27.移除元素80.删除有序数组中的重复项 Ⅱ 2.相向双指针2.1例题11.盛最多水的容器42.接雨水581.最短无序连续子数组 双指针在算法题中很常见,下面总结双指针在数组中的一些应用,主要分为两类…...
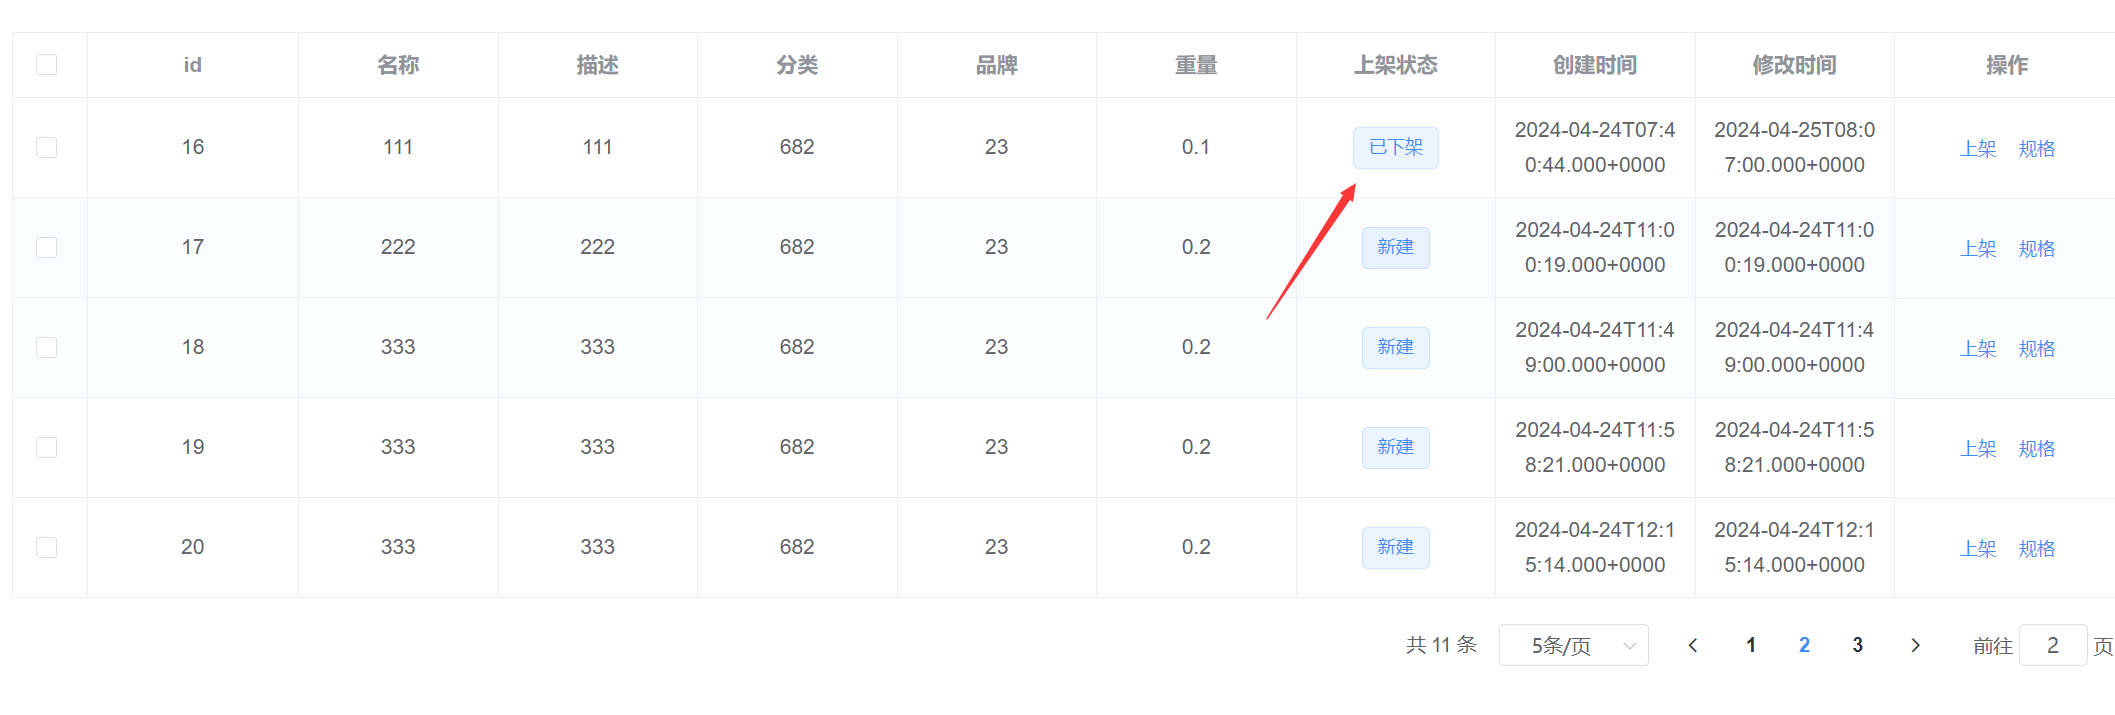
完成商品SPU管理页面
文章目录 1.引入前端界面1.将前端界面放到commodity下2.创建菜单3.进入前端项目,使用npm添加依赖1.根目录下输入2.报错 chromedriver2.27.2的问题3.点击链接下载压缩包,然后使用下面的命令安装4.再次安装 pubsub-js 成功5.在main.js中引入这个组件 4.修改…...
Ansible实战YAML语言完成apache的部署,配置,启动全过程
🏡作者主页:点击! 🏝️Ansible专栏:点击! ⏰️创作时间:2024年5月24日15点59分 目录 💯趣站推荐💯 🎊前言 ✨️YAML语言回顾 🎆1.编写YAML文…...

深入探索微软Edge:新一代浏览器的演进与创新
在数字时代的浪潮中,浏览器已不再只是简单的网页访问工具,而是成为了连接信息、服务与用户之间的重要桥梁。微软Edge作为微软公司推出的一款全新的浏览器,不仅承载着微软在互联网领域的最新愿景,还融合了多项前沿技术,…...

k8s使用Volcano调度gpu
k8s部署 https://www.yangxingzhen.com/9817.html cri-dockerd安装 https://zhuanlan.zhihu.com/p/632861515 安装nvidia-container-runtime https://docs.nvidia.com/datacenter/cloud-native/container-toolkit/latest/install-guide.html 安装k8s-device-plugin https://…...

Shiro RememberMe反序列化漏洞深度解析与实战利用
1. 这个漏洞不是“老古董”,而是理解Java安全边界的活教材很多人看到CVE-2016-4437,第一反应是“Shiro都淘汰了,还讲这个干啥?”——我去年在给一家做政企内部系统的客户做渗透复测时,就遇到过一个上线三年的审批平台&…...

量子计算中Loschmidt回声相位测量的创新方法
1. 量子计算中的Loschmidt回声相位测量方法概述Loschmidt回声是量子动力学中一个重要的概念,它描述了量子系统在时间反演演化后与初始状态的相似程度。在量子计算领域,精确测量Loschmidt回声的相位信息对于理解量子系统的非平衡态行为、计算能量本征值以…...

Yokogawa AAI835-H50/K4A00模拟输入/输出模块
Yokogawa AAI835-H50/K4A00 模拟输入/输出模块产品特点:通道配置:共8个通道,含4路模拟输入和4路模拟输出。信号类型:所有通道均支持4-20mA标准电流信号。HART通信:支持HART协议,可与智能现场设备双向数字通…...
)
毕业设计 yolov11骨折检测医疗辅助系统(源码+论文)
文章目录 0 前言1 项目运行效果2 课题背景2.1 研究背景2.2 国内外研究现状2.3 研究意义 3 设计框架(骨折检测系统设计框架说明)3.1. 系统架构图3.2. 技术选型3.2.1 核心组件3.2.2 辅助工具 3.3. 核心模块设计3.3.1 YOLO模型训练模块训练流程图关键伪代码…...

武汉国电华美串联谐振试验装置,现场用着心里有底
在高压试验现场干了这么多年,这位老师傅常说,一台好的串联谐振装置,就是试验人员的胆。面对GIS、大型变压器、超高压电缆这些大电容试品,没有趁手的谐振设备,交流耐压试验根本没法干。16875kVA/225kV这个规格ÿ…...

INT8量化下TVA注意力对齐精度保障方案
重磅预告:本专栏将独家连载系列丛书《智能体视觉技术与应用》部分精华内容,该书是世界首套系统阐述“因式智能体”视觉理论与实践的专著,特邀美国 TypeOne 公司首席科学家、斯坦福大学博士 Bohan 担任技术顾问。Bohan先生师从美国三院院士、“…...

InVideo插件深度解析:如何在Unreal Engine中实现高效视频流播放与录制
InVideo插件深度解析:如何在Unreal Engine中实现高效视频流播放与录制 【免费下载链接】InVideo 基于UE4实现的rtsp的视频播放插件 项目地址: https://gitcode.com/gh_mirrors/in/InVideo InVideo是一个基于Unreal Engine 5开发的RTSP视频播放插件࿰…...
)
实战对比:用直方图均衡化与CLAHE拯救你的背光/过曝照片(附Python完整代码)
拯救逆光废片:直方图均衡化与CLAHE的实战效果对比每次旅行回来整理照片时,总会有几张因为光线问题几乎要删除的废片——要么是逆光下的人脸黑得看不清五官,要么是天空过曝失去所有云层细节。这些照片往往记录着重要时刻,直接删除实…...

基于EMA与轻量级机器学习的Wi-Fi链路质量预测实战
1. 项目概述与核心价值在工业自动化、仓储物流和智能制造等场景里,无线网络的稳定性正变得前所未有的重要。想象一下,一个自动导引运输车(AGV)正在执行物料搬运任务,或者一个机械臂正在与中央控制系统进行实时数据同步…...

怎么理解Filter不是在afterCompetition里面remove掉ThreadLocal里面的东西,而是说在finally块里面remove
文章目录1. 核心原因:Filter 的“套娃(洋葱圈)”执行模型2. 为什么不能(也无法)在这里用 afterCompletion?维度一:Filter 拿不到 afterCompletion维度二:生命周期顺序的致命冲突总结…...