【Spring】SSM整合_入门代码实现
1. Maven依赖
在pom.xml中添加SSM框架的依赖
<!-- Spring Core -->
<dependency>  <groupId>org.springframework</groupId>  <artifactId>spring-context</artifactId>  <version>5.3.x</version>
</dependency>
<!-- Spring Web MVC -->
<dependency>  <groupId>org.springframework</groupId>  <artifactId>spring-webmvc</artifactId>  <version>5.3.x</version>
</dependency>
<!-- MyBatis -->
<dependency>  <groupId>org.mybatis</groupId>  <artifactId>mybatis</artifactId>  <version>3.5.x</version>
</dependency>
<!-- MyBatis Spring Integration -->
<dependency>  <groupId>org.mybatis</groupId>  <artifactId>mybatis-spring</artifactId>  <version>2.0.x</version>
</dependency>
<!-- Database Driver (e.g., MySQL) -->
<dependency>  <groupId>mysql</groupId>  <artifactId>mysql-connector-java</artifactId>  <version>8.0.x</version>
</dependency>
<!-- Other dependencies... -->
2. Spring配置文件 (applicationContext.xml)
在src/main/resources目录下创建applicationContext.xml文件,并配置数据源、事务管理和MyBatis的SqlSessionFactoryBean。
<beans xmlns="http://www.springframework.org/schema/beans"  xmlns:xsi="http://www.w3.org/2001/XMLSchema-instance"  xmlns:context="http://www.springframework.org/schema/context"  xmlns:tx="http://www.springframework.org/schema/tx"  xsi:schemaLocation="  http://www.springframework.org/schema/beans  http://www.springframework.org/schema/beans/spring-beans.xsd  http://www.springframework.org/schema/context  http://www.springframework.org/schema/context/spring-context.xsd  http://www.springframework.org/schema/tx  http://www.springframework.org/schema/tx/spring-tx.xsd">  <!-- DataSource Configuration -->  <bean id="dataSource" class="org.springframework.jdbc.datasource.DriverManagerDataSource">  <property name="driverClassName" value="com.mysql.cj.jdbc.Driver"/>  <property name="url" value="jdbc:mysql://localhost:3306/your_database"/>  <property name="username" value="your_username"/>  <property name="password" value="your_password"/>  </bean>  <!-- Session Factory Configuration -->  <bean id="sqlSessionFactory" class="org.mybatis.spring.SqlSessionFactoryBean">  <property name="dataSource" ref="dataSource"/>  <property name="mapperLocations" value="classpath:mappers/*.xml"/>  </bean>  <!-- Mapper Scanner Configuration -->  <bean class="org.mybatis.spring.mapper.MapperScannerConfigurer">  <property name="basePackage" value="com.example.yourapp.mapper"/>  <property name="sqlSessionFactoryBeanName" value="sqlSessionFactory"/>  </bean>  <!-- Transaction Manager Configuration -->  <bean id="transactionManager" class="org.springframework.jdbc.datasource.DataSourceTransactionManager">  <property name="dataSource" ref="dataSource"/>  </bean>  <!-- Enable Transaction Annotation Support -->  <tx:annotation-driven transaction-manager="transactionManager"/>  <!-- Other bean definitions... -->
</beans>
3. SpringMVC配置文件 (springmvc-config.xml)
在src/main/resources目录下创建springmvc-config.xml文件,并配置视图解析器、组件扫描等。
<beans xmlns="http://www.springframework.org/schema/beans" xmlns:xsi="http://www.w3.org/2001/XMLSchema-instance" xmlns:context="http://www.springframework.org/schema/context" xmlns:mvc="http://www.springframework.org/schema/mvc" xsi:schemaLocation=" http://www.springframework.org/schema/beans http://www.springframework.org/schema/beans/spring-beans.xsd http://www.springframework.org/schema/context http://www.springframework.org/schema/context/spring-context.xsd http://www.springframework.org/schema/mvc http://www.springframework.org/schema/mvc/spring-mvc.xsd"> <!-- Enable @Controller support --> <mvc:annotation-driven/> <!-- Scan for @Controllers --> <context:component-scan base-package="com.example.yourapp.controller" /> <!-- Configure View Resolver --> <bean class="org.springframework.web.servlet.view.InternalResourceViewResolver"> <property name="prefix" value="/WEB-INF/views/" /> <property name="suffix" value=".jsp" /> </bean> <!-- Other bean definitions for MVC components --> </beans>4. 配置web.xml
在src/main/webapp/WEB-INF目录下,配置web.xml以加载Spring和SpringMVC的配置文件,并设置DispatcherServlet。
<web-app xmlns="http://xmlns.jcp.org/xml/ns/javaee" xmlns:xsi="http://www.w3.org/2001/XMLSchema-instance" xsi:schemaLocation="http://xmlns.jcp.org/xml/ns/javaee http://xmlns.jcp.org/xml/ns/javaee/web-app_4_0.xsd" version="4.0"> <!-- Spring Context Loader Listener --> <listener> <listener-class>org.springframework.web.context.ContextLoaderListener</listener-class> </listener> <!-- Spring Context Config Location --> <context-param> <param-name>contextConfigLocation</param-name> <param-value>/WEB-INF/applicationContext.xml</param-value> </context-param> <!-- Spring MVC Servlet --> <servlet> <servlet-name>dispatcherServlet</servlet-name> <servlet-class>org.springframework.web.servlet.DispatcherServlet</servlet-class> <init-param> <param-name>contextConfigLocation</param-name> <param-value>/WEB-INF/springmvc-config.xml</param-value> </init-param> <load-on-startup>1</load-on-startup> </servlet> <!-- Map all requests to the DispatcherServlet for handling --> <servlet-mapping> <servlet-name>dispatcherServlet</servlet-name> <url-pattern>/</url-pattern> </servlet-mapping> <!-- Other configurations... --> </web-app>5. 创建Mapper接口和映射文件
在src/main/java/com/example/yourapp/mapper目录下创建Mapper接口,并在src/main/resources/mappers目录下创建相应的XML映射文件。
Mapper接口
在src/main/java/com/example/yourapp/mapper目录下创建UserMapper.java接口:
package com.example.yourapp.mapper;  import com.example.yourapp.model.User;
import org.apache.ibatis.annotations.Mapper;
import org.apache.ibatis.annotations.Param;  import java.util.List;  @Mapper
public interface UserMapper {  User findUserById(@Param("id") Integer id);  List<User> findAllUsers();  int insertUser(User user);  int updateUser(User user);  int deleteUserById(@Param("id") Integer id);
}
映射文件
在src/main/resources/mappers目录下创建UserMapper.xml文件:
<?xml version="1.0" encoding="UTF-8" ?>
<!DOCTYPE mapper PUBLIC "-//mybatis.org//DTD Mapper 3.0//EN" "http://mybatis.org/dtd/mybatis-3-mapper.dtd" >
<mapper namespace="com.example.yourapp.mapper.UserMapper">  <select id="findUserById" resultType="com.example.yourapp.model.User">  SELECT * FROM users WHERE id = #{id}  </select>  <select id="findAllUsers" resultType="com.example.yourapp.model.User">  SELECT * FROM users  </select>  <insert id="insertUser" parameterType="com.example.yourapp.model.User">  INSERT INTO users (name, email) VALUES (#{name}, #{email})  </insert>  <update id="updateUser" parameterType="com.example.yourapp.model.User">  UPDATE users SET name = #{name}, email = #{email} WHERE id = #{id}  </update>  <delete id="deleteUserById" parameterType="java.lang.Integer">  DELETE FROM users WHERE id = #{id}  </delete>  </mapper>
6. 创建Controller、Service和DAO层
在src/main/java/com/example/yourapp目录下创建Controller、Service和DAO层的相关类和接口。
Model类(可选,但通常在项目中会有)
在src/main/java/com/example/yourapp/model目录下创建User.java:
package com.example.yourapp.model;  public class User {  private Integer id;  private String name;  private String email;  // getters and setters
}
Service接口和实现
在src/main/java/com/example/yourapp/service目录下创建UserService.java接口和UserServiceImpl.java实现类:
UserService.java:
package com.example.yourapp.service;  import com.example.yourapp.model.User;  import java.util.List;  public interface UserService {  User findUserById(Integer id);  List<User> findAllUsers();  int insertUser(User user);  int updateUser(User user);  int deleteUserById(Integer id);
}
UserServiceImpl.java:
package com.example.yourapp.service.impl;  import com.example.yourapp.mapper.UserMapper;
import com.example.yourapp.model.User;
import com.example.yourapp.service.UserService;
import org.springframework.beans.factory.annotation.Autowired;
import org.springframework.stereotype.Service;  import java.util.List;  @Service
public class UserServiceImpl implements UserService {  @Autowired  private UserMapper userMapper;  @Override  public User findUserById(Integer id) {  return userMapper.findUserById(id);  }  // ... 其他方法的实现 ...
}
Controller类
在src/main/java/com/example/yourapp/controller目录下创建UserController.java:
package com.example.yourapp.controller;  import com.example.yourapp.model.User;
import com.example.yourapp.service.UserService;
import org.springframework.beans.factory.annotation.Autowired;
import org.springframework.http.HttpStatus;
import org.springframework.http.ResponseEntity;
import org.springframework.web.bind.annotation.*;  import java.util.List;  @RestController
@RequestMapping("/users")
public class UserController {  @Autowired  private UserService userService;  @GetMapping("/{id}")  public ResponseEntity<User> getUserById(@PathVariable Integer id) {  User user = userService.findUserById(id);  if (user == null) {  return new ResponseEntity<>(HttpStatus.NOT_FOUND);  }  return new ResponseEntity<>(user, HttpStatus.OK);  }  @GetMapping("/")  public ResponseEntity<List<User>> getAllUsers() {  List<User> users = userService.findAllUsers();  return new ResponseEntity<>(users, HttpStatus.OK);  }  @PostMapping("/")  public ResponseEntity<Integer> createUser(@RequestBody User user) {  int result = userService.insertUser(user);  if (result == 1) {  return new ResponseEntity<>(user.getId(), HttpStatus.CREATED);  } else {  return new ResponseEntity<>(HttpStatus.INTERNAL_SERVER_ERROR);  }  }  @PutMapping("/")  public ResponseEntity<Integer> updateUser(@RequestBody User user) {  int result = userService.updateUser(user);  if (result == 1) {  return new ResponseEntity<>(HttpStatus.OK);  } else {  return new ResponseEntity<>(HttpStatus.NOT_FOUND);  }  }  @DeleteMapping("/{id}")  public ResponseEntity<Void> deleteUserById(@PathVariable Integer id) {  int result = userService.deleteUserById(id);  if (result == 1) {  return new ResponseEntity<>(HttpStatus.NO_CONTENT);  } else {  return new ResponseEntity<>(HttpStatus.NOT_FOUND);  }  }
}
7. 测试和部署
- 编写测试用例或使用Postman等工具测试API接口。
- 打包项目为WAR文件,并部署到Tomcat或其他Servlet容器中。
相关文章:

【Spring】SSM整合_入门代码实现
1. Maven依赖 在pom.xml中添加SSM框架的依赖 <!-- Spring Core --> <dependency> <groupId>org.springframework</groupId> <artifactId>spring-context</artifactId> <version>5.3.x</version> </dependency>…...

C++代码错误解决1(函数模板)
1、代码如下 //示例函数模板的使用 #include <iostream> #include <string> using namespace std; template <typename T>//函数模板 T max(T a,T b) {return a>b?a:b; } int main() {int a,b;cout<<"input two integers to a&b:"…...
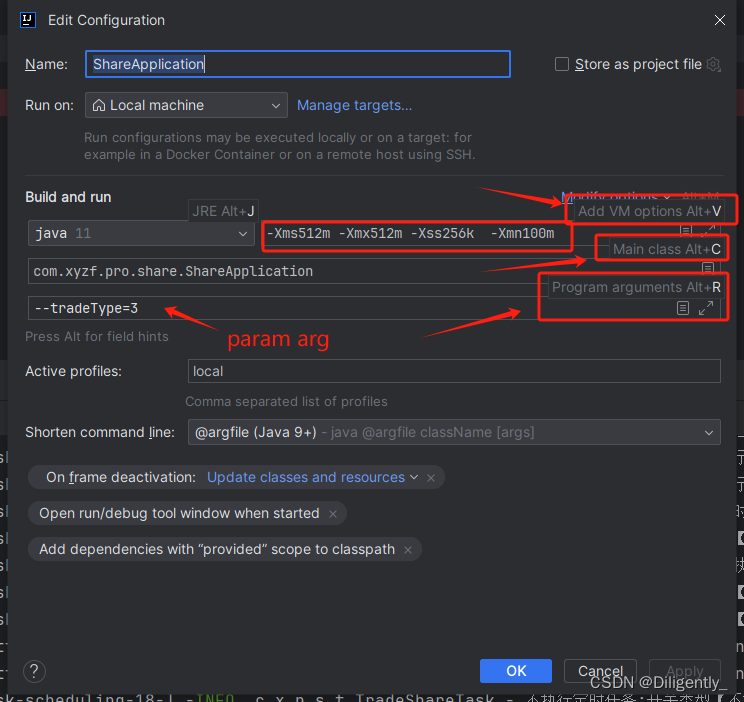
idea configuration 配置 方便本地启动环境切换
idea 再项目启动的时候避免切换环境导致上线的时候出现环境配置问题 可以再idea 的 configuration 中配置项目的 vm options 虚拟机的内容占用 -Xmx256m -Xms256m -Xmn100m -Xss256k program arguments properties 文件中需要修改的配置参数 active profiles 指定启动的本…...

win10配置wsl的深度学习环境
# 1、一步完成wsl:开启虚拟机、linux子系统、并下载ubuntu # 官方文档: https://learn.microsoft.com/zh-cn/windows/wsl/install wsl --install# 2、打开windows terminal,选ubuntu交互环境 # 第一次需要配置用户名和密码 # 接下来正常使用即可# 3、cud…...
如何处理时间序列的缺失数据
您是否应该删除、插入或估算? 世界上没有完美的数据集。每个数据科学家在数据探索过程中都会有这样的感觉: df.info()看到类似这样的内容: 大多数 ML 模型无法处理 NaN 或空值,因此如果您的特征或目标包含这些值,则在…...
fastapi中实现多个路由请求
大家伙,我是雄雄,欢迎关注微信公众号:雄雄的小课堂。 前言 最近在写机器人相关的接口,顺手学了学python,发现这是个好东西,写代码效率比java要高很多,比如写个词云呀,写个回调呀&am…...

前端框架选择指南:React vs Vue vs Angular
选择前端框架时,React、Vue 和 Angular 都是流行的选择,各有优缺点。我们可以从各个维度进行比较和选择: React 核心理念: 组件化开发,专注于视图层。学习曲线: 相对平缓,因为重点在于JSX和组…...

猫头虎 解析:为什么AIGC在国内适合做TOB,在国外适合做TOC?
猫头虎 解析:为什么AIGC在国内适合做TOB,在国外适合做TOC? 博主 猫头虎 的技术世界 🌟 欢迎来到猫头虎的博客 — 探索技术的无限可能! 专栏链接: 🔗 精选专栏: 《面试题大全》 — 面…...

并发编程笔记8--ThreadLocal结构详解
ThreadLocal,即线程变量,是一个以ThreadLocal对象为键,任意对象为值的存储结构。这个结构被附带在线程上,也就是说一个线程可以根据一个ThreadLocal对象查询到绑定在这个线程上的值。可以通过set(T)方法来设置一个值,在…...

强烈推荐 20.7k Star!企业级商城开源项目强烈推荐!基于DDD领域驱动设计模型,助您快速掌握技术奥秘,实现业务快速增长
更多资源请关注纽扣编程微信公众号 1 项目简介 商城是个从零到一的C端商城项目,包含商城核心业务和基础架构两大模块,推出用户、消息、商品、订单、优惠券、支付、网关、购物车等业务模块,通过商城系统中复杂场景,给出对应解决方案。使用 …...

【C++STL详解(四)------vector的模拟实现】
文章目录 vector各函数接口总览vector当中的成员变量介绍默认成员函数构造函数1构造函数2构造函数3拷贝构造函数赋值运算符重载函数析构函数 迭代器相关函数begin和end 容量和大小相关函数size和capacityreserveresizeempty 修改容器内容相关函数push_backpop_backinserterases…...

租赁系统|北京租赁系统|租赁软件开发流程
在数字化时代的浪潮下,小程序成为了各行各业争相探索的新领域。租赁行业亦不例外,租赁小程序的开发不仅提升了用户体验,更为商家带来了更多商业机会。本文将详细解析租赁小程序的开发流程,为有志于进军小程序领域的租赁行业从业者…...
)
JAVA面试题大全(十四)
1、Kafka 可以脱离 Zookeeper 单独使用吗?为什么? kafka不能脱离zookper单独使用,因为kafka使用zookper管理和协调kafka的节点服务器。 2、Kafka 有几种数据保留的策略? Kafka提供了多种数据保留策略,这些策略用于定…...

Web Accessibility基础:构建无障碍的前端应用
Web Accessibility(网络无障碍)是确保所有人都能平等访问和使用网站和应用程序的关键。这包括视觉、听觉、运动和认知能力有限的用户。以下是一些构建无障碍前端应用的基础原则和代码示例: 2500G计算机入门到高级架构师开发资料超级大礼包免…...

谈谈你对 SPA 的理解?
1 理解基本概念 SPA(single-page application)单页应用,默认情况下我们编写 Vue、React 都只有一个html 页面,并且提供一个挂载点,最终打包后会再此页面中引入对应的资源。(页面的渲染全部是由 JS 动态进行…...

JAVA给一个JSON数组添加对象
操作Mysql表的json字段,查询json字段的内容,将新增的内容添加到查询的json数组中 String a "[{\"name\": \"张三\", \"age\": 10, \"gender\": \"男\", \"email\": \"123qq.co…...

设计一个完美的用户角色权限表
设计一个完美的用户角色权限表需要考虑系统的安全性、灵活性和可扩展性。以下是一个详细的用户角色权限管理表设计方案,包含多个表结构和字段描述。 目录 1. 用户表(Users Table)2. 角色表(Roles Table)3. 权限表&…...
Git 基本使用
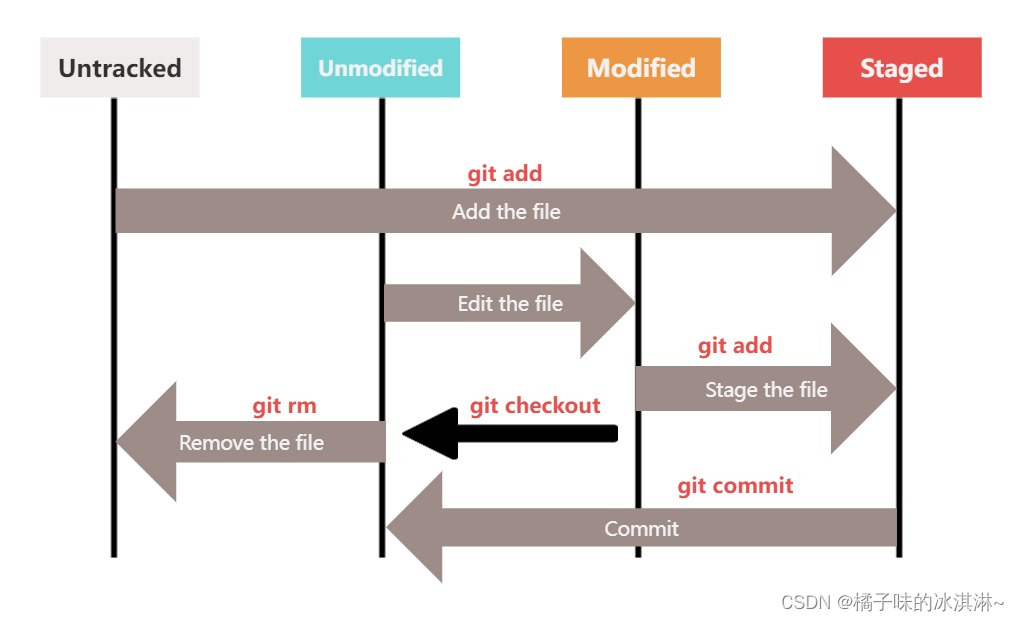
目录 Git 安装与设置 在 Windows上安装 Git git 的配置 Git 原理 git 的四个区域 git 工作流程 git 文件的状态 Git 操作 创建仓库 免密登录 基本操作 版本回退 本地仓库整理 分支命令 合并分支 解决冲突 Git 安装与设置 在 Windows上安装 Git 在 Windows上使…...

LabVIEW使用PID 控制器有哪些应用场景?
如何在LabVIEW中创建PID控制器? LabVIEW为各种控制工程任务提供了内置函数和库,包括PID控制器编程。这些功能位于控制设计和仿真调色板中,其中有用于不同类型控制器的子调色板。要在LabVIEW中创建PID控制器,需要将PID函数从PID子调色板拖放…...
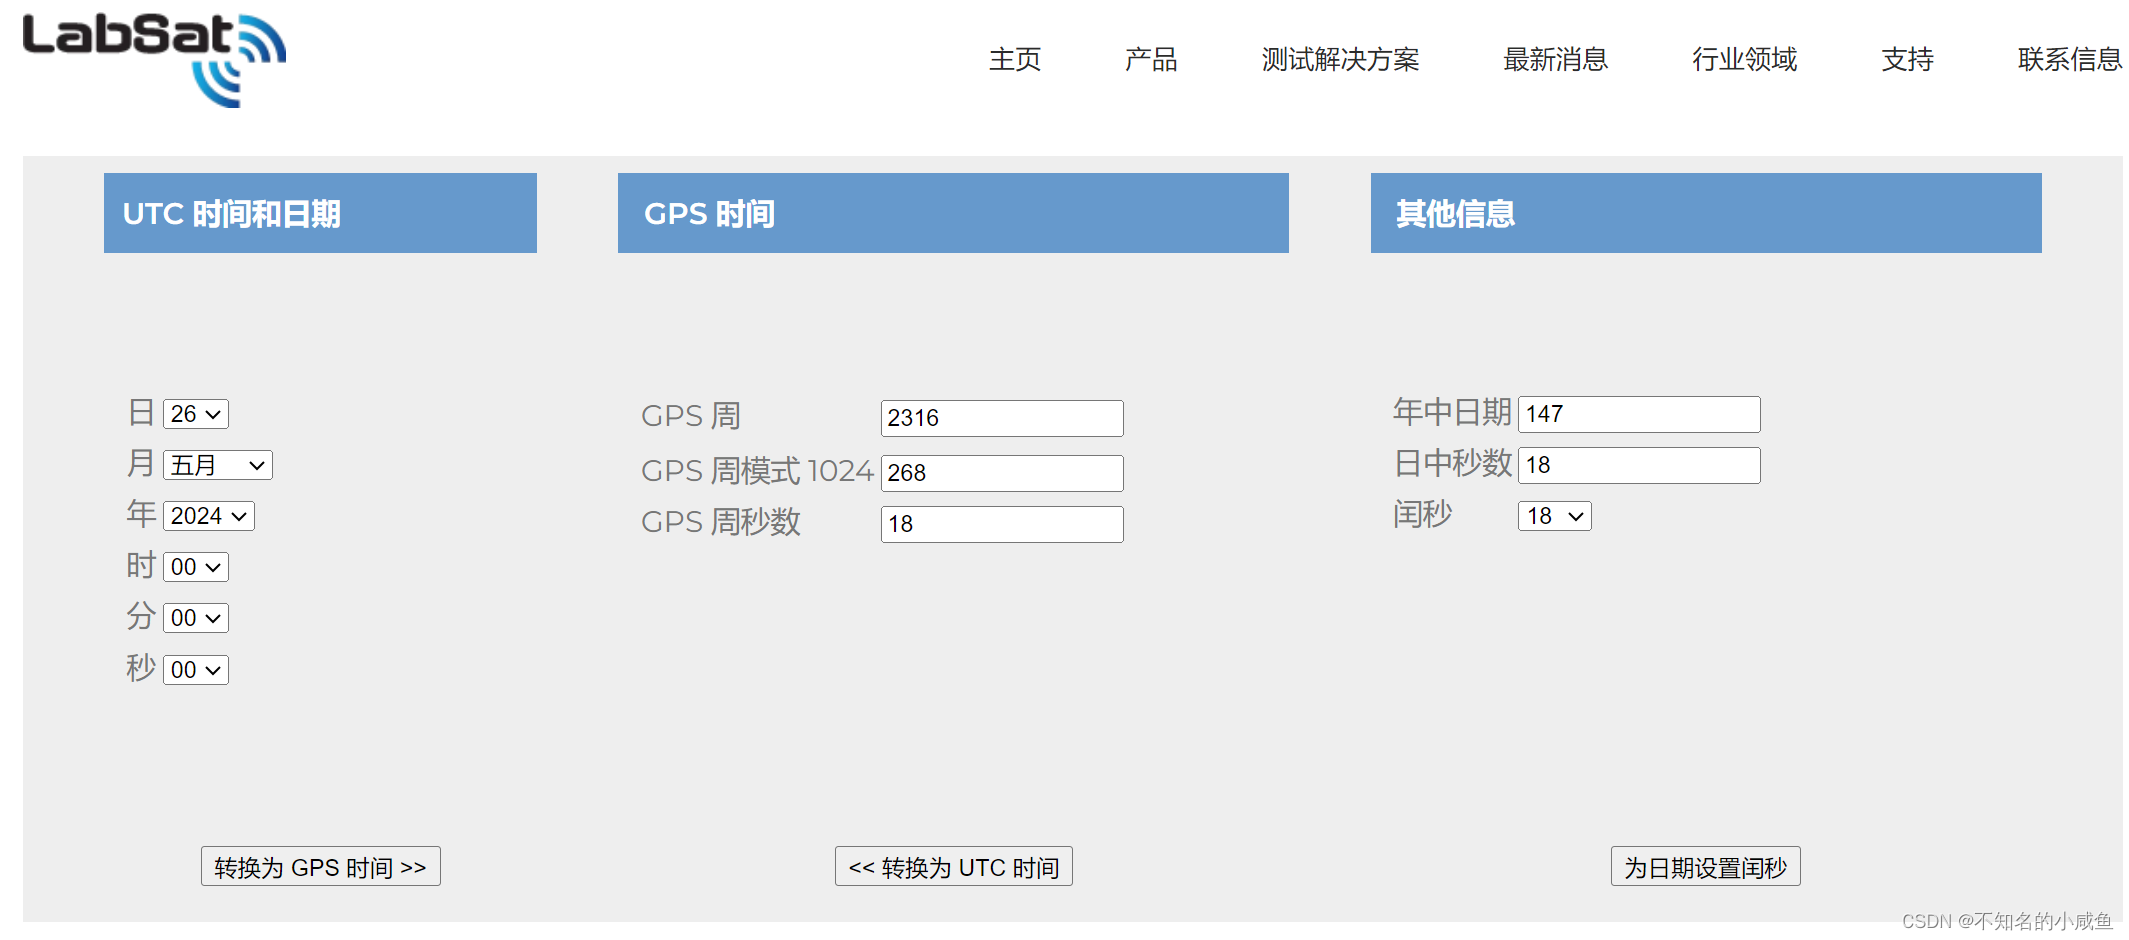
UTC与GPS时间转换-[week, sow]
UTC与GPS时间转换-[week, sow] utc2gpsgps2utc测试参考 Ref: Global Positioning System utc2gps matlab源码 function res utc2gps(utc_t, weekStart)%% parameterssec_day 86400;sec_week 604800;leapsec 18; % 默认周一为一周的开始if nargin < 2weekStart d…...

除了ulimit -c unlimited:深入理解Linux core dump机制与高级配置指南
深入Linux核心转储:从基础配置到生产环境实战指南当服务器上的关键应用突然崩溃时,系统管理员最需要的就是一份完整的"事故现场记录"。Linux的core dump机制正是为此而生,它能保存程序崩溃时的内存状态、寄存器值和调用堆栈&#x…...

Godot中型项目工程化实践:目录规范、资源引用与状态管理
1. 这不是续集,而是项目落地的分水岭“Godot 游戏引擎项目(二)”——看到这个标题,很多人第一反应是:“哦,上一篇讲了环境搭建和Hello World,这篇该讲节点树和信号了?”但我在带三个…...

Hirschmann RS20-0800M4M4SDAE工业以太网交换机
Hirschmann RS20-0800M4M4SDAE 工业以太网交换机产品特点:端口配置:共8个端口,含6个RJ45电口和2个ST光纤接口。端口速率:所有端口均为100Mbps快速以太网。光纤类型:2个光纤端口为多模、ST接头。管理类型:二…...

软阴影:那个让虚拟世界“温柔起来“的光影小秘密
一、从一只小猫的影子说起 前几天我在朋友家做客,他家养了一只胖乎乎的橘猫,正趴在阳台的窗边晒太阳。我无意间瞥了一眼那只猫脚边的影子,突然被一个细节震撼了—— 那只猫的影子——并不是一片均匀的黑。 仔细看——猫肚子紧贴地板的地方——…...

番茄小说下载器终极指南:三步构建你的离线阅读自由王国
番茄小说下载器终极指南:三步构建你的离线阅读自由王国 【免费下载链接】Tomato-Novel-Downloader 番茄小说下载器不精简版 项目地址: https://gitcode.com/gh_mirrors/to/Tomato-Novel-Downloader 你是否曾在地铁里读到精彩章节时突然断网?是否在…...

服务器日志分析实战:用Python追踪HTTP 404错误并可视化异常频率
作为一名爬虫开发者或网站运维人员,服务器日志就像飞机的“黑匣子”——它记录了每个请求的来龙去脉。而404错误(页面未找到)尤其值得关注:它可能是用户输错了网址,可能是你爬虫的URL构造逻辑有漏洞,也可能是网站改版后旧的链接失效了。更严重的是,大量突然涌出的404请求…...

Agent开发面试通关攻略:吃透稳拿offer
阅读前置:2026年当下最卷也最缺人的AI岗位,一定是AI Agent开发。最近刷遍CSDN、牛客、力扣最新面经,发现一个非常明显的招聘趋势:普通大模型微调岗位饱和内卷,而AI Agent开发岗位人才严重缺口,薪资更高、竞…...

Wechat2RSS:微信公众号转RSS订阅工具
文章目录Wechat2RSS:微信公众号转RSS订阅工具Wechat2RSS:微信公众号转RSS订阅工具 ttttmr开源的Wechat2RSS项目,目前在GitHub上获得1409颗Star,项目地址为https://github.com/ttttmr/Wechat2RSS。该工具的核心作用是将微信公众号…...

贵阳婚礼西服定制攻略:面料、工艺、版型避坑指南
婚礼西装是男士婚礼造型的核心,区别于日常商务正装,婚礼西服更看重版型精致度、面料质感、上身挺拔感以及镜头适配度。在贵阳备婚的新人,大多会放弃成品西装,选择专属定制服务。但本地婚礼西服定制市场参差不齐,很多新…...

光效崩坏?噪点泛滥?色温漂移?——Midjourney专业级光效渲染全流程校准协议,含ACEScg色彩空间适配模板
更多请点击: https://kaifayun.com 第一章:光效崩坏、噪点泛滥与色温漂移的系统性归因诊断 图像采集链路中出现的光效崩坏、噪点泛滥与色温漂移并非孤立现象,而是光学设计、传感器响应、ISP管线调度及环境耦合失配共同作用的结果。三者常呈现…...