Servlet搭建博客系统
现在我们可以使用Servlet来搭建一个动态(前后端可以交互)的博客系统了(使用Hexo只能实现一个纯静态的网页,即只能在后台自己上传博客)。有一种"多年媳妇熬成婆"的感觉。
一、准备工作
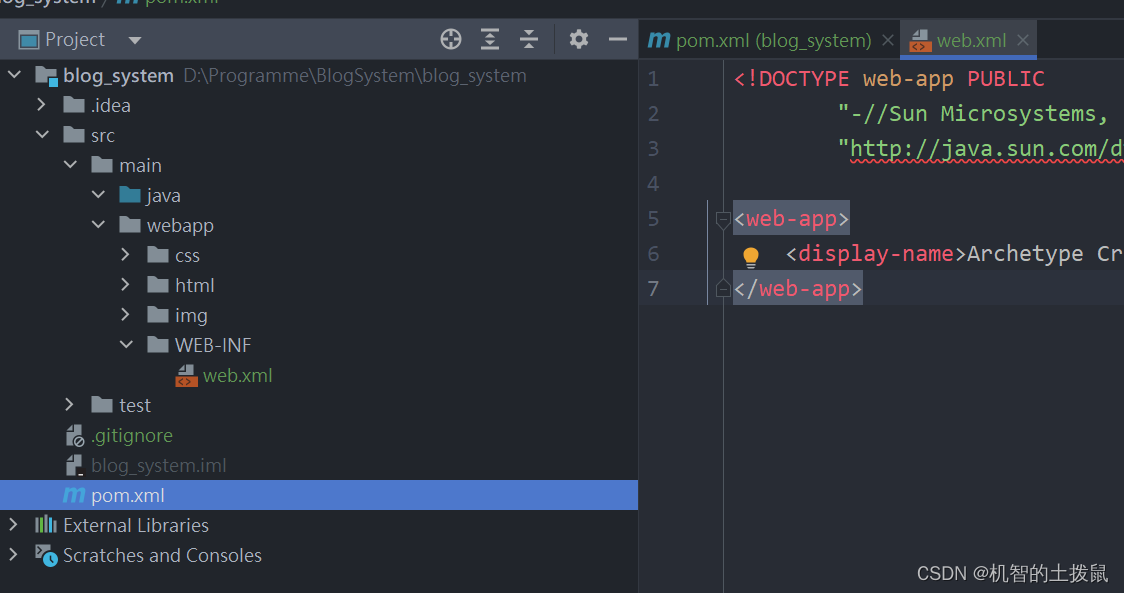
首先创建好项目,引入相关依赖。具体过程在"Servlet的创建"中介绍了。
在这我们要引入servlet,mysql,jackson的相关依赖。

然后将相关web.xml配置好,将网站前端的代码也引入webapp中。
二、业务逻辑的实现
由于数据要进行持久化保存,在这我们使用mysql数据来存储。
首先我们先进行数据库的设计。
在这个博客系统中,会涉及到写博客和登陆的简单操作,因此需要创建两个表:用户表和博客表。
因为数据库需要创建,当们换了一台机器的时候需要再一次创建,为了简便,可以将创建的sql语句保存下来,下次直接调用即可。
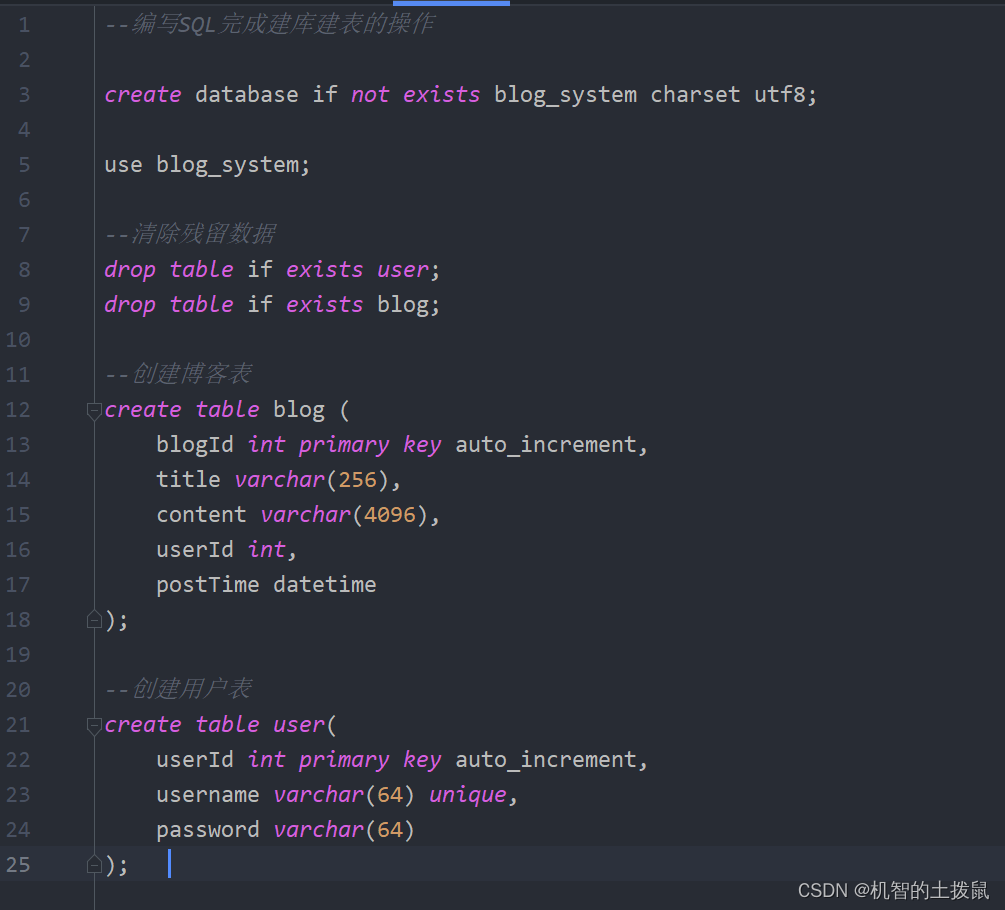
然后将上述代码复制到mysql的命令行执行即可。
封装数据库
为了简化后续对数据库的crud操作,在这对JDBC进行封装,后续代码就轻松许多了。
在这创建一个dao的文件夹,表示Data Access Object, 即数据访问对象,通过写一些类,然后通过类中的封装好的方法来间接访问数据库。
在dao文件下创建一个DBUtil的类,将连接数据库和释放资源操作进行封装。
package dao;import com.mysql.jdbc.jdbc2.optional.MysqlDataSource;import javax.sql.DataSource;
import java.sql.Connection;
import java.sql.PreparedStatement;
import java.sql.ResultSet;
import java.sql.SQLException;public class DBUtil {//使用单例模式中的饿汉模式创建实例private static volatile DataSource dataSource = null;private static DataSource getDataSource(){//防止竞争太激烈if(dataSource == null){synchronized (DBUtil.class){if(dataSource == null){dataSource = new MysqlDataSource();((MysqlDataSource)dataSource).setUrl("jdbc:mysql://127.0.0.1:3306/blog_system?characterEncoding=utf8&useSSL=false");((MysqlDataSource)dataSource).setUser("root");((MysqlDataSource)dataSource).setPassword("root");}}}return dataSource;}//获取数据库连接public static Connection getConnection() {try {return getDataSource().getConnection();} catch (SQLException e) {e.printStackTrace();}return null;}//释放资源public static void close(Connection connection, PreparedStatement statement, ResultSet resultSet){//一个一个释放,防止一个抛出异常,后续就不释放连接了if(resultSet != null){try {resultSet.close();} catch (SQLException e) {e.printStackTrace();}}if(statement != null){try {statement.close();} catch (SQLException e) {e.printStackTrace();}}if(connection != null){try {connection.close();} catch (SQLException e) {e.printStackTrace();}}}
}
创建实体类
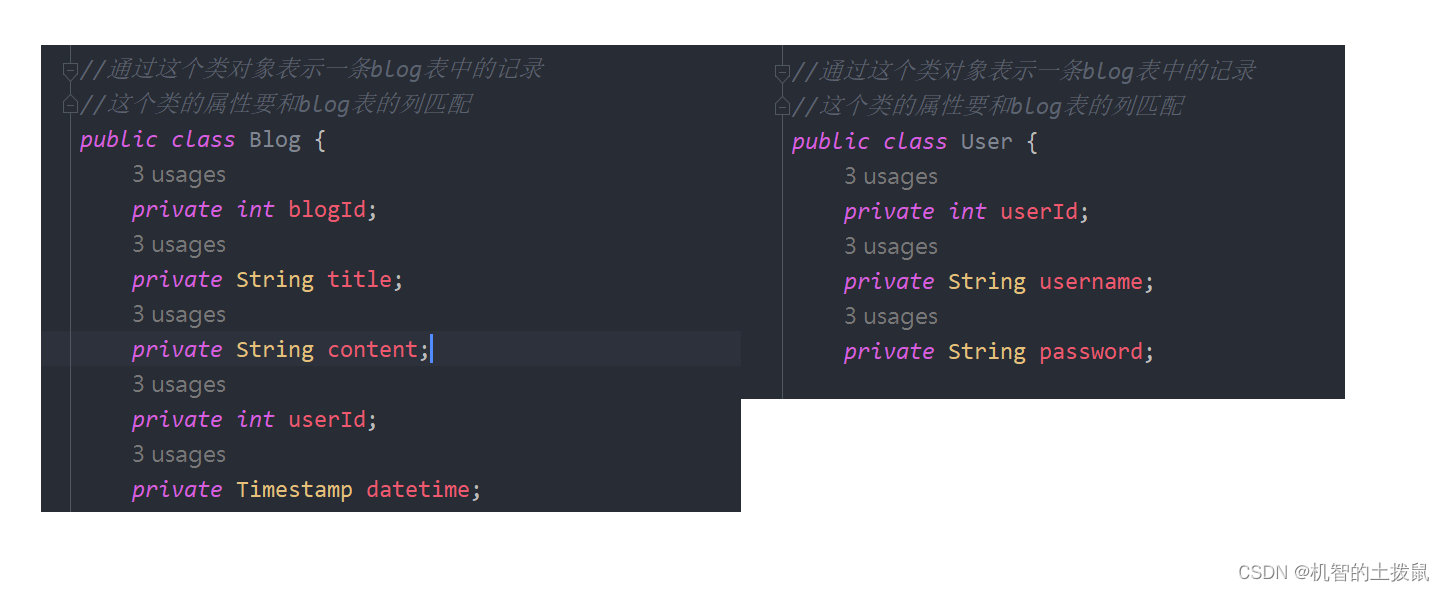
创建实体类的Dao类,进一步封装数据库操作
package dao;import java.net.ConnectException;
import java.sql.Connection;
import java.sql.PreparedStatement;
import java.sql.ResultSet;
import java.sql.SQLException;
import java.util.ArrayList;
import java.util.List;//通过这个类,封装针对 blog 表的增删改查操作
public class BlogDao {//新增一个博客//使用try catch捕获异常,finally释放资源public void insert(Blog blog)  {Connection connection = null;PreparedStatement statement = null;try{connection = DBUtil.getConnection();String sql = "insert into blog values(null, ?, ?, ?, now())";statement = connection.prepareStatement(sql);statement.setString(1, blog.getTitle());statement.setString(2, blog.getContent());statement.setInt(3, blog.getUserId());statement.executeUpdate();}catch (SQLException e){e.printStackTrace();}finally {DBUtil.close(connection, statement, null);}}public List<Blog> getBlogs(){Connection connection = null;PreparedStatement statement = null;ResultSet resultSet = null;List<Blog> blogs = new ArrayList<>();try{connection = DBUtil.getConnection();String sql = "select * from blog";statement = connection.prepareStatement(sql);resultSet = statement.executeQuery();while(resultSet.next()){Blog blog = new Blog();blog.setBlogId(resultSet.getInt("blogId"));blog.setTitle(resultSet.getString("title"));blog.setContent(resultSet.getString("content"));blog.setUserId(resultSet.getInt("userId"));blog.setPostTime(resultSet.getTimestamp("postTime"));blogs.add(blog);}}catch (SQLException e){e.printStackTrace();}finally {DBUtil.close(connection, statement, resultSet);}return blogs;}public Blog getBlog(){Connection connection = null;PreparedStatement statement = null;ResultSet resultSet = null;Blog blog = null;try{connection = DBUtil.getConnection();String sql = "select * from blog";statement = connection.prepareStatement(sql);resultSet = statement.executeQuery();if(resultSet.next()){blog = new Blog();blog.setBlogId(resultSet.getInt("blogId"));blog.setTitle(resultSet.getString("title"));blog.setContent(resultSet.getString("content"));blog.setUserId(resultSet.getInt("userId"));blog.setPostTime(resultSet.getTimestamp("postTime"));}} catch (SQLException e){e.printStackTrace();}finally {DBUtil.close(connection, statement, resultSet);}return blog;}//根据博客ID指定博客删除public void delete(int blogId){Connection connection = null;PreparedStatement statement = null;try{connection = DBUtil.getConnection();String sql = "delete from blog where blogId = ?";statement = connection.prepareStatement(sql);statement.setInt(1, blogId);statement.executeUpdate();}catch (SQLException e){e.printStackTrace();}finally {DBUtil.close(connection, statement, null);}}
}
后面再处理数据库操作的时候就可以直接使用这些代码了。
通过观察这些代码,我们会发现非常多重复的东西,后期通过学习了一些高级的框架后就能将代码的结构再优化一下.
同理,UserDao类也是如此完成。
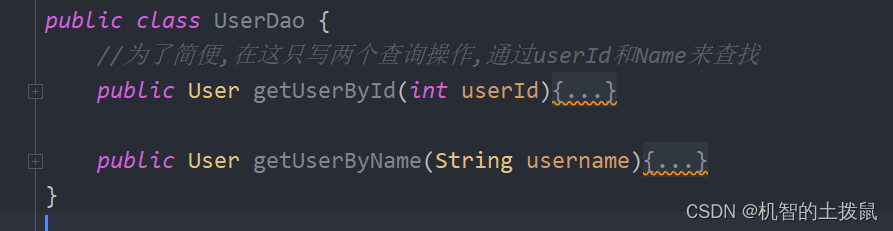
至此,数据方面的东西我们都已经写完了,后续只需要调用即可。
接来下就可以进行一些前后端交互逻辑的实现了。
在这以功能点为维度进行展开,针对每个功能点,进行"设计前后端交互接口","开发后端代码","开发前端代码","调试"
实现博客列表页
让博客列表页能够加载博客列表。
大致流程如下:
-
前端发起一个HTTP请求,向后端所要博客列表数据
-
后端收到请求之后查询数据库获取数据库中的 博客列表,将数据返回给前端
-
前端拿到响应后,根据内容构造出html片段,并显示。
在写代码前,需要进行约定,即规范双方发什么样的数据,发什么请求,如何解析数据等。
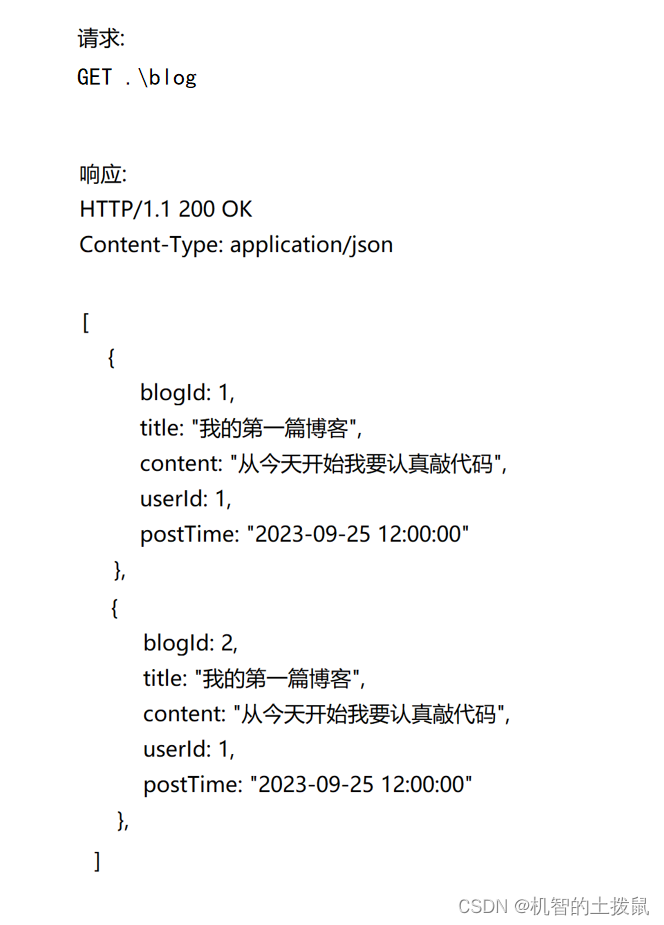
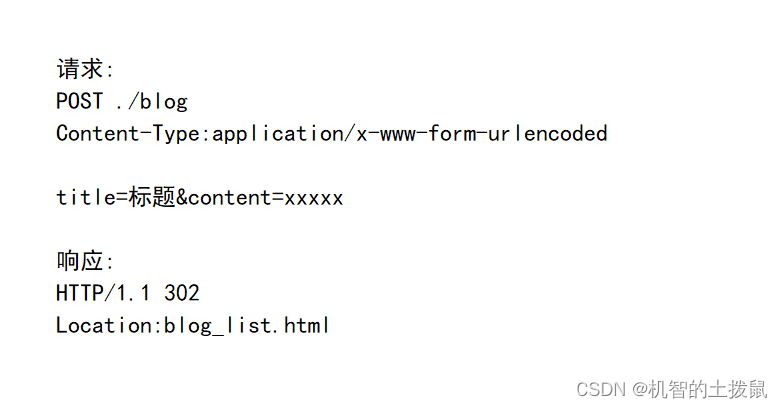
假设双方约定按照如下格式发送数据。
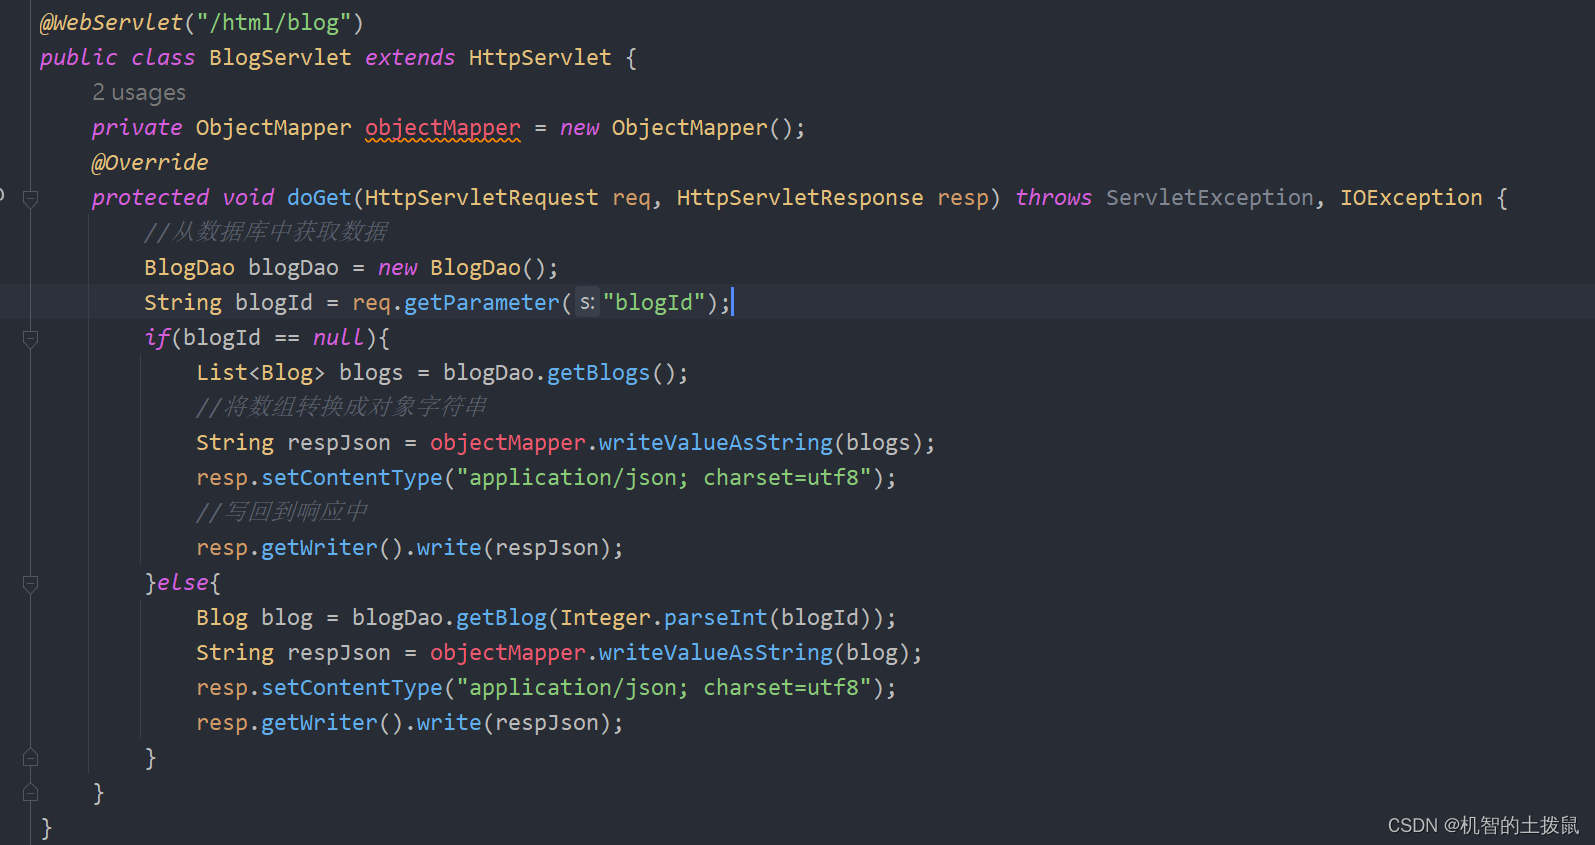
后端代码:
@WebServlet("/html/blog")
public class BlogServlet extends HttpServlet {private ObjectMapper objectMapper = new ObjectMapper();@Overrideprotected void doGet(HttpServletRequest req, HttpServletResponse resp) throws ServletException, IOException {//从数据库中获取数据BlogDao blogDao = new BlogDao();List<Blog> blogs = blogDao.getBlogs();//将数组转换成对象字符串String respJson = objectMapper.writeValueAsString(blogs);resp.setContentType("application/json; charset=utf8");//写回到响应中resp.getWriter().write(respJson);}
}
前端代码:
让页面通过js的ajax的方式发起http请求。
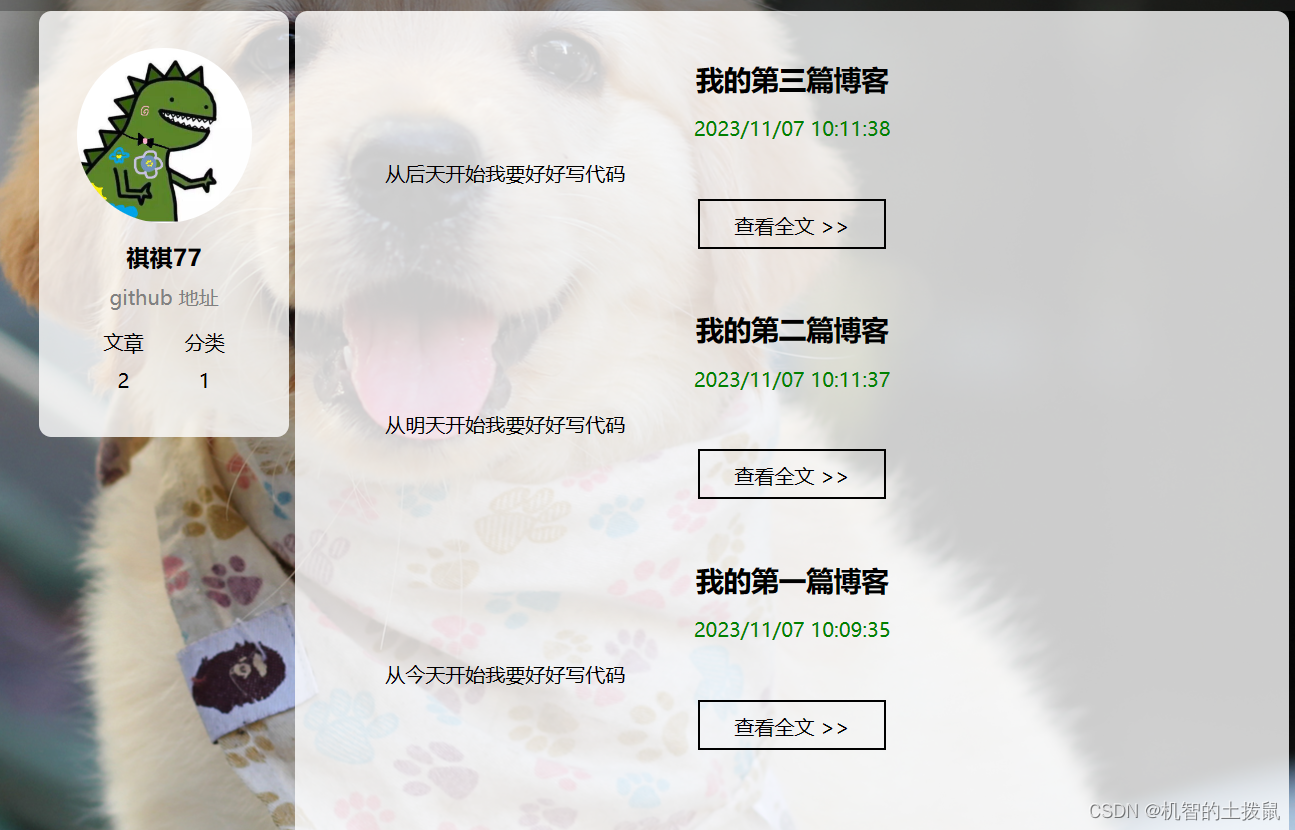
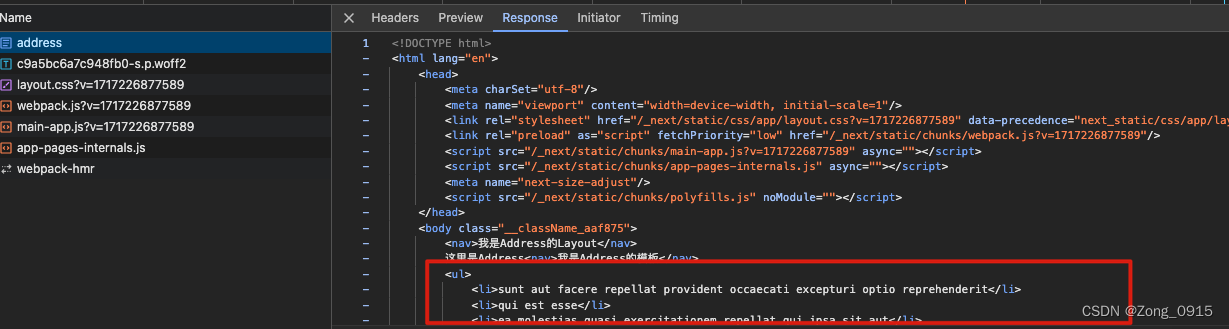
function getBlogs(){$.ajax({type: 'get',url: 'blog',success: function(body){let container = document.querySelector('.container-right');for(let blog of body){let blogDiv = document.createElement('div');blogDiv.className='blog';//构造标题let titleDiv = document.createElement('div');titleDiv.className = 'title';titleDiv.innerHTML = blog.title;blogDiv.appendChild(titleDiv);//构造发布时间let dateDiv = document.createElement('div');dateDiv.className = 'date';dateDiv.innerHTML = blog.postTime;blogDiv.appendChild(dateDiv);//构造博客摘要let descDiv = document.createElement('div');descDiv.className = 'desc';descDiv.innerHTML = blog.content;blogDiv.appendChild(descDiv);//构造查看全文按钮let a = document.createElement('a');a.href = 'blog_content.html?blogId=' + blog.blogId;a.innerHTML = '查看全文 >>';blogDiv.appendChild(a);container.appendChild(blogDiv);}}});}getBlogs();由于数据库中的数据为标明啥数据,我们还需要手动指定.
效果如下:
博客详情页
1.约定前后端交互接口
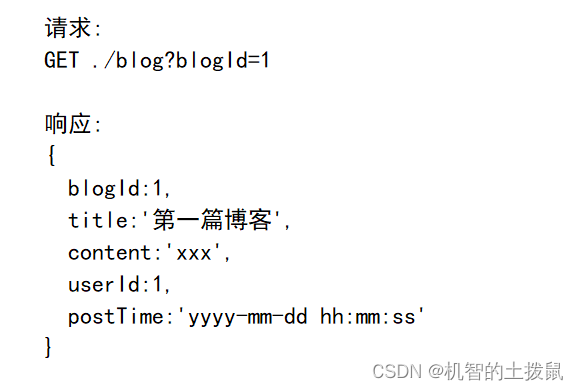
和前面博客列表页类似,不同的是我们只需要在请求中带上blogId的属性,以及后端代码的稍作修改即可。
后端代码:
我们可以通过对之前的后端代码稍作修改,就可以完成上述操作。
前端代码:
<script src="https://cdn.bootcdn.net/ajax/libs/jquery/3.6.4/jquery.min.js"></script><script>function getBlog(){$.ajax({type: 'get',url: 'blog'+location.search,success: function(body){let h3 = document.querySelector('.container-right h3');h3.innerHTML = body.title;let dateDiv = document.querySelector('.container-right .date');dateDiv.innerHTML = body.postTime;editormd.markdownToHTML('content', { markdown: body.content });}});}getBlog();</script>登录功能
1.约定前后端交互接口
此处提交用户名和密码,可以使用form也可以使用ajax。在这使用form的形式(更简单一些)。
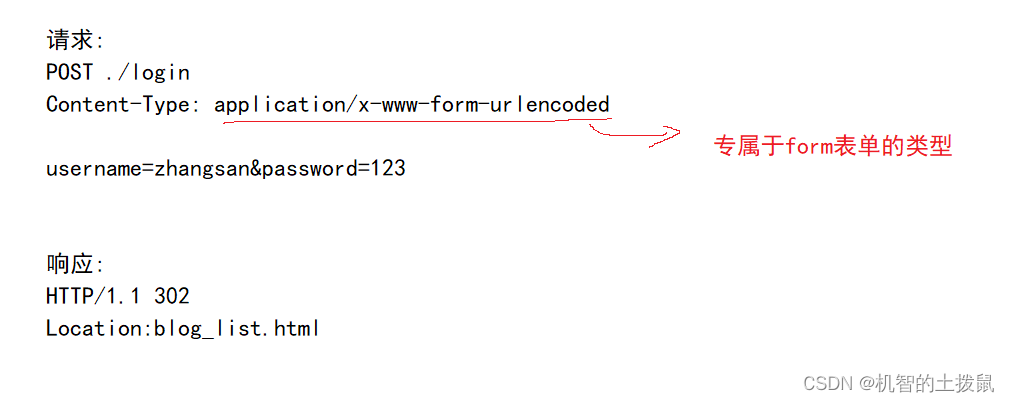
2.后端代码
@WebServlet("/html/login")
public class LoginServlet extends HttpServlet {@Overrideprotected void doPost(HttpServletRequest req, HttpServletResponse resp) throws ServletException, IOException {//首先获取请求中的查询字符串中的用户名和密码//需要手动告诉Servlet,使用什么样的编码方式来读取请求req.setCharacterEncoding("utf8");String username = req.getParameter("username");String password = req.getParameter("password");if(username == null || password == null || username.equals("") || password.equals("")){//用户提交的数据非法resp.setContentType("text/html; charset=utf8");resp.getWriter().write("当前的用户名或密码非法");return;}//再去数据库中比对UserDao userDao = new UserDao();User user = userDao.getUserByName(username);if(user == null){resp.setContentType("text/html; charset=utf8");resp.getWriter().write("当前的用户名或密码错误");return;}if(!user.getPassword().equals(password)){resp.setContentType("text/html; charset=utf8");resp.getWriter().write("当前的用户名或密码错误");}//创建会话关系HttpSession session = req.getSession(true);session.setAttribute("user", user);//发送重定向网页,跳转到列表页resp.sendRedirect("blog_list.html");}
}
注意:
由于请求中可能带有中文字符,我们需要手动指定一下字符集utf8,防止读取请求的时候出现乱码。
使用一个会话,让服务器保存当前用户的一些数据。
3.前端代码
<form action="login" method="post"><div class="row"><span>用户名</span><input type="text" id="username"></div><div class="row"><span>密码</span><input type="password" id="password"></div><div class="row"><input type="submit" id="submit" value="登录"></div></form>检查用户登录状态
强制用户登录,当用户直接去访问博客列表页或者其他页面的时候,如果是未登录过的状态,会强制跳转到登录页要求用户登录。
如何实现?
在其他页面中的前端代码,写一个ajax请求,通过这个请求,访问服务器来获取当前的登录状态。
如果当前未登录,则跳转登录页面,如果已经登录,就不进行操作。
1.约定前后端交互接口
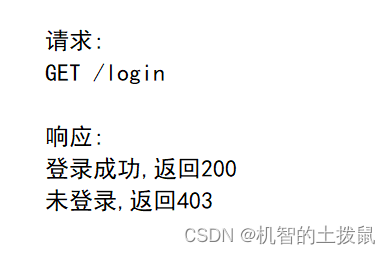
2.后端代码
protected void doGet(HttpServletRequest req, HttpServletResponse resp) throws ServletException, IOException {HttpSession session = req.getSession(false);if(session == null){resp.setStatus(403);return;}User user = (User) session.getAttribute("user");if(user == null){resp.setStatus(403);return;}resp.setStatus(200);}3.前端代码
<div class="login-container"><!-- 登录对话框 --><div class="login-dialog"><h3>登录</h3><!-- 使用 form 包裹一下下列内容, 便于后续给服务器提交数据 --><form action="login" method="post"><div class="row"><span>用户名</span><input type="text" id="username" name="username"></div><div class="row"><span>密码</span><input type="password" id="password" name="password"></div><div class="row"><input type="submit" id="submit" value="登录"></div></form></div></div>form表单中的action为请求中的url,method为请求中的方法类型,id属性时针对html获取元素,name属性则是针对form表单构造http请求。
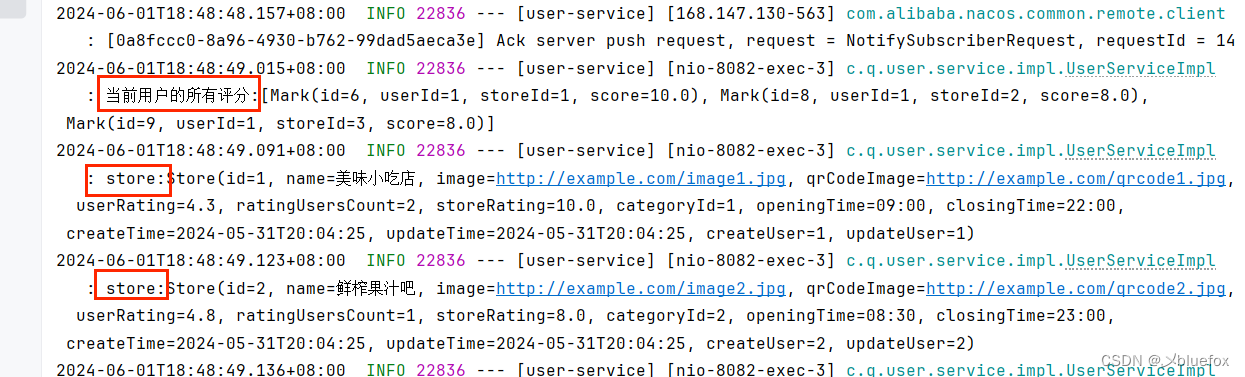
显示用户信息
当我们进入博客列表页的时候,用户显示的内容应该是登录用户的信息,一旦我们进入到博客详情页的时候,显示的就应该是该博客作者的信息。
首先是博客列表页
1.约定前后端交互接口
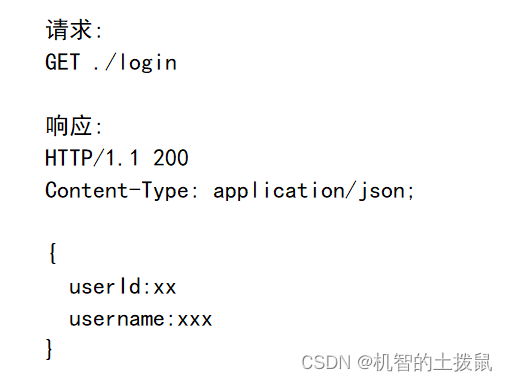
2.后端代码
由于我们进入博客列表页,首先会去检查是否已经登录过,如果登录过就可以拿到用户的数据,此时我们可以将用户数据返回给前端,然后修改用户姓名的属性。此时我们也只要在前面代码的基础上稍加修改。
//防止将密码传输回去user.setPassword("");String respJson = objectMapper.writeValueAsString(user);resp.setContentType("application/json; charset=utf8");resp.getWriter().write(respJson);3.前端代码
前端代码也只需要在之前的基础上稍加修改就行
function checkLogin(){$.ajax({type: 'get',url: 'login',success: function(body){let h3 = document.querySelector('h3');h3.innerHTML = body.username;},error: function(body){location.assign('blog_login.html');}}) ;
}
然后是博客详情页
详情页这里显示的是当前文章的作者信息,由于我们知道blogId,就可以查询到userId然后就能查询到user的信息。最后再将信息显示出来即可。
1.约定前后端交互接口
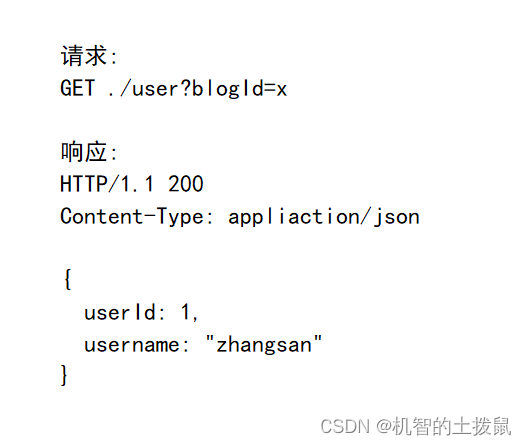
2.后端代码
public class UserServlet extends HttpServlet {private ObjectMapper objectMapper = new ObjectMapper();@Overrideprotected void doGet(HttpServletRequest req, HttpServletResponse resp) throws ServletException, IOException {String blogId = req.getParameter("blogId");//如果用户直接访问博客详情页if(blogId == null){//从session中拿到user对象HttpSession session = req.getSession(false);if(session == null){//为了方便后续统一处理,返回空对象User user = new User();String respJson = objectMapper.writeValueAsString(user);resp.setContentType("application/json; charset=utf8");resp.getWriter().write(respJson);return;}User user = (User)session.getAttribute("user");String respJson = objectMapper.writeValueAsString(user);resp.setContentType("application/json; charset=utf8");resp.getWriter().write(respJson);}else{BlogDao blogDao = new BlogDao();Blog blog = blogDao.getBlog(Integer.parseInt(blogId));if(blog == null){User user = new User();String respJson = objectMapper.writeValueAsString(user);resp.setContentType("application/json; charset=utf8");resp.getWriter().write(respJson);return;}UserDao userDao = new UserDao();User user = userDao.getUserById(blog.getUserId());if(user == null){String respJson = objectMapper.writeValueAsString(user);resp.setContentType("application/json; charset=utf8");resp.getWriter().write(respJson);return;}String respJson = objectMapper.writeValueAsString(user);resp.setContentType("application/json; charset=utf8");resp.getWriter().write(respJson);}}
}
3.前端代码
前端代码前面博客列表页类似
function getUser(){$.ajax({type:'get',url:'user'+location.search,success: function(body){let h3 = document.querySelector('.card h3');h3.innerHTML = body.username;}});}getUser();用户退出功能
当用户点击注销的时候,即点击了a标签,此时会触发一个get请求,服务器收到这个get请求,就可以把当前用户会话中的user对象删除。即通过代码删除之前的session对象(最好是删除映射关系,但是Servlet没有提供相应简单的API).
1.约定前后端交互接口

2.后端代码
@WebServlet("/html/logout")
public class LogoutServlet extends HttpServlet {@Overrideprotected void doGet(HttpServletRequest req, HttpServletResponse resp) throws ServletException, IOException {HttpSession session = req.getSession(false);if(session == null){resp.sendRedirect("blog_login.html");return;}session.removeAttribute("user");resp.sendRedirect("blog_login.html");}
}
3.前端代码
只需要给a元素写个href即可。
![]()
发布博客
在写博客页中,用户可以写博客标题,正文,然后点击发布即可上传数据。
1.约定前后端交互接口
2.后端代码
@Overrideprotected void doPost(HttpServletRequest req, HttpServletResponse resp) throws ServletException, IOException {HttpSession session = req.getSession(false);if(session == null){resp.setContentType("text/html; charset=utf8");resp.getWriter().write("用户未登录! 无法发布博客!");return;}User user = (User)session.getAttribute("user");if (user == null) {resp.setContentType("text/html; charset=utf8");resp.getWriter().write("用户未登录! 无法发布博客!");return;}resp.setCharacterEncoding("utf8");String title = req.getParameter("title");String content = req.getParameter("content");if (title == null || content == null || "".equals(title) || "".equals(content)) {resp.setContentType("text/html; charset=utf8");resp.getWriter().write("标题或者正文为空");return;}Blog blog = new Blog();blog.setTitle(title);blog.setContent(content);blog.setUserId(user.getUserId());BlogDao blogDao = new BlogDao();blogDao.insert(blog);resp.sendRedirect("blog_list.html");}3.前端代码
<div class="blog-edit-container"><form action="blog" method="post"><!-- 标题编辑区 --><div class="title"><input type="text" id="title-input" name="title"><input type="submit" id="submit"></div><!-- 博客编辑器 --><!-- 把 md 编辑器放到这个 div 中 --><div id="editor"><textarea name="content" style="display: none;"></textarea></div></form></div>相关文章:
Servlet搭建博客系统
现在我们可以使用Servlet来搭建一个动态(前后端可以交互)的博客系统了(使用Hexo只能实现一个纯静态的网页,即只能在后台自己上传博客)。有一种"多年媳妇熬成婆"的感觉。 一、准备工作 首先创建好项目,引入相关依赖。具体过程在"Servlet的创建"中介绍了。…...
NextJs 渲染篇 - 什么是CSR、SSR、SSG、ISR 和服务端/客户端组件
NextJs 渲染篇 - 什么是CSR、SSR、SSG、ISR 和服务端/客户端组件 前言一. 什么是CSR、SSR、SSG、ISR1.1 CSR 客户端渲染1.2 SSR 服务端渲染1.3 SSG 静态站点生成① 没有数据请求的页面② 页面内容需要请求数据③ 页面路径需要获取数据 1.4 ISR 增量静态再生1.5 四种渲染方式的对…...
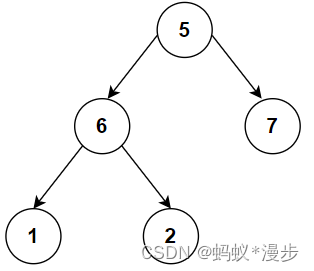
Python 二叉数的实例化及遍历
首先创建一个这样的二叉树,作为我们今天的实例。实例代码在下方。 #创建1个树类型 class TreeNode:def __init__(self,val,leftNone,rightNone):self.valvalself.leftleftself.rightright #实例化类 node1TreeNode(5) node2TreeNode(6) node3TreeNode(7) node4Tre…...
计算 x 的二进制表示中 1 的个数
计算 x 的二进制表示中 1 的个数 代码如下: int func(int x){int countx 0;while (x>0){countx;x x & (x - 1);}return countx;} 完整代码: using System; using System.Collections.Generic; using System.ComponentModel; using System.Dat…...

基于Vue的前端瀑布流布局组件的设计与实现
摘要 随着前端技术的不断演进,复杂业务场景和多次迭代后的产品对组件化开发提出了更高的要求。传统的整块应用开发方式已无法满足快速迭代和高效维护的需求。因此,本文将介绍一款基于Vue的瀑布流布局组件,旨在通过组件化开发提升开发效率和降…...
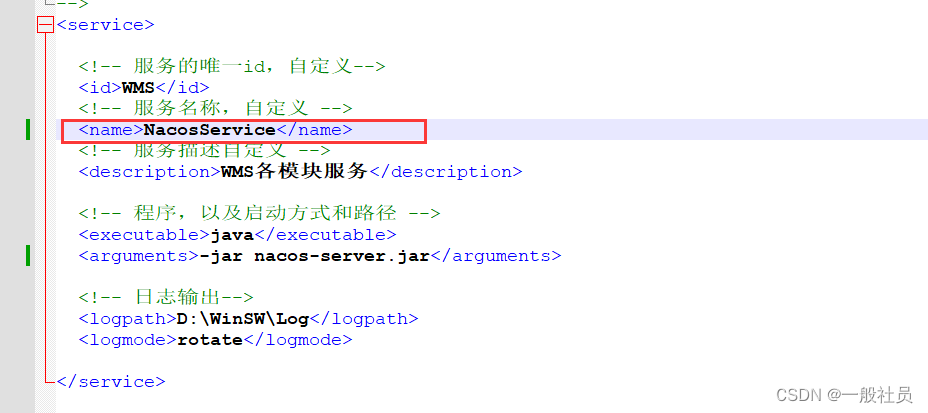
WinSW使用说明
WinSW使用说明 Windows系统下部署多个java程序 场景: 多个java的jar程序,通常来说一个程序使用一个cmd窗口,通过java -jar xxx.jar 命令来运行。这样如果程序多了打开cmd窗口也就多了。 解决: 通过使用WinSW程序,把ja…...

SpringBoot 多模块 多环境 项目 单元测试
环境描述 假设项目中有以下三个yml文件: application.ymlapplication-dev.ymlapplication-prod.yml 假设项目各Module之间依赖关系如下: 其中,D依赖C,C依赖B,B依赖A,D对外提供最终的访问接口 现在要想采…...

网络安全法中的网络安全规定和措施
《中华人民共和国网络安全法》是中国首部全面规范网络空间安全管理的基础性法律,旨在加强网络安全,保障国家安全和社会公共利益,保护公民、法人和其他组织的合法权益,促进互联网的健康发展。以下是该法律中关于网络安全的一些核心…...

一、搭建 Vue3 Admin 项目:从无到有的精彩历程
在前端开发的领域中,Vue3 展现出了强大的魅力,而搭建一个功能丰富的 Vue3 Admin 项目更是充满挑战与乐趣。今天,我将和大家分享我搭建 Vue3 Admin 项目的详细过程,其中用到了一系列重要的依赖包。 首先 让我们开启这个旅程。在确…...

Qt | Qt 资源简介(rcc、qmake)
1、资源系统是一种独立于平台的机制,用于在应用程序的可执行文件中存储二进制文件(前面所讨论的数据都存储在外部设备中)。若应用程序始终需要一组特定的文件(比如图标),则非常有用。 2、资源系统基于 qmake,rcc(Qt 的资源编译器,用于把资源转换为 C++代码)和 QFile …...
对boot项目拆分成cloud项目的笔记
引言:这里我用的是新版本的技术栈 spring-boot-starter-parent >3.2.5 mybatis-spring-boot-starter >3.0.3 mybatis-plus-boot-starter >3.5.5 spring-cloud-dependencies …...
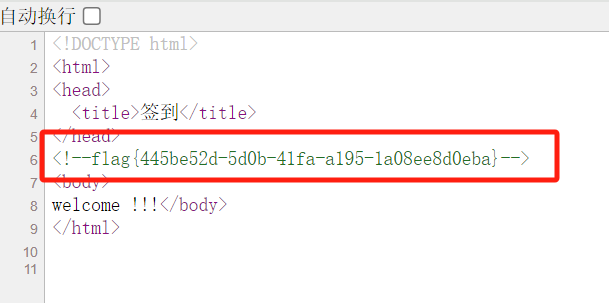
CTF本地靶场搭建——基于阿里云ACR实现动态flag题型的创建
接上文,这篇主要是结合阿里云ACR来实现动态flag题型的创建。 这里顺便也介绍一下阿里云的ACR服务。 阿里云容器镜像服务(简称 ACR)是面向容器镜像、Helm Chart 等符合 OCI 标准的云原生制品安全托管及高效分发平台。 ACR 支持全球同步加速、…...
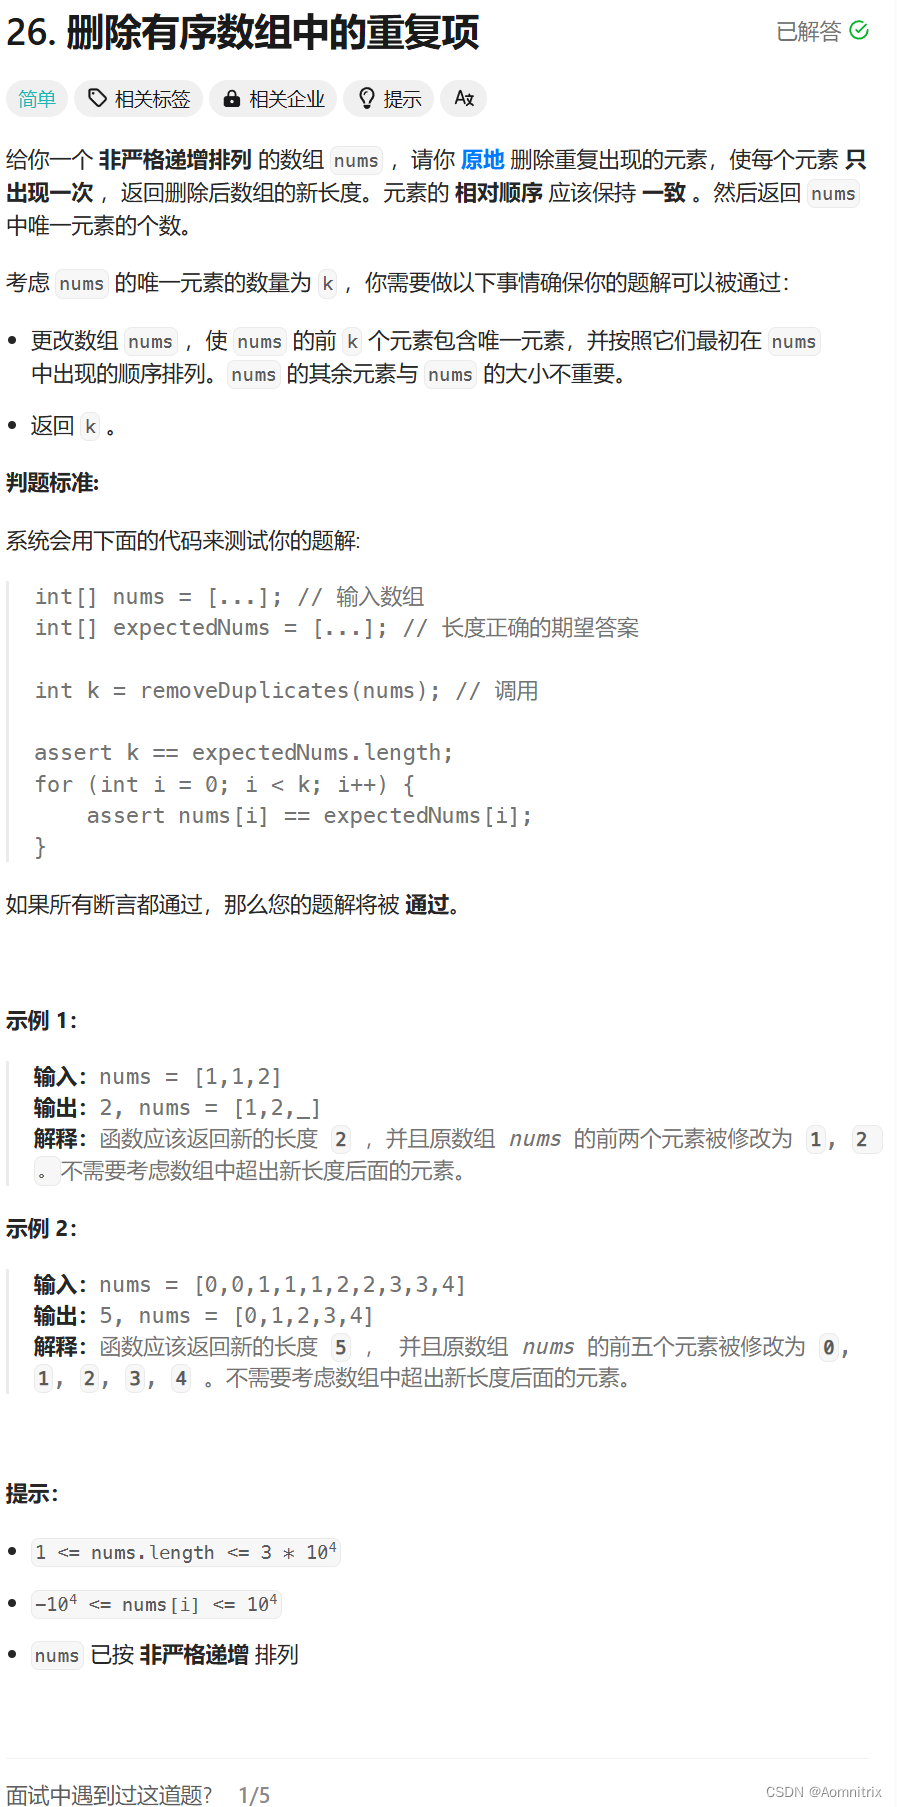
【面试经典150题】删除有序数组中的重复项
目录 一.删除有序数组中的重复项 一.删除有序数组中的重复项 题目如上图所示,这里非严格递增排序的定义是数字序列,其中相邻的数字可以相等,并且数字之间的差值为1。 这题我们依旧使用迭代器进行遍历,比较当前的数据是否与下一个数…...

太阳能辐射整车综合性能环境试验舱
产品别名 步入式恒温恒湿试验箱、步入式温湿度试验箱、温度试验室、模拟环境试验室、大型恒温恒湿箱、步入式高低温湿热交变试验箱、大型高低温箱、步入式老化箱、恒温恒湿试验房、步入式高低温试验箱. 整车综合性能环境试验舱:整车综合性能环境试验舱:主要用于整车高低温存放…...
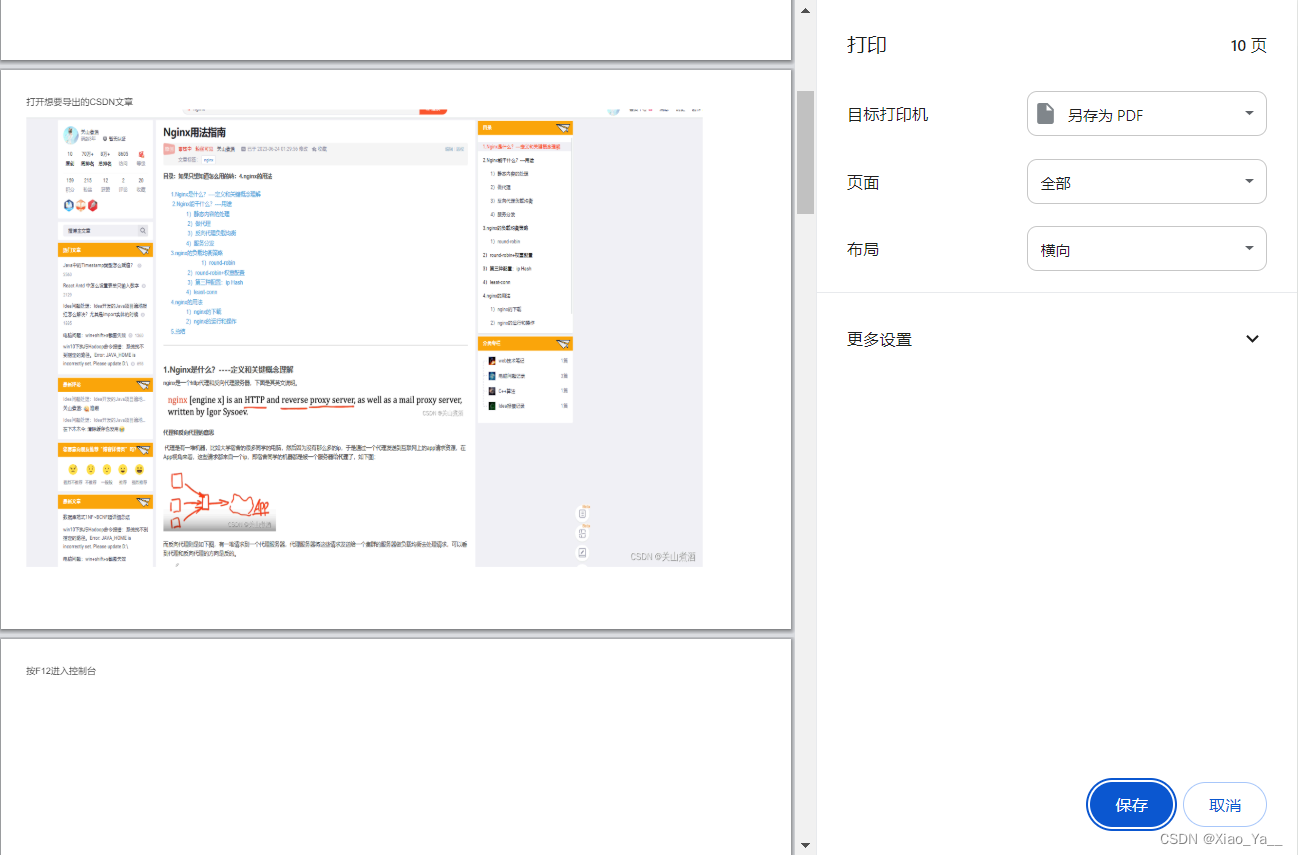
JS脚本打包成一个 Chrome 扩展(CRX 插件)
受这篇博客 如何把CSDN的文章导出为PDF_csdn文章怎么导出-CSDN博客 启发,将 JavaScript 代码打包成一个 Chrome 扩展(CRX 插件)。 步骤: 1.创建必要的文件结构和文件: manifest.jsonbackground.jscontent.js 2.编写…...

js事件对象
js事件对象概念说明 在JavaScript中,事件对象是在事件触发时由浏览器自动创建的一个对象。它包含了与事件相关的信息,例如触发事件的元素、事件类型、鼠标的坐标等。 可以通过事件处理函数的第一个参数来访问事件对象。例如,在一个鼠标点击…...
希捷硬盘怎么恢复数据? 5 个免费希捷数据恢复软件
希捷已迅速成为全球最大的数字存储提供商。许多人选择并使用希捷外置硬盘来存储他们的媒体文件、学校或工作文件以及其他重要数据。有时,希捷硬盘中的数据会丢失。 如果您丢失了希捷硬盘上的数据,请不要惊慌。在专业的希捷数据恢复软件的帮助下…...
Nvidia Jetson/Orin +FPGA+AI大算力边缘计算盒子:京东无人配送机器人
电商巨头京东已选用NVIDIA Jetson AGX Xavier 平台,作为下一代自主配送机器人核心AI算力。 在过去的几十年中,中国占据了全球40%以上的电商交易——每年约为千亿美元。根据麦肯锡全球研究院的数据,这一数字已经高于法国、德国、…...

STM32作业实现(七)OLED显示数据
目录 STM32作业设计 STM32作业实现(一)串口通信 STM32作业实现(二)串口控制led STM32作业实现(三)串口控制有源蜂鸣器 STM32作业实现(四)光敏传感器 STM32作业实现(五)温湿度传感器dht11 STM32作业实现(六)闪存保存数据 STM32作业实现(七)OLED显示数据 STM32作业实现(八)触摸按…...
elementui el-tooltip文字提示组件弹出层内容格式换行处理
1、第一种 1.1 效果图 1.2、代码 <template><div class"wrapper"><el-tooltip class"content" effect"dark" placement"top"><div slot"content"><div v-html"getTextBrStr(text)"&…...

Go语言实现跨平台系统更新检查器:自动化运维与安全监控实践
1. 项目概述:一个被低估的系统运维“哨兵”在服务器和桌面系统的日常运维中,有一个场景大家一定不陌生:某天,你管理的服务器突然因为一个已知漏洞被攻击,事后排查发现,相关的安全补丁其实在几周前就已经发布…...

Go语言静态站点生成器Zeuxis:极简架构与高性能构建实践
1. 项目概述:一个轻量级、高性能的静态站点生成器最近在折腾个人博客和文档站点,发现市面上的静态站点生成器虽然多,但要么配置复杂、学习曲线陡峭,要么过于臃肿,启动和构建速度慢得让人抓狂。直到我遇到了bnomei/zeux…...

合宙Air153C看门狗芯片:嵌入式系统可靠性的硬件守护方案
1. 项目概述:一颗“小而美”的国产看门狗芯片最近在做一个低功耗的户外监测设备项目,主控用的就是合宙的Air系列MCU。在调试过程中,最让我头疼的就是系统偶尔的“死机”问题。设备部署在野外,不可能每次都跑过去手动重启。正当我琢…...

基于AutoHotkey的Windows桌面自动化工具开发实战
1. 项目概述与核心价值最近在整理个人项目库时,翻到了一个挺有意思的“老伙计”——cua_desktop_operator_skill。这个项目名听起来有点拗口,直译过来是“CUA桌面操作员技能”。乍一看,可能会让人联想到某种工业控制台的专用软件。但实际上&a…...

量化交易强化学习环境TradingGym:从Gym接口到实战策略训练
1. 项目概述:一个为量化交易策略量身定制的强化学习训练场如果你正在尝试将强化学习(Reinforcement Learning, RL)应用到股票、期货或加密货币的量化交易中,大概率会遇到一个共同的困境:环境太难搭了。市面上的回测框架…...

ComfyUI-Manager终极指南:3步掌握AI绘画插件管理技巧
ComfyUI-Manager终极指南:3步掌握AI绘画插件管理技巧 【免费下载链接】ComfyUI-Manager ComfyUI-Manager is an extension designed to enhance the usability of ComfyUI. It offers management functions to install, remove, disable, and enable various custom…...

物联网安防系统故障排查与ESP8266固件刷写实战指南
1. 物联网安防系统故障排查实战做物联网安防系统,最怕的就是“哑火”。你花了好几天时间,把ESP8266、Raspberry Pi、MQTT Broker、Adafruit.IO和IFTTT像搭积木一样连起来,满心期待它能在关键时刻给你发条短信。结果,门被推开了&am…...

MATLAB/Simulink模型化设计驱动树莓派:从LED闪烁到快速原型开发
1. 项目概述:当MATLAB/Simulink遇见树莓派 如果你是一名算法工程师、控制工程师,或者正在学习嵌入式系统,那么“模型化设计”和“快速原型开发”这两个词对你来说一定不陌生。它们听起来很高大上,但核心目标其实很朴素࿱…...

基于Vanilla JS与IndexedDB构建本地化Markdown笔记工具
1. 项目概述:从零开始构建一个轻量级笔记工具最近在整理个人知识库时,发现市面上的笔记软件要么功能过于臃肿,要么云端同步存在隐私顾虑,要么就是定制化程度不够。作为一个有十多年开发经验的从业者,我决定自己动手&am…...

RTX 5090功耗600W:高功耗显卡的系统级挑战与实战装机指南
1. 项目概述:从一则功耗新闻到显卡生态的深度解构最近,一则关于英伟达下一代旗舰显卡RTX 5090功耗可能高达600W的消息,在硬件圈和AI计算领域激起了不小的波澜。对于普通玩家而言,这或许只是一个“电老虎”又升级了的谈资ÿ…...