基于MingGW64 GCC编译Windows平台上的 libuvc
安装cmake
打开cmake官网 https://cmake.org/download/,下载安装包:
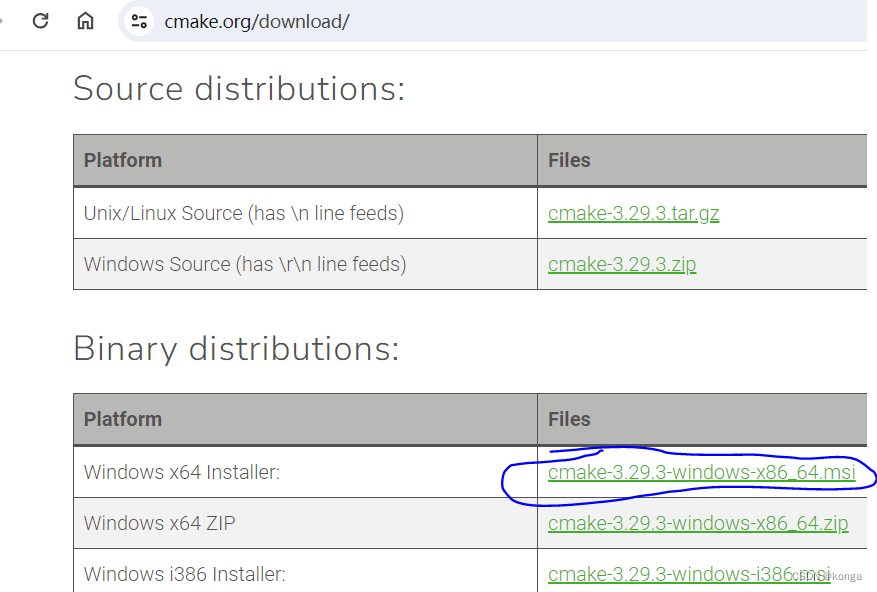
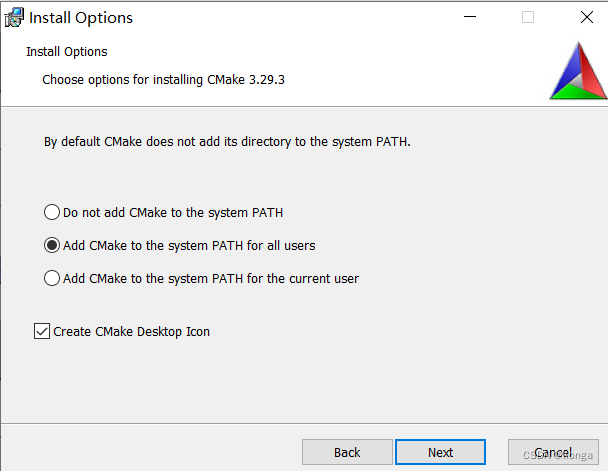
安装时选择将cmake加到系统环境变量里。安装完成后在新的CMD命令窗口执行cmake --version可看到输出:
D:\>cmake --version
cmake version 3.29.3
CMake suite maintained and supported by Kitware (kitware.com/cmake).
安装Mingw64 GCC
Mingw目标是为支持Windows平台上的GCC编译,它主要提供头文件和支持库,Mingw自身不包括GCC和binutils,所以官网提供了集成这些组件的各种安装包。列表里有Linux平台的安装包,那些是用来在Linux平台生成Widows程序的。
https://www.mingw-w64.org/
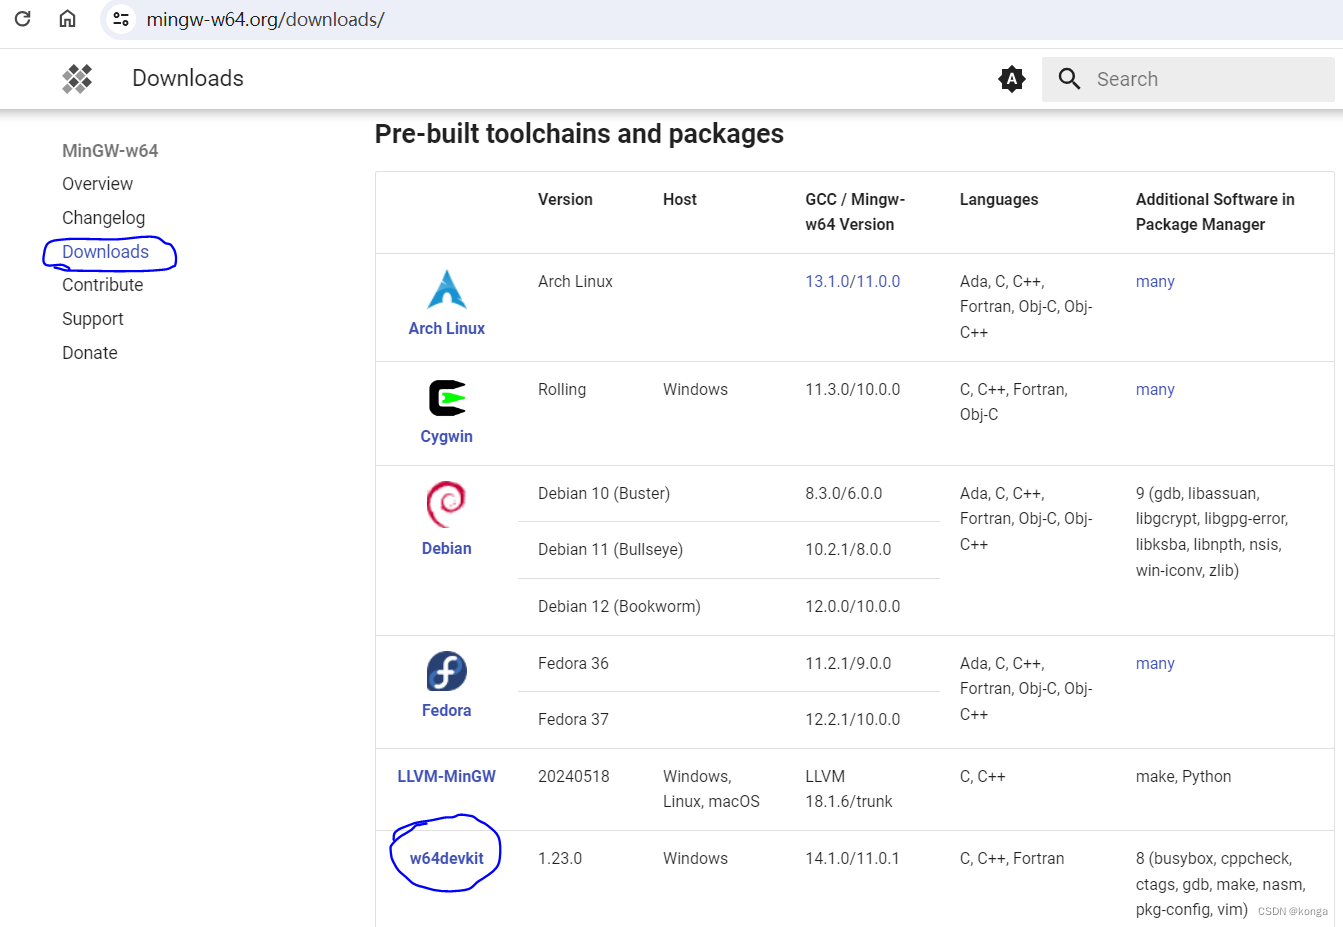
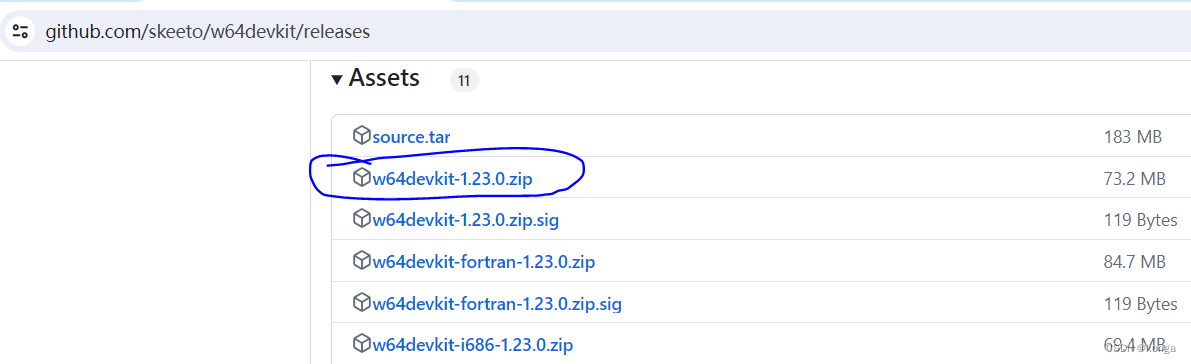
这里我选择了w64devkit,点击后安装链接指向了github:https://github.com/skeeto/w64devkit/releases ,下载w64devkit-1.23.0.zip。
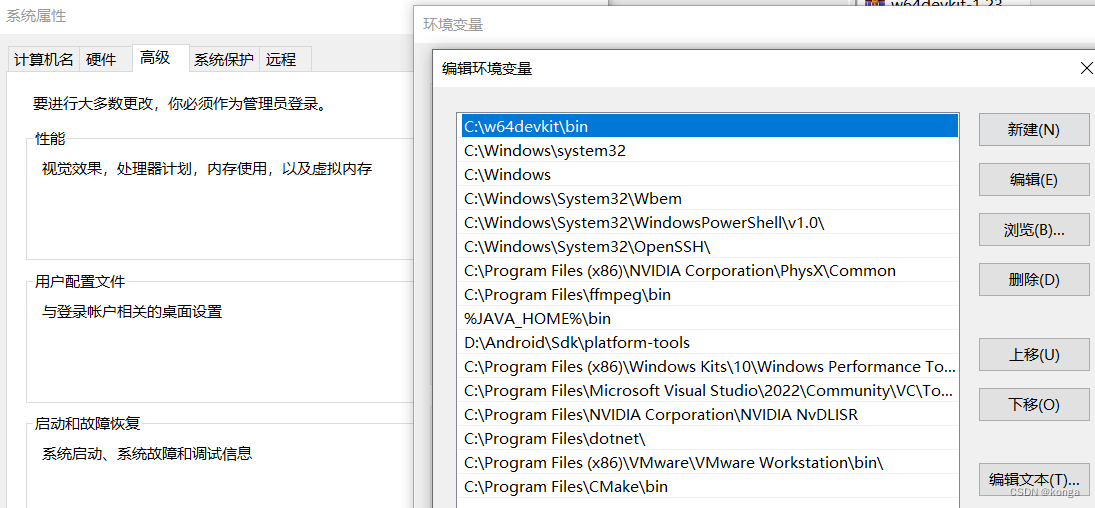
解压后放在C盘,将目录 C:\w64devkit\bin\ 加入系统PATH环境变量。
然后新打开的CMD命令窗口输入gcc –v 可以看到输出:
D:\>gcc -v
Using built-in specs.
COLLECT_GCC=gcc
COLLECT_LTO_WRAPPER=C:/w64devkit/bin/../libexec/gcc/x86_64-w64-mingw32/14.1.0/lto-wrapper.exe
Target: x86_64-w64-mingw32
Configured with: /gcc-14.1.0/configure --prefix=/w64devkit --with-sysroot=/w64devkit/x86_64-w64-mingw32 --with-native-system-header-dir=/include --target=x86_64-w64-mingw32 --host=x86_64-w64-mingw32 --enable-static --disable-shared --with-pic --with-gmp-include=/deps/include --with-gmp-lib=/deps/lib --with-mpc-include=/deps/include --with-mpc-lib=/deps/lib --with-mpfr-include=/deps/include --with-mpfr-lib=/deps/lib --enable-languages=c,c++ --enable-libgomp --enable-threads=posix --enable-version-specific-runtime-libs --disable-dependency-tracking --disable-lto --disable-multilib --disable-nls --disable-win32-registry --enable-mingw-wildcard CFLAGS_FOR_TARGET=-Os CXXFLAGS_FOR_TARGET=-Os LDFLAGS_FOR_TARGET=-s CFLAGS=-Os CXXFLAGS=-Os LDFLAGS=-s
Thread model: posix
Supported LTO compression algorithms: zlib
gcc version 14.1.0 (GCC)
下载libusb
Libuvc依赖libusb,libusb是一个低级的通用访问USB设备的用户空间库。我们直接下载官网已经编译好的二进制库。
https://libusb.info/
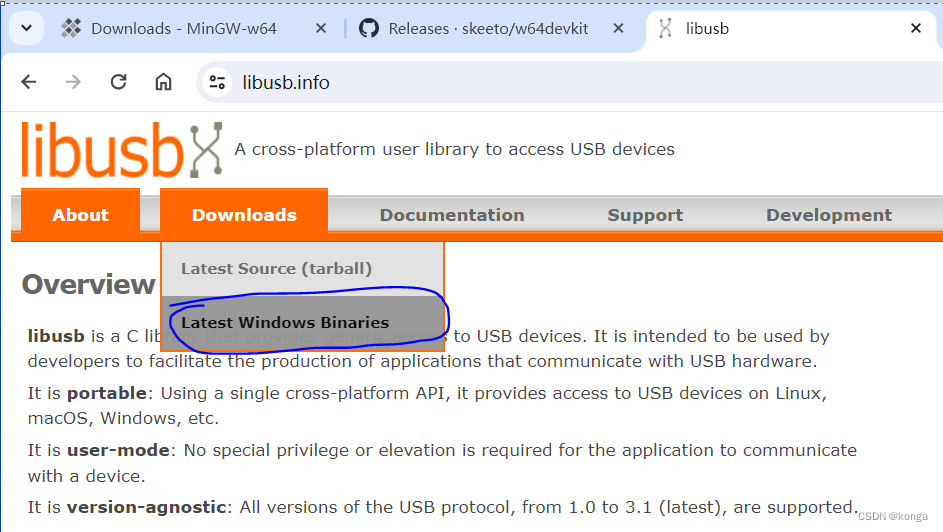
点击图中Latest Windows Binaries下载 https://github.com/libusb/libusb/releases/download/v1.0.27/libusb-1.0.27.7z 解压后将 include\libusb.h, MinGW64下面的 .a 及 .dll 库提取到一个目录,如D:\libusb:

下载编译libuvc
https://github.com/libuvc/libuvc
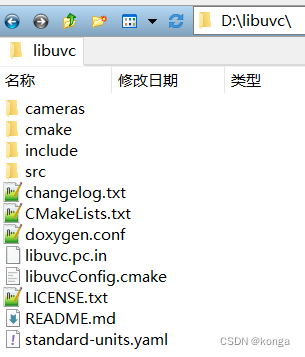
从官网以git clone下载源码,源码所放位置为D:\libuvc
由于cmake最小版本过低会产生如下告警:
CMake Deprecation Warning at CMakeLists.txt:1 (cmake_minimum_required):Compatibility with CMake < 3.5 will be removed from a future version ofCMake.Update the VERSION argument <min> value or use a ...<max> suffix to tellCMake that the project does not need compatibility with older versions.所以我们把libuvc/CmakeList.txt开头的cmake最低版本改为3.10

如果直接执行cmake .. 会提示找不到libusb,打开D:\libuvc\CmakeLists.txt,删除find_package(LibUSB)一行,替换为下面内容(目录分隔符这里用的是 /, 如果用 \ 分隔,转义的原因还要改为 \\):
# Locate the libusb-1.0 package manually if not found
#find_path(LIBUSB_INCLUDE_DIR NAMES libusb.h PATH_SUFFIXES libusb-1.0)
#find_library(LIBUSB_LIBRARY NAMES usb-1.0 libusb-1.0)
set(LIBUSB_INCLUDE_DIR D:/libusb)
set(LIBUSB_LIBRARY   D:/libusb/libusb-1.0.dll  D:/libusb/libusb-1.0.dll.a)
#set(LIBUSB_LIBRARY  D:/libusb/libusb-1.0.a)   # for static linkif(LIBUSB_INCLUDE_DIR AND LIBUSB_LIBRARY)set(LIBUSB_FOUND TRUE)
else()set(LIBUSB_FOUND FALSE)message(WARNING "LibUSB not found. Please install it.")
endif()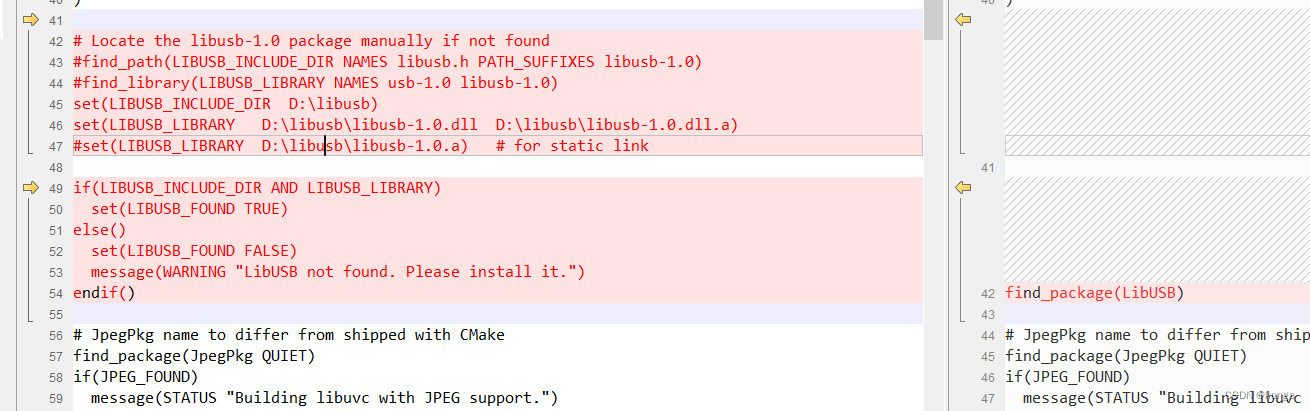
静态链接用lbusb-1.0.a就注释掉46行,打开47行, 这样会更方便一点,不会产生找不到dll的问题。
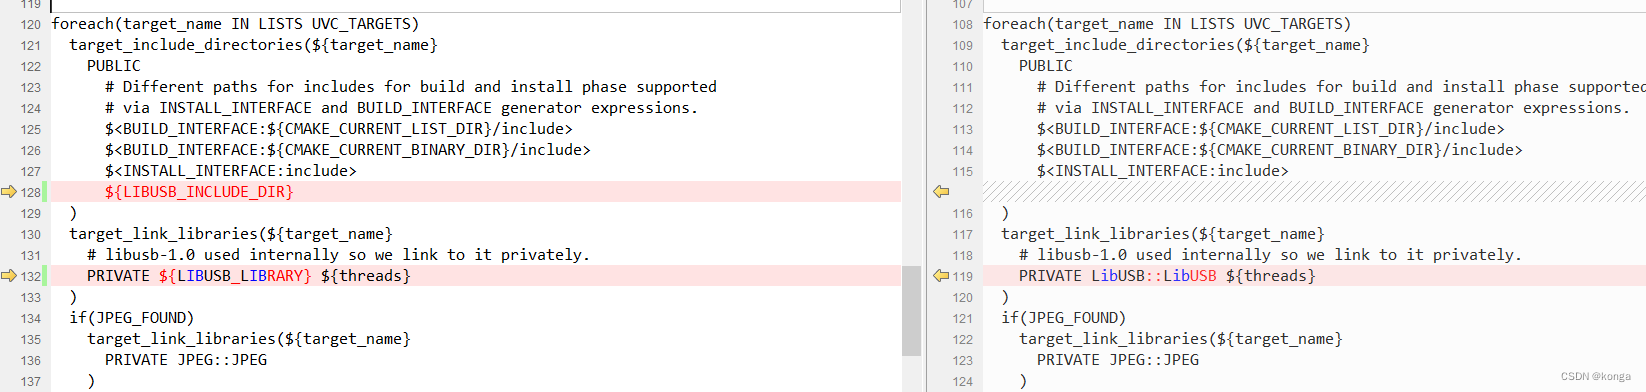
然后在130行左右添加libusb.h头文件目录和链接库,
打开CMD窗口,执行下面命令:
cd D:\libuvc
mkdir build install
cd build
rm –fr *;  #如果cmake有错,重新执行时建议把目录清空。
cmake -G "MinGW Makefiles" -DCMAKE_INSTALL_PREFIX=D:\libuvc\install -DBUILD_SHARED_LIBS=ON  ..
第一次执行cmake报错, 系统会报病毒拦截,再执行一次上面的cmake 命令即可。 不确定是误报还是真有病毒。
CMake Error at C:/Program Files/CMake/share/cmake-3.29/Modules/CMakeDetermineCompilerId.cmake:922 (file):file STRINGS file "D:/libuvc/build/CMakeFiles/3.29.3/CompilerIdC/a.exe"cannot be read.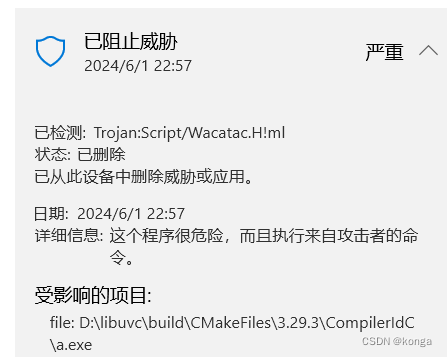
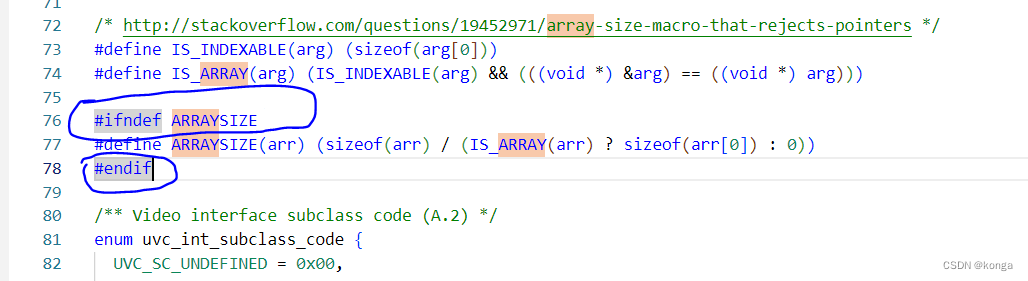
执行cmake成功后生成Makefie,接下来执行make命令进行编译。编译过程中会提示ARRAYSIZE重复定义的警告:
D:/libuvc/include/libuvc/libuvc_internal.h:75:9: warning: "ARRAYSIZE" redefined75 | #define ARRAYSIZE(arr) (sizeof(arr) / (IS_ARRAY(arr) ? sizeof(arr[0]) : 0))|         ^~~~~~~~~
In file included from C:/w64devkit/x86_64-w64-mingw32/include/minwindef.h:163,from C:/w64devkit/x86_64-w64-mingw32/include/windef.h:9,from C:/w64devkit/x86_64-w64-mingw32/include/windows.h:69,from D:/libusb/libusb.h:64,from D:/libuvc/include/libuvc/libuvc_internal.h:14:
C:/w64devkit/x86_64-w64-mingw32/include/winnt.h:681:
note: this is the location of the previous definition681 | #define ARRAYSIZE(A) RTL_NUMBER_OF_V2(A)
如果不想看到太多输出警告信息,可以编辑D:\libuvc\include\libuvc\libuvc_internal.h, 在ARRAYSIZE外面加上#ifndef ARRAYSIZE 进行防御。
编译成功:
D:\libuvc\build>make
[  5%] Building C object CMakeFiles/uvc.dir/src/ctrl.c.obj
[ 10%] Building C object CMakeFiles/uvc.dir/src/ctrl-gen.c.obj
[ 15%] Building C object CMakeFiles/uvc.dir/src/device.c.obj
[ 20%] Building C object CMakeFiles/uvc.dir/src/diag.c.obj
[ 25%] Building C object CMakeFiles/uvc.dir/src/frame.c.obj
[ 30%] Building C object CMakeFiles/uvc.dir/src/init.c.obj
[ 35%] Building C object CMakeFiles/uvc.dir/src/stream.c.obj
[ 40%] Building C object CMakeFiles/uvc.dir/src/misc.c.obj
[ 45%] Linking C shared library libuvc.dll
[ 45%] Built target uvc
[ 50%] Building C object CMakeFiles/uvc_static.dir/src/ctrl.c.obj
[ 55%] Building C object CMakeFiles/uvc_static.dir/src/ctrl-gen.c.obj
[ 60%] Building C object CMakeFiles/uvc_static.dir/src/device.c.obj
[ 65%] Building C object CMakeFiles/uvc_static.dir/src/diag.c.obj
[ 70%] Building C object CMakeFiles/uvc_static.dir/src/frame.c.obj
[ 75%] Building C object CMakeFiles/uvc_static.dir/src/init.c.obj
[ 80%] Building C object CMakeFiles/uvc_static.dir/src/stream.c.obj
[ 85%] Building C object CMakeFiles/uvc_static.dir/src/misc.c.obj
[ 90%] Linking C static library libuvc.a
[ 90%] Built target uvc_static
[ 95%] Building C object CMakeFiles/example.dir/src/example.c.obj
[100%] Linking C executable example.exe
[100%] Built target example
然后安装到install目录,
D:\libuvc\build>make install
[ 45%] Built target uvc
[ 90%] Built target uvc_static
[100%] Built target example
Install the project...
-- Install configuration: "Release"
-- Installing: D:/libuvc/install/lib/libuvc.dll.a
-- Installing: D:/libuvc/install/bin/libuvc.dll
-- Installing: D:/libuvc/install/include/libuvc/libuvc.h
-- Installing: D:/libuvc/install/include/libuvc/libuvc_config.h
-- Installing: D:/libuvc/install/lib/libuvc.a
-- Up-to-date: D:/libuvc/install/include/libuvc/libuvc.h
-- Up-to-date: D:/libuvc/install/include/libuvc/libuvc_config.h
-- Installing: D:/libuvc/install/lib/cmake/libuvc/libuvcTargets.cmake
-- Installing: D:/libuvc/install/lib/cmake/libuvc/libuvcTargets-release.cmake
-- Installing: D:/libuvc/install/lib/cmake/libuvc/FindLibUSB.cmake
-- Installing: D:/libuvc/install/lib/cmake/libuvc/FindJpegPkg.cmake
-- Installing: D:/libuvc/install/lib/cmake/libuvc/libuvcConfigVersion.cmake
-- Installing: D:/libuvc/install/lib/pkgconfig/libuvc.pc
-- Installing: D:/libuvc/install/lib/cmake/libuvc/libuvcConfig.cmake
测试
以example.exe来进行测试。
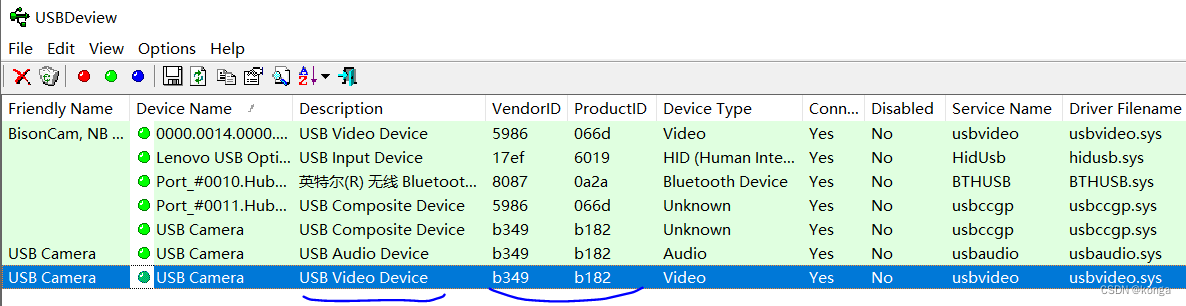
首先利用USBDeview (https://usbdeview.me)工具找到电脑上外置UVC摄像头的VID和PID。
然后打开D:\libuvc\src\example.c, 修改其中的VID和PID:

重新在build目录执行make,然后执行example.exe, 会提示找不到libusb-1.0.dll,可以将D:\libusb-1.0.dll复制一份放在example.exe同一个目录。 或者一劳永逸的复制到C:\Windows\System32下。 如果给别人发编译好的程序,需要带上libusb-1.0.dll。若前面Cmake配置静态链接libusb则没有此麻烦。
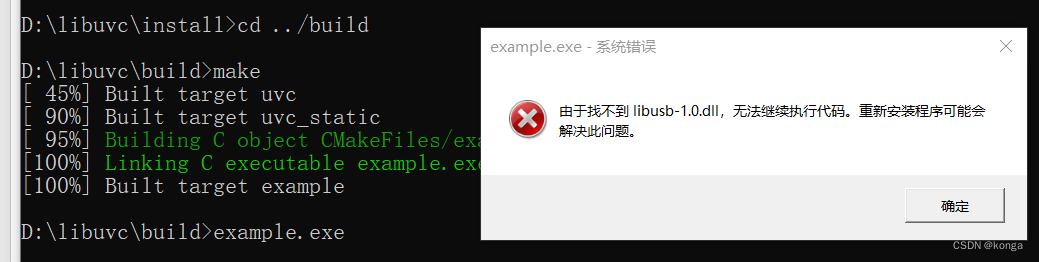
解决完dll问题后,example跑起来会报错,找不到设备:
D:\libuvc\build>example.exe
UVC initialized
Device found
uvc_open: Not found (-5)
UVC exited
先用USBDeview查看驱动,此UVC设备使用了usbvideo驱动,需要安装WinUSB驱动。
https://learn.microsoft.com/zh-cn/windows-hardware/drivers/usbcon/winusb-installation 面向开发人员的 WinUSB (Winusb.sys) 安装 文档中描述到:
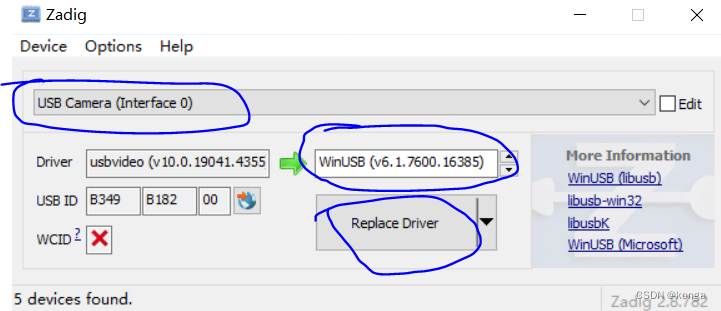
对于某些通用串行总线 (USB) 设备(例如仅由单个应用程序访问的设备),可以在设备的内核模式堆栈中安装 WinUSB (Winusb.sys) 作为 USB 设备的功能驱动程序,而不是实现驱动程序。libusb正是此种场景。可以认为WinUSB.sys驱动是一种低层次的驱动,libusb要跟低层的驱动打交道,usbvideo.sys驱动是高层次的驱动。可以31按链接中微软官方的指导安装WinUSB驱动,也可以用Zadig来安装此驱动。
从 https://zadig.akeo.ie下载Zadig。由于在此电脑上,USB Camera(Interface 0)是Video类型,USB Camera(Interface 2)是Audio类型, 所以在从Options菜单中选择List All Devices后选择USB Camera(Interface 0),换用WinUSB驱动。
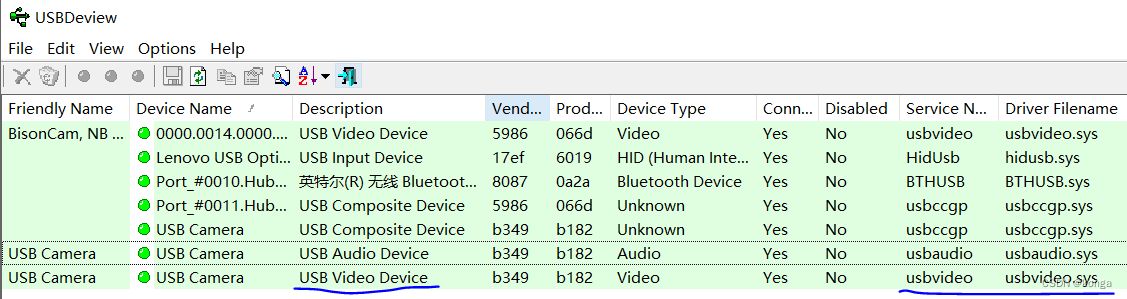
安装WinUSB驱动后用USBDeview查看:

example跑成功的日志:
D:\libuvc\build>example.exeUVC initialized
Device found
Device openedDEVICE CONFIGURATION (b349:b182/[none]) ---
Status: idle
VideoControl:bcdUVC: 0x0100VideoStreaming(1):bEndpointAddress: 129Formats:UncompressedFormat(1)bits per pixel: 16GUID: 5955593200001000800000aa00389b71 (YUY2)default frame: 1aspect ratio: 0x0interlace flags: 00copy protect: 00FrameDescriptor(1)capabilities: 01size: 1600x1200bit rate: 153600000-153600000max frame size: 3840000default interval: 1/5interval[0]: 1/5FrameDescriptor(2)capabilities: 01size: 1280x720bit rate: 110592000-110592000max frame size: 1843200default interval: 1/7interval[0]: 1/7FrameDescriptor(3)capabilities: 01size: 640x480bit rate: 147456000-147456000max frame size: 614400default interval: 1/30interval[0]: 1/30MJPEGFormat(2)bits per pixel: 0GUID: 4d4a5047000000000000000000000000 (MJPG)default frame: 1aspect ratio: 0x0interlace flags: 00copy protect: 00FrameDescriptor(1)capabilities: 01size: 1600x1200bit rate: 921600000-921600000max frame size: 3840000default interval: 1/30interval[0]: 1/30FrameDescriptor(2)capabilities: 01size: 1280x720bit rate: 442368000-442368000max frame size: 1843200default interval: 1/30interval[0]: 1/30FrameDescriptor(3)capabilities: 01size: 640x480bit rate: 147456000-147456000max frame size: 614400default interval: 1/30interval[0]: 1/30
END DEVICE CONFIGURATION
First format: (YUY2) 1600x1200 5fps
bmHint: 0001
bFormatIndex: 1
bFrameIndex: 1
dwFrameInterval: 2000000
wKeyFrameRate: 0
wPFrameRate: 0
wCompQuality: 61
wCompWindowSize: 0
wDelay: 0
dwMaxVideoFrameSize: 3840000
dwMaxPayloadTransferSize: 3060
bInterfaceNumber: 1
Streaming...
Enabling auto exposure ...... full AE not supported, trying aperture priority mode... enabled aperture priority auto exposure mode
callback! frame_format = 3, width = 1600, height = 1200, length = 3840000, ptr = 0000000000003039
callback! frame_format = 3, width = 1600, height = 1200, length = 3840000, ptr = 0000000000003039
callback! frame_format = 3, width = 1600, height = 1200, length = 3840000, ptr = 0000000000003039
callback! frame_format = 3, width = 1600, height = 1200, length = 3840000, ptr = 0000000000003039
callback! frame_format = 3, width = 1600, height = 1200, length = 3840000, ptr = 0000000000003039
callback! frame_format = 3, width = 1600, height = 1200, length = 3840000, ptr = 0000000000003039
callback! frame_format = 3, width = 1600, height = 1200, length = 3840000, ptr = 0000000000003039
callback! frame_format = 3, width = 1600, height = 1200, length = 3840000, ptr = 0000000000003039
callback! frame_format = 3, width = 1600, height = 1200, length = 3840000, ptr = 0000000000003039
callback! frame_format = 3, width = 1600, height = 1200, length = 3840000, ptr = 0000000000003039
callback! frame_format = 3, width = 1600, height = 1200, length = 3840000, ptr = 0000000000003039
callback! frame_format = 3, width = 1600, height = 1200, length = 3840000, ptr = 0000000000003039
callback! frame_format = 3, width = 1600, height = 1200, length = 3840000, ptr = 0000000000003039
callback! frame_format = 3, width = 1600, height = 1200, length = 3840000, ptr = 0000000000003039
callback! frame_format = 3, width = 1600, height = 1200, length = 3840000, ptr = 0000000000003039
callback! frame_format = 3, width = 1600, height = 1200, length = 3840000, ptr = 0000000000003039
Done streaming.
Device closed
UVC exited
恢复驱动
安装过WinUSB驱动的UVC设备,不会出现在设备管理器的照像机下面。 如果要恢复正常的UVC Camera功能,可以在设备管理器中卸载此设备的驱动。
卸载驱动后在设备管理器中右击鼠标,扫描检测硬件改动,USB Camera可以自动识别出来。驱动也恢复为原来的usbvideo.sys。

相关文章:
基于MingGW64 GCC编译Windows平台上的 libuvc
安装cmake 打开cmake官网 https://cmake.org/download/,下载安装包: 安装时选择将cmake加到系统环境变量里。安装完成后在新的CMD命令窗口执行cmake --version可看到输出: D:\>cmake --version cmake version 3.29.3 CMake suite mainta…...

【Linux】网络高级IO
欢迎来到Cefler的博客😁 🕌博客主页:折纸花满衣 🏠个人专栏:Linux 目录 👉🏻五种IO模型👉🏻消息通信的同步异步与进程线程的同步异步有什么不同?👉…...
【C++ ——— 继承】
文章目录 继承的概念即定义继承概念继承定义定义格式继承关系和访问限定符继承基类成员访问方式的变化 基类对象和派生类对象的赋值转换继承中的作用域派生类中的默认成员函数继承与友元继承与静态成员菱形继承虚继承解决数据冗余和二义性的原理继承的总结继承常见笔试面试题 继…...
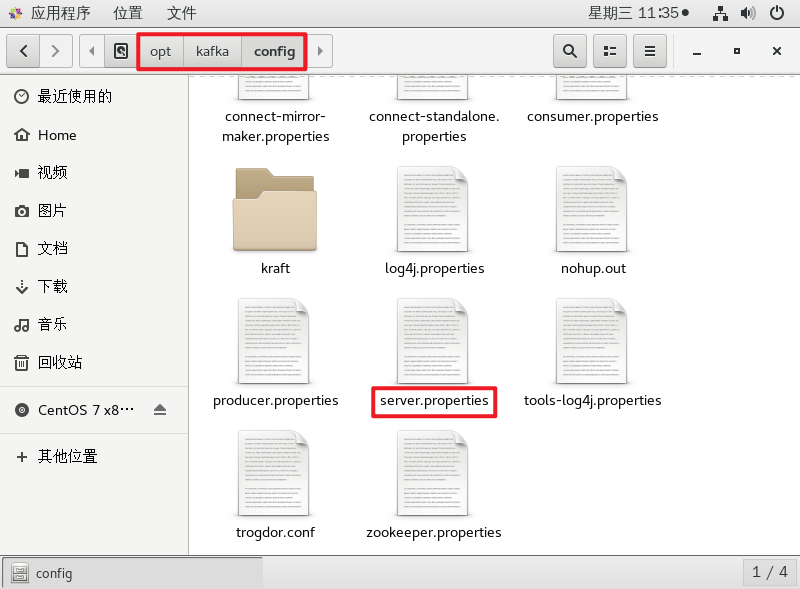
kafka-守护启动
文章目录 1、kafka守护启动1.1、先启动zookeeper1.1.1、查看 zookeeper-server-start.sh 的地址1.1.2、查看 zookeeper.properties 的地址 1.2、查看 jps -l1.3、再启动kafka1.3.1、查看 kafka-server-start.sh 地址1.3.2、查看 server.properties 地址 1.4、再次查看 jps -l 1…...

TypeScript 中的命名空间和模块化
1. 命名空间(Namespace) 命名空间提供了一种逻辑上的代码分组机制,用于避免命名冲突和将相关代码组织在一起。它使用 namespace 关键字来定义命名空间,并通过点运算符来访问其中的成员。例如: // 定义命名空间 names…...

9 html综合案例-注册界面
9 综合案例-注册界面 一个只有html骨架的注册页面 <!DOCTYPE html> <html lang"en"> <head><meta charset"UTF-8"><meta name"viewport" content"widthdevice-width, initial-scale1.0"><title>…...
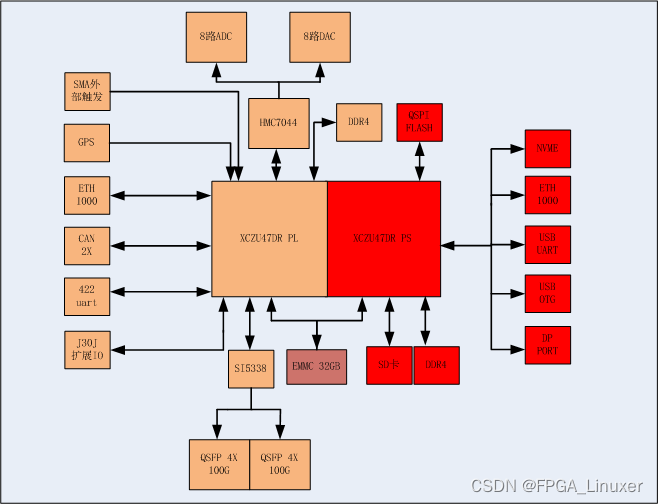
Xilinx RFSOC 47DR 8收8发 信号处理板卡
系统资源如图所示: FPGA采用XCZU47DR 1156芯片,PS端搭载一组64Bit DDR4,容量为4GB,最高支持速率:2400MT/s; PS端挂载两片QSPI X4 FLASH; PS支持一路NVME存储; PS端挂载SD接口,用于存储程序&…...

ros2 launch 用法以及一些基础功能函数的示例
文章目录 launch启动一个节点的launch示例launch文件中添加节点的namespacelaunch文件中的话题名称映射launch文件中向节点内传入命令行参数launch文件中向节点内传入rosparam使用方法多节点启动命令行参数配置资源重映射ROS参数设置加载参数文件在launch文件中使用条件变量act…...

如何使用Python获取图片中的文字信息
如下有三中方法: 方法1. 使用Tesseract OCR(pytesseract) 安装依赖 首先,确保你已经安装了Tesseract OCR引擎(例如,通过你的操作系统的包管理器)。然后,你可以通过pip安装pytesse…...

C++知识点
1. 构造函数:当没有写任何构造函数(含拷贝构造),系统会生成默认的无参构造,并且访问属性是共有。 默认拷贝构造:当没有写任何的拷贝构造,系统会生成默认的拷贝构造->是一个浅拷贝 写了拷贝构造函数,这…...

反转字符串中的单词-力扣
此题将问题分为三步进行解决: 第一步,删除字符串中多余的空格,removeSpaces函数中删除所有的空格,并手动在每个单词后添加一个空格,最后重构字符串s第二步,将整个字符串反转第三步,对反转后的字…...

Kotlin 重写与重载
文章目录 重写(Override)重载(Overload) 重写(Override) 重写通常是指子类覆盖父类的属性或方法,通常会标记为override: open class Base {open val name "Base"open f…...
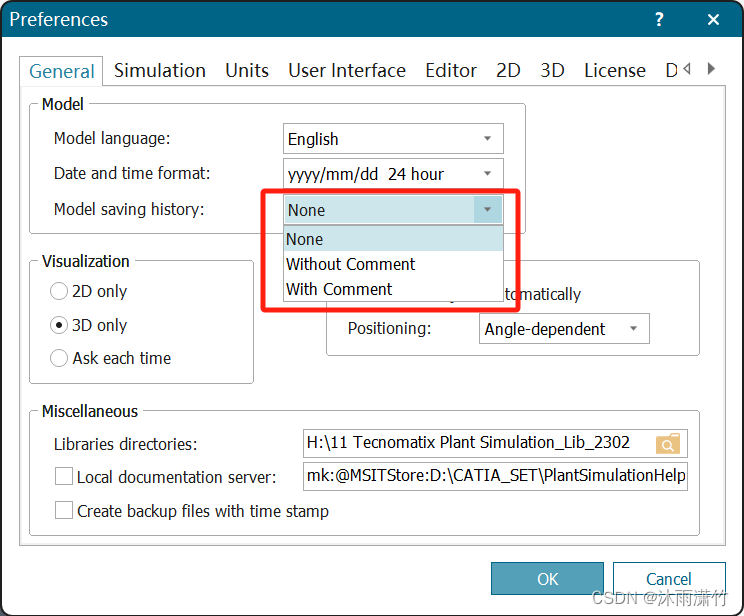
关于高版本 Plant Simulation 每次保存是 提示提交comm对话框的处理方法
关于高版本 Plant Simulation 每次保存是 提示提交comm对话框的处理方法 如下图 将model saving history 修改为None即可 关于AutoCAD 2022 丢失模板库的问题 从新从以下地址打开即可: D:\Program Files\Autodesk\AutoCAD 2022\UserDataCache\zh-cn\Template...

C语言之旅:探索单链表
目录 一、前言 二、实现链表的功能: 打印 创建节点 尾插 尾删 头插 头删 查找 在指定位置之前插入数据 指定位置删除 在指定位置之后插入数据 打印 销毁 三、全部源码: 四、结语 一、前言 链表是一个强大且基础的数据结构。对于很多初…...

【安卓基础】-- 消息机制 Handler
目录 消息机制 Handler面试问题 消息机制 Handler 对handler机制的基本作用、用法、时序流程进行介绍,针对handler机制中的内存泄漏问题讲解:一篇读懂Android Handler机制 Android-Handler机制详解 全面解析 | Android之Handler机制 需要掌握的&#x…...

Optional 类
概述 到目前为止,臭名昭著的空指针异常是导致 Java 应用程序失败的最常见原因。以前,为了解决空指针异常,Google 公司著名的 Guava 项目引入了 Optional 类, Guava 通过使用检查空值的方式来防止代码污染,它鼓励程序员…...
自动微分技术在 AI for science 中的应用
本文简记我在学习自动微分相关技术时遇到的知识点。 反向传播和自动微分 以 NN 为代表的深度学习技术展现出了强大的参数拟合能力,人们通过堆叠固定的 layer 就能轻松设计出满足要求的参数拟合器。 例如,大部分图神经网络均基于消息传递的架构。在推理…...

ASM OMF single-file creation form 重命名
OMF下不能自动命名,需要重新命名的话:1 1. spfile 可以 create pfile from spfile 后再create spfile from pfile 2 redo? 3 datafile? Here are some details of the copy problem: a) You are not allowed to set the numbe…...
VGGNet
VGGNet CNN卷积网络的发展史 1. LetNet5(1998) 2. AlexNet(2012) 3. ZFNet(2013) 4. VGGNet(2014) 5. GoogLeNet(2014) 6. ResNet(2015) 7. DenseNet(2017) 8. EfficientNet(2019) 9. Vision Transformers(2020) 10. 自适应卷积网络(2021) 上面列出了发展到现在CNN的一些经典…...
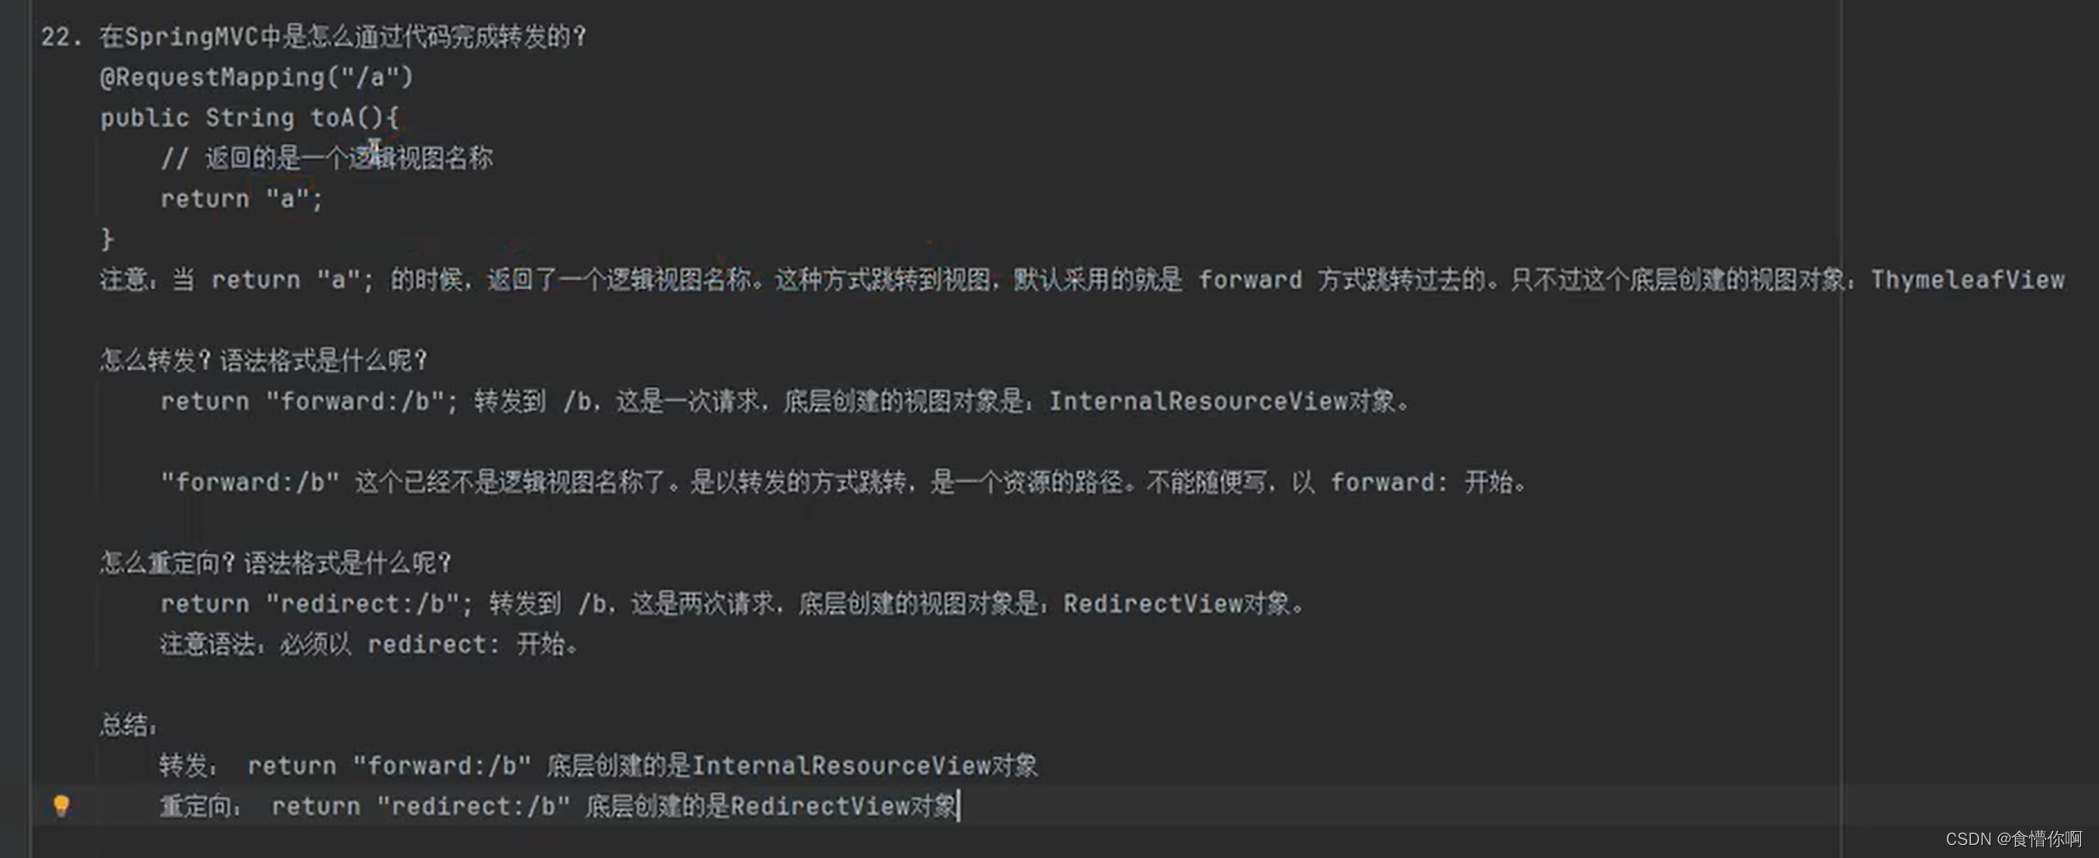
SpringMVC:转发和重定向
1. 请求转发和重定向简介 参考该链接第9点 2. forward 返回下一个资源路径,请求转发固定格式:return "forward:资源路径"如 return "forward:/b" 此时为一次请求返回逻辑视图名称 返回逻辑视图不指定方式时都会默认使用请求转发in…...

健身房会员行为可视化涨点改进 | 全网独家复现,健康洞察实战篇 引入多维度可视化+用户分层分析,助力会员留存、课程优化、个性化指导有效涨点
目录 一、实战背景与核心目标(贴合健身房实际运营场景) 1.1 实战背景 1.2 核心目标 1.3 数据集说明(可直接获取,确保复现) 二、完整代码实现(全流程可复现,标注详细注释) 2.1 环境配置(明确版本,避免兼容问题) 2.2 数据加载与初步探索(补充异常值、冗余数据…...

如何选择最佳视频播放器?Awesome Video推荐15款跨平台解决方案
如何选择最佳视频播放器?Awesome Video推荐15款跨平台解决方案 【免费下载链接】awesome-video A curated list of awesome streaming video tools, frameworks, libraries, and learning resources. 项目地址: https://gitcode.com/gh_mirrors/aw/awesome-video …...

编译和链接+预处理
编译(compile)和链接(link)在以前我们提到过,C语言是一门编译型的计算机语言,C语言的源代码都是文本文件,文本文件本身无法运行,电脑不能执行C语言代码,计算机能够执行的…...
)
ComfyUI全面掌握-知识点详解——ComfyUI 开发与扩展基础(开发指南+环境搭建)
本文为「ComfyUI 全面掌握」系列第 23 篇,是高阶进阶章节的第一篇知识点详解博客。作为开发系列的起点,本文将带你系统了解 ComfyUI 社区贡献流程,并手把手搭建完整的自定义节点开发环境,为后续的节点开发与发布奠定坚实的技术基础…...

Lovable框架实战速成:3天掌握UI动效、状态管理与热重载调试全流程
更多请点击: https://intelliparadigm.com 第一章:Lovable框架核心理念与开发环境搭建 Lovable 是一个以开发者体验(DX)为第一优先级的现代 Go Web 框架,其核心理念可凝练为三个关键词:可读性(…...

短波通讯:魔术6米波
制作一个用于50MHz(6米波段)的天线,是业余无线电爱好者探索这一“魔术波段”的基础。该频段天线相对短波天线更易于制作和架设,但良好的设计对捕捉稍纵即逝的远距离传播至关重要。以下是基于不同需求的天线类型、设计要点和制作指…...

毫米波高汇聚空馈天线技术【附方案】
✨ 长期致力于透射阵天线、高增益、宽角波束扫描、共形设计、近场赋形研究工作,擅长数据搜集与处理、建模仿真、程序编写、仿真设计。 ✅ 专业定制毕设、代码 ✅ 如需沟通交流,点击《获取方式》 (1)低剖面透射阵天线设计ÿ…...

中国分县林地面积统计数据
一、数据简介 林地是指生长乔木、竹类、灌木及其他林业植物的土地,是陆地生态系统的重要组成部分,也是森林资源的核心载体。CnOpenData中国分县林地面积统计数据基于中国国土三调及国土年度变更调查汇总统计成果整合形成,包括全国、分省、分市…...

【限时公开】盐印相风格Prompt工程黑箱:3类被官方隐藏的--stylize权重阈值,97%用户从未触发过第3级胶片响应
更多请点击: https://codechina.net 第一章:盐印相风格Prompt工程的视觉本质解构 盐印相(Salted Paper Print)作为19世纪早期摄影工艺的代表,其视觉特征——柔和的颗粒质感、低对比度过渡、泛暖棕褐基调与微妙的纸基纤…...

瑞萨RZ系列核心板选型指南:从A55到RISC-V的嵌入式开发实战
1. 项目概述:当国产方案商遇上日系芯片巨头在嵌入式开发这个圈子里混久了,你会发现一个有趣的现象:很多项目在启动时,面临的第一个灵魂拷问往往不是“功能怎么实现”,而是“平台怎么选”。是追求极致的性能,…...