音视频开发—FFmpeg 打开摄像头进行RTMP推流
实验平台:Ubuntu20.04
摄像头:普通USB摄像头,输出格式为YUV422
1.配置RTMP服务器推流平台
使用Nginx 配置1935端口即可,贴上教程地址
ubuntu20.04搭建Nginx+rtmp服务器)
2.配置FFmpeg开发环境
过程较为简单,这里不再赘述,可以看博主的往期博客,贴上教程地址:配置FFmpeg开发环境 (Vscode+CMake
3.推流具体实现流程
总体流程图

3.1 设备初始化
有些摄像头可能支持输出多种参数,因此一定要检查摄像头支持的格式
v4l2-ctl: 一个命令行工具,用于控制和调试V4L2设备。可以查询设备信息、设置参数、捕获视频帧等。
v4l2-ctl --list-formats-ext  # 列出设备支持的所有格式
v4l2-ctl --set-fmt-video=width=1920,height=1080,pixelformat=H264  # 设置视频格式
v4l2-ctl --stream-mmap --stream-count=100 --stream-to=output.raw  # 捕获视频流
查看本次实验的摄像头的相关参数
marxist@ubuntu:~/Desktop/audio_test/build$ v4l2-ctl --list-formats-ext
ioctl: VIDIOC_ENUM_FMTType: Video Capture[0]: 'MJPG' (Motion-JPEG, compressed)Size: Discrete 1920x1080Interval: Discrete 0.033s (30.000 fps)Size: Discrete 640x480Interval: Discrete 0.008s (120.101 fps)Interval: Discrete 0.011s (90.000 fps)Interval: Discrete 0.017s (60.500 fps)Interval: Discrete 0.033s (30.200 fps)Size: Discrete 1280x720Interval: Discrete 0.017s (60.000 fps)Interval: Discrete 0.033s (30.500 fps)Size: Discrete 1024x768Interval: Discrete 0.033s (30.000 fps)Size: Discrete 800x600Interval: Discrete 0.017s (60.000 fps)Size: Discrete 1280x1024Interval: Discrete 0.033s (30.000 fps)Size: Discrete 320x240Interval: Discrete 0.008s (120.101 fps)[1]: 'YUYV' (YUYV 4:2:2)Size: Discrete 1920x1080Interval: Discrete 0.167s (6.000 fps)Size: Discrete 640x480Interval: Discrete 0.033s (30.000 fps)Size: Discrete 1280x720Interval: Discrete 0.111s (9.000 fps)Size: Discrete 1024x768Interval: Discrete 0.167s (6.000 fps)Size: Discrete 800x600Interval: Discrete 0.050s (20.000 fps)Size: Discrete 1280x1024Interval: Discrete 0.167s (6.000 fps)Size: Discrete 320x240Interval: Discrete 0.033s (30.000 fps)
由上述可知,摄像头一共支持两种格式,一是MJPG格式,已经由硬件压缩好的一种格式,一种就是常见的YUV422格式,YUV同样支持多种分辨率格式。
设置输入格式上下文,Linux系统对应的是V4L2,查找视频流信息
AVInputFormat *input_format = av_find_input_format("v4l2");if ((ret = avformat_open_input(&input_ctx, "/dev/video0", input_format, &options)) < 0){fprintf(stderr, "Could not open input\n");return ret;}// 查找流信息ret = avformat_find_stream_info(input_ctx, NULL);if (ret < 0){std::cerr << "could not find stream info" << std::endl;return -1;}// 查找视频流for (size_t i = 0; i < input_ctx->nb_streams; i++){if (input_ctx->streams[i]->codecpar->codec_type == AVMEDIA_TYPE_VIDEO){video_stream_index = i;break;}}if (video_stream_index == -1){std::cerr << "no video stream found" << std::endl;return -1;}
3.2 初始化编码器
本次推流实验使用的是H264编码器,CPU软编码,没有使用到硬件编码,用到的库是X264。
主要流程为 查找编码器——分配编码器上下文——设置编码器参数——打开编码器
// 查找编码器AVCodec *codec = avcodec_find_encoder(AV_CODEC_ID_H264);if (!codec){fprintf(stderr, "Could not find AV_CODEC_ID_H264\n");return -1;}// 分配编码器上下文AVCodecContext *codec_ctx = avcodec_alloc_context3(codec);if (!codec_ctx){std::cerr << "Could not allocate video codec context" << std::endl;return -1;}// 设置编码器参数codec_ctx->codec_id = codec->id;codec_ctx->bit_rate = 400000;codec_ctx->width = 1280;codec_ctx->height = 720;codec_ctx->time_base = (AVRational){1, 9};codec_ctx->framerate = (AVRational){9, 1};codec_ctx->gop_size = 10;codec_ctx->max_b_frames = 0; // 不需要B帧codec_ctx->pix_fmt = AV_PIX_FMT_YUV420P; // 传入的420P 格式,而cam 默认输出422 则一会 需要作转换// 打开编码器if (avcodec_open2(codec_ctx, codec, NULL) < 0){fprintf(stderr, "Could not open codec\n");return -1;}
这里将B帧参数设置为了0,因为加入B帧之后,虽然提高了压缩效率,但是也显著增加了编码的复杂性。编码B帧需要更多的计算资源,因为它不仅需要前向预测,还需要后向预测。对于资源受限的设备(如移动设备、嵌入式系统等),不使用B帧可以减少编码器的负担。
3.3 设置输出流
这里的输出流地址则特指的RTMP服务器地址,也就是说FFmpeg将编码好的数据传输到RTMP服务器。如果需要写入到文件,输出流地址也可以是文件路径。
相关代码操作
// 创建输出流AVStream *out_stream = avformat_new_stream(output_ctx, codec);if (!out_stream){fprintf(stderr, "Could not avformat_new_stream\n");return -1;}// 从输入流复制参数到输出流avcodec_parameters_from_context(out_stream->codecpar, codec_ctx);out_stream->time_base = codec_ctx->time_base;// 打开输出URLif (!(output_ctx->oformat->flags & AVFMT_NOFILE)){if (avio_open(&output_ctx->pb, output_url, AVIO_FLAG_WRITE) < 0){std::cerr << "Could not open output URL" << std::endl;return -1;}}// 写输出文件头if (avformat_write_header(output_ctx, NULL) < 0){fprintf(stderr, "Could not write header\n");return -1;}
3.4 读取摄像头数据
av_read_frame(input_ctx, &pkt)
代码作用是从输入设备读取数据帧,封装到packet中。
根据上文已经获取到了视频流索引,在此判断一下是不是视频流,因为有些摄像头支持语音输入,packet中存放的也可能是音频流
pkt.stream_index == video_stream_index
3.5 颜色空间转换
在上述过程中, 已经指定输出YUV422的数据了因此需要转换为YUV420数据
大体流程为:原始帧—转换上下文—YUV420帧
首先初始化转换上下文
// 准备颜色空间色彩转换SwsContext *sws_ctx = sws_getContext(codec_ctx->width, codec_ctx->height, AV_PIX_FMT_YUYV422,codec_ctx->width, codec_ctx->height, AV_PIX_FMT_YUV420P,SWS_BILINEAR, NULL, NULL, NULL);if (!sws_ctx){std::cerr << "Could not initialize the conversion context" << std::endl;return -1;}分辨率与编码器参数保持一致
准备原始数据帧,从摄像头读取的数据包中得到
AVFrame *temp_frame = av_frame_alloc();if (!temp_frame){std::cerr << "Could not allocate temporary frame" << std::endl;av_packet_unref(&pkt);continue;}// 分配临时帧的内存空间if (av_image_alloc(temp_frame->data, temp_frame->linesize, codec_ctx->width, codec_ctx->height, AV_PIX_FMT_YUYV422, 1) < 0){std::cerr << "Could not allocate temporary frame buffer" << std::endl;av_frame_free(&temp_frame);av_packet_unref(&pkt);continue;}// 将pkt.data中的数据填充到temp_frameret = av_image_fill_arrays(temp_frame->data, temp_frame->linesize, pkt.data, AV_PIX_FMT_YUYV422, codec_ctx->width, codec_ctx->height, 1);if (ret < 0){std::cerr << "Error filling arrays" << std::endl;av_freep(&temp_frame->data[0]);av_frame_free(&temp_frame);av_packet_unref(&pkt);continue;}
初始化YUV420的帧
// 分配AVFrame并设置参数AVFrame *frame = av_frame_alloc();if (!frame){std::cerr << "Could not allocate video frame" << std::endl;return -1;}frame->format = codec_ctx->pix_fmt;frame->width = codec_ctx->width;frame->height = codec_ctx->height;av_frame_get_buffer(frame, 32);
最后执行转换即可
sws_scale(sws_ctx, temp_frame->data, temp_frame->linesize, 0, codec_ctx->height, frame->data, frame->linesize);
3.6 编码并输出到RTMP服务器
得到YUV420的数据,就可以进行最后的操作了
// 编码视频数据ret = avcodec_send_frame(codec_ctx, frame);if (ret < 0){std::cerr << "Error sending frame to encoder" << std::endl;break;}while (ret >= 0){ret = avcodec_receive_packet(codec_ctx, &pkt);if (ret == AVERROR(EAGAIN) || ret == AVERROR_EOF){break;}else if (ret < 0){std::cerr << "Error encoding frame" << std::endl;break;}// 将编码后的视频数据推送到RTMP服务器pkt.stream_index = out_stream->index;av_packet_rescale_ts(&pkt, codec_ctx->time_base, out_stream->time_base);pkt.pos = -1;ret = av_interleaved_write_frame(output_ctx, &pkt);if (ret < 0){std::cerr << "Error writing frame" << std::endl;break;}av_packet_unref(&pkt);}
4.完整代码
extern "C"
{
#include <libavformat/avformat.h>
#include <libavdevice/avdevice.h>
#include <libavutil/opt.h>
#include <libavcodec/avcodec.h>
#include <libswscale/swscale.h>
#include "libavutil/imgutils.h"
}
#include <iostream>
#include <cstdlib>
using namespace std;int main(int argc, char *argv[])
{const char *output_url = "rtmp://192.168.1.79:1935/orin/live"; // 替换为你的RTMP推流地址AVFormatContext *input_ctx = NULL;AVPacket pkt;int ret;int video_stream_index = -1;AVDictionary *options = nullptr; // 摄像头相关参数int64_t pts = 0;                 // 初始化 PTS// 初始化libavformat和注册所有muxers, demuxers和协议avdevice_register_all();avformat_network_init();// 打开摄像头开始//   // 摄像头支持多种参数,因此使用option 指定参数 最大支持到9帧av_dict_set(&options, "video_size", "1280*720", 0);av_dict_set(&options, "framerate", "9", 0);av_dict_set(&options, "input_format", "yuyv422", 0);AVInputFormat *input_format = av_find_input_format("v4l2");if ((ret = avformat_open_input(&input_ctx, "/dev/video0", input_format, &options)) < 0){fprintf(stderr, "Could not open input\n");return ret;}// 查找流信息ret = avformat_find_stream_info(input_ctx, NULL);if (ret < 0){std::cerr << "could not find stream info" << std::endl;return -1;}// 查找视频流for (size_t i = 0; i < input_ctx->nb_streams; i++){if (input_ctx->streams[i]->codecpar->codec_type == AVMEDIA_TYPE_VIDEO){video_stream_index = i;break;}}if (video_stream_index == -1){std::cerr << "no video stream found" << std::endl;return -1;}// 查找编码器AVCodec *codec = avcodec_find_encoder(AV_CODEC_ID_H264);if (!codec){fprintf(stderr, "Could not find AV_CODEC_ID_H264\n");return -1;}// 分配编码器上下文AVCodecContext *codec_ctx = avcodec_alloc_context3(codec);if (!codec_ctx){std::cerr << "Could not allocate video codec context" << std::endl;return -1;}// 设置编码器参数codec_ctx->codec_id = codec->id;codec_ctx->bit_rate = 400000;codec_ctx->width = 1280;codec_ctx->height = 720;codec_ctx->time_base = (AVRational){1, 9};codec_ctx->framerate = (AVRational){9, 1};codec_ctx->gop_size = 10;codec_ctx->max_b_frames = 0;             // 不需要B帧codec_ctx->pix_fmt = AV_PIX_FMT_YUV420P; // 传入的420P 格式,而cam 默认输出422 则一会 需要作转换// 打开编码器if (avcodec_open2(codec_ctx, codec, NULL) < 0){fprintf(stderr, "Could not open codec\n");return -1;}// 分配输出上下文AVFormatContext *output_ctx = nullptr;ret = avformat_alloc_output_context2(&output_ctx, NULL, "flv", output_url);if (!output_ctx){fprintf(stderr, "Could not create output context\n");return ret;}// 创建输出流AVStream *out_stream = avformat_new_stream(output_ctx, codec);if (!out_stream){fprintf(stderr, "Could not avformat_new_stream\n");return -1;}// 从输入流复制参数到输出流avcodec_parameters_from_context(out_stream->codecpar, codec_ctx);out_stream->time_base = codec_ctx->time_base;// 打开输出URLif (!(output_ctx->oformat->flags & AVFMT_NOFILE)){if (avio_open(&output_ctx->pb, output_url, AVIO_FLAG_WRITE) < 0){std::cerr << "Could not open output URL" << std::endl;return -1;}}// 写输出文件头if (avformat_write_header(output_ctx, NULL) < 0){fprintf(stderr, "Could not write header\n");return -1;}// 分配AVFrame并设置参数AVFrame *frame = av_frame_alloc();if (!frame){std::cerr << "Could not allocate video frame" << std::endl;return -1;}frame->format = codec_ctx->pix_fmt;frame->width = codec_ctx->width;frame->height = codec_ctx->height;av_frame_get_buffer(frame, 32);// 准备颜色空间色彩转换SwsContext *sws_ctx = sws_getContext(codec_ctx->width, codec_ctx->height, AV_PIX_FMT_YUYV422,codec_ctx->width, codec_ctx->height, AV_PIX_FMT_YUV420P,SWS_BILINEAR, NULL, NULL, NULL);if (!sws_ctx){std::cerr << "Could not initialize the conversion context" << std::endl;return -1;}while (true){if (av_read_frame(input_ctx, &pkt) >= 0){if (pkt.stream_index == video_stream_index){// 从相机出来的原始帧 为YUV 422 需要转换为420P// 数据是YUYV422格式,需要转换为YUV420PAVFrame *temp_frame = av_frame_alloc();if (!temp_frame){std::cerr << "Could not allocate temporary frame" << std::endl;av_packet_unref(&pkt);continue;}// 分配临时帧的内存空间if (av_image_alloc(temp_frame->data, temp_frame->linesize, codec_ctx->width, codec_ctx->height, AV_PIX_FMT_YUYV422, 1) < 0){std::cerr << "Could not allocate temporary frame buffer" << std::endl;av_frame_free(&temp_frame);av_packet_unref(&pkt);continue;}// 将pkt.data中的数据填充到temp_frameret = av_image_fill_arrays(temp_frame->data, temp_frame->linesize, pkt.data, AV_PIX_FMT_YUYV422, codec_ctx->width, codec_ctx->height, 1);if (ret < 0){std::cerr << "Error filling arrays" << std::endl;av_freep(&temp_frame->data[0]);av_frame_free(&temp_frame);av_packet_unref(&pkt);continue;}// 转换颜色空间到YUV420Psws_scale(sws_ctx, temp_frame->data, temp_frame->linesize, 0, codec_ctx->height, frame->data, frame->linesize);// 设置帧的 PTSframe->pts = pts++;// 编码视频数据ret = avcodec_send_frame(codec_ctx, frame);if (ret < 0){std::cerr << "Error sending frame to encoder" << std::endl;break;}while (ret >= 0){ret = avcodec_receive_packet(codec_ctx, &pkt);if (ret == AVERROR(EAGAIN) || ret == AVERROR_EOF){break;}else if (ret < 0){std::cerr << "Error encoding frame" << std::endl;break;}// 将编码后的视频数据推送到RTMP服务器pkt.stream_index = out_stream->index;av_packet_rescale_ts(&pkt, codec_ctx->time_base, out_stream->time_base);pkt.pos = -1;ret = av_interleaved_write_frame(output_ctx, &pkt);if (ret < 0){std::cerr << "Error writing frame" << std::endl;break;}av_packet_unref(&pkt);}av_frame_free(&temp_frame);}}}av_write_trailer(output_ctx);// 释放资源av_frame_free(&frame);avcodec_free_context(&codec_ctx);avformat_close_input(&input_ctx);if (output_ctx && !(output_ctx->oformat->flags & AVFMT_NOFILE)){avio_closep(&output_ctx->pb);}avformat_free_context(output_ctx);sws_freeContext(sws_ctx);return 0;
}
5.获取推流数据
常用的工具为VLC播放器,选择打开网络串流地址

就能播放推流画面了

相关文章:
音视频开发—FFmpeg 打开摄像头进行RTMP推流
实验平台:Ubuntu20.04 摄像头:普通USB摄像头,输出格式为YUV422 1.配置RTMP服务器推流平台 使用Nginx 配置1935端口即可,贴上教程地址 ubuntu20.04搭建Nginxrtmp服务器) 2.配置FFmpeg开发环境 过程较为简单,这里不…...
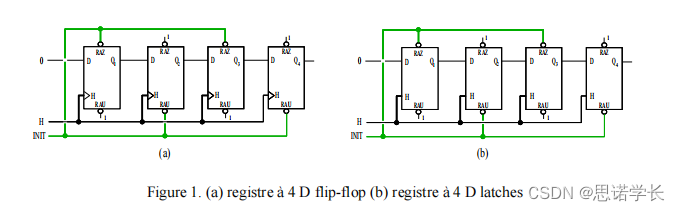
D触发器(D Flip-Flop)与D锁存器(D Latch)
1 基础概念 我们先来简单回顾一下D触发器(D flip-flop)和D锁存器(D latch)的概念,以及它们在数字电路中的作用。 1.1 D触发器(D Flip-Flop) D触发器是一种数字存储器件,它在时钟信号…...
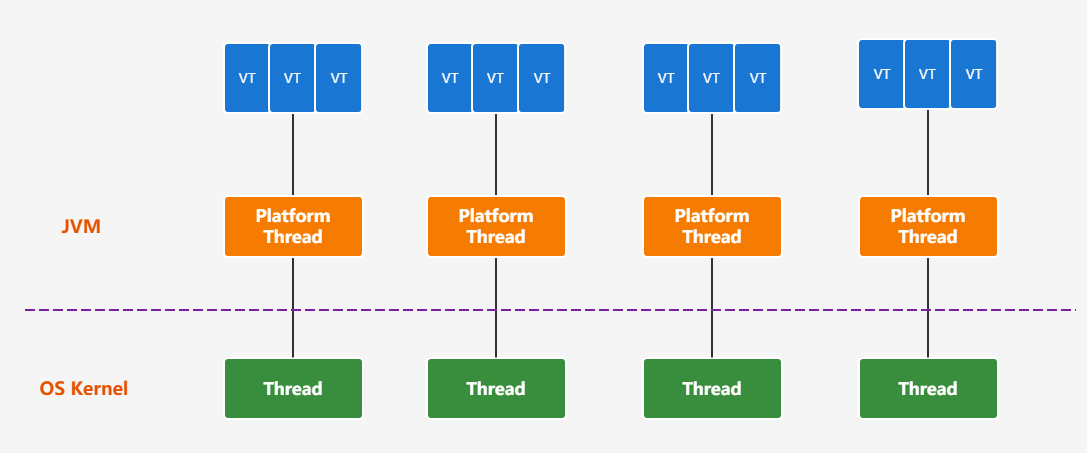
JDK19特性
JDK19特性 一、JAVA19概述 JDK 19 2022 年 9 月 20 日正式发布以供生产使用,非长期支持版本。不过,JDK 19 中有一些比较重要的新特性值得关注。 JDK 19 只有 7 个新特性: JEP 405: Record Patterns(记录模式)[1] (预览)JEP 422: Linux/RISC-V Port[2]JEP 424: Foreign …...

sql语句中常用的函数有那些
1、字符串函数 CONCAT(string1, string2, ...): 连接两个或多个字符串。 UPPER(string): 将字符串转换为大写。 LOWER(string): 将字符串转换为小写。 TRIM(string): 去除字符串两端的空格。 LENGTH(string): 返回字符串的长度。 SUBSTRING(string, start, length): 从字符串中…...

odoo17 小变更3 Warning、 “attrs “和 “states “不再用
odoo17 小变更 1、Warning from odoo.exceptions import ValidationError,Warning ImportError: cannot import name Warning from odoo.exceptions (D:\od172406\odoo\exceptions.py) 2、自 17.0 版起,不再使用 "attrs "和 "states "属性。 …...

Unity3d 游戏暂停(timeScale=0)引起的deltaTime关联的系列问题解决
问题描述 游戏暂停的功能是通过设置timeScale0实现的,不过在暂停游戏的时候,需要对角色进行预览和设置,为了实现这个功能,是通过鼠标控制相机的操作,为了使相机的操作丝滑,获取鼠标操作系数乘以Time.delta…...

服务端代码编写中MySql大小写在Java中报错问题解决
报错信息: 原因:MySql和Java变量大小写产生的冲突。 经过查阅各个博客等,得出浅显结论(不一定对):MySql大小写不敏感,Java大小写敏感,当Javabean转为MySql数据库表时,Ja…...
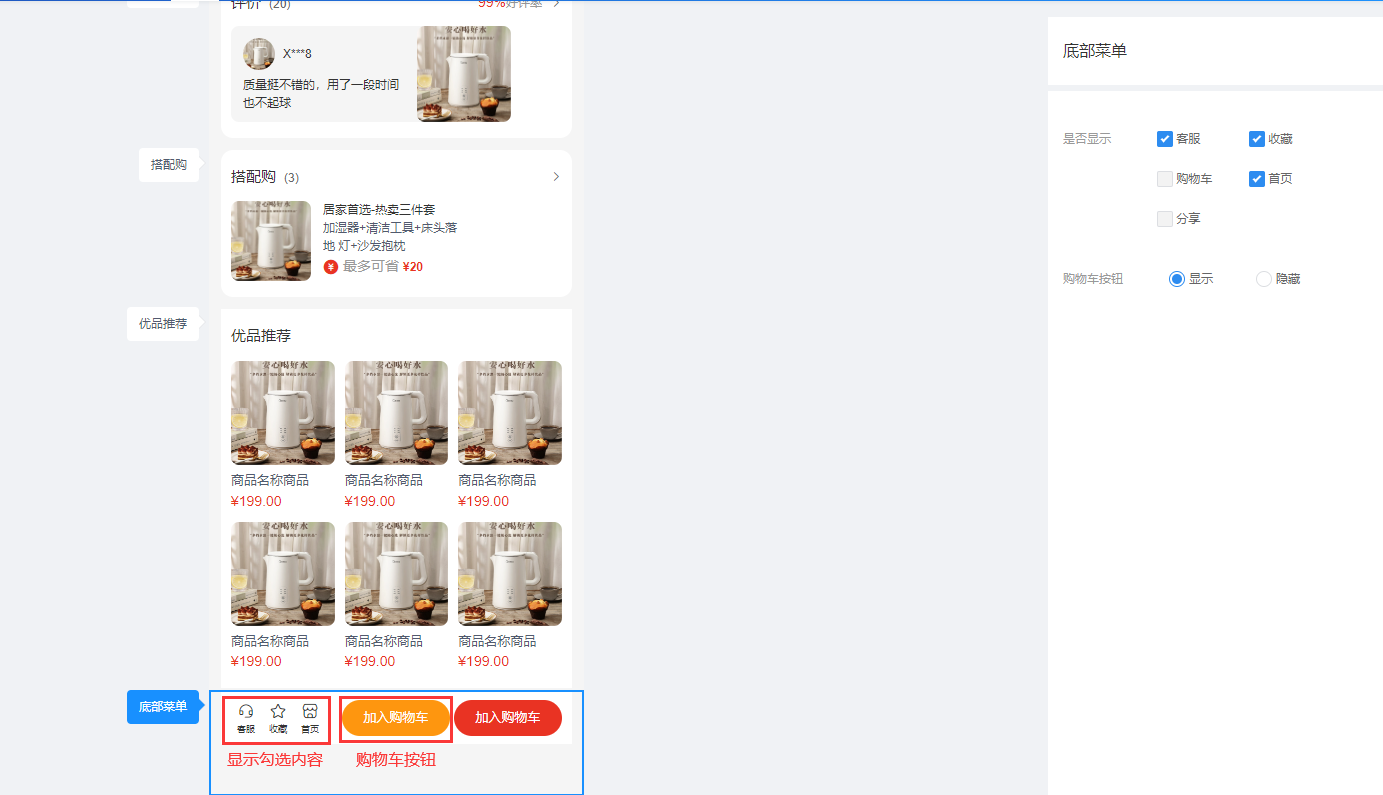
CRMEB 多店商品详情页装修说明
一、功能介绍 商家可调整商品详情各板块样式,可根据不同的需求开启或关闭单独的板块 二、操作流程 装修 > 商品详情 三、功能说明 1、商品信息 可控制商品详情页面商品信息的显示与隐藏 2、会员信息,排行榜 控制商品详情页面会员信息及排行榜的…...

Redis-使用 jedis 操作数据
文章目录 1、Jedis简介2、环境准备3、创建maven普通项目,导入如下依赖4、测试JAVA程序和Redis之间的通信 1、Jedis简介 "Jedis" 通常是作为 "Java Redis" 的缩写或简称来理解的。Java Embedded Data Structures Interface 表示 Java嵌入式数据结构接口 2、…...

简说PIP换源
概述 PIP(Python Package Installer)是 Python 的包管理工具,用于安装和管理 Python 包。默认情况下,PIP 从 Python 官方的包仓库(即 PyPI)下载和安装包。然而,由于网络原因,访问官…...
django学习入门系列之第三点《CSS基础样式介绍2》
文章目录 文字对齐方式外边距内边距往期回顾 文字对齐方式 水平对齐方式 text-align: center;垂直对齐方式 /* 注意,这个只能是一行来居中 */ line-height:/*长度*/ ;样例 <!DOCTYPE html> <html lang"en"> <head><meta charset…...

分布式光纤测温DTS在工程现场中稳定性与可靠性如何?
20年前,分布式光纤测温(Distributed Temperature Sensing,DTS)技术的发展尚不成熟,设备成本高昂,其稳定性与可靠性也存在一定问题。然而,经过二十多年的不断发展与创新,DTS技术在工程现场应用中取得了显著进…...

PHP多线程模块parallel的编译安装和多线程编程演示
从PHP7开始,多线程编原有的pthreads已经不在维护,而是使用parallel替代。 由于是新的模块,样例代码很少,这里总结一个简单的代码和详细的备注供大家参考。 编译和安装 parallel需要启用ZTS(Zend Thread Safety&…...

记录grid布局属性
grid布局 分为容器和项目元素 容器属性 #container{display:grid;grid-template-columns:100px 100px 100px;/* 1fr 表示比例为占1份 */grid-template-columns:1fr 100px 1fr;/*100px为1列,自动填充,容器宽度不足则换行*/grid-template-columns:repeat(auto-fill,100px);/* …...

12.爬虫---PyMysql安装与使用
12.PyMysql安装与使用 1.安装 PyMySQL2.使用PyMySQL2.1创建数据表2.2连接数据库2.3增加数据2.4修改数据2.5查询数据2.6删除数据2.7关闭连接 3.总结 MySQL 安装可以看这篇文章MySql 安装与使用(非常详细) 1.安装 PyMySQL PyMySQL是Python中用于连接MySQL…...
VS2022遇到的两个问题
问题一:找不到定义的头文件 别的博主说是:在属性页里面进行改写,改成是,我试过之后并不行; 解决思路:但其实在右边视图里面找到你自己定义的头文件加到你运行文件中就行;因为程序就只有一个入口…...
【Android14 ShellTransitions】(六)SyncGroup完成
这一节的内容在WMCore中,回想我们的场景,是在Launcher启动某一个App,那么参与动画的就是该App对应Task(OPEN),以及Launcher App对应的Task(TO_BACK)。在确定了动画的参与者后&#x…...

技术管理转型之战:决策之道-管理中的智慧与策略
文章目录 引言一、决策的重要性二、常见的决策方式1. 理性决策(Rational Decision Making)2. 有限理性(Bounded Rationality)3. 直觉决策(Intuitive Decision Making)4. 循证管理(Evidence-Base…...

Shell脚本:条件语句(if、case)
目录 硬编码 硬编码的缺点 条件判断 $? 命令行语句 判断指定目录是否存在 判断指定文件是否存在 判断指定对象是否存在 表达式形式语句 判断对象是否存在 判断对象是否有权限 与、或、非 运算 与运算 或运算 非运算 比较大小 判断磁盘利用率实验步骤 字符串…...

在Linux上为Windows目标配置Qt交叉编译
问题描述 我想使用Linux x86_64主机为Windows x86_64目标交叉编译Qt库(最终也包括我的应用程序)。我觉得自己已经接近成功了,但可能对整个过程有一些基本的误解。 我从在我的Fedora机器上安装所有mingw包开始,并修改了win32-g的…...
)
告别“人工智障”:用LangChain和GPT-4打造你的第一个AI智能体(附保姆级代码)
从零构建智能体:LangChain与GPT-4实战指南 在咖啡厅角落,一位开发者正对着屏幕皱眉——她刚读完一篇关于AI代理的学术论文,满篇理论却找不到一行可执行的代码。这场景你是否熟悉?本文将用完全不同的方式,带你用LangCha…...

从‘看到’到‘看懂’:VSRN模型如何像人一样进行视觉语义推理?一个生动的案例拆解
从‘看到’到‘看懂’:VSRN模型如何像人一样进行视觉语义推理?一个生动的案例拆解 想象这样一个场景:你看到一张照片,画面中一只棕色的狗在绿色的草地上追逐飞盘。几乎瞬间,你的大脑就完成了从视觉感知到语义理解的完整…...

网易云音乐API深度解析:模块化接口开发与实战应用指南
网易云音乐API深度解析:模块化接口开发与实战应用指南 【免费下载链接】NeteaseCloudMusicApiBackup 项目地址: https://gitcode.com/gh_mirrors/ne/NeteaseCloudMusicApiBackup 在当今音乐应用开发领域,后端服务的稳定性和可扩展性至关重要。网…...

昇思大模型垂域模型
昇思 MindSpore 垂域模型是基于通用大模型基座 行业数据微调 领域技术增强构建的行业专用 AI 模型,依托 MindSpore Transformers 套件与昇腾硬件,在医疗、金融、电力、法律、工业等领域实现深度落地,兼顾通用能力与行业专业性,训…...

Perplexity图标资源搜索私藏库曝光:内部团队未开放的8类高保真SVG图标源及授权合规对照表
更多请点击: https://intelliparadigm.com 第一章:Perplexity图标资源搜索 Perplexity AI 官方未提供公开的图标资源包(如 SVG、Favicon 或 App Icon 套件),但开发者可通过合法合规方式获取其品牌视觉资产用于技术文档…...
)
Overleaf实战:手把手教你用LaTeX制作符合A4排版要求的跨页长表格(含完整代码)
Overleaf实战:LaTeX跨页长表格的终极解决方案 当你正在撰写一篇包含大量数据的学术论文或技术手册时,那些横跨多页的表格往往会成为格式噩梦。表格在页面底部被生硬截断,表头在后续页面消失,页码引用混乱——这些问题不仅影响阅读…...

思源宋体TTF:免费专业中文字体终极使用指南
思源宋体TTF:免费专业中文字体终极使用指南 【免费下载链接】source-han-serif-ttf Source Han Serif TTF 项目地址: https://gitcode.com/gh_mirrors/so/source-han-serif-ttf 还在为中文排版找不到合适的免费字体而烦恼吗?思源宋体TTF正是你需要…...
)
【中科院研究所主办、高录用、往届会后4个月检索】第二届人工智能与基础模型国际学术会议(AIFM 2026)
第二届人工智能与基础模型国际学术会议(AIFM 2026)将于2026 年 6 月 26-28 日在中国乌鲁木齐举办。会议旨在汇聚来自世界各地学术界、产业界及政府机构的专家学者,围绕人工智能与基础模型技术的核心议题展开深度研讨,共同探索领域…...

【亲测免费】 探索光谱与色谱数据分析的新利器:CARS-PLS MATLAB 源码
探索光谱与色谱数据分析的新利器:CARS-PLS MATLAB 源码 【下载地址】CARS-PLS用于光谱数据或色谱数据变量选择的MATLAB源码 本仓库提供了一个用于光谱数据或色谱数据变量选择的 MATLAB 源码,基于 CARS-PLS(Competitive Adaptive Reweighted S…...

第 12 篇:W55RP20-EVB-Pico MicroPython 实战:MQTT 协议基础通信验证
本文为 WIZnet W55RP20 芯片 MicroPython教程第 12 篇,基于官方最新固件编写,代码均经过实际验证,可直接烧录运行。 版权声明:本文为 WIZnet 官方原创技术文章,转载请注明出处。 前言 上一篇实战教程,我们…...