[C++]使用C++部署yolov10目标检测的tensorrt模型支持图片视频推理windows测试通过
【测试通过环境】
vs2019
cmake==3.24.3
cuda11.7.1+cudnn8.8.0
tensorrt==8.6.1.6
opencv==4.8.0
【部署步骤】
获取pt模型:https://github.com/THU-MIG/yolov10训练自己的模型或者直接使用yolov10官方预训练模型
下载源码:https://github.com/laugh12321/yolov10/tree/nms并安装到环境中
导出onnx:
yolo export model=yolov10n.pt format=onnx opset=13 simplify max_det=100 conf=0.25 iou=0.65 nms
注意导出模型和官方yolov10指令导出的onnx是不一样的,使用yolov10-nms导出模型结构如图
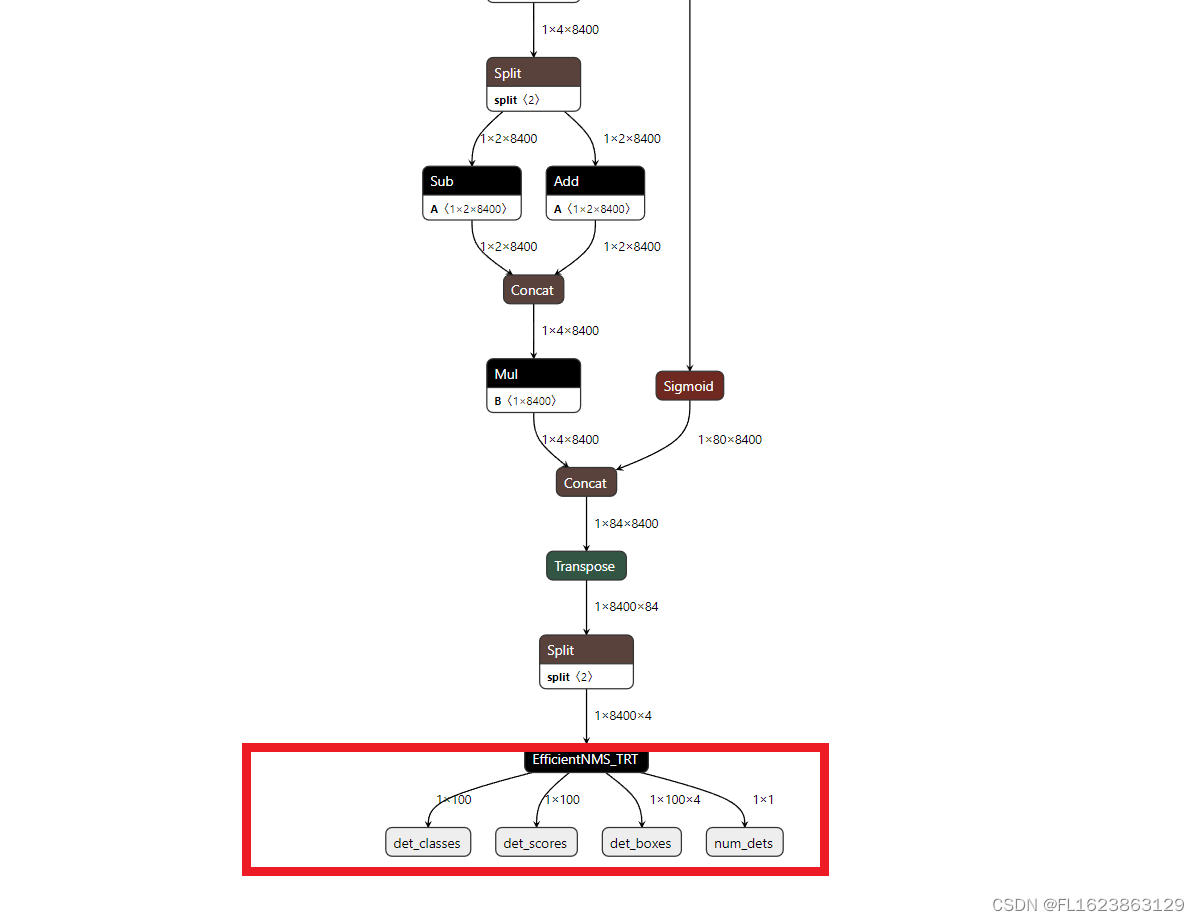
注意一定要是上面类似结构图才能用于这个C++项目
导出tensorrt:
等20分钟左右即可导出需要耐心等待一段时间视个人电脑性能决定,由于tensorrt依赖硬件不一样电脑可能无法共用tensorrt模型,所以必须要重新转换onnx模型到engine才可以运行。请勿直接使用提供的engine模型进行直接测试,否则可能无法正常运行
trtexec --onnx=yolov10n.onnx --saveEngine=yolov10n.engine --fp16
下载安装vs2019勾选桌面C++安装
git clone https://github.com/laugh12321/TensorRT-YOLO
cd TensorRT-YOLO
xmake f -k shared --tensorrt="C:/Program Files/NVIDIA GPU Computing Toolkit/TensorRT/v8.6.1.6"
xmake -P . -r
将编译好的deploy.dll和deploy.lib文件放到yolov10-tensorrt-cplus/lib文件夹
编译源码yolov10-tensorrt-cplus
运行命令:
推理图片:
yolov10.exe -e C:\Users\Administrator\Desktop\yolov10-tensorrt-cplus\yolov10n.engine -i C:\Users\Administrator\Desktop\yolov10-tensorrt-cplus\images\bus.jpg -o ./out -l C:\Users\Administrator\Desktop\yolov10-tensorrt-cplus\labels.txt
推理视频:
yolov10.exe -e C:\Users\Administrator\Desktop\yolov10-tensorrt-cplus\yolov10n.engine -i D:\car.mp4 -o ./out -l C:\Users\Administrator\Desktop\yolov10-tensorrt-cplus\labels.txt
【视频演示】
使用C++部署yolov10目标检测的tensorrt模型支持图片视频推理windows测试通过_哔哩哔哩_bilibili【测试通过环境】vs2019cmake==3.24.3cuda11.7.1+cudnn8.8.0tensorrt==8.6.1.6opencv==4.8.0更多信息参考博文:https://blog.csdn.net/FL1623863129/article/details/139693743, 视频播放量 3、弹幕量 0、点赞数 0、投硬币枚数 0、收藏人数 0、转发人数 0, 视频作者 未来自主研究中心, 作者简介 未来自主研究中心,相关视频:4060Ti 16G显卡安装Ollama+ChatTTS打造智能语音秘书(突破30秒限制),AI换脸最全面部细节演示:眨眼,捏眉毛,斗鸡眼,戳鼻子,做猪鼻子……认识ai换脸,警惕Ai换脸,Ai变声诈骗!,基于yolo的骑行速度检测,labelme json转yolo工具用于目标检测训练数据集使用教程,使用纯opencv部署yolov8目标检测模型onnx,rk3588 yolov5 目标检测推流rtsp,[深度学习][目标检测][面试提问]Batch Normalization批归一化,[数据集介绍][目标检测]城市街道垃圾数据集VOC格式5266张,GPT:可恶!我好不容易才建立的三观啊!,毕设项目—基于最新YOLOv10+ByteTrack+PaddleOCR实现交通状态分析 (功能:目标检测、轨迹跟踪、车牌检测、车牌号识别、单目测速及目标计数)![]() https://www.bilibili.com/video/BV13S411P7XL/
https://www.bilibili.com/video/BV13S411P7XL/
【部分实现代码】
#include <CLI/CLI.hpp>
#include <chrono>
#include <filesystem>
#include <fstream>
#include <iostream>
#include <memory>
#include <opencv2/opencv.hpp>
#include <random>
#include <string>
#include <algorithm>
#include "deploy/utils/utils.hpp"
#include "deploy/vision/detection.hpp"
#include "deploy/vision/result.hpp"
#include <opencv2/core/core.hpp>
#include <opencv2/highgui/highgui.hpp>
using namespace cv;
using namespace std;namespace fs = std::filesystem;
std::string getFileExtension(const std::string& filePath) {  size_t dotPosition = filePath.rfind('.'); // 从右向左查找'.'的位置  if (dotPosition == std::string::npos) {  // 没有找到'.',返回空字符串  return "";  }  return filePath.substr(dotPosition + 1); // 返回'.'之后的所有字符
}
// Get image files in a directory
std::vector<std::string> getImagesInDirectory(const std::string &folderPath)
{std::vector<std::string> imageFiles;for (const auto &entry : fs::directory_iterator(folderPath)){const auto extension = entry.path().extension().string();if (fs::is_regular_file(entry) && (extension == ".jpg" || extension == ".png" || extension == ".jpeg" || extension == ".bmp")){imageFiles.push_back(entry.path().string());}}return imageFiles;
}// Get file name from file path
std::string getFileName(const std::string &filePath)
{return fs::path(filePath).filename().string();
}// Create output directory
void createOutputDirectory(const std::string &outputPath)
{if (!fs::exists(outputPath) && !fs::create_directories(outputPath)){std::cerr << "Failed to create output directory: " << outputPath << std::endl;exit(1);}else if (!fs::is_directory(outputPath)){std::cerr << "Output path exists but is not a directory: " << outputPath << std::endl;exit(1);}
}// Generate label and color pairs
std::vector<std::pair<std::string, cv::Scalar>> generateLabelColorPairs(const std::string &labelFile)
{std::vector<std::pair<std::string, cv::Scalar>> labelColorPairs;std::ifstream file(labelFile);if (!file.is_open()){std::cerr << "Failed to open labels file: " << labelFile << std::endl;return labelColorPairs;}auto generateRandomColor = [](){std::random_device rd;std::mt19937 gen(rd());std::uniform_int_distribution<int> dis(0, 255);return cv::Scalar(dis(gen), dis(gen), dis(gen));};std::string label;while (std::getline(file, label)){labelColorPairs.emplace_back(label, generateRandomColor());}return labelColorPairs;
}// Visualize detection results
void visualize(cv::Mat &image, const deploy::DetectionResult &result, const std::vector<std::pair<std::string, cv::Scalar>> &labelColorPairs)
{for (size_t i = 0; i < result.num; ++i){const auto &box = result.boxes[i];int cls = result.classes[i];float score = result.scores[i];const auto &label = labelColorPairs[cls].first;const auto &color = labelColorPairs[cls].second;std::string labelText = label + " " + cv::format("%.2f", score);// Draw rectangle and labelcv::rectangle(image, cv::Point(box.left, box.top), cv::Point(box.right, box.bottom), color, 2, cv::LINE_AA);int baseLine;cv::Size labelSize = cv::getTextSize(labelText, cv::FONT_HERSHEY_SIMPLEX, 0.6, 1, &baseLine);cv::rectangle(image, cv::Point(box.left, box.top - labelSize.height), cv::Point(box.left + labelSize.width, box.top), color, -1);cv::putText(image, labelText, cv::Point(box.left, box.top), cv::FONT_HERSHEY_SIMPLEX, 0.6, cv::Scalar(255, 255, 255), 1);}
}// Process a single image
void processSingleImage(const std::string &imagePath, const std::shared_ptr<deploy::DeployDet> &model, const std::string &outputPath, const std::vector<std::pair<std::string, cv::Scalar>> &labels)
{cv::Mat cvimage = cv::imread(imagePath, cv::IMREAD_COLOR);if (cvimage.empty()){std::cerr << "Failed to read image: " << imagePath << std::endl;return;}// cv::cvtColor(cvimage, cvimage, cv::COLOR_BGR2RGB);  // It is better to use RGB images, but the impact of using BGR on the results is not significant.deploy::Image image(cvimage.data, cvimage.cols, cvimage.rows);std::cout << "start inference\n";auto result = model->predict(image);std::cout << "inference over!\n";if (!outputPath.empty()){std::cout << "show result\n";// cv::cvtColor(cvimage, cvimage, cv::COLOR_RGB2BGR);visualize(cvimage, result, labels);cv::imwrite(outputPath + "/" + getFileName(imagePath), cvimage);}else{std::cout << "outputPath is empty\n";}
}void processVideo(const std::string &videoPath, const std::shared_ptr<deploy::DeployDet> &model, const std::vector<std::pair<std::string, cv::Scalar>> &labels)
{VideoCapture capture(videoPath);if (!capture.isOpened())return;double fps = capture.get(cv::CAP_PROP_FPS);          // 帧率int width = capture.get(cv::CAP_PROP_FRAME_WIDTH);   // 视频帧宽度int height = capture.get(cv::CAP_PROP_FRAME_HEIGHT); // 视频帧高度while (1){Mat frame;capture >> frame; // 从相机读取新一帧if (frame.empty()){std::cout << "read over!\n";break;}deploy::Image image(frame.data, frame.cols, frame.rows);auto result = model->predict(image);// cv::cvtColor(cvimage, cvimage, cv::COLOR_RGB2BGR);visualize(frame, result, labels);cv::imshow("result", frame);if (char(waitKey(2)) == 'q'){break;}}capture.release();cv::destroyAllWindows();
}// Process a batch of images
void processBatchImages(const std::vector<std::string> &imageFiles, const std::shared_ptr<deploy::DeployDet> &model, const std::string &outputPath, const std::vector<std::pair<std::string, cv::Scalar>> &labels)
{const size_t batchSize = model->batch;deploy::GpuTimer gpuTimer;deploy::CpuTimer<std::chrono::high_resolution_clock> cpuTimer;int count = 0;for (size_t i = 0; i < imageFiles.size(); i += batchSize){std::vector<cv::Mat> images;std::vector<std::string> imgNameBatch;for (size_t j = i; j < i + batchSize && j < imageFiles.size(); ++j){cv::Mat image = cv::imread(imageFiles[j], cv::IMREAD_COLOR);if (image.empty()){std::cerr << "Failed to read image: " << imageFiles[j] << std::endl;continue;}// cv::cvtColor(image, image, cv::COLOR_BGR2RGB); // It is better to use RGB images, but the impact of using BGR on the results is not significant.images.push_back(image);imgNameBatch.push_back(getFileName(imageFiles[j]));}if (images.empty())continue;std::vector<deploy::Image> imgBatch;for (const auto &image : images){imgBatch.emplace_back(image.data, image.cols, image.rows);}if (i > 5){cpuTimer.start();gpuTimer.start();}auto results = model->predict(imgBatch);if (i > 5){cpuTimer.stop();gpuTimer.stop();count++;}if (!outputPath.empty()){for (size_t j = 0; j < images.size(); ++j){// cv::cvtColor(images[j], images[j], cv::COLOR_RGB2BGR);visualize(images[j], results[j], labels);cv::imwrite(outputPath + "/" + imgNameBatch[j], images[j]);}}}if (count > 0){std::cout << "Average infer CPU elapsed time: " << cpuTimer.microseconds() / 1000 / count << " ms" << std::endl;std::cout << "Average infer GPU elapsed time: " << gpuTimer.microseconds() / 1000 / count << " ms" << std::endl;}
}int main(int argc, char **argv)
{CLI::App app{"YOLO Series Inference Script"};std::string enginePath, inputPath, outputPath, labelPath;app.add_option("-e,--engine", enginePath, "Serialized TensorRT engine")->required()->check(CLI::ExistingFile);app.add_option("-i,--input", inputPath, "Path to image or directory")->required()->check(CLI::ExistingPath);app.add_option("-o,--output", outputPath, "Directory to save results");app.add_option("-l,--labels", labelPath, "File to use for reading the class labels from")->check(CLI::ExistingFile);CLI11_PARSE(app, argc, argv);std::cout << "load engine...\n";auto model = std::make_shared<deploy::DeployDet>(enginePath);std::cout << "engine loaded!\n";std::vector<std::pair<std::string, cv::Scalar>> labels;if (!outputPath.empty()){labels = generateLabelColorPairs(labelPath);createOutputDirectory(outputPath);}if (fs::is_regular_file(inputPath)){if(getFileExtension(inputPath)=="mp4"){processVideo(inputPath, model, labels);}else{std::cout << "start process image file\n";processSingleImage(inputPath, model, outputPath, labels);}}else{std::cout << "start process image directory\n";auto imageFiles = getImagesInDirectory(inputPath);if (!imageFiles.empty()){processBatchImages(imageFiles, model, outputPath, labels);}else{std::cerr << "No images found in directory: " << inputPath << std::endl;return 1;}}std::cout << "Inference completed." << std::endl;return 0;
}
【源码下载】https://download.csdn.net/download/FL1623863129/89436042
相关文章:
[C++]使用C++部署yolov10目标检测的tensorrt模型支持图片视频推理windows测试通过
【测试通过环境】 vs2019 cmake3.24.3 cuda11.7.1cudnn8.8.0 tensorrt8.6.1.6 opencv4.8.0 【部署步骤】 获取pt模型:https://github.com/THU-MIG/yolov10训练自己的模型或者直接使用yolov10官方预训练模型 下载源码:https://github.com/laugh12321/yol…...

分享uniapp + Springboot3+vue3小程序项目实战
分享uniapp Springboot3vue3小程序项目实战 经过10天敲代码,终于从零到项目测试完成,一个前后端分离的小程序实战项目学习完毕 时间从6月12日 到6月22日,具有程序开发基础,第一次写uniapp,Springboot以前用过,VUE3也…...
Ubuntu 24.04安装zabbix7.0.0图形中文乱码
当zabbix安装完成后,设置中文界面时,打开图形,中文内容会显示方框乱码,是因为服务器字体中没有相关的中文字体,需要更换。 1、找到中文字体,可以在网络上下载《得意黑》开源字体,也可以在windo…...

MybatisPlus 调用 原生SQL
方式一 DemoMapper.java Mapper public interface DemoMapper extends BaseMapper<TableConfig> {Update("${sql}")int createTable(Param("sql") String sql); }测试代码 SpringBootTest class DemoMapperTest {Resourceprivate DemoMapper demo…...
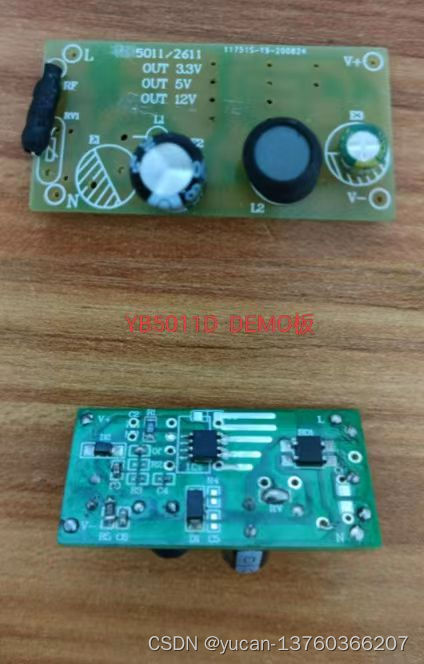
1.SG90
目录 一.实物图 二.原理图 三.简介 四.工作原理 一.实物图 二.原理图 三.简介 舵机(英文叫Servo),是伺服电机的一种,伺服电机就是带有反馈环节的电机,这种电机可以进行精确的位置控制或者输出较高的扭矩。舵机…...
【yolov8语义分割】跑通:下载yolov8+预测图片+预测视频
1、下载yolov8到autodl上 git clone https://github.com/ultralytics/ultralytics 下载到Yolov8文件夹下面 另外:现在yolov8支持像包一样导入,pip install就可以 2、yolov8 语义分割文档 看官方文档:主页 -Ultralytics YOLO 文档 还能切…...

基于STM8系列单片机驱动74HC595驱动两个3位一体的数码管
1)单片机/ARM硬件设计小知识,分享给将要学习或者正在学习单片机/ARM开发的同学。 2)内容属于原创,若转载,请说明出处。 3)提供相关问题有偿答疑和支持。 为了节省单片机MCU的IO口资源驱动6个数码管&…...
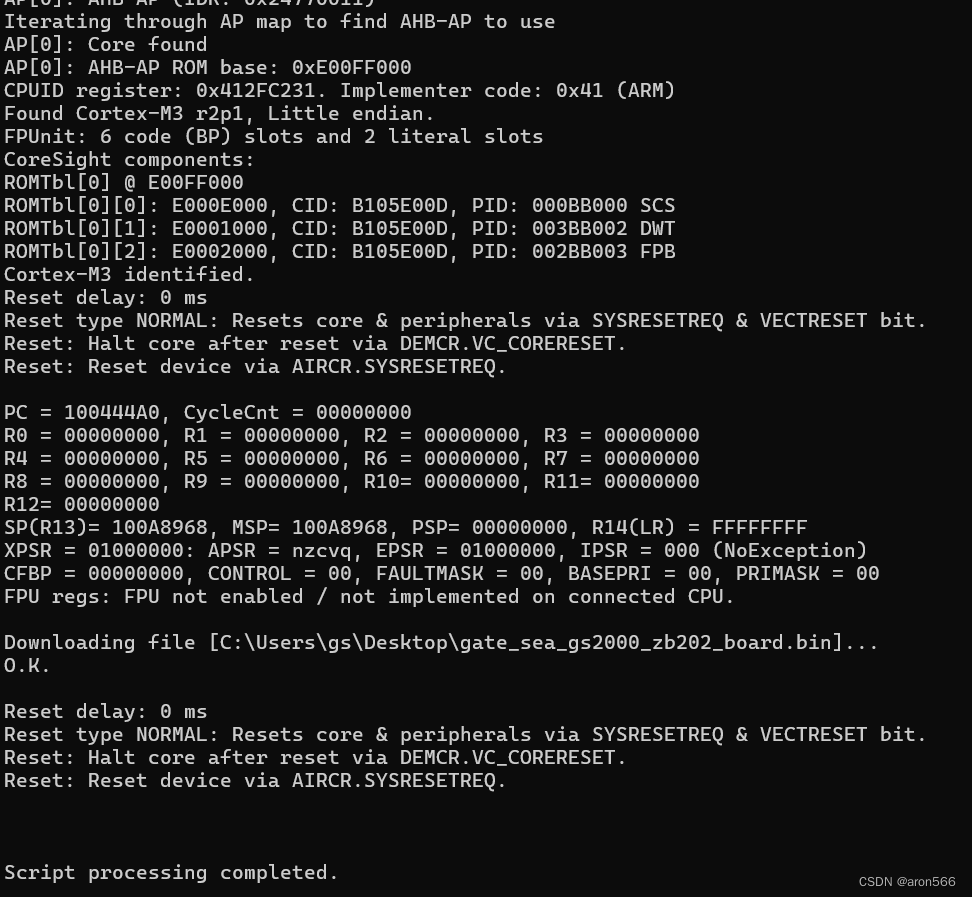
Jlink下载固件到RAM区
Jlink下载固件到RAM区 准备批处理搜索exe批处理读取bin数据解析调用jlink批处理准备jlink脚本 调用执行 环境:J-Flash V7.96g 平台:arm cortex-m3 准备批处理 搜索exe批处理 find_file.bat echo off:: 自动识别脚本名和路径 set "SCRIPT_DIR%~dp…...

Kotlin基础——Typeclass
高阶类型 如在Iterable新增泛型方法时 interface Iterable<T> {fun filter(p: (T) -> Boolean): Iterable<T>fun remove(p: (T) -> Boolean): Iterable<T> filter { x -> !p(x) } }对应的List、Set实现上述方法时仍需要返回具体的类型 interfac…...
DC-DC 高压降压、非隔离AC-DC、提供强大的动力,选择优质电源芯片-(昱灿)
畅享长续航,尽在我们的充电芯片! 无论是手机、平板还是智能设备,长时间使用后电量不足总是令人头疼。然而,我们的充电芯片将为您带来全新的充电体验!采用先进的技术,我们的充电芯片能够提供快速而稳定的充电…...

GPT-4o的视觉识别能力,将绕过所有登陆的图形验证码
知识星球🔗除了包含技术干货:《Java代码审计》《Web安全》《应急响应》《护网资料库》《网安面试指南》还包含了安全中常见的售前护网案例、售前方案、ppt等,同时也有面向学生的网络安全面试、护网面试等。 我们来看一下市面上常见的图形验证…...

【LinuxC语言】进程间的通信——管道
文章目录 前言不同进程间通信的方式管道匿名管道和命名管道半双工与全双工管道相关函数创建管道总结前言 在Linux操作系统中,进程是执行中的程序的实例。每个进程都有自己的地址空间,数据栈以及其他用于跟踪进程执行的辅助数据。操作系统管理这些进程,并通过调度算法来分享…...
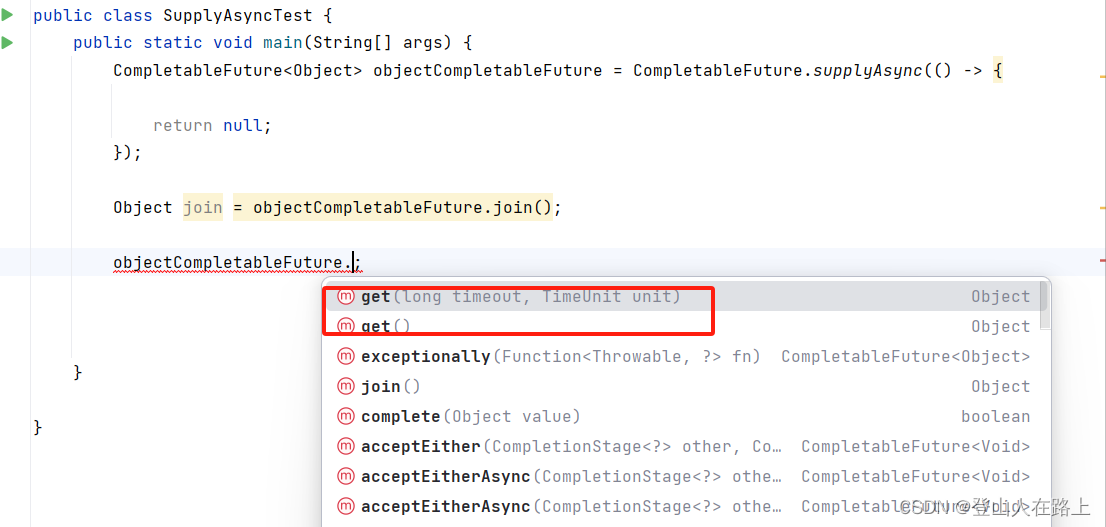
CompletableFuture 基本用法
一、 CompletableFuture简介 CompletableFuture 是 Java 8 引入的一个功能强大的类,用于异步编程和并发处理。它提供了丰富的 API 来处理异步任务的结果,支持函数式编程风格,并允许通过链式调用组合多个异步操作。 二、CompletableFuture中…...

网页如何发布到服务器上
将网页发布到服务器上的过程涉及多个步骤,包括准备阶段、选择托管提供商、发布网站等。12 准备阶段: 确保在本地开发环境中对网站进行了充分的测试,包括功能测试、性能测试和安全测试。 检查Web.config文件,确保所有的配置设置…...

Jenkins简要说明
Jenkins 是一个开源的持续集成和持续部署(CI/CD)工具,广泛用于自动化软件开发过程中的构建、测试和部署等任务。它是基于Java开发的,因此可以在任何支持Java的平台上运行,并且能够与各种操作系统、开发工具和插件无缝集…...

C# 比较基础知识:最佳实践和技巧
以下是一些在 C# 中进行比较的技巧和窍门的概述。 1. 比较原始类型 对于原始类型(int、double、char 等),可以使用标准比较运算符。 int a 5; int b 10; bool isEqual (a b); // false bool isGreater (a > b); // false bool is…...

Ansible 自动化运维实践
随着 IT 基础设施的复杂性不断增加,手动运维已无法满足现代企业对高效、可靠的 IT 运维需求。Ansible 作为一款开源的自动化运维工具,通过简洁易用的 YAML 语法和无代理(agentless)架构,极大简化了系统配置管理、应用部…...

红队攻防渗透技术实战流程:中间件安全:IISNGINXAPACHETOMCAT
红队攻防渗透实战 1. 中间件安全1.1 中间件-IIS-短文件&解析&蓝屏等1.2 中间件-Nginx-文件解析&命令执行等1.2.1 后缀解析 文件名解析1.2.2 cve_2021_23017 无EXP有POC1.2.3 cve_2017_7529 意义不大1.3 中间件-Apache-RCE&目录遍历&文件解析等1.3.1 cve_20…...

如何卸载宝塔面板?
宝塔官方有提供宝塔面板的卸载命令,使用这个卸载命令,我们就能将宝塔面板卸载掉。 这里有一点需要注意的,如果卸载宝塔面板的同时,也希望将 Nginx、MySQL、PHP 等组件卸载掉,那么我们应该先在宝塔面板里面卸载掉以上软…...
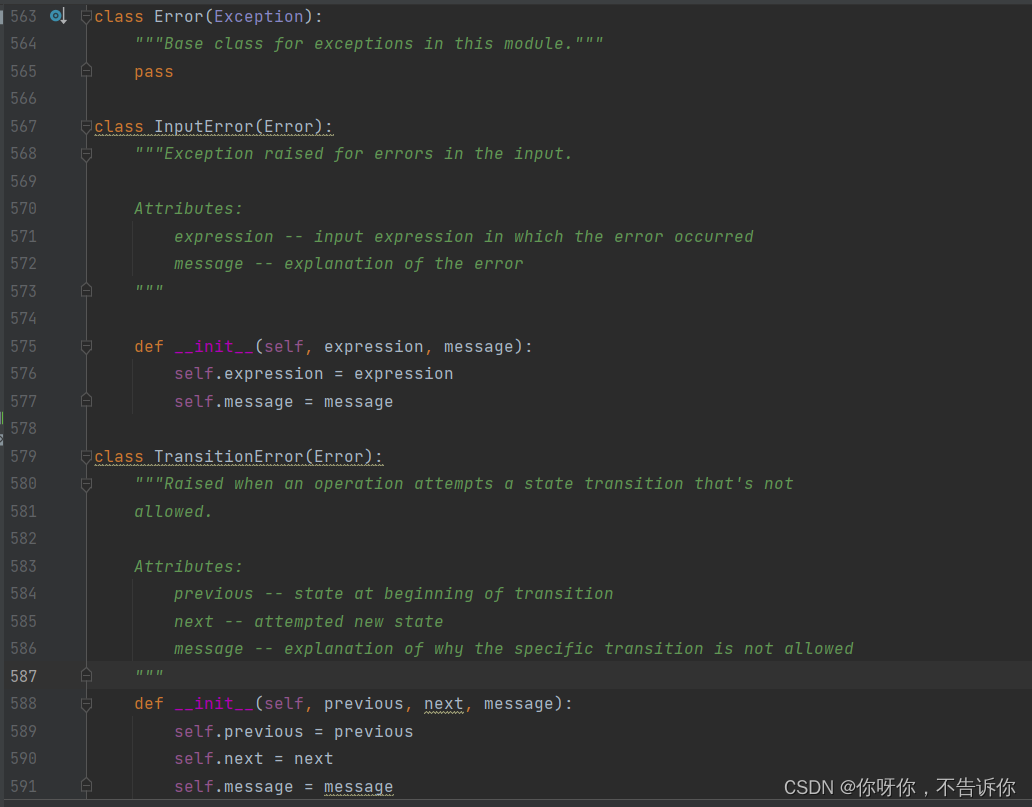
python入门基础知识(错误和异常)
本文部分内容来自菜鸟教程Python 基础教程 | 菜鸟教程 (runoob.com) 本人负责概括总结代码实现。 以此达到快速复习目的 目录 语法错误 异常 异常处理 try/except try/except...else try-finally 语句 抛出异常 用户自定义异常 内置异常类型 常见的标准异常类型 语法…...

突破QQ音乐格式壁垒:qmcdump开源工具全场景应用指南
突破QQ音乐格式壁垒:qmcdump开源工具全场景应用指南 【免费下载链接】qmcdump 一个简单的QQ音乐解码(qmcflac/qmc0/qmc3 转 flac/mp3),仅为个人学习参考用。 项目地址: https://gitcode.com/gh_mirrors/qm/qmcdump 当你兴冲…...

基于STM32F103的热电偶采集与PID温度控制系统设计方案——包含IAR开发环境下的STM...
STM32F103热电偶采集PID温控采集系统 基于stm32设计,可以实现热电偶采集,PID温度控制,注意51单片机源码基于keil开发环境,STM32源码基于IAR开发环境 提供原理图, PCB(AD格式),源代码 ,不提供&am…...

实战esp32智能门禁系统,快马平台生成完整应用代码助力项目落地
最近在做一个办公室智能门禁的小项目,用ESP32实现了完整的门禁控制功能。整个过程挺有意思的,特别是发现用InsCode(快马)平台可以快速生成项目代码框架,省去了很多重复工作。下面分享下具体实现思路和经验。 硬件选型与连接 ESP32作为主控板性…...
、配置加速镜像、项目部署;查看lastest镜像具体版本并改tag)
【Docker】Docker的安装、使用(安装nginx、mysql、redis)、配置加速镜像、项目部署;查看lastest镜像具体版本并改tag
Docker的安装 官方文档: Docker Docs Docker Hub: Docker Hub Container Image Library | App Containerization centos7安装 1、安装 清华镜像站: docker-ce | 镜像站使用帮助 | 清华大学开源软件镜像站 | Tsinghua Open Source Mi…...

为什么你的Zotero无法正确处理中文文献?Jasminum给出完美答案
为什么你的Zotero无法正确处理中文文献?Jasminum给出完美答案 【免费下载链接】jasminum A Zotero add-on to retrive CNKI meta data. 一个简单的Zotero 插件,用于识别中文元数据 项目地址: https://gitcode.com/gh_mirrors/ja/jasminum 在学术研…...

OpenCV需要的Numpy知识
图像 NumPy 数组彩色图:(高度, 宽度, 3)灰度图:(高度, 宽度)像素值:0~255,类型 uint8下面所有内容,都围绕这句话。1. 创建数组1.1 np.array () —— 把列表变成数组import numpy as np a np.array([1, 2, 3]) b …...

Obsidian插件i18n:终极指南,让英文插件说中文的完整解决方案
Obsidian插件i18n:终极指南,让英文插件说中文的完整解决方案 【免费下载链接】obsidian-i18n 项目地址: https://gitcode.com/gh_mirrors/ob/obsidian-i18n 你是否曾因Obsidian插件全是英文界面而感到困扰?数据显示超过83%的Obsidian…...

2026本科论文降AI率工具哪个好用?实测推荐
这篇是我实测了主流降AI率工具之后写的,不是广告,数据都是我自己测的。 2026年的降AI工具市场,鱼龙混杂。有些号称免费的用完没效果,有些价格贵但退款流程复杂。我帮你们踩过这些坑了,这里把真正有用的列出来。 先说…...

如何让Windows播放器支持所有视频格式:终极媒体解码解决方案
如何让Windows播放器支持所有视频格式:终极媒体解码解决方案 【免费下载链接】LAVFilters LAV Filters - Open-Source DirectShow Media Splitter and Decoders 项目地址: https://gitcode.com/gh_mirrors/la/LAVFilters 你是否曾经遇到过这样的烦恼…...
实测好用!translategemma-4b-it图文翻译模型快速上手体验
实测好用!translategemma-4b-it图文翻译模型快速上手体验 1. 为什么选择translategemma-4b-it 1.1 轻量级但功能强大 translategemma-4b-it是Google基于Gemma 3架构开发的轻量级翻译模型,仅有4B参数,却支持55种语言的互译任务。最特别的是…...