Elasticsearch:智能 RAG,获取周围分块(二)
在之前的文章 “Elasticsearch:智能 RAG,获取周围分块(一) ” 里,它介绍了如何实现智能 RAG,获取周围分块。在那个文章里有一个 notebook。为了方便在本地部署的开发者能够顺利的运行那里的 notebook。在本篇文章里,我来详述如何进行配置。

安装
Elastisearch 及 Kibana
如果你还没有安装好自己的 Elasticsearch 及 Kibana,请参考如下的链接来进行安装:
- 如何在 Linux,MacOS 及 Windows 上进行安装 Elasticsearch
- Kibana:如何在 Linux,MacOS 及 Windows上安装 Elastic 栈中的 Kibana
在安装的时候,我们选择 Elastic Stack 8.x 来进行安装。特别值得指出的是:ES|QL 只在 Elastic Stack 8.11 及以后得版本中才有。你需要下载 Elastic Stack 8.11 及以后得版本来进行安装。
在首次启动 Elasticsearch 的时候,我们可以看到如下的输出:
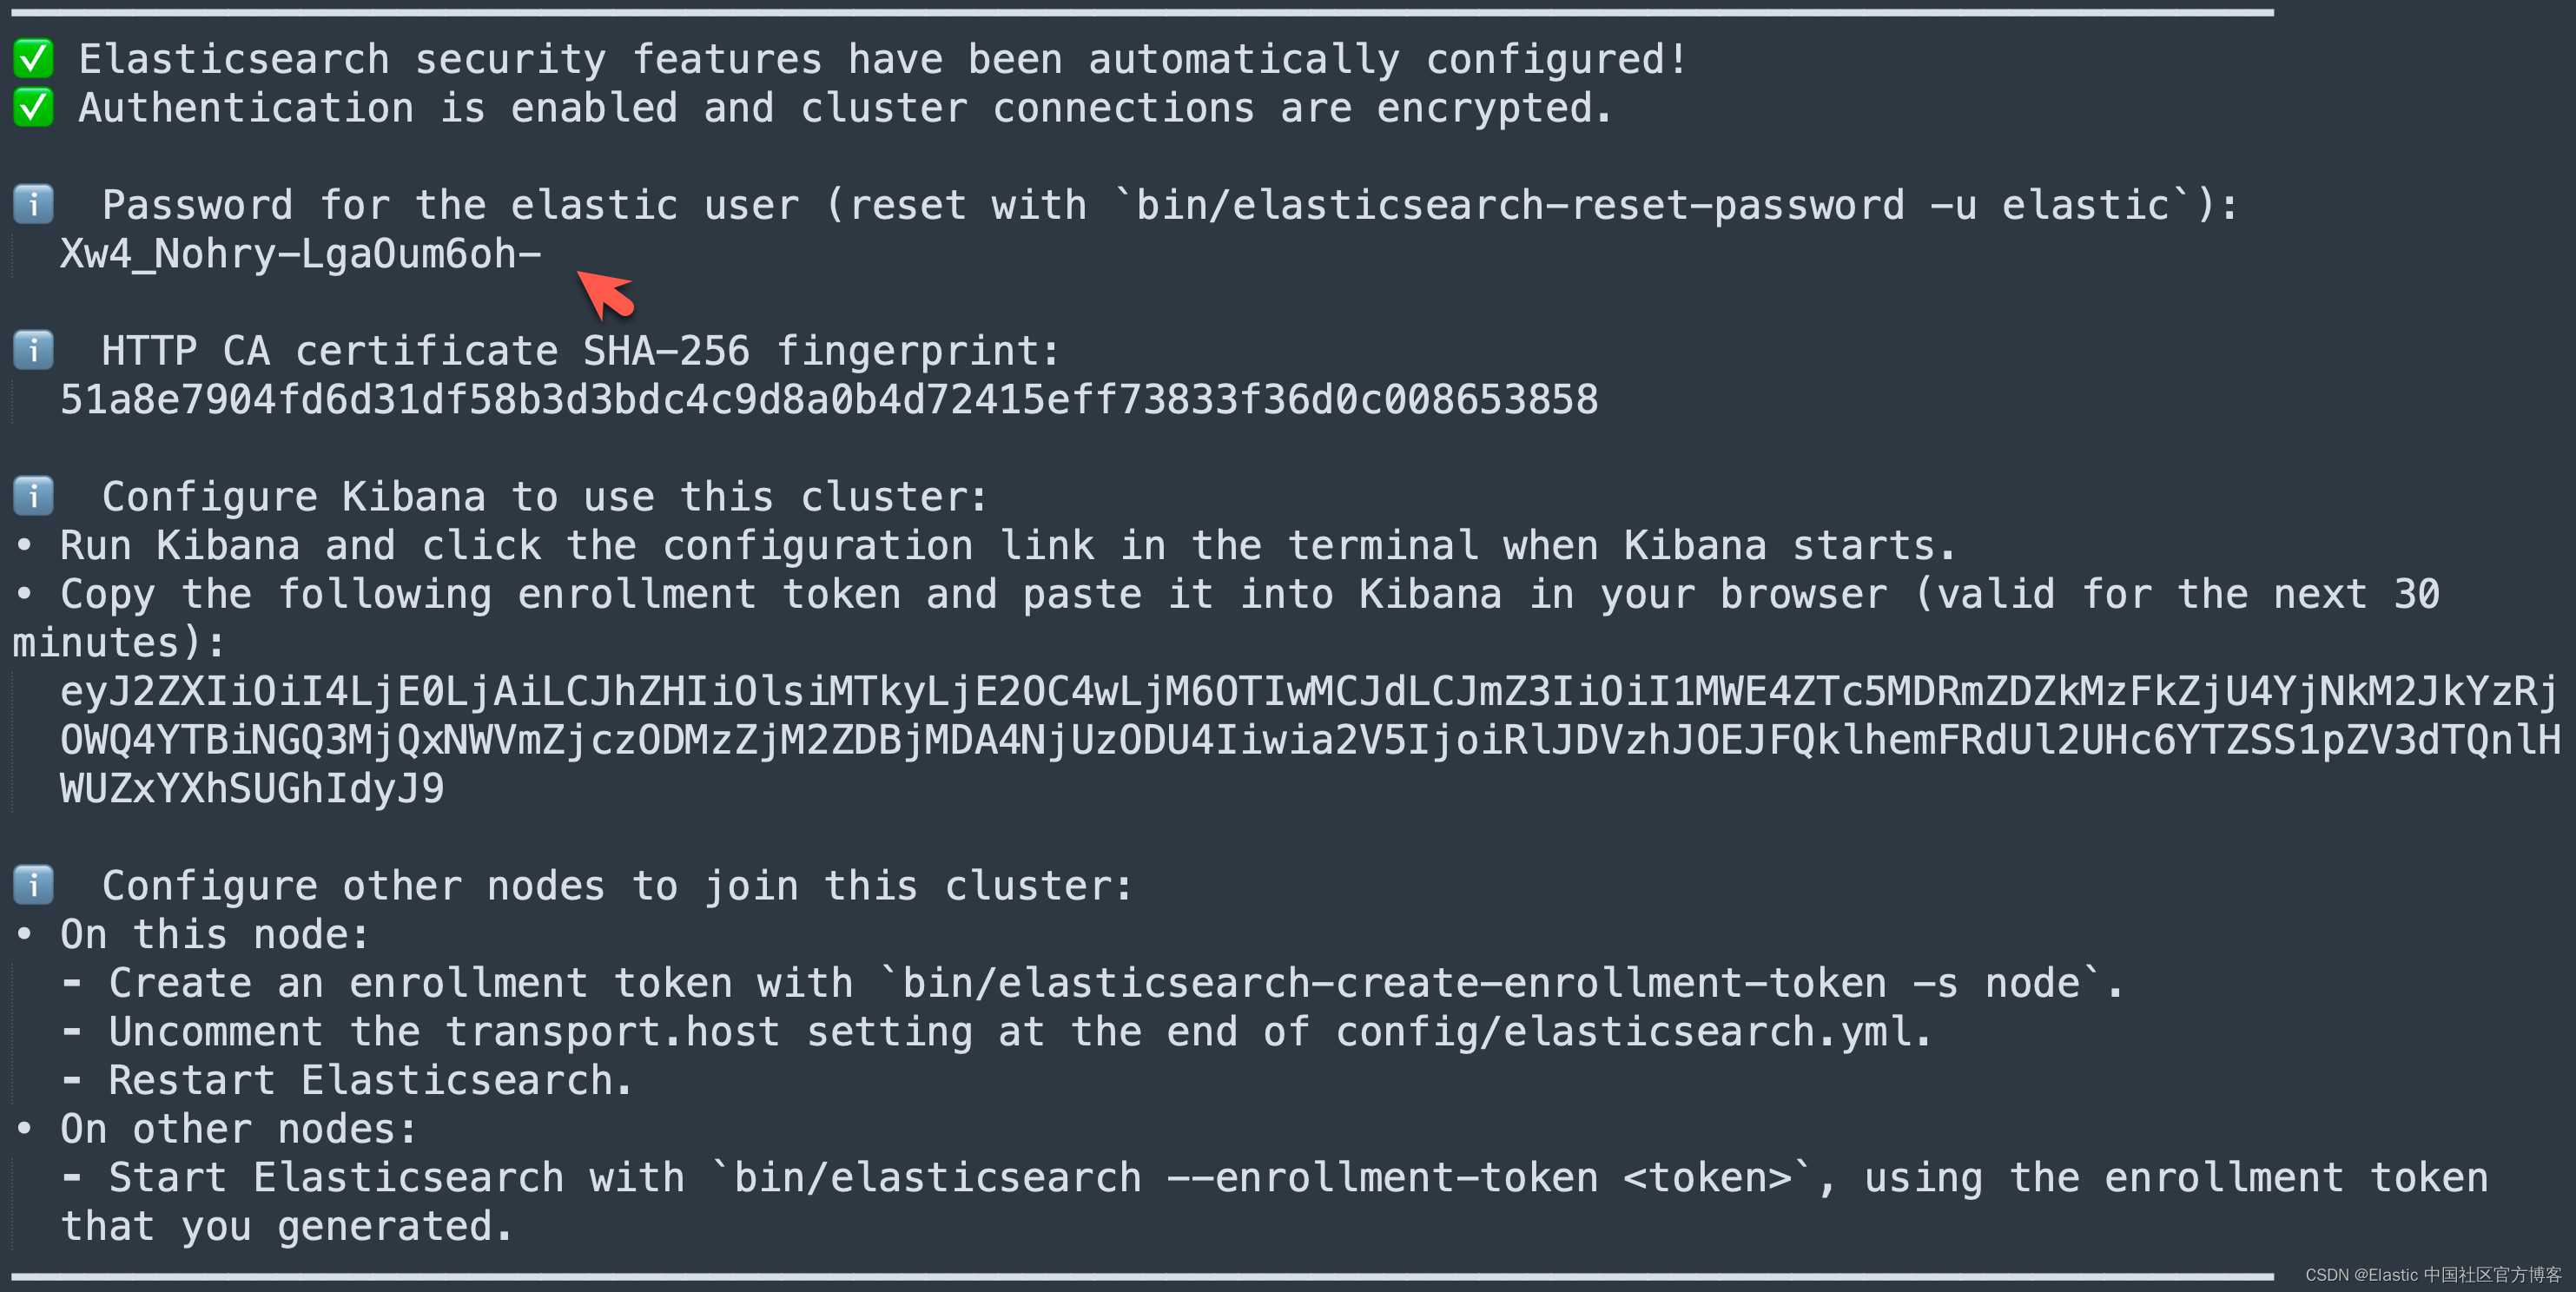
我们需要记下 Elasticsearch 超级用户 elastic 的密码。
我们还可以在安装 Elasticsearch 目录中找到 Elasticsearch 的访问证书:
$ pwd
/Users/liuxg/elastic/elasticsearch-8.14.0/config/certs
$ ls
http.p12      http_ca.crt   transport.p12
在上面,http_ca.crt 是我们需要用来访问 Elasticsearch 的证书。
我们首先克隆已经写好的代码:
git clone https://github.com/liu-xiao-guo/elasticsearch-labs我们然后进入到该项目的根目录下:
$ pwd
/Users/liuxg/python/elasticsearch-labs/supporting-blog-content/fetch-surrounding-chunks
$ cp ~/elastic/elasticsearch-8.14.0/config/certs/http_ca.crt .
$ ls
README.md      fetch-surrounding-chunks.ipynb
http_ca.crt
在上面,我们把 Elasticsearch 的证书拷贝到当前的目录下。上面的 09-geospatial-search.ipynb 就是我们下面要展示的 notebook。
启动白金试用
在下面,我们需要使用 ELSER。这是一个白金试用的功能。我们按照如下的步骤来启动白金试用:
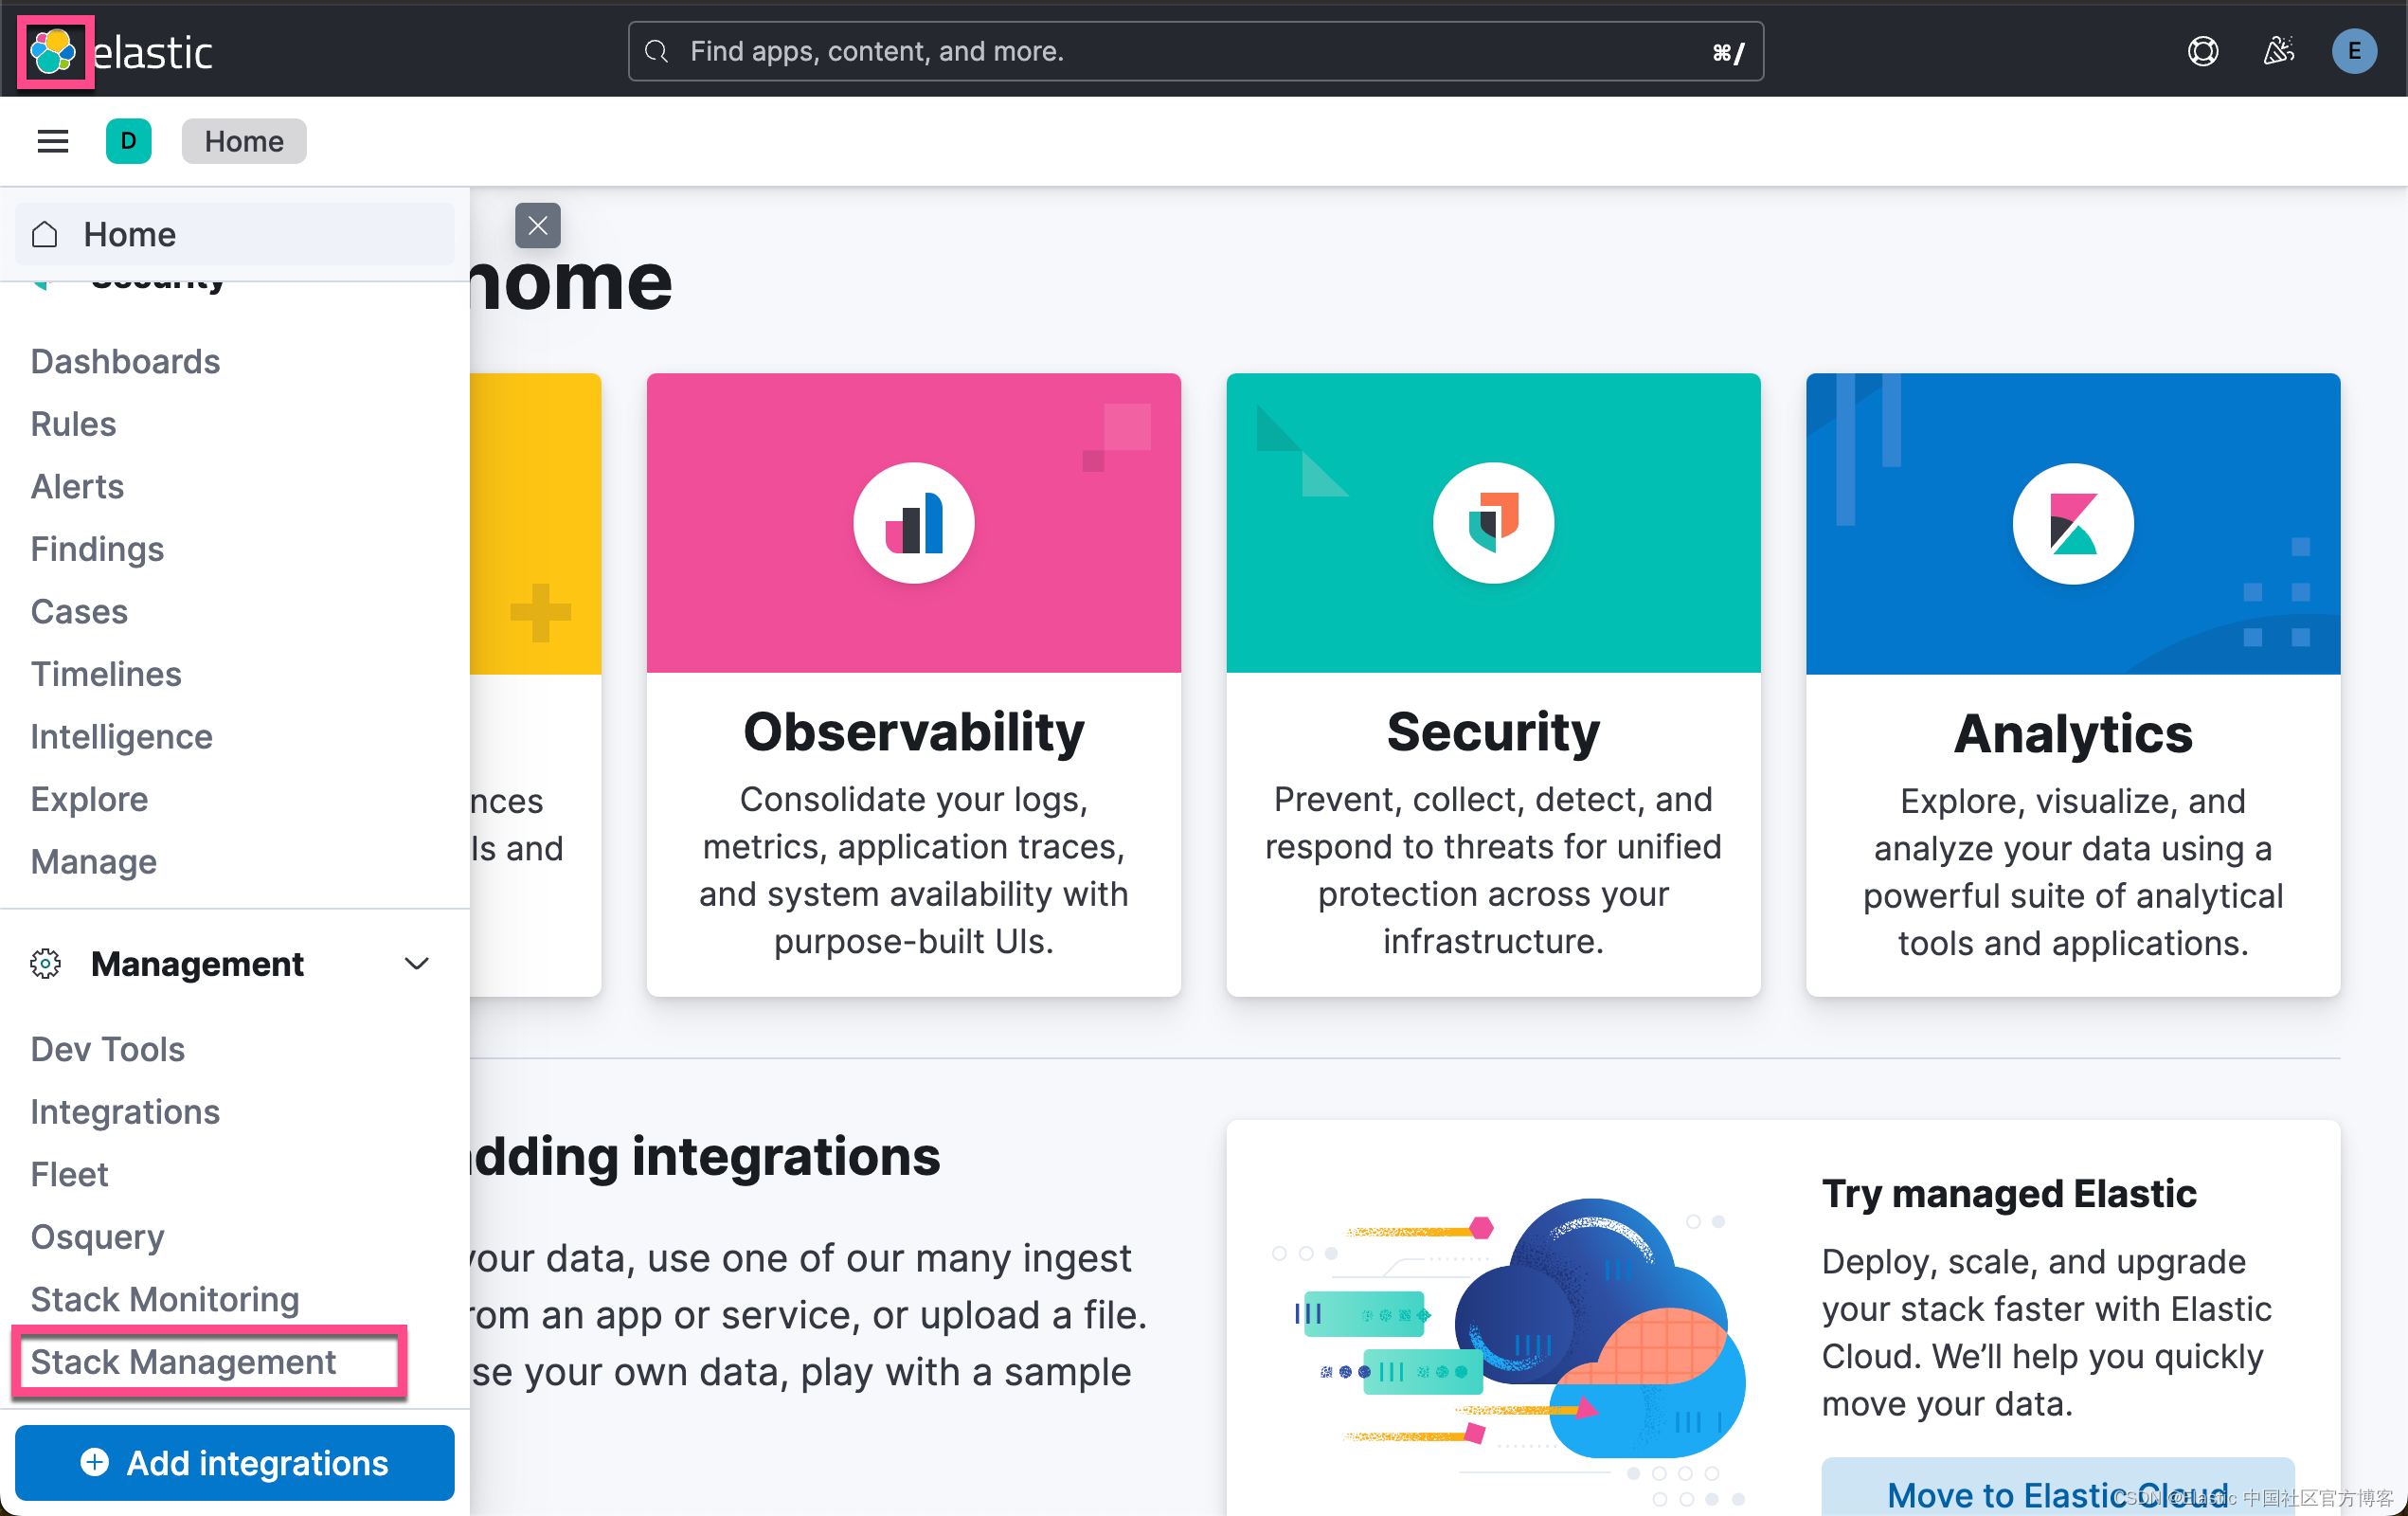
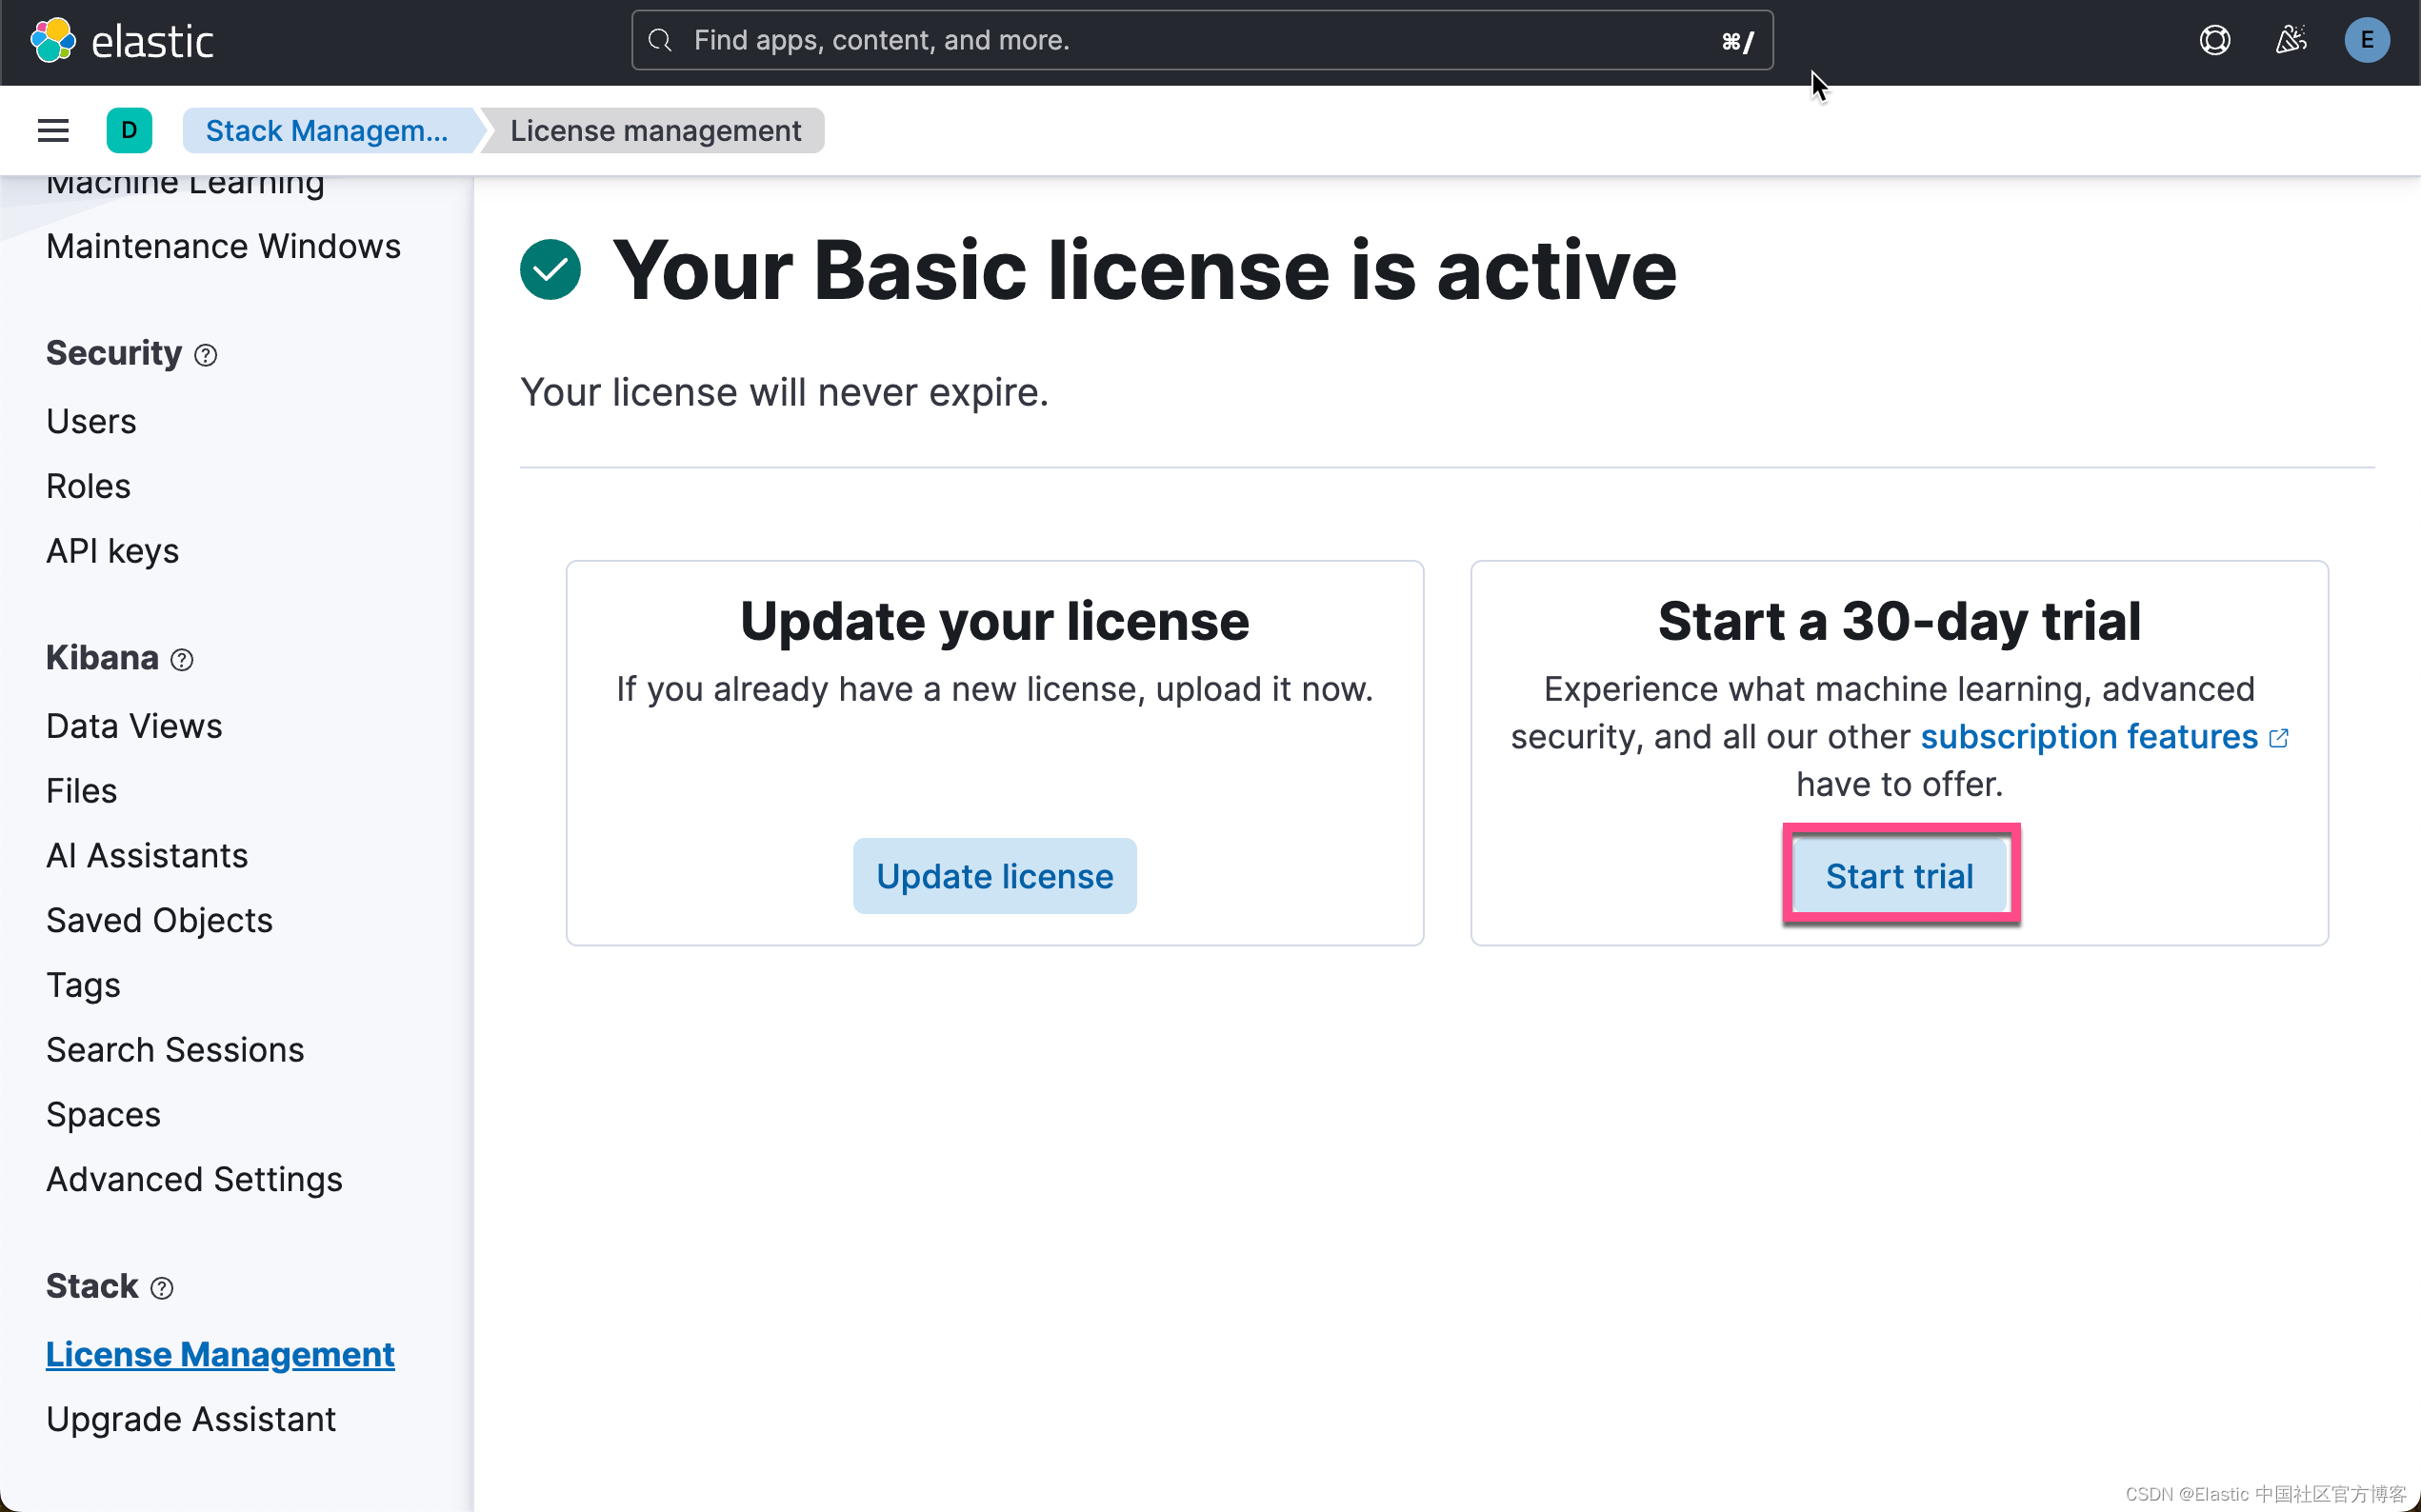
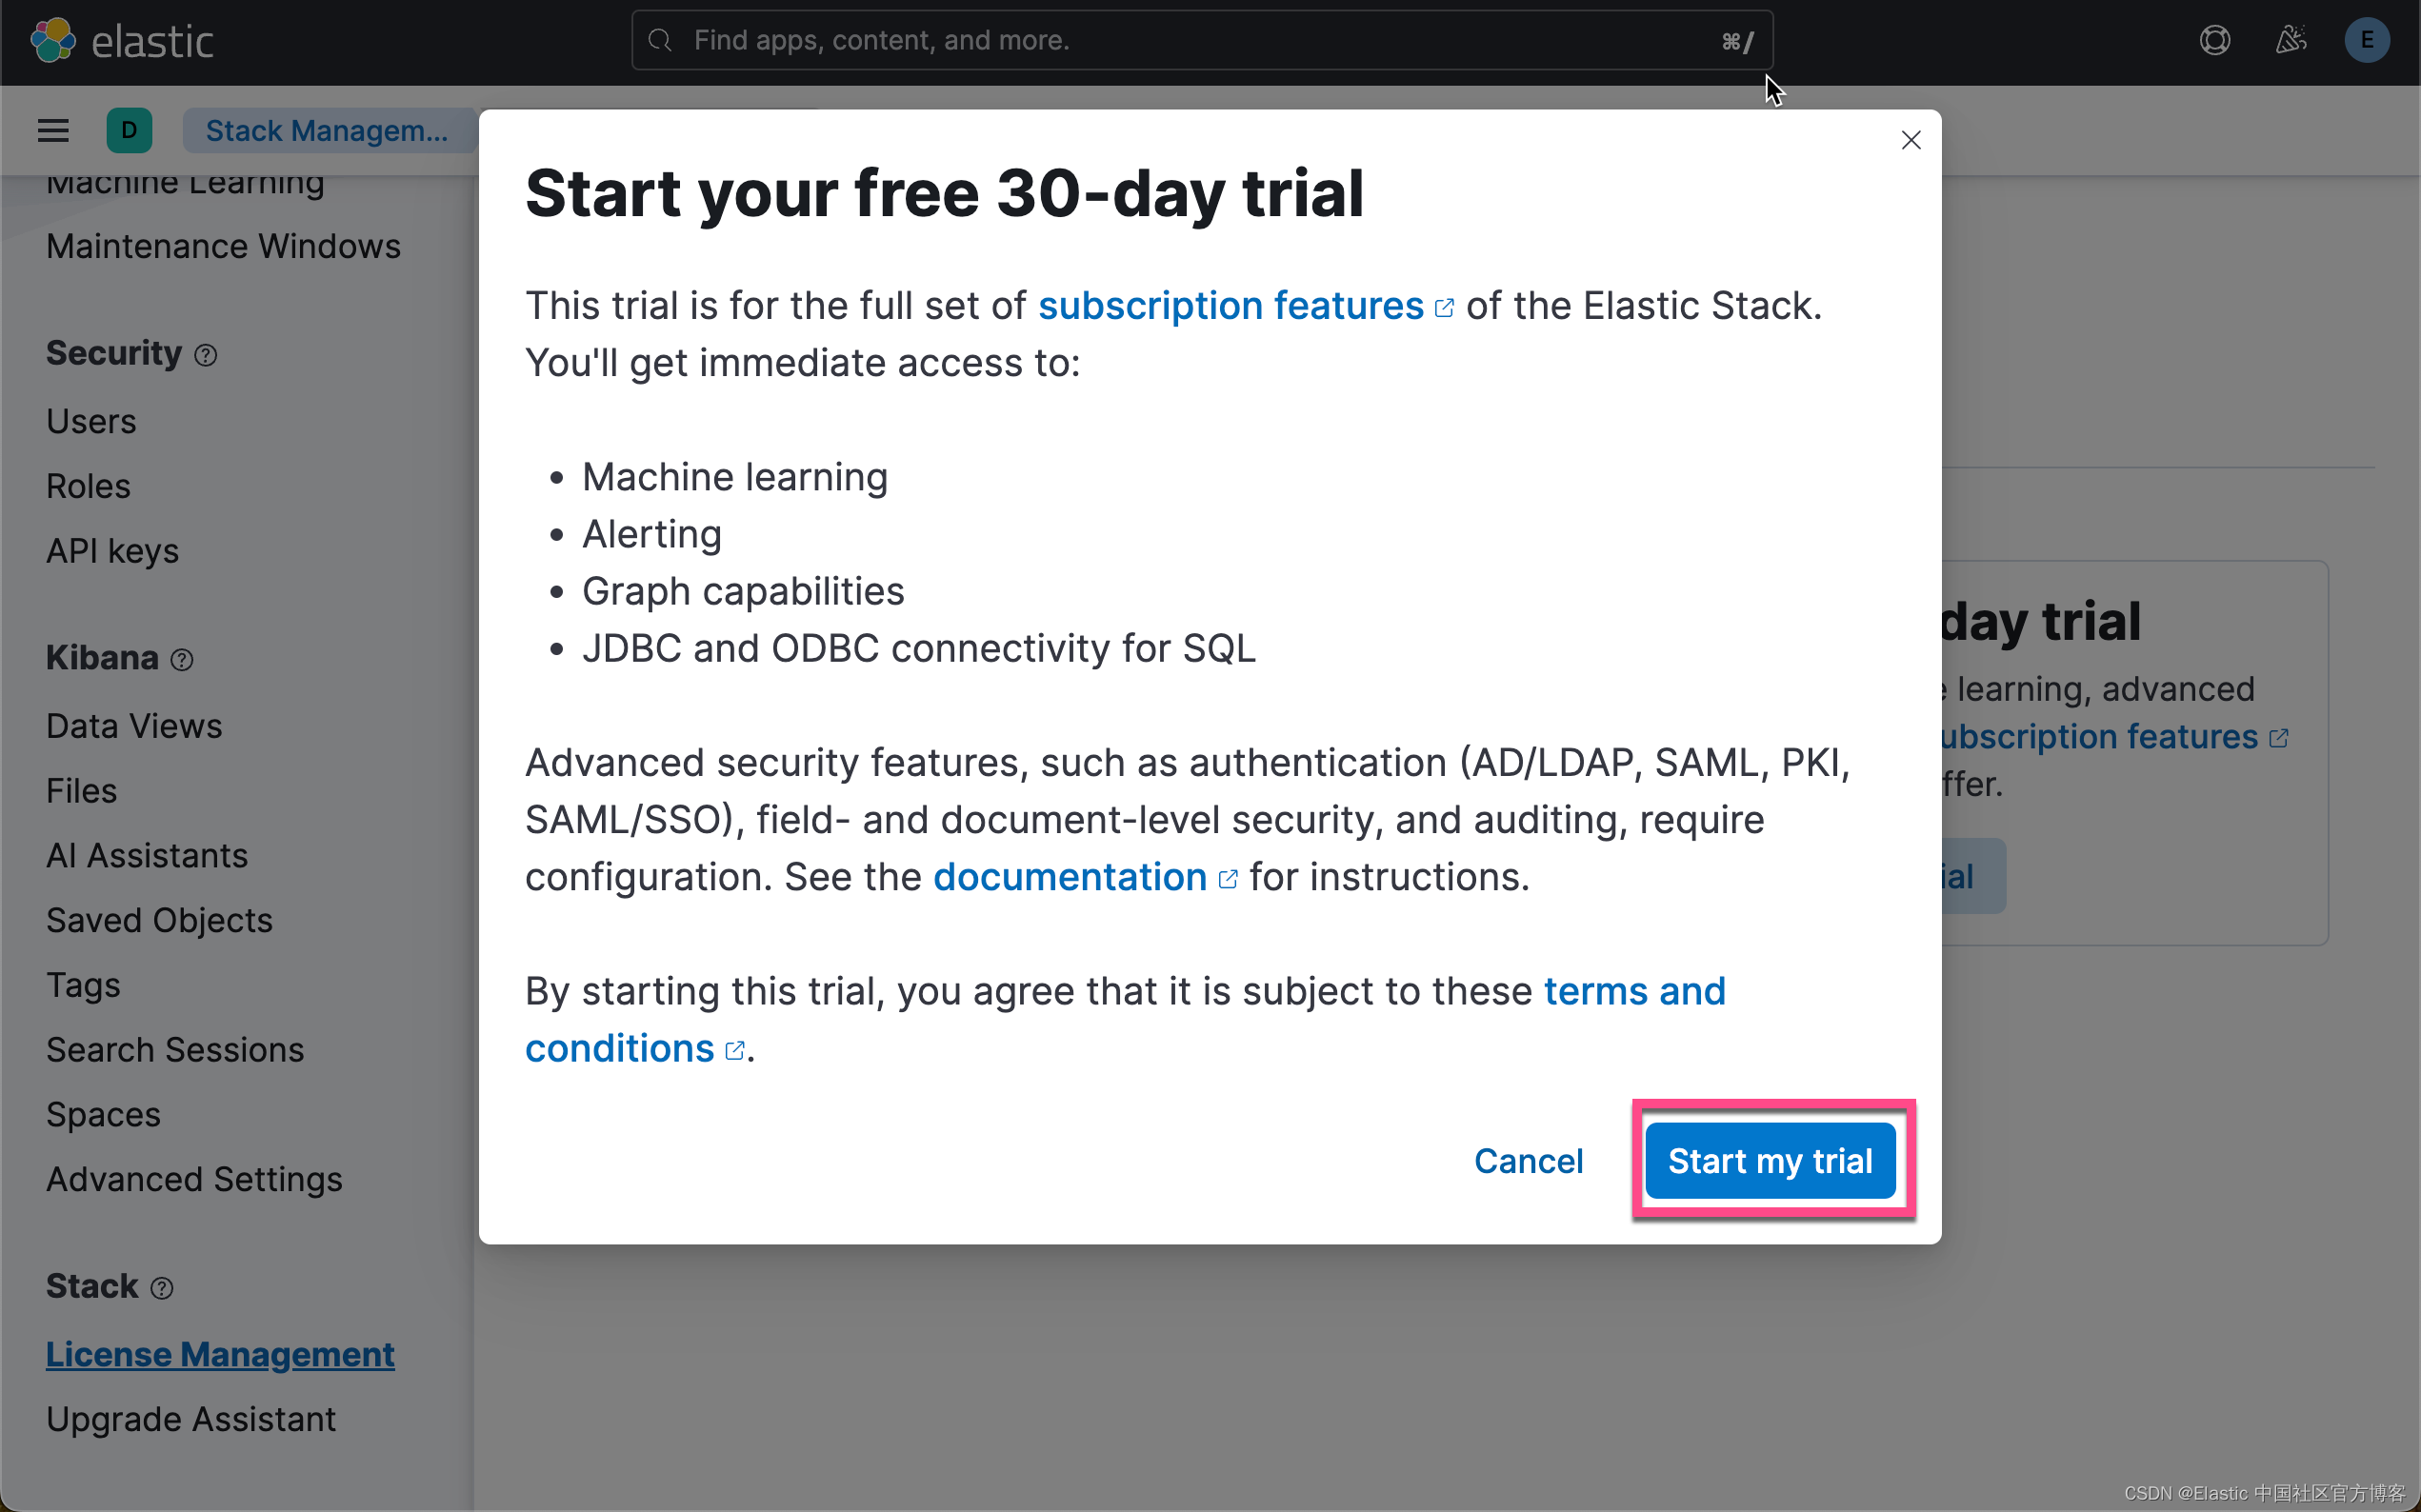
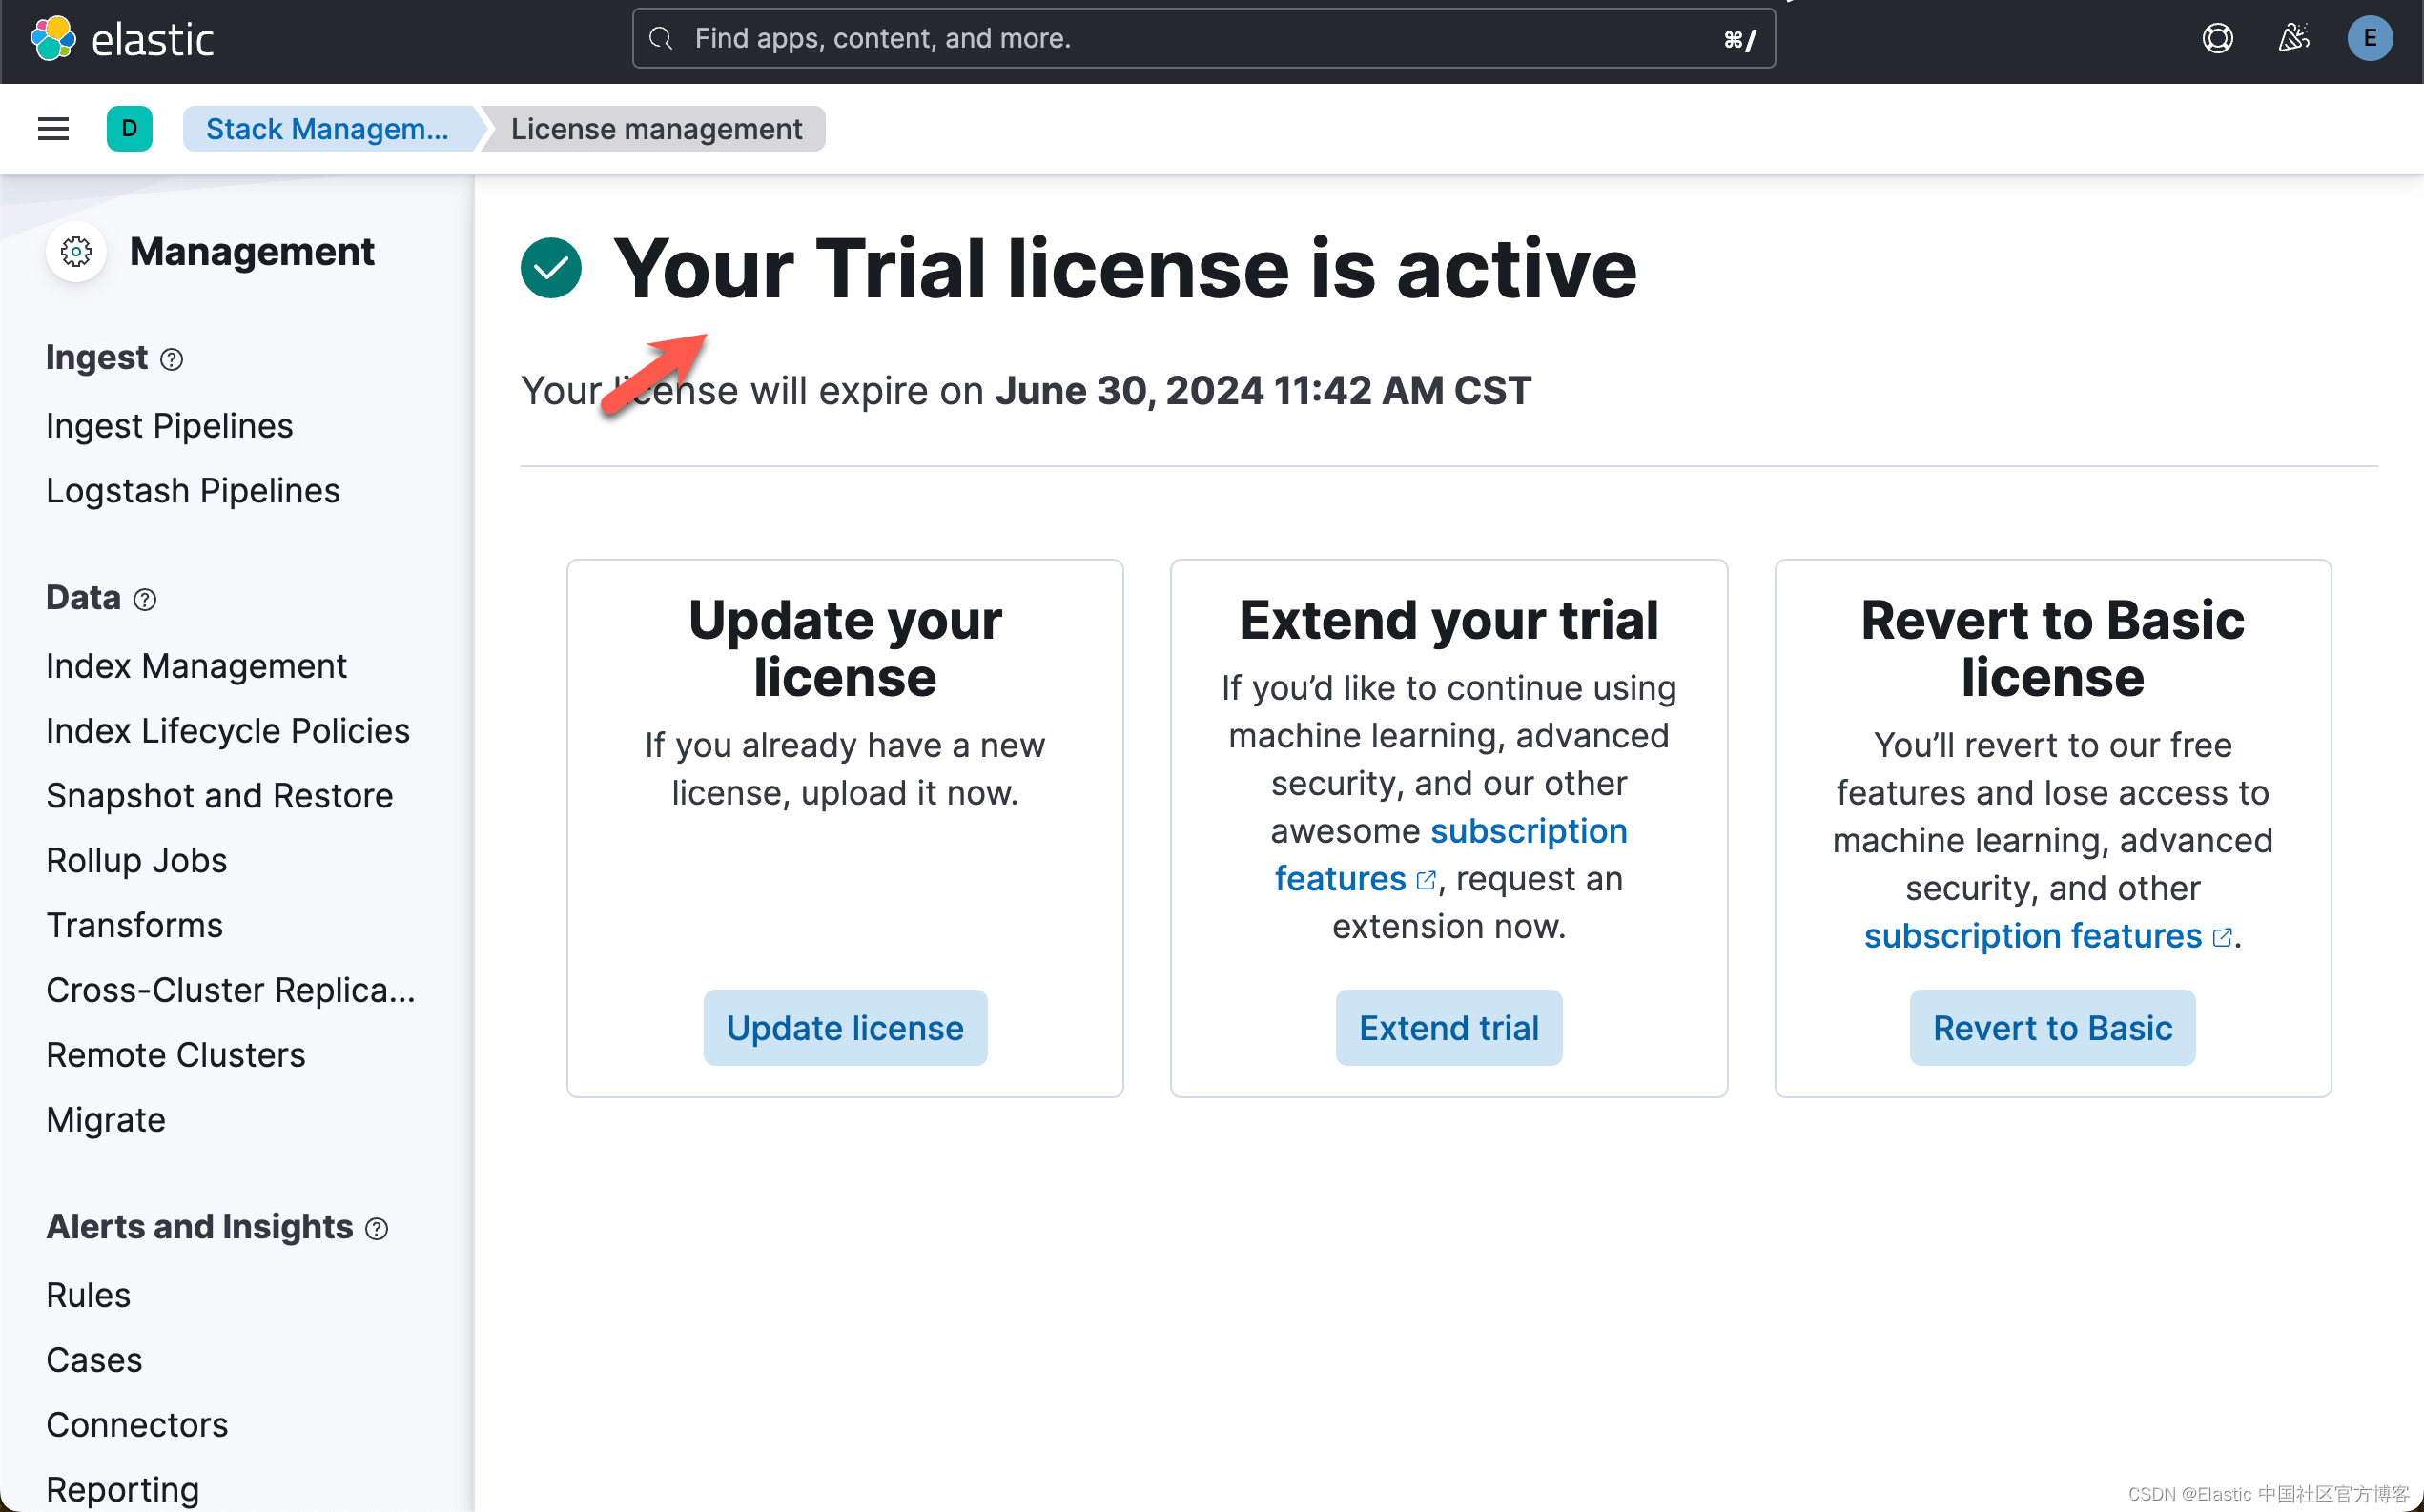
这样我们就完成了白金试用功能。
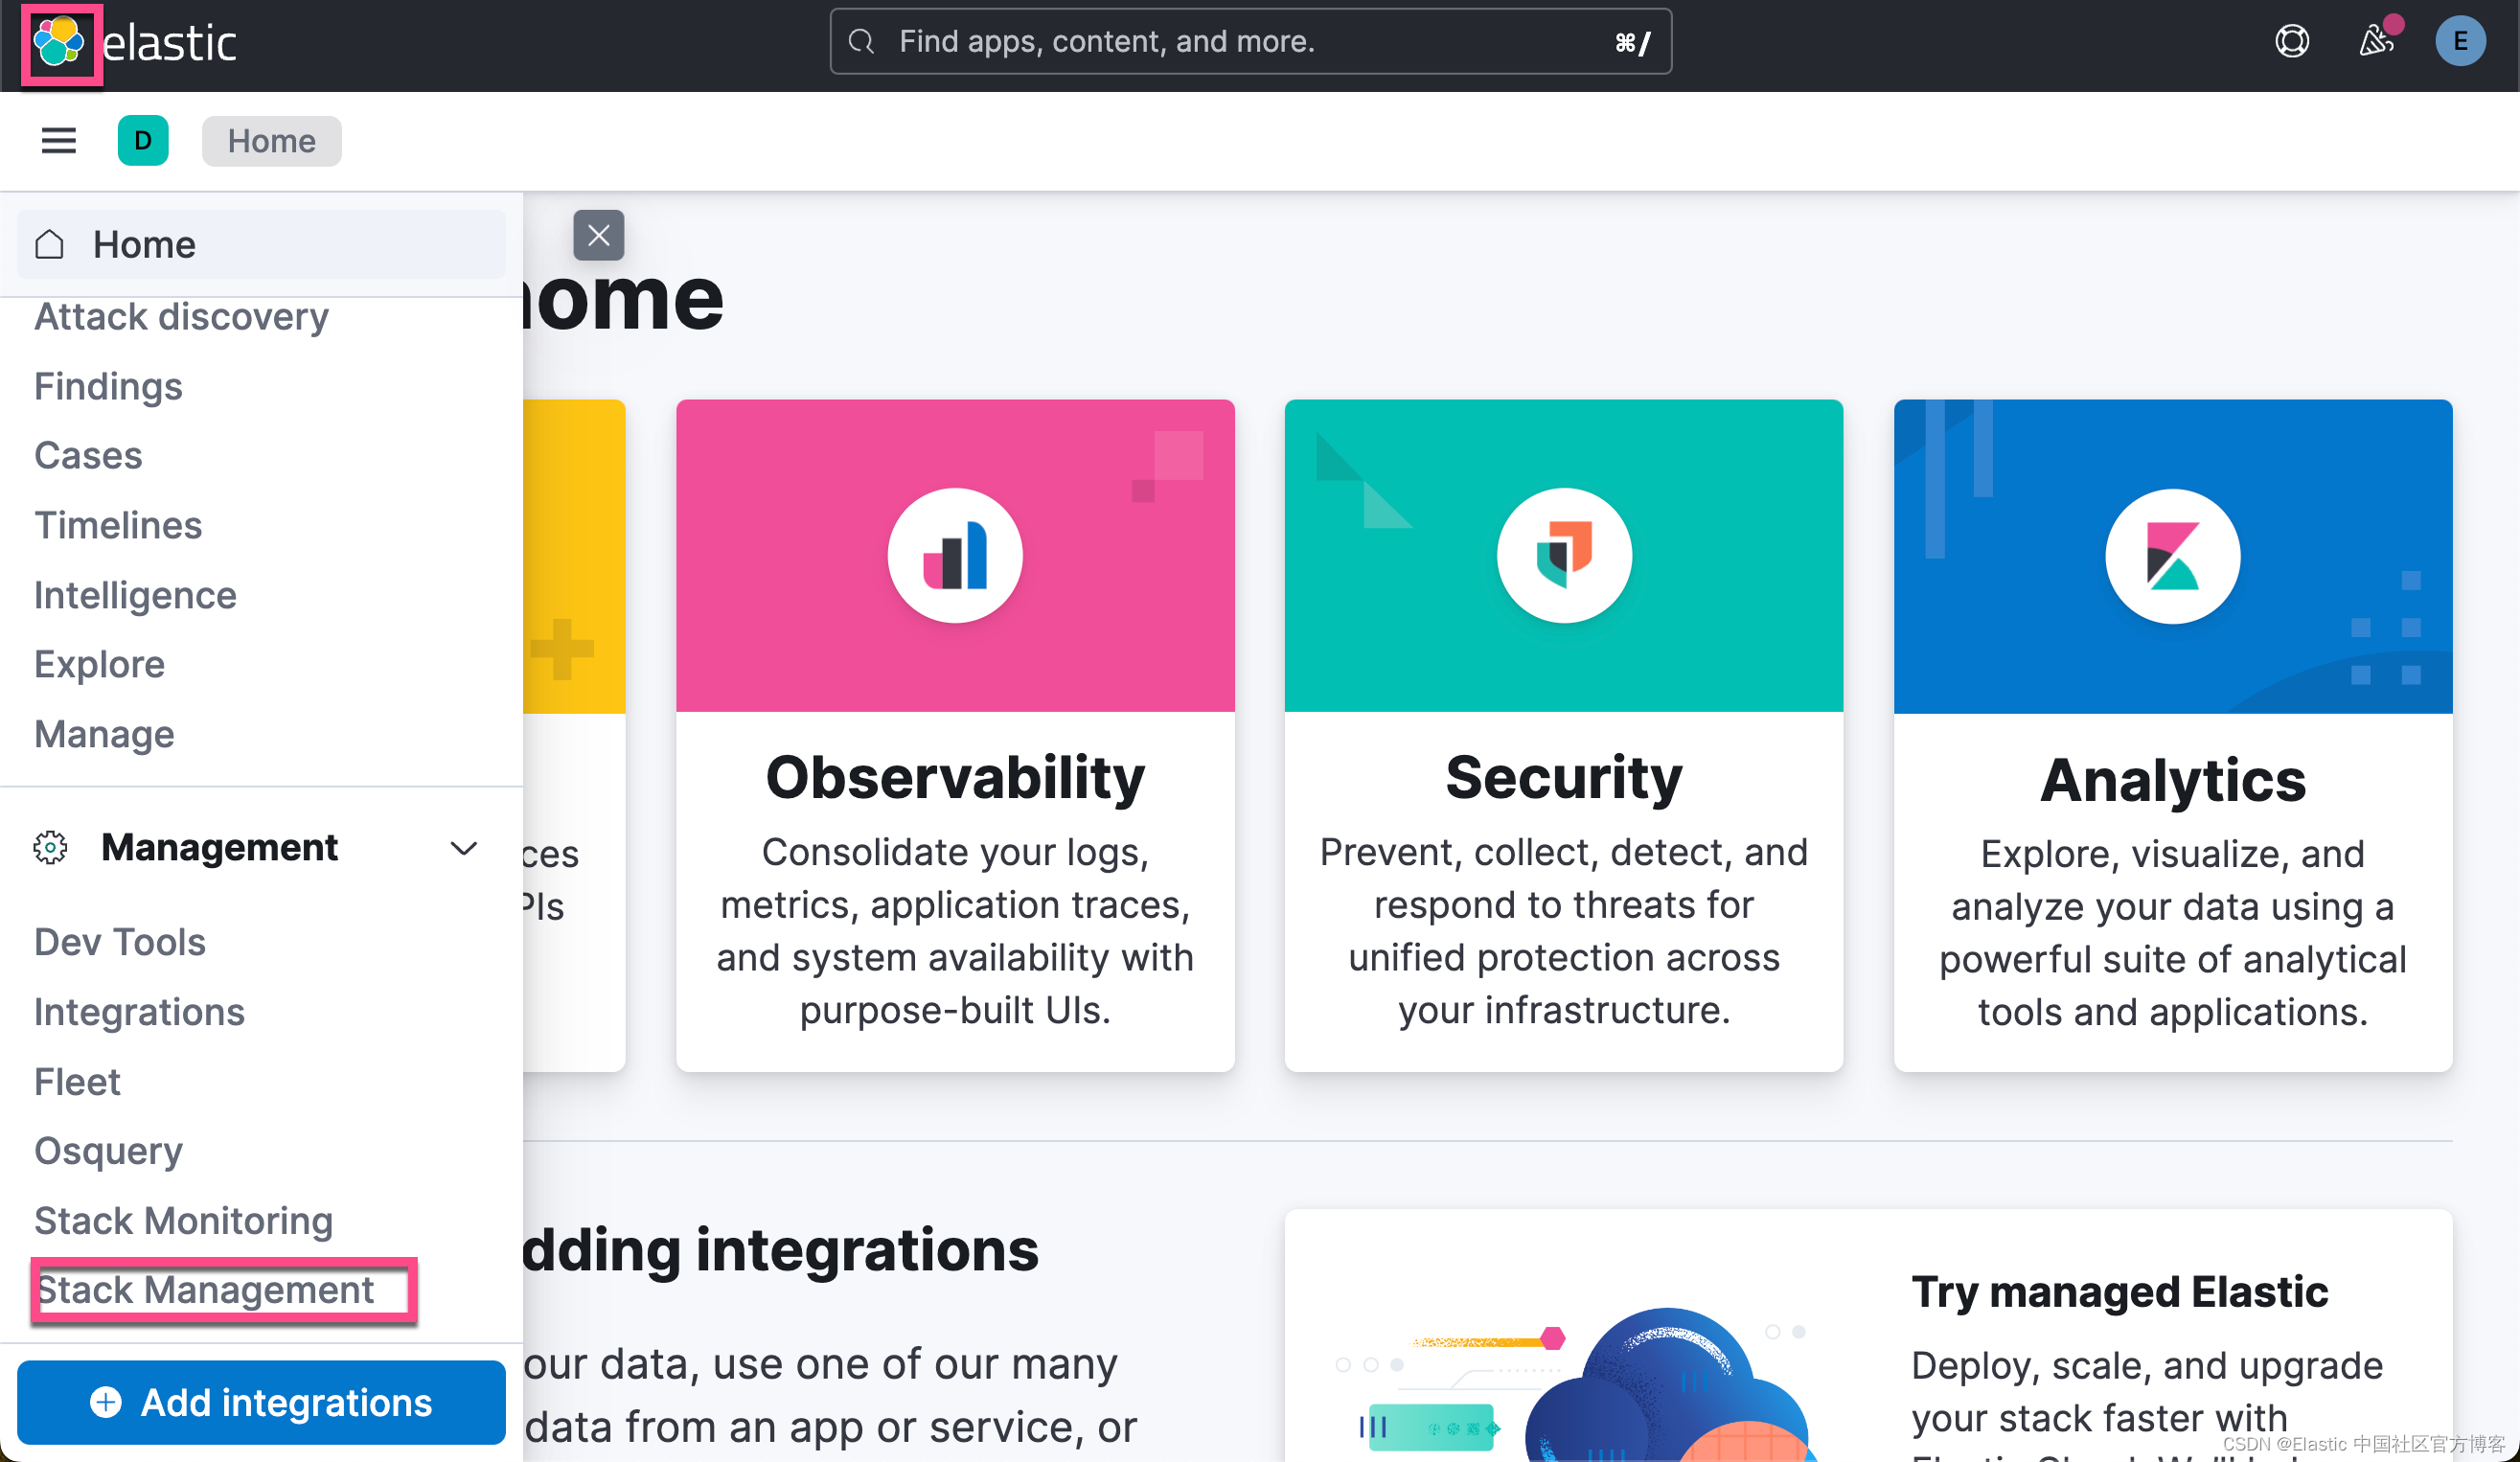
获取 Elasticsearch API key
我们在 Kibana 中,进行如下的步骤:
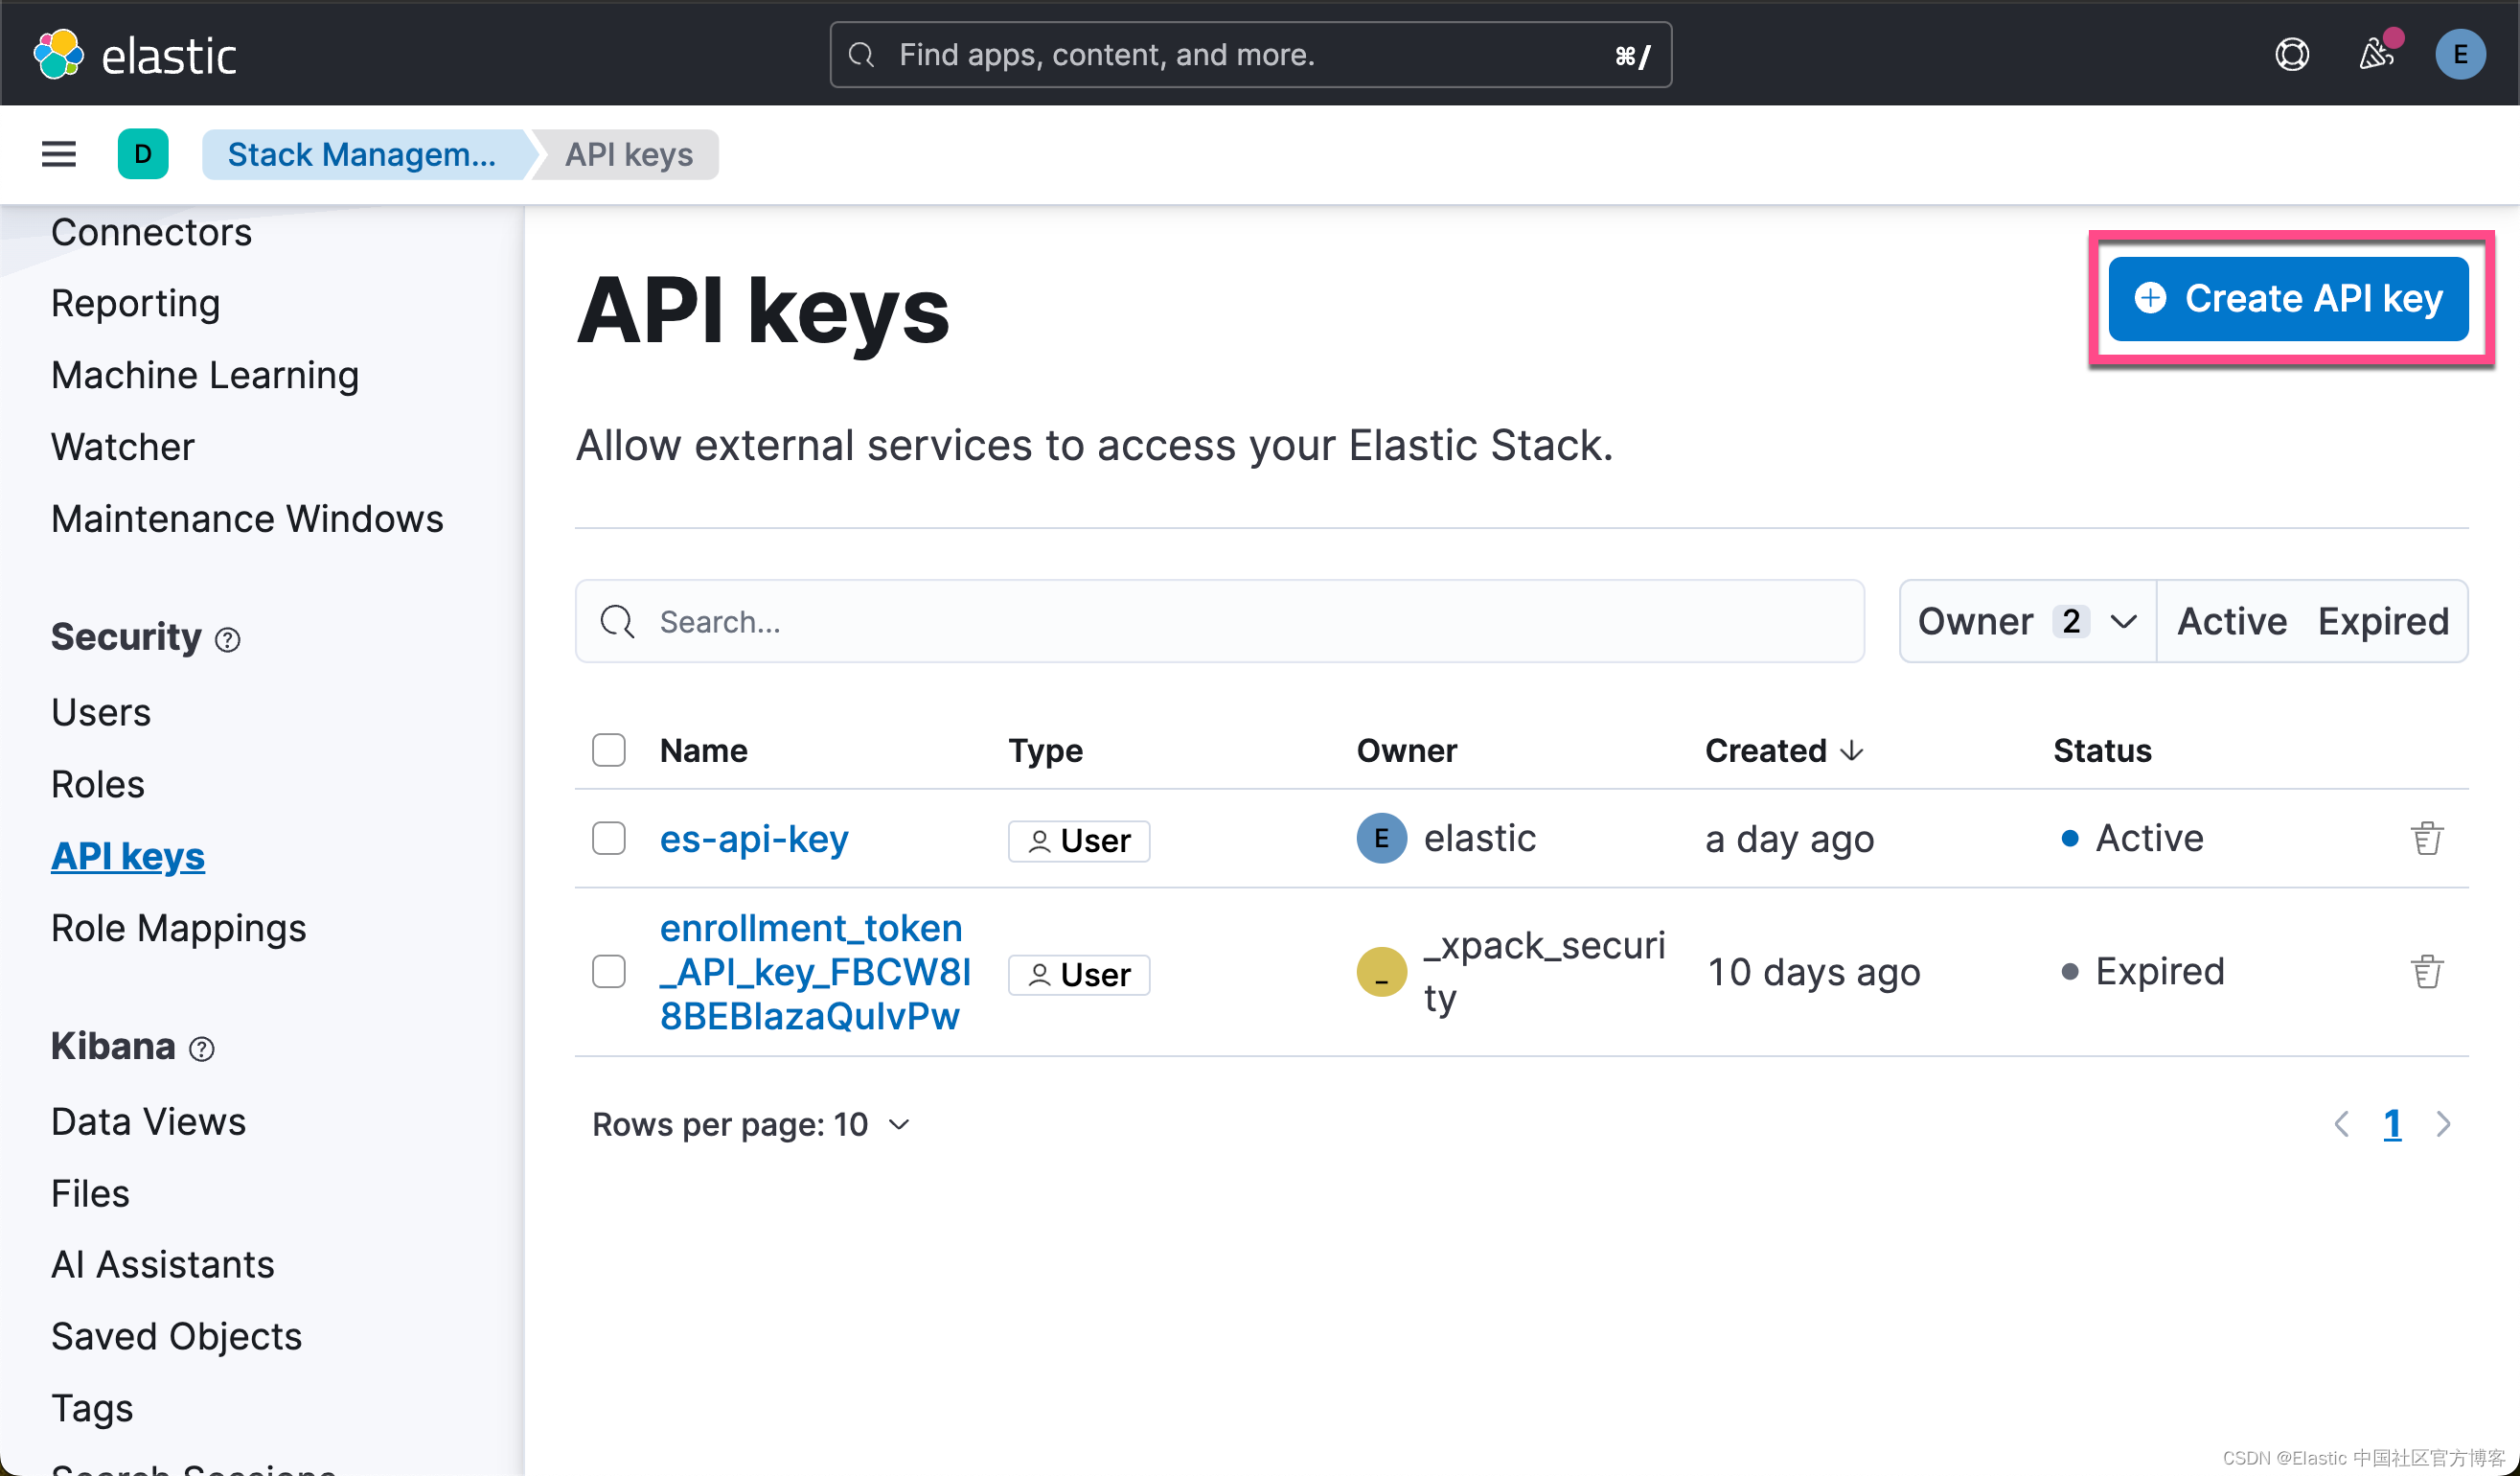
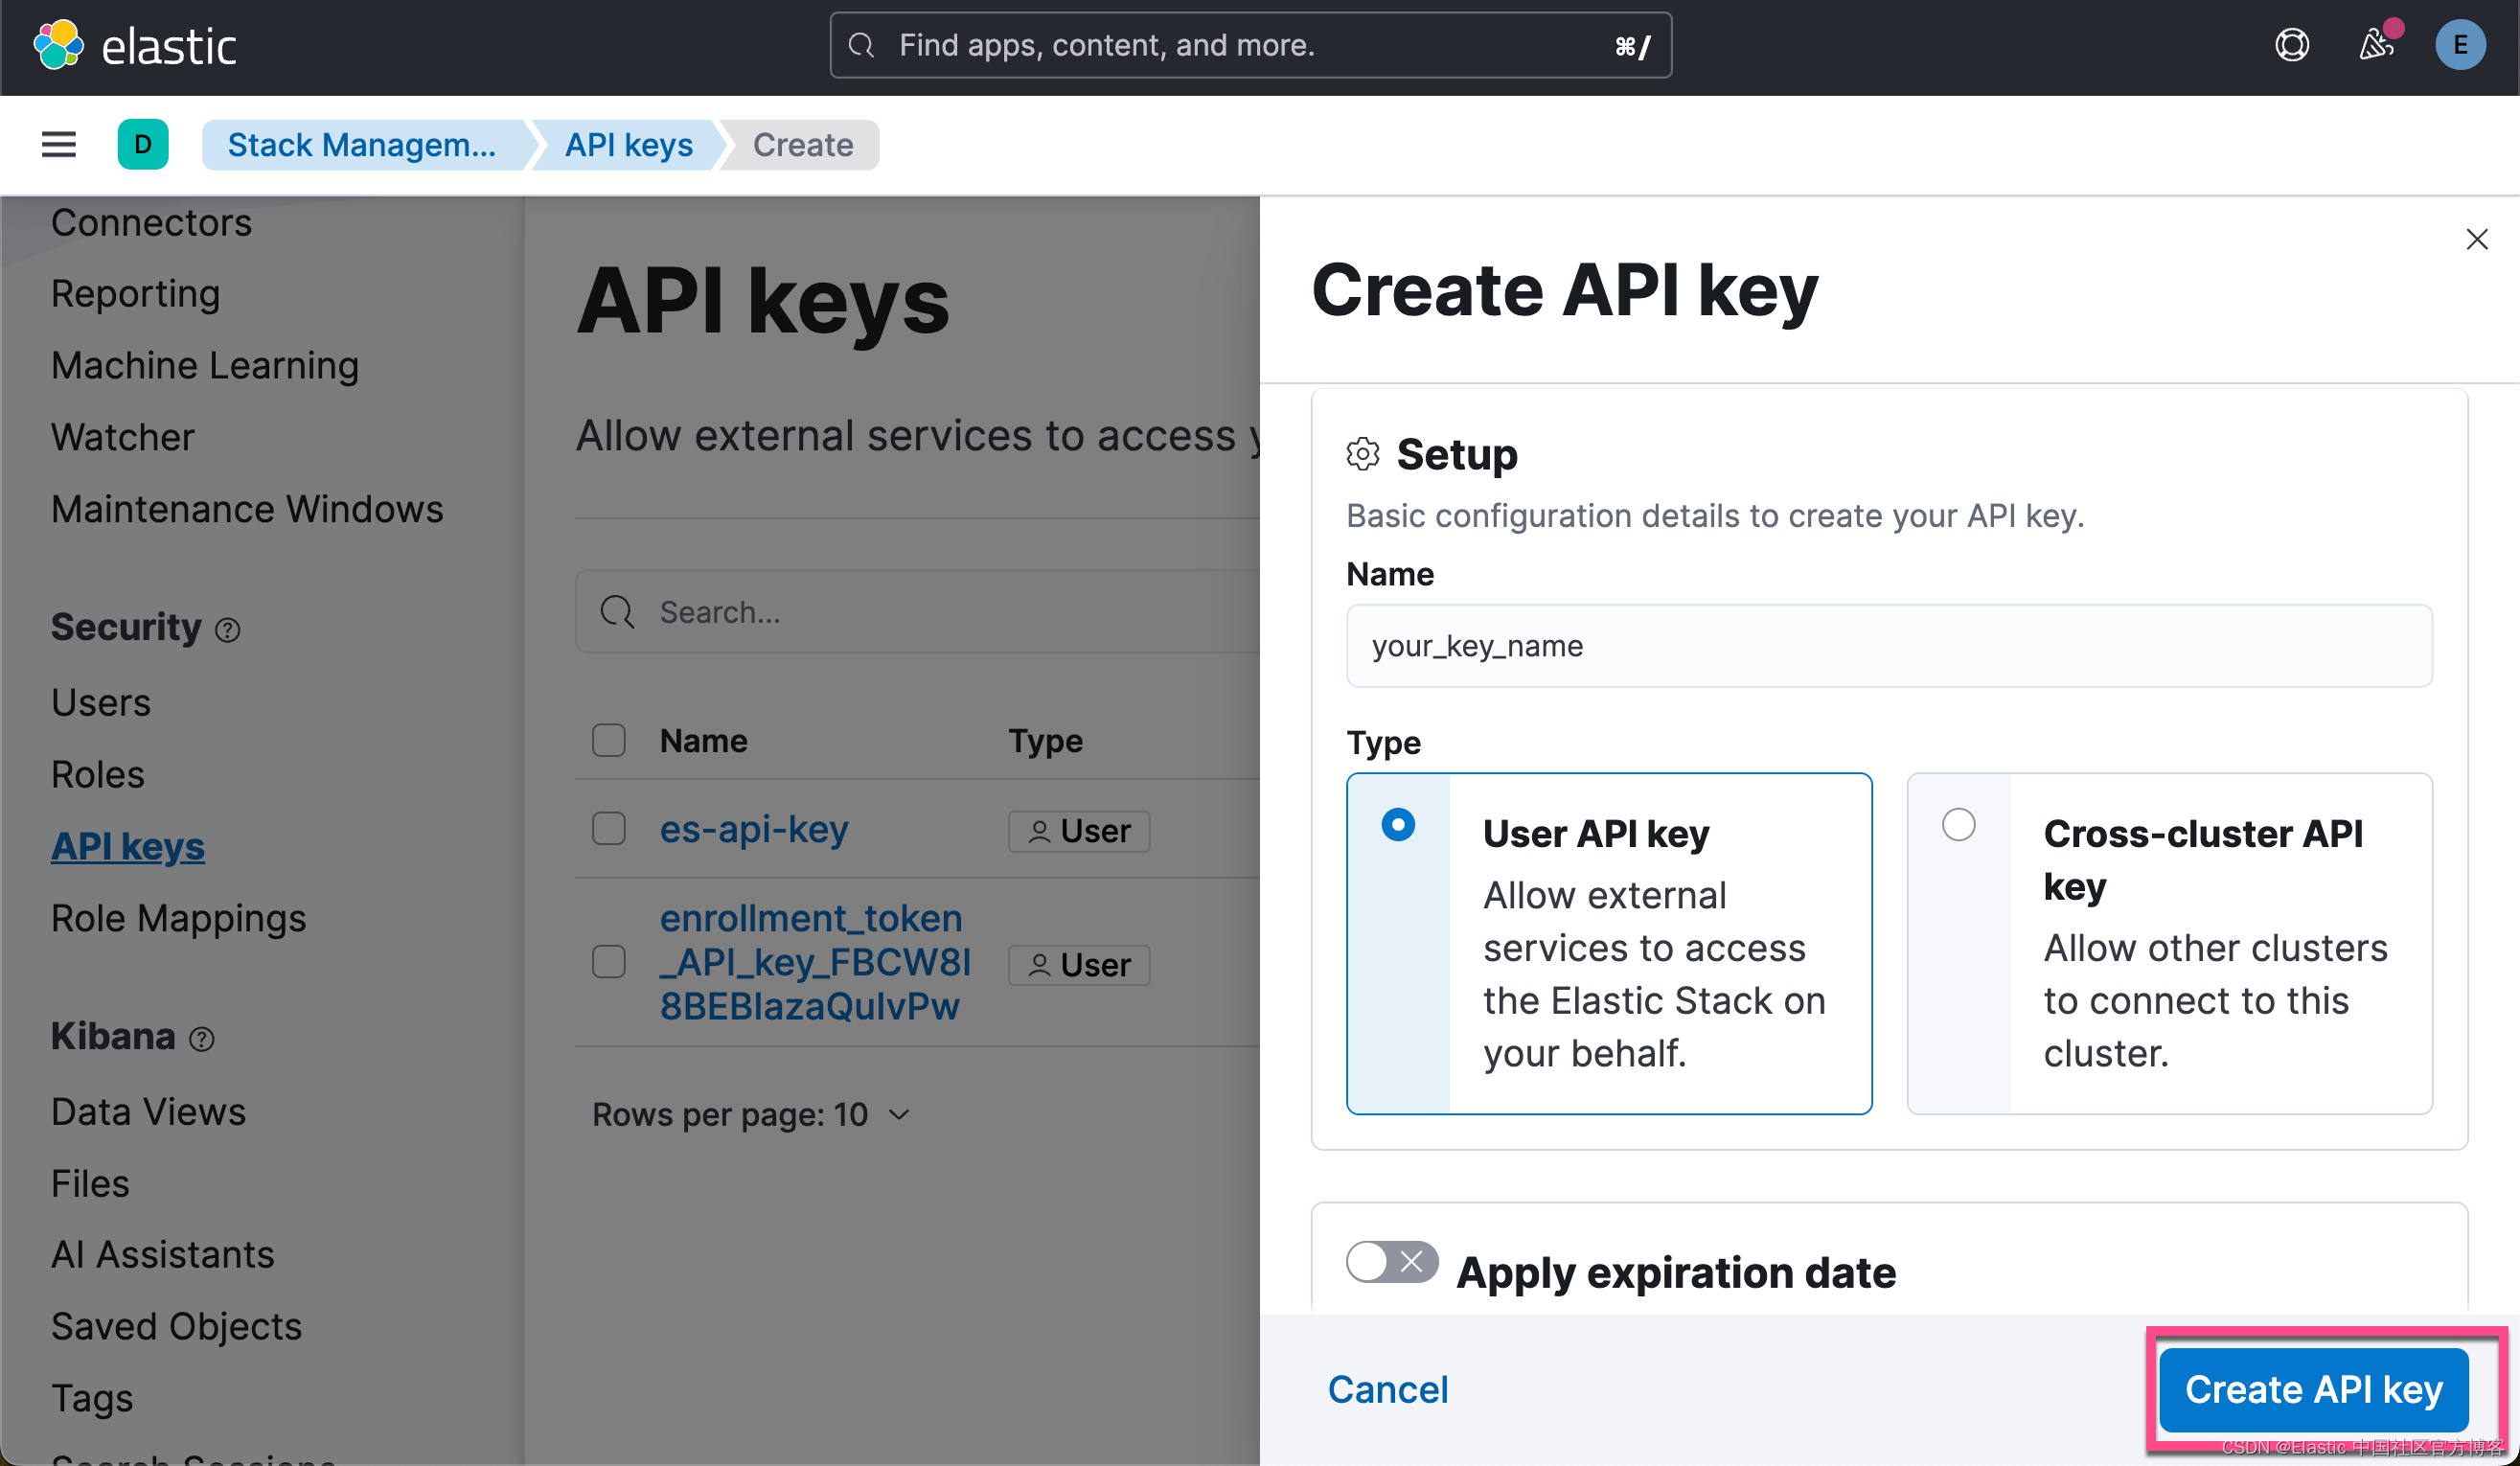
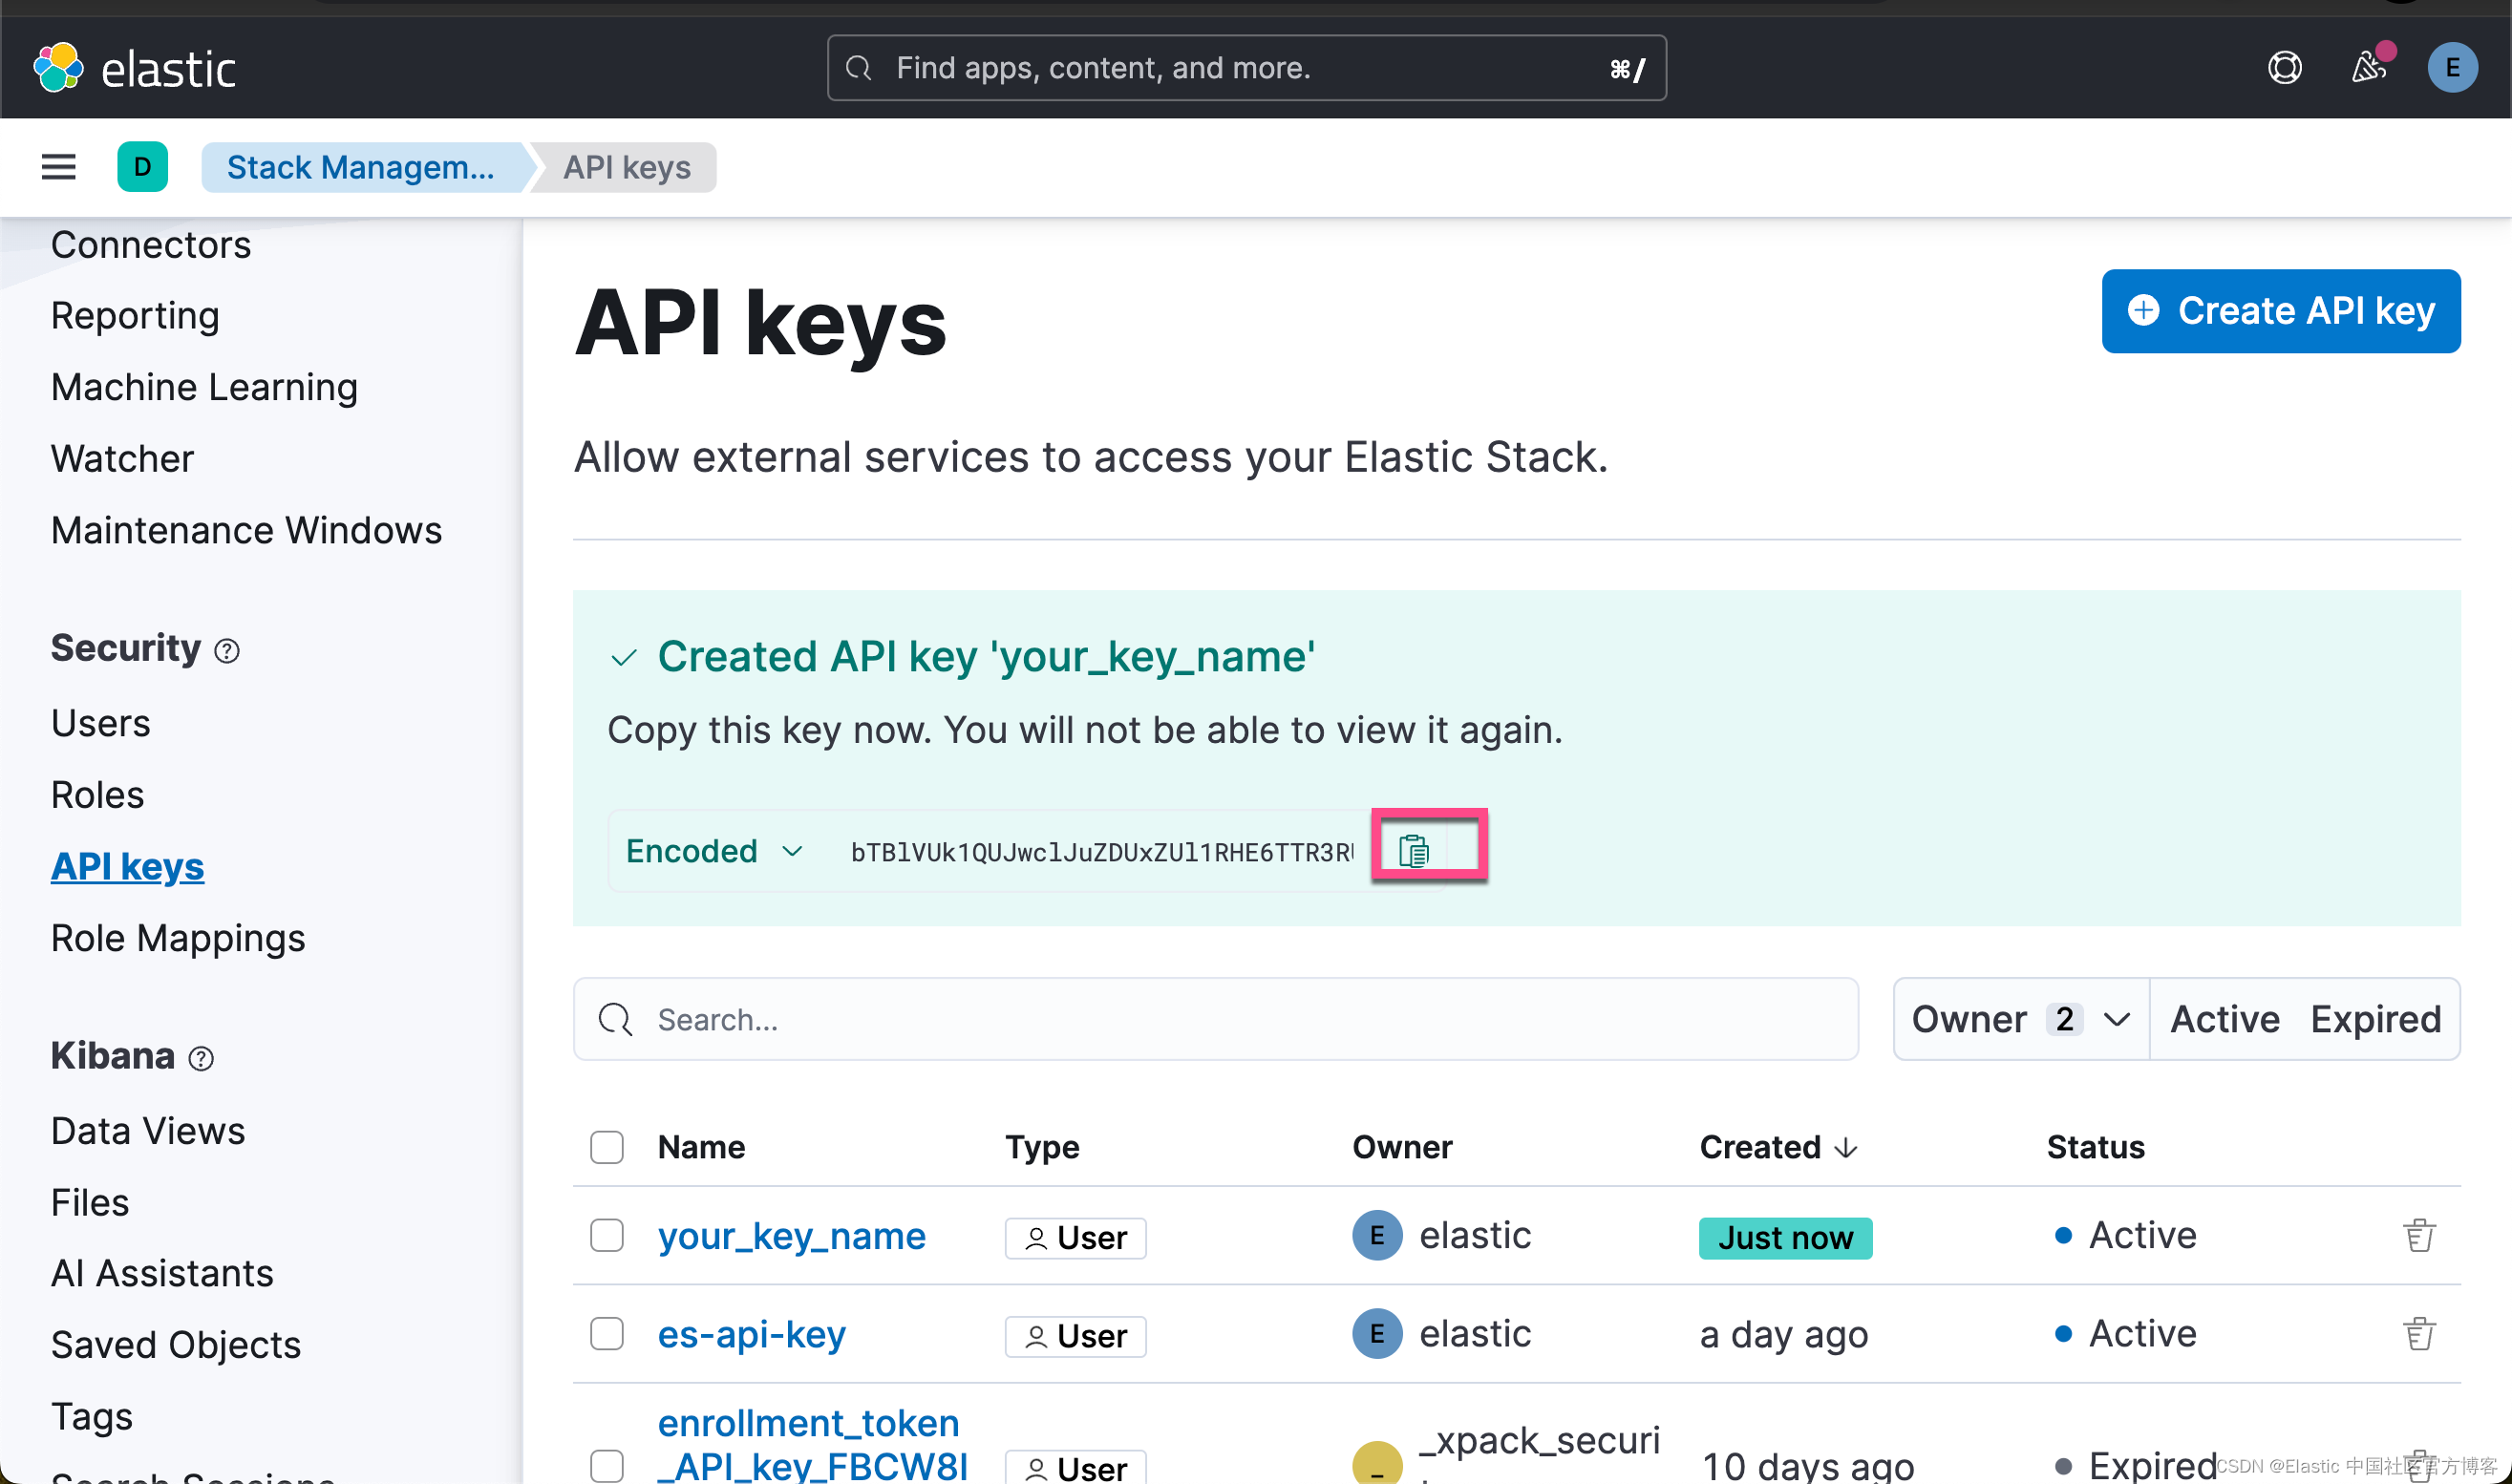
点击上面的拷贝按钮,我们就可以得到所需要的 Elastic API key。
创建环境变量
为了能够使得下面的应用顺利执行,在项目当前的目录下运行如下的命令:
export ES_ENDPOINT="localhost"
export ES_USER="elastic"
export ES_PASSWORD="Xw4_Nohry-LgaOum6oh-"
export ELASTIC_API_KEY="WXhDakhwQUJFQklhemFRdVRQTkw6V3A0TFFieFZTRjJDdzFZbkF5dGVyUQ=="
在上面,我们需要根据自己的 Elasticsearch 配置来进行设置。
下载文档
在我们的例程中,它讲使用哈利波特的文字来进行练习。这个文字,我们可以在地址进行获得。我们可以通过如下的方式来进行下载:
curl -o harry_potter.txt https://raw.githubusercontent.com/amephraim/nlp/master/texts/J.%20K.%20Rowling%20-%20Harry%20Potter%201%20-%20Sorcerer\'s%20Stone.txt$ pwd
/Users/liuxg/python/elasticsearch-labs/supporting-blog-content/fetch-surrounding-chunks
$ ls
README.md fetch-surrounding-chunks.ipynb http_ca.crt
$ curl -o harry_potter.txt https://raw.githubusercontent.com/amephraim/nlp/master/texts/J.%20K.%20Rowling%20-%20Harry%20Potter%201%20-%20Sorcerer\'s%20Stone.txt% Total % Received % Xferd Average Speed Time Time Time CurrentDload Upload Total Spent Left Speed
100 429k 100 429k 0 0 274k 0 0:00:01 0:00:01 --:--:-- 274k这样我们可以在当前目录下看到一个叫做 harry_potter.txt 的文件:
$ ls
README.md                      harry_potter.txt
fetch-surrounding-chunks.ipynb http_ca.crt
安装 Python 响应的包
pip3 install python-dotenv elasticsearch==8.14.0 pandas eland好了,我们的一切准备工作就完成了。我们在下面,就可以打开 notebook 来进行练习了。
代码展示
我们可以使用如下的命令来启动 notebook:
jupyter notebook fetch-surrounding-chunks.ipynb$ pwd
/Users/liuxg/python/elasticsearch-labs/supporting-blog-content/fetch-surrounding-chunks
$ jupyter notebook fetch-surrounding-chunks.ipynb 安装及导入包
!pip install elasticsearch==8.14.0
!pip install pandas
!python -m pip install elandimport json
import time
import urllib.request
import re
import pandas as pd
from transformers import AutoTokenizer, BertTokenizer
from elasticsearch import Elasticsearch, helpers, exceptions
import textwrap
如果在上面已经安装了所需要的包,那么我们可以省去上面的安装命令。
读入变量并连接到 Elasticsearch
from elasticsearch import Elasticsearch
from dotenv import load_dotenv
import os
from transformers import BertTokenizer, BertForMaskedLMload_dotenv()raw_source_index = "harry_potter_dataset-raw"
index_name = "harry_potter_dataset_enriched"dense_embedding_model_id = "sentence-transformers__all-minilm-l6-v2"
dense_huggingface_model_id = "sentence-transformers/all-MiniLM-L6-v2"
dense_model_number_of_allocators = 2elser_model_id = ".elser_model_2"
elser_model_number_of_allocators = 2bert_tokenizer = BertTokenizer.from_pretrained("bert-base-uncased")SEMANTIC_SEARCH_TOKEN_LIMIT = 500
ELSER_TOKEN_OVERLAP = 0.0# Create the client instance
load_dotenv()ES_USER = os.getenv("ES_USER")
ES_PASSWORD = os.getenv("ES_PASSWORD")
ES_ENDPOINT = os.getenv("ES_ENDPOINT")
ELASTIC_API_KEY = os.getenv("ELASTIC_API_KEY")url = f"https://{ES_USER}:{ES_PASSWORD}@{ES_ENDPOINT}:9200"
print(url)esclient = Elasticsearch(url, ca_certs = "./http_ca.crt", verify_certs = True)
print(esclient.info())
如果你运行顺利的话,那么你可以看到如下的输出结果:

它表明我们的 Elasticsearch 客户端连接是成功的。
导入模型
在这里,我们用到脚本来上传所需要的模型。使用 eland_import_hub_model 脚本,下载并安装 all-MiniLM-L6-v2 转换器模型。将 NLP --task-type 设置为 text_embedding。
要验证你的请求,请使用 Elastic API API 密钥。
CA_CERT = "./http_ca.crt"
print(url)
!eland_import_hub_model --url $url --es-model-id {dense_embedding_model_id} --hub-model-id {dense_huggingface_model_id} --task-type text_embedding --es-api-key $ELASTIC_API_KEY --ca-cert $CA_CERT --start --clear-previous
resp = esclient.ml.update_trained_model_deployment(model_id=dense_embedding_model_id,body={"number_of_allocations": dense_model_number_of_allocators},
)
print(resp)
https://elastic:Xw4_Nohry-LgaOum6oh-@localhost:9200
2024-06-17 07:36:04,762 INFO : Establishing connection to Elasticsearch
2024-06-17 07:36:04,781 INFO : Connected to cluster named 'elasticsearch' (version: 8.14.0)
2024-06-17 07:36:04,781 INFO : Loading HuggingFace transformer tokenizer and model 'sentence-transformers/all-MiniLM-L6-v2'
STAGE:2024-06-17 07:36:09 54226:14164655 ActivityProfilerController.cpp:314] Completed Stage: Warm Up
STAGE:2024-06-17 07:36:09 54226:14164655 ActivityProfilerController.cpp:320] Completed Stage: Collection
STAGE:2024-06-17 07:36:09 54226:14164655 ActivityProfilerController.cpp:324] Completed Stage: Post Processing
2024-06-17 07:36:09,768 WARNING : `SentenceTransformer._target_device` has been removed, please use `SentenceTransformer.device` instead.
2024-06-17 07:36:09,768 WARNING : `SentenceTransformer._target_device` has been removed, please use `SentenceTransformer.device` instead.
2024-06-17 07:36:09,996 WARNING : `SentenceTransformer._target_device` has been removed, please use `SentenceTransformer.device` instead.
2024-06-17 07:36:09,996 WARNING : `SentenceTransformer._target_device` has been removed, please use `SentenceTransformer.device` instead.
2024-06-17 07:36:10,705 INFO : Stopping deployment for model with id 'sentence-transformers__all-minilm-l6-v2'
2024-06-17 07:36:10,806 INFO : Deleting model with id 'sentence-transformers__all-minilm-l6-v2'
2024-06-17 07:36:10,962 INFO : Creating model with id 'sentence-transformers__all-minilm-l6-v2'
2024-06-17 07:36:11,120 INFO : Uploading model definition
100%|███████████████████████████████████████| 87/87 [00:03<00:00, 25.11 parts/s]
2024-06-17 07:36:14,584 INFO : Uploading model vocabulary
2024-06-17 07:36:14,622 INFO : Starting model deployment
2024-06-17 07:36:16,031 INFO : Model successfully imported with id 'sentence-transformers__all-minilm-l6-v2'
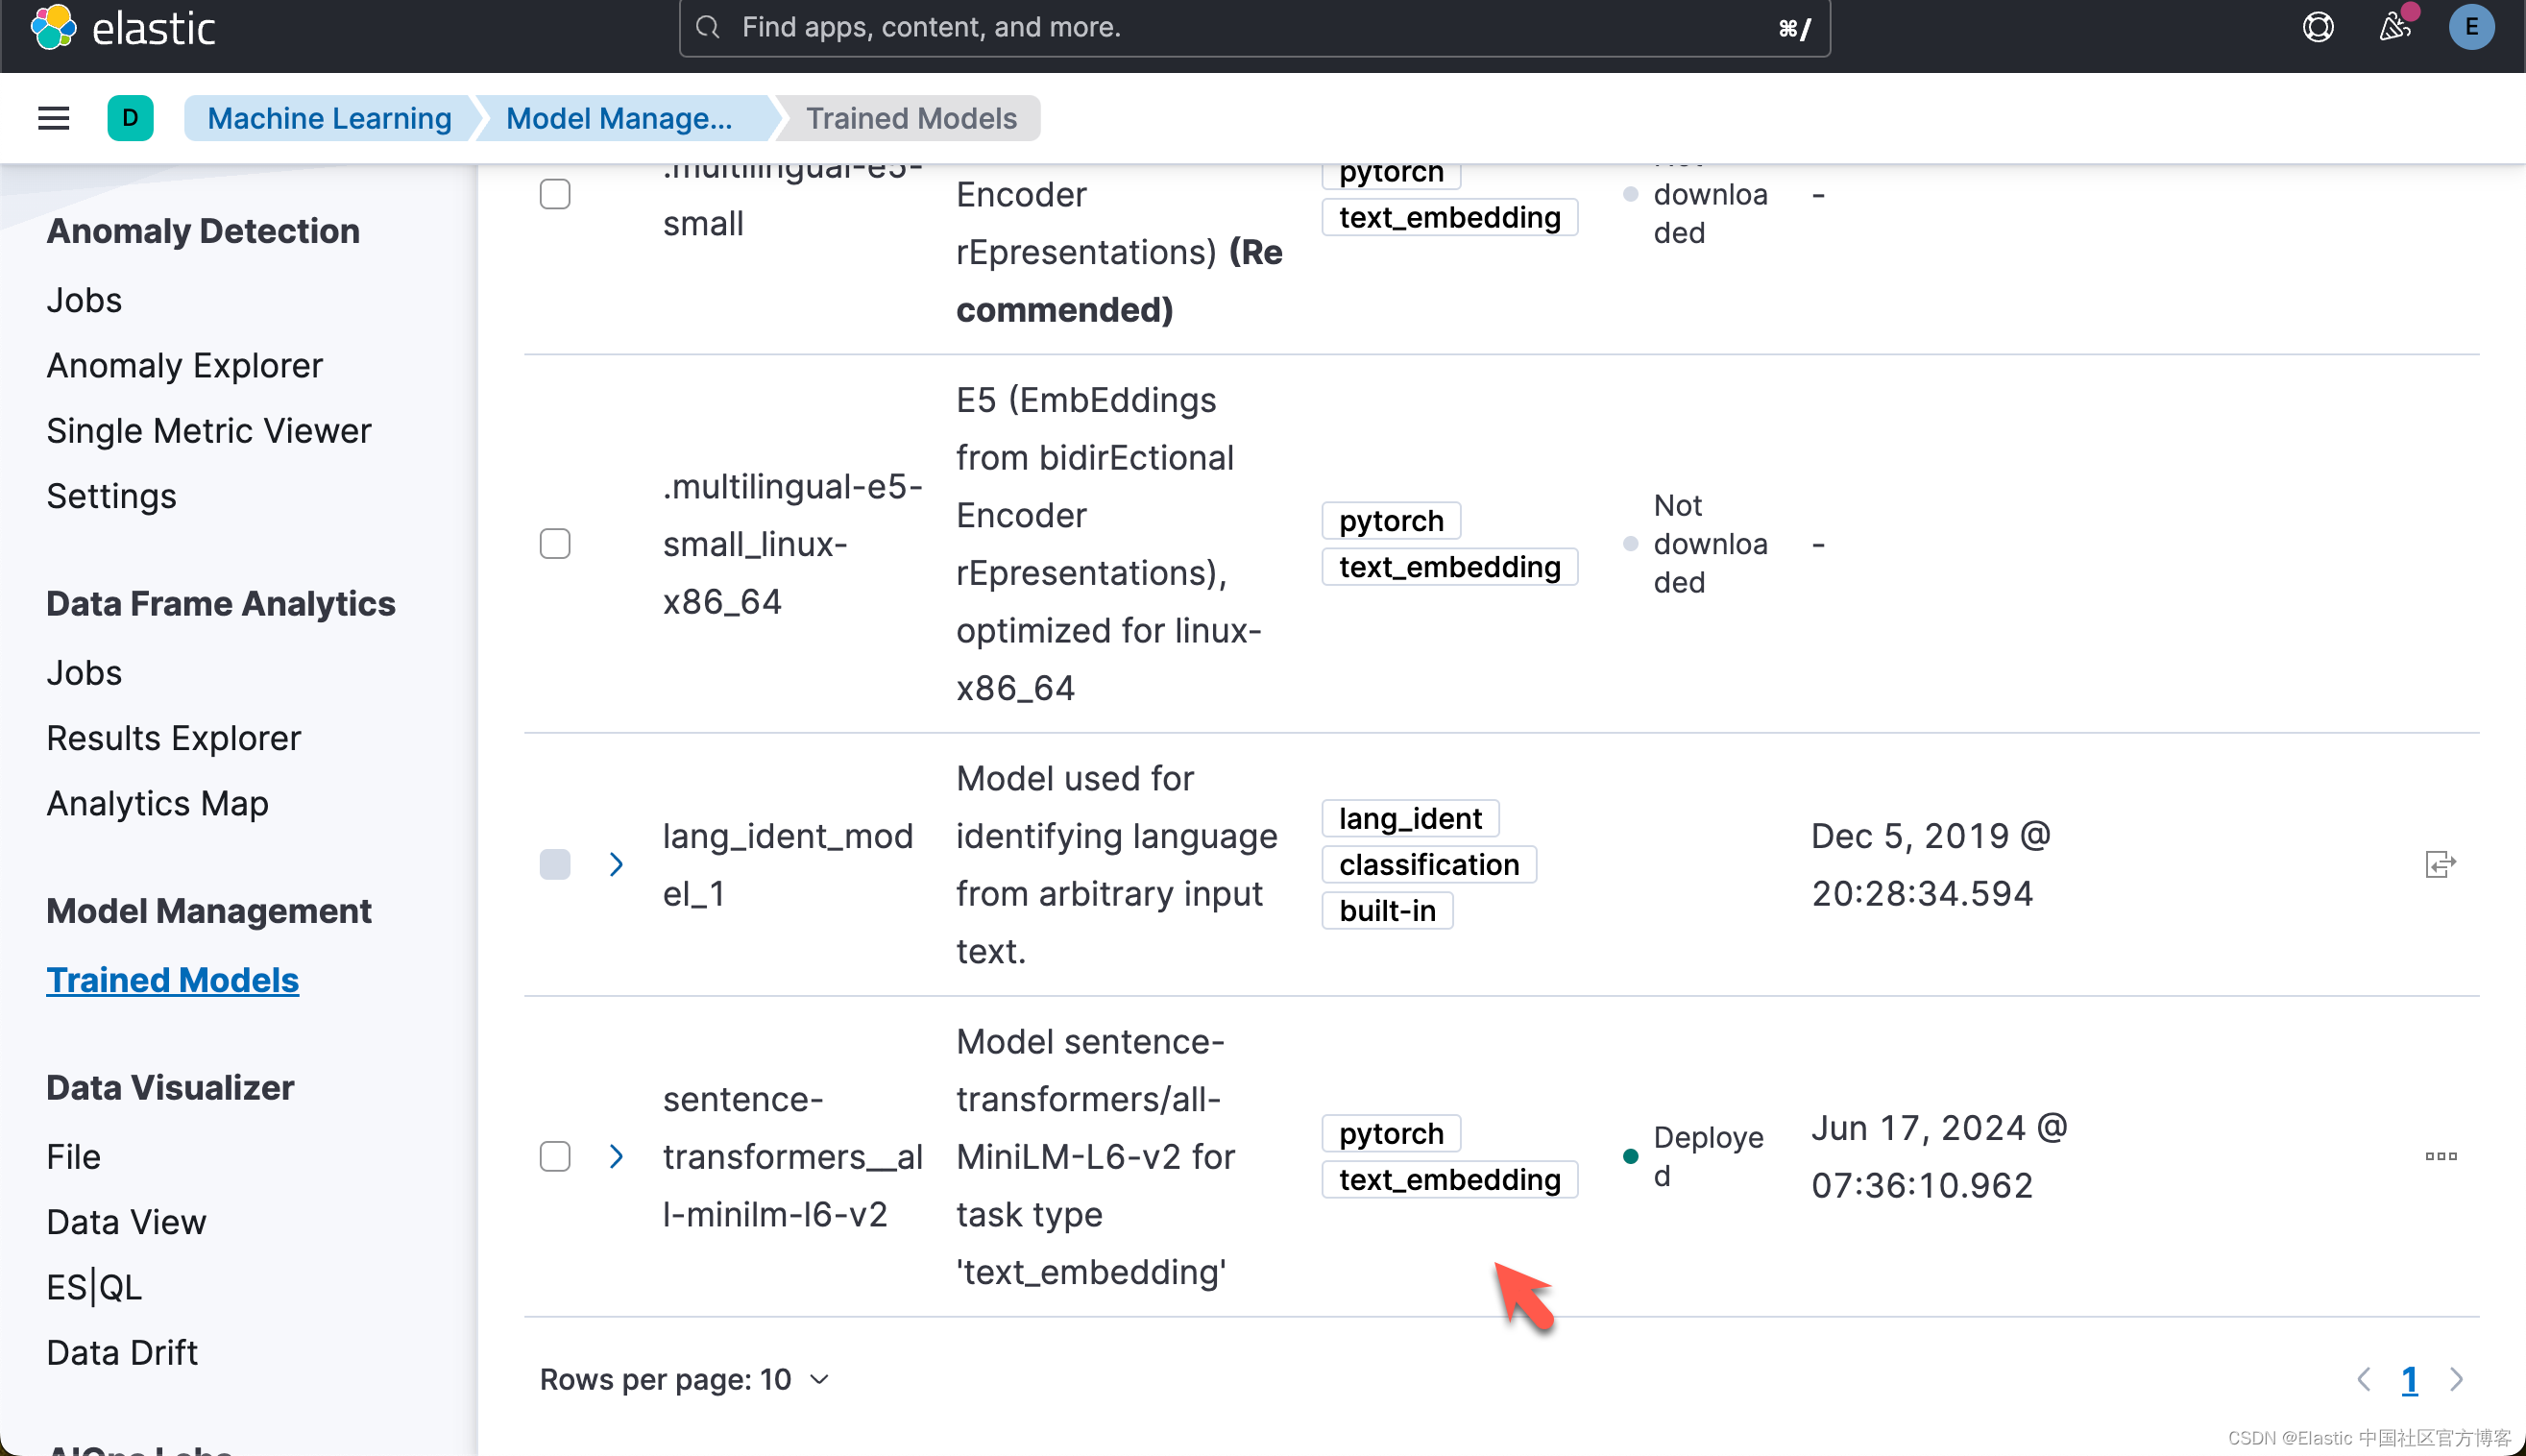
{'assignment': {'task_parameters': {'model_id': 'sentence-transformers__all-minilm-l6-v2', 'deployment_id': 'sentence-transformers__all-minilm-l6-v2', 'model_bytes': 90303522, 'threads_per_allocation': 1, 'number_of_allocations': 2, 'queue_capacity': 1024, 'cache_size': '90303522b', 'priority': 'normal', 'per_deployment_memory_bytes': 90269696, 'per_allocation_memory_bytes': 291876956}, 'routing_table': {'PEyvsErNSXu8NbrlO_HPxA': {'current_allocations': 1, 'target_allocations': 2, 'routing_state': 'started', 'reason': ''}}, 'assignment_state': 'started', 'start_time': '2024-06-16T23:36:14.652847Z', 'max_assigned_allocations': 1}}这个步骤,你可以参考之前的文章 “Elasticsearch:如何部署 NLP:文本嵌入和向量搜索” 来在命令行中进行部署。运行完上面的命令后,你需要在 Kibana 界面中进行选择:

下载及部署 ELSER 模型
对于一些开发者对 ELSER 还不是很熟的话,那么请阅我之前的文章 “Elasticsearch:部署 ELSER - Elastic Learned Sparse EncoderR”。
# delete model if already downloaded and deployed
try:esclient.ml.delete_trained_model(model_id=elser_model_id, force=True)print("Model deleted successfully, We will proceed with creating one")
except exceptions.NotFoundError:print("Model doesn't exist, but We will proceed with creating one")# Creates the ELSER model configuration. Automatically downloads the model if it doesn't exist.
esclient.ml.put_trained_model(model_id=elser_model_id, input={"field_names": ["text_field"]}
)
在上面,它删除已经部署好的 ELSER,并重新对它进行部署。
Model deleted successfully, We will proceed with creating one
ObjectApiResponse({'model_id': '.elser_model_2', 'model_type': 'pytorch', 'model_package': {'packaged_model_id': 'elser_model_2', 'model_repository': 'https://ml-models.elastic.co', 'minimum_version': '11.0.0', 'size': 438123914, 'sha256': '2e0450a1c598221a919917cbb05d8672aed6c613c028008fedcd696462c81af0', 'metadata': {}, 'tags': [], 'vocabulary_file': 'elser_model_2.vocab.json'}, 'created_by': 'api_user', 'version': '12.0.0', 'create_time': 1718580981790, 'model_size_bytes': 0, 'estimated_operations': 0, 'license_level': 'platinum', 'description': 'Elastic Learned Sparse EncodeR v2', 'tags': ['elastic'], 'metadata': {}, 'input': {'field_names': ['text_field']}, 'inference_config': {'text_expansion': {'vocabulary': {'index': '.ml-inference-native-000002'}, 'tokenization': {'bert': {'do_lower_case': True, 'with_special_tokens': True, 'max_sequence_length': 512, 'truncate': 'first', 'span': -1}}}}, 'location': {'index': {'name': '.ml-inference-native-000002'}}})
上述命令将下载 ELSER 模型。这将需要几分钟才能完成。使用以下命令检查模型下载的状态。
while True:status = esclient.ml.get_trained_models(model_id=elser_model_id, include="definition_status")if status["trained_model_configs"][0]["fully_defined"]:print("ELSER Model is downloaded and ready to be deployed.")breakelse:print("ELSER Model is downloaded but not ready to be deployed.")time.sleep(5)ELSER Model is downloaded but not ready to be deployed.
ELSER Model is downloaded but not ready to be deployed.
ELSER Model is downloaded but not ready to be deployed.
ELSER Model is downloaded but not ready to be deployed.
ELSER Model is downloaded and ready to be deployed.
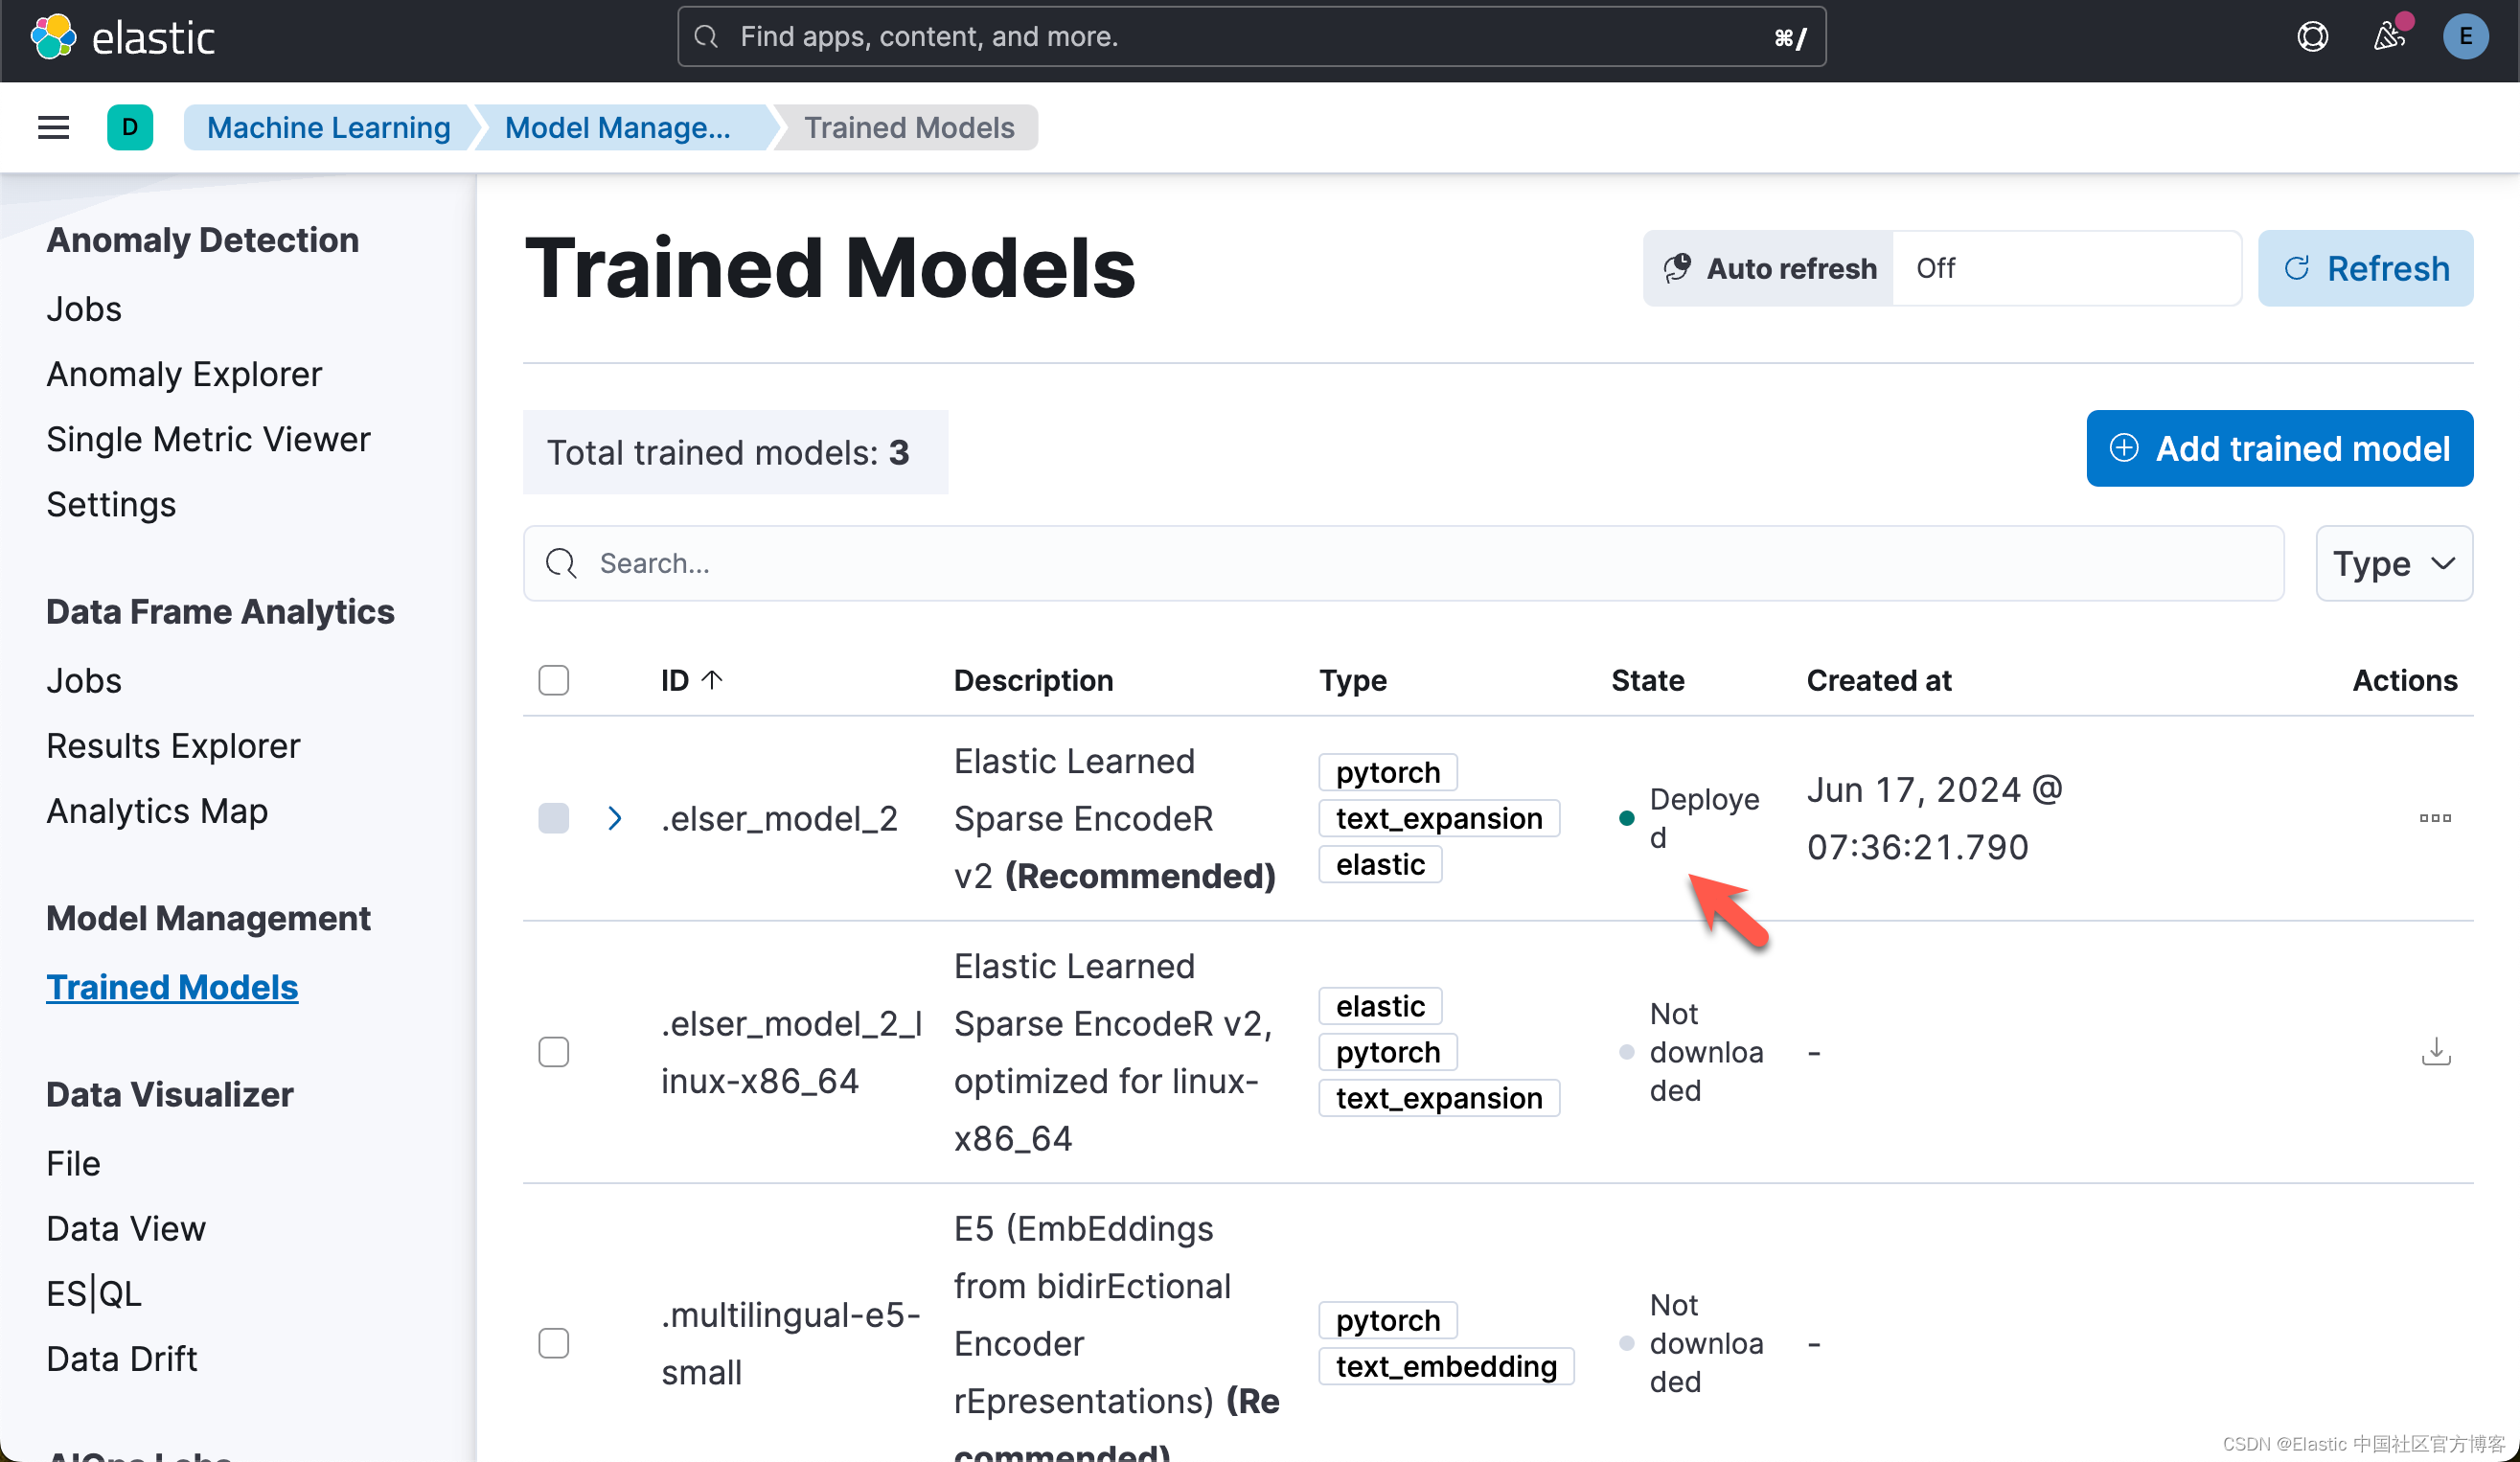
下载模型后,我们可以在 ML 节点中部署该模型。使用以下命令部署模型。这也需要几分钟才能完成。
# Start ELSER model deployment if not already deployed
esclient.ml.start_trained_model_deployment(model_id=elser_model_id,number_of_allocations=elser_model_number_of_allocators,wait_for="starting",
)while True:status = esclient.ml.get_trained_models_stats(model_id=elser_model_id,)if status["trained_model_stats"][0]["deployment_stats"]["state"] == "started":print("ELSER Model has been successfully deployed.")breakelse:print("ELSER Model is currently being deployed.")time.sleep(5)
ELSER Model is currently being deployed.
ELSER Model has been successfully deployed.一旦部署完毕,我们可以在 Kibana 中进行查看:
写入数据
import codecs
f = codecs.open("harry_potter.txt", "r", "utf-8")
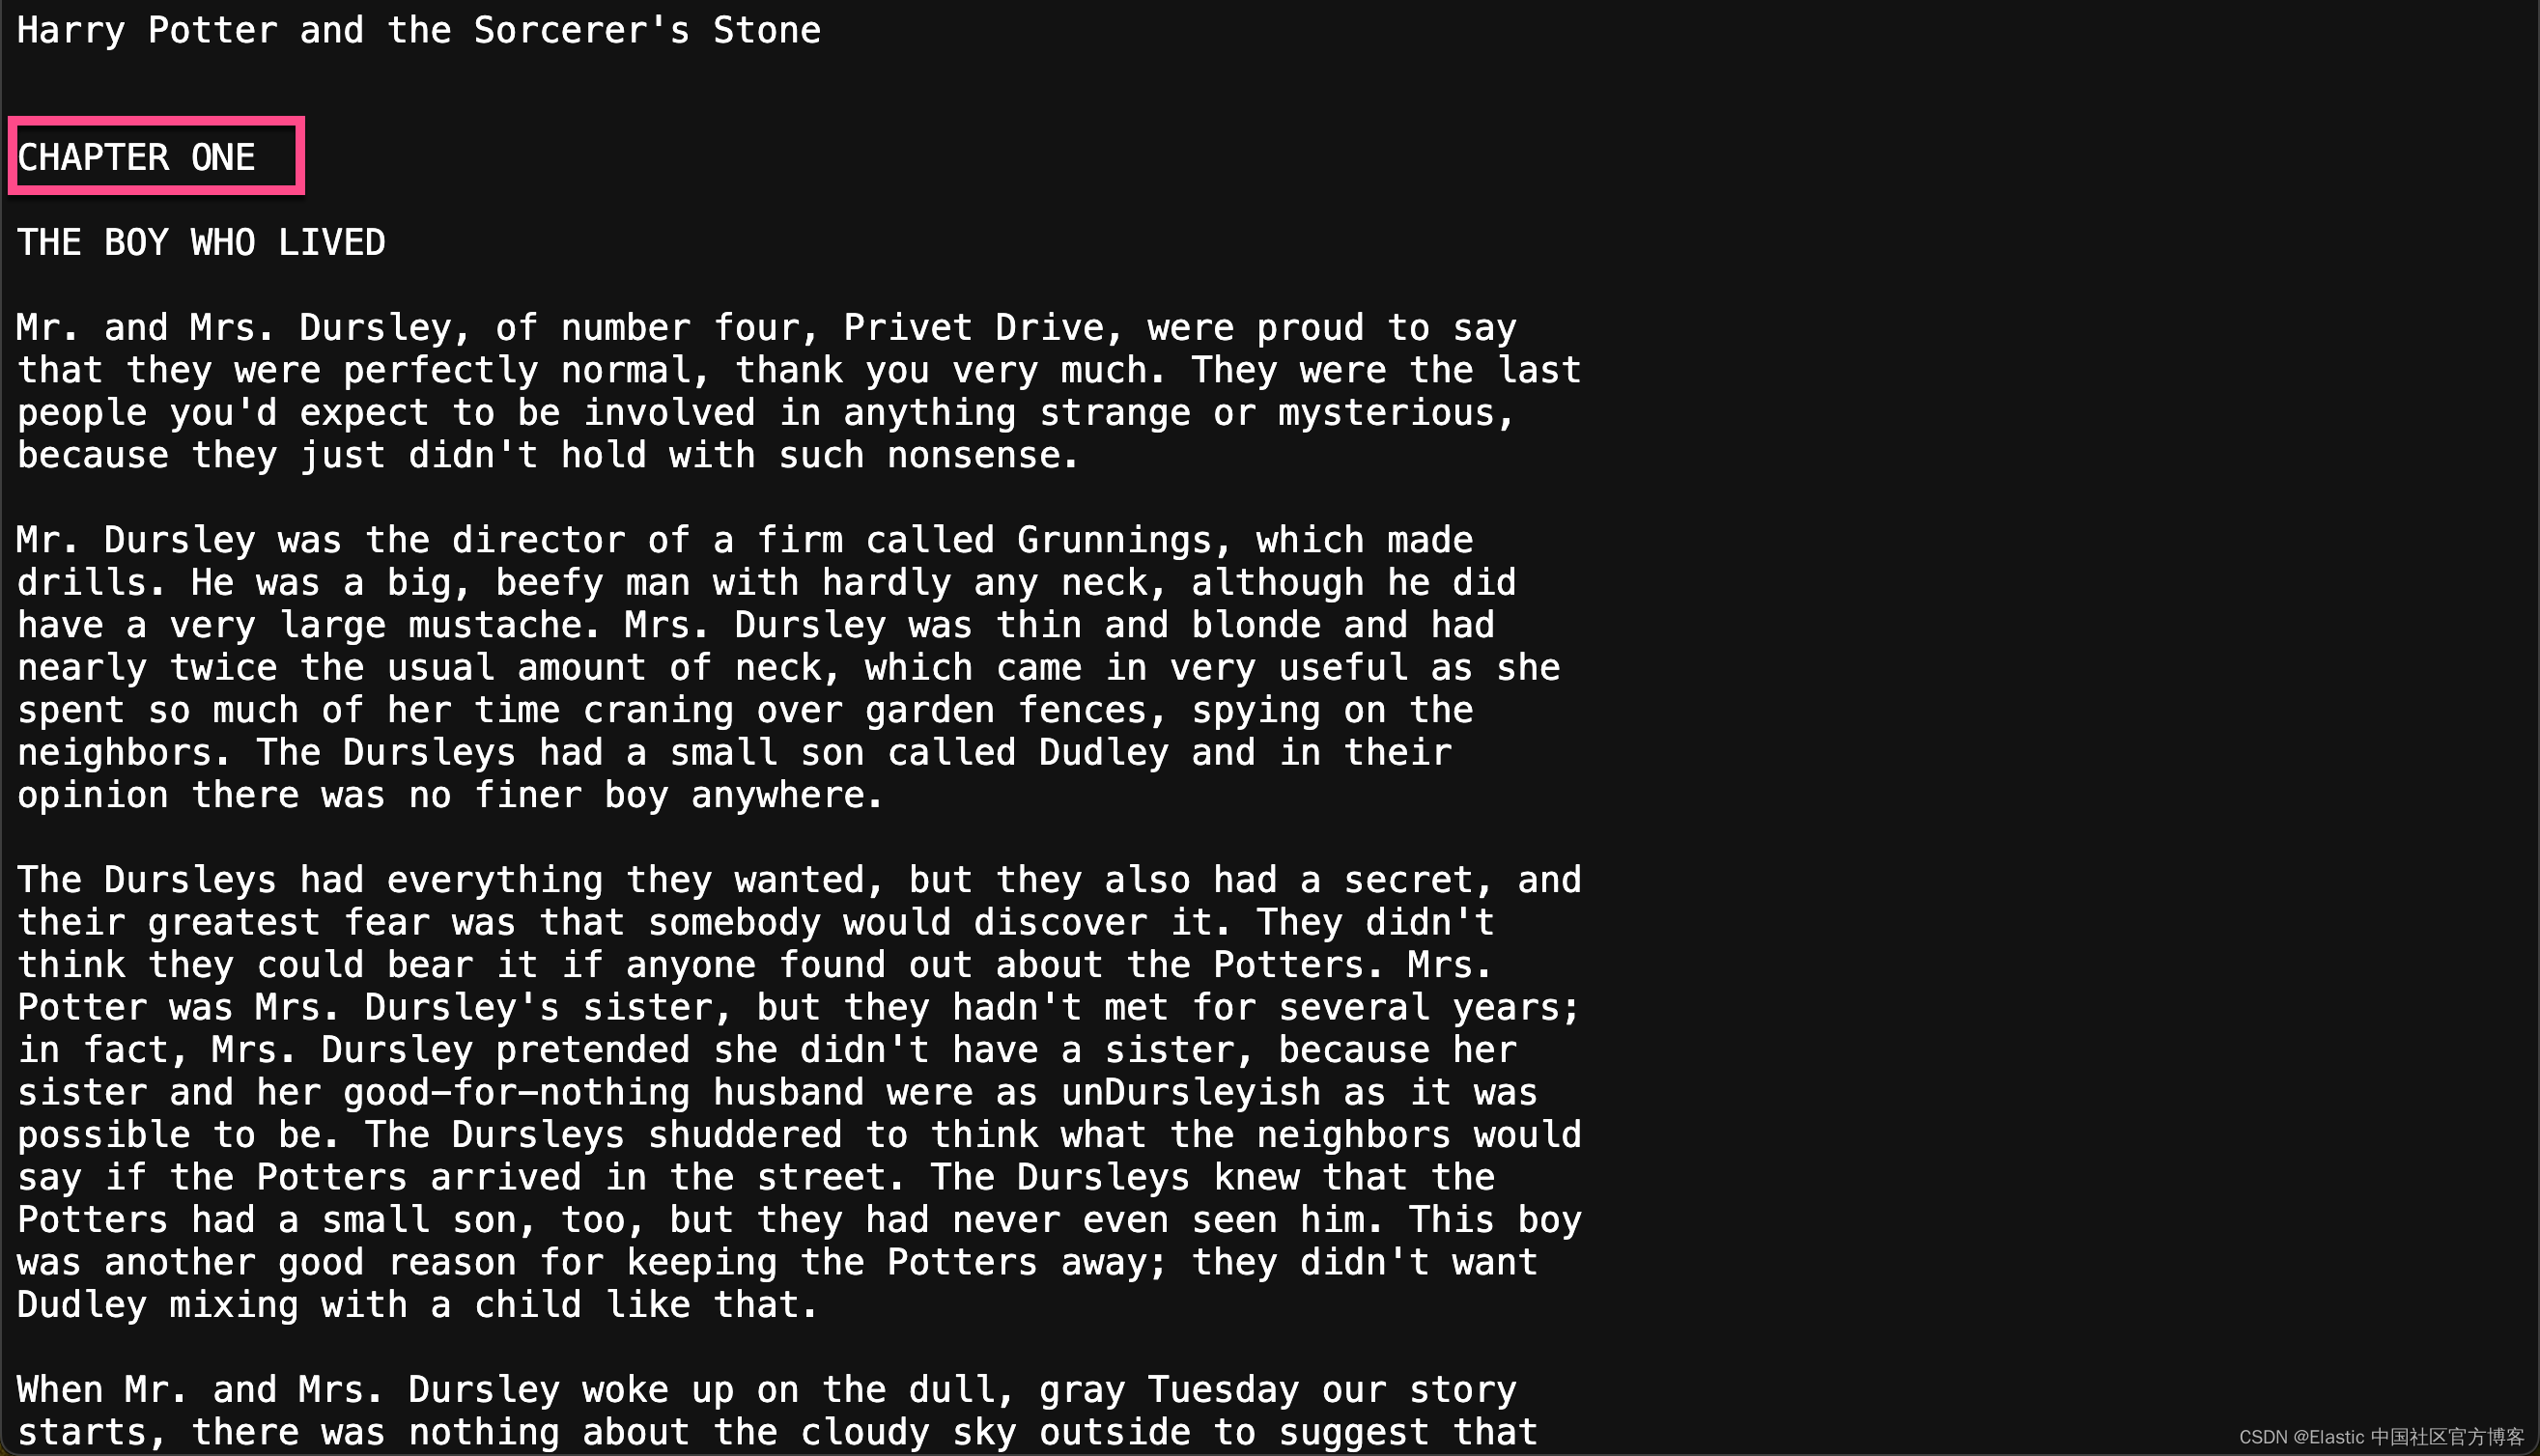
harry_potter_book_text = f.read()chapter_pattern = re.compile(r"CHAPTER [A-Z]+", re.IGNORECASE)
chapters = chapter_pattern.split(harry_potter_book_text)[1:]
chapter_titles = re.findall(chapter_pattern, harry_potter_book_text)
chapters_with_titles = list(zip(chapter_titles, chapters))print("Total chapters found:", len(chapters))
if chapters_with_titles:print("First chapter title:", chapters_with_titles[0][0])print("Text sample from first chapter:", chapters_with_titles[0][1][:500])# Structuring chapters into a DataFrame
df = pd.DataFrame(chapters_with_titles, columns=["chapter_title", "chapter_full_text"])
df["chapter"] = df.index + 1
df["book_title"] = "Harry Potter and the Sorcerer’s Stone"
df["passages"] = df["chapter_full_text"].apply(lambda text: chunk(text))Total chapters found: 17
First chapter title: CHAPTER ONE
Text sample from first chapter: THE BOY WHO LIVEDMr. and Mrs. Dursley, of number four, Privet Drive, were proud to say
that they were perfectly normal, thank you very much. They were the last
people you'd expect to be involved in anything strange or mysterious,
because they just didn't hold with such nonsense.Mr. Dursley was the director of a firm called Grunnings, which made
drills. He was a big, beefy man with hardly any neck, although he did
have a very large mustache. Mrs. Dursley was thin and blonde and had
nearly t上面的代码把文章按照每个 chapter 来进行拆分:

然后,我们通过如下的代码,把每个 chapter 写入到 Elasticsearch 中:
ndex_dataframe(esclient, raw_source_index, df)Indexing documents to harry_potter_dataset-raw...
Successfully indexed 17 documents.
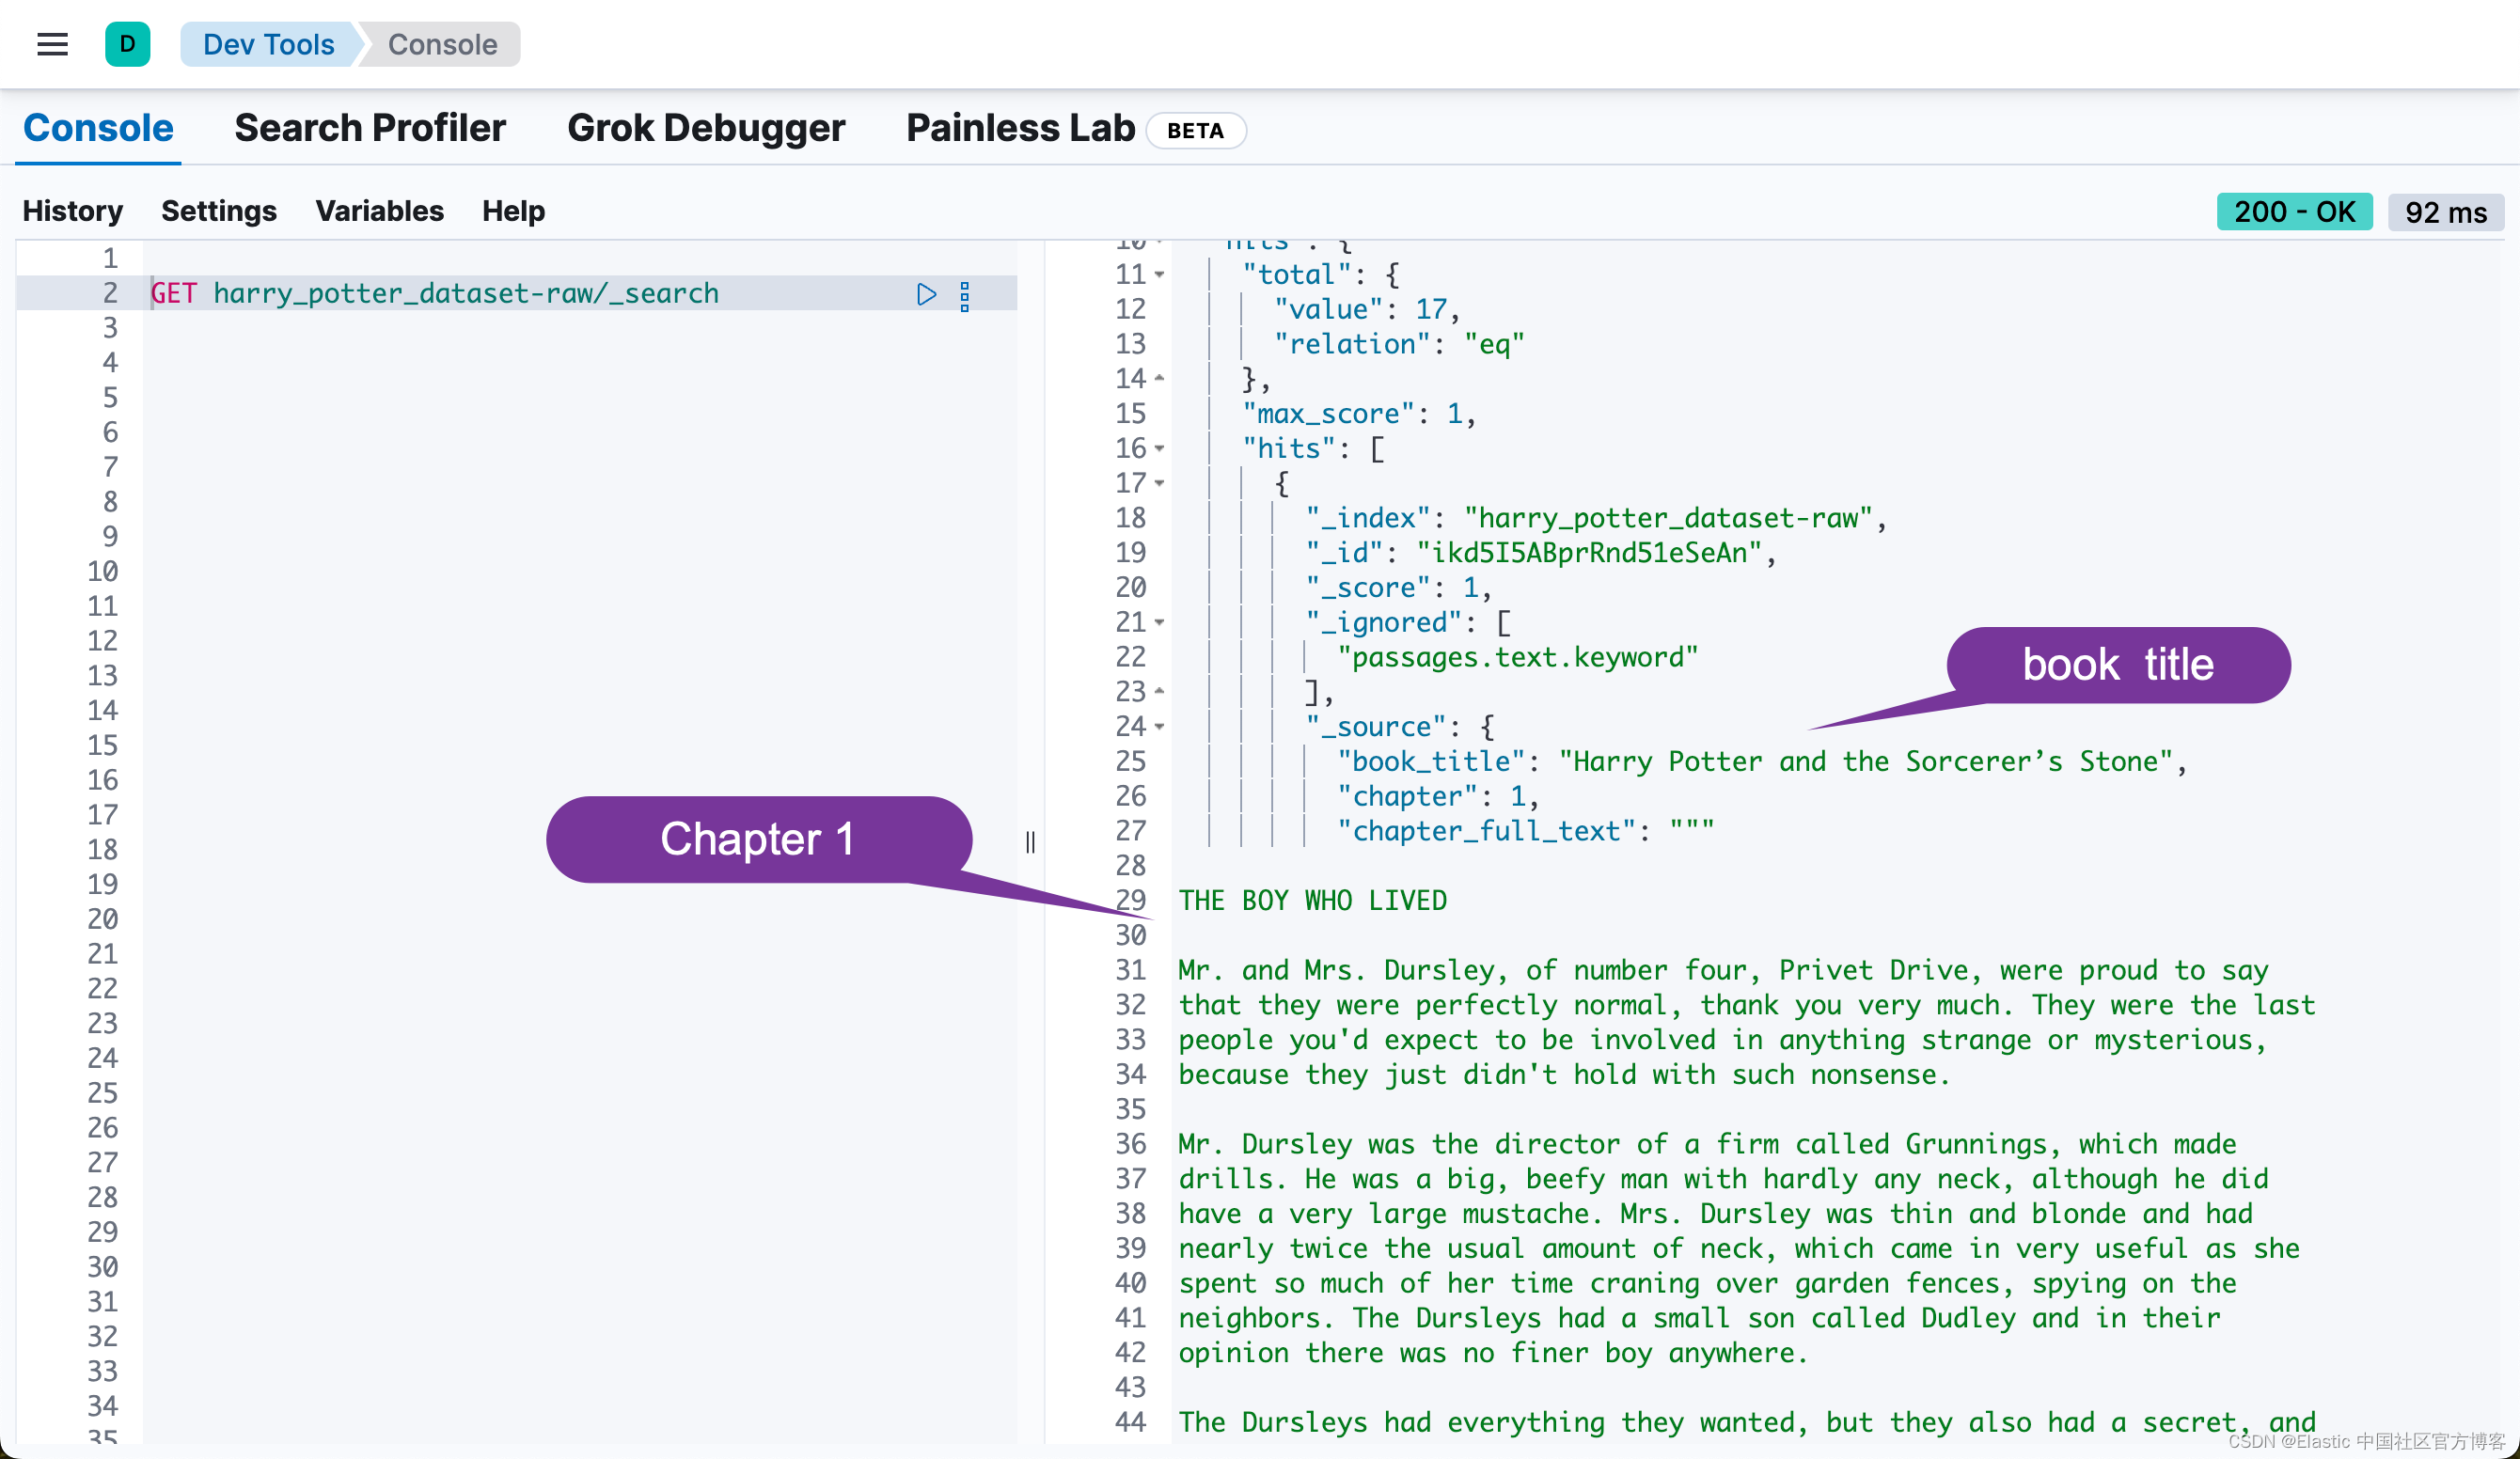
Failed to index 0 documents.我们可以在 Kibana 中进行查看:
Elasticsearch 中的异步重新索引
此部分启动异步重新索引操作,将数据从原始源索引传输到 Elasticsearch 中的丰富索引。此过程在后台运行,允许其他操作继续进行而无需等待完成。
关键步骤:
- 启动重新索引:从 raw_source_index 到 index_name 触发重新索引操作,将 wait_for_completion 设置为 False 以允许异步执行。
- 检索任务 ID:捕获并打印重新索引操作的任务 ID 以用于监控目的。
- 监控进度:check_task_status 函数持续检查重新索引任务的状态,每 10 秒提供一次更新,直到操作完成。
# Start the reindex operation asynchronously
response = esclient.reindex(body={"source": {"index": raw_source_index}, "dest": {"index": index_name}},wait_for_completion=False,
)
task_id = response["task"]
print("Task ID:", task_id)
check_task_status(esclient, task_id)
在上面 reindex 的过程中,它讲自动调用 index_name 所定义的 default_pipeline。这个在上面的代码中所定义:
index_settings = {"settings": {"number_of_shards": 2,"number_of_replicas": 0,"default_pipeline": "books_dataset_chunker",},"mappings": {"dynamic": "false","properties": {"book_title": {"type": "keyword"},"chapter": {"type": "keyword"},"chapter_full_text": {"type": "text", "index": False},"passages": {"type": "nested","properties": {"content_embedding": {"properties": {"is_truncated": {"type": "boolean"},"model_id": {"type": "text","fields": {"keyword": {"type": "keyword", "ignore_above": 256}},},"predicted_value": {"type": "sparse_vector"},}},请注意上面的 default_pipeline。这个在 reindex 时,会自动调用。这个 pipeline 的定义是在 pipeline_body 中所定义的:
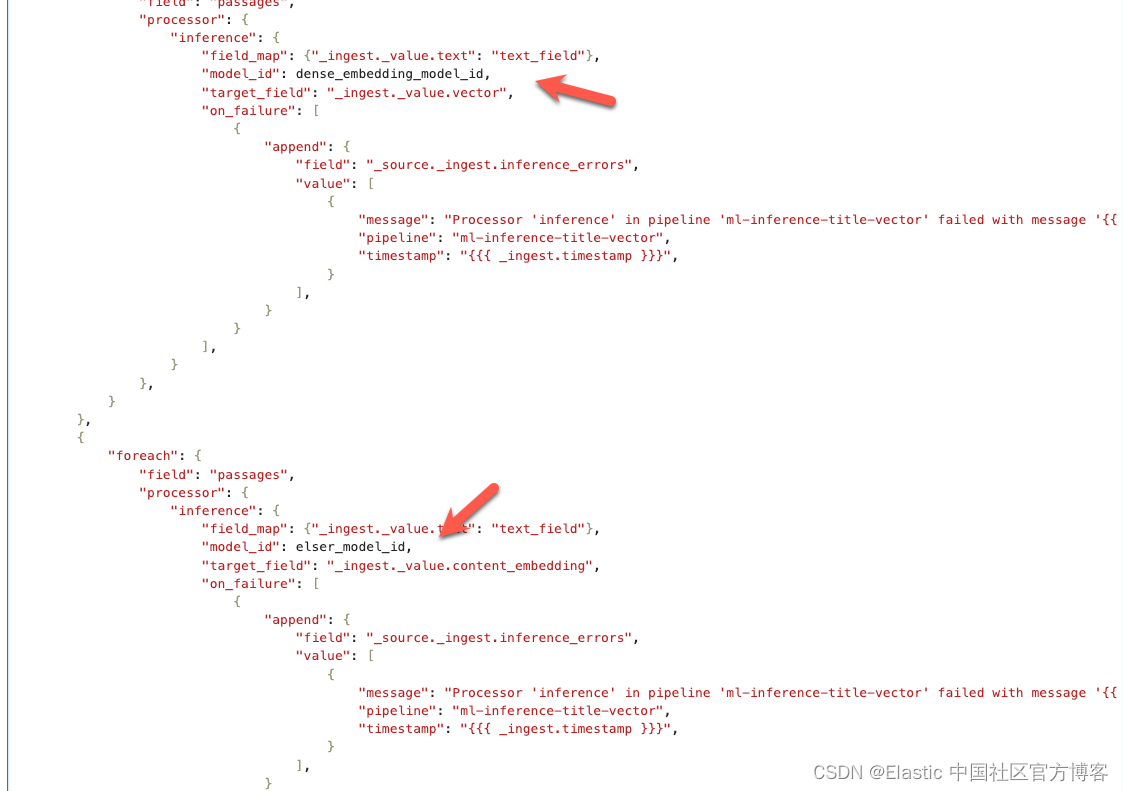
# Define the ingest pipeline configuration
pipeline_body = {"description": "Pipeline for processing book passages","processors": [{"foreach": {"field": "passages","processor": {"inference": {"field_map": {"_ingest._value.text": "text_field"},"model_id": dense_embedding_model_id,"target_field": "_ingest._value.vector","on_failure": [{"append": {"field": "_source._ingest.inference_errors","value": [{"message": "Processor 'inference' in pipeline 'ml-inference-title-vector' failed with message '{{ _ingest.on_failure_message }}'","pipeline": "ml-inference-title-vector","timestamp": "{{{ _ingest.timestamp }}}",}],}}],}},}},{"foreach": {"field": "passages","processor": {"inference": {"field_map": {"_ingest._value.text": "text_field"},"model_id": elser_model_id,"target_field": "_ingest._value.content_embedding","on_failure": [{"append": {"field": "_source._ingest.inference_errors","value": [{"message": "Processor 'inference' in pipeline 'ml-inference-title-vector' failed with message '{{ _ingest.on_failure_message }}'","pipeline": "ml-inference-title-vector","timestamp": "{{{ _ingest.timestamp }}}",}],}}],}},}},],
}
它分别针对 passages 中的每个段落进行 dene vector 的向量化(使用 sentence-transformers__all-minilm-l6-v2 模型),同时也针对它进行 sparse vectore 的向量化(使用 ELSER 模型):
整个 reindex 需要一定的时间来完成:
Task ID: PEyvsErNSXu8NbrlO_HPxA:122681
Indexing...
Indexing...
Indexing...
Indexing...
Indexing...
Indexing...
Indexing...
Indexing...
Indexing...
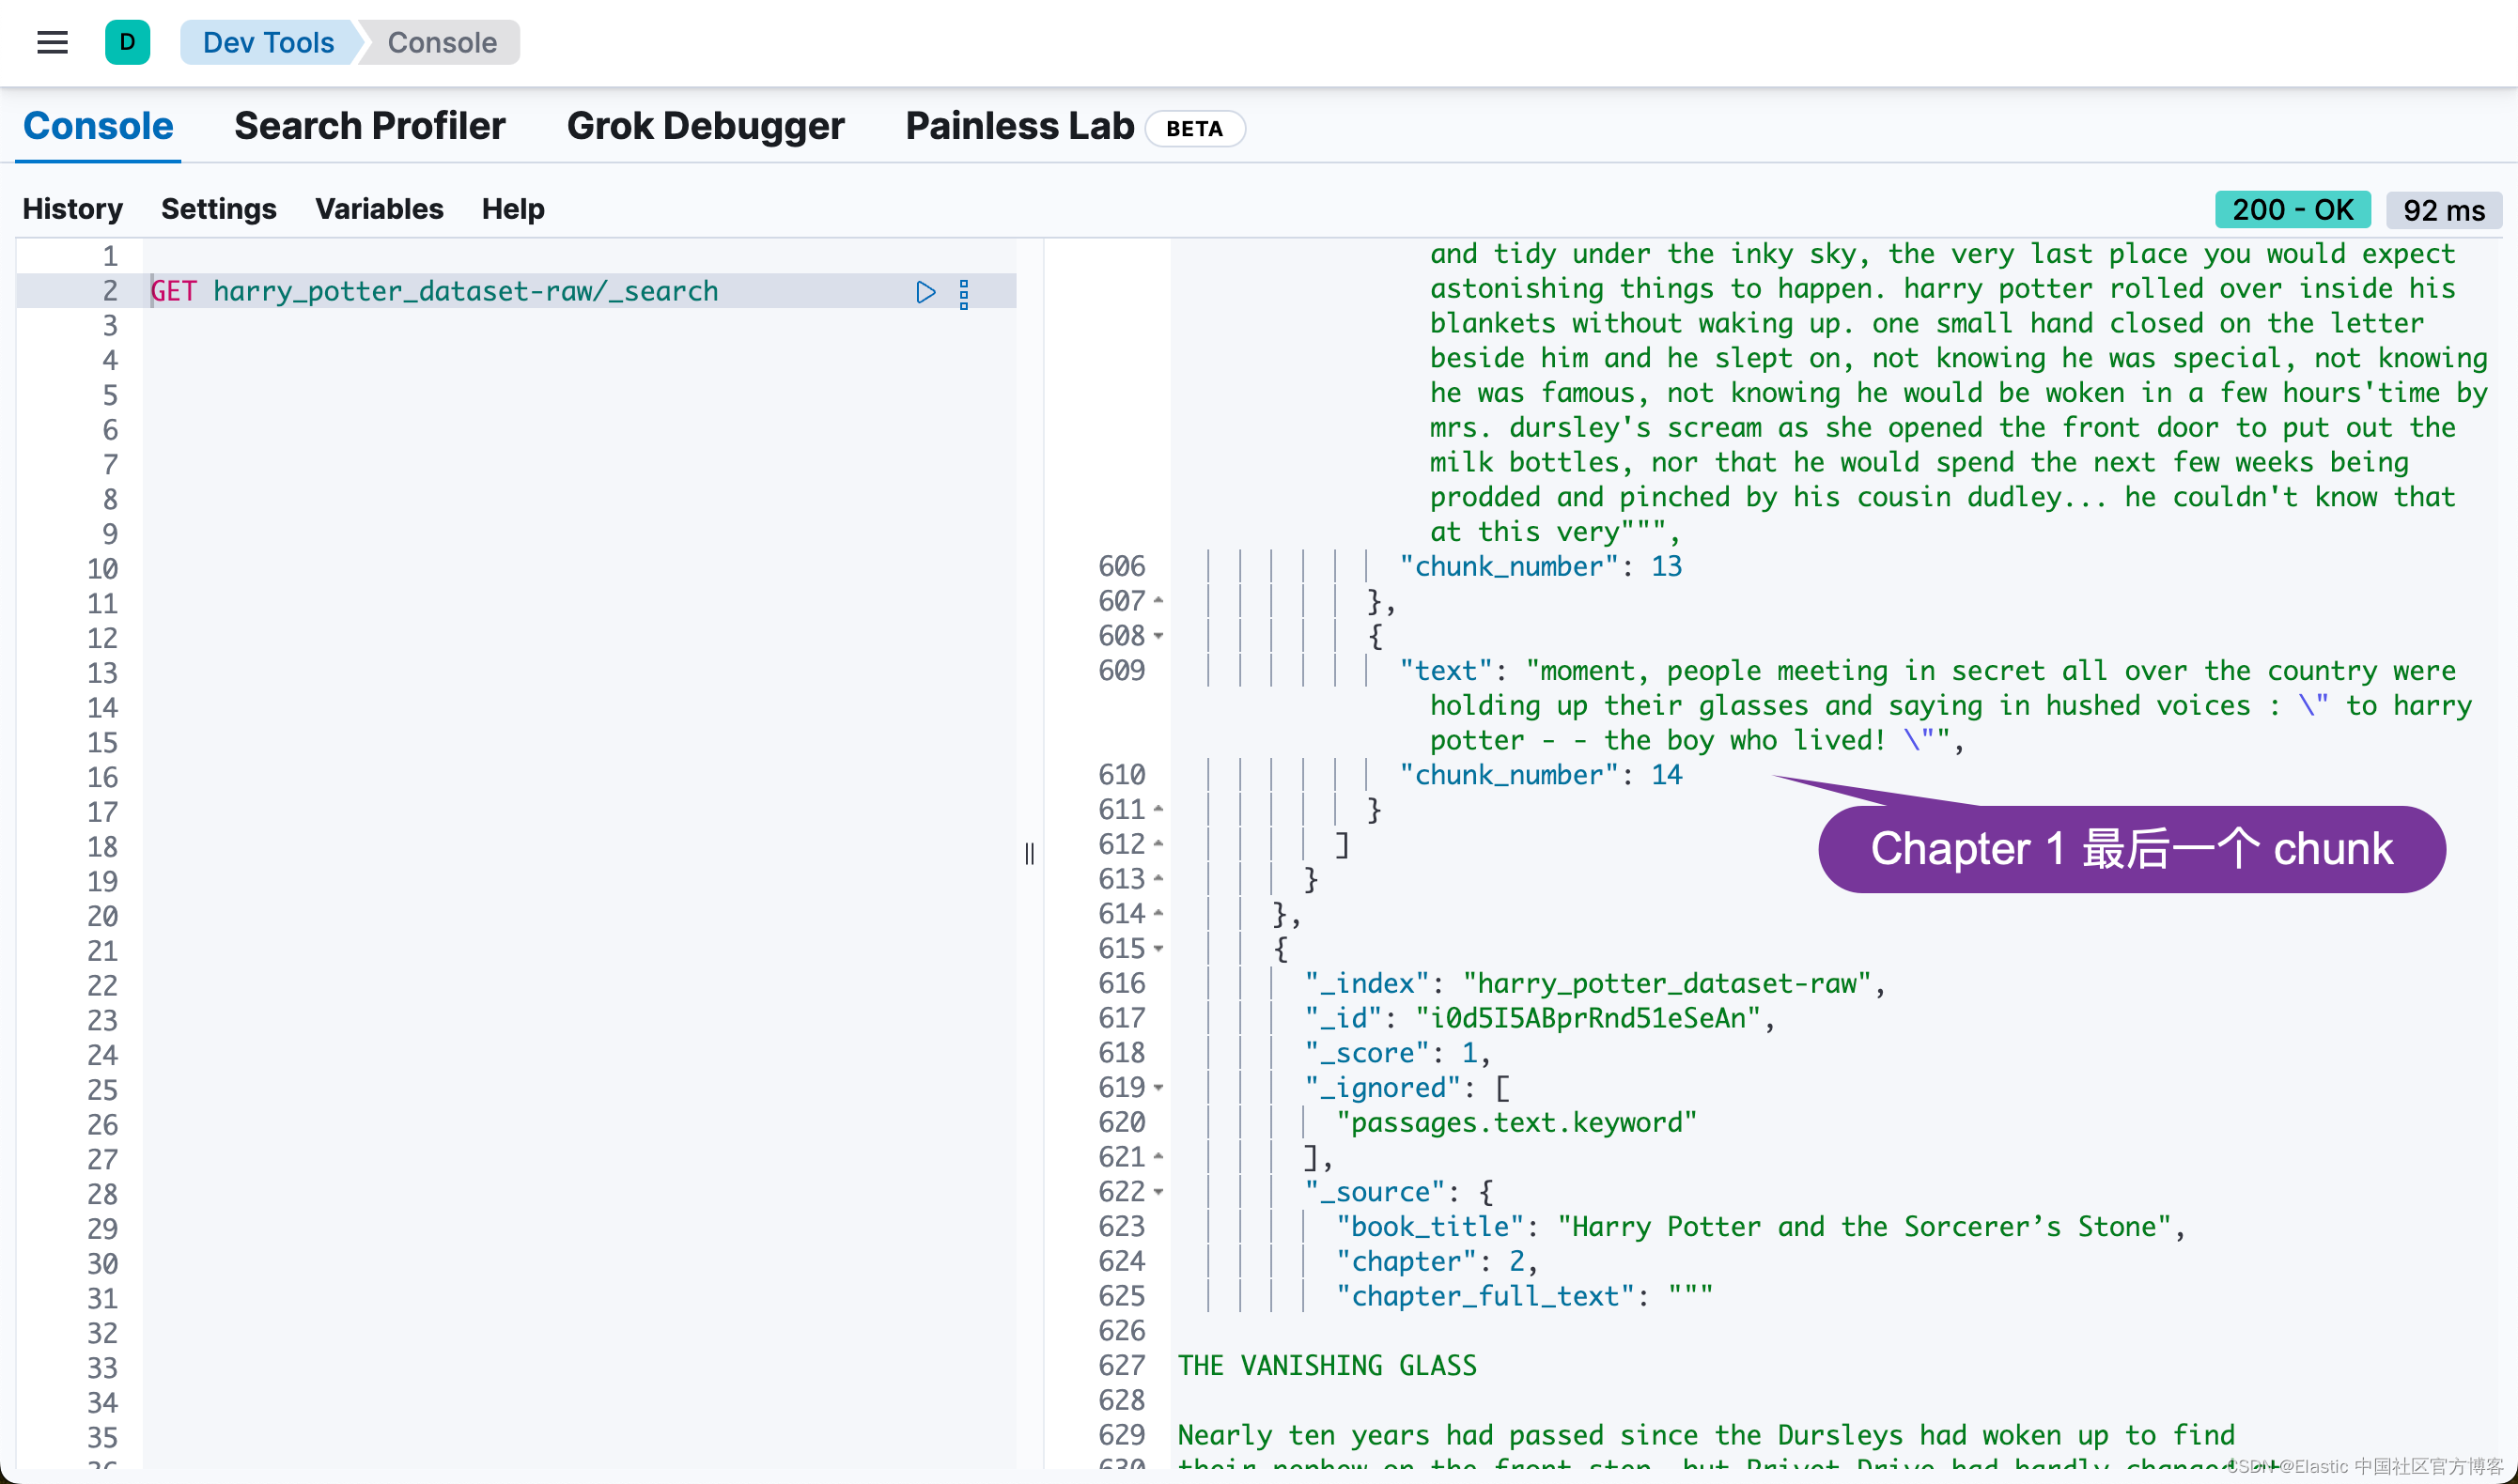
Reindexing complete.等 reindex 完成后,我们可以在 Kibana 中进行查看:
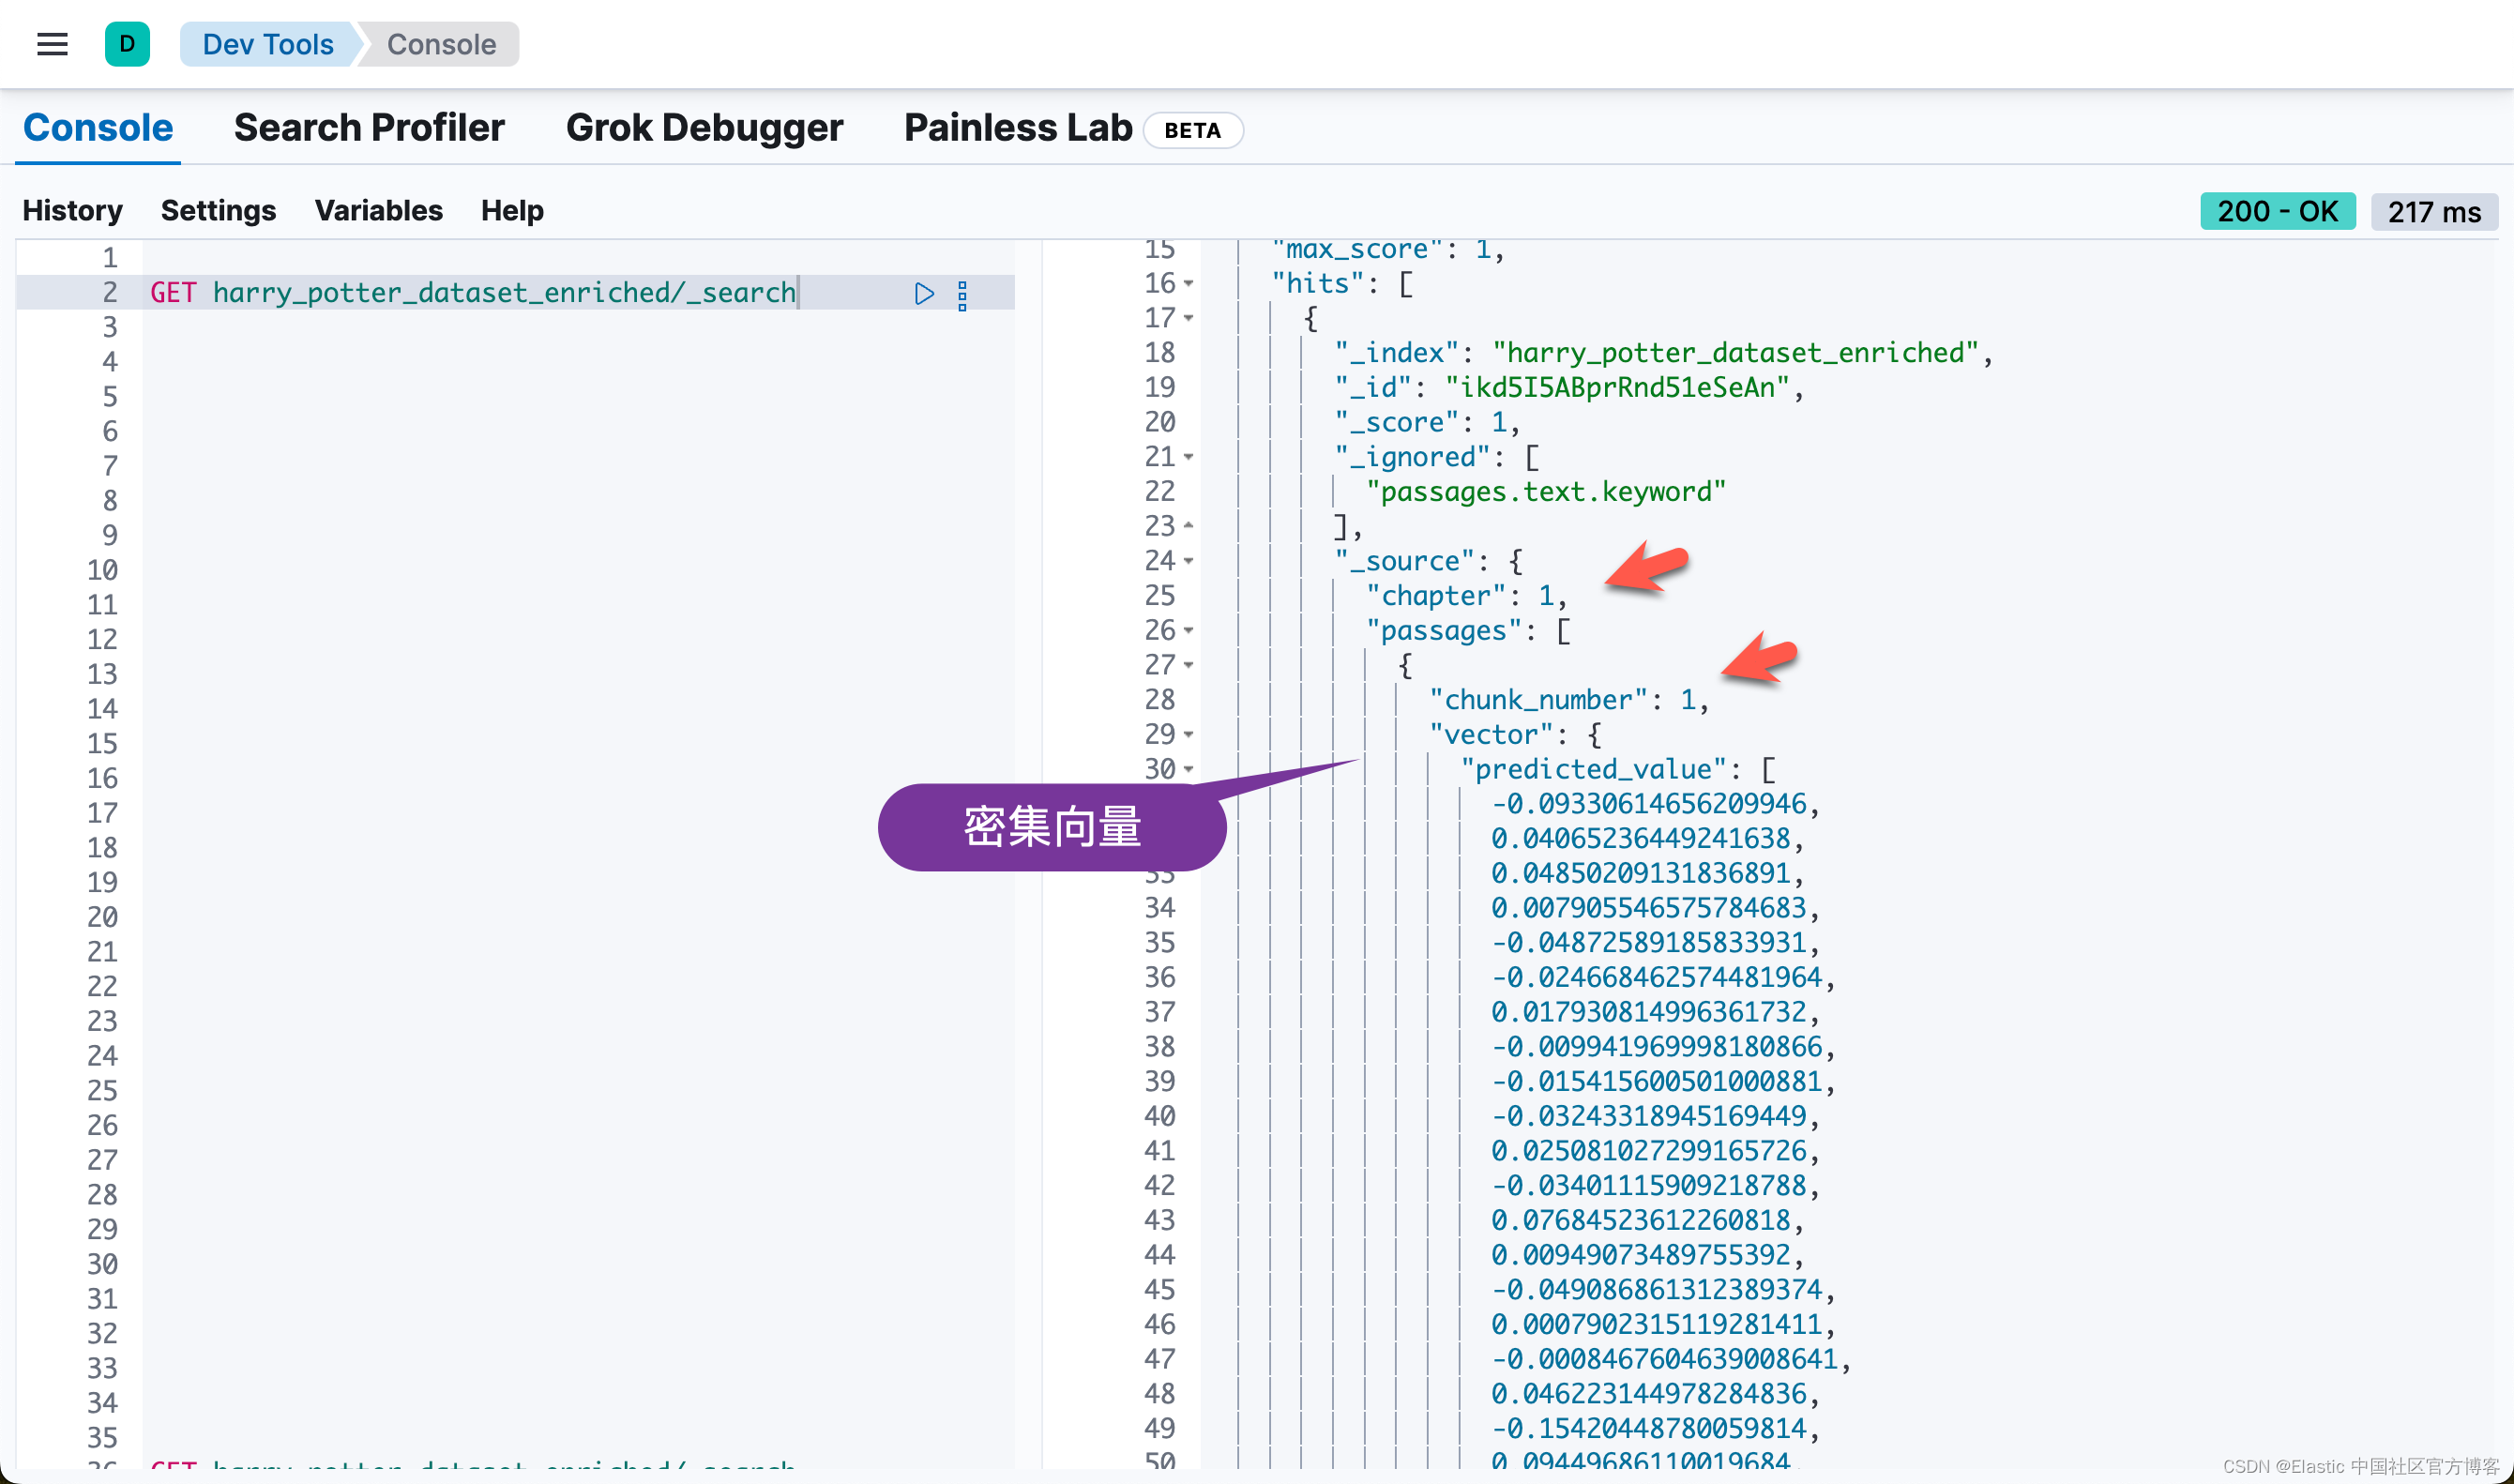
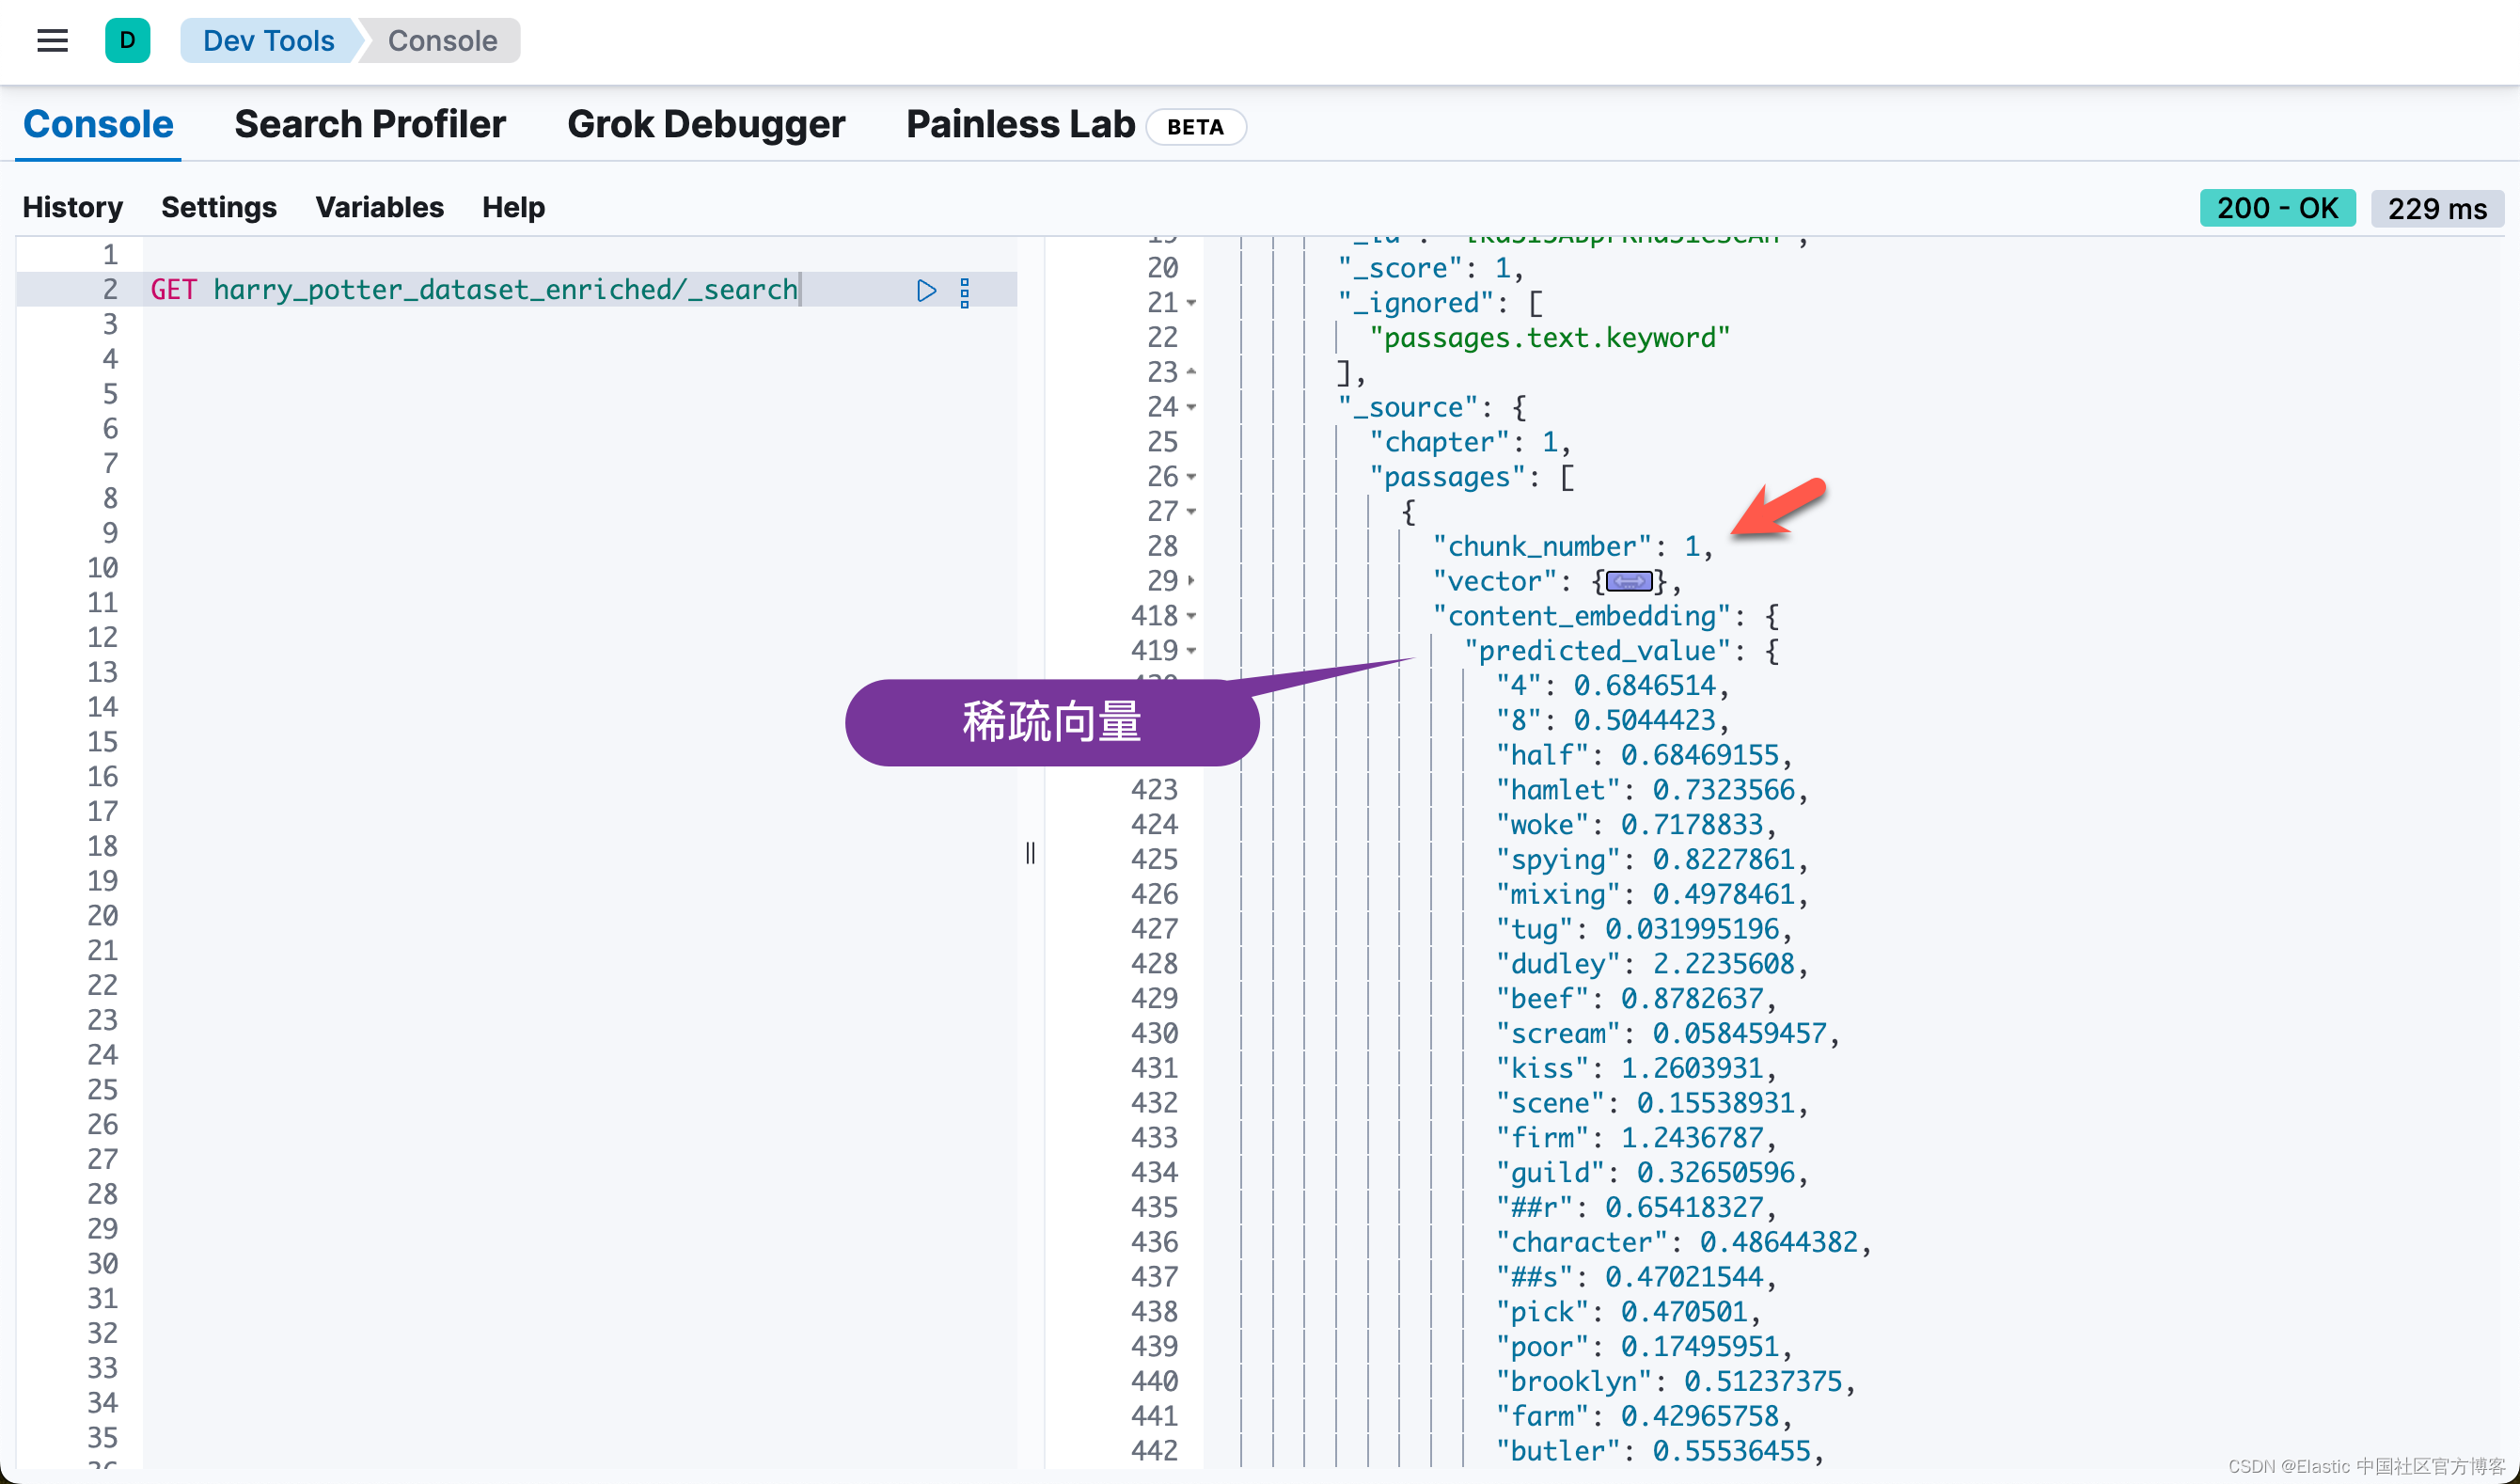

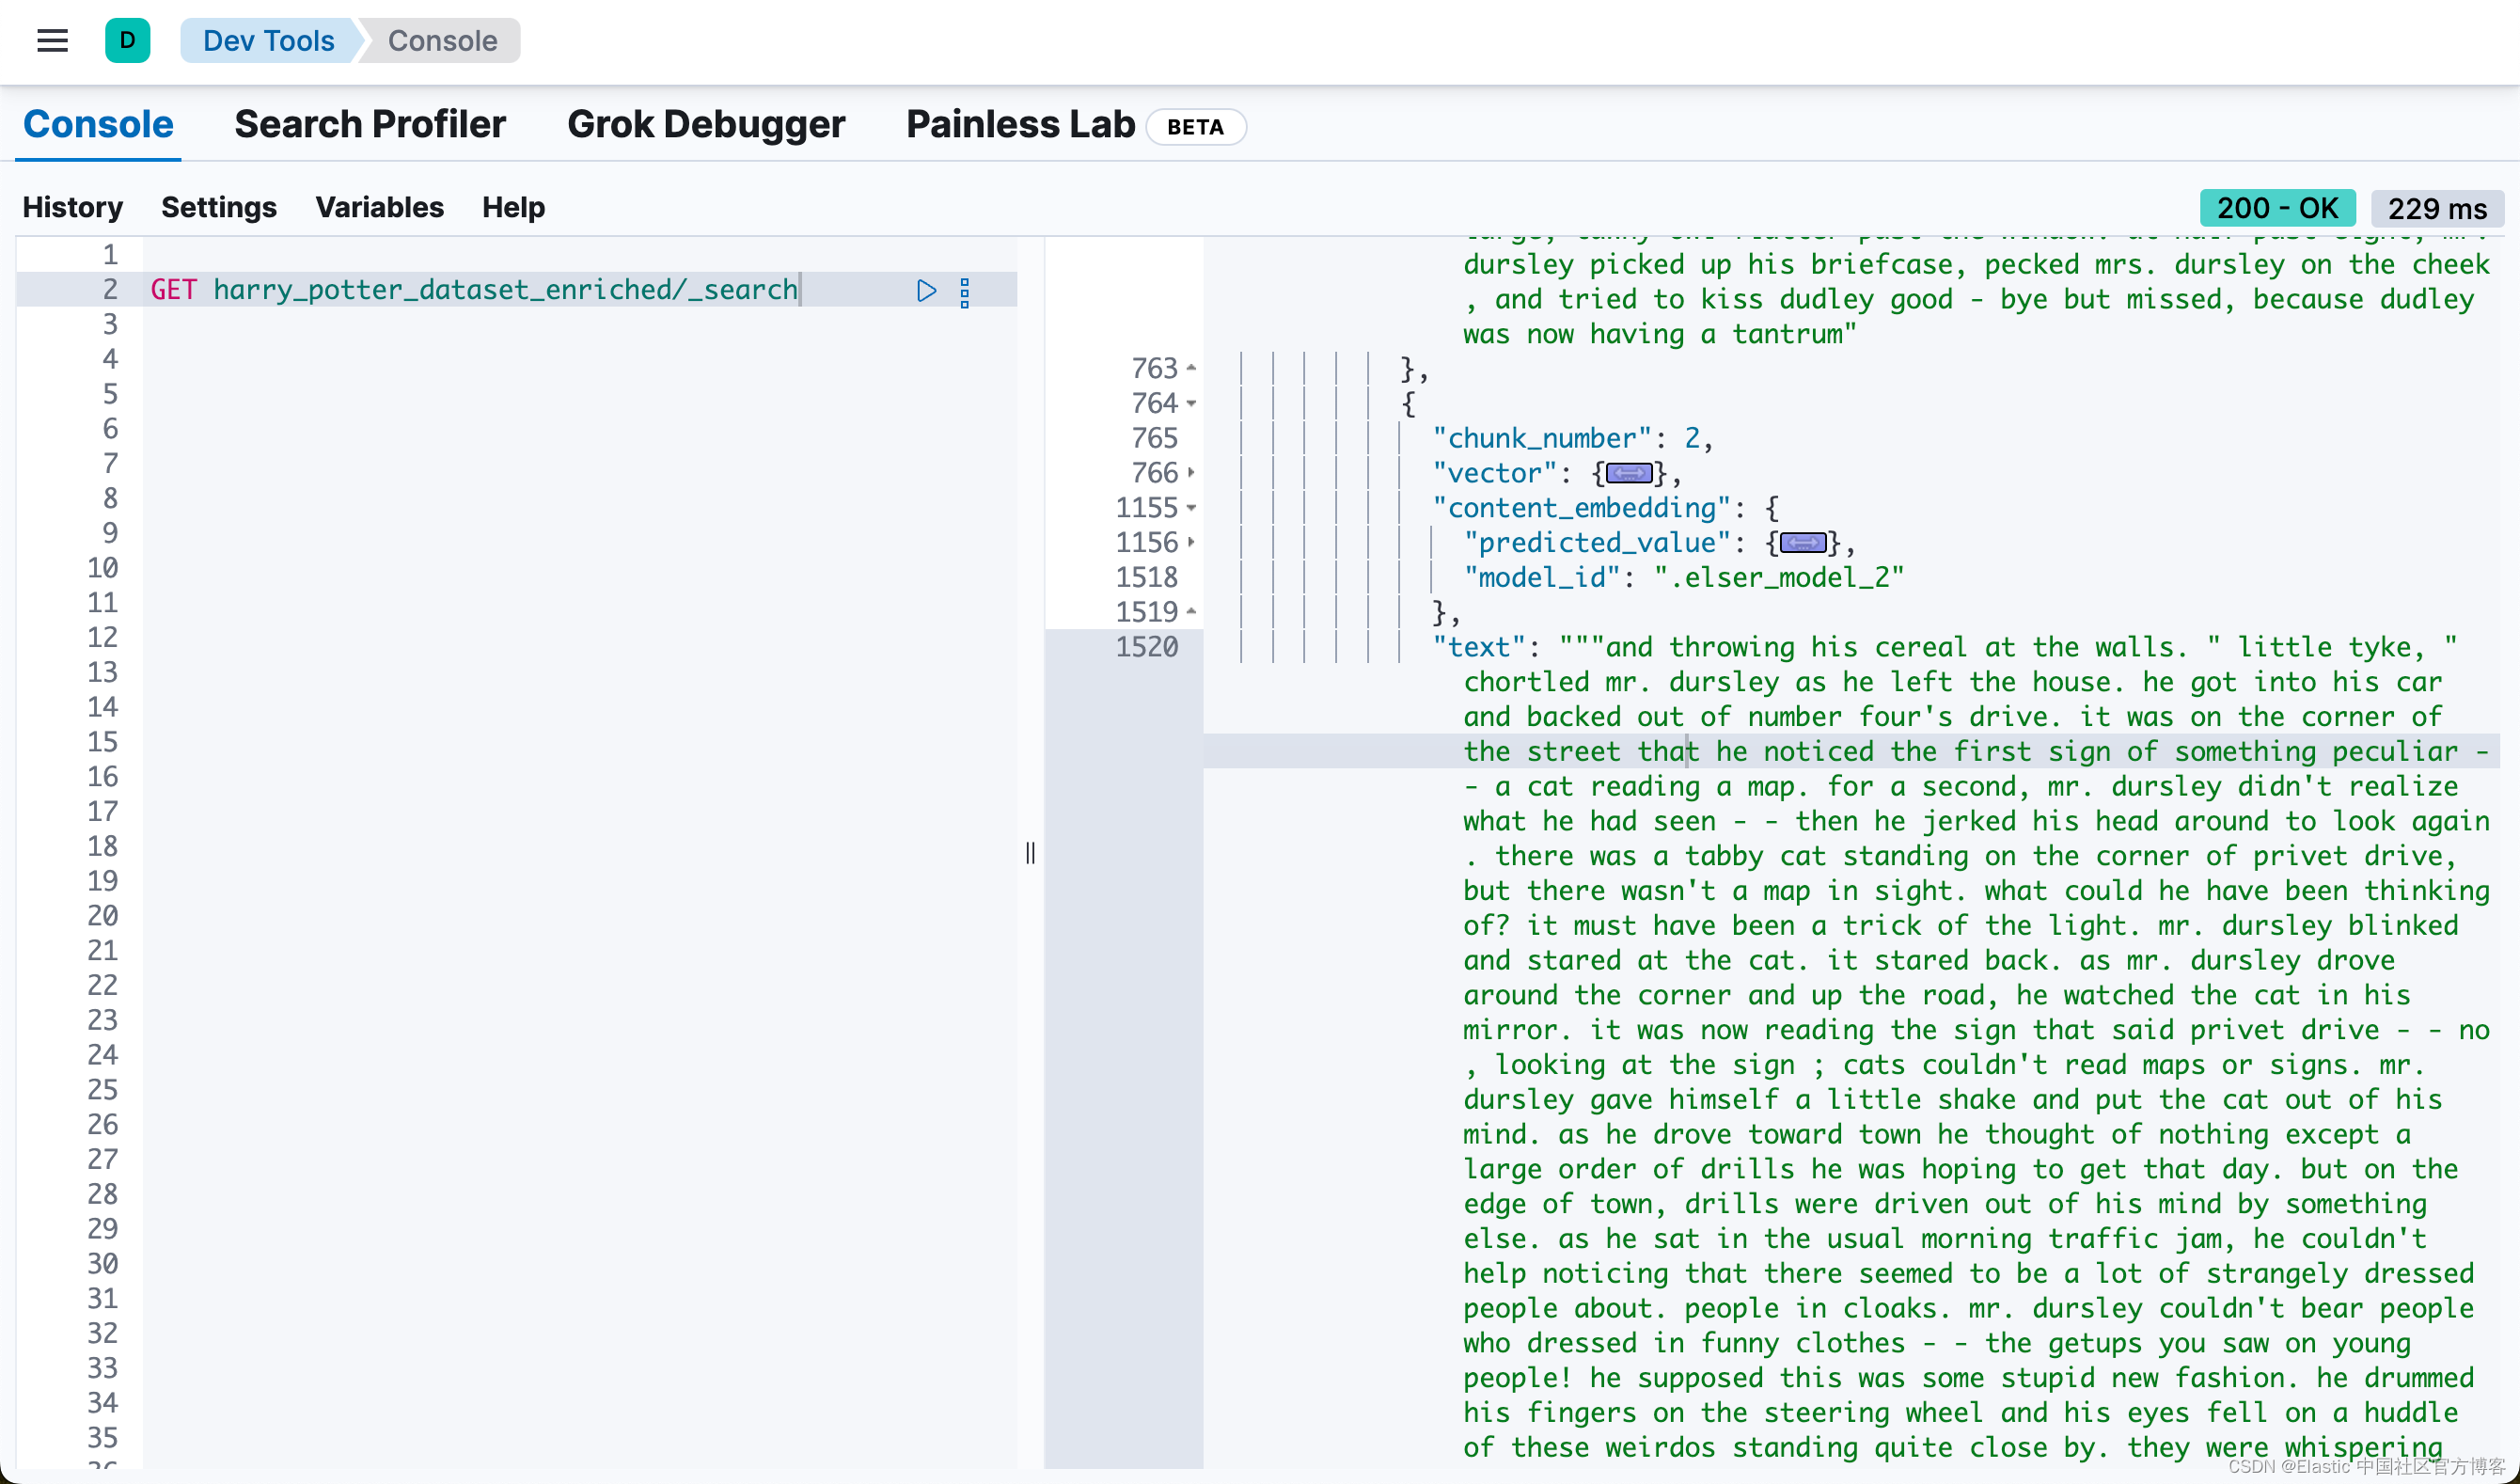
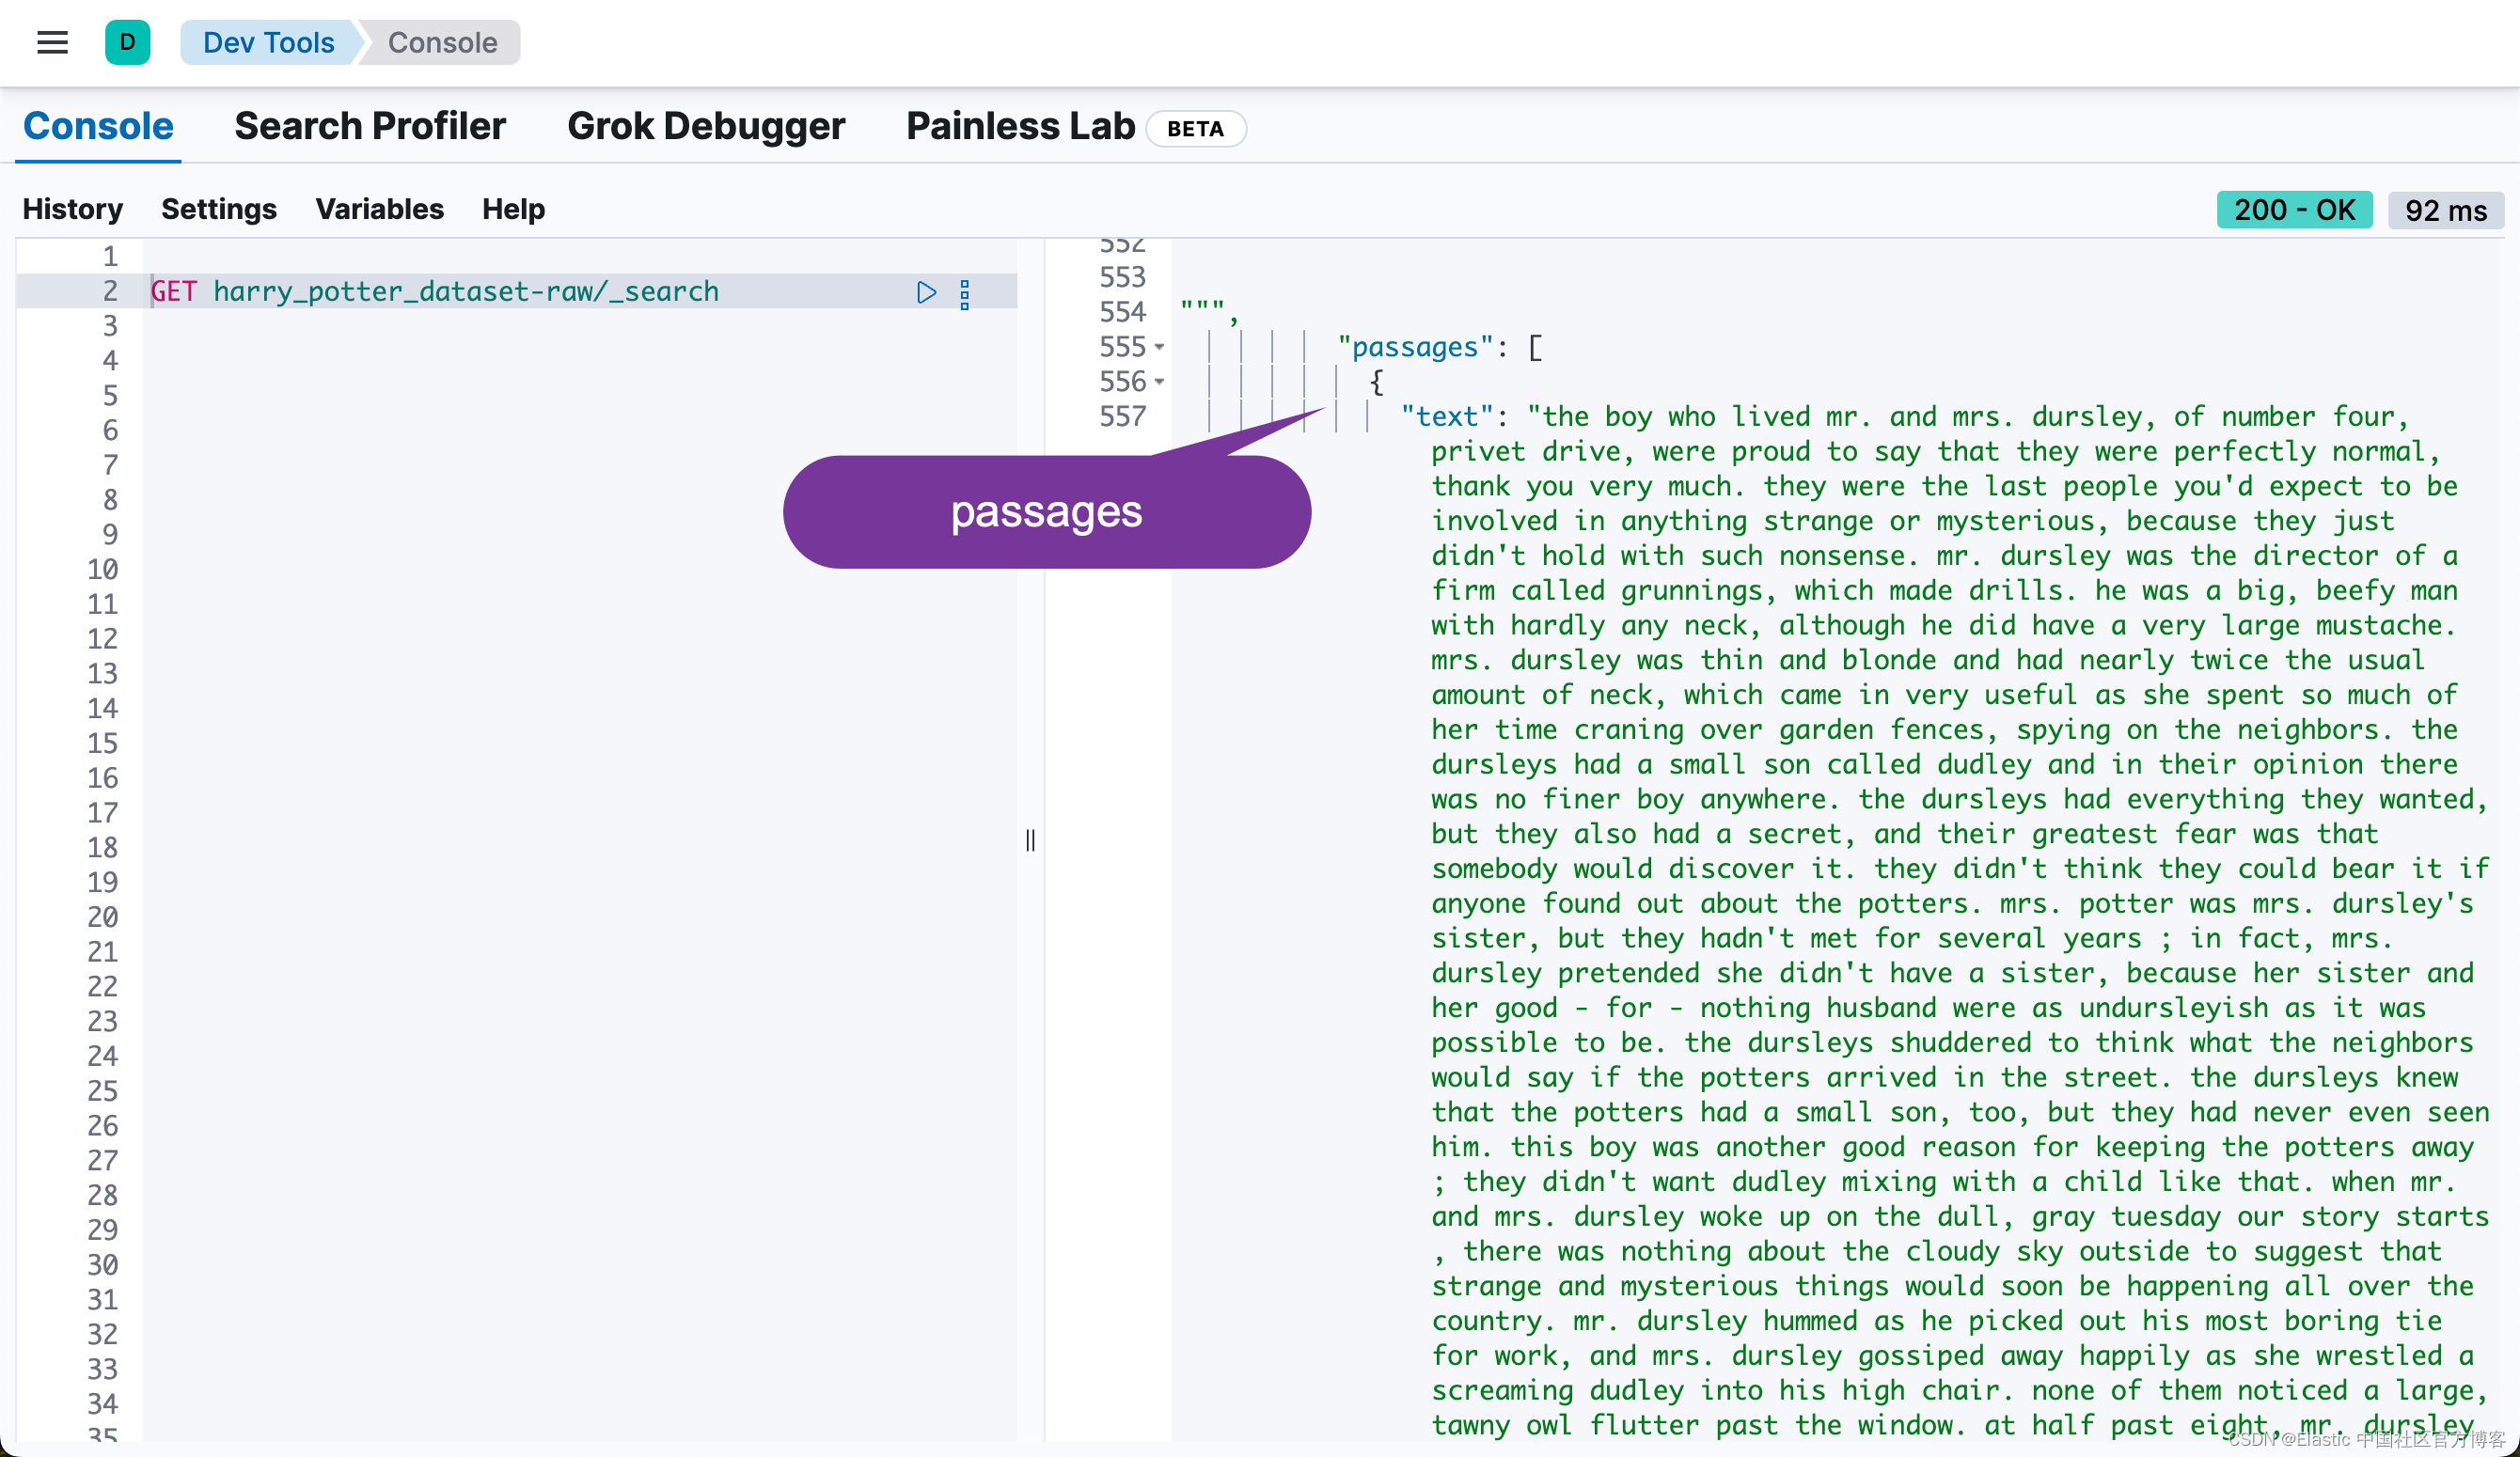
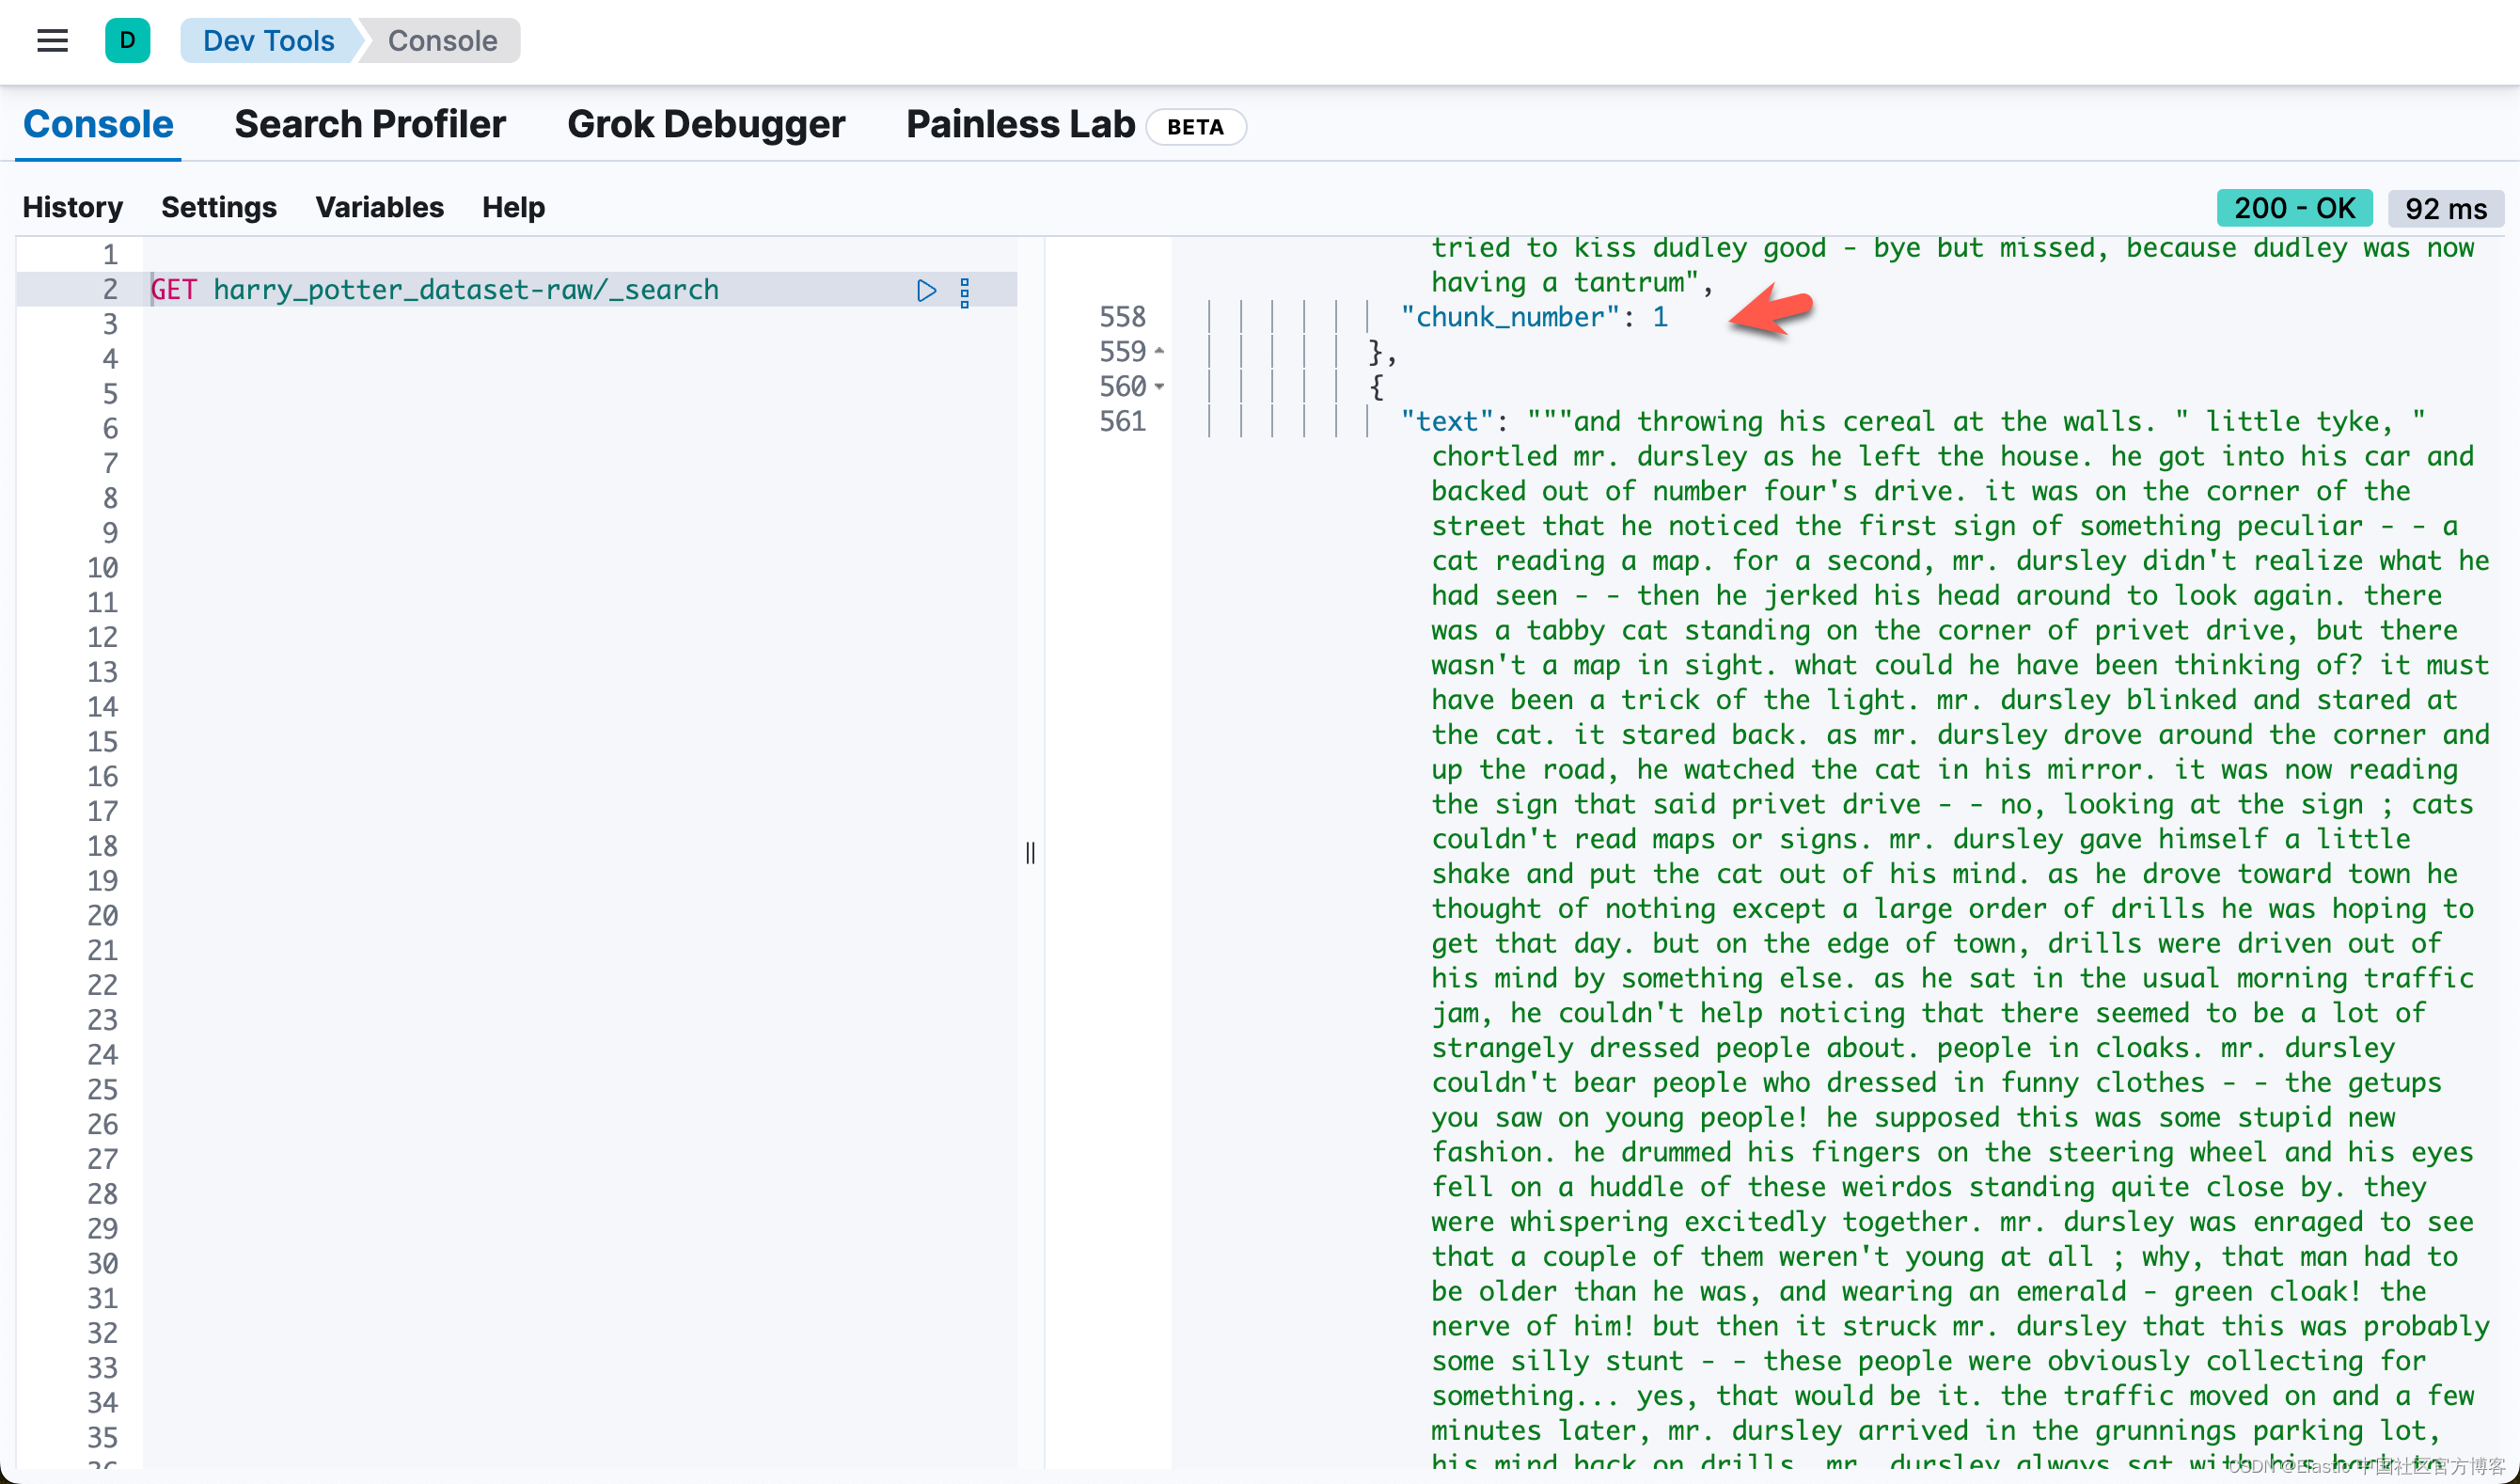
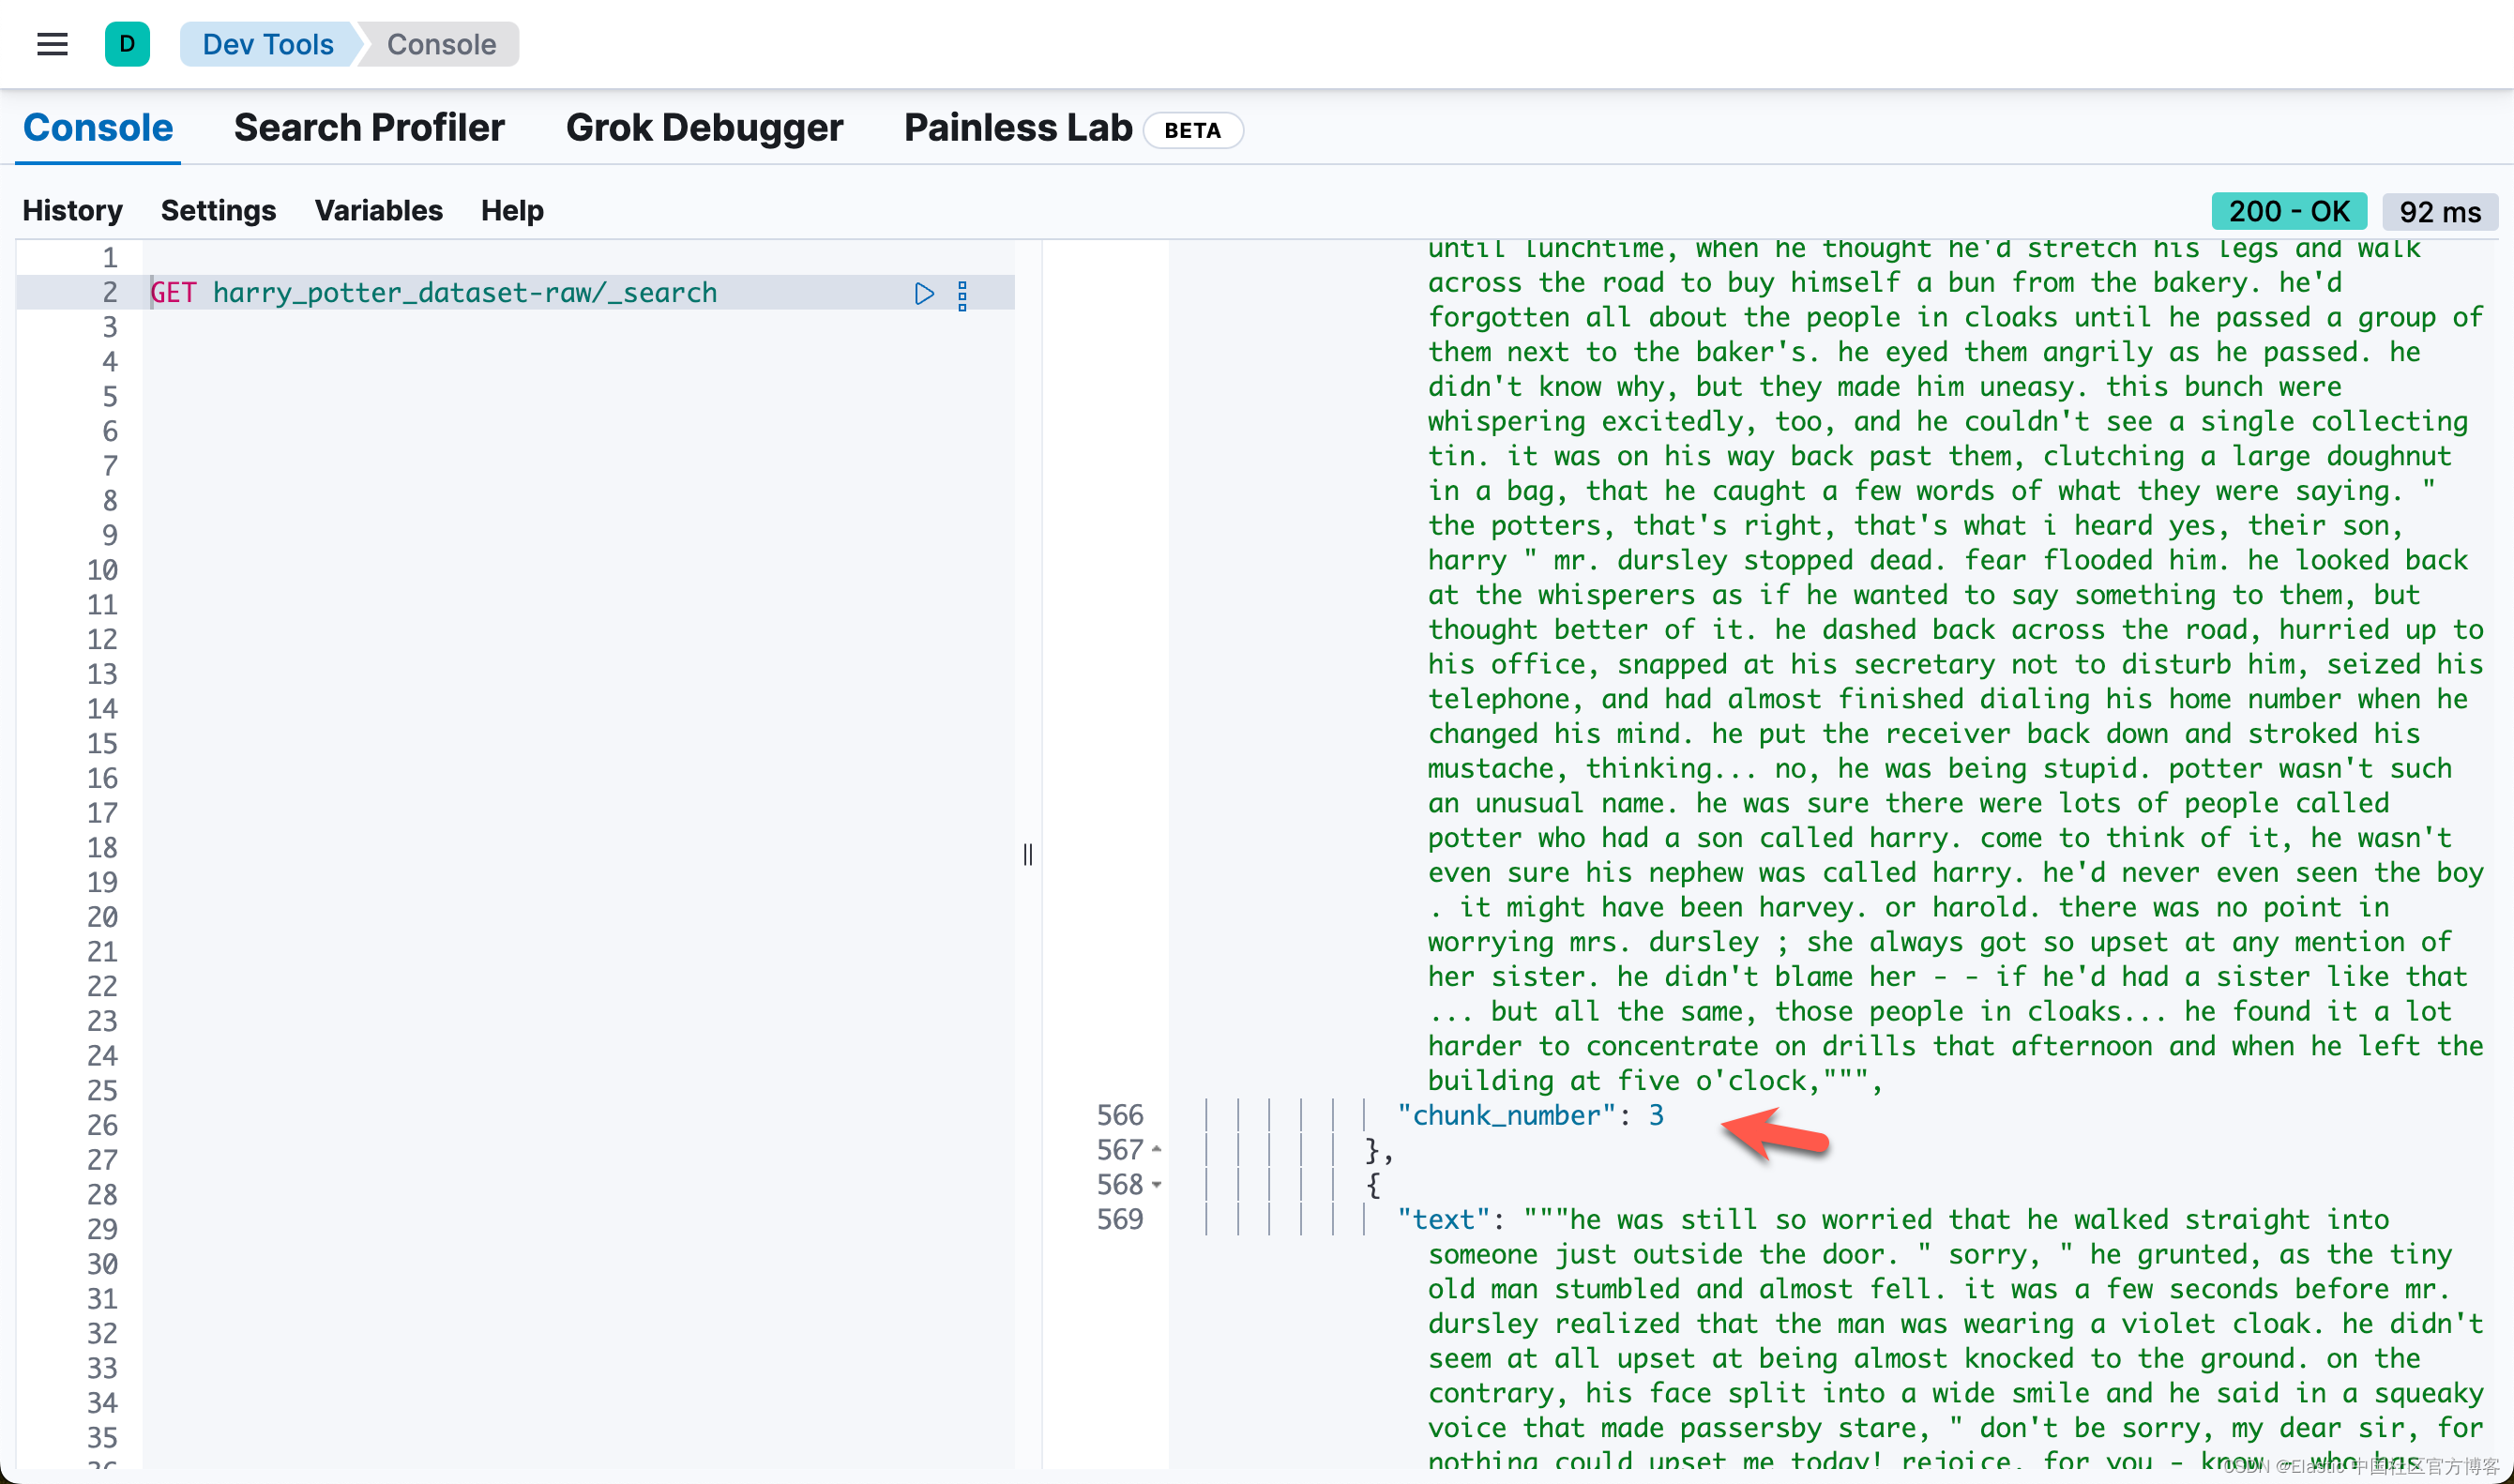
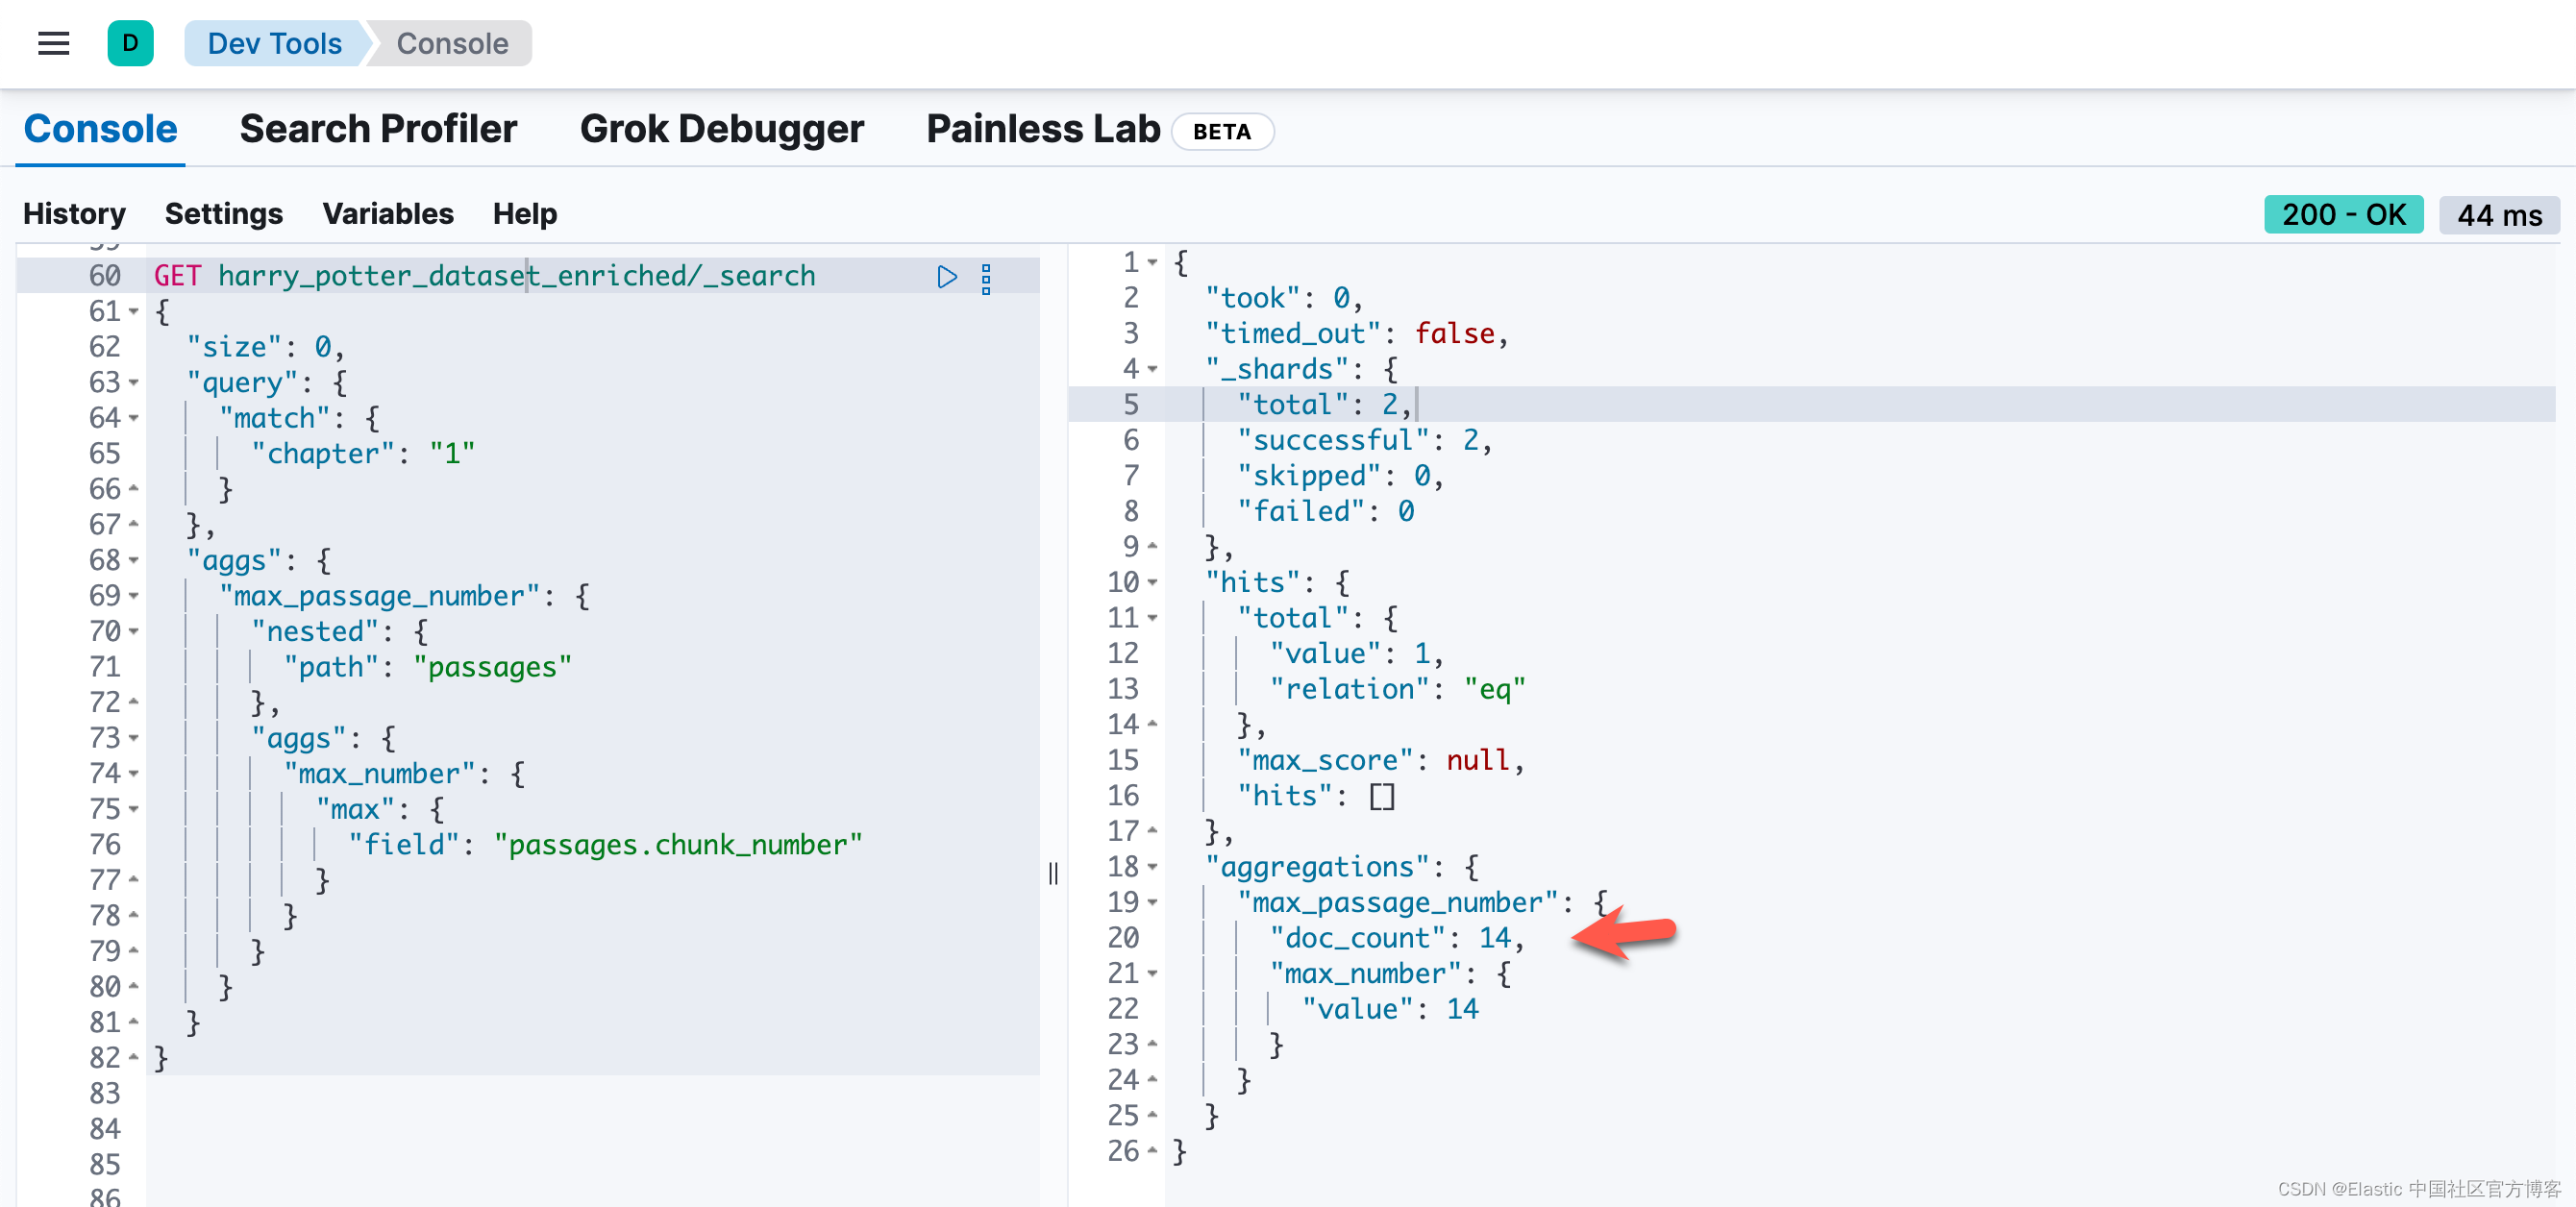
也就是说,同样一个 passage,被同时密集向量化和稀疏向量化。我们可以看到每个 chunk 都是同样的。我们可以通过如下的方法来查看每个 chapter 最多的 chunk 数值:
GET harry_potter_dataset_enriched/_search
{"size": 0,"query": {"match": {"chapter": "1"}},"aggs": {"max_passage_number": {"nested": {"path": "passages"},"aggs": {"max_number": {"max": {"field": "passages.chunk_number"}}}}}
}
或者通过如下的方法来得到各个 chapter 的 passages 数值:
GET harry_potter_dataset_enriched/_search
{"size": 0,"aggs": {"chapter_chunks": {"terms": {"field": "chapter"},"aggs": {"max_passage_number": {"nested": {"path": "passages"},"aggs": {"max_number": {"max": {"field": "passages.chunk_number"}}}}}}}
}
自定义搜索查询的构建和执行
本节在 Elasticsearch 中构建和执行自定义搜索查询,利用结合向量和基于文本的搜索方法的混合方法来提高搜索准确性和相关性。使用的具体示例是关于“Nimbus 2000” 的用户查询。
关键步骤:
- 定义用户查询:将用户查询指定为“what is a nimbus 2000”。
- 设置提升因子:
- knn_boost_factor:用于放大 vector-based 的搜索组件的重要性的值。
- text_expansion_boost:用于修改 text-based 的搜索组件的权重的值。
- 构建查询:build_custom_query 函数构建搜索查询,结合密集向量和文本扩展组件。
- 执行搜索:针对指定的 Elasticsearch 索引执行查询。
- 识别相关段落:
- 分析搜索结果以找到相关性得分最高的段落。
- 捕获并打印最佳匹配段落的 ID 和 chunk 编号。
- 获取周围区块:构建并执行查询以检索与已识别段落相邻的区块,以获得更广泛的上下文。如果匹配的区块是第一个区块,则获取 n、n+1 和 n+2。如果该区块是章节中的最后一区块,则获取 n、n-1 和 n-2。对于其他区块,则获取 n-1、n 和 n+1。
- 显示结果:输出相关和相邻段落的文本。
# Custom Search Query Construction
user_query = "what is a nimbus 2000"knn_boost_factor = 20
text_expansion_boost = 1
query = build_custom_query(build_vector(user_query),user_query,knn_boost_factor,text_expansion_boost,debug=False,
)# Searching and identifying relevant passages
results = esclient.search(index=index_name, body=query, _source=False)hit_id = None
chunk_number = None
chapter_number = None
max_chunk_number = None
max_chapter_chunk_result = None
max_chunk_query = Noneif results and results.get("hits") and results["hits"].get("hits"):highest_score = -1best_hit = Nonehit_id = results["hits"]["hits"][0]["_id"]chapter_number = results["hits"]["hits"][0]["fields"]["chapter"][0]if "inner_hits" in results["hits"]["hits"][0]:for hit_type in ["text_hits", "dense_hit", "sparse_hits"]:if hit_type in results["hits"]["hits"][0]["inner_hits"]:inner_hit = results["hits"]["hits"][0]["inner_hits"][hit_type]["hits"]if inner_hit["hits"]:max_score = inner_hit["max_score"]if max_score and max_score > highest_score:highest_score = max_scorebest_hit = inner_hit["hits"][0]if best_hit:first_passage_text = best_hit["_source"]["text"]chunk_number = best_hit["_source"]["chunk_number"]# print(f"Matched Chunk ID: {hit_id}, Chunk Number: {chunk_number}, Text: {first_passage_text}")print(f"Matched Chunk ID: {hit_id}, Chunk Number: {chunk_number}, Text:\n{textwrap.fill(first_passage_text, width=200)}")print(f"\n")else:print(f"ID: {hit_id}, No relevant passages found.")
else:print("No results found.")# Fetch Surrounding Chunks if chapter_number is not None
if chapter_number is not None:print(f"Fetch Surrounding Chunks")print(f"------------------------")# max_chunk_query = get_max_chunk_number_query(chapter_number, debug=False)# max_chapter_chunk_result = esclient.search(index=index_name, body=max_chunk_query, _source=False)max_chapter_chunk_result = esclient.search(index=index_name,body=get_max_chunk_number_query(chapter_number, debug=False),_source=False,)max_chunk_number = max_chapter_chunk_result["aggregations"]["max_chunk_number"]["max_chunk"]["value"]adjacent_chunks_query = get_adjacent_chunks_query(hit_id, chunk_number, max_chunk_number, debug=False)results = esclient.search(index=index_name, body=adjacent_chunks_query, _source=False)print_text_from_results(results)
else:print("Skipping fetch of surrounding chunks due to no initial results.") 
完整的代码可以在地址 elasticsearch-labs/supporting-blog-content/fetch-surrounding-chunks at main · liu-xiao-guo/elasticsearch-labs · GitHub 进行下载。
相关文章:
Elasticsearch:智能 RAG,获取周围分块(二)
在之前的文章 “Elasticsearch:智能 RAG,获取周围分块(一) ” 里,它介绍了如何实现智能 RAG,获取周围分块。在那个文章里有一个 notebook。为了方便在本地部署的开发者能够顺利的运行那里的 notebook。在本…...

华为---RIP路由协议的汇总
8.3 RIP路由协议的汇总 8.3.1 原理概述 当网络中路由器的路由条目非常多时,可以通过路由汇总(又称路由汇聚或路由聚合)来减少路由条目数,加快路由收敛时间和增强网络稳定性。路由汇总的原理是,同一个自然网段内的不同子网的路由在向外(其他…...

Python基础——字符串常见用法:切片、去空格、替换、拼接
文章目录 专栏导读1、拼接字符串2、获取字符串长度3、字符串切片4、字符串替换:5、字符串分割6、字符串查找7、字符串大小写转换8、字符串去除空白9、字符串格式化:10、字符串编码与解码:11、字符串判断12、字符串填充与对齐总结 专栏导读 &a…...

LeetCode.51N皇后详解
问题描述 按照国际象棋的规则,皇后可以攻击与之处在同一行或同一列或同一斜线上的棋子。 n 皇后问题 研究的是如何将 n 个皇后放置在 nn 的棋盘上,并且使皇后彼此之间不能相互攻击。 给你一个整数 n ,返回所有不同的 n 皇后问题 的解决方案…...
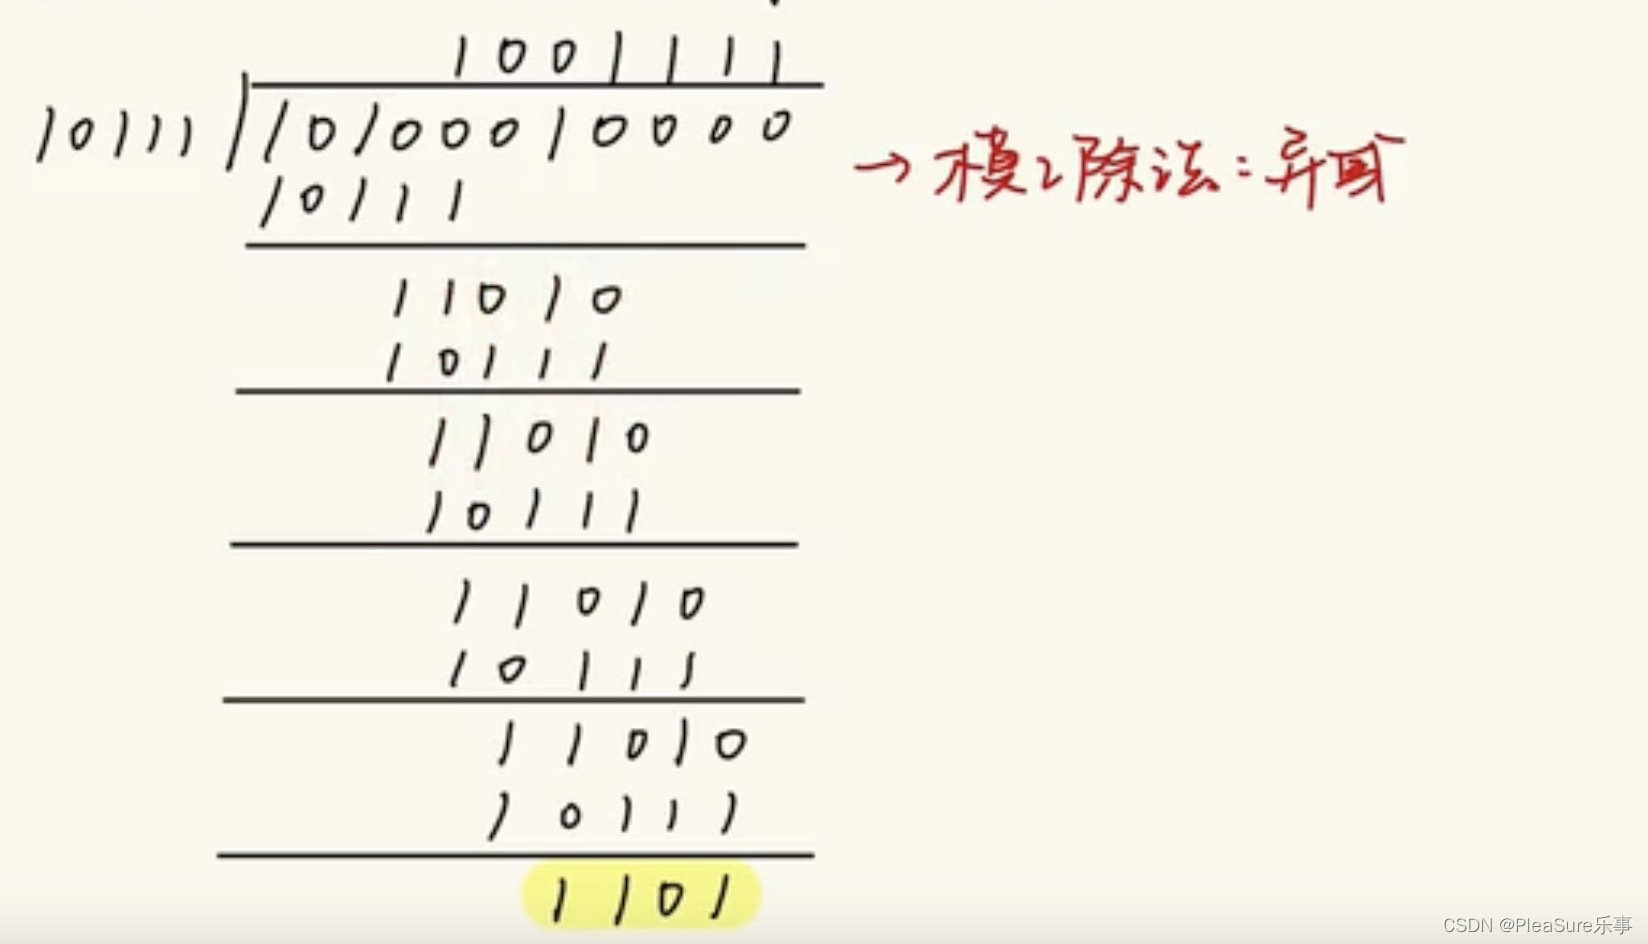
计算机网络之奇偶校验码和CRC冗余校验码
今天我们来看看有关于计算机网络的知识——奇偶校验码和CRC冗余校验码,这两种检测编码的方式相信大家在计算机组成原理当中也有所耳闻,所以今天我就来跟大家分享有关他们的知识。 奇偶校验码 奇偶校验码是通过增加冗余位使得码字中1的个数恒为奇数或偶数…...
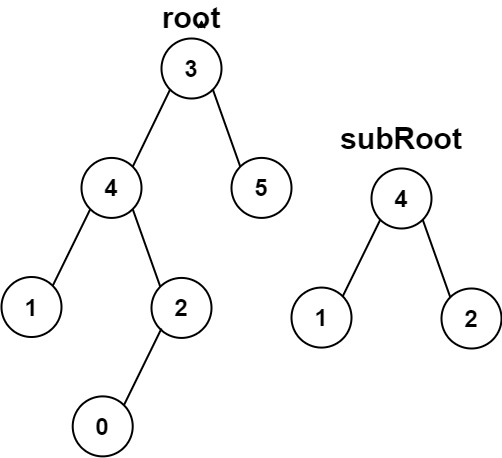
二叉树经典OJ练习
个人主页:C忠实粉丝 欢迎 点赞👍 收藏✨ 留言✉ 加关注💓本文由 C忠实粉丝 原创 二叉树经典OJ练习 收录于专栏【数据结构初阶】 本专栏旨在分享学习数据结构学习的一点学习笔记,欢迎大家在评论区交流讨论💌 目录 前置说…...

【OpenHarmony4.1 之 U-Boot 2024.07源码深度解析】008 - make distclean 命令解析
【OpenHarmony4.1 之 U-Boot 2024.07源码深度解析】008 - make distclean 命令解析 一、make V=1 distclean 命令解析系列文章汇总:《【OpenHarmony4.1 之 U-Boot 源码深度解析】000 - 文章链接汇总》 本文链接:《【OpenHarmony4.1 之 U-Boot 2024.07源码深度解析】008 - mak…...
QTreeView双击任意列展开
一.效果 二.原理 重点是如何通过其他列的QModelIndex(假设为index),获取第一列的QModelIndex(假设为firstColumnIndex)。代码如下所示: QModelIndex firstColumnIndex = model->index(index.row(), 0, index.parent()); 这里要注意index函数的第三个参数,第三个参…...
Linux入门攻坚——26、Web Service基础知识与httpd配置-2
http协议 URL:Uniform Resource Locator,统一资源定位符 URL方案:scheme,如http://,https:// 服务器地址:IP:port 资源路径: 示例:http://www.test.com:80/bbs/…...

相由心生与事出反常必有妖
从端午节之日生病起,已就医三次,快半个月了。医检的结论是老病复发—— 上呼吸道感染 。原本并无大碍,加之“水不在深,有龙则灵”的张龙医生处方得当,现已病情好转。只是“800727”趁人之危,兴灾乐祸地欲从…...

微信小程序---支付
一、判断是否登录 如果没有登录,走前端登录流程,不再赘述 二、获取订单编号 跟自己的后端商议入参,然后获取订单编号 三、通过订单编号获取wx.requestPayment()需要的参数 获取订单编号再次请求后端接口,拿到wx.requestPayme…...
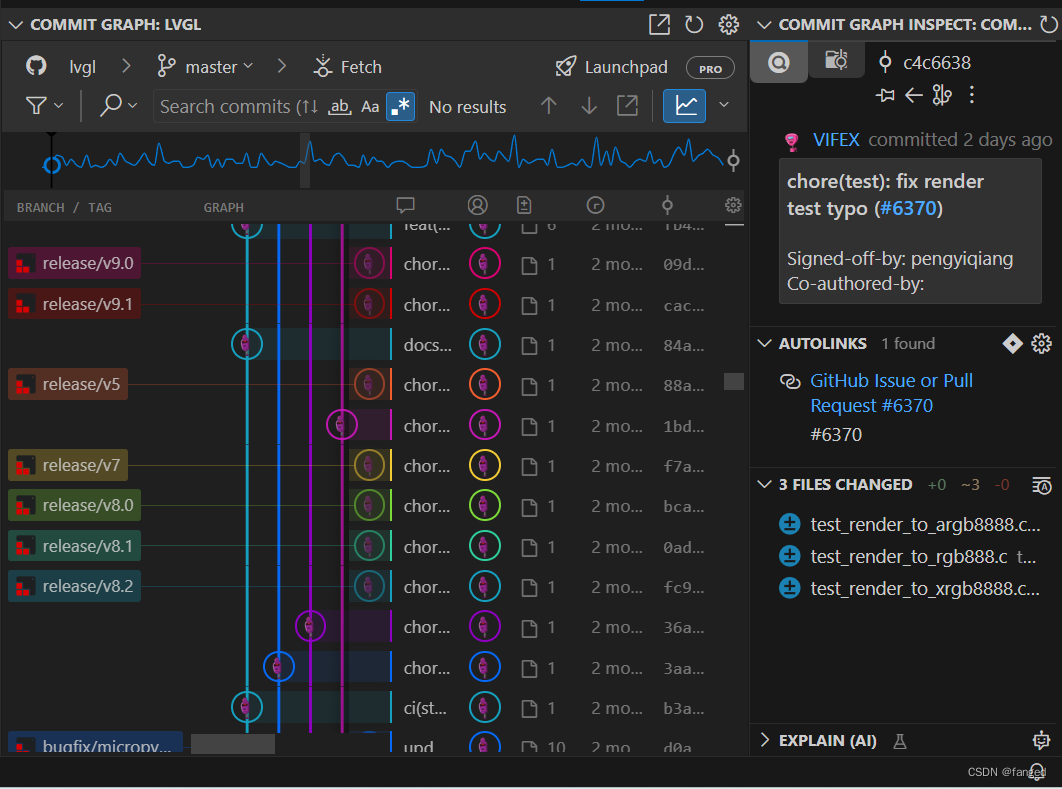
Git学习2 -- VSCode中的Git
看了下,主要的插件有3个。自带的Source Control。第1个是Gitlens,第2个是Git Graph。第三个还有个git history。 首先是Source Control。界面大概是这样的。 还是挺直观的。在第一栏source control,可以进行基本的git操作。主要的git操作都是…...

VC++支持断点续下或续传的功能
VC使用多线程和Socket实现断点续下 一、断点续下的基本原理: 1.断点续传的理解可以分为两部分:一部分是断点,一部分是续传。断点的由来是在下载过程中,将一个下载文件分成了多个部分,同时进行多个部分一起的下载&…...
机器学习数学原理专题——线性分类模型:损失函数推导新视角——交叉熵
目录 二、从回归到线性分类模型:分类 3.分类模型损失函数推导——极大似然估计法 (1)二分类损失函数——极大似然估计 (2)多分类损失函数——极大似然估计 4.模型损失函数推导新视角——交叉熵 (1&#x…...
windows和linux路径斜杆转换脚本,打开即用
前言: windows和linux的目录路径斜杆是相反的,在ssh或者其他什么工具在win和ubuntu传文件时候经常需要用到两边的路径,有这个工具就不用手动去修改斜杆反斜杠了。之前有个在线网站,后来挂了,就想着自己搞一个脚本来用。…...

在Android系统中,查看apk安装路径
在Android系统中,应用通常安装在内部存储的特定目录下。要找到已安装应用的路径,可以通过ADB(Android Debug Bridge)工具来查询。以下是一些步骤和命令,可以帮助你找到应用的安装路径: 使用pm list package…...

管理不到位,活该执行力差?狠抓这4点要素,强化执行力
管理不到位,活该执行力差?狠抓这4点要素,强化执行力 一:强化制度管理 1、权责分明,追责管理 要知道,规章制度其实就是一种“契约”。 在制定制度和规则的时候,民主一点,征求团队成员…...

应届毕业之本科简历制作
因为毕设以及编制岗位面试,最近好久没有更新了,刚好有同学问如何制作简历,我就准备将我自己制作简历的流程分享给各位,到此也算是一个小的结束,拿了工科学位证书毕业去做🐂🐎了。 简历主要包含内…...
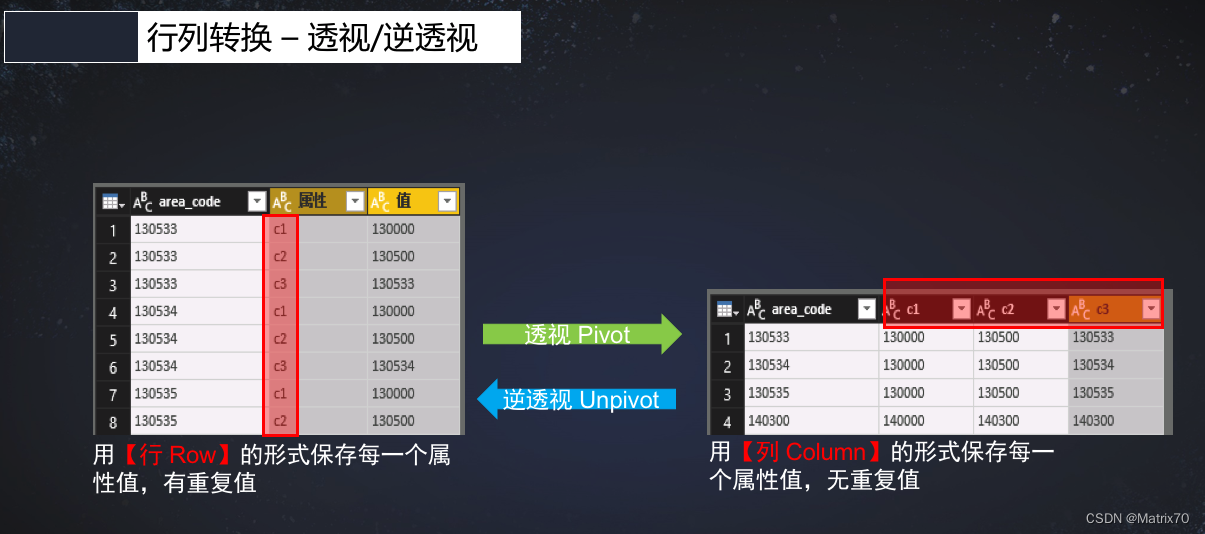
SparkOnHive_列转行、行转列生产操作(透视和逆透视)
前言 行专列,列转行是数开不可避免的一步,尤其是在最初接触Hive的时候,看到什么炸裂函数,各种udf,有点发憷,无从下手,时常产生这t怎么搞,我不会啊? 好吧ÿ…...

【人机交互 复习】第2章 Hadoop
一、概念 1.Hadoop 是一个能够对大量数据进行分布式处理的软件框架,并 且是以一种可靠、高效、可伸缩的方式进行处理的, 2.特点: 高可靠性,高效性,高可扩展性,高容错性 运行在Linux平台上,支持…...

3分钟告别浏览器Markdown阅读困境:这款扩展如何重塑你的技术文档体验
3分钟告别浏览器Markdown阅读困境:这款扩展如何重塑你的技术文档体验 【免费下载链接】markdown-viewer Markdown Viewer / Browser Extension 项目地址: https://gitcode.com/gh_mirrors/ma/markdown-viewer 你是否曾面对浏览器中杂乱的Markdown源代码感到困…...

告别网络瓶颈:手把手教你用K8s RDMA Device Plugin和SR-IOV CNI搭建超低延迟通信栈
云原生时代的超高速通信:基于K8s RDMA与SR-IOV的实战架构设计 当分布式AI训练任务因为网络延迟导致GPU利用率不足50%,当金融高频交易系统因TCP协议栈开销错过最佳套利窗口,传统网络架构已成为性能瓶颈的罪魁祸首。本文将揭示如何通过RDMA&…...

LVGUI字体瘦身实战:如何为你的IoT设备定制一个超小的中文字体库
LGVUI字体瘦身实战:为IoT设备定制超小中文字体库的工程化解决方案 在嵌入式物联网设备开发中,每一KB的Flash和RAM都弥足珍贵。当你的智能温控器需要显示"当前温度:25℃"或者电子秤要呈现"净重:0.5kg"时&#…...

Flutter GetX实战:从Provider迁移到GetX,我的开发效率提升了多少?
Flutter GetX实战:从Provider迁移到GetX的效率革命 当Flutter开发团队面临状态管理方案的选择时,往往会陷入一种甜蜜的烦恼——官方推荐的Provider虽然稳定可靠,但第三方库GetX却以"全家桶"式的解决方案不断吸引开发者的目光。作为…...

QMCFLAC2MP3终极指南:免费快速解锁QQ音乐格式限制
QMCFLAC2MP3终极指南:免费快速解锁QQ音乐格式限制 【免费下载链接】qmcflac2mp3 直接将qmcflac文件转换成mp3文件,突破QQ音乐的格式限制 项目地址: https://gitcode.com/gh_mirrors/qm/qmcflac2mp3 你是否曾经在QQ音乐下载了心爱的歌曲࿰…...

Godot卡牌游戏框架终极指南:3小时从零构建专业级卡牌游戏
Godot卡牌游戏框架终极指南:3小时从零构建专业级卡牌游戏 【免费下载链接】godot-card-game-framework A framework which comes with prepared scenes and classes to kickstart your card game, as well as a powerful scripting engine to use to provide full r…...

Thorium浏览器深度解析:5个核心优势与进阶配置实战
Thorium浏览器深度解析:5个核心优势与进阶配置实战 【免费下载链接】thorium Chromium fork named after radioactive element No. 90. Source code and Linux releases. Windows/MacOS/ARM builds served in different repos, links are towards the top of the RE…...

10分钟掌握Autovisor:智慧树网课自动化学习的完整解决方案
10分钟掌握Autovisor:智慧树网课自动化学习的完整解决方案 【免费下载链接】Autovisor 2025智慧树刷课脚本 基于Python Playwright的自动化程序 [有免安装版] 项目地址: https://gitcode.com/gh_mirrors/au/Autovisor 还在为繁重的智慧树网课任务而烦恼吗&am…...

从TPM到机密计算:远程证明技术原理与zap1项目实践指南
1. 项目概述与核心价值最近在整理一些零散的学习笔记时,发现了一个挺有意思的项目,叫Frontier-Compute/zap1-learning-attestation。乍一看这个标题,可能有点让人摸不着头脑,尤其是对于刚接触可信计算或者硬件安全领域的朋友来说。…...

Unity游戏开发集成MCP协议:AI助手自动化操作指南
1. 项目概述:Unity游戏开发中的MCP革命如果你是一名Unity开发者,最近可能已经注意到一个名为“CoderGamester/mcp-unity”的项目在GitHub上悄然走红。这不仅仅是一个普通的插件或工具包,它代表了一种全新的工作流范式,旨在将大型语…...