高并发线程池设计Nginx线程池源码剖析
为什么我们需要线程池?Why?
省流:
为了解决:
1.访问磁盘速度慢
2.等待设备工作
3.....
我们使用多线程技术,在IO繁忙的时候优先处理别的任务
为了解决多线程的缺陷:
1.创建、销毁线程时间消耗大
2.创建线程太多使系统资源不足或者线程频繁切换耗时太多
我们采用了线程池技术
线程池
两个主要组成部分
任务队列(类比银行客户)、线程池(类比银行窗口)
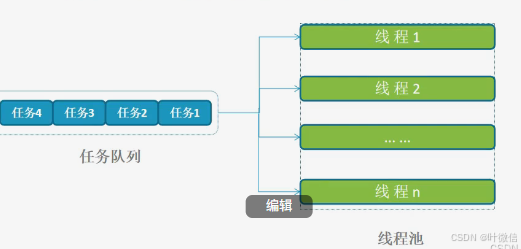
工作流程
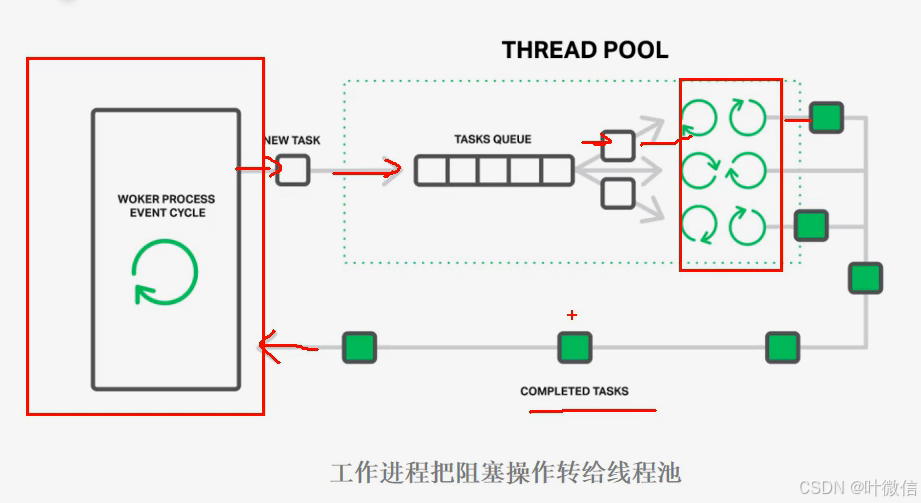
1.工作进程碰到需要"阻塞"的操作
2.将操作放进任务队列
3.空闲进程处理任务队列中的任务
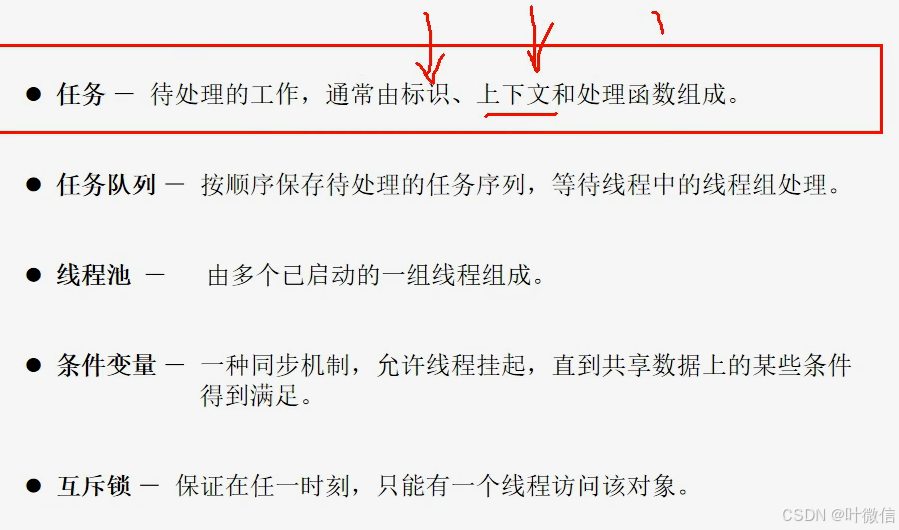
核心组件
Nginx线程池源码剖析
thread_pool.h
完成任务、任务队列、线程池的结构定义
#ifndef _THREAD_POOL_H_INCLUDED_
#define _THREAD_POOL_H_INCLUDED_#include "thread.h"#define DEFAULT_THREADS_NUM 4 //默认线程数
#define DEFAULT_QUEUE_NUM 65535 //默认任务队列长度typedef unsigned long atomic_uint_t;
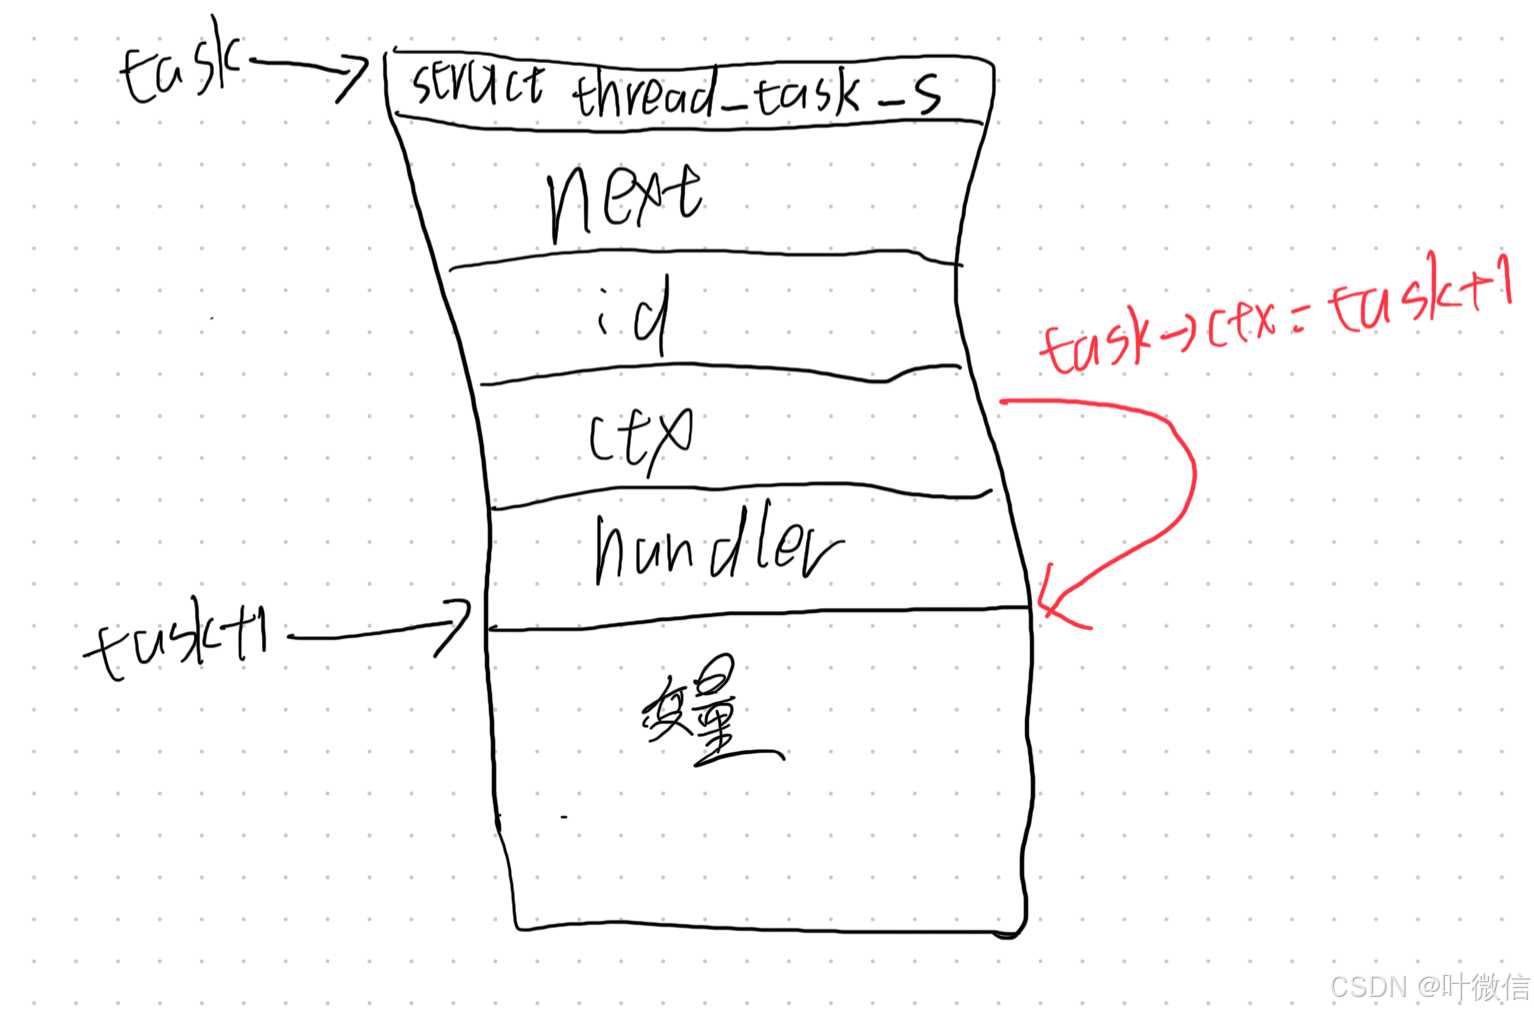
typedef struct thread_task_s thread_task_t;//线程任务
typedef struct thread_pool_s thread_pool_t;//线程池struct thread_task_s {thread_task_t *next;uint_t id;//标识void *ctx;//上下文 指向执行函数参数的起始地址void (*handler)(void *data);//指向空闲线程要执行的函数
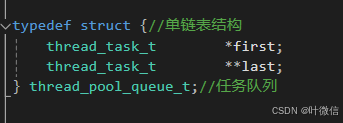
};typedef struct {//单链表结构thread_task_t *first;thread_task_t **last;
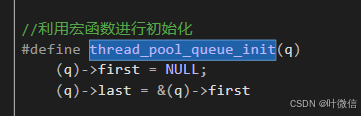
} thread_pool_queue_t;//任务队列//利用宏函数进行初始化
#define thread_pool_queue_init(q) \(q)->first = NULL; \(q)->last = &(q)->firststruct thread_pool_s {pthread_mutex_t mtx;//线程池的互斥锁thread_pool_queue_t queue;//任务队列int_t waiting;//任务队列中的任务数pthread_cond_t cond;//条件变量char *name;//线程池名字uint_t threads;//线程数量int_t max_queue;//最大队列长度
};thread_task_t *thread_task_alloc(size_t size);
int_t thread_task_post(thread_pool_t *tp, thread_task_t *task);
thread_pool_t* thread_pool_init();
void thread_pool_destroy(thread_pool_t *tp);#endif /* _THREAD_POOL_H_INCLUDED_ */
thread_pool.c
thread_pool_init函数——线程池初始化
作用:线程池初始化
thread_pool_t* thread_pool_init()
{int             err;pthread_t       tid;uint_t          n;pthread_attr_t  attr;thread_pool_t   *tp=NULL;tp = calloc(1,sizeof(thread_pool_t));if(tp == NULL){fprintf(stderr, "thread_pool_init: calloc failed!\n");}thread_pool_init_default(tp, NULL);thread_pool_queue_init(&tp->queue);if (thread_mutex_create(&tp->mtx) != OK) {free(tp);return NULL;}if (thread_cond_create(&tp->cond) != OK) {(void) thread_mutex_destroy(&tp->mtx);free(tp);return NULL;}err = pthread_attr_init(&attr);if (err) {fprintf(stderr, "pthread_attr_init() failed, reason: %s\n",strerror(errno));free(tp);return NULL;}err = pthread_attr_setdetachstate(&attr, PTHREAD_CREATE_DETACHED);if (err) {fprintf(stderr, "pthread_attr_setdetachstate() failed, reason: %s\n",strerror(errno));free(tp);return NULL;}for (n = 0; n < tp->threads; n++) {err = pthread_create(&tid, &attr, thread_pool_cycle, tp);if (err) {fprintf(stderr, "pthread_create() failed, reason: %s\n",strerror(errno));free(tp);return NULL;}}(void) pthread_attr_destroy(&attr);return tp;
}
剖析
tp = calloc(1,sizeof(thread_pool_t));
为线程池分配内存
thread_pool_init_default(tp, NULL);
执行默认的初始化(设置默认线程数、任务队列最大长度、线程池名字)
thread_pool_init_default代码如下:
static int_t
thread_pool_init_default(thread_pool_t *tpp, char *name)
{if(tpp){tpp->threads = DEFAULT_THREADS_NUM;//设置默认线程数tpp->max_queue = DEFAULT_QUEUE_NUM;//设置任务队列最大长度tpp->name = strdup(name?name:"default");//设置线程名字if(debug)fprintf(stderr,"thread_pool_init, name: %s ,threads: %lu max_queue: %ld\n",tpp->name, tpp->threads, tpp->max_queue);return OK;}return ERROR;
}
回到thread_pool_init:
thread_pool_queue_init(&tp->queue);用宏函数初始化任务队列
回到thread_pool_init:
创建互斥锁和条件变量,代码如下
if (thread_mutex_create(&tp->mtx) != OK) {free(tp);return NULL;
}if (thread_cond_create(&tp->cond) != OK) {(void) thread_mutex_destroy(&tp->mtx);free(tp);return NULL;
}
对线程属性进行初始化,在线程创建时将其属性设为分离态(detached):父线程使用thread_join 无法等待到结束了的子进程,代码如下:
err = pthread_attr_init(&attr);if (err) {fprintf(stderr, "pthread_attr_init() failed, reason: %s\n",strerror(errno));free(tp);return NULL;}err = pthread_attr_setdetachstate(&attr, PTHREAD_CREATE_DETACHED);if (err) {fprintf(stderr, "pthread_attr_setdetachstate() failed, reason: %s\n",strerror(errno));free(tp);return NULL;}创建线程并消费属性变量(属性已经设置到线程中了,属性变量就没用了),为每个线程设置的任务为thread_pool_cycle(下面介绍)
 for (n = 0; n < tp->threads; n++) {err = pthread_create(&tid, &attr, thread_pool_cycle, tp);if (err) {fprintf(stderr, "pthread_create() failed, reason: %s\n",strerror(errno));
free(tp);return NULL;}}(void) pthread_attr_destroy(&attr);
thread_pool_cycle函数——每个线程的生命周期
完整代码
static void *
thread_pool_cycle(void *data)
{thread_pool_t *tp = data;int                 err;thread_task_t       *task;if(debug)fprintf(stderr,"thread in pool \"%s\" started\n", tp->name);for ( ;; ) {if (thread_mutex_lock(&tp->mtx) != OK) {return NULL;}tp->waiting--;while (tp->queue.first == NULL) {if (thread_cond_wait(&tp->cond, &tp->mtx)!= OK){(void) thread_mutex_unlock(&tp->mtx);return NULL;}}task = tp->queue.first;tp->queue.first = task->next;if (tp->queue.first == NULL) {tp->queue.last = &tp->queue.first;}if (thread_mutex_unlock(&tp->mtx) != OK) {return NULL;}if(debug) fprintf(stderr,"run task #%lu in thread pool \"%s\"\n",task->id, tp->name);task->handler(task->ctx);if(debug) fprintf(stderr,"complete task #%lu in thread pool \"%s\"\n",task->id, tp->name);task->next = NULL;//notify }
}
剖析
进入for循环,尝试对任务队列上锁(因为任务队列是临界资源,访问任务队列前要上锁)
代码如下:
for ( ;; ) {if (thread_mutex_lock(&tp->mtx) != OK) {return NULL;}线程拿到锁之后,使得等待任务数量-1,并调用thread_con_wait函数等待条件变量,并挂起进程,代码如下:
while (tp->queue.first == NULL) {if (thread_cond_wait(&tp->cond, &tp->mtx)!= OK){(void) thread_mutex_unlock(&tp->mtx);return NULL;}
}
thread_pool_cycle和thread_task_post的同步机制cle
thread_cond_wait执行之后,线程会被挂起,并且对tp->mtx进行解锁;
那么什么时候将线程唤醒呢?——在thread_task_post中
thread_task_post的作用是将任务挂载到任务队列中,thread_task_post首先会对线程池进行上锁,然后对task进行初始化,然后唤醒等待条件变量的线程,注意此时cycle线程还不能往下执行,因为thread_task_post已经获得了锁,只有在thread_task_post将任务挂载到队列上并解锁后,cycle才能从thread_cond_wati往下执行。
thread_task_post代码如下:
int_t
thread_task_post(thread_pool_t* tp, thread_task_t* task)
{if (thread_mutex_lock(&tp->mtx) != OK) {return ERROR;}/*此部分对任务属性进行初始化*/if (thread_cond_signal(&tp->cond) != OK) {(void)thread_mutex_unlock(&tp->mtx);return ERROR;}//将任务挂在到任务队列上*tp->queue.last = task;tp->queue.last = &task->next;tp->waiting++;(void)thread_mutex_unlock(&tp->mtx);//对线程池进行解锁/*函数返回*/}
回到thread_pool_init剩下的代码:
task = tp->queue.first;
tp->queue.first = task->next;if (tp->queue.first == NULL) {tp->queue.last = &tp->queue.first;
}if (thread_mutex_unlock(&tp->mtx) != OK) {return NULL;
}if(debug) fprintf(stderr,"run task #%lu in thread pool \"%s\"\n",task->id, tp->name);task->handler(task->ctx);if(debug) fprintf(stderr,"complete task #%lu in thread pool \"%s\"\n",task->id, tp->name);task->next = NULL;//notify
获取任务队列中的任务后进行解锁 (从thread_cond_wati返回时进行了解锁),执行函数handler,结束.....
thread_task_alloc函数——为任务分配内存
作用:为任务分配内存,内存包括两部分:任务结构体所占内存、任务函数的参数所占内存。
thread_task_t *
thread_task_alloc(size_t size)
{thread_task_t  *task;task = calloc(1,sizeof(thread_task_t) + size);if (task == NULL) {return NULL;}task->ctx = task + 1;//ctx指向任务执行函数参数的起始地址return task;
}
传入的参数size用来指定任务的执行函数的参数的大小
task = calloc(1,sizeof(thread_task_t) + size);
为任务分配内存,内存大小为任务结构体大小+参数的大小
task->ctx = task + 1;//tast->ctx指向任务函数参数的起始地址
task指针指向的是任务结体存储的起始地址,task+1表示向下偏移一个thread_task_t的长度,
也就是说task+1指向的是函数变量的起始地址,如图所示
创建任务并传参示例
#include "thread_pool.h"struct test {int arg1;int arg2;
};void task_handler3(void* data) {static int index = 0;struct test* t = (struct test*)data;printf("Hello, this is 3th test.index=%d\r\n", index++);printf("arg1: %d, arg2: %d\n", t->arg1, t->arg2);}int
main(int argc, char** argv)
{thread_pool_t* tp = NULL;int i = 0;tp = thread_pool_init();//线程池初始化//sleep(1);thread_task_t* test3 = thread_task_alloc(sizeof(struct test));//给任务分配内存test3->handler = task_handler3;//为任务设置执行函数((struct test*)test3->ctx)->arg1 = 666;//设置参数值((struct test*)test3->ctx)->arg2 = 888;}
thread_task_post函数——往线程池中投递任务
int_t
thread_task_post(thread_pool_t *tp, thread_task_t *task)
{if (thread_mutex_lock(&tp->mtx) != OK) {return ERROR;}if (tp->waiting >= tp->max_queue) {(void) thread_mutex_unlock(&tp->mtx);fprintf(stderr,"thread pool \"%s\" queue overflow: %ld tasks waiting\n",tp->name, tp->waiting);return ERROR;}//task->event.active = 1;task->id = thread_pool_task_id++;task->next = NULL;if (thread_cond_signal(&tp->cond) != OK) {(void) thread_mutex_unlock(&tp->mtx);return ERROR;}*tp->queue.last = task;tp->queue.last = &task->next;tp->waiting++;(void) thread_mutex_unlock(&tp->mtx);if(debug)fprintf(stderr,"task #%lu added to thread pool \"%s\"\n",task->id, tp->name);return OK;
}
代码剖析
if (thread_mutex_lock(&tp->mtx) != OK) {return ERROR;
}
线程池是临界资源,分配任务前要对线程池上锁。
if (tp->waiting >= tp->max_queue) {(void) thread_mutex_unlock(&tp->mtx);fprintf(stderr,"thread pool \"%s\" queue overflow: %ld tasks waiting\n",tp->name, tp->waiting);return ERROR;
}
线程池中等待任务数量>=任务队列长度,表明任务队列已满,则对任务队列进行解锁并报错
task->id = thread_pool_task_id++;
task->next = NULL;
为任务分配唯一id,thread_pool_task_id是一个全局的静态变量
if (thread_cond_signal(&tp->cond) != OK) {(void) thread_mutex_unlock(&tp->mtx);return ERROR;
}
这里会设置条件变量,唤醒处于thread_con_wait状态的线程池中的线程
*tp->queue.last = task;
tp->queue.last = &task->next;tp->waiting++;
任务队列结构如下:
tp->queue.last是一个二级指针,表示的是队尾节点的指针的地址
通过这个二级指针可以很快地在队尾插入结点,如图所示

wating表示任务队列中等待的任务数目,使其+1
(void) thread_mutex_unlock(&tp->mtx);if(debug)fprintf(stderr,"task #%lu added to thread pool \"%s\"\n",task->id, tp->name);解锁线程池的锁,debug打印信息,没什么好说的。
thread_mutex_create函数——对pthread_mutex_init函数进行封装
int
thread_mutex_create(pthread_mutex_t *mtx)
{int            err;pthread_mutexattr_t  attr;err = pthread_mutexattr_init(&attr);if (err != 0) {fprintf(stderr, "pthread_mutexattr_init() failed, reason: %s\n",strerror(errno));return ERROR;}err = pthread_mutexattr_settype(&attr, PTHREAD_MUTEX_ERRORCHECK);if (err != 0) {fprintf(stderr, "pthread_mutexattr_settype(PTHREAD_MUTEX_ERRORCHECK) failed, reason: %s\n",strerror(errno));return ERROR;}err = pthread_mutex_init(mtx, &attr);if (err != 0) {fprintf(stderr,"pthread_mutex_init() failed, reason: %s\n",strerror(errno));return ERROR;}err = pthread_mutexattr_destroy(&attr);if (err != 0) {fprintf(stderr,"pthread_mutexattr_destroy() failed, reason: %s\n",strerror(errno));}return OK;
}
在pthread_mutex_init的基础上加了错误检查和一些属性的设定。
剖析
err = pthread_mutexattr_settype(&attr, PTHREAD_MUTEX_ERRORCHECK);
if (err != 0) {fprintf(stderr, "pthread_mutexattr_settype(PTHREAD_MUTEX_ERRORCHECK) failed, reason: %s\n",strerror(errno));return ERROR;
}
PTHREAD_MUTEX_ERRORCHECK_NP,检错锁,如果同一个线程请求同一个锁,则返回EDEADLK,否则与PTHREAD MUTEX TIMED NP类型动作相同。这样就保证当不允许多次加锁时不会出现最简单情况下的死锁。
PTHREAD_MUTEX_TIMED_NP,这是缺省值,也就是普通锁。当一个线程加锁以后,其余请求锁的线程将形成一个等待队列,并在解锁后按优先级获得锁。这种锁策略保证了资源分配的公平性。
thread_pool_destroy函数——摧毁线程池
功能:当程序运行将要结束时,摧毁线程池,对资源进行释放。
完整代码
void thread_pool_destroy(thread_pool_t *tp)
{uint_t           n;thread_task_t    task;volatile uint_t  lock;memset(&task,'\0', sizeof(thread_task_t));task.handler = thread_pool_exit_handler;task.ctx = (void *) &lock;for (n = 0; n < tp->threads; n++) {lock = 1;if (thread_task_post(tp, &task) != OK) {return;}while (lock) {sched_yield();}//task.event.active = 0;}(void) thread_cond_destroy(&tp->cond);(void) thread_mutex_destroy(&tp->mtx);free(tp);
}
给线程池中的每一个线程分配一个“自杀”的任务,同时调用sched_yield降低执行thread_pool_destroy函数的线程的优先级。
等分配完"自杀"任务之后,释放条件变量、互斥锁和给线程池分配的内存,线程池就被摧毁了。
“自杀”函数如下:
static void
thread_pool_exit_handler(void *data)
{uint_t *lock = data;*lock = 0;pthread_exit(0);
}
只有自杀函数执行到*lock=0时,执行thread_pool_destroy函数的线程才能给下一个线程分配"自杀"任务,否则就一直执行sched_yield函数,让出CPU时间片。
相关文章:
高并发线程池设计Nginx线程池源码剖析
为什么我们需要线程池?Why? 省流: 为了解决: 1.访问磁盘速度慢 2.等待设备工作 3..... 我们使用多线程技术,在IO繁忙的时候优先处理别的任务 为了解决多线程的缺陷: 1.创建、销毁线程时间消耗大 2.创建线程太多使系统资源不足或者线程频繁切换…...

SEO:6个避免被搜索引擎惩罚的策略-华媒舍
在当今数字时代,搜索引擎成为了绝大多数人获取信息和产品的首选工具。为了在搜索结果中获得良好的排名,许多网站采用了各种优化策略。有些策略可能会适得其反,引发搜索引擎的惩罚。以下是彭博社发稿推广的6个避免被搜索引擎惩罚的策略。 1. 内…...
STM32之六:SysTick系统滴答定时器
目录 1. SysTick简介 2. 时钟来源 3. SysTick寄存器 3.1 CTRL—SysTick控制及状态寄存器 3.2 RELOAD—SysTick重装载数值寄存器 3.3 CURRENT—SysTick当前数值寄存器 4. systick系统定时器配置 5. 延时函数实现 5.1 延时函数编写步骤 5.2 微秒级延时函数delay_us 5.…...

全栈物联网项目:结合 C/C++、Python、Node.js 和 React 开发智能温控系统(附代码示例)
1. 项目概述 本文详细介绍了一个基于STM32微控制器和AWS IoT云平台的智能温控器项目。该项目旨在实现远程温度监控和控制,具有以下主要特点: 使用STM32F103微控制器作为主控芯片,负责数据采集、处理和控制逻辑采用DHT22数字温湿度传感器,精确采集环境温湿度数据通过ESP8266 W…...
WPF学习(3) -- 控件模板
一、操作过程 二、代码 <Window x:Class"学习.MainWindow"xmlns"http://schemas.microsoft.com/winfx/2006/xaml/presentation"xmlns:x"http://schemas.microsoft.com/winfx/2006/xaml"xmlns:d"http://schemas.microsoft.com/expressio…...

Netty Websocket SpringBoot Starter
netty websocket starter Quick Start Demo 项目 添加依赖 <!--添加源--> <repository><id>github</id><url>https://maven.pkg.github.com</url><snapshots><enabled>true</enabled></snapshots> </reposit…...

数据结构(4.2)——朴素模式匹配算法
字符串模式匹配 在主串中找到模式串相同的子串,并返回其所在的位置。 子串和模式串的区别 子串:主串的一部分,一定存在 模式串:不一定能在主串中找到 字符串模式匹配 朴素模式匹配算法 主串长度为n,模式串长度为…...

git切换远程仓库地址
git 更换远程仓库地址三种方法总结 一、前言 由于之前项目管理使用私服的 gitlab ,现在换成了Gitea,需要修改远端仓库地址。 二、环境 windows 10git version 2.34.0.windows.1 三、帮助文档 GitHub文档 四、三种修改方法 方法一:不删除远程仓…...

同步与异步:.NET 中的 Task.WaitAll 和 Task.WhenAll
在 C# 中,异步编程通常涉及同时运行多个任务。处理多个任务的两种常见方法是 Task.WaitAll 和 Task.WhenAll。虽然它们看起来很相似,但它们的用途不同,并且用于不同的场景。本文探讨了 Task.WaitAll 和 Task.WhenAll 之间的区别,并…...

在Linux系统实现瑞芯微RK3588部署rknntoolkit2进行模型转换
一、首先要先安装一个虚拟的环境 安装Miniconda包 Miniconda的官网链接:Minidonda官网 下载好放在要操作的linux系统,我用的是远程服务器的linux系统,我放在whl这个文件夹里面,这个文件夹是我自己创建的 运行安装 安装的操作都是yes就可以了 检查是否安装成功,输入下面…...

【人工智能】Transformers之Pipeline(概述):30w+大模型极简应用
目录 一、引言 二、pipeline库 2.1 概述 2.2 使用task实例化pipeline对象 2.2.1 基于task实例化“自动语音识别” 2.2.2 task列表 2.2.3 task默认模型 2.3 使用model实例化pipeline对象 2.3.1 基于model实例化“自动语音识别” 2.3.2 查看model与task…...

Jenkins中Node节点与构建任务
目录 节点在 Jenkins 中的主要作用 1. 分布式构建 分布式处理 负载均衡 2. 提供不同的运行环境 多平台支持 特殊环境需求 3. 提高资源利用率 动态资源管理 云端集成 4. 提供隔离和安全性 任务隔离 权限控制 5. 提高可扩展性 横向扩展 高可用性 Jenkins 主服务…...

Leetcode3200. 三角形的最大高度
Every day a Leetcode 题目来源:3200. 三角形的最大高度 解法1:模拟 枚举第一行是红色还是蓝色,再按题意模拟即可。 代码: /** lc appleetcode.cn id3200 langcpp** [3200] 三角形的最大高度*/// lc codestart class Solutio…...

docker运行nginx挂载前端html页面步骤
1.常用docker命令 1.docker ps -a 查看所有容器 2.docker ps查看存活的容器 3.docker rm 删除容器 4.docker stop 停止容器运行 5.docker logs 容器id 查看容器日志 6.docker images 查看镜像 7.docker rmi 删除镜像 8.docker exec nginx nginx -s reload 重新加载conf文件…...

kafka部署以及常用命令详细总结
1环境准备 1.1ip规划 ip: 192.168.1.200 1.2配置主机名 #设置主机名 hostnamectl set-hostname node11.3配置hosts [rootnode1 ~]# cat >> /etc/hosts << EOF192.168.1.200 node1 EOF2部署 2.1安装包准备 将以下安装包从官网下载到本地 jdk-8u371-linux-x6…...

代码随想录算法训练营第29天|LeetCode 134. 加油站、135. 分发糖果、860.柠檬水找零、406.根据身高重建队列
1. LeetCode 134. 加油站 题目链接:https://leetcode.cn/problems/gas-station/description/ 文章链接:https://programmercarl.com/0134.加油站.html 视频链接:https://www.bilibili.com/video/BV1jA411r7WX 思路: 贪心ÿ…...

代理模式(大话设计模式)C/C++版本
代理模式 C #include <iostream> using namespace std;class Subject // Subject 定义了RealSubject和Proxy的共用接口..这样就在任何使用RealSubject的地方都可以使用Proxy { public:virtual void func(){cout << "Subject" << endl;} };class R…...
本人学习保存-macOS打开Navicat提示「“Navicat Premium”已损坏,无法打开。 你应该将它移到废纸篓。」的解决方法
新安装了macOS Ventura,打开Navicat Premium,发现会提示: “Navicat Premium”已损坏,无法打开。 你应该将它移到废纸篓。 遇到这种情况,千万别直接移到废纸篓,是有办法解决的。在这里记录一下解决方案。 …...
《Cross-Image Pixel Contrasting for Semantic Segmentation》论文解读
期刊:TPAMI 年份:2024 摘要 研究图像语义分割问题。目前的方法主要集中在通过专门设计的上下文聚合模块(如空洞卷积、神经注意力)或结构感知的优化目标(如iou样损失)挖掘"局部"上下文,即单个图像中像素之间的依赖关系。然而&…...

技术周总结 2024.07.08~07.14(算法,Python,Java,Scala,PHP)
文章目录 一、07.13 周六1.0)算法题:字符串中的单词反转1.1) 问题01:可靠性计算中的MTTR MTTF MTBF 分别指什么?他们之间有什么联系?MTTR (Mean Time to Repair)MTTF (Mean Time to Failure)MTBF (Mean Time Between F…...

Switch控制器PC适配难题的技术解决方案:BetterJoy架构解析与高级配置指南
Switch控制器PC适配难题的技术解决方案:BetterJoy架构解析与高级配置指南 【免费下载链接】BetterJoy Allows the Nintendo Switch Pro Controller, Joycons and SNES controller to be used with CEMU, Citra, Dolphin, Yuzu and as generic XInput 项目地址: ht…...

美国AI监管令紧急叫停:安全与速度的终极博弈与全球AI治理新格局
一、事件核心:临门一脚的惊天逆转 2026年5月21日,美国华盛顿时间下午2点,原本应该是白宫椭圆形办公室一场万众瞩目的签字仪式。特朗普总统计划签署一项酝酿数月的AI安全行政令,该令要求OpenAI、Anthropic、谷歌等头部AI企业在发布…...

3秒解锁微博图片溯源能力:重新定义你的信息追踪体验
3秒解锁微博图片溯源能力:重新定义你的信息追踪体验 【免费下载链接】WeiboImageReverse Chrome 插件,反查微博图片po主 项目地址: https://gitcode.com/gh_mirrors/we/WeiboImageReverse 当你在微博上看到一张惊艳的摄影作品,想要了解…...

ESP32嵌入式GUI开发终极指南:使用lv_port_esp32构建专业级单色屏应用
ESP32嵌入式GUI开发终极指南:使用lv_port_esp32构建专业级单色屏应用 【免费下载链接】lv_port_esp32 LVGL ported to ESP32 including various display and touchpad drivers 项目地址: https://gitcode.com/gh_mirrors/lv/lv_port_esp32 在资源受限的ESP32…...

OpenCore Legacy Patcher终极教程:如何让老旧Mac重获新生,运行最新macOS
OpenCore Legacy Patcher终极教程:如何让老旧Mac重获新生,运行最新macOS 【免费下载链接】OpenCore-Legacy-Patcher Experience macOS just like before 项目地址: https://gitcode.com/GitHub_Trending/op/OpenCore-Legacy-Patcher 还在为老旧Ma…...

如何利用LayerPlayer快速掌握iOS动画开发技巧
如何利用LayerPlayer快速掌握iOS动画开发技巧 【免费下载链接】LayerPlayer Layer Player explores the capabilities of Apples Core Animation API 项目地址: https://gitcode.com/gh_mirrors/la/LayerPlayer LayerPlayer是一款专注于探索Apple Core Animation API功能…...

中文分词与词频统计全流程实战 | 全网独家复现,Python零基础落地篇 引入jieba分词优化+多策略词频统计,助力文本挖掘、舆情分析、学术研究高效落地
目录 一、核心前言(明确价值,避开踩坑) 1.1 实战意义 1.2 技术选型说明 1.3 前置准备(零基础必看) 二、核心原理(极简理解,无需深入) 2.1 中文分词原理 2.2 词频统计原理 三、全流程代码实现(零基础可复制,全程注释) 3.1 工程化目录结构(必看,避免路径错…...

告别内存泄漏!Cocos Creator 2.4+ AssetManager资源释放的完整避坑指南
Cocos Creator 2.4 AssetManager资源释放的完整避坑指南在游戏开发中,资源管理一直是影响性能和稳定性的关键因素。随着Cocos Creator 2.4版本推出全新的AssetManager系统,开发者获得了更强大的资源管理能力,但也面临着新的挑战。本文将深入探…...

量子机器学习实战:用变分量子电路对泰坦尼克数据集分类
1. 项目概述:当量子计算遇上经典分类难题量子机器学习(QML)听起来像是科幻小说里的概念,但如果你像我一样,在经典机器学习领域摸爬滚打多年,再一头扎进量子计算的海洋,你会发现它更像是一场激动…...

从 Session 到 JWT:Web 认证系统的发展与 JWT 原理详解
文章目录 前言一、Web 认证系统的发展史1.第一代认证方案:Cookie Session2.Session 方案的问题开始出现1. Session 存储压力大2. 分布式系统难处理3. 移动端时代到来 二、JWT 是什么三、JWT 的结构到底长什么样1.第一部分:Header(头部&#…...