uniapp-vue3-vite 搭建小程序、H5 项目模板
uniapp-vue3-vite 搭建小程序、H5 项目模板
- 特色
- 准备
- 拉取默认UniApp模板
- 安装依赖
- 启动项目测试
- 结果
- 配置自动化导入
- 安装依赖
- 在vite.config.js中配置
- 引入 prerttier + eslint + stylelint
- .editorconfig
- .prettierrc.cjs
- .eslintrc.cjs
- .stylelintrc.cjs
- 引入 husky + lint-staged + commitlint
- Commitizen & cz-git
- 更改提示消息模板 .cz-config.js
- 检测
- 配置UnoCss
- 检测
- 配置pinia 添加持久化
- 检测
- Axios接入配置
- 在vite.config.js中配置自动化导入
- 检测
- 图标库
- UI 方案
- 模板
- 敬请期待

作者GitHub:https://github.com/gitboyzcf 有兴趣可关注!!!
特色
-
⚡️uni-app, Vue 3, Vite, pnpm
-
📦 组件自动化引入
-
🍍 使用 Pinia 的状态管理
-
🎨 UnoCSS - 高性能且极具灵活性的即时原子化 CSS 引擎
-
😃 各种图标集为你所用
-
🔥 使用 新的
<script setup>语法 -
📥 API 自动加载 - 直接使用 Composition API 无需引入
-
🌍 API 采用模块化自动导入方式 根据demo.js文件设置接口,以API_xxx_method的方式命名,在请求时无需导入 直接使用useRequest()函数返回参数以解构的方式获取,拿到即为写入的接口
准备
Vue3/Vite版要求 node 版本^14.18.0 || >=16.0.0
拉取默认UniApp模板
点击下载 默认模板,或者通过下面命令行拉取
npx degit dcloudio/uni-preset-vue#vite my-vue3-project
得到下面目录结构👇

安装依赖
我这里使用pnpm ,可以使用如npm、yarn、…
pnpm install
如有报下面错误👇
This modules directory was created using the following registries configuration:{“default”:“https://registry.npmjs.org/”}. The current configuration is {“default”:“https://registry.npm.taobao.org/”}. To recreate the modules directory using the new settings, run “pnpm install -g”.
解决方案 下载源切换
pnpm config set registry https://registry.npmjs.org
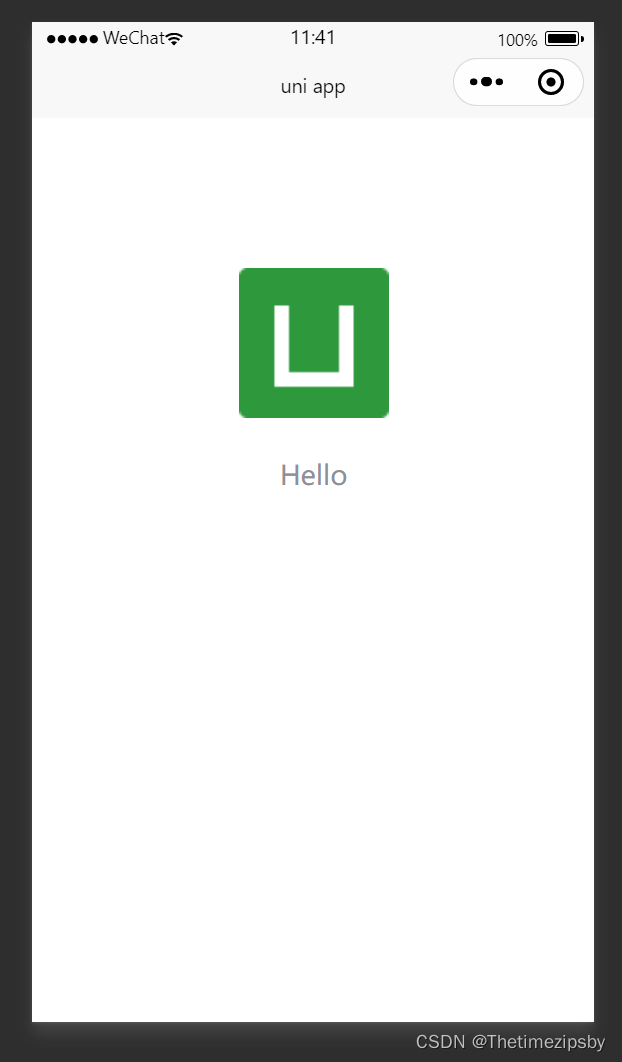
启动项目测试
执行该命令 会将此项目编译成微信小程序项目,该命令会持续监听修改并进行热更新
pnpm dev:mp-weixin
执行后会出现 dist\dev\mp-weixin文件夹结构
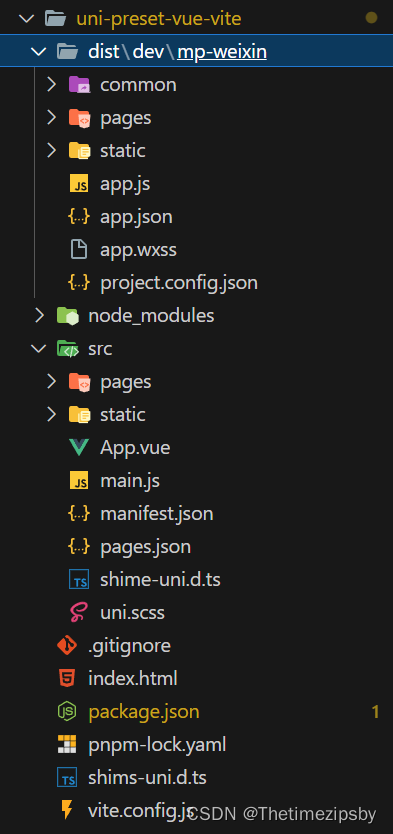
将此目录下的mp-weixin用微信开发者工具进行打开
如未安装点击下面链接下载安装即可👇
https://developers.weixin.qq.com/miniprogram/dev/devtools/download.html
结果
配置自动化导入
安装依赖
pnpm i unplugin-auto-import -D
在vite.config.js中配置
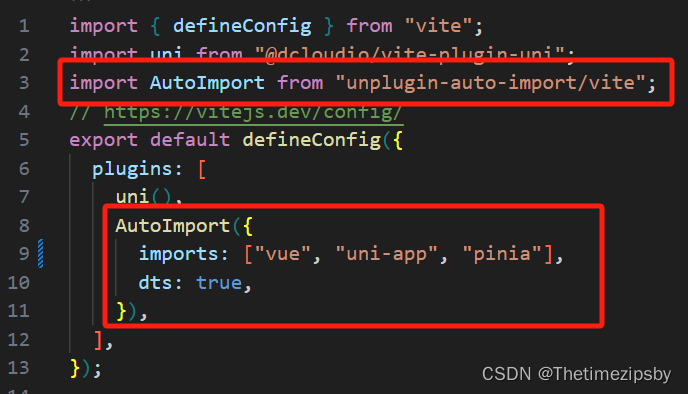
import AutoImport from 'unplugin-auto-import/vite'AutoImport({imports: ["vue", "uni-app", "pinia"],dts: true,
})
配置完后 重新执行pnpm dev:mp-weixin此时会生成auto-imports.d.ts文件
此时在pages/index/index.vue中不用引入直接可以使用vue的api
<script setup>
const title = ref('Hello World!')
</script>
引入 prerttier + eslint + stylelint
安装相关依赖包👇
pnpm add -D eslint @babel/eslint-parser eslint-config-airbnb-base eslint-config-prettier eslint-plugin-import eslint-plugin-prettier eslint-plugin-vue vue-global-api stylelint stylelint-scss stylelint-config-standard-scss stylelint-config-prettier
.editorconfig
# .editorconfig 文件
root = true[*] # 表示所有文件适用
charset = utf-8 # 设置文件字符集为 utf-8
indent_style = space # 缩进风格(tab | space)
indent_size = 2 # 缩进大小
end_of_line = lf # 控制换行类型(lf | cr | crlf)
trim_trailing_whitespace = true # 去除行首的任意空白字符
insert_final_newline = true # 始终在文件末尾插入一个新行[*.md] # 表示仅 md 文件适用以下规则
max_line_length = off # 关闭最大行长度限制
trim_trailing_whitespace = false # 关闭末尾空格修剪
.prettierrc.cjs
module.exports = {// 一行的字符数,如果超过会进行换行,默认为80,官方建议设100-120其中一个数printWidth: 100,// 一个tab代表几个空格数,默认就是2tabWidth: 2,// 启用tab取代空格符缩进,默认为falseuseTabs: false,// 行尾是否使用分号,默认为true(添加理由:更加容易复制添加数据,不用去管理尾行)semi: false,vueIndentScriptAndStyle: true,// 字符串是否使用单引号,默认为false,即使用双引号,建议设true,即单引号singleQuote: true,// 给对象里的属性名是否要加上引号,默认为as-needed,即根据需要决定,如果不加引号会报错则加,否则不加quoteProps: 'as-needed',// 是否使用尾逗号,有三个可选值"<none|es5|all>"trailingComma: 'none',// 在jsx里是否使用单引号,你看着办jsxSingleQuote: true,// 对象大括号直接是否有空格,默认为true,效果:{ foo: bar }bracketSpacing: true,proseWrap: 'never',htmlWhitespaceSensitivity: 'strict',endOfLine: 'auto',
}
.eslintrc.cjs
// .eslintrc.cjs 文件
module.exports = {env: {browser: true,es2021: true,node: true,},extends: ['eslint:recommended','plugin:vue/vue3-essential',// eslint-plugin-import 插件, @see https://www.npmjs.com/package/eslint-plugin-import'plugin:import/recommended',// eslint-config-airbnb-base 插件, tips: 本插件也可以替换成 eslint-config-standard'airbnb-base',// 1. 接入 prettier 的规则'prettier','plugin:prettier/recommended','vue-global-api',],overrides: [{env: {node: true,},files: ['.eslintrc.{js}'],parserOptions: {sourceType: 'script',},},],parserOptions: {ecmaVersion: 'latest',parser: '@babel/eslint-parser',sourceType: 'module',},plugins: ['@babel/eslint-parser','vue',// 2. 加入 prettier 的 eslint 插件'prettier',// eslint-import-resolver-typescript 插件,@see https://www.npmjs.com/package/eslint-import-resolver-typescript'import',],rules: {// 3. 注意要加上这一句,开启 prettier 自动修复的功能'prettier/prettier': 'error',// turn on errors for missing imports'import/no-unresolved': 'off',// 对后缀的检测,否则 import 一个ts文件也会报错,需要手动添加'.ts', 增加了下面的配置后就不用了'import/extensions': ['error','ignorePackages',{ js: 'never', jsx: 'never', ts: 'never', tsx: 'never' },],// 只允许1个默认导出,关闭,否则不能随意export xxx'import/prefer-default-export': ['off'],'no-console': ['off'],// 'no-unused-vars': ['off'],// '@typescript-eslint/no-unused-vars': ['off'],// 解决vite.config.ts报错问题'import/no-extraneous-dependencies': 'off','no-plusplus': 'off','no-shadow': 'off','vue/multi-word-component-names': 'off','@typescript-eslint/no-explicit-any': 'off',},// eslint-import-resolver-typescript 插件,@see https://www.npmjs.com/package/eslint-import-resolver-typescriptsettings: {'import/parsers': {'@typescript-eslint/parser': ['.ts', '.tsx'],},'import/resolver': {typescript: {},},},globals: {uni: true,UniApp: true,wx: true,WechatMiniprogram: true,getCurrentPages: true,UniHelper: true,Page: true,App: true,},
}
.stylelintrc.cjs
// .stylelintrc.cjs 文件
module.exports = {root: true,extends: ['stylelint-config-standard','stylelint-config-standard-scss', // tips: 本插件也可以替换成 stylelint-config-recommended-scss'stylelint-config-recommended-vue/scss','stylelint-config-html/vue','stylelint-config-recess-order',],overrides: [// 扫描 .vue/html 文件中的<style>标签内的样式{files: ['**/*.{vue,html}'],customSyntax: 'postcss-html',},{files: ['**/*.{css,scss}'],customSyntax: 'postcss-scss',},],// 自定义规则rules: {// 允许 global 、export 、v-deep等伪类'selector-pseudo-class-no-unknown': [true,{ignorePseudoClasses: ['global', 'export', 'v-deep', 'deep'],},],'unit-no-unknown': [true,{ignoreUnits: ['rpx'],},],// 处理小程序page标签不认识的问题'selector-type-no-unknown': [true,{ignoreTypes: ['page'],},],'comment-empty-line-before': 'never',},
}
引入 husky + lint-staged + commitlint
说明
husky 用于git提交的钩子
lint-staged 一个在 git 暂存文件上(也就是被git add后的文件)运行已配置的格式工具;比如eslint、stylelintrc、…
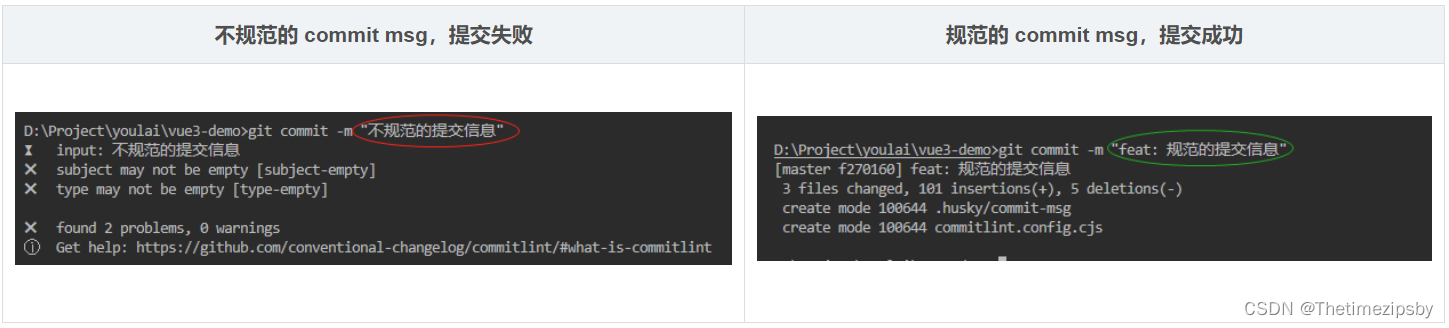
commitlint 检查您的提交消息是否符合 常规提交格式 (Conventional commit format)
正确的提交格式:(): ,type 和 subject 默认必填
安装相关依赖包👇
pnpm i -D husky@6 lint-staged commitlint @commitlint/cli @commitlint/config-conventional
执行 npx husky install
并且在 package.json的scripts里面增加 "prepare": "husky install",(其他人安装后会自动执行) 根目录会生成 .hushy 文件夹。
package.josn 增加如下属性👇:
...
"scripts": {..."prepare": "husky install",
},
"lint-staged": {"**/*.{html,vue,ts,cjs,json,md}": ["prettier --write"],"**/*.{vue,js,ts,jsx,tsx}": ["eslint --fix"],"**/*.{vue,css,scss,html}": ["stylelint --fix"]
}
根目录新增 .commitlintrc.cjs,内容如下👇
module.exports = {extends: ['@commitlint/config-conventional'],rules: {'type-enum': [2,'always',['feat','fix','perf','style','docs','test','refactor','build','ci','init','chore','revert','wip','workflow','types','release',],],'subject-case': [0],},
}
通过下面命令在钩子文件中添加内容👇
npx husky add .husky/pre-commit "npx --no-install -- lint-staged"
npx husky add .husky/commit-msg "npx --no-install commitlint --edit $1"
Commitizen & cz-git
说明
commitizen 基于Node.js的 git commit 命令行工具,辅助生成标准化规范化的 commit message
cz-customizable 标准输出格式的 commitizen 适配器
安装依赖包👇
pnpm add -D commitizen cz-customizable
修改 package.json指定使用的适配器
...
"scripts": {..."cz": "git-cz"
},"config": {"commitizen": {"path": "node_modules/cz-customizable"}}
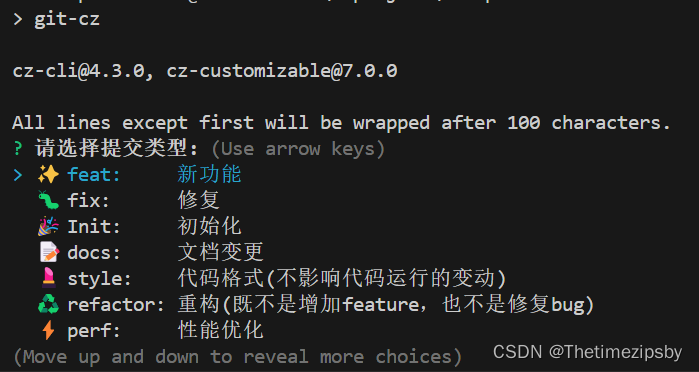
更改提示消息模板 .cz-config.js
.cz-config.js
module.exports = {types: [{ value: 'feat', name: '✨ feat: 新功能' },{ value: 'fix', name: '🐛 fix: 修复' },{ value: 'init', name: '🎉 Init: 初始化' },{ value: 'docs', name: '📝 docs: 文档变更' },{ value: 'style', name: '💄 style: 代码格式(不影响代码运行的变动)' },{value: 'refactor',name: '♻️ refactor: 重构(既不是增加feature,也不是修复bug)',},{ value: 'perf', name: '⚡️ perf: 性能优化' },{ value: 'test', name: '✅ test: 增加测试' },{ value: 'revert', name: '⏪️ Revert: 回退' },{ value: 'build', name: '🚀 build: 构建过程或辅助工具的变动' },{ value: 'ci', name: '👷 ci: CI 配置' },],// 消息步骤messages: {type: '请选择提交类型:',subject: '请简要描述提交(必填):',customScope: '请输入修改范围(可选):',body: '请输入详细描述(可选):',breaking: '列出任何BREAKING CHANGES(可选)',footer: '请输入要关闭的issue(可选):',confirmCommit: '确认使用以上信息提交吗?',},allowBreakingChanges: ['feat', 'fix'],skipQuestions: ['customScope'],subjectLimit: 72,
}
检测
在命令行中输入👇
git add .
pnpm cz
然后会出现本次提交选项
选择本次提交的类型,按要求写入然后回车即可
配置UnoCss
安装依赖👇
pnpm add -D unocss @unocss/preset-uno unocss-applet @unocss/preset-legacy-compat
pnpm add @uni-helper/unocss-preset-uni
然后配置 unocss.config.js
// uno.config.js
import {Preset,defineConfig,presetAttributify,presetIcons,transformerDirectives,transformerVariantGroup,
} from 'unocss'import {presetApplet,presetRemRpx,transformerApplet,transformerAttributify,
} from 'unocss-applet'
import { presetUni } from '@uni-helper/unocss-preset-uni'// @see https://unocss.dev/presets/legacy-compat
import presetLegacyCompat from '@unocss/preset-legacy-compat'const isH5 = process.env?.UNI_PLATFORM === 'h5'
const isMp = process.env?.UNI_PLATFORM?.startsWith('mp') ?? falseconst presets = []
if (!isMp) {/*** you can add `presetAttributify()` here to enable unocss attributify mode prompt* although preset is not working for applet, but will generate useless css* 为了不生产无用的css,要过滤掉 applet*/// 支持css class属性化,eg: `<button bg="blue-400 hover:blue-500 dark:blue-500 dark:hover:blue-600" text="sm white">attributify Button</button>`presets.push(presetAttributify())
}
if (!isH5) {presets.push(presetRemRpx())
}
export default defineConfig({presets: [presetApplet({ enable: !isH5 }),...presets,// 支持图标,需要搭配图标库,eg: @iconify-json/carbon, 使用 `<button class="i-carbon-sun dark:i-carbon-moon" />`presetIcons({scale: 1.2,warn: true,extraProperties: {display: 'inline-block','vertical-align': 'middle',},}),// 将颜色函数 (rgb()和hsl()) 从空格分隔转换为逗号分隔,更好的兼容性app端,example:// `rgb(255 0 0)` -> `rgb(255, 0, 0)`// `rgba(255 0 0 / 0.5)` -> `rgba(255, 0, 0, 0.5)`presetLegacyCompat({commaStyleColorFunction: true,}),],/*** 自定义快捷语句* @see https://github.com/unocss/unocss#shortcuts*/shortcuts: [['center', 'flex justify-center items-center']],transformers: [// 启用 @apply 功能transformerDirectives(),// 启用 () 分组功能// 支持css class组合,eg: `<div class="hover:(bg-gray-400 font-medium) font-(light mono)">测试 unocss</div>`transformerVariantGroup(),// Don't change the following ordertransformerAttributify({// 解决与第三方框架样式冲突问题prefixedOnly: true,prefix: 'fg',}),transformerApplet(),],rules: [['p-safe',{padding:'env(safe-area-inset-top) env(safe-area-inset-right) env(safe-area-inset-bottom) env(safe-area-inset-left)',},],['pt-safe', { 'padding-top': 'env(safe-area-inset-top)' }],['pb-safe', { 'padding-bottom': 'env(safe-area-inset-bottom)' }],],
})
在src/main.js增加 import 'virtual:uno.css'
在 vite.config.js文件写入:
import UnoCSS from 'unocss/vite'// 其他配置省略
plugins: [UnoCSS()],
检测
<view class="text-area b-1px b-solid b-color-red"><text class="title mt-4">{{ title }}</text>
</view>
结果👇

配置pinia 添加持久化
首先安装依赖包:
pnpm add pinia pinia-plugin-persistedstate -S
然后写入文件:
// src/store/count.js
import { piniaStore } from '@/store'
export const useCountStore = defineStore('count', {state: () => {return {count: 0}},actions: {increment() {this.count++}},persist: true // 配置持久化
})export function useOutsideCountStore(){return useCountStore(piniaStore)
}
注意下面👇这个文件对持久化的处理,否则非h5环境不能正确持久化
// src/store/index.js
import { createPinia } from 'pinia'
import { createPersistedState } from 'pinia-plugin-persistedstate' // 数据持久化const store = createPinia()
store.use(createPersistedState({storage: {getItem: uni.getStorageSync,setItem: uni.setStorageSync,},}),
)
export default store
// src/main.js
import { createSSRApp } from 'vue'
import App from './App.vue'
import { setupStore } from './store'
import 'virtual:uno.css'
export function createApp() {const app = createSSRApp(App)setupStore(app)return {app}
}
如有报下面错误👇
vue pinia版本冲突问题
Not able to use pinia: No matching export in “node_modules/pinia/node_modules/vue-demi/lib/index.mjs” for import “hasInjectionContext”
解决方案
将vue3 和pinia更换成下面版本重新下载对应npm包
“pinia”: “2.0.32”,
“vue”: “3.2.47”,
pnpm install vue@3.2.47 pinia@2.0.32 -S
具体请看:https://github.com/vuejs/pinia/issues/2210
检测
<view><button type="primary" @click="useCountStore.count++">点击 {{ count }}</button>
</view><script setup>import { useOutsideCountStore } from '@/store/count'const useCountStore = useOutsideCountStore()const count = computed(() => useCountStore.count)
</script>
Axios接入配置
安装相关依赖包👇
pnpm add @uni-helper/axios-adapter axios
以下步骤创建对应文件粘贴代码即可
-
src》api》index.js
/*** 模块化方式处理 默认处理 modules文件夹下的所有js文件 内容以export default导出的文件* @param { 模块内容集合 } moduleContext* @returns modules集合*/ const modulesHandle = (moduleContext = {}) => {if (!Object.keys(moduleContext).length) returnconst modules = {}Object.keys(moduleContext).forEach((v) => {for (let key in moduleContext[v].default) {modules[key] = moduleContext[v].default[key]}})return modules }const apis = modulesHandle(import.meta.glob('./modules/**/*.js', { eager: true })) export const useRequest = () => apis -
src》api》utils.js
// 请求状态错误 export const httpLogError = (error, msg) => {error.message = msguni.showToast({title: msg,icon: 'error',duration: 2000}) }// api请求错误 export const requestError = (response) => {return new Promise((_, reject) => {const { data } = responseconst msg = `api请求出错 ${response.config.url}:${data.message}`uni.showToast({title: msg,icon: 'error',duration: 2000})reject(data)}) }// 登录失效 export const throttleToLogin = () => {// uni.navigateTo({ url: '/pages/login/login' }) } -
src》api》service.js
import axios from 'axios' import { createUniAppAxiosAdapter } from '@uni-helper/axios-adapter' import { httpLogError, requestError, throttleToLogin } from './utils' export function createService() {const request = axios.create({ adapter: createUniAppAxiosAdapter() })request.interceptors.request.use((request) => {return request},(err) => {return Promise.reject(err)})request.interceptors.response.use((response) => {const dataAxios = response.data// 这个状态码是和后端约定的const { code, data } = dataAxiosconsole.log(dataAxios);// 根据 code 进行判断if (code === undefined) {return dataAxios} else {// 目前和公司后端口头约定是字符串,以防万一强制转字符串switch (`${code}`) {// code === 200 | 2 代表没有错误case '200':return data// code === 400001004 代表token 过期打回登录页case '400001004':throttleToLogin()breakcase '400':// 不是正确的 codereturn requestError(response)case '401':// 错误登录return throttleToLogin()default:// 不是正确的 codereturn requestError(response)}}}, (error) => {console.log(error);const status = error.response?.statusswitch (status) {// TODO 再考虑下怎么判断是跨域问题case undefined:case null:httpLogError(error, '网路错误或跨域')breakcase 400:httpLogError(error, '请求错误')breakcase 401:httpLogError(error, '未授权,请登录')breakcase 403:httpLogError(error, '拒绝访问')breakcase 404:httpLogError(error, `请求地址出错: ${error.response.config.url}`)breakcase 408:httpLogError(error, '请求超时')breakcase 500:httpLogError(error, '服务器内部错误')breakcase 501:httpLogError(error, '服务未实现')breakcase 502:httpLogError(error, '网关错误')breakcase 503:httpLogError(error, '服务不可用')breakcase 504:httpLogError(error, '网关超时')breakcase 505:httpLogError(error, 'HTTP版本不受支持')breakdefault:httpLogError(error, '请求错误')break}return Promise.reject(error)})return request }export const service = createService() -
src》api》request.js
import { service } from './service' function createRequest(service) {function request(config) {// config 自定义配置// axios默认配置const configDefault = {baseURL: import.meta.env.VITE_APP_API_BASEURL, // 所有通过此配置的基础地址 在.env文件配置timeout: 15000, // 请求超时时间responseType: 'json', // 响应类型headers: {// 请求头配置...}}const requestConfig = Object.assign(configDefault, config)return service(requestConfig)}return request }export const request = createRequest(service) -
src》modules》demo.js
/*** 命名=》API_xxx_methodName*/import { request } from '@/api/request.js'
export default {API_DEMO_POST(data = {}) {return request({url: 'demo/mock',method: 'post',data})},API_DEMO_GET(params = {}) {return request({url: '/demo/get',method: 'get',params})}
}
在vite.config.js中配置自动化导入
在原有的配置中添加
import { defineConfig } from 'vite'
import AutoImport from 'unplugin-auto-import/vite'
// ...
// https://vitejs.dev/config/
export default defineConfig({plugins: [//...AutoImport({imports: [//...{'@/api': ['useRequest']}],//...}),//...],//...
})
检测
<template><view class="content"><view><button type="primary" @click="getList">点击请求数据</button></view></view><view class="p-2"><viewclass="my-15rpx b-b-solid b-b-1rpx b-b-color-[#cccccc]"v-for="item in list":key="item.id"><text class="text-18rpx font-bold">{{ item.title }}</text><view class="mt-4 text-12rpx color-[#9999]">{{ item.body }}</view></view></view>
</template><script setup>const { API_DEMO_GET } = useRequest()const list = ref([])const getList = () => {uni.showLoading({title: '加载中...'})API_DEMO_GET().then((res) => {console.log(res)list.value = resuni.hideLoading()}).catch(() => {uni.hideLoading()})}
</script>

图标库
-
前往图标库查找相关图标iconify.design
-
安装图标所在的图标库
# 格式:pnpm add @iconify-json/[the-collection-you-want] -D# 例如
pnpm add @iconify-json/ep -D
安装完后可以使用当前库下的所有图标
https://icon-sets.iconify.design/ep/ -
项目中使用
使用unocss的方式https://iconify.design/docs/usage/css/unocss/#icons-with-unocss<text class="i-ep-apple w-40rpx h-40rpx color-red"></text>
UI 方案
自行使用相关ui接入项目
uni-ui
https://www.uvui.cn/
https://uviewui.com/
模板
拉取后 开箱即用
模板地址👉 https://github.com/gitboyzcf/uni-preset-vue3-vite
敬请期待
后续还会有新功能接入当前模板,敬请期待…
到这里就结束了,后续还会更新 前端 系列相关,还请持续关注!
感谢阅读,若有错误可以在下方评论区留言哦!!!

推荐文章👇
相关文章:
uniapp-vue3-vite 搭建小程序、H5 项目模板
uniapp-vue3-vite 搭建小程序、H5 项目模板 特色准备拉取默认UniApp模板安装依赖启动项目测试结果 配置自动化导入安装依赖在vite.config.js中配置 引入 prerttier eslint stylelint.editorconfig.prettierrc.cjs.eslintrc.cjs.stylelintrc.cjs 引入 husky lint-staged com…...

sealos快速安装k8s
Sealos 提供一套强大的工具,使得用户可以便利地管理整个集群的生命周期。 功能介绍 使用 Sealos,您可以安装一个不包含任何组件的裸 Kubernetes 集群。此外,Sealos 还可以在 Kubernetes 之上,通过集群镜像能力组装各种上层分布式…...

智慧水利:迈向水资源管理的新时代,结合物联网、云计算等先进技术,阐述智慧水利解决方案在提升水灾害防控能力、优化水资源配置中的关键作用
本文关键词:智慧水利、智慧水利工程、智慧水利发展前景、智慧水利技术、智慧水利信息化系统、智慧水利解决方案、数字水利和智慧水利、数字水利工程、数字水利建设、数字水利概念、人水和协、智慧水库、智慧水库管理平台、智慧水库建设方案、智慧水库解决方案、智慧…...

MATLAB——字符串处理
文章目录 MATLAB——字符串处理字符串处理函数字符串或字符串数组构造 MATLAB——字符串处理 字符串处理函数 MATLAB中的字符串处理函数如下: 函数名称说明eval(string)作为一个MATLAb命令求字符串的值blanks(n)返回一个具有n个空格的字符串deblank去掉字符串末尾…...
Qt实现一个简单的视频播放器
目录 1 工程配置 1.1 创建新工程 1.2 ui界面配置 1.3 .pro配置 2 代码 2.1 main.c代码 2.2 widget.c 2.3 widget.h 本文主要记述了如何使用Qt编写一个简单的视频播放器,整个示例采用Qt自带组件就可以完成。可以实现视频的播放和暂停等功能。 1 工程配置 1.…...

微服务治理新篇章:Eureka中细粒度策略管理实现
微服务治理新篇章:Eureka中细粒度策略管理实现 在微服务架构中,服务的治理和管理是确保系统稳定性和可扩展性的关键。Eureka作为Netflix开源的服务发现框架,提供了基本的服务注册与发现功能。然而,随着微服务规模的扩大和业务需求…...

快排的3种方式
//(前两种时间复杂度为o(n^2) , 最后一种为o(n*logn)public static void swap(int[] arr , int i , int j){arr[i] arr[i] ^arr[j];arr[j] arr[i] ^arr[j];arr[i] arr[i] ^arr[j]; } //使数组中以arr[R]划分,返回循环后arr[R]的所在地 public…...

el-date-picker手动输入日期,通过设置开始时间和阶段自动填写结束时间
需求:根据开始时间,通过填写阶段时长,自动填写结束时间,同时开始时间和节数时间可以手动输入 代码如下: <el-form ref"ruleForm2" :rules"rules2" :model"formData" inline label-po…...

springboot 适配ARM 架构
下载对应的maven https://hub.docker.com/_/maven/tags?page&page_size&ordering&name3.5.3-alpinedocker pull maven:3.5.3-alpinesha256:4c4e266aacf8ea6976b52df8467134b9f628cfed347c2f6aaf9e6aff832f7c45 2、下载对应的jdk https://hub.docker.com/_/o…...

ElementUI el-select 组件动态设置disabled后,高度变更的问题解决办法
问题描述 Vue2 项目在使用 el-select 组件时,动态将disabled变更为了 true,元素的高度发生了变化。 问题原因 通过浏览器开发人员工具面板,发现,组件内的 input 元素被动态设置了height的样式: 在项目中检查后并…...

写个网络爬虫
网络爬虫是一种自动化程序,通过发送HTTP请求并解析HTML等网页内容,获取指定网页数据的工具。下面是一个简单的Python代码示例,用于实现一个基本的网络爬虫: import requests from bs4 import BeautifulSoupdef get_html(url):try…...

模板方法模式的实现
1. 引言: 交易管理系统中的模板方法模式 之前做过一个交易管理系统,其中有一个核心模块是“交易流程管理”,该模块需要处理不同类型的交易,比如期货交易、期权交易和股票交易。在构建交易管理系统的过程中,我们面临了一个核心挑战…...

Redis的计数功能
Redis的学习专栏:http://t.csdnimg.cn/a8cvV 许多应用都会使用Redis作为计数的基本工具,可以实现快速计数、查询缓存的功能,同时数据也可以异步处理。例如:博客浏览,用户每查看一次,就会增加一次的访问量&a…...
 --MVVM模式)
WPF学习(7) --MVVM模式
1. MVVM模式概述 MVVM模式由三个主要部分组成: Model(模型):包含应用程序的业务逻辑和数据。通常是数据对象和数据访问层。View(视图):用户界面部分,展示数据并与用户进行交互。通…...

【人工智能】-- 受限玻尔兹曼机
个人主页:欢迎来到 Papicatch的博客 课设专栏 :学生成绩管理系统 专业知识专栏: 专业知识 文章目录 🍉引言 🍉受限玻尔兹曼机 🍈RBM的结构 🍍RBM的架构图 🍍RBM的经典实现 &…...

在 Android 中定义和使用自定义属性
1. 定义自定义属性 首先,我们需要在 res/values/attrs.xml 文件中定义自定义属性。这些属性可以是颜色、尺寸、字符串等。 创建或打开 res/values/attrs.xml 文件,并添加以下内容: <?xml version"1.0" encoding"utf-8&…...

【实战:python-Django发送邮件-短信-钉钉通知】
一 Python发送邮件 1.1 使用SMTP模块发送邮件 import smtplib from email.mime.text import MIMEText from email.header import Headermsg_from 306334678qq.com # 发送方邮箱 passwd luzdikipwhjjbibf # 填入发送方邮箱的授权码(填入自己的授权码,相当于邮箱…...

Todo List
待整理的笔记,先列出来,防止后面忘记要整理什么内容。一个一个整理: Linux内核ARM架构(v8)的系统调用的实现过程;open()/write()/read()在Linux内核中的详细实现过程,到驱动中注册的操作集的调用过程;文件…...

【Redis】Redis十大类型
文章目录 前言一、string字符串类型二、List列表类型三、 Hash表四、 Set集合五、 ZSet有序集合六、 GEO地理空间七、 HyperLogLog基数统计八、Bitmap位图九、bitfield位域十、 Stream流10.1 队列指令10.2 消费组指令10.3 ACK机制 前言 redis是k-v键值对进行存储,k…...
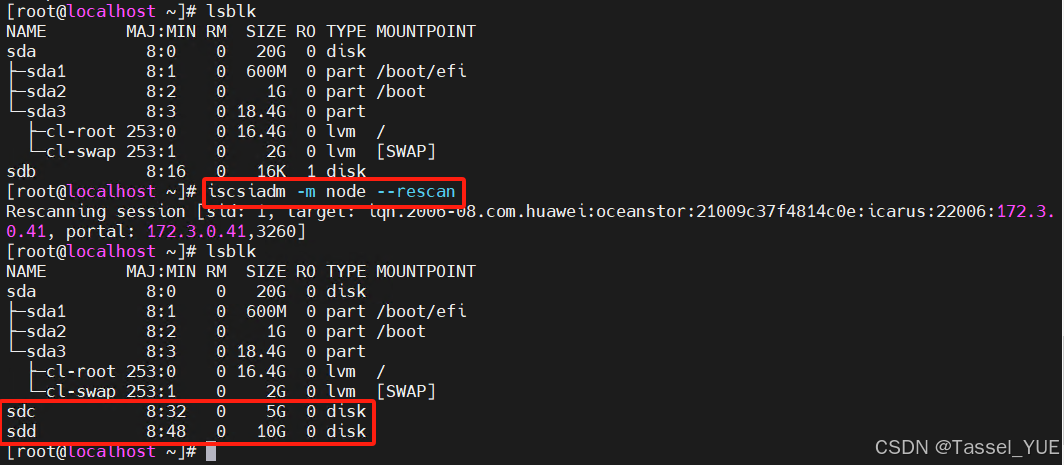
存储实验:Linux挂载iscsi硬盘与华为OceanStor创建LUN全流程
目录 目的环境规划实验实验流程Centos配置0. 关闭防火墙1. 设置网卡信息2. 配置路由3. iscsiadm连接存储 iSCSI LUN创建(以华为OceanStor为例)验证1. 验证是否成功2. 开启自动挂载 目的 实现Linux连接iscsi硬盘,同时实现开机自启挂载 环境规…...

轨迹在线识别导向的3D折线焊缝机器人摆动GMAW实时跟踪系统【附程序】
✨ 长期致力于3D折线焊缝、机器人、GMAW、轨迹在线识别、焊缝跟踪研究工作,擅长数据搜集与处理、建模仿真、程序编写、仿真设计。 ✅ 专业定制毕设、代码 ✅ 如需沟通交流,点击《获取方式》 (1)基于激光位移传感与密度聚类点云在线…...
)
STM32CubeMX配置SPI驱动W25Q128实战:从硬件连接到DMA优化(附完整代码)
STM32CubeMX配置SPI驱动W25Q128实战:从硬件连接到DMA优化 在嵌入式开发中,SPI接口的Flash存储器因其高速、简单和可靠的特点,成为存储配置数据、日志和固件的理想选择。W25Q128作为Winbond公司推出的128Mbit串行Flash存储器,广泛…...

机器学习实战地形图:从问题定义到模型监控的端到端闭环
1. 项目概述:这不是一本“速成手册”,而是一张机器学习领域的实操地形图 “Machine Learning A-Z Briefly Explained”——光看标题,很多人第一反应是“又一本入门书?”、“是不是那种翻两页就堆满公式、第三章就开始推导梯度下降…...

Windows安全中心空白0x80073d0a注册表修复指南
1. 这不是“界面卡住”,而是Windows安全服务的底层通信断联了你点开Windows 10 Defender安全中心,看到的不是熟悉的病毒防护、防火墙状态、设备性能与健康状况面板,而是一片灰白——顶部菜单栏勉强能显示“主页”“病毒和威胁防护”“防火墙和…...
)
大学生HTML期末大作业——HTML+CSS+JavaScript公司网站(自行车)
HTMLCSSJS【公司网站】网页设计期末课程大作业 web前端开发技术 web课程设计 网页规划与设计💥 文章目录一、🏁 网站题目二、🚩 网站描述三、🎌 网站介绍四、🏴 网站效果五、🏳️ 网站代码六、🏳…...

液冷及前沿散热技术的理论分析:从宏观系统到芯片级散热的范式跃迁
🎓作者简介:科技自媒体优质创作者 🌐个人主页:莱歌数字-CSDN博客 211、985硕士,从业16年 从事结构设计、热设计、售前、产品设计、项目管理等工作,涉足消费电子、新能源、医疗设备、制药信息化、核工业等…...

Keil C251启动代码中?C?INITEDATA机制详解
1. C251启动代码中的?C?INITEDATA机制解析在嵌入式开发领域,Keil C251编译器的启动过程隐藏着许多工程师容易忽略的关键细节。其中位于?C_C51STARTUP?2段的?C?INITEDATA例程,就是这样一个看似简单却至关重要的初始化环节。这个机制负责处理全局nea…...

Maxwell 磁芯损耗模型怎么选?Power Ferrite vs B-P Curve
🔖 开篇一句话总结 Power Ferrite:用斯坦梅茨公式算损耗,简单高效,适合标准铁氧体材料快速估算。 B-P Curve:直接用实测数据点插值,精度更高,适合非标准材料或追求极致仿真的场景。 一、底层逻辑有什么不一样? 🔹 Power Ferrite:公式拟合的 “标准模板” 它基于经…...

如何用Python快速接入Taotoken调用多模型API完成开发任务
🚀 告别海外账号与网络限制!稳定直连全球优质大模型,限时半价接入中。 👉 点击领取海量免费额度 如何用Python快速接入Taotoken调用多模型API完成开发任务 对于开发者而言,快速验证想法、构建原型是开发流程中的关键环…...

用PyTorch手把手实现PGD对抗训练:从FGM的‘一步到位’到‘小步快跑’的实战代码详解
用PyTorch手把手实现PGD对抗训练:从FGM的‘一步到位’到‘小步快跑’的实战代码详解 对抗训练已成为提升模型鲁棒性的核心技术之一。不同于FGM(Fast Gradient Method)的"一步到位"策略,PGD(Projected Gradie…...