[STM32][Bootloader][教程]STM32 HAL库 Bootloader开发和测试教程
0. 项目移植
对于不想知道其执行过程的朋友来说,可以直接移植,我的板子是STM32F411CER6, 512K M4内核
项目地址:
- Bootloader(可以自己写标志位用于自测,项目中这部分代码已经被注释,可以打开自行测试):
- 配套测试程序:
0.1 Bootloader移植
-
修改刷写大小,我用的Cubeide,我使用第一个扇区当作bootloader,其为16k
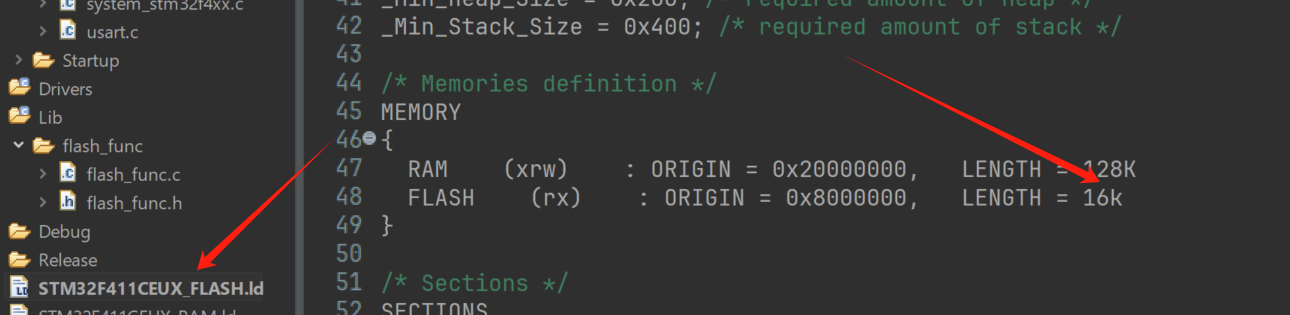
-
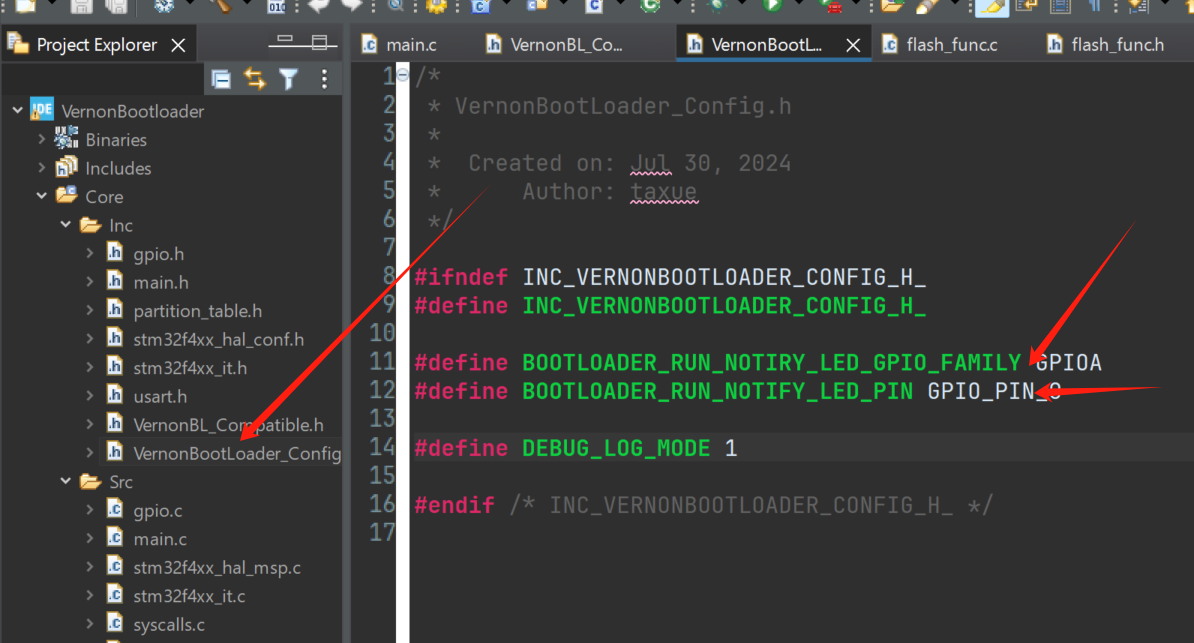
修改指示灯引脚
-
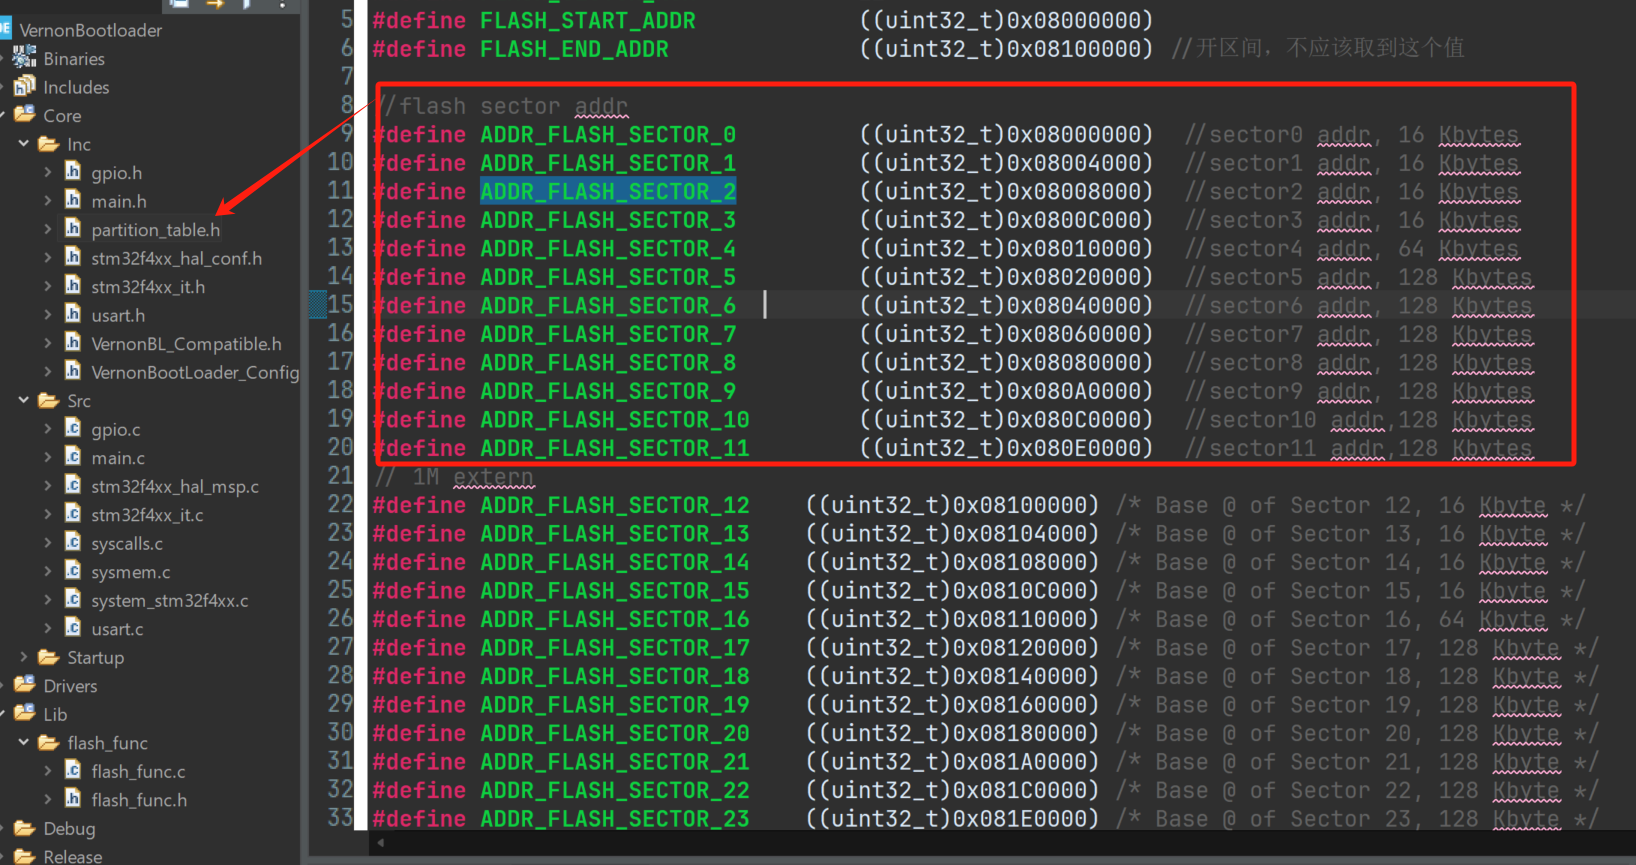
修改扇区开始地址,根据自己的芯片的内部FLASH扇区分配,分配对应的起始地址
-
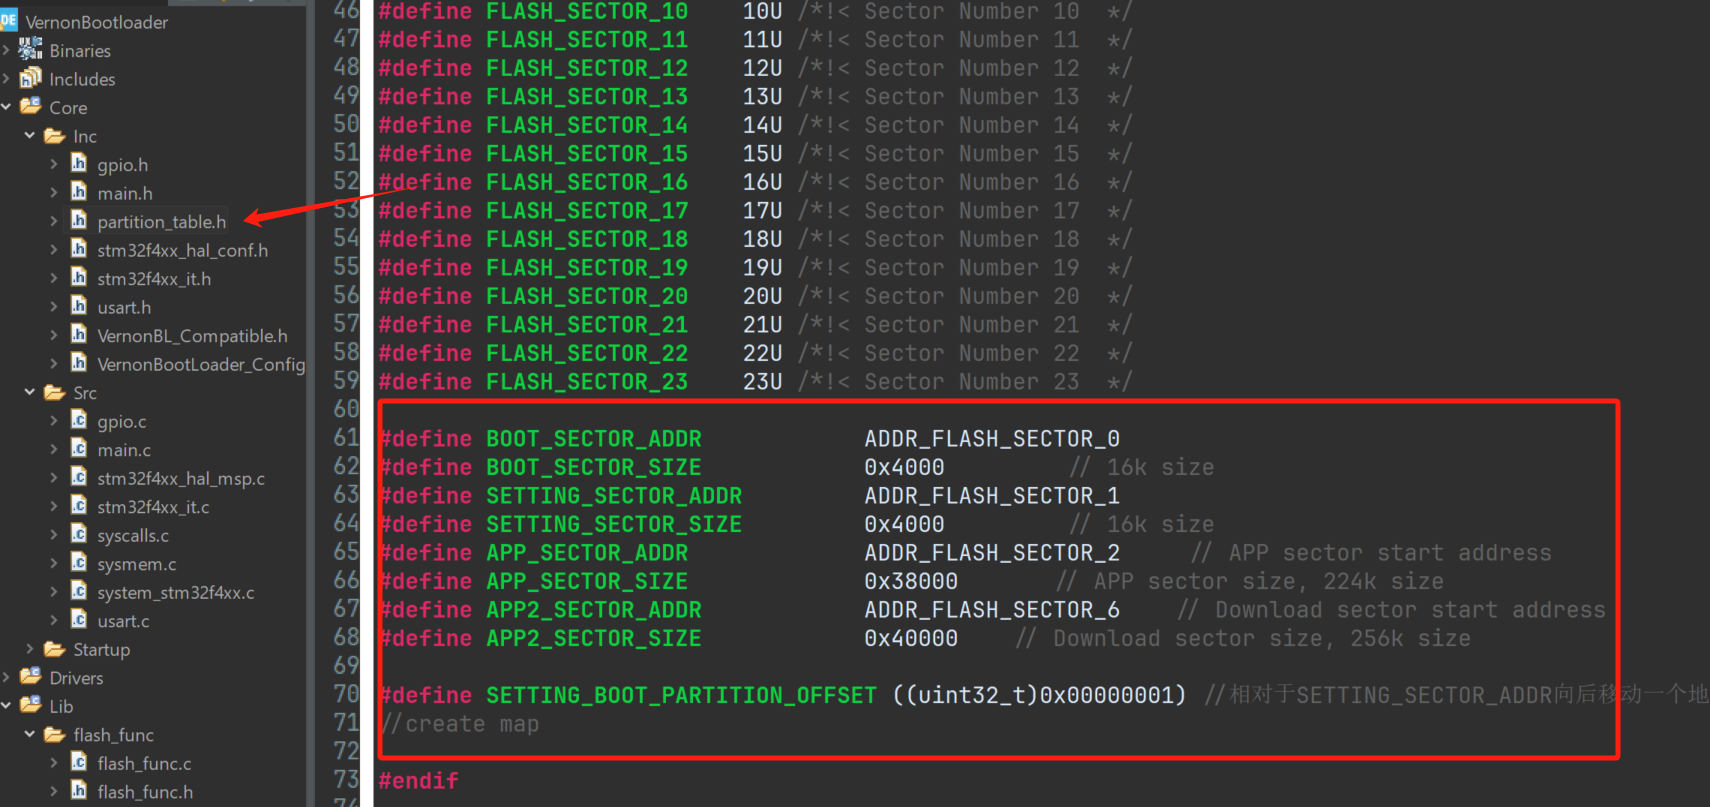
修改分区开始地址 ,分区参考1.1中的分区表进行分区
-
修改刷写大小
0.2 应用程序和Bootloaer配合
-
应用程序只要正确的将程序刷写到对应的分区开始地址即可,刷写示例程序参照 2.2
-
应用程序可以选择性包含以下两个文件,
VernonBL_Compatible.h文件用于指示Settings分区中各个变量的枚举值,便于和Bootloader交互,partition_table.h则保存分区表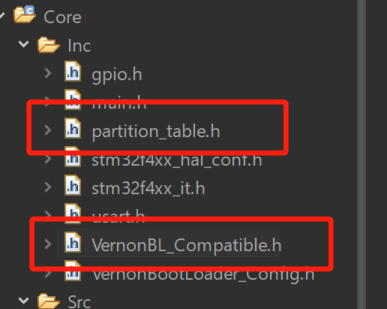
-
最为重要的一步!!!
重定义向量表,设置向量表偏移量,0x0000_8000是因为前两个分区占据了32k大小,换成十六进制为0x8000
-
魔术棒修改刷写地址
1. 整体思路
正常的裸机STM32直接开始执行程序,为了能够正式启动应用程序之前能过做更多的功能,比如固件更新等,因此我们需要Bootloader
在正常的STM32启动流程中,其实也有Bootloader的身影存在,即我们在开发的时候所看到的启动文件。
我们先来大致过一下正常的STM32是如何进行启动的。
- STM32首先将ROM的0x0800_0000映射成0x0000_0000
- STM32获取0x0800_0000的第一地址内的内容(连续取32位),此内容即为MSP堆栈指针,此后单片机便从此地址开始读取数据
- STM32获取从0x0800_0000偏移四个地址的内容(0x0800_0004)(因为上面读取了32位),此内容则为PC指针的内容,至此,单片机跳转到0x0800_0004中所代表地址(因为此地址的值给了PC指针),PC指针的地址刚好是函数SystemInit的地址
- SystemInit中负责相关时钟初始化等工作。
具体的启动细节这里不在解释,读者可自行查阅其他文章
1.1 分区介绍
分区有好几种分区方式,具体可以参见这个文章https://blog.csdn.net/ShenZhen_zixian/article/details/129064681
要想实现Bootloader启动,我们就应该先给ROM 进行分区,这里我们采用一种全新的方式,这种方式,我们就得采用奇数和偶数更新法,就是奇数版本号更新到Application,偶数版本更新到Application_2,因为我们两个分区的程序中断向量表映射位置是不同的。优点就是有一个版本的备份。
下图对STM32F411CEU6 512K的ROM进行分配的,STM32F1系列可以分配到1k一个扇区
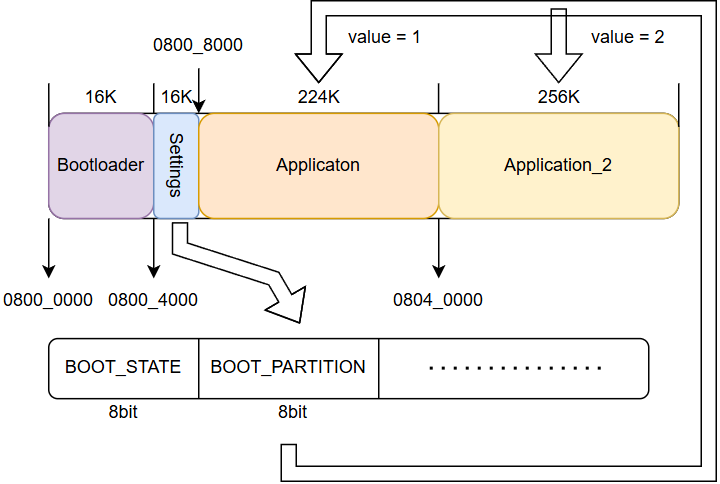
我们采用Bootloader分区+设置参数+双分区的形式,和其他教程不同的是,Application_2也用于运行程序,即:Bootloader只识别BOOT_PARTITION中的内容,用来识别跳转到第Application分区还是Application_2分区,这样做的好处是即使新版本任何错误,我们Bootloader可以自动切换回旧的版本运行。防止造成设备故障。
1.2 启动过程
阅读本章之前请先阅读这个文章,讲的很好很清楚:https://shatang.github.io/2020/08/12/IAP%E5%8D%87%E7%BA%A7-Bootloader%E5%88%B6%E4%BD%9C/
使用Bootloader之后,我们的启动过程为:先启动Bootloader,Bootloader再来启动应用程序。具体在Bootloader内应该:
- 判断栈顶指针是否合规
- 获得应用程序的PC指针
- 设置应用程序MSP堆栈指针
- 通过PC地址跳转到应用程序,开始执行应用程序
具体在应用程序内应该:
- 重定向向量表–>设置向量表偏移量(注意一定要设置偏移量(VECT_TAB_OFFSET)来完成重定向向量表,而不是设置FLASH_BASE来达到重定向向量表的效果,不然DMA之类的中断无法使用!!!后面会详细讲到)
- 检查是否有用户更新,用户更新的时候刷写到Application的另外一个分区
- 写Settings中的信息,用于指示Bootloader下一步启动时启动哪个Application
2. 代码编写
2.1 Boot loader编写
2.1.0 CubeMX配置
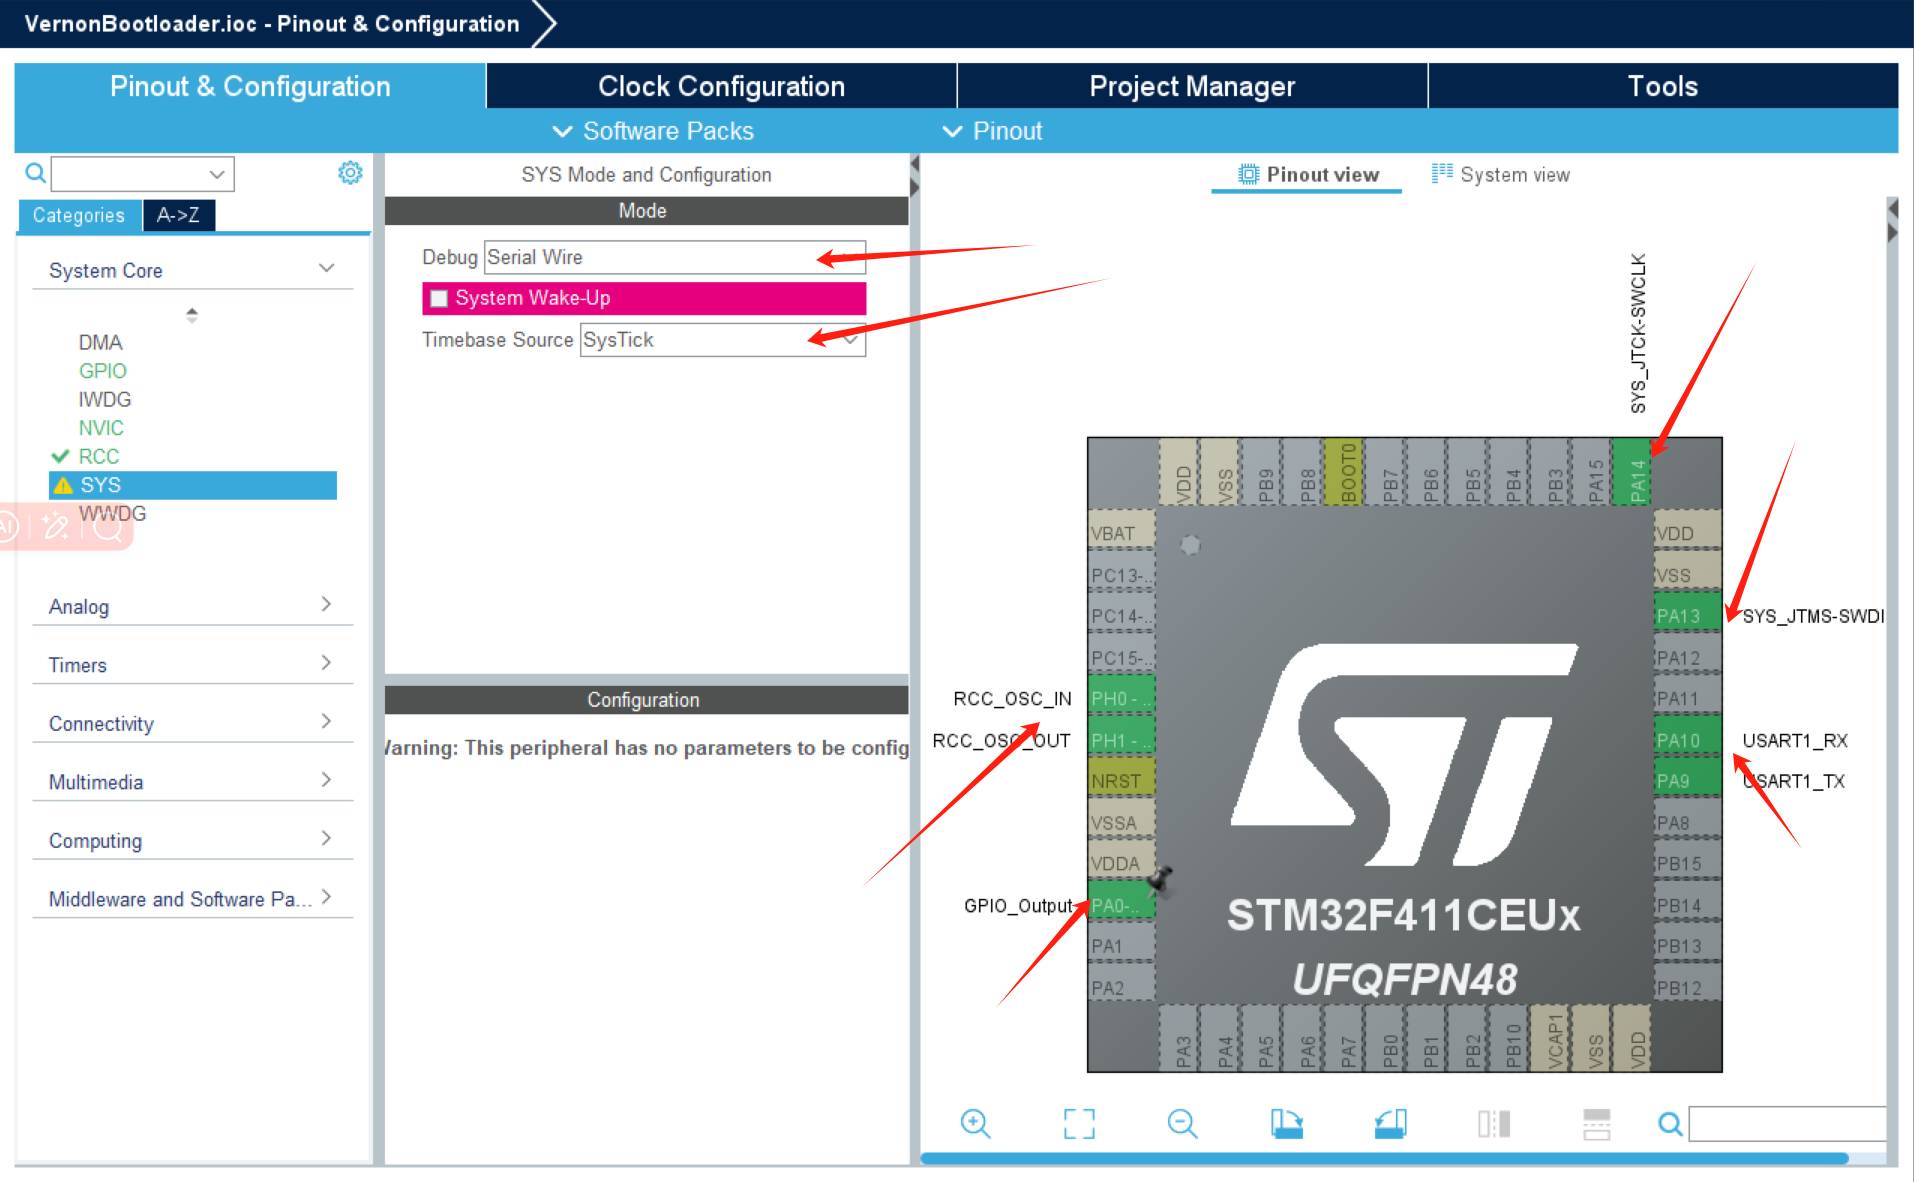
cubemx里面的这些引脚我相信各位一看就知道我配置了什么,简单地说除了必要的配置,我另外配置了串口、还有一个指示灯(PA0),指示灯使用Systick提供闪烁功能。
要注意的是,STM32F411CEU6 HAL库Systick的中断回调默认官方对其进行了关闭,按照如下方式打开:
如果你的Systick_Handler打开是这样子的,只有一个HAL_IncTick()
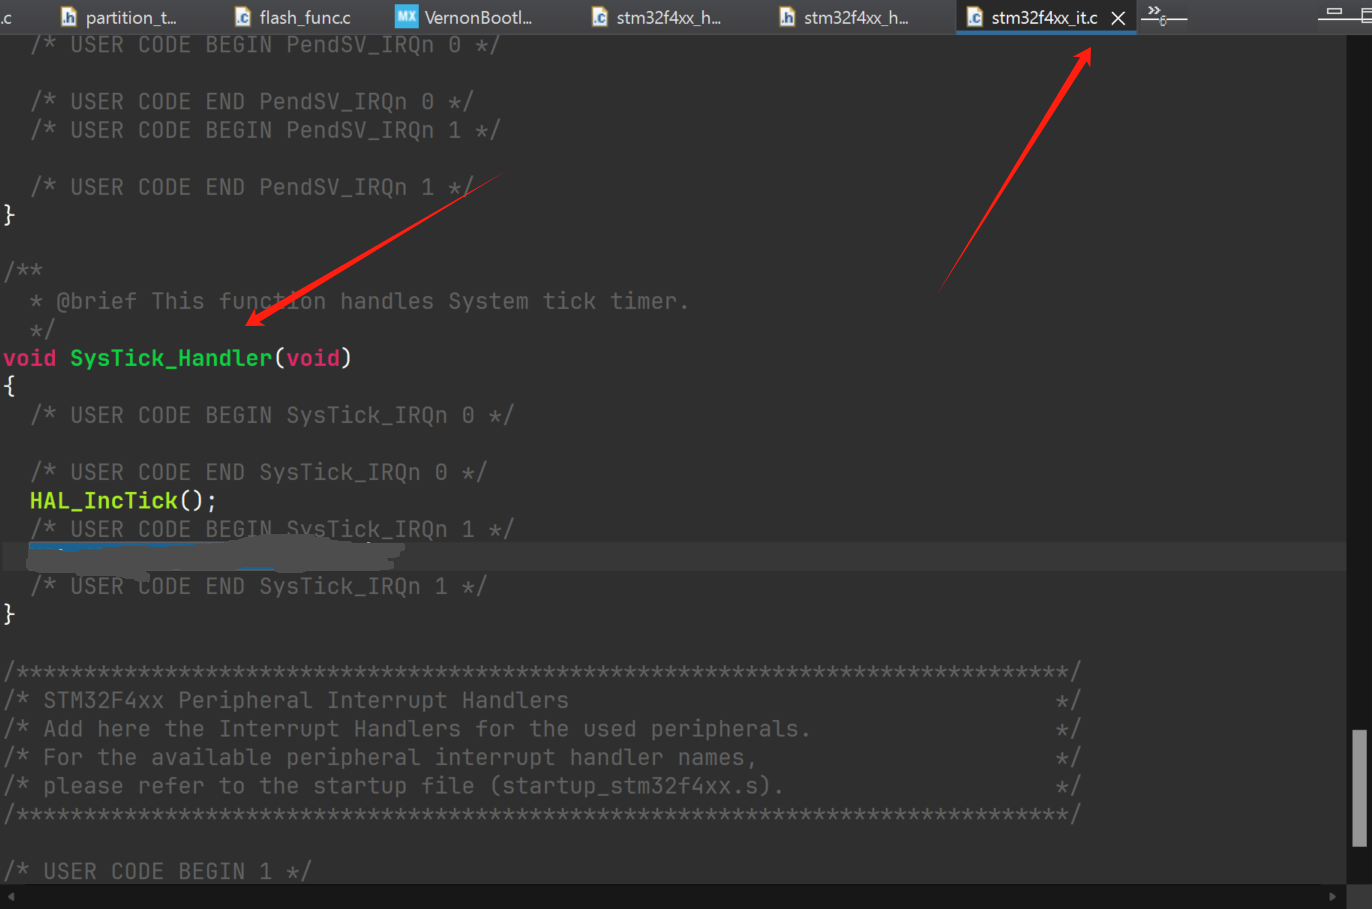
那么改成这样,把HAL_SYSTICK_IRQHandler()加进去
//stm32f4xx_it.c
/*** @brief This function handles System tick timer.*/
void SysTick_Handler(void)
{/* USER CODE BEGIN SysTick_IRQn 0 *//* USER CODE END SysTick_IRQn 0 */HAL_IncTick();/* USER CODE BEGIN SysTick_IRQn 1 */HAL_SYSTICK_IRQHandler();/* USER CODE END SysTick_IRQn 1 */
}
这样你main.c中才能写Systick回调
//mainc.c
void HAL_SYSTICK_Callback(void){bootloader_run_notify_led_count ++;if(bootloader_run_notify_led_count >= 600){bootloader_run_notify_led_count = 0;led_blink_on = ~led_blink_on;}
}
2.1.1 跳转函数
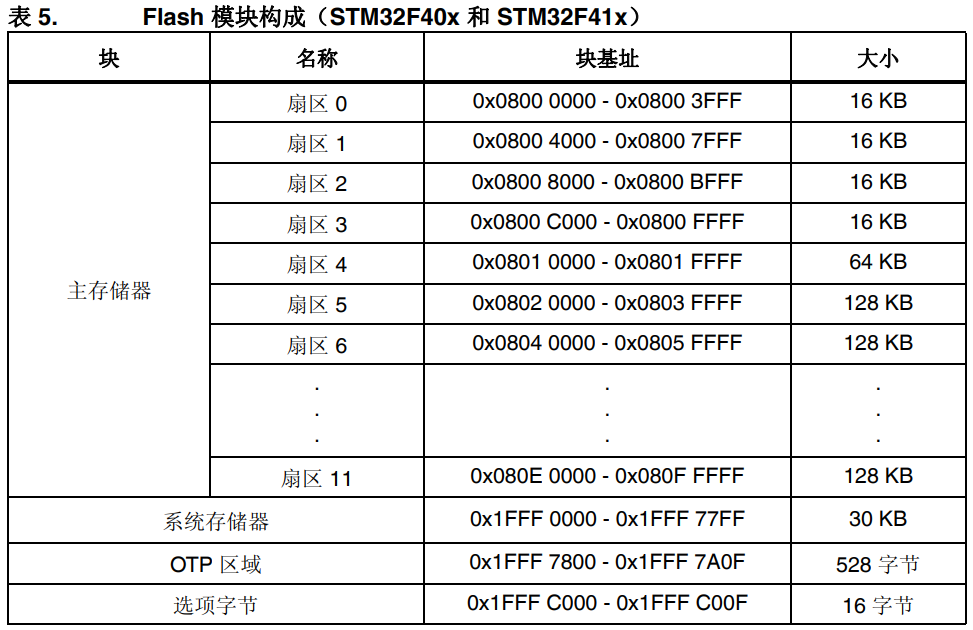
在编写跳转函数之前,我们应该先根据手册将扇区定义好,我这里用的STM32F411CEU6,其有512K Flash,因此根据图表,列出定义
//partation_table.h
#define ADDR_FLASH_SECTOR_0         ((uint32_t)0x08000000) 	//sector0 addr, 16 Kbytes
#define ADDR_FLASH_SECTOR_1         ((uint32_t)0x08004000) 	//sector1 addr, 16 Kbytes
#define ADDR_FLASH_SECTOR_2         ((uint32_t)0x08008000) 	//sector2 addr, 16 Kbytes
#define ADDR_FLASH_SECTOR_3         ((uint32_t)0x0800C000) 	//sector3 addr, 16 Kbytes
#define ADDR_FLASH_SECTOR_4         ((uint32_t)0x08010000) 	//sector4 addr, 64 Kbytes
#define ADDR_FLASH_SECTOR_5         ((uint32_t)0x08020000) 	//sector5 addr, 128 Kbytes
#define ADDR_FLASH_SECTOR_6         ((uint32_t)0x08040000) 	//sector6 addr, 128 Kbytes
#define ADDR_FLASH_SECTOR_7         ((uint32_t)0x08060000) 	//sector7 addr, 128 Kbytes
编写其跳转函数:我们根据官方的IAP程序中的示例,我们直接拿过来。
//main.c
typedef  void (*pFunction)(void);static pFunction JumpToApplication;
static uint32_t JumpAddress;uint8_t IAP_LoadAPP(uint32_t AppxAddr)
{if (((*(__IO uint32_t*)AppxAddr) & 0x2FFE0000 ) == 0x20000000){/* Jump to user application */JumpAddress = *(__IO uint32_t*) (AppxAddr + 4); //PC指针地址JumpToApplication = (pFunction) JumpAddress;/* Initialize user application's Stack Pointer */__set_MSP(*(__IO uint32_t*) AppxAddr); //设置MSP指针JumpToApplication();return 0;}return -1;
}
2.2.2 日志
打印点东西,表示我进入Bootloader了
void print_boot_message(void)
{printf("\r\n--------- Enter Vernon BootLoader --------\r\n");printf("\r\n");printf("========= flash partition table ==========\r\n");printf("|     name     |   offset   |    size    |\r\n");printf("--------------------------------------\r\n");printf("| bootloader   | 0x%08lx | 0x%08x |\r\n", BOOT_SECTOR_ADDR, BOOT_SECTOR_SIZE);printf("| setting      | 0x%08lx | 0x%08x |\r\n", SETTING_SECTOR_ADDR, SETTING_SECTOR_SIZE);printf("| application1 | 0x%08lx | 0x%08x |\r\n", APP_SECTOR_ADDR, APP_SECTOR_SIZE);printf("| application2 | 0x%08lx | 0x%08x |\r\n", APP2_SECTOR_ADDR, APP2_SECTOR_SIZE);printf("==========================================\r\n");printf("\r\n");
}
2.2.3 Flash刷写函数
下面这几个函数是用来写Settings这个分区里的标志位的,即BOOT_STATE和BOOT_PARTITION
//flash_fun.c
int8_t read_settings_boot_state(void)
{return *(__IO uint8_t *)(SETTING_SECTOR_ADDR);
}int8_t write_settings_boot_state(uint8_t state)
{uint32_t sector_index;HAL_StatusTypeDef res;uint32_t read_buf;read_buf = *(__IO uint32_t *)(SETTING_SECTOR_ADDR); // 先把前四个字节数据读出来res = HAL_FLASH_Unlock();if (res != HAL_OK){printf("FLASH_UNLOCK ERROR\r\n");return -1;}sector_index = get_sector_from_addr(SETTING_SECTOR_ADDR);printf("[Bootloader]Erase ADDR 0x%08lx; Sector No.%ld...\r\n", SETTING_SECTOR_ADDR, sector_index);FLASH_Erase_Sector(sector_index, FLASH_VOLTAGE_RANGE_3);printf("[Bootloader]Flash ADDR 0x%08lx ...\r\n", SETTING_SECTOR_ADDR);// 把想要写入的信息写入readbuf中去,最后把32位信息一起写进去read_buf &= 0xffffff00; // 先把第一个字节数据清0,FLASH是高字节存储在高位,低字节存储在低位,所以应该把低字节设置为0read_buf |= state;res = HAL_FLASH_Program(FLASH_TYPEPROGRAM_WORD, SETTING_SECTOR_ADDR, read_buf);if (res != HAL_OK){printf("[Bootloader]FLASH_WRITE ERROR\r\n");return -1;}res = HAL_FLASH_Lock();if (res != HAL_OK){printf("[Bootloader]FLASH_LOCK ERROR\r\n");return -1;}return 0;
}int8_t read_settings_boot_partition(void)
{return *(__IO uint8_t *)(SETTING_SECTOR_ADDR + SETTING_BOOT_PARTITION_OFFSET);
}int8_t write_settings_boot_partition(int8_t state)
{int sector_index;HAL_StatusTypeDef res;uint32_t read_buf;read_buf = *(__IO uint32_t *)(SETTING_SECTOR_ADDR); // 先把前四个字节数据读出来res = HAL_FLASH_Unlock();if (res != HAL_OK){printf("FLASH_UNLOCK ERROR\r\n");return -1;}sector_index = get_sector_from_addr(SETTING_SECTOR_ADDR);printf("[Bootloader]Erase ADDR 0x%08lx; Sector No.%d...\r\n", SETTING_SECTOR_ADDR, sector_index);FLASH_Erase_Sector(sector_index, FLASH_VOLTAGE_RANGE_3);printf("[Bootloader]Flash ADDR 0x%08lx ...\r\n", SETTING_SECTOR_ADDR);// 把想要写入的信息写入readbuf中去,最后把32位信息一起写进去read_buf &= 0xffff00ff;   // 先把第二个字节数据清0,FLASH是高字节存储在高位,低字节存储在低位,所以应该把低字节设置为0read_buf |= (state << 8); // 放在第二个字节的位置res = HAL_FLASH_Program(FLASH_TYPEPROGRAM_WORD, SETTING_SECTOR_ADDR, read_buf);if (res != HAL_OK){printf("[Bootloader]FLASH_WRITE ERROR\r\n");return -1;}res = HAL_FLASH_Lock();if (res != HAL_OK){printf("[Bootloader]FLASH_LOCK ERROR\r\n");return -1;}return 0;
}
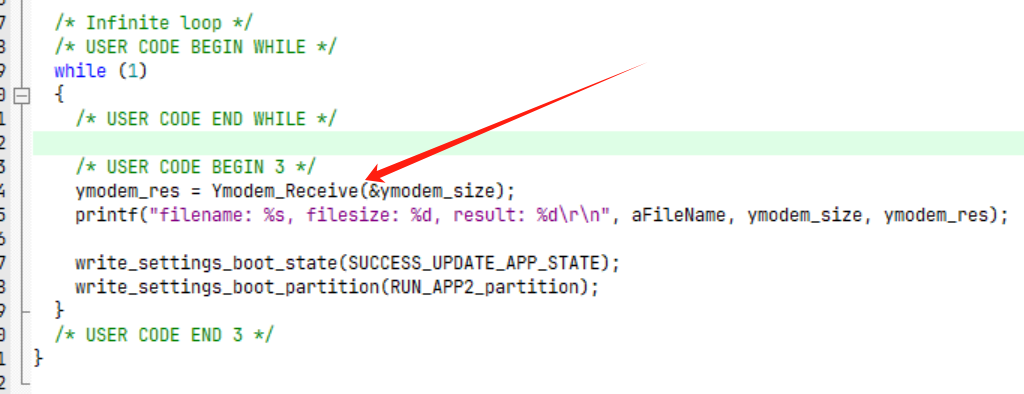
2.2.4 根据标志位启动对应应用程序
BOOT_STATE有三个状态,分别为运行状态,更新应用程序状态和应用程序更新完成状态,应用程序更新由用户编写的应用程序完成,这里只负责根据对应标志位跳转。
//main.c
boot_state = read_settings_boot_state();boot_partition_select = read_settings_boot_partition();switch(boot_state){case RUN_APP_STATE:printf("[Bootloader]Start to run APP[%d] ...\r\n", boot_partition_select);if(boot_partition_select == RUN_APP1_partition){err = IAP_LoadAPP(APP_SECTOR_ADDR);if(err != 0){printf("[Bootloader]Run App error, please flash the new bin...\r\n");}}else if(boot_partition_select == RUN_APP2_partition){err = IAP_LoadAPP(APP2_SECTOR_ADDR);if(err != 0){printf("[Bootloader]Run App error, please flash the new bin...\r\n");}}else{printf("[Bootloader]Can not find the select settings of the partition\r\n");}break;case UPDATE_APP_STATE:printf("[Bootloader]Update APP...\r\n");break;case SUCCESS_UPDATE_APP_STATE:printf("[Bootloader]Success Update APP...Then Reboot System\r\n");err = write_settings_boot_state(RUN_APP_STATE);if(err != 0){printf("FLASH ERROR!\r\n");}__ASM volatile ("cpsid i"); //关闭总中断HAL_NVIC_SystemReset();break;default:printf("[Bootloader]Unknown Update APP...Error Code : %x\r\n", boot_state);}
2.2 用户程序编写-测试
在应用程序中,使用YModem协议进行数据传输,写入新的固件,之后再由应用程序写入Setttings配置信息,重启之后Bootloader即可自动启动新更新的应用。
2.2.1 Flash和Ymodem函数的实现
这两个部分在Cubemx的实例中有,但是其Flash函数个人测试无法使用,还有Ymodem函数有bug,个人对其进行了修改和适配,篇幅限制,就不说改了哪里了,大家直接在Gitee克隆下来用吧,具体代码可以去库里面查看
2.2.1.1 Flash函数
在Bootloader中的函数中再添加
//flash_func.c
// FLash Function
/*** @brief  This function does an erase of all user flash area* @param  StartSector: start of user flash area* @retval 0: user flash area successfully erased*         1: error occurred*/
uint32_t flash_erase(uint32_t StartAdd)
{uint32_t UserStartSector;uint32_t SectorError;FLASH_EraseInitTypeDef pEraseInit;HAL_FLASH_Unlock();/* Get the sector where start the user flash area */UserStartSector = get_sector_from_addr(StartAdd);pEraseInit.TypeErase = TYPEERASE_SECTORS;pEraseInit.Sector = UserStartSector;pEraseInit.NbSectors = 5;pEraseInit.VoltageRange = VOLTAGE_RANGE_3;if (HAL_FLASHEx_Erase(&pEraseInit, &SectorError) != HAL_OK){/* Error occurred while page erase */return (1);}HAL_FLASH_Lock();return (0);
}/*** @brief  This function writes a data buffer in flash (data are 32-bit aligned).* @note   After writing data buffer, the flash content is checked.* @param  StartAddress: start address for writing data buffer* @param  EndAddress: end address for writing data buffer* @param  Data: pointer on data buffer* @param  DataLength: length of data buffer (unit is 32-bit word)* @retval 0: Data successfully written to Flash memory*         -2: Error occurred while writing data in Flash memory*         -1: Written Data in flash memory is different from expected one*/
int8_t flash_write_continue(uint32_t StartAddress, uint32_t EndAddress,uint32_t *Data, uint32_t DataLength)
{int32_t i = 0;HAL_FLASH_Unlock();for (i = 0; (i < DataLength) && (StartAddress <= (EndAddress - 4)); i++){/* Device voltage range supposed to be [2.7V to 3.6V], the operation willbe done by word */if (HAL_FLASH_Program(TYPEPROGRAM_WORD, StartAddress, *(uint32_t *)(Data + i)) == HAL_OK){/* Check the written value */if (*(uint32_t *)StartAddress != *(uint32_t *)(Data + i)){/* Flash content doesn't match SRAM content */return (-1);}/* Increment FLASH destination address */StartAddress += 4;}else{/* Error occurred while writing data in Flash memory */return (-2);}}HAL_FLASH_Lock();return (0);
}
2.2.1.2 Ymodem函数
关于协议,可以看这篇https://blog.csdn.net/weixin_41865104/article/details/107388202
//ymedom.c
/********************************************************************************* @file    IAP/IAP_Main/Src/ymodem.c* @author  MCD Application Team* @brief   This file provides all the software functions related to the ymodem*          protocol.******************************************************************************* @attention** Copyright (c) 2017 STMicroelectronics.* All rights reserved.** This software is licensed under terms that can be found in the LICENSE file* in the root directory of this software component.* If no LICENSE file comes with this software, it is provided AS-IS.********************************************************************************/
/** @addtogroup STM32F4xx_IAP_Main* @{*//* Includes ------------------------------------------------------------------*/
#include "common.h"
#include "ymodem.h"
#include "string.h"
#include "main.h"
#include "usart.h"
#include "VernonBL_Compatible.h"
#include "flash_func.h"/* Private typedef -----------------------------------------------------------*/
/* Private define ------------------------------------------------------------*/
#define CRC16_F /* activate the CRC16 integrity */
#define UartHandle huart1
#define APPLICATION_ADDRESS APP2_SECTOR_ADDR
#define APPLICATION_PARTITION_SIZE APP_SECTOR_SIZE
/* Private macro -------------------------------------------------------------*/
/* Private variables ---------------------------------------------------------*/
__IO uint32_t flashdestination;
/* @note ATTENTION - please keep this variable 32bit aligned */
uint8_t aPacketData[PACKET_1K_SIZE + PACKET_DATA_INDEX + PACKET_TRAILER_SIZE];
uint8_t aFileName[FILE_NAME_LENGTH];
/* Private function prototypes -----------------------------------------------*/
static HAL_StatusTypeDef ReceivePacket(uint8_t *p_data, uint32_t *p_length, uint32_t timeout);
uint16_t UpdateCRC16(uint16_t crc_in, uint8_t byte);
uint16_t Cal_CRC16(const uint8_t *p_data, uint32_t size);
uint8_t CalcChecksum(const uint8_t *p_data, uint32_t size);/* Private functions ---------------------------------------------------------*//*** @brief  Receive a packet from sender* @param  data* @param  length*     0: end of transmission*     2: abort by sender*    >0: packet length* @param  timeout* @retval HAL_OK: normally return*         HAL_BUSY: abort by user*/
static HAL_StatusTypeDef ReceivePacket(uint8_t *p_data, uint32_t *p_length, uint32_t timeout)
{uint32_t crc;uint32_t packet_size = 0;HAL_StatusTypeDef status;uint8_t char1;*p_length = 0;status = HAL_UART_Receive(&UartHandle, &char1, 1, timeout);if (status == HAL_OK){switch (char1){case SOH:packet_size = PACKET_SIZE;break;case STX:packet_size = PACKET_1K_SIZE;break;case EOT:break;case CA:if ((HAL_UART_Receive(&UartHandle, &char1, 1, timeout) == HAL_OK) && (char1 == CA)){packet_size = 2;}else{status = HAL_ERROR;}break;case ABORT1:case ABORT2:status = HAL_BUSY;break;default:status = HAL_ERROR;break;}*p_data = char1;if (packet_size >= PACKET_SIZE){status = HAL_UART_Receive(&UartHandle, &p_data[PACKET_NUMBER_INDEX], packet_size + PACKET_OVERHEAD_SIZE, timeout);/* Simple packet sanity check */if (status == HAL_OK){if (p_data[PACKET_NUMBER_INDEX] != ((p_data[PACKET_CNUMBER_INDEX]) ^ NEGATIVE_BYTE)){packet_size = 0;status = HAL_ERROR;}else{/* Check packet CRC */crc = p_data[packet_size + PACKET_DATA_INDEX] << 8;crc += p_data[packet_size + PACKET_DATA_INDEX + 1];if (Cal_CRC16(&p_data[PACKET_DATA_INDEX], packet_size) != crc){packet_size = 0;status = HAL_ERROR;}}}else{packet_size = 0;}}}*p_length = packet_size;return status;
}/*** @brief  Update CRC16 for input byte* @param  crc_in input value* @param  input byte* @retval None*/
uint16_t UpdateCRC16(uint16_t crc_in, uint8_t byte)
{uint32_t crc = crc_in;uint32_t in = byte | 0x100;do{crc <<= 1;in <<= 1;if (in & 0x100)++crc;if (crc & 0x10000)crc ^= 0x1021;}while (!(in & 0x10000));return crc & 0xffffu;
}/*** @brief  Cal CRC16 for YModem Packet* @param  data* @param  length* @retval None*/
uint16_t Cal_CRC16(const uint8_t *p_data, uint32_t size)
{uint32_t crc = 0;const uint8_t *dataEnd = p_data + size;while (p_data < dataEnd)crc = UpdateCRC16(crc, *p_data++);crc = UpdateCRC16(crc, 0);crc = UpdateCRC16(crc, 0);return crc & 0xffffu;
}/*** @brief  Calculate Check sum for YModem Packet* @param  p_data Pointer to input data* @param  size length of input data* @retval uint8_t checksum value*/
uint8_t CalcChecksum(const uint8_t *p_data, uint32_t size)
{uint32_t sum = 0;const uint8_t *p_data_end = p_data + size;while (p_data < p_data_end){sum += *p_data++;}return (sum & 0xffu);
}/* Public functions ---------------------------------------------------------*/
/*** @brief  Receive a file using the ymodem protocol with CRC16.* @param  p_size The size of the file.* @retval COM_StatusTypeDef result of reception/programming*/
COM_StatusTypeDef Ymodem_Receive(uint32_t *p_size)
{uint32_t i, packet_length, session_done = 0, file_done, errors = 0, session_begin = 0;// uint32_t flashdestination;uint32_t ramsource, filesize, packets_received;uint8_t *file_ptr;uint8_t file_size[FILE_SIZE_LENGTH], tmp;COM_StatusTypeDef result = COM_OK;*p_size = 0; //it may be a random value if you not assigned value in out of the function/* Initialize flashdestination variable */flashdestination = APP2_SECTOR_ADDR;while ((session_done == 0) && (result == COM_OK)){packets_received = 0;file_done = 0;while ((file_done == 0) && (result == COM_OK)){switch (ReceivePacket(aPacketData, &packet_length, DOWNLOAD_TIMEOUT)){case HAL_OK:errors = 0;switch (packet_length){case 2:/* Abort by sender */Serial_PutByte(ACK);result = COM_ABORT;break;case 0:/* End of transmission */Serial_PutByte(ACK);file_done = 1;break;default:/* Normal packet */if (aPacketData[PACKET_NUMBER_INDEX] != (uint8_t)packets_received){Serial_PutByte(NAK);}else{if (packets_received == 0){/* File name packet */if (aPacketData[PACKET_DATA_INDEX] != 0){/* File name extraction */i = 0;file_ptr = aPacketData + PACKET_DATA_INDEX;while ((*file_ptr != 0) && (i < FILE_NAME_LENGTH)){aFileName[i++] = *file_ptr++;}/* File size extraction */aFileName[i++] = '\0';i = 0;file_ptr++;while ((*file_ptr != ' ') && (i < FILE_SIZE_LENGTH)){file_size[i++] = *file_ptr++;}file_size[i++] = '\0';Str2Int(file_size, &filesize);/* Test the size of the image to be sent *//* Image size is greater than Flash size */if (*p_size > (APPLICATION_PARTITION_SIZE + 1)){/* End session */tmp = CA;HAL_UART_Transmit(&UartHandle, &tmp, 1, NAK_TIMEOUT);HAL_UART_Transmit(&UartHandle, &tmp, 1, NAK_TIMEOUT);result = COM_LIMIT;}/* erase user application area */flash_erase(APPLICATION_ADDRESS);*p_size = filesize;Serial_PutByte(ACK);Serial_PutByte(CRC16);}/* File header packet is empty, end session */else{Serial_PutByte(ACK);file_done = 1;session_done = 1;break;}}else /* Data packet */{ramsource = (uint32_t)&aPacketData[PACKET_DATA_INDEX];/* Write received data in Flash */				if (flash_write_continue(flashdestination, APPLICATION_ADDRESS + APPLICATION_PARTITION_SIZE,(uint32_t*) ramsource, packet_length/4) == 0){//data transforming led blinkint value = 3;while(value --){HAL_Delay(50);HAL_GPIO_WritePin(GPIOA, GPIO_PIN_1, GPIO_PIN_RESET);HAL_Delay(50);HAL_GPIO_WritePin(GPIOA, GPIO_PIN_1, GPIO_PIN_SET);}flashdestination += packet_length;Serial_PutByte(ACK);}else /* An error occurred while writing to Flash memory */{/* End session */Serial_PutByte(CA);Serial_PutByte(CA);result = COM_DATA;}}packets_received++;session_begin = 1;}break;}break;case HAL_BUSY: /* Abort actually */Serial_PutByte(CA);Serial_PutByte(CA);result = COM_ABORT;break;default:if (session_begin > 0){errors++;}if (errors > MAX_ERRORS){/* Abort communication */Serial_PutByte(CA);Serial_PutByte(CA);}else{Serial_PutByte(CRC16); /* Ask for a packet */}break;}}}return result;
}/*******************(C)COPYRIGHT 2016 STMicroelectronics *****END OF FILE****/
最后外部调用即可

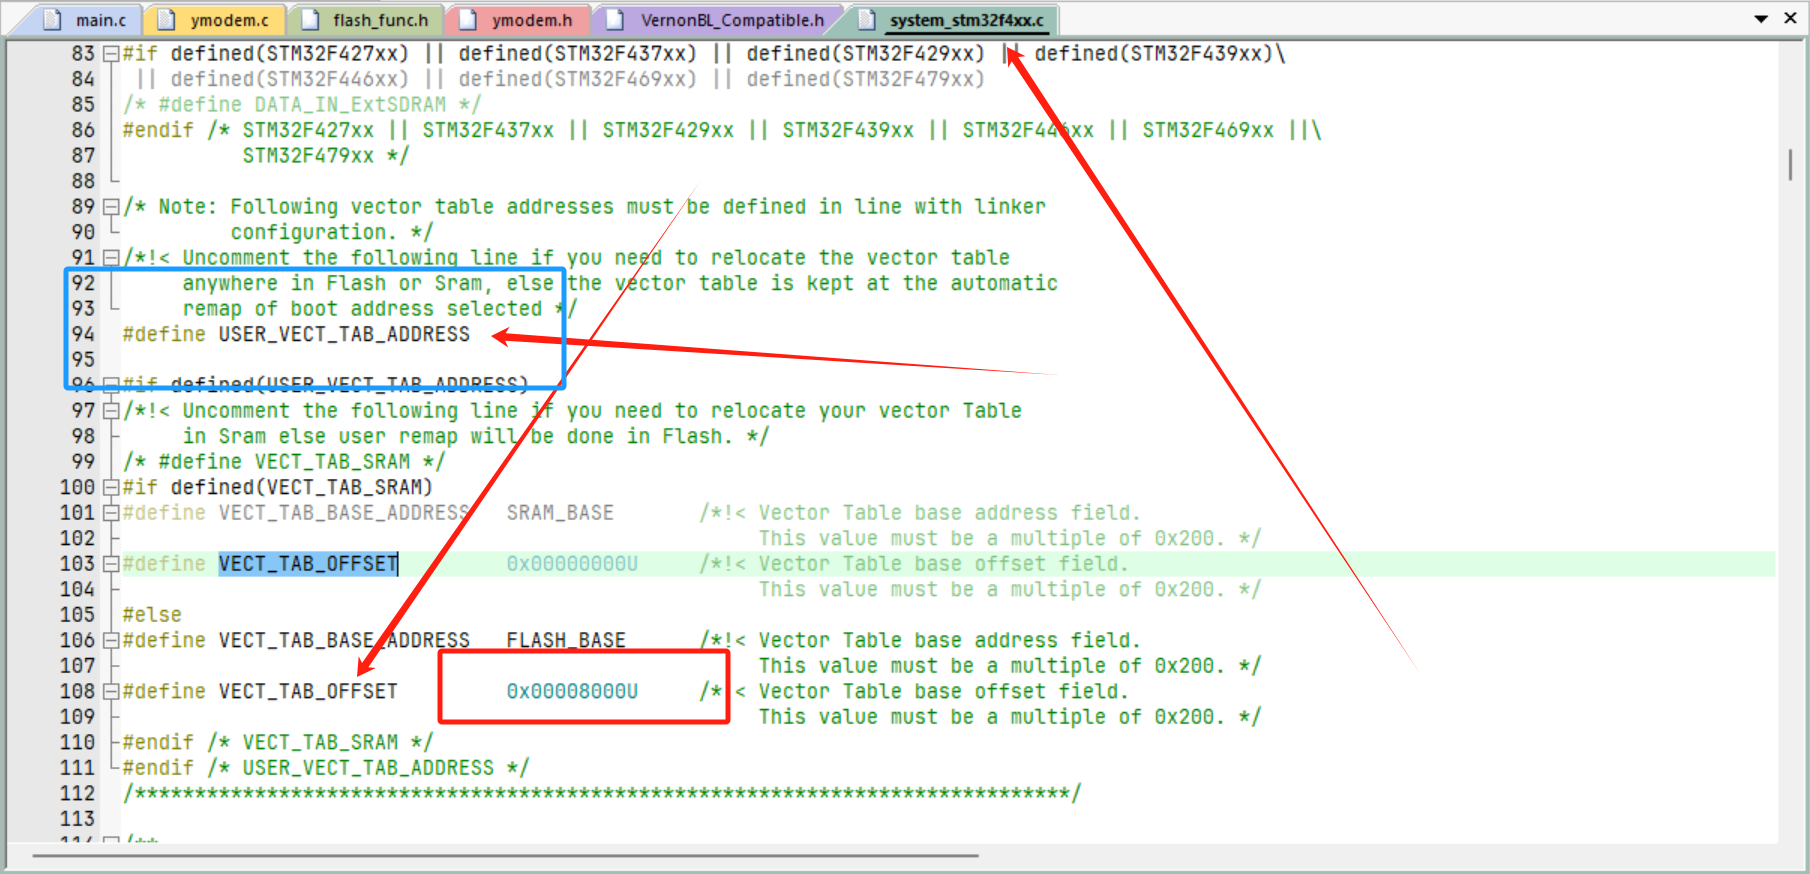
2.3 重定义向量表(重点看,有坑)
我们可以知道,我们的应用程序是写在了0x0800_8000的,那我们程序从这里开始不就可以了吗?事实也确实是这样,正常情况下应用程序应该从0x0800_0000开始,我们看下图
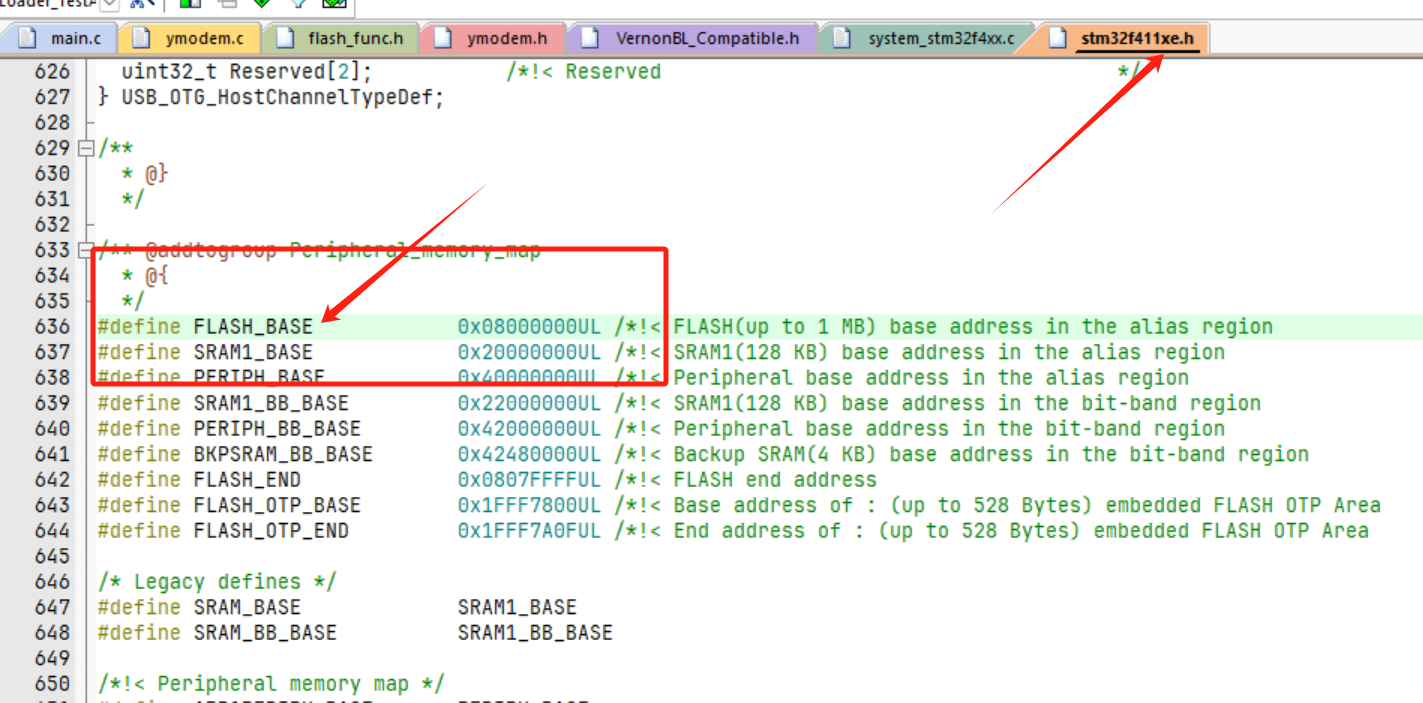
这里定义了FLASH_BASE,也确实是这样,正常情况从0x0800_0000开始,所以我们把这个变量改成0x0800_8000不就可以了吗?中断向量表也在从这个地址的开始写着。这不是完美吗?有些博主也确实是这么做的。能运行吗?能,如果不涉及DMA的话(不是说只有DMA,只是因为我写应用程序的时候用到了DMA,它出现了问题)。
所以我们坚决不能改这个!
所以我们应该改的是偏移值:
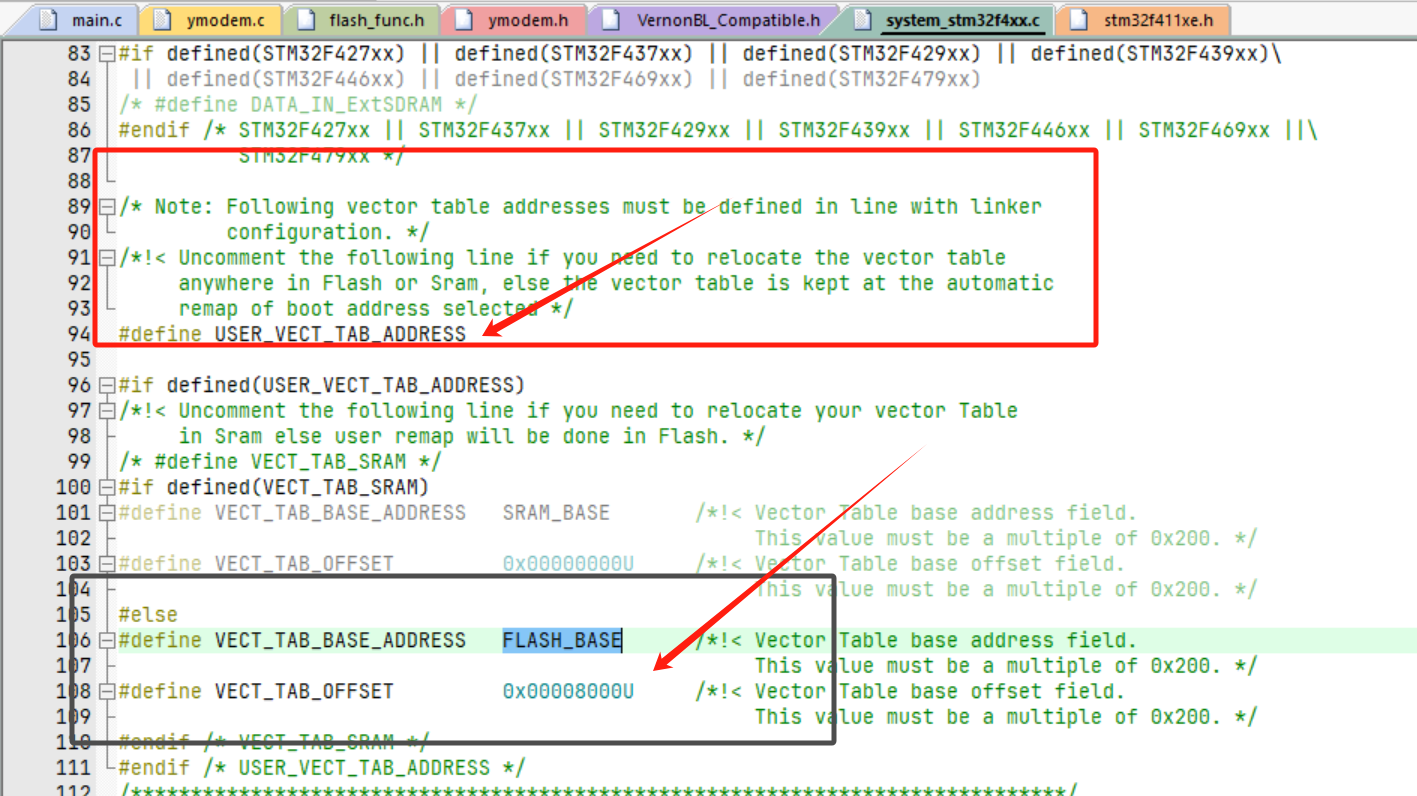
0x0000_8000是因为前两个分区占据了32k大小,换成十六进制为0x8000
其实源码中Note已经写的很清楚了,只不过我们不太注意哈哈。
这个小插曲我在学习这部分的时候所有博主都没说过,所以难免会出现这种问题,正常现象, 现在解决以免以后在工作中出现~
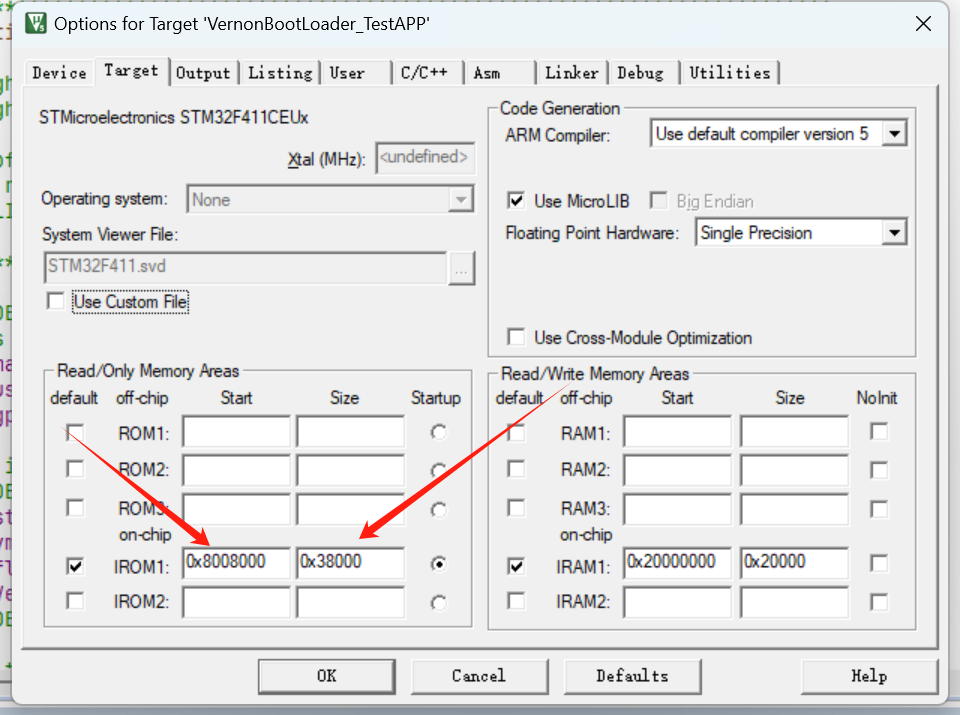
2.4 修改刷写地址
魔术棒里面修改地址和大小即可

2.5 刷写测试
这里使用软件Tera Term 5,因为其支持1k的Ymodem,刷写速度较快
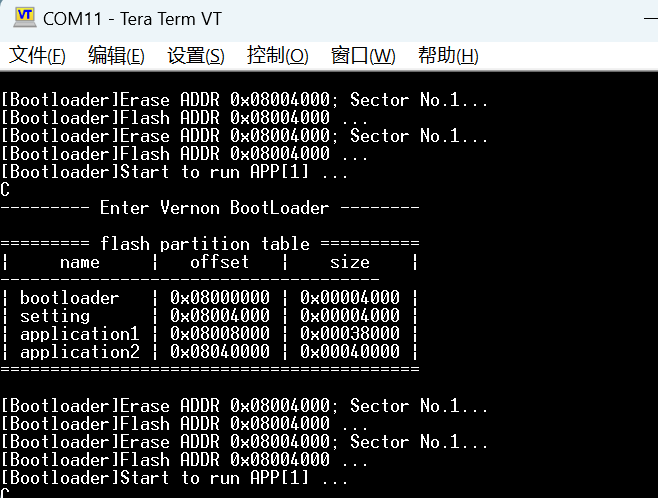
插入开发板,打开串口,可以发现Bootloader启动了,当其出现C字样的时候,表示其可以进行刷写。
选择bin文件,使用Ymodem发送
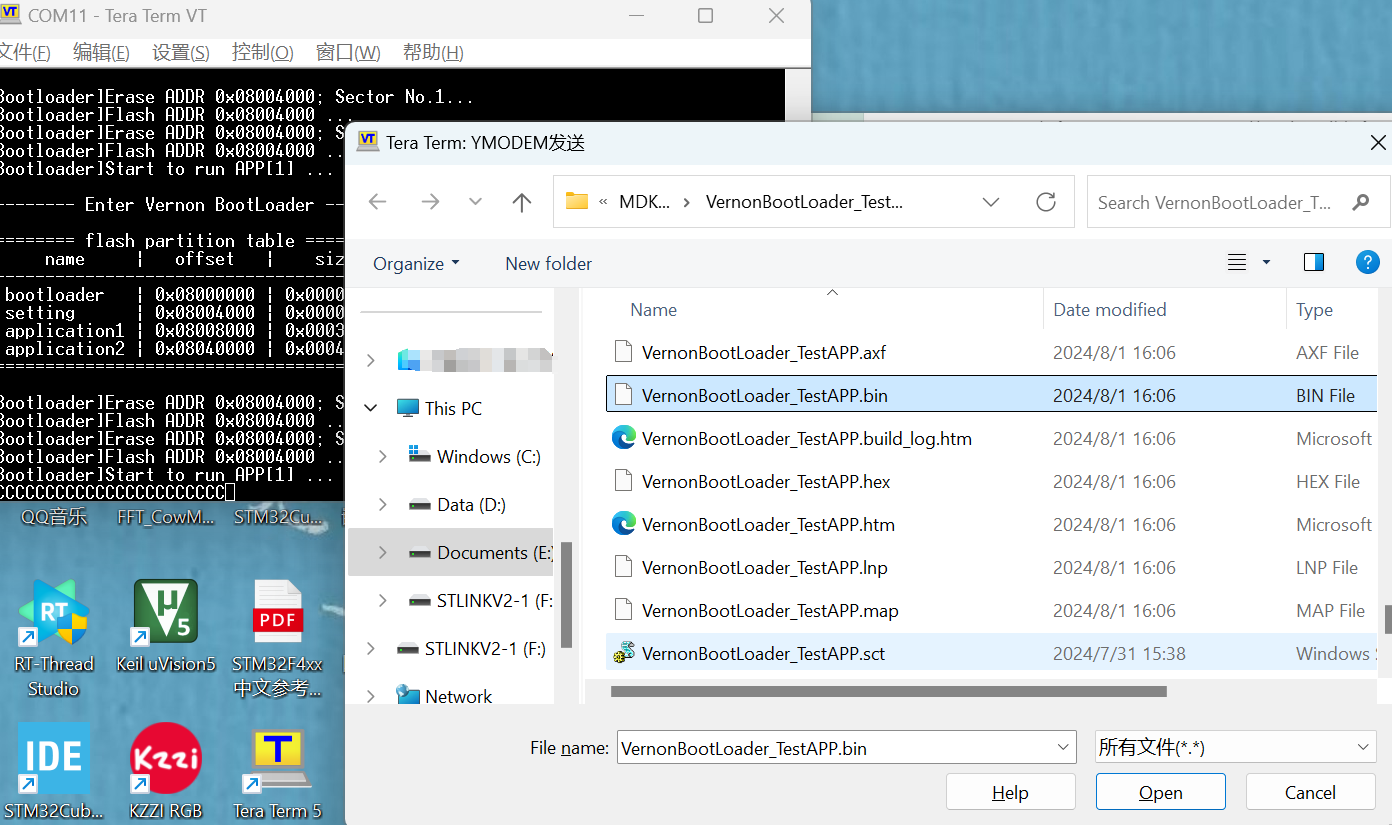
等待其刷写完成就可以了

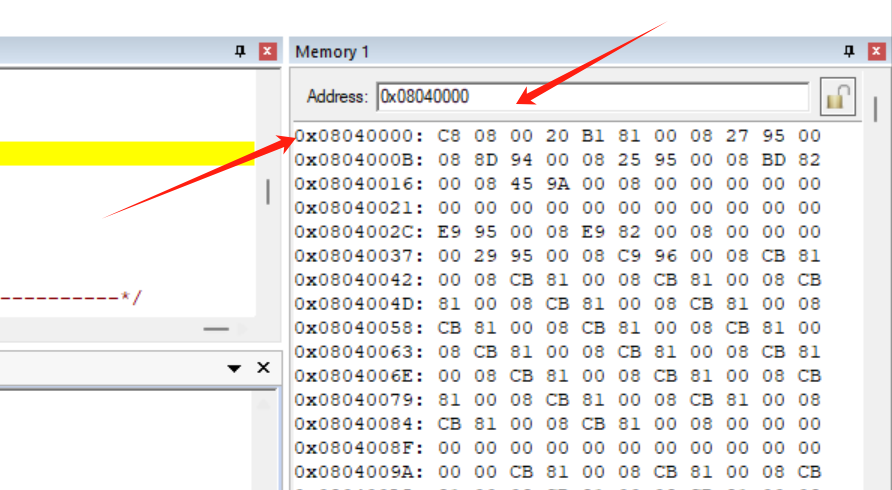
应用程序中,设置的烧写在Application_2这个分区里,所以我们可以通过keli看0x0804_0000这个地址的内容,如果有内容则刷写成功。
相关文章:
[STM32][Bootloader][教程]STM32 HAL库 Bootloader开发和测试教程
0. 项目移植 对于不想知道其执行过程的朋友来说,可以直接移植,我的板子是STM32F411CER6, 512K M4内核 项目地址: Bootloader(可以自己写标志位用于自测,项目中这部分代码已经被注释,可以打开自行测试&…...

如何手写一个SpringBoot框架
你好,我是柳岸花开。 在这篇文章中,我们将手写模拟SpringBoot的核心流程,让大家能够以一种简单的方式了解SpringBoot的大概工作原理。 项目结构 我们创建一个工程,包含两个模块: springboot模块,表示Spring…...

vite解决前端跨域步骤
Vite 解决跨域问题的原理主要是通过其内置的开发服务器功能实现的,具体来说,是通过 HTTP 代理(HTTP Proxy)机制。在开发环境中,Vite 服务器可以配置为一个代理服务器,将前端应用发出的请求转发到实际的后端…...

同步交互与异步交互:深入解析与选择
同步交互与异步交互:深入解析与选择 1、同步交互2、异步交互3、选择策略 💖The Begin💖点点关注,收藏不迷路💖 在软件开发的世界里,交互方式主要分为两大类:同步与异步。下面是对这两种方式的解…...

Day1
首先,大概学习了一下用anaconda去创建一个环境(因为Django是有python版本的要求),然后学着去切换环境。 创建环境:conda create -n django_study python3.10 激活环境:conda activate django_study 删除环…...

Introduction to Data Analysis with PySpark
1.DataFrame and RDDs 2.Spark Architecture 3. Data Formats and Data Sources 倘若您觉得我写的好,那么请您动动你的小手粉一下我,你的小小鼓励会带来更大的动力。Thanks....

基于双PI控制器结构的六步逆变器供电无刷直流电机调速simulink仿真
目录 1.课题概述 2.系统仿真结果 3.核心程序与模型 4.系统原理简介 4.1 无刷直流电机(BLDCM)原理 4.2 六步换相逆变器 4.3 双PI控制器设计 5.完整工程文件 1.课题概述 基于双PI控制器结构的六步逆变器供电无刷直流电机调速simulink仿真。双PI控制…...

双向链表的基本操作
#include<iostream> #include<cmath> #include<cstring> using namespace std; typedef long long ll; typedef struct line {int data;struct line *pre;//前指针struct line *next;//后指针 }line,*a; line* init_line(line*head) {cout<<"请输…...

modbus tcp和modbusRTU的区别是什么?
Modbus是一种应用广泛的通信协议,主要用于工业自动化和过程控制系统。Modbus有多种变体,其中Modbus TCP和Modbus RTU是最常见的两种。以下是它们之间的主要区别: 1. 基本定义 Modbus RTU (Remote Terminal Unit): 是基于串行通信的协议&am…...
对调和移动拼图玩法的实现)
web小游戏开发:拼图(四)对调和移动拼图玩法的实现
web小游戏开发:拼图(四)对调和移动拼图玩法的实现 对调方式对调模式实现移动方式移动的实现小结对调方式 在完成了原始拼图玩法后,剩下两个玩法其实相对就变得简单的多了。 对调模式,简单来说,就是选中两个图块,然后位置对调一下。 那么,我们来整理一下,看看需要哪…...

前端:Vue学习 - 智慧商城项目
前端:Vue学习 - 智慧商城项目 1. vue组件库 > vant-ui2. postcss插件 > vw 适配3. 路由配置4. 登录页面静态布局4.1 封装axios实例访问验证码接口4.2 vant 组件 > 轻提示4.3 短信验证倒计时4.4 登录功能4.5 响应拦截器 > 统一处理错误4.6 登录权证信息存…...
关系)
KVM调整虚拟机与CPU铆钉(绑定)关系
虚拟机铆钉CPU 把虚拟机的vCPU绑定在物理CPU上,即VCPU只在绑定的物理CPU上调度,在特定场景下达到提升虚拟机性能的目的。比如在NUMAQ系统中,把vCPU绑定在同一个NUMA节点上,可以避免CPU跨节点访问内存,避免影响虚拟机运…...

华火电焰灶:烹饪新宠,温暖与美味的完美融合
在众多厨房电器中,华火电焰灶以其独特的魅力和卓越的性能脱颖而出,成为了众多家庭的烹饪新宠。今天,就让我们一同走进华火电焰灶的精彩世界,探索它的非凡之处。 华火电焰灶,首先吸引人的便是其创新的等离子电生明火技术…...

理想发周榜,不是新能源市场的原罪
余华在他的小说《在细雨中呼喊》曾写过这么一段话: “仓廪实而知礼节,衣食足而知荣辱”,在物质需求得到满足以前,精神文明的发展难免会有所滞后。所以,贫穷,不是原罪。 同样的,在如今的新能源…...

AHK是让任何软件都支持 Shift + 鼠标滚轮 实现界面水平滚动
目录 基本介绍 详细特点 图解安装 下载失败?缓慢? 创建并运行脚本代码😃 新建空 xxx.ahk文件 vscode/记事本等编辑工具打开 复制并粘贴简易脚本 运行 其他问题 问题一:弹出无法执行此脚本 关闭脚本 基本介绍 AutoHot…...

如何在C语言中实现求解超级丑数
超级丑数是一个正整数,并且它的质因数只包含在给定的质数列表中。超级丑数的定义类似于丑数,但可以根据特定需求改变质因数的范围。下面是如何在C语言中实现求解超级丑数的代码。 我们使用最小堆(优先队列)来高效地生成超级丑数序…...

secExample靶场之java反序列化漏洞复现
我是使用kali虚拟机搭建的靶场,具体搭建步骤可以看我之前的博客内容。 访问靶机地址,打开java反序列化的 点进去后是如图的页面,随便输入一信息。 可以看到敏感信息直接显示在了页面上。 访问192.168.189.141:8080/cors1,可以看到…...

解决升级Linux内核后,open files设置无效的问题。
问题过程 操作系统是OpenEuler 20.03,内核由4.19.90-2112.8.0.0131.oe1.aarch64升级到kernel-4.19.90-2401.1.0.0233.oe1.aarch64后,重启系统后,重新开起来运行OceanBase就运行不起来了,提示open files must not be less than 20…...

关于防范勒索病毒Play新变种的风险提示
近日,工业信息化部网络安全威胁和漏洞信息共享平台监测发现针对 Linux的勒索病毒Play新变种,攻击对象主要为VMware ESXi 虚拟化环境,攻击目标包括制造、建筑业、IT、金融和房地产等行业。 Play勒索病毒又名 Balloonfly和PlayCrypt࿰…...
一款.NET开源、跨平台的DASH/HLS/MSS下载工具
前言 今天大姚给大家分享一款.NET开源(MIT License)、免费、跨平台的DASH/HLS/MSS下载工具,并且支持点播和直播(DASH/HLS)的内容下载:N_m3u8DL-RE。 网络流媒体传输协议介绍 DASH DASH是一种基于HTTP的…...

Dell G15终极散热管理:开源热控中心完全指南 [特殊字符]
Dell G15终极散热管理:开源热控中心完全指南 🚀 【免费下载链接】tcc-g15 Thermal Control Center for Dell G15 - open source alternative to AWCC 项目地址: https://gitcode.com/gh_mirrors/tc/tcc-g15 还在为Dell G15游戏本的过热问题而烦恼…...

工业 AI 赋能采购:智能供应商匹配重构招标流程
Q1:传统企业采购招标,供应商对接与筛选存在哪些固有痛点?传统工业企业采购招标模式高度依赖人工经验,存在三大核心痛点:供应商资源固化:每次招标都需从零手动联络供应商,仅依靠采购人员个人记忆…...

CanFestival回调函数避坑指南:为什么你的RPDO参数修改了却没生效?
CanFestival回调函数深度解析:RPDO参数修改失效的五大隐蔽原因与实战解决方案 在工业自动化领域,CanFestival作为开源的CANopen协议栈,被广泛应用于各类嵌入式设备中。然而,许多开发者在配置RPDO(接收过程数据对象&…...

VR大空间项目屡获行业大奖,AI数字人公司赋能文旅智慧升级
在经历了早期的概念普及和单点试验后,AI数字人、VR、MR等技术正在文旅行业完成从“尝鲜”到“刚需”的蜕变。不再仅仅是博物馆或景区里的一块互动屏幕,而是一套能够重塑服务流程、活化文化IP、创造全新消费场景的完整解决方案。从边疆秘境到城市地标&…...

数据中心机架内互连新范式:为何PCIe正取代以太网与InfiniBand?
1. 数据中心互连的十字路口:为什么是PCIe?在数据中心这个庞大而精密的数字世界里,服务器、存储和网络设备之间的“对话”效率,直接决定了整个系统的性能上限。过去十几年,我们习惯了用以太网(Ethernet&…...

WPF中OxyPlot不同图表的使用
在 WPF 中使用 OxyPlot 实现不同图表,核心在于创建和配置PlotModel对象,并将其绑定到PlotView控件上进行显示。通过向PlotModel中添加不同类型的Series(数据系列),即可轻松实现折线图、柱状图、饼图、散点图等多种图表…...

应用间自动化网关:构建私有化、可编程的跨平台工作流中枢
1. 项目概述与核心价值最近在折腾一些跨平台、跨设备的自动化流程,发现一个痛点:不同应用、不同服务之间的数据流转,经常需要手动“搭桥”。比如,想把手机上的一个链接快速推送到电脑上处理,或者把某个文档从A服务同步…...

GLIGEN图像空间控制:用边界框实现像素级精准生成
1. GLIGEN:不是又一个“AI画图玩具”,而是图像生成控制权的真正移交你有没有试过对着 Stable Diffusion 的提示词框反复修改半小时,就为了把一只猫准确地放在沙发左边、让咖啡杯稳稳立在桌面上、让窗外的梧桐树只出现在画面右上角——结果生成…...

AI与建模仿真融合:数字孪生从静态镜像到智能决策的演进
1. 项目概述:当AI遇见建模仿真,数字孪生正在经历什么?最近几年,无论是工业制造、智慧城市还是医疗健康,但凡提到数字化转型,总绕不开“数字孪生”这个词。它就像一个在虚拟世界里为物理实体打造的“克隆体”…...

收藏!小白程序员必看:从AI提效到重构产品,企业智能转型4阶段实战指南
本文深入探讨了企业如何拥抱智能时代,通过4个阶段实现AI落地。从提升内部效率开始,逐步激活沉睡数据,重构产品价值,最终形成深场景智能闭环。强调AI不应仅用于替代人工,更要关注为客户创造新价值、提升产品智能化&…...