Centos安装OpenSearch
Centos安装OpenSearch
- 下载并安装OpenSearch
- 下载OpenSearch RPM包
- 导入公共GNU Privacy Guard(GPG)密钥。此密钥验证您的OpenSearch实例是否已签名
- 安装RPM包
- 安装完设置开机自启动OpenSearch
- 启动OpenSearch
- 验证OpenSearch是否正确启动
- 测试OpenSearch
- 向服务器发送请求以验证OpenSearch是否正在运行
- 向端口9200发送请求
- 查询插件端点
- 设置OpenSearch可远程连接
- 将OpenSearch绑定到主机上的IP或网络接口
- 打开opensearch.yml
- 添加以下行
- 保存更改并关闭文件
- 设置初始和最大JVM堆大小
- 配置TLS
- 导航到将存储证书的目录
- 删除演示证书
- 生成根证书,这将用于签署其他证书
- 创建管理员证书,此证书用于获得执行与安全插件相关的管理任务的提升权限
- 为正在配置的节点创建证书
- 删除不再需要的临时文件
- 确保其余证书归opensearch用户所有
- 按照生成证书中的说明将这些证书添加到opensearch.yml,推荐选择使用脚本进行设置
- 新建shell脚本文件 append-setting.sh
- 执行append-setting.sh
- 为自签名根证书添加信任(可选)
下载并安装OpenSearch
下载OpenSearch RPM包
X64系统
wget https://artifacts.opensearch.org/releases/bundle/opensearch/2.16.0/opensearch-2.16.0-linux-x64.rpm
ARM64系统
wget https://artifacts.opensearch.org/releases/bundle/opensearch/2.16.0/opensearch-2.16.0-linux-arm64.rpm
导入公共GNU Privacy Guard(GPG)密钥。此密钥验证您的OpenSearch实例是否已签名
sudo rpm --import https://artifacts.opensearch.org/publickeys/opensearch.pgp
安装RPM包
## Install the x64 package using rpm.
sudo env OPENSEARCH_INITIAL_ADMIN_PASSWORD=<custom-admin-password> rpm -ivh opensearch-2.16.0-linux-x64.rpm
## Install the arm64 package using rpm.
sudo env OPENSEARCH_INITIAL_ADMIN_PASSWORD=<custom-admin-password> rpm -ivh opensearch-2.16.0-linux-arm64.rpm
安装完设置开机自启动OpenSearch
sudo systemctl enable opensearch
启动OpenSearch
sudo systemctl start opensearch
验证OpenSearch是否正确启动
sudo systemctl status opensearch
测试OpenSearch
向服务器发送请求以验证OpenSearch是否正在运行
向端口9200发送请求
curl -X GET https://localhost:9200 -u 'admin:<custom-admin-password>' --insecure
响应:
{"name":"hostname","cluster_name":"opensearch","cluster_uuid":"QqgpHCbnSRKcPAizqjvoOw","version":{"distribution":"opensearch","number":<version>,"build_type":<build-type>,"build_hash":<build-hash>,"build_date":<build-date>,"build_snapshot":false,"lucene_version":<lucene-version>,"minimum_wire_compatibility_version":"7.10.0","minimum_index_compatibility_version":"7.0.0"},"tagline":"The OpenSearch Project: https://opensearch.org/"}
查询插件端点
curl -X GET https://localhost:9200/_cat/plugins?v -u 'admin:<custom-admin-password>' --insecure
响应:
name component versionhostname opensearch-alerting 2.15.0hostname opensearch-anomaly-detection 2.15.0hostname opensearch-asynchronous-search 2.15.0hostname opensearch-cross-cluster-replication 2.15.0hostname opensearch-geospatial 2.15.0hostname opensearch-index-management 2.15.0hostname opensearch-job-scheduler 2.15.0hostname opensearch-knn 2.15.0hostname opensearch-ml 2.15.0hostname opensearch-neural-search 2.15.0hostname opensearch-notifications 2.15.0hostname opensearch-notifications-core 2.15.0hostname opensearch-observability 2.15.0hostname opensearch-performance-analyzer 2.15.0hostname opensearch-reports-scheduler 2.15.0hostname opensearch-security 2.15.0hostname opensearch-security-analytics 2.15.0hostname opensearch-sql 2.15.0
设置OpenSearch可远程连接
默认情况下,OpenSearch不绑定到网络接口,外部主机无法访问。此外,安全设置由默认用户名和密码填充。以下建议将使用户能够将OpenSearch绑定到网络接口,创建和签署TLS证书,以及配置基本身份验证
将OpenSearch绑定到主机上的IP或网络接口
打开opensearch.yml
sudo vi /etc/opensearch/opensearch.yml
添加以下行
# Bind OpenSearch to the correct network interface. Use 0.0.0.0
# to include all available interfaces or specify an IP address
# assigned to a specific interface.
network.host: 0.0.0.0# Unless you have already configured a cluster, you should set
# discovery.type to single-node, or the bootstrap checks will
# fail when you try to start the service.
discovery.type: single-node# If you previously disabled the Security plugin in opensearch.yml,
# be sure to re-enable it. Otherwise you can skip this setting.
plugins.security.disabled: false
保存更改并关闭文件
:wq
设置初始和最大JVM堆大小
vi /etc/opensearch/jvm.options
修改初始堆大小和最大堆大小的值。作为起点,您应该将这些值设置为可用系统内存的一半。对于专用主机,可以根据您的工作流程要求增加此值。
例如,如果主机有8GB的内存,那么您可能希望将初始堆大小和最大堆大小设置为4GB:
-Xms4g
-Xmx4g
配置TLS
导航到将存储证书的目录
cd /etc/opensearch
删除演示证书
sudo rm -f *pem
生成根证书,这将用于签署其他证书
# Create a private key for the root certificate
sudo openssl genrsa -out root-ca-key.pem 2048# Use the private key to create a self-signed root certificate. Be sure to
# replace the arguments passed to -subj so they reflect your specific host.
sudo openssl req -new -x509 -sha256 -key root-ca-key.pem -subj "/C=CA/ST=ONTARIO/L=TORONTO/O=ORG/OU=UNIT/CN=ROOT" -out root-ca.pem -days 730
创建管理员证书,此证书用于获得执行与安全插件相关的管理任务的提升权限
# Create a private key for the admin certificate.
sudo openssl genrsa -out admin-key-temp.pem 2048# Convert the private key to PKCS#8.
sudo openssl pkcs8 -inform PEM -outform PEM -in admin-key-temp.pem -topk8 -nocrypt -v1 PBE-SHA1-3DES -out admin-key.pem# Create the certficiate signing request (CSR). A common name (CN) of "A" is acceptable because this certificate is
# used for authenticating elevated access and is not tied to a host.
sudo openssl req -new -key admin-key.pem -subj "/C=CA/ST=ONTARIO/L=TORONTO/O=ORG/OU=UNIT/CN=A" -out admin.csr# Sign the admin certificate with the root certificate and private key you created earlier.
sudo openssl x509 -req -in admin.csr -CA root-ca.pem -CAkey root-ca-key.pem -CAcreateserial -sha256 -out admin.pem -days 730
为正在配置的节点创建证书
# Create a private key for the node certificate.
sudo openssl genrsa -out node1-key-temp.pem 2048# Convert the private key to PKCS#8.
sudo openssl pkcs8 -inform PEM -outform PEM -in node1-key-temp.pem -topk8 -nocrypt -v1 PBE-SHA1-3DES -out node1-key.pem# Create the CSR and replace the arguments passed to -subj so they reflect your specific host.
# The CN should match a DNS A record for the host-do not use the hostname.
sudo openssl req -new -key node1-key.pem -subj "/C=CA/ST=ONTARIO/L=TORONTO/O=ORG/OU=UNIT/CN=node1.dns.a-record" -out node1.csr# Create an extension file that defines a SAN DNS name for the host. This
# should match the DNS A record of the host.
sudo sh -c 'echo subjectAltName=DNS:node1.dns.a-record > node1.ext'# Sign the node certificate with the root certificate and private key that you created earlier.
sudo openssl x509 -req -in node1.csr -CA root-ca.pem -CAkey root-ca-key.pem -CAcreateserial -sha256 -out node1.pem -days 730 -extfile node1.ext
删除不再需要的临时文件
sudo rm -f *temp.pem *csr *ext
确保其余证书归opensearch用户所有
sudo chown opensearch:opensearch admin-key.pem admin.pem node1-key.pem node1.pem root-ca-key.pem root-ca.pem root-ca.srl
按照生成证书中的说明将这些证书添加到opensearch.yml,推荐选择使用脚本进行设置
新建shell脚本文件 append-setting.sh
vi aplpend-seeting.sh#! /bin/bash# Before running this script, make sure to replace the CN in the
# node's distinguished name with a real DNS A record.echo "plugins.security.ssl.transport.pemcert_filepath: /etc/opensearch/node1.pem" | sudo tee -a /etc/opensearch/opensearch.yml
echo "plugins.security.ssl.transport.pemkey_filepath: /etc/opensearch/node1-key.pem" | sudo tee -a /etc/opensearch/opensearch.yml
echo "plugins.security.ssl.transport.pemtrustedcas_filepath: /etc/opensearch/root-ca.pem" | sudo tee -a /etc/opensearch/opensearch.yml
echo "plugins.security.ssl.http.enabled: true" | sudo tee -a /etc/opensearch/opensearch.yml
echo "plugins.security.ssl.http.pemcert_filepath: /etc/opensearch/node1.pem" | sudo tee -a /etc/opensearch/opensearch.yml
echo "plugins.security.ssl.http.pemkey_filepath: /etc/opensearch/node1-key.pem" | sudo tee -a /etc/opensearch/opensearch.yml
echo "plugins.security.ssl.http.pemtrustedcas_filepath: /etc/opensearch/root-ca.pem" | sudo tee -a /etc/opensearch/opensearch.yml
echo "plugins.security.allow_default_init_securityindex: true" | sudo tee -a /etc/opensearch/opensearch.yml
echo "plugins.security.authcz.admin_dn:" | sudo tee -a /etc/opensearch/opensearch.yml
echo "  - 'CN=A,OU=UNIT,O=ORG,L=TORONTO,ST=ONTARIO,C=CA'" | sudo tee -a /etc/opensearch/opensearch.yml
echo "plugins.security.nodes_dn:" | sudo tee -a /etc/opensearch/opensearch.yml
echo "  - 'CN=node1.dns.a-record,OU=UNIT,O=ORG,L=TORONTO,ST=ONTARIO,C=CA'" | sudo tee -a /etc/opensearch/opensearch.yml
echo "plugins.security.audit.type: internal_opensearch" | sudo tee -a /etc/opensearch/opensearch.yml
echo "plugins.security.enable_snapshot_restore_privilege: true" | sudo tee -a /etc/opensearch/opensearch.yml
echo "plugins.security.check_snapshot_restore_write_privileges: true" | sudo tee -a /etc/opensearch/opensearch.yml
echo "plugins.security.restapi.roles_enabled: [\"all_access\", \"security_rest_api_access\"]" | sudo tee -a /etc/opensearch/opensearch.yml
执行append-setting.sh
sh append-setting.sh
为自签名根证书添加信任(可选)
# Copy the root certificate to the correct directory
sudo cp /etc/opensearch/root-ca.pem /etc/pki/ca-trust/source/anchors/# Add trust
sudo update-ca-trust
相关文章:

Centos安装OpenSearch
Centos安装OpenSearch 下载并安装OpenSearch下载OpenSearch RPM包导入公共GNU Privacy Guard(GPG)密钥。此密钥验证您的OpenSearch实例是否已签名安装RPM包安装完设置开机自启动OpenSearch启动OpenSearch验证OpenSearch是否正确启动 测试OpenSearch向服务…...

【pkill pgrep】Centos/Linux pkill命令详细介绍
【pkill & pgrep】Centos/Linux pkill命令详细介绍 简介 基础语法 选项介绍 退出状态 基本用法 注意事项 简介 系统版本:Centos7.6 pkill命令用于杀死一个进程,会根据进程名称和其他属性杀死进程(默认会向进程发送SIGTERM信号&…...

Java如何使用 HTTP 请求下载图片
工具类: public FileInputStream fileDownload(String fileLink) throws Exception {System.out.println("开始下载"fileLink);// 转码中文URL url new URL(encodeURLChinese(fileLink));System.out.println("fileLink:"url);// 开始下载Trust…...
:地平线嵌入式开发)
ARM/Linux嵌入式面经(二十):地平线嵌入式开发
一面 1、自己介绍一下项目 一个清晰、结构化的表达能极大地提升你的专业形象。所以一定要养成结构性的回答,真的铁子,信我。 项目介绍示例 项目名称:智能温控系统 项目背景: 该项目旨在开发一款应用于智能家居环境的智能温控系统,通过精准控制室内温度,提高居住舒适度…...

无人机竞速赛
速度与激情的空中盛宴,无人机竞速赛再次点燃我们的肾上腺素! 想象一下,数百架智能飞行器在蓝天下疾驰,如同未来战士穿梭于现实与虚拟的边界,每一次转弯、加速都精准至极,挑战着物理与技术的极限࿰…...

【书生大模型实战营(暑假场)】入门任务二 Git 关卡
入门任务二 Git 关卡 参考: 教程任务 注意: 项目Github链接 1 闯关任务 1.1 使用 Git 完成破冰介绍 本任务将基于开发机实现,重点在于熟悉Git操作。首先要了解 Git操作的常见四部曲,即:舔 Add,提 Co…...

OSPF小实验
根据题目完成下列实验: 拓扑图详细设计如下: 1.基础配置 R1: [R1]interface s4/0/0 [R1-Serial4/0/0]ip address 12.1.1.1 24 [R1]interface LoopBack 0 [R1-LoopBack0]ip address 1.1.1.1 24 R2: [R2]interface s4/0/1 [R2-…...

蛋白质生物学:从序列到结构和疾病 下载并同时打开1LYZ和1H6M的PDB文件(提交图片)。描述这种蛋白质的二级和三级结构。(10分)
Download and open the PDB files of 1LYZ and 1H6M together in one view (submit an image). Describe the secondary and tertiary structure of this protein. (10 marks) 下面给出完整详细的解答: 同时打开1LYZ和1H6M的PDB文件得到: 首先二级结构…...

用VBA在Word中随机打乱单词表,进行分列
一、效果展示(以下是三次随机打乱的结果) 二、代码 Sub 随机分单词到后面的单元格()Dim C1 As CellDim str, str1, aDim shuffledArray() As VariantSet C1 Selection.Range.Tables(1).Cell(1, 1)str C1.Range.textstr mid(str, 3, Len(str) - 4)str…...

UNI-APP_点击,长按,触摸,结束触摸事件
touchstartEventHandle手指触摸动作开始字节跳动小程序不支持touchmoveEventHandle手指触摸后移动字节跳动小程序不支持touchendEventHandle手指触摸动作结束字节跳动小程序不支持touchcancelEventHandle手指触摸动作被打断,如来电提醒,弹窗字节跳动小程…...

【QT】Qt 音视频
Qt 音视频 Qt 音视频1. Qt 音频2. Qt 视频 Qt 音视频 在 Qt 中,音频主要是通过 QSound 类来实现。但是需要注意的是 QSound 类只支持播放 wav 格式的音频文件。也就是说如果想要添加音频效果,那么首先需要将非 wav 格式的音频文件转换为 wav 格式。 通…...

CSP-J 复赛 模拟题6
1.大小写字母互换: 题目描述 由输入给定一个字符串,你的任务是将原字符串中的大写字母转换成其对应的小写字母,还要将原字符串中的小写字母转换成对应的大写字母,其余字符不变。 输出转换之后得到的新字符串。 输入格式 一行…...

拷贝函数的三种调用方式
1.使用一个已经创建完成的对象来初始化一个新对象,就比如有参构造接收了一个属性后拷贝构造copy它后可以将获取的值赋值给自己的属性 记得拷贝后还要再进行赋值才行 2.值传递的方式给函数参数 额外声明一点,因为我们知道struct和class很相似,…...
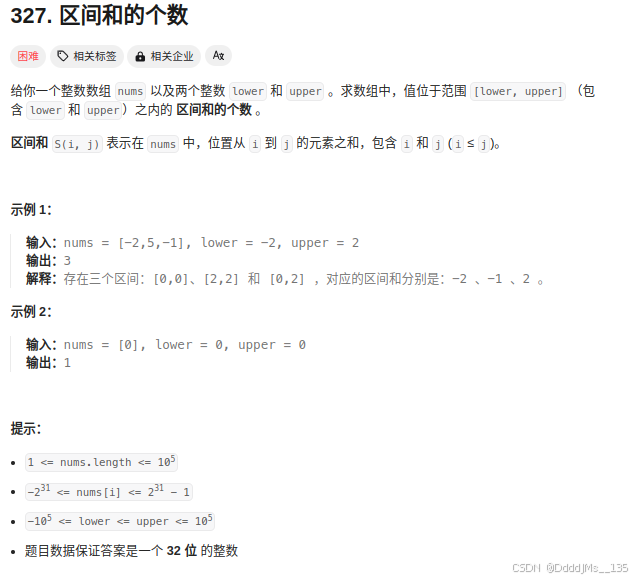
C语言 | Leetcode C语言题解之第327题区间和的个数
题目: 题解: #define FATHER_NODE(i) (0 (i) ? -1 : ((i) - 1 >> 1)) #define LEFT_NODE(i) (((i) << 1) 1) #define RIGHT_NODE(i) (((i) << 1) 2)/* 优先队列(小根堆)。 */ typedef s…...
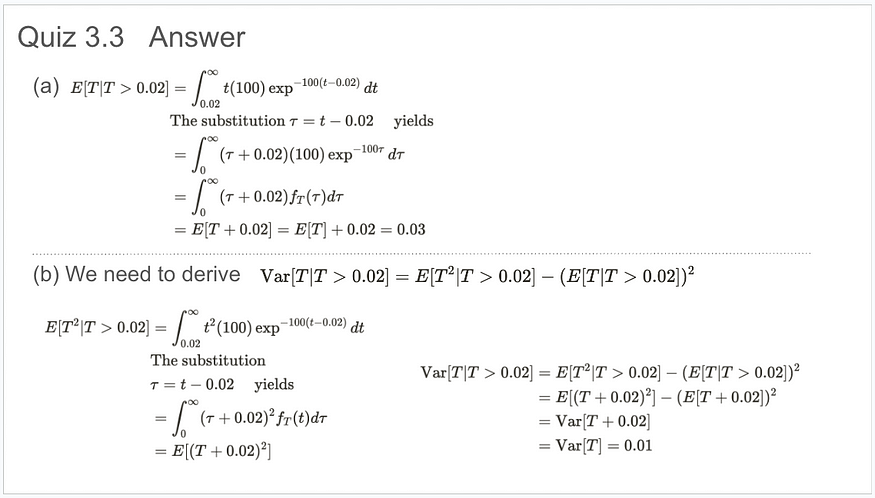
统计学:条件概率模型
照片由Edge2Edge Media在Unsplash上拍摄 一、介绍 在概率的许多应用中,不可能直接观察实验的结果;而是观察与结果相关的事件。因此,条件概率模型对于考虑和利用从观察到的事件中获得的信息至关重要。此外,条件概率模型与贝叶斯定理…...

前端工程师学习springboot2.x之配置idea热更新实现高效率开发节奏
目前已经学习springboot实现了增删改查分页查询,每次修改业财或者是代码重启项目都让我觉得很闹心,现在给出idea2021版本自带热更新操作设置,设置过程分享给大家 总结:以上就是配置的全部过程,祝大家写代码快乐…...

文本rerank与图像rerank
1、文本rerank: 这里介绍的是目前比较流行和通用一套方案:先利用特征检索(这里是特征空间上的相似度),召回相关信息,然后对query与召回的相关信息进行rerank(这里是利用cross-encoder网络做一个…...

Docker 在 Windows 系统下的使用指南:数据卷和数据库
Docker 在 Windows 系统下的使用指南:数据卷和数据库 Docker 提供了强大的功能来创建、管理和持久化数据。数据卷是 Docker 中用于存储和管理数据的机制,使得数据能够在容器的生命周期之外持久化。数据库容器可以利用数据卷来持久化数据库文件ÿ…...

[数据集][目标检测]轴承缺陷划痕检测数据集VOC+YOLO格式1166张1类别
数据集格式:Pascal VOC格式YOLO格式(不包含分割路径的txt文件,仅仅包含jpg图片以及对应的VOC格式xml文件和yolo格式txt文件) 图片数量(jpg文件个数):1166 标注数量(xml文件个数):1166 标注数量(txt文件个数):1166 标注…...

将本地微服务发布到docker镜像二:
上一篇文章我们介绍了如何将一个简单的springboot服务发布到docker镜像中,这一篇我们将介绍如何将一个复杂的微服务(关联mysql、redis)发布到docker镜像。 我们将使用以下两种不同的方式来实现此功能。 redis、mysql、springboot微服务分开…...

Agent Client Protocol 全景解析涛
1. 核心概念 在 Antigravity 中,技能系统分为两层: Skills (全局库):实际的代码、脚本和指南,存储在系统级目录(如 ~/.gemini/antigravity/skills)。它们是“能力”的本体。 Workflows (项目级):…...

AI 模型训练与推理一体化平台设计
AI模型训练与推理一体化平台设计:加速智能应用落地的关键 随着人工智能技术的快速发展,模型训练与推理的分离式架构逐渐暴露出效率低、资源浪费等问题。AI模型训练与推理一体化平台应运而生,它将模型开发、训练优化与部署推理无缝衔接&#…...

国产大模型DeepSeek首次推出模式分层功能,开启V4版本灰度测试,引发行业广泛关注
文章目录前言去医院挂号?这次DeepSeek让你选"普通门诊"还是"专家号"快速模式:那个戴着闪电标志的"急诊小能手"专家模式:戴着钻石的"学霸型选手"视觉模式:那个还在"隐身"的第三…...

文献综述与波普尔语境的形成:从 “伪神” 到 “补锅匠” 的逻辑坍缩史
文献综述与波普尔语境的形成:从 “伪神” 到 “补锅匠” 的逻辑坍缩史摘要本文系统批判20世纪科学哲学“三座丰碑”——波普尔、库恩、拉卡托斯及费耶阿本德,揭示其理论演进实为从逻辑诈骗到社会学强辩、再到官僚式和稀泥的堕落三部曲。波普尔以“可证伪…...

开源模拟器Ryujinx配置指南:解决卡顿问题与性能优化全攻略
开源模拟器Ryujinx配置指南:解决卡顿问题与性能优化全攻略 【免费下载链接】Ryujinx 用 C# 编写的实验性 Nintendo Switch 模拟器 项目地址: https://gitcode.com/GitHub_Trending/ry/Ryujinx Ryujinx作为一款采用C#语言开发的开源Nintendo Switch模拟器&…...

Katran性能优化终极指南:10个从驱动模式到通用XDP的核心技巧
Katran性能优化终极指南:10个从驱动模式到通用XDP的核心技巧 【免费下载链接】katran A high performance layer 4 load balancer 项目地址: https://gitcode.com/gh_mirrors/ka/katran Katran作为一款高性能的四层负载均衡器,基于BPF和XDP技术构…...

口碑好的余姚加工中心编程培训哪家专业
在浙江余姚这座"中国模具之城",寻找一家专业可靠的加工中心编程培训机构,对于想要在模具数控领域发展的技术人员来说至关重要。余姚作为全国模具产业集聚地,拥有众多培训机构,但如何在众多选择中找到真正专业、实用的培…...

8款热门数据治理工具深度测评,哪款功能最强大?
业务要报表,数据散在 ERP、CRM、Excel 十几个系统里,跨部门取数要等好几天。好不容易凑齐数据,财务和业务口径不一致,核心指标算出来两个数。数据越多越混乱,找数据比用数据难,这些问题都是因为数据治理没做…...

Python敏感词检测方案详解
一、引言在互联网内容审核、社交平台监管、评论系统过滤等场景中,敏感词检测是一项必不可少的功能。Python凭借其丰富的生态和简洁的语法,提供了多种实现敏感词检测的方案。本文将详细介绍几种主流的实现方式,并分析各自的优缺点及适用场景。…...

Snap.Hutao:5分钟掌握原神玩家必备的终极桌面工具箱
Snap.Hutao:5分钟掌握原神玩家必备的终极桌面工具箱 【免费下载链接】Snap.Hutao 实用的开源多功能原神工具箱 🧰 / Multifunctional Open-Source Genshin Impact Toolkit 🧰 项目地址: https://gitcode.com/GitHub_Trending/sn/Snap.Hutao…...