vue2图片预览插件
学习:vue插件开发实例-图片预览插件
vue2-pre-img-plugin的gitee代码
准备工作
准备图片与基础的样式
- 将iconfont下载的字体图标资源放在src/assets/iconfont目录下
- 将准备预览的图片放到src/static/images目录下
PrevImg.vue
在plugins/PrevImg目录下,创建PrevImg.vue。
直接引入静态图片资源,然后作为vue组件实例的data
<template><div class="prev-container"><div class="mask"></div><div class="indicator"><i class="iconfont icon-jiahao1"></i><i class="iconfont icon-jian"></i><i class="iconfont icon-reset"></i><i class="iconfont icon-close"></i></div><div class="img-wrapper"><img :src="imgPath"></div></div>
</template><script>
import img1 from '@/static/images/1.jpg'
import img2 from '@/static/images/2.jpg'
import img3 from '@/static/images/3.jpg'
import img4 from '@/static/images/4.png'
import img5 from '@/static/images/5.png'console.log('PrevImg->img1',img1); // PrevImg->img1 /img/1.1a1b49d1.jpgexport default {name: 'PrevImg2',data() {return {imgPath: img1}},
}
</script><style lang="scss">.prev-container {position: fixed;top:0;left: 0;width: 100%;height: 100%;.mask {position: absolute;background-color: rgba(0,0,0,.3);width: 100%;height: 100%;z-index: -1;}.indicator {display: flex;justify-content: flex-end;padding: 20px;z-index: 100;i {padding: 10px;background-color: rgba(255,255,255,.3);border-radius: 50%;margin: 0 5px;cursor: pointer;}}.img-wrapper {position: absolute;top: 0;width: 100%;height: 100%;z-index: -1;display: flex;align-items: center;justify-content: center;img {max-height: 100%;max-width: 80%;transition: all 0.5s;}}}
</style>
App.vue
App.vue中使用改组件
<template><div id="app"><prev-img/></div>
</template><script>import PrevImg from '@/plugins/prevImg/PrevImg'export default {name: 'App',components: {PrevImg}
}
</script><style>
* {margin: 0;
}body {display: flex;flex-direction: column;
}.btn-box {text-align: center;margin-top: 20px;
}
</style>
静态效果
封装插件
修改PrevImg.vue
为按钮绑定相关的方法,图片的路径,将由外部传递过来
<template><div class="prev-container" v-show="isShow"><div class="mask"></div><div class="indicator"><i @click="operate('zoomIn')" class="iconfont icon-jiahao1"></i><i @click="operate('zoomOut')" class="iconfont icon-jian"></i><i @click="operate('rotate')" class="iconfont icon-reset"></i><i @click="close" class="iconfont icon-close"></i></div><div class="img-wrapper"><img :src="imgPath" :style="imgStyle" alt=""></div></div>
</template><script>export default {name: 'PrevImg',components: {},data() {return {isShow: false,imgPath: '',transform: {rotate: 0,scale: 1}}},computed:{imgStyle() {let {rotate, scale} = this.transformreturn {transform: `scale(${scale}) rotate(${rotate}deg)`}}},methods: {open({url}) {this.isShow = truethis.imgPath = url},close() {console.log('object');this.isShow = false},operate(command) {if(command == 'zoomIn') {this.transform.scale += 0.04} else if(command == 'zoomOut') {this.transform.scale -= 0.04} else if(command == 'rotate') {this.transform.rotate += 90} }}
}
</script><style lang="scss">.prev-container {position: fixed;top:0;left: 0;width: 100%;height: 100%;.mask {position: absolute;background-color: rgba(0,0,0,.3);width: 100%;height: 100%;z-index: -1;}.indicator {display: flex;justify-content: flex-end;padding: 20px;z-index: 100;i {padding: 10px;background-color: rgba(255,255,255,.3);border-radius: 50%;margin: 0 5px;cursor: pointer;}}.img-wrapper {position: absolute;top: 0;width: 100%;height: 100%;z-index: -1;display: flex;align-items: center;justify-content: center;img {max-height: 100%;max-width: 80%;transition: all 0.5s;}}}
</style>
定义插件逻辑
import PrevImg from '@/plugins/prevImg/PrevImg'export default {install(Vue, options) {let PrevImgConstructor = Vue.extend(PrevImg)let instance = new PrevImgConstructor()/* 这里会打印dom */console.log('instance', instance.$mount().$el);// instance <div class="prev-container" style="display: none;">...</div>/* 把组件转换成了dom,插入到了body中  */document.body.appendChild(instance.$mount().$el) let opts = {open(url) {// 调用组件实例上定义的方法instance.open({url})},close() {instance.close()}}// 挂载到vue组件实例上Vue.prototype.$prevImg = opts}
}
main.js中应用此插件
import Vue from 'vue'
import App from './App.vue'import '@/assets/iconfont/iconfont.css'
import ElementUI from 'element-ui';
import 'element-ui/lib/theme-chalk/index.css';import prevImg from './plugins/prevImg';Vue.config.productionTip = falseVue.use(ElementUI)
Vue.use(prevImg)new Vue({render: h => h(App),
}).$mount('#app')
App.vue中使用此插件
<template><div id="app"><div class="btn-box"><el-button @click="preview">打开预览</el-button></div></div>
</template><script>
import img1 from '@/static/images/1.jpg'
import img2 from '@/static/images/2.jpg'
import img3 from '@/static/images/3.jpg'
import img4 from '@/static/images/4.png'
import img5 from '@/static/images/5.png'export default {name: 'App',components: {},methods: {preview() {// 原本测试的是把PrevImg.vue组件给引进来, 直接调用子组件的方法使用, 但// 是没想到插件还能这么玩的, 感觉那种方式会更好// this.$refs.prevImgRef.open()this.$prevImg.open(img4)}}
}
</script><style>
* {margin: 0;
}body {display: flex;flex-direction: column;
}.btn-box {text-align: center;margin-top: 20px;
}
</style>
图片预览列表
修改App.vue
<template><div id="app"><div class="btn-box"><el-button @click="preview">打开预览</el-button></div></div>
</template><script>
import img1 from '@/static/images/1.jpg'
import img2 from '@/static/images/2.jpg'
import img3 from '@/static/images/3.jpg'
import img4 from '@/static/images/4.png'export default {name: 'App',components: {},methods: {preview() {// this.$refs.prevImgRef.open()this.$prevImg.open(0,[img1,img2,img3,img4])}}
}
</script><style>
* {margin: 0;
}body {display: flex;flex-direction: column;
}.btn-box {text-align: center;margin-top: 20px;
}
</style>
修改插件逻辑
import PrevImg from '@/plugins/prevImg/PrevImg'
export default {install(Vue, options) {let PrevImgConstructor = Vue.extend(PrevImg)let instance = new PrevImgConstructor()/* 这里会打印dom */console.log('instance', instance.$mount().$el);// instance <div class="prev-container" style="display: none;">...</div>/* 把组件转换成了dom,插入到了body中  */document.body.appendChild(instance.$mount().$el) let opts = {open(imgIdx,imgPaths) {instance.open({imgIdx,imgPaths})},close() {instance.close()}}Vue.prototype.$prevImg = opts}
}
修改PrevImg.vue
<template><div class="prev-container" v-show="isShow"><div class="mask"></div><div class="indicator"><i @click="operate('zoomIn')" class="iconfont icon-jiahao1"></i><i @click="operate('zoomOut')" class="iconfont icon-jian"></i><i @click="operate('rotate')" class="iconfont icon-reset"></i><i @click="close" class="iconfont icon-close"></i></div><div :class="['prev-next', 'left', { 'pointer-allowd': isPrev }]" @click="operate('left')"><i class="iconfont icon-houtuishangyige"></i></div><div :class="['prev-next', 'right', { 'pointer-allowd': isNext }]" @click="operate('right')"><i class="iconfont icon-qianjinxiayige"></i></div><div ref="imgWrapper" :class="['img-wrapper']"><img :src="imgPaths[imgIdx]" :style="imgStyle" alt=""></div></div>
</template><script>export default {name: 'PrevImg',components: {},data() {return {isShow: false,imgIdx: 0,imgPaths: [],transform: {rotate: 0,scale: 1},enterAniClass: '',}},computed: {imgStyle() {let { rotate, scale } = this.transformreturn {transform: `scale(${scale}) rotate(${rotate}deg)`}},isNext() {return this.imgIdx != this.imgPaths.length - 1},isPrev() {return this.imgIdx != 0},},mounted() {this.$refs['imgWrapper'].addEventListener('webkitAnimationEnd', (e) => {console.log('动画停止了');this.enterAniClass = ''})},methods: {open({ imgIdx, imgPaths }) {this.isShow = truethis.imgIdx = imgIdxthis.imgPaths = imgPaths},close() {console.log('object');this.isShow = falsethis.transform = {rotate: 0,scale: 1}},operate(command) {if (command == 'zoomIn') {this.transform.scale += 0.04} else if (command == 'zoomOut') {this.transform.scale -= 0.04} else if (command == 'rotate') {this.transform.rotate += 90} else {this.transform = {rotate: 0,scale: 1}if (command == 'left') {if (this.imgIdx == 0) {return}this.imgIdx = this.imgIdx - 1} else if (command == 'right') {if (this.imgIdx == this.imgPaths.length - 1) {return}this.imgIdx = this.imgIdx + 1}}}}
}
</script><style lang="scss">
.prev-container {position: fixed;top: 0;left: 0;width: 100%;height: 100%;.mask {position: absolute;background-color: rgba(0, 0, 0, .3);width: 100%;height: 100%;z-index: -1;}.pointer-allowd {cursor: pointer !important;}.prev-next {width: 36px;height: 36px;border-radius: 50%;background-color: rgba(255, 255, 255, .3);text-align: center;line-height: 36px;cursor: not-allowed;position: absolute;top: 0;bottom: 0;margin: auto;z-index: 2000;}.left {left: 30px;}.right {right: 30px;}.indicator {display: flex;justify-content: flex-end;padding: 20px;z-index: 100;i {padding: 10px;background-color: rgba(255, 255, 255, .3);border-radius: 50%;margin: 0 5px;cursor: pointer;}}.img-wrapper {position: absolute;top: 0;width: 100%;height: 100%;z-index: -1;display: flex;align-items: center;justify-content: center;img {max-height: 100%;max-width: 80%;transition: all 0.5s;}}
}</style>
相关文章:
vue2图片预览插件
学习:vue插件开发实例-图片预览插件 vue2-pre-img-plugin的gitee代码 准备工作 准备图片与基础的样式 将iconfont下载的字体图标资源放在src/assets/iconfont目录下将准备预览的图片放到src/static/images目录下 PrevImg.vue 在plugins/PrevImg目录下ÿ…...

手写Promise源码的实现思路
Promise的使用: let promise new Promise((resolve, reject) > {resolve("OK");// reject("Error"); });console.log(promise);promise.then(value > {console.log("success"); }, error > {console.log("fail"…...

【数据结构】-关于树的概念和性质你了解多少??
作者:小树苗渴望变成参天大树 作者宣言:认真写好每一篇博客 作者gitee:gitee 如 果 你 喜 欢 作 者 的 文 章 ,就 给 作 者 点 点 关 注 吧! 树前言一、树概念及结构1.1树的概念1.2 树的相关概念1.3 树的表示1.4树在实际中的运用…...

【前端之旅】NPM必知必会
一名软件工程专业学生的前端之旅,记录自己对三件套(HTML、CSS、JavaScript)、Jquery、Ajax、Axios、Bootstrap、Node.js、Vue、小程序开发(UniApp)以及各种UI组件库、前端框架的学习。 【前端之旅】Web基础与开发工具 【前端之旅】手把手教你安装VS Code并附上超实用插件…...

Android SQLite使用事务来确保所有语句都以原子方式执行及保证数据完整性一次执行多条语句示例
execSQL 不支持用分号分隔一次执行多个 SQL 语句,虽然理论上可以实现。但是,并不建议这样做,因为这可能会导致潜在的 SQL 注入漏洞。相反,建议使用 execSQL 或 rawQuery 分别执行每个语句。 在下面的代码块中,我们正在…...
nodejs+vue校园超市小卖部零食在线购物商城系统
21世纪的今天,随着社会的不断发展与进步,人们对于信息科学化的认识,已由低层次向高层次发展,由原来的感性认识向理性认识提高,管理工作的重要性已逐渐被人们所认识,科学化的管理,使信息存储达到…...
Karl Guttag:论相机对焦技术在AR/VR中的沿用
近期,AR/VR光学专家Karl Guttag介绍了两家在CES 2023展出光学传感技术的公司:poLight和CML(剑桥机电一体化)。同时介绍两家公司的原因,是因为他们提供了实现AR/VR“光学微动”(Optics Micromovement&…...
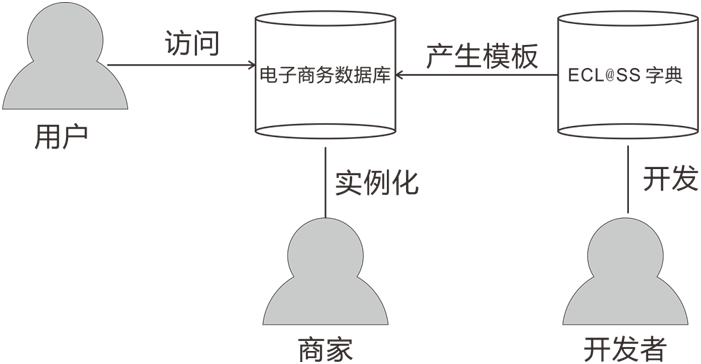
ECL@SS学习笔记(3)-概念数据模型
ECLSS 是产品,服务的分类和描述系统。本文介绍其内部的数据模型。ECLSS的作用ECLSS 标准的目标是为了实现工业界数据交换的标准化。这个标准主要作用是产品的分类和描述。分类为了有效地物料管理,供应链管理和电子商务,需要对物料进行分类和编…...

206. 反转链表
给你单链表的头节点 head ,请你反转链表,并返回反转后的链表。 示例 1: 输入:head [1,2,3,4,5] 输出:[5,4,3,2,1] 示例 2: 输入:head [1,2] 输出:[2,1] 示例 3: 输…...
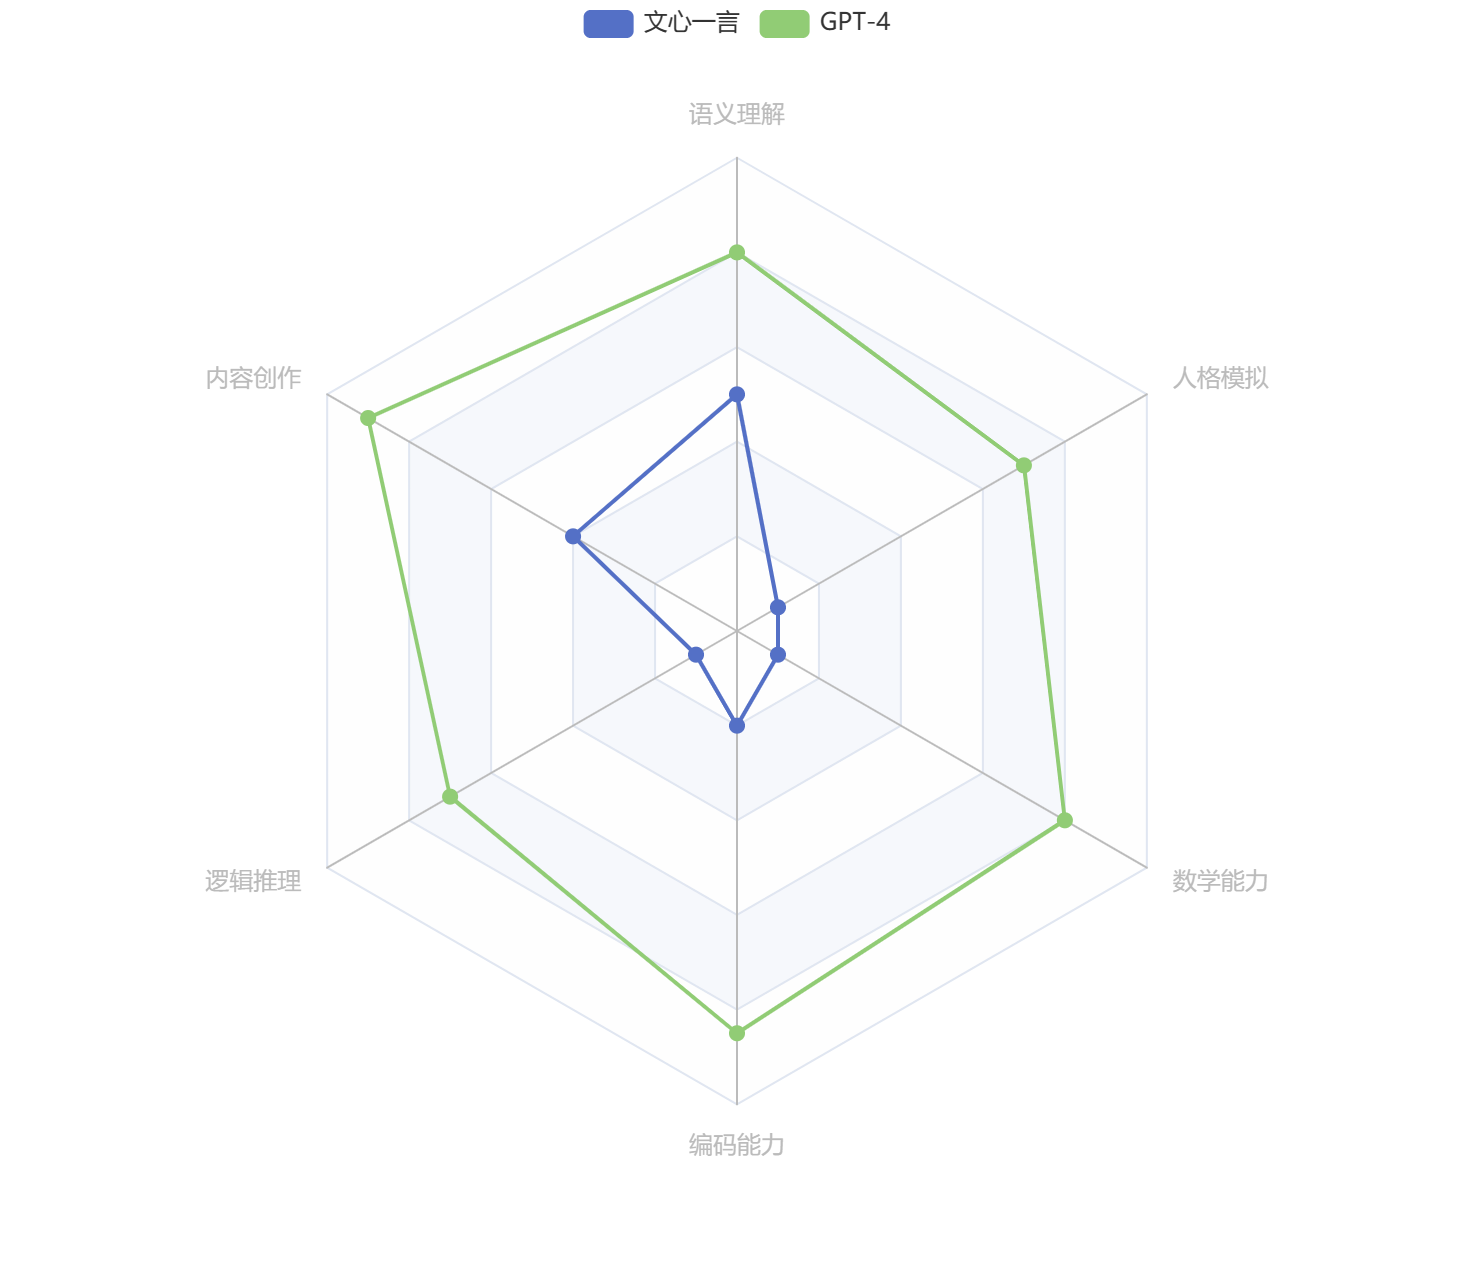
文心一言 vs GPT-4 —— 全面横向比较
文心一言 vs GPT-4 —— 全面横向比较 3月15日凌晨,OpenAI发布“迄今为止功能最强大的模型”——GPT-4。我第一时间为大家奉上了体验报告《OpenAI 发布GPT-4——全网抢先体验》。 时隔一日,3月16日下午百度发布大语言模型——文心一言。发布会上&#…...

rancher2.6进阶之kubectl安装
rancher2.6进阶之kubectl安装 1.安装kubectl客户端 1.1.1.使用命令行下载安装包: curl -LO https://dl.k8s.io/release/$(curl -L -s https://dl.k8s.io/release/stable.txt)/bin/linux/amd64/kubectl Note: 可指定下载版本, 将 ( c u r l − L − s h t t p s : / / d l . k …...
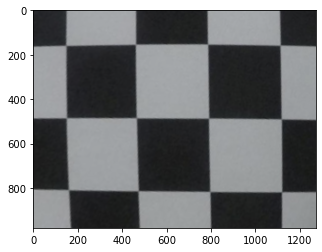
图像基本变换
缩放与裁剪裁剪图像的裁剪,是指将图像的某个区域切割出来。一些常见的应用场景包括:* 感兴趣区域提取* 去除无用信息* 图像增强* 纠偏:去除不规则部分,将图像变得更加整齐事实上,图像裁剪的裁剪通常就是一个numpy矩阵切…...
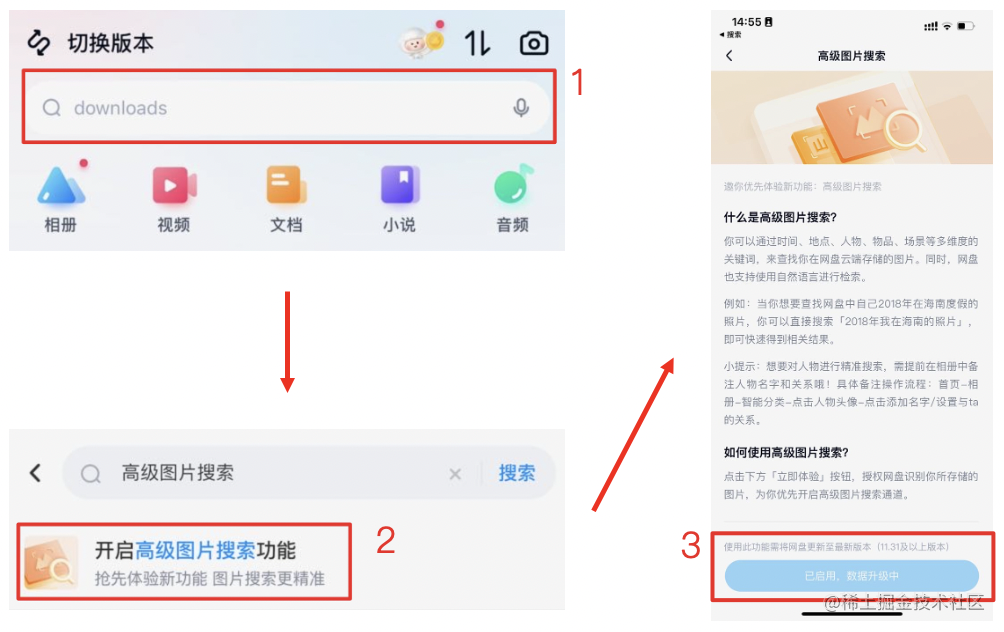
基于文心一言的底层视觉理解,百度网盘把「猫」换成了「黄色的猫」
随着移动互联网的一路狂飙,手机已经成为人们的新器官。出门不带钥匙可以,不带手机却是万万不可以的。而手机上,小小的摄像头也越来越成为各位「vlogger」的口袋魔方。每天有超过数亿的照片和视频被上传到百度网盘中,这些照片和视频…...

安卓开发的环境配置教程
文章目录事先准备:下载 JDK、Gradle下载安装 Android Studio下载安装 Android SDK下载安装 ADB笔者的环境: Java 17.0.1 Gradle 8.0.1 Android Studio Electric Eel | 2022.1.1 Patch 1 Windows 10 教育版 64位 事先准备:下载 JDK、Gradl…...

【Spring Cloud Alibaba】Spring Cloud Alibaba 搭建教程
文章目录教程适用版本一、简介主要功能组件开源地址二、开始搭建1.项目搭建与依赖管理2.服务注册与发现(Nacos安装)3.创建服务提供者4.创建服务消费者5.创建服务消费者(Feign)6.添加熔断机制(Sentinel)7.Sentinel熔断器仪表盘监控…...

关于自动机器学习flaml训练时的一些报错
一、版本背景flaml 1.1.3sciket-learn 0.23.0二、一路报错2.1、SyntaxError: future feature annotations is not definedTraceback (most recent call last):File "C:/Users/dell/Desktop/AI/run.py", line 151, in <module>model.autoMlArgs(queryDf,targe…...
是什么?)
【计算机视觉】消融实验(Ablation Study)是什么?
文章目录一、前言二、定义三、来历四、举例说明一、前言 我第一次见到消融实验(Ablation Study)这个概念是在论文《Faster R-CNN》中。 消融实验类似于我们熟悉的“控制变量法”。 假设在某目标检测系统中,使用了A,B࿰…...

Java毕业论文参考文献参考例子整理
[1]李庆民.基于java的软件agent开发环境的分析[J].数字技术与应用,2017,01:189. [2]籍慧文.Web应用开发中JAVA编程语言的应用探讨[J].科技创新与应用,2017,07:90. [3]卜令瑞.基于Java软件项目开发岗位的企业实践总结报告[J].职业,2016,32:124-125. [4]肖成金,吕…...
)
C++ Primer第五版_第六章习题答案(21~30)
文章目录练习6.21练习6.22练习6.23练习6.24练习6.25练习6.26练习6.27练习6.28练习6.29练习6.30练习6.21 编写一个函数,令其接受两个参数:一个是int型的数,另一个是int指针。函数比较int的值和指针所指的值,返回较大的那个。在该函…...
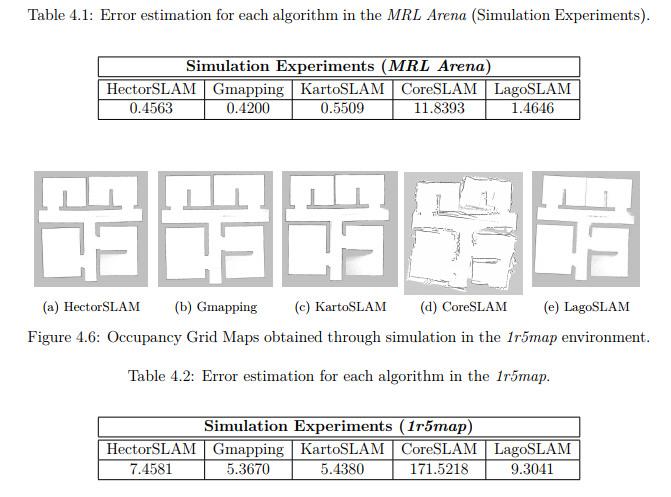
SLAM算法之HectorSLAM,Gmapping,KartoSLAM,CoreSLAM和LagoSLAM
文章将介绍使用的基于机器人操作系统(ROS)框架工作的SLAM算法。 在ROS中提供的五种基于2D激光的SLAM算法分别是:HectorSLAM,Gmapping,KartoSLAM,CoreSLAM和LagoSLAM。当然最后还有比较经典的google开源的ca…...

单神经元动态记忆机制及其神经形态计算应用
1. 动态记忆的神经实现范式革新在神经科学与类脑计算领域,动态记忆(或称工作记忆)一直被视为认知功能的基础模块。传统理论认为,这种能够短暂保持神经活动状态的功能必须依赖于神经元群体构成的递归网络——通过兴奋性神经元间的相…...

7 年评测经验博主发布扫地机器人挑选指南,邀你探讨机器人革命!
评测多款扫地机器人,Matic 脱颖而出博主发布了关于挑选最佳扫地机器人的指南,近期评测了戴森的 Spot & Scrub、鲨客的 Power Detect 以及 Matic。在其 7 年的扫地机器人评测生涯中,Matic 是最有意思的新型扫地机器人。拨开营销迷雾&#…...

python旅游出行指南系统
目录同行可拿货,招校园代理 ,本人源头供货商项目概述核心功能技术实现代码示例(路线规划)扩展方向适用场景源码获取详细视频演示 :同行可合作点击我获取源码->获取博主联系方式->进我个人主页-->同行可拿货,招校园代理 ,本人源头供货…...
)
今日算法(二叉搜索树)
题目描述给定一棵二叉搜索树(BST)的根节点 root,树中节点值各不相同。要求将其转换为累加树(Greater Sum Tree),规则如下:每个节点的新值 原节点值 所有比它大的节点值的总和二叉搜索树的性质…...

后端开发必知的数据库优化技巧:这5个方法让你的系统性能提升10倍
对于软件测试从业者来说,理解数据库优化逻辑不仅能帮我们更快定位性能瓶颈,还能让我们在测试阶段就提前发现潜在的数据库设计问题,避免上线后出现大规模性能故障。很多测试同学往往把注意力放在接口逻辑、功能正确性上,却忽略了数…...

KMS智能激活终极指南:一键永久激活Windows和Office的完整教程
KMS智能激活终极指南:一键永久激活Windows和Office的完整教程 【免费下载链接】KMS_VL_ALL_AIO Smart Activation Script 项目地址: https://gitcode.com/gh_mirrors/km/KMS_VL_ALL_AIO 还在为Windows系统频繁弹出激活提示而烦恼吗?Office文档突然…...

ncmdumpGUI:Windows平台免费NCM文件转换终极指南
ncmdumpGUI:Windows平台免费NCM文件转换终极指南 【免费下载链接】ncmdumpGUI C#版本网易云音乐ncm文件格式转换,Windows图形界面版本 项目地址: https://gitcode.com/gh_mirrors/nc/ncmdumpGUI 您是否在网易云音乐下载了喜爱的歌曲,…...

从噪音烦恼到静音天堂:Fan Control帮你实现Windows风扇控制的终极自由
从噪音烦恼到静音天堂:Fan Control帮你实现Windows风扇控制的终极自由 【免费下载链接】FanControl.Releases This is the release repository for Fan Control, a highly customizable fan controlling software for Windows. 项目地址: https://gitcode.com/Git…...

如何通过精细风扇控制优化Windows电脑的散热与静音体验
如何通过精细风扇控制优化Windows电脑的散热与静音体验 【免费下载链接】FanControl.Releases This is the release repository for Fan Control, a highly customizable fan controlling software for Windows. 项目地址: https://gitcode.com/GitHub_Trending/fa/FanContro…...

C++ 程序内存分区
C 程序运行时,操作系统会给进程分配虚拟地址空间,在 32/64 位系统中,逻辑上划分为 代码区、全局静态区、常量区、栈区、堆区 5 个区域。下面从存储内容、管理方式、生命周期、权限、代码示例、常见坑逐一拆解。一、代码区(Text 段…...