85、 探针
一、pod的进阶
pod的进阶:
1.1、pod的生命周期当中的状态:
1、Running运行中,pod已经分配到节点上且pod内的容器正常运行。正常状态(ready 1/1)。
2、complete:完成之后退出,容器内的返回码是0,echo $?(表示容器正常运行结束)
3、pending:挂起状态,pod已经创建好了,但是没有被分配到节点上。
面试题:出现pending状态如何解决?
- 1、节点上的资源不足 nginx------node1 node1---->换个节点
- 2、污点,节点上设置了污点标签,导致节点不可部署
- 3、pv,节点上没有合适的pv挂载点(手动),创建pv失败。(手动,自动)
- 4、网络原因,防火墙导致节点不可用。
- 5、swap没有关闭,k8s禁止使用交换分区。
- 6、HostPort已经被占用,NodePort节点上的端口被占用,也会pending。
- 7、ImagePullBackOff:镜像拉取失败
- 8、CrashLoopBackOff:容器已经启动了,但是异常退出了,可以看日志,或者查看详细信息情况。
- 9、error:pod启动过程中报错,日志可以查询。
- 10、PodInitializing:初始化中(pod内部有初始化init容器)
- 11、Evicte:pod被驱逐。
pod状态一览:
CrashLoopBackOff:    容器退出,kubelet正在将它重启
InvalidImageName:    无法解析镜像名称
ImageInspectError:   无法校验镜像
ErrImageNeverPull:   策略禁止拉取镜像
ImagePullBackOff:    正在重试拉取
RegistryUnavailable: 连接不到镜像中心
ErrImagePull:        通用的拉取镜像出错
CreateContainerConfigError: 不能创建kubelet使用的容器配置
CreateContainerError: 创建容器失败
m.internalLifecycle.PreStartContainer 执行hook报错
RunContainerError:   启动容器失败
PostStartHookError:   执行hook报错
ContainersNotInitialized: 容器没有初始化完毕
ContainersNotReady:   容器没有准备完毕
ContainerCreating:    容器创建中
PodInitializing:pod   初始化中
DockerDaemonNotReady:  docker还没有完全启动
NetworkPluginNotReady: 网络插件还没有完全启动
Evicte:     pod被驱赶
4、Failed:失败:容器内的返回码是非0状态退出,进入失败状态。
logs -f 可以查看pod的日志 describe pod 查看pod的详细情况,也可以查询到错误原因。
5、Terminating(终止中)
pod正在删除中。
6、Unknown:未知
集群出现问题了,API出现了问题,或者是API server和调度器之间通信有问题(证书过期)。
1.2、资源限制
docker cpu 100000
内存 m g
k8s cpu 最小单位 100m 0.1 一个cpu的10%
1000m 1 沾满一个cpu
500m 0.5 占cpu的50%
2 占2个cpu
内存:单位 Ki Mi Gi Ti
1、cpu和内存做资源限制
[root@master01 k8s-yaml]# vim test1.yml#定义api接口的版本
apiVersion: v1
kind: Pod
metadata:name: nginx1labels:app: nginx1
spec:containers:- name: nginximage: nginx:1.22resources:requests:cpu: "0.5"memory: "512Mi"
#软限制,最低的要求,可以不做limits:cpu: "1"memory: "1Gi"
#硬策略,最多使用这么多[root@master01 k8s-yaml]# kubectl apply -f test1.yml
pod/nginx1 created[root@master01 k8s-yaml]# kubectl describe pod nginx1 Limits:cpu:     1memory:  1GiRequests:cpu:        500mmemory:     512Mi
二、探针probe:(面试必问)
探针是对容器执行定期的检查。
2.1、启动探针
探针:启动探针,在容器启动时,根据条件判断容器是否成功。如果有启动探针和其他探针并列。只有启动探针执行完毕(成功),后续的探针才会执行,启动探针失败,整个容器判定为失败,pod也会进入失败状态。
在整个容器的生命周期当中,只有启动探针在启动时执行,执行成功之后,后续不再执行。
startupProbe
2.2、存活探针
存活探针:livenessProbe 探测容器是否正常运行(Running),如果探测失败,会根据pod的重启策略来决定是否重启。
将伴随整个pod的生命周期。
2.3、就绪探针
就绪探针:readinessProbe 探测pod的状态是否进入ready,如果进入ready状态失败,service将会把这个pod的ip从转发中移除。
service不会把请求转发到这个pod
nginx1 --3 node1 node2 node3
nginx1-pod 10.244.0.10
nginx1-pod2 10.244.0.11-------------service----------NodePort 192.168.168.81:30001
nginx1-pod3 10.244.0.12----------ready 0/1
就绪探针没有检测成功或者失败,pod可能是running,但是ready一定是0/1。
存活探针一般用于容器内的配置文件或者是关键组件是否正常。
就绪探针一般用于指定端口的服务,需要对外提供访问的业务。
这两个探针都会伴随整个pod的生命周期。
2.4、probe的检测方法:
1、exec方法:就是进入容器内,指定命令,命令的返回码是0就是成功,非0都是失败。
在容器内使用自定义命令来检测容器内的健康状况,判断关键配置文件是否存在,依赖环境是否完整等等。
2、tcpSocket方法:对容器的ip地址进行tcp检查(三次握手),和指定的端口进行连接,如果三次握手和端口通信建立连接正常。
则认为成功,判断容器的端口是否正常启动,端口是否处于监听状态。
3、httpGet方法:对容器内的ip+端口进行http请求,请求的方式是get。响应码大于等于200且小于400,都是成功。
200=<x<400,主要应用于web容器。
结果:
1、成功。
2、失败。定义了容器的重启策略,容器会进行重启。
3、未知。探针失败,但是不会采取任何行动。
2.5、lifecycle字段:
2.5、容器钩子:
1、postStart----启动钩子
postStart:容器启动时立即执行的命令,执行容器内需要执行的初始化命令,等待依赖环境。
2、preStop----停止钩子
preStop:停止之前执行的任务,清理任务,同步文件等等(导出容器内的数据)。
1、启动任务失败,pod能否进入正常状态
2、停止任务失败,pod能否退出
3、如果和探针一起,启动失败的任务影响探针嘛?
影响,优先级大于启动探针
容器的启动的钩子----->启动探针-------->存活和就绪探针
存活探针
[root@master01 k8s-yaml]# vim test2.yamlapiVersion: apps/v1
kind: Deployment
metadata:name: centoslabels:app: centos7
spec:replicas: 1selector:matchLabels:app: centos7template:metadata:labels:app: centos7spec:
#定义pod的容器参数containers:- name: centos7image: centos:7command: ["/bin/bash","-c","touch /opt/123.txt && sleep 3600"]livenessProbe:exec:command: ["/usr/bin/test","-e","/opt/123.txt"]initialDelaySeconds: 1
#initialDelaySeconds: 表示容器启动之后多少秒开始第一次探测,1是秒,要等待应用程
#序准备好之后再探测。以避免结果有误。periodSeconds: 3
#在pod的生命周期内,探针的检测时间间隔是3秒 ,也没有固定的范围,根据业务容器的>情况来看,比较敏感的检测时间,可以缩短时间间隔
#在pod的生命周期内,探针的检测时间间隔是3秒,也没有固定的范围,根据业务容器的情
况来看,比较敏感的检测时间,可以缩短时间间隔failureThreshold: 2
#表示次数,表示探针检测容器失败几次就把容器标记为不健康。timeoutSeconds: 1
#timeoutSeconds的时间必须小于periodSeconds,表示探针在多少时间之内完成探测。 successThreshold: 1
#只要探针成功一次,就把容器标记为健康,这个值只能是1,默认也是1,可以不写。[root@master01 k8s-yaml]# kubectl apply -f test2.yaml
deployment.apps/centos created
[root@master01 k8s-yaml]# kubectl get pod
[root@master01 k8s-yaml]# kubectl describe pod centos-6746885856-pvd88 Liveness:       exec [/usr/bin/test -e /opt/123.txt] delay=1s timeout=1s period=3s #success=1 #failure=2##删除文件,触发存活探针
[root@master01 k8s-yaml]# kubectl exec -it centos-6746885856-nvndp
error: you must specify at least one command for the container
[root@master01 k8s-yaml]# kubectl exec -it centos-6746885856-nvndp bash
kubectl exec [POD] [COMMAND] is DEPRECATED and will be removed in a future version. Use kubectl exec [POD] -- [COMMAND] instead.
[root@centos-6746885856-nvndp /]# cd /opt/
[root@centos-6746885856-nvndp opt]# ls
123.txt
[root@centos-6746885856-nvndp opt]# rm -rf *
[root@centos-6746885856-nvndp opt]# exit
exit
[root@master01 k8s-yaml]# kubectl describe pod centos-6746885856-nvndp  Events:Type     Reason     Age              From               Message----     ------     ----             ----               -------Normal   Scheduled  71s              default-scheduler  Successfully assigned default/centos-6746885856-nvndp to node02Normal   Pulled     70s              kubelet            Container image "centos:7" already present on machineNormal   Created    70s              kubelet            Created container centos7Normal   Started    70s              kubelet            Started container centos7Warning  Unhealthy  1s (x2 over 4s)  kubelet            Liveness probe failed:Normal   Killing    1s               kubelet            Container centos7 failed liveness probe, will be restarted
探针的优化(面试)
  initialDelaySeconds: 1
#initialDelaySeconds: 表示容器启动之后多少秒开始第一次探测,1是秒,要等待应用程
#序准备好之后再探测。以避免结果有误。periodSeconds: 3
#在pod的生命周期内,探针的检测时间间隔是3秒 ,也没有固定的范围,根据业务容器的>情况来看,比较敏感的检测时间,可以缩短时间间隔
#在pod的生命周期内,探针的检测时间间隔是3秒,也没有固定的范围,根据业务容器的情
况来看,比较敏感的检测时间,可以缩短时间间隔failureThreshold: 2
#表示次数,表示探针检测容器失败几次就把容器标记为不健康。timeoutSeconds: 1
#timeoutSeconds的时间必须小于periodSeconds,表示探针在多少时间之内完成探测。 successThreshold: 1
#只要探针成功一次,就把容器标记为健康,这个值只能是1,默认也是1,可以不写。
存活探针不设置参数
[root@master01 k8s-yaml]# vim test3.yaml apiVersion: apps/v1
kind: Deployment
metadata:name: centoslabels:app: centos7
spec:replicas: 1selector:matchLabels:app: centos7template:metadata:labels:app: centos7spec:
#定义pod的容器参数containers:- name: centos7image: centos:7command: ["/bin/bash","-c","touch /opt/123.txt && sleep 3600"]livenessProbe:exec:command: ["/usr/bin/test","-e","/opt/123.txt"]#      initialDelaySeconds: 1
#initialDelaySeconds: 表示容器启动之后多少秒开始第一次探测,1是秒,要等待应用程
#序准备好之后再探测。以避免结果有误。#       periodSeconds: 3
#在pod的生命周期内,探针的检测时间间隔是3秒 ,也没有固定的范围,根据业务容器的>情况来看,比较敏感的检测时间,可以缩短时间间隔
#在pod的生命周期内,探针的检测时间间隔是3秒,也没有固定的范围,根据业务容器的情
况来看,比较敏感的检测时间,可以缩短时间间隔#        failureThreshold: 2
#表示次数,表示探针检测容器失败几次就把容器标记为不健康。#         timeoutSeconds: 1
#timeoutSeconds的时间必须小于periodSeconds,表示探针在多少时间之内完成探测。
#          successThreshold: 1
#只要探针成功一次,就把容器标记为健康,这个值只能是1,默认也是1,可以不写。[root@master01 k8s-yaml]# kubectl get pod
[root@master01 k8s-yaml]# kubectl describe pod centos-596c98dd98-wwfbl Liveness:       exec [/usr/bin/test -e /opt/123.txt] delay=0s timeout=1s period=10s #success=1 #failure=3
存活探针检测方法为tcp-80
[root@master01 k8s-yaml]# vim test3.yaml apiVersion: apps/v1
kind: Deployment
metadata:name: nginxlabels:app: centos7
spec:replicas: 1selector:matchLabels:app: centos7template:metadata:labels:app: centos7spec:
#定义pod的容器参数containers:- name: nginximage: nginx:1.22livenessProbe:tcpSocket:port: 80
[root@master01 k8s-yaml]# kubectl apply -f test3.yaml
deployment.apps/nginx created
[root@master01 k8s-yaml]# kubectl get pod
[root@master01 k8s-yaml]# kubectl describe pod nginx-585c6b6f4b-kfrjv Liveness:       tcp-socket :80 delay=0s timeout=1s period=10s #success=1 #failure=3
存活探针检测方法为tcp-81
[root@master01 k8s-yaml]# vim test3.yaml apiVersion: apps/v1
kind: Deployment
metadata:name: nginxlabels:app: centos7
spec:replicas: 1selector:matchLabels:app: centos7template:metadata:labels:app: centos7spec:
#定义pod的容器参数containers:- name: nginximage: nginx:1.22livenessProbe:tcpSocket:port: 81[root@master01 k8s-yaml]# kubectl get pod -o wide
nginx-654cfc659-nlkzh     0/1     CrashLoopBackOff   4          2m28s   10.244.2.91   node02   <none> [root@master01 k8s-yaml]# kubectl describe pod nginx-654cfc659-nlkzh
存活探针检测方法为http-81
[root@master01 k8s-yaml]# vim test3.yaml apiVersion: apps/v1
kind: Deployment
metadata:name: nginxlabels:app: centos7
spec:replicas: 1selector:matchLabels:app: centos7template:metadata:labels:app: centos7spec:
#定义pod的容器参数containers:- name: nginximage: nginx:1.22livenessProbe:httpGet:port: 80scheme: HTTPpath: /index.html[root@master01 k8s-yaml]# kubectl apply -f test3.yaml
[root@master01 k8s-yaml]# kubectl get pod -o wide
[root@master01 k8s-yaml]# kubectl describe pod nginx-5859bfdf9f-xbqnn Liveness:       http-get http://:80/index.html delay=0s timeout=1s period=10s #success=1 #failure=3
启动探针检测方法为http-80+就绪探针–exec指定命令检测文件是否存在
[root@master01 k8s-yaml]# vim test3.yaml apiVersion: apps/v1
kind: Deployment
metadata:name: nginxlabels:app: centos7
spec:replicas: 1selector:matchLabels:app: centos7template:metadata:labels:app: centos7spec:
#定义pod的容器参数containers:- name: nginximage: nginx:1.22livenessProbe:startupProbe:httpGet:port: 80scheme: HTTPpath: /index.htmlreadinessProbe:exec: command: ["/usr/bin/test","-e","/etc/passwd"][root@master01 k8s-yaml]# kubectl apply -f test3.yaml
[root@master01 k8s-yaml]# kubectl get pod -o wide
[root@master01 k8s-yaml]# kubectl describe pod nginx-76f8b6d4f7-xt4mp#scheme:调用的协议(http)
#path:path: /index.html curl 192.168.168.81
#      initialDelaySeconds: 1
#initialDelaySeconds: 表示容器启动之后多少秒开始第一次探测,1是秒,要等待应用程
#序准备好之后再探测。以避免结果有误。#       periodSeconds: 3
#在pod的生命周期内,探针的检测时间间隔是3秒 ,也没有固定的范围,根据业务容器的>情况来看,比较敏感的检测时间,可以缩短时间间隔
#在pod的生命周期内,探针的检测时间间隔是3秒,也没有固定的范围,根据业务容器的情
况来看,比较敏感的检测时间,可以缩短时间间隔#        failureThreshold: 2
#表示次数,表示探针检测容器失败几次就把容器标记为不健康。#         timeoutSeconds: 1
#timeoutSeconds的时间必须小于periodSeconds,表示探针在多少时间之内完成探测。
#          successThreshold: 1
#只要探针成功一次,就把容器标记为健康,这个值只能是1,默认也是1,可以不写。
[root@master01 k8s-yaml]# vim test3.yaml apiVersion: apps/v1
kind: Deployment
metadata:name: nginxlabels:app: centos7
spec:replicas: 1selector:matchLabels:app: centos7template:metadata:labels:app: centos7spec:
#定义pod的容器参数containers:- name: nginximage: nginx:1.22livenessProbe:startupProbe:httpGet:port: 80scheme: HTTPpath: /index.htmlreadinessProbe:exec:command: ["/usr/bin/test","-e","/etc/passwd"]
---
#表示分段,上一个yml结束,下一个新的yml
apiVersion: v1
kind: Service
metadata:name: nginx-1
# namespacelabels:app: nginx1
spec:type: NodePortports:- port: 80targetPort: 80nodePort: 30000selector:app: centos7[root@master01 k8s-yaml]# kubectl apply -f test3.yaml [root@master01 k8s-yaml]# kubectl get pod
NAME READY STATUS RESTARTS AGE
nfs1-76f66b958-68wpl 1/1 Running 0 12h
nginx-76f8b6d4f7-hhvdq 1/1 Running 0 41s
[root@master01 k8s-yaml]# kubectl exec -it nginx-76f8b6d4f7-hhvdq bash
kubectl exec [POD] [COMMAND] is DEPRECATED and will be removed in a future version. Use kubectl exec [POD] -- [COMMAND] instead.
root@nginx-76f8b6d4f7-hhvdq:/# cd /usr/share/nginx/html/
root@nginx-76f8b6d4f7-hhvdq:/usr/share/nginx/html# ls
50x.html index.html
root@nginx-76f8b6d4f7-hhvdq:/usr/share/nginx/html# cat index.html
<!DOCTYPE html>
<html>
<head>
<title>Welcome to nginx!</title>
<style>
html { color-scheme: light dark; }
body { width: 35em; margin: 0 auto;
font-family: Tahoma, Verdana, Arial, sans-serif; }
</style>
</head>
<body>
<h1>Welcome to nginx!</h1>
<p>If you see this page, the nginx web server is successfully installed and
working. Further configuration is required.</p><p>For online documentation and support please refer to
<a href="http://nginx.org/">nginx.org</a>.<br/>
Commercial support is available at
<a href="http://nginx.com/">nginx.com</a>.</p><p><em>Thank you for using nginx.</em></p>
</body>
</html>
root@nginx-76f8b6d4f7-hhvdq:/usr/share/nginx/html# echo 123456 > index.html
root@nginx-76f8b6d4f7-hhvdq:/usr/share/nginx/html# cat index.html
123456
root@nginx-76f8b6d4f7-hhvdq:/usr/share/nginx/html# exit
exit
[root@master01 k8s-yaml]# curl 192.168.168.81
curl: (7) Failed connect to 192.168.168.81:80; 拒绝连接
[root@master01 k8s-yaml]# curl 192.168.168.81:30000
123456[root@master01 k8s-yaml]# vim test3.yaml
[root@master01 k8s-yaml]# kubectl exec -it nginx-76f8b6d4f7-hhvdq bash
kubectl exec [POD] [COMMAND] is DEPRECATED and will be removed in a future version. Use kubectl exec [POD] -- [COMMAND] instead.
root@nginx-76f8b6d4f7-hhvdq:/# rm -rf /etc/passwd
root@nginx-76f8b6d4f7-hhvdq:/# exit
exit
[root@master01 k8s-yaml]# kubectl get pod
NAME READY STATUS RESTARTS AGE
nfs1-76f66b958-68wpl 1/1 Running 0 12h
nginx-76f8b6d4f7-hhvdq 1/1 Running 0 5m48s
[root@master01 k8s-yaml]# kubectl get pod
NAME READY STATUS RESTARTS AGE
nfs1-76f66b958-68wpl 1/1 Running 0 12h
nginx-76f8b6d4f7-hhvdq 0/1 Running 0 8m18s就绪探针生效,文件丢失,ready变化
启动钩子—指定命令检测文件不存在,导致后续容器启动失败
[root@master01 k8s-yaml]# vim test3.yaml apiVersion: apps/v1
kind: Deployment
metadata:name: nginxlabels:app: centos7
spec:replicas: 1selector:matchLabels:app: centos7template:metadata:labels:app: centos7spec:
#定义pod的容器参数containers:- name: nginximage: nginx:1.22livenessProbe:startupProbe:httpGet:port: 80scheme: HTTPpath: /index.htmlreadinessProbe:exec:command: ["/usr/bin/test","-e","/etc/passwd"]lifecycle:postStart:exec:command: ["/bin/bash","-c","cat /opt/123.txt"]
---
#表示分段,上一个yml结束,下一个新的yml
apiVersion: v1
kind: Service
metadata:name: nginx-1
# namespacelabels:app: nginx1
spec:type: NodePortports:- port: 80targetPort: 80[root@master01 k8s-yaml]# kubectl apply -f test3.yaml --force
[root@master01 k8s-yaml]# kubectl get pod
NAME                    READY   STATUS    RESTARTS   AGE
nfs1-76f66b958-68wpl    1/1     Running   0          12h
nginx-df44cb667-kt4xj   0/1     PostStartHookError: command '/bin/bash -c cat /opt/123.txt' exited with 1: cat: /opt/123.txt: No such file or directory1       3s[root@master01 k8s-yaml]# kubectl describe pod nginx-df44cb667-p4vspWarning  FailedPostStartHook  4m49s (x4 over 5m33s)  kubelet            Exec lifecycle hook ([/bin/bash -c cat /opt/123.txt]) for Container "nginx" in Pod "nginx-df44cb667-p4vsp_default(8ee9249a-e118-4e25-8b10-cb53e8cc189f)" failed - error: command '/bin/bash -c cat /opt/123.txt' exited with 1: cat: /opt/123.txt: No such file or directory
, message: "cat: /opt/123.txt: No such file or directory\n"Normal   Killing  4m49s (x4 over 5m33s)  kubelet  FailedPostStartHookWarning  BackOff  25s (x27 over 5m31s)   kubelet  Back-off restarting failed container
lifecycle字段:
容器钩子:
postStart:容器启动时立即执行的命令,执行容器内需要执行的初始化命令,等待依赖环境。
preStop:停止之前执行的任务,清理任务,同步文件等等(导出容器内的数据)。
1、启动任务失败,pod能否进入正常状态
2、停止任务失败,pod能否退出
3、如果和探针一起,启动失败的任务影响探针嘛?
影响,优先级大于启动探针
容器的启动的钩子----->启动探针-------->存活和就绪探针
4、容器的钩子,不论是启动还是停止之前的命令,只能使用exec。
容器的钩子,不论是启动还是停止之前的命令,只能使用exec。
[root@master01 k8s-yaml]# vim test3.yaml apiVersion: apps/v1
kind: Deployment
metadata:name: nginxlabels:app: centos7
spec:replicas: 3selector:matchLabels:app: centos7template:metadata:labels:app: centos7spec:
#定义pod的容器参数containers:- name: nginximage: nginx:1.22livenessProbe:startupProbe:httpGet:port: 81scheme: HTTPpath: /index.htmlreadinessProbe:exec:command: ["/usr/bin/test","-e","/etc/passwd"]lifecycle:postStart:tcpSocket:port: 80---
#表示分段,上一个yml结束,下一个新的yml
apiVersion: v1
kind: Service
metadata:name: nginx-1
# namespacelabels:app: nginx1
spec:type: NodePortports:- port: 80targetPort: 80
[root@master01 k8s-yaml]# kubectl apply -f test3.yaml
[root@master01 k8s-yaml]# kubectl get pod
NAME                     READY   STATUS             RESTARTS   AGE
nfs1-76f66b958-68wpl     1/1     Running            0          13h
nginx-56f444c575-qq29d   0/1     CrashLoopBackOff   5          7m17s
[root@master01 k8s-yaml]# kubectl describe pod nginx-56f444c575-qq29d Warning  FailedPostStartHook  4m6s (x4 over 6m21s)  kubelet            Cannot run handler: invalid handler: &Handler{Exec:nil,HTTPGet:nil,TCPSocket:&TCPSocketAction{Port:{0 80 },Host:,},}Normal   Killing              4m6s (x4 over 6m21s)  kubelet            FailedPostStartHookWarning  BackOff              66s (x17 over 5m19s)  kubelet            Back-off restarting failed container容器的钩子,不论是启动还是停止之前的命令,只能使用exec。
容器的钩子,不论是启动还是停止之前的命令,只能使用exec。
[root@master01 k8s-yaml]# vim test3.yaml apiVersion: apps/v1
kind: Deployment
metadata:name: nginxlabels:app: centos7
spec:replicas: 1selector:matchLabels:app: centos7template:metadata:labels:app: centos7spec:
#定义pod的容器参数containers:- name: nginximage: nginx:1.22livenessProbe:startupProbe:httpGet:port: 81scheme: HTTPpath: /index.htmlreadinessProbe:exec:command: ["/usr/bin/test","-e","/etc/passwd"]lifecycle:postStart:httpGet:port: 80scheme: HTTPpath: /index.html
---
#表示分段,上一个yml结束,下一个新的yml
apiVersion: v1
kind: Service
metadata:name: nginx-1
# namespacelabels:app: nginx1
spec:type: NodePortports:- port: 80targetPort: 80[root@master01 k8s-yaml]# kubectl apply -f test3.yaml
deployment.apps/nginx created
service/nginx-1 unchanged
[root@master01 k8s-yaml]# kubectl get pod
NAME                    READY   STATUS                                                                                                                RESTARTS   AGE
nfs1-76f66b958-68wpl    1/1     Running                                                                                                               0          13h
nginx-cbf59dc9f-s4tx6   0/1     PostStartHookError: Get "http://10.244.2.213:80//index.html": dial tcp 10.244.2.213:80: connect: connection refused   0          2s[root@master01 k8s-yaml]# kubectl describe pod nginx-cbf59dc9f-s4tx6 Warning  FailedPostStartHook  24s (x3 over 38s)  kubelet            Http lifecycle hook (/index.html) for Container "nginx" in Pod "nginx-cbf59dc9f-s4tx6_default(ab801d25-2c1f-4ede-a9ac-351d843b8067)" failed - error: Get "http://10.244.2.213:80//index.html": dial tcp 10.244.2.213:80: connect: connection refused, message: ""容器的钩子,不论是启动还是停止之前的命令,只能使用exec。
启动及停止exec指定命令写入文件
[root@master01 k8s-yaml]# vim test4.yamlapiVersion: v1
kind: Pod
metadata:name: centos1labels:app: centos1
spec:containers:- name: centosimage: centos:7command: ["/bin/bash","-c","sleep 30"]lifecycle:postStart:exec:command: ["/bin/bash","-c","echo start > /opt/123.txt && sleep 10"]preStop:exec:command: ["/bin/bash","-c","echo stop > /opt/123.txt && sleep 10"]
启动及停止exec指定命令写入文件,通过挂载目录查看
[root@master01 k8s-yaml]# vim test4.yamlapiVersion: v1
kind: Pod
metadata:name: centos1labels:app: centos1
spec:containers:- name: centosimage: centos:7command: ["/bin/bash","-c","sleep 30"]volumeMounts:- name: data-vmountPath: /opt/test1
#容器内的目录,挂载卷的名称lifecycle:postStart:exec:command: ["/bin/bash","-c","echo start >> /opt/test1/123.txt && sleep 10"]preStop:exec:command: ["/bin/bash","-c","echo stop >> /opt/test1/456.txt && sleep 10"]volumes:- name: data-vhostPath:path: /opt/testtype: DirectoryOrCreate[root@master01 k8s-yaml]# kubectl apply -f test4.yaml --force
pod/centos1 configured
[root@master01 k8s-yaml]# kubectl exec -it centos1 bash
kubectl exec [POD] [COMMAND] is DEPRECATED and will be removed in a future version. Use kubectl exec [POD] -- [COMMAND] instead.
[root@centos1 /]# cd /opt/test1/
[root@centos1 test1]# ls
123.txt  456.txt
[root@centos1 test1]# command terminated with exit code 137
[root@master01 k8s-yaml]# kubectl exec -it centos1 bash
kubectl exec [POD] [COMMAND] is DEPRECATED and will be removed in a future version. Use kubectl exec [POD] -- [COMMAND] instead.
[root@centos1 /]# cd /opt/test1/
[root@centos1 test1]# ls
123.txt  456.txt
[root@centos1 test1]# cat 456.txt
stop
[root@centos1 test1]# cat 123.txt
start
启动及停止exec指定命令写入文件
[root@master01 k8s-yaml]# vim test4.yamlapiVersion: v1
kind: Pod
metadata:name: centos1labels:app: centos1
spec:containers:- name: centosimage: centos:7command: ["/bin/bash","-c","sleep 30"]volumeMounts:- name: data-vmountPath: /opt/test1
#容器内的目录,挂载卷的名称lifecycle:postStart:exec:command: ["/bin/bash","-c","echo start >> /opt/test1/123.txt && sleep 10"]preStop:exec:command: ["/bin/bash","-c","echo stop >> /opt/test1/321.txt && sleep 10"]volumes:- name: data-vhostPath:path: /opt/testtype: DirectoryOrCreate[root@master01 k8s-yaml]# kubectl apply -f test4.yaml
pod/centos1 created
[root@master01 k8s-yaml]# kubectl exec -it centos1 bash
kubectl exec [POD] [COMMAND] is DEPRECATED and will be removed in a future version. Use kubectl exec [POD] -- [COMMAND] instead.
[root@centos1 /]# cd /opt/test1/
[root@centos1 test1]# ls
123.txt
[root@centos1 test1]# command terminated with exit code 137
[root@master01 k8s-yaml]# kubectl delete pod centos1
pod "centos1" deleted[root@master01 k8s-yaml]# kubectl get pod -o wide
centos1                   0/1     ContainerCreating   0          2s      <none>         node02   <none>           <none>[root@node02 test]# cat 321.txt
stop
探针三种:
启动 : 启动执行完毕之后,后续不再执行。
存活 :
就绪
存活和就绪会伴随整个pod的生命周期
三种方法:
exec
tcpSocket
httpGet
作业:
启动钩子和退出钩子
和节点挂载:/usr/share/nginx/html 节点: /opt/node
exec执行 要能在目录中看到开始和打印的结果
包含探针:
1、启动探针:
方法:exec 检测 /usr/share/nginx/html/index.html 文件是否存在
2、存活探针
方法:httpGET
访问验证返回码是否正确
3、就绪探针
tcpSocket
监听容器的80端口是否正常
启动探针、存活探针、就绪探针、启动及停止钩子通过exec指定命令写入文件
[root@master01 k8s-yaml]# vim test5.yamlapiVersion: v1
kind: Pod
metadata:name: nginx1labels:app: nginx1
spec:containers:- name: nignx1image: nginx:1.22volumeMounts:- name: data-vmountPath: /usr/share/nginx/html
#设置容器钩子lifecycle:
#设置启动钩子postStart:exec:command: ["/bin/bash","-c","echo start >> /usr/share/nginx/html/index.html"]
#设置停止钩子preStop:exec:command: ["/bin/bash","-c","echo stop >> /usr/share/nginx/html/error.html"]startupProbe:exec:command: ["/usr/bin/test","-e","/usr/share/nginx/html/index.html"]livenessProbe:httpGet:port: 80scheme: HTTPpath: /index.htmlreadinessProbe:tcpSocket:port: 80volumes:- name: data-vhostPath:path: /opt/nodetype: DirectoryOrCreate[root@master01 k8s-yaml]# kubectl apply -f test5.yaml [root@master01 k8s-yaml]# kubectl get pod -o wide
NAME     READY   STATUS    RESTARTS   AGE   IP            NODE     NOMINATED NODE   READINESS GATES
nginx1   1/1     Running   0          51s   10.244.1.66   node01   <none>           <none>[root@master01 k8s-yaml]# kubectl describe pod nginx1 Liveness:       http-get http://:80/index.html delay=0s timeout=1s period=10s #success=1 #failure=3Readiness:      tcp-socket :80 delay=0s timeout=1s period=10s #success=1 #failure=3Startup:        exec [/usr/bin/test -e /usr/share/nginx/html/index.html] delay=0s timeout=1s period=10s #success=1 #failure=3Events:Type    Reason     Age   From               Message----    ------     ----  ----               -------Normal  Scheduled  63s   default-scheduler  Successfully assigned default/nginx1 to node01Normal  Pulled     63s   kubelet            Container image "nginx:1.22" already present on machineNormal  Created    63s   kubelet            Created container nignx1Normal  Started    63s   kubelet            Started container nignx1[root@node01 node]# cat /opt/node/index.html
start[root@master01 k8s-yaml]# kubectl delete pod nginx1
pod "nginx1" deleted[root@node01 node]# cat error.html
stop
相关文章:

85、 探针
一、pod的进阶 pod的进阶: 1.1、pod的生命周期当中的状态: 1、Running运行中,pod已经分配到节点上且pod内的容器正常运行。正常状态(ready 1/1)。 2、complete:完成之后退出,容器内的返回码…...
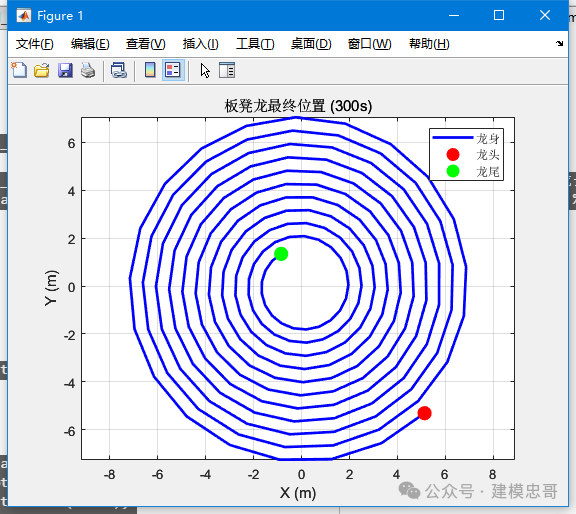
2024全国大学省数学建模竞赛A题-原创参考论文(部分+第一问代码)
一问题重述 1.1 问题背景 "板凳龙",又称"盘龙",是浙闽地区的传统地方民俗文化活动。这种独特的表演艺术形式融合了中国传统龙舞的精髓和地方特色,展现了人们对美好生活的向往和对传统文化的传承。 在板凳龙表演中&am…...

在VScode上写网页(html)
一、首先点进VScode,下载3个插件。 VScode安装:VScode 教程 | 菜鸟教程 二、新建 HTML 文件 作者运行的代码来自:http://t.csdnimg.cn/vIAQi 把代码复制粘贴进去,然后点击文件→另存为→选择html格式。 三、运行代码...

C#中LINQ的Cast<T>与OfType<T>
在C#中,Cast() 方法是LINQ(Language Integrated Query)的一部分,它位于 System.Linq 命名空间中。这个方法用于将 IEnumerable 集合(或任何实现了 IEnumerable 接口的集合)的元素转换为指定类型 T 的集合。…...

小阿轩yx-Kubernertes日志收集
小阿轩yx-Kubernertes日志收集 前言 在 Kubernetes 集群中如何通过不同的技术栈收集容器的日志,包括程序直接输出到控制台日志、自定义文件日志等 有哪些日志需要收集 日志收集与分析很重要,为了更加方便的处理异常 简单总结一些比较重要的需要收集…...

0to1使用Redis实现“登录验证”次数限制
1 引言 系统为了避免密码遭到暴力破解,通常情况下需要在登录时,限制用户验证账号密码的次数,当达到一定的验证次数后,在一段时间内锁定该账号,不再验证。本章将用几行代码实现该功能,完整代码链接在文章最…...

ARM----时钟
时钟频率可以是由晶振提供的,我们需要高频率,但是外部接高的晶振会不稳定,所有使用PLL(锁相环)来放大频率。接下来就让我们学习用外部晶振提供的频率来配置时钟频率。 一.时钟源的选择 在这里我们选择外部晶振作为时钟…...

NISP 一级 —— 考证笔记合集
该笔记为导航目录,在接下来一段事件内,我会每天发布我关于考取该证书的相关笔记。 当更新完成后,此条注释会被删除。 第一章 信息安全概述 1.1 信息与信息安全1.2 信息安全威胁1.3 信息安全发展阶段与形式1.4 信息安全保障1.5 信息系统安全保…...

C++三位状态比较排序
数组相同元素个数及按序 void 交换3个数升(int& A, int& B, int& C, bool& k) {int J 0;if (B > A&&A > C)J C, C B, B A, A J, k true;//231else if (C > A&&A > B)J A, A B, B J, k true;//213else if (A > B&a…...

麒麟系统安装GPU驱动
1.nvidia 1.1显卡驱动 本机显卡型号:nvidia rtx 3090 1.1.1下载驱动 打开 https://www.nvidia.cn/geforce/drivers/ 也可以直接使用下面这个地址下载 https://www.nvidia.com/download/driverResults.aspx/205464/en-us/ 1.1.3安装驱动 右击,为run文件添加可…...

IDEA 安装lombok插件不兼容的问题及解决方法
解决:IDEA 安装lombok插件不兼容问题,plugin xxxx is incompatible 一、去官网下载最新的2024版本 地址传送通道: lombok插件官网地址https://plugins.jetbrains.com/plugin/6317-lombok/versions/stable 二、修改参数的配置 在压缩包路径…...

聊聊说话的习惯
1 在日常生活中,每个人都有固定的说话习惯。心理学研究表明,通过一个人的说话习惯,也可以分析出他的性格特点。对于每一个人来讲,说话习惯已经融为他们生活中的一部分。在社交活动中,一些不良的说话习惯很可能会给他们带来麻烦。…...
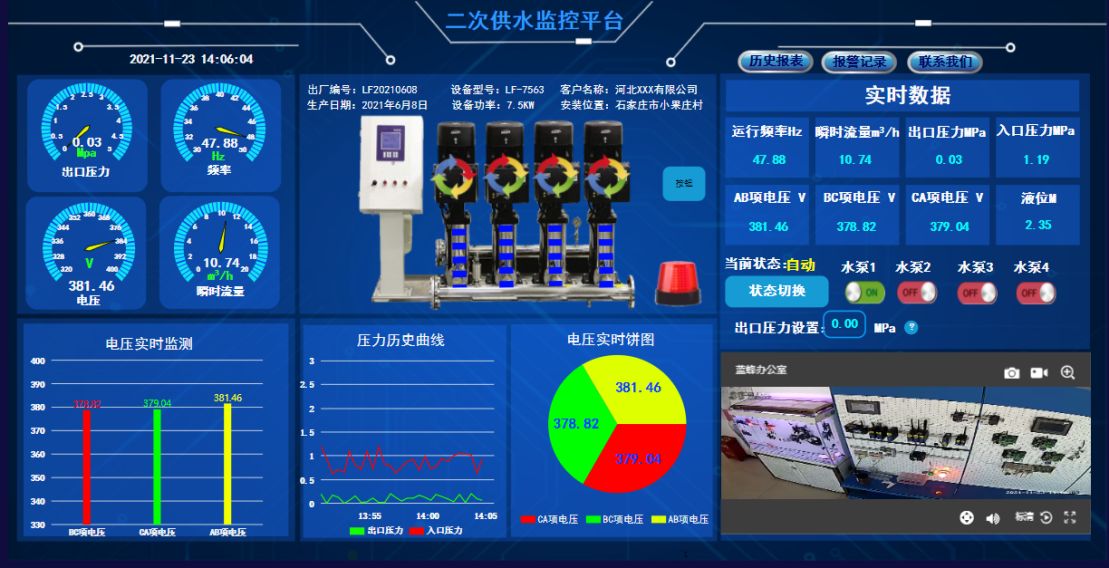
当水泵遇上物联网:智能水务新时代的浪漫交响
在当代科技的宏伟乐章中,物联网(IoT)技术宛如一位技艺高超的指挥家,引领着各行各业迈向智能化的新纪元。当这股创新浪潮涌向古老的水务行业时,一场前所未有的“智能水务”革命便悄然上演,而水泵——这一传统…...

【Canvas与钟表】干支表盘
【成图】 【代码】 <!DOCTYPE html> <html lang"utf-8"> <meta http-equiv"Content-Type" content"text/html; charsetutf-8"/> <head><title>387.干支表盘</title><style type"text/css">…...

分布式项目中使用雪花算法提前获取对象主键ID
hello,大家好,我是灰小猿! 在做分布式项目开发进行数据表结构设计时,有时候为了提高查询性能,在进行数据库表设计时,会使用自增ID来代替UUID作为数据的主键ID,但是这样就会有一个问题ÿ…...

小程序多个set-cookie无法处理
1、情景: 项目中遇到一个问题,客户的服务器上了华为云的防火墙,导致小程序请求头中携带了3个set- cookie(有两个是华为云给自动加的),而小程序端不知道用哪个来 处理,结果选了个错误的进行处理…...

Mybatis【分页插件,缓存,一级缓存,二级缓存,常见缓存面试题】
文章目录 MyBatis缓存分页延迟加载和立即加载什么是立即加载?什么是延迟加载?延迟加载/懒加载的配置 缓存什么是缓存?缓存的术语什么是MyBatis 缓存?缓存的适用性缓存的分类一级缓存引入案例一级缓存的配置一级缓存的工作流程一级…...

【Qt开发】QT6.5.3安装方法(使用国内源)亲测可行!!!
目录 🌕下载在线安装包🌕 把安装包放到系统盘🌕开始安装🌕参考文章 🌕下载在线安装包 https://mirrors.nju.edu.cn/qt/official_releases/online_installers/ 🌕 把安装包放到系统盘 我的系统盘是G盘&…...
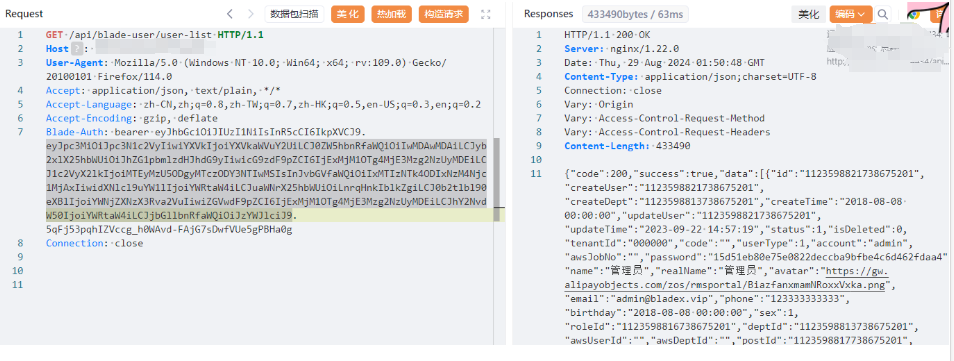
springblade-JWT认证缺陷漏洞CVE-2021-44910
漏洞成因 SpringBlade前端通过webpack打包发布的,可以从其中找到app.js获取大量接口 然后直接访问接口:api/blade-log/api/list 直接搜索“请求未授权”,定位到认证文件:springblade/gateway/filter/AuthFilter.java 后面的代码…...

Chapter 12 Vue CLI脚手架组件化开发
欢迎大家订阅【Vue2Vue3】入门到实践 专栏,开启你的 Vue 学习之旅! 文章目录 前言一、项目目录结构二、组件化开发1. 组件化2. Vue 组件的基本结构3. 依赖包less & less-loader 前言 组件化开发是Vue.js的核心理念之一,Vue CLI为开发者提…...

Unity安卓打包实战指南:从环境配置到APK生成全链路排错
1. 这不是“入门教程”,而是一份写给真实开发现场的生存指南你打开Unity,新建一个3D项目,拖进一个Cube,点击Play——它动了。你松了口气,觉得“Unity好像也没那么难”。但当你把APK打包发给测试同事,对方回…...

学术写作创新突破!2026全流程AI论文工具精选指南
2026 年 AI 论文写作工具已进入全流程闭环 学术合规时代,千笔 AI(综合评分 99 分)中文学术场景标杆;Grammarly Academic与Elicit为英文论文写作首选;按需求匹配度 - 数据可信度 - 成本承受力三维模型选型,…...

电容损坏深度诊断,从外观到 ESR精准区分容衰与漏电
在 PCB 故障中,电容损坏占比超 40%,是当之无愧的 “头号杀手”。很多工程师仅靠 “鼓包漏液” 判断电容好坏,殊不知80% 的电容损坏是隐性的—— 外观平整但容值衰减、ESR 升高、轻微漏电,导致供电不稳、系统重启、噪声增大&#x…...

2026长沙智能家居品牌实测,这些本地老牌值得选
2026年,长沙的智能家居市场已经从“概念热”转向“落地战”。我走访了长沙多个本地服务商,实测了不同品牌在别墅、酒店、大平层等场景的真实表现。今天,结合数据与案例,分享几个值得关注的本地品牌,尤其是深耕8年以上的…...

基于Max78000与规则引导的音频数据集构建:边缘AI声音识别实战
1. 项目概述:当边缘AI遇见棕榈树里的“窃听者”在边缘计算和物联网设备大行其道的今天,我们常常面临一个核心矛盾:一方面,我们希望设备足够“聪明”,能实时识别并响应特定的声音模式,比如工厂里高压阀门的异…...

为开源项目OpenClaw配置Taotoken作为其大模型服务后端
🚀 告别海外账号与网络限制!稳定直连全球优质大模型,限时半价接入中。 👉 点击领取海量免费额度 为开源项目OpenClaw配置Taotoken作为其大模型服务后端 OpenClaw 是一个功能强大的开源工具,它允许开发者便捷地调用各类…...

关于我第九次博客作业
(1)Flex布局核心概念一、Flex 是什么Flex 是 CSS3 一维弹性布局,专治元素对齐、自适应、空间分配问题,布局更高效灵活。二、两大核心角色1. 父容器(Flex容器)设置 display: flex 即为弹性父盒子,负责统一规定子元素排列…...

温差发电驱动轻型电动车:热电模块与催化燃烧器的系统集成实践
1. 项目概述:用温差发电驱动轻型电动车最近在琢磨一个挺有意思的玩意儿:能不能给那些轻型的电动车,比如高尔夫球车、园区巡逻车或者小型载货三轮,换上一套不一样的“心脏”?传统的方案,要么背着一大块死沉死…...

3分钟掌握PUBG罗技鼠标宏:新手也能轻松压枪的完整指南
3分钟掌握PUBG罗技鼠标宏:新手也能轻松压枪的完整指南 【免费下载链接】logitech-pubg PUBG no recoil script for Logitech gaming mouse / 绝地求生 罗技 鼠标宏 项目地址: https://gitcode.com/gh_mirrors/lo/logitech-pubg 还在为《绝地求生》中难以控制…...

Hotkey Detective:3步快速定位Windows快捷键冲突的终极指南
Hotkey Detective:3步快速定位Windows快捷键冲突的终极指南 【免费下载链接】hotkey-detective A small program for investigating stolen key combinations under Windows 7 and later. 项目地址: https://gitcode.com/gh_mirrors/ho/hotkey-detective 你是…...