vLLM (4) - LLMEngine上篇
系列文章目录
vLLM (1) - Qwen2推理&部署
vLLM (2) - 架构总览
vLLM (3) - Sequence & SequenceGroup
vLLM (4) - LLMEngine上篇
vLLM (5) - LLMEngine下篇
文章目录
- 系列文章目录
- 前言
- 一、类图
- 二、LLM
- 三、LLMEngine
- 四、GPUExectuor
- 五、Worker
- 六、ModelRunner
- 七、CacheEngine
- 总结
前言
经过前面两篇的铺垫,终于来到了解析LLMEngine的篇章。如下图所示,LLMEngine主要有两部分构成,右边部分包括Worker、CacheEngine和ModelRunner等重要的类,它们在LLMEngine的初始化阶段就会用到,工作内容包括模型加载,KV Cache初始化等等,这是本文中重点;左边部分包括Scheduler和BlockSpaceManger,用于调度用户请求,并在过程中管理显存和内存,这部分发生在LLMEngine的(generate)生成阶段,将放到后续文章中。

一、类图
本篇重点讲述LLMEngine的初始化部分。由于代码调用相对复杂,下面我使用类图的方式来表示不同的类之间的关系。同时,在类图中只写上本篇所涉及的相关属性和方法,避免其他属性和方法对本篇阅读造成干扰。建议该类图当结合后续代码一起使用。
# 类图+-------------------------+
|           LLM           |
+-------------------------+
| + llm_engine: LLMEngine |
+-------------------------+||v
+-------------------------+
|        LLMEngine        |
+-------------------------+
| + model_executor: GPUExecutor |  # 执行器,名字有点歧义,项目有个子目录也叫model_exectuor
| - _initialize_kv_caches()     |  # 初始化kv_caches
| + scheduler: Scheduler  |        # 调度器
| + output_processor      |        # 输出处理器
+-------------------------+||v
+-------------------------+
|        GPUExecutor      |
+-------------------------+
| - _init_executor()      |        # 初始化执行器
| + driver_worker: Worker |        # worker
|                         |
| + determine_num_available_blocks: Tuple[int, int] |   # 确认可用的gpu blocks和cpu blocks
| + initalize_cache()     |        # 初始化缓存,先用全0张量为kv_cache占住内存
+-------------------------+||v
+-------------------------+
|          Worker         |
+-------------------------+
| + model_runner: ModelRunner |    # 加载和执行模型的部分
| + cache_engine: CacheEngine |    # 初始化和更新kv_cache的部分
| + init_device()         |        # 初始化设备,gpu
| + load_model()          |        # 加载模型
+-------------------------+|                              	||                              	|v                              	v
+-------------------------+    +-------------------------+
|       ModelRunner       |    |       CacheEngine       |
+-------------------------+    +-------------------------+
| + loader_model()        |    | + gpu_cache             |
| + profile_run()         |    | - _allocate_kv_cache(): List[torch.Tensor] |
| + capture_model()       |    | + get_cache_block_size(...): int           |
+-------------------------+    +-------------------------+
二、LLM
LLM是一个在给定prompt和sample paramters时,使用指定的大语言模型生成文本的类;其核心组件为self.llm_engine(LLMEngine的实例化对象),LLM的绝大多数工作由它来完成。
使用LLM的示例代码如下所示。1)构建LLM实例化对象,其初始化部分将完成llm_engine: LLMEngine的创建(本文将重点);2)处理请求,使用self.generate()方法,完成了资源调度,高效的应对用户请求,输出文本(后续文章讲述)。
# 完整示例见系列文章的Qwen2推理篇
from vllm import LLMllm = LLM(model=DEFAULT_CKPT_PATH)      # DEFAULT_CKPT_PATH为模型名称或下载到本地的目录
outputs = llm.generate(text, sampling_params)  # text为输入文本,sampling_params是采样参数
三、LLMEngine
LLMEngine主要包含两个部分:1)model_executor;2)scheduler。model_executor主要负责模型相关的部分,比如设备的选择,模型的加载等等;而scheduler用于资源的调度,这部分在会模型推理阶段频繁使用。
结合代码来看一下LLMEngine在初始化环节都在干什么:
- 创建
model_executor:根据model_config等一系列配置创建模型执行器;对于一个不太富裕的从业者来说,我们可能在一块单卡上跑vllm,这时候model_executor是GPUExectuor,如果你使用的硬件是Neuron或者TPU,对应的model_executor就是NeuronExecutor或TPUExecutor;另外,model_config等配置是将输入和默认参数按照功能拆分出的多个配置项,这里不赘述; - 初始化
kv_caches:借由self.model_exectutor(下一小节展开),确定可用于kv_caches的内存空间,并创建tensor占用这部分内存;在Qwen2推理&部署中的真实显存占用这一小节中,我们已经观察到了这个动作,并做了详细分析,不清楚的可以去看一下; - 构建
scheduler:资源调度一般都出现在模型推理阶段; - 其他:比如创建
output_processor等,这部分不是重点。
# vllm/engine/llm_engine.py
class LLMEngine:def __init__(self, ...):# ...self.model_executor = executor_class(model_config=model_config,cache_config=cache_config,parallel_config=parallel_config,scheduler_config=scheduler_config,device_config=device_config,lora_config=lora_config,vision_language_config=vision_language_config,speculative_config=speculative_config,load_config=load_config,)    # 1) 根据输入配置构建model_executorif not self.model_config.embedding_mode:self._initialize_kv_caches()   # 2) 初始化kv caches# 3) 构建schedulerself.scheduler = Scheduler(scheduler_config, cache_config, lora_config)# 4) 创建输出处理器,这在最后输出的时候会用到# Create sequence output processor, e.g. for beam search or speculative decoding.self.output_processor = (SequenceGroupOutputProcessor.create_output_processor(self.scheduler_config,self.detokenizer,self.scheduler,self.seq_counter,self.get_tokenizer_for_seq,stop_checker=StopChecker(self.scheduler_config.max_model_len,self.get_tokenizer_for_seq,),))def _initialize_kv_caches(self) -> None:"""Initialize the KV cache in the worker(s).The workers will determine the number of blocks in both the GPU cacheand the swap CPU cache."""num_gpu_blocks, num_cpu_blocks = (self.model_executor.determine_num_available_blocks())if self.cache_config.num_gpu_blocks_override is not None:num_gpu_blocks_override = self.cache_config.num_gpu_blocks_overridelogger.info("Overriding num_gpu_blocks=%d with ""num_gpu_blocks_override=%d", num_gpu_blocks,num_gpu_blocks_override)num_gpu_blocks = num_gpu_blocks_overrideself.cache_config.num_gpu_blocks = num_gpu_blocksself.cache_config.num_cpu_blocks = num_cpu_blocksself.model_executor.initialize_cache(num_gpu_blocks, num_cpu_blocks)
四、GPUExectuor
model_executor(比如GPUExecutor)在初始化阶段在干什么呢?GPUExecutor继承自基类ExecutorBase,在self.__init__()中调用了self._init_executor()方法,具体包括如下:
- 使用
self._create_worker()创建worker:实际上是通过WorkerWrapperBase来创建的worker,不同的配置对应不同类型的worker,默认情况下是Worker,当你使用投机采样speculative decoding的时候,则是SpecDecodeWorker(合理使用投机采样能够提升解码效率); worker初始化设备:self.driver_worker.init_device();worker加载模型:self.driver_worker.load_model();
前面提到,GPUExecutor在被创建之后,还用来完成kv_caches的初始化,如上一节LLMEngine._initialize_kv_caches()方法所示,这其中主要涉及GPUExecutor的两个方法:self.determine_num_available_blocks():该方法返回了当前可用的gpu_blocks和cpu_blocks的数量;block的意思是将gpu和cpu按照指定的大小block_size进行分块,每一块对应一定大小的显存/内存;initialize_cache():在确定num_gpu_blocks和num_cpu_blocks,也就是确定有多少显存和内存可用于kv_caches之后,就可以占据这部分资源进行缓存初始化;
这边简单说明了GPUExecutor在前期的一些工作,但这些操作基本依赖于它创建的worker,我们下一小节来看。
# vllm/executor/gpu_executor.py
class GPUExecutor(ExecutorBase):def _init_executor(self) -> None:"""Initialize the worker and load the model."""assert self.parallel_config.world_size == 1, ("GPUExecutor only supports single GPU.")self.driver_worker = self._create_worker()   # 创建workerself.driver_worker.init_device()   # 初始化设备self.driver_worker.load_model()    # 加载模型def _create_worker(self,local_rank: int = 0,rank: int = 0,distributed_init_method: Optional[str] = None):if self.speculative_config is None:worker_module_name = "vllm.worker.worker"worker_class_name = "Worker"else:worker_module_name = "vllm.spec_decode.spec_decode_worker"worker_class_name = "create_spec_worker"wrapper = WorkerWrapperBase(worker_module_name=worker_module_name,worker_class_name=worker_class_name,)wrapper.init_worker(**self._get_worker_kwargs(local_rank, rank,distributed_init_method))return wrapper.workerdef determine_num_available_blocks(self) -> Tuple[int, int]:"""Determine the number of available KV blocks by invoking theunderlying worker."""return self.driver_worker.determine_num_available_blocks()def initialize_cache(self, num_gpu_blocks: int, num_cpu_blocks) -> None:"""Initialize the KV cache by invoking the underlying worker."""# NOTE: This is logged in the executor because there can be >1 worker# with other executors. We could log in the engine level, but work# remains to abstract away the device for non-GPU configurations.logger.info("# GPU blocks: %d, # CPU blocks: %d", num_gpu_blocks,num_cpu_blocks)self.driver_worker.initialize_cache(num_gpu_blocks, num_cpu_blocks)
五、Worker
Worker主要承载两部分功能:model和cache,分别对应于成员model_runner和cache_engine。
self.model_runner:对于使用大模型生成(本次举例)的情形,它是ModelRunner的实例对象;而如果使用了embedding_mode,它就是EmbeddingModelRunner的实例对象;self.cache_engine:是CacheEngine的实例对象,在self.initial_cache()方法中,主要就是初始化了self.cache_engine,相关内容放在下下小节。
关于方法self.determine_num_available_blocks(),它返回的是num_gpu_blocks和num_cpu_blocks,两者获取逻辑分别如下:
num_gpu_blocks:在清空CUDA缓存之后,执行一次前向传播,profile模型的显存使用情况,然后获取当前CUDA设备的空闲显存和总显存,此时就能就算出峰值显存占用peak_memory;那么可用于kv_caches的显存就是total_gpu_memory * self.cache_config.gpu_memory_utilization - peak_memory,其中的gpu_memory_utilization是gpu使用率,默认0.9;因为缓存以block形式存在,所以除以cache_block_size就能得到num_gpu_blocks,其中cache_block_size是一个block所占用的字节数,这会在CacheEngine中讲到;num_cpu_blocks:模型不会在cpu上进行运算,但是可以在上面缓存,必要时再swap到gpu上,这部分内存大小是self.cache_config.swap_space_bytes,默认是4GB。
# vllm/worker/worker.py
class Worker(WorkerBase):def __init__(self, ...)   # 传入参数是一些配置项,这边略去# 无关代码,passModelRunnerClass = (EmbeddingModelRunner ifself.model_config.embedding_mode else ModelRunner)self.model_runner = ModelRunnerClass(model_config,parallel_config,scheduler_config,device_config,cache_config,load_config=load_config,lora_config=self.lora_config,kv_cache_dtype=self.cache_config.cache_dtype,is_driver_worker=is_driver_worker,vision_language_config=vision_language_config,)# Uninitialized cache engine. Will be initialized by# initialize_cache.self.cache_engine: CacheEngine# Initialize gpu_cache as embedding models don't initialize kv_cachesself.gpu_cache: Optional[List[torch.tensor]] = None# ------------------- GPUExecutor中被调用来初始化的部分 ------------------- # def init_device(self) -> None:if self.device_config.device.type == "cuda":os.environ["TORCH_NCCL_AVOID_RECORD_STREAMS"] = "1"# This env var set by Ray causes exceptions with graph building.os.environ.pop("NCCL_ASYNC_ERROR_HANDLING", None)self.device = torch.device(f"cuda:{self.local_rank}")torch.cuda.set_device(self.device)_check_if_gpu_supports_dtype(self.model_config.dtype)torch.cuda.empty_cache()self.init_gpu_memory = torch.cuda.mem_get_info()[0]else:raise RuntimeError(f"Not support device type: {self.device_config.device}")# Initialize the distributed environment.init_worker_distributed_environment(self.parallel_config, self.rank,self.distributed_init_method,self.local_rank)# Set random seed.set_random_seed(self.model_config.seed)def load_model(self):self.model_runner.load_model()# ------------------- model runner相关 ------------------- # @torch.inference_mode()def determine_num_available_blocks(self) -> Tuple[int, int]:"""Profiles the peak memory usage of the model to determine how manyKV blocks may be allocated without OOMs."""# Profile the memory usage of the model and get the maximum number of# cache blocks that can be allocated with the remaining free memory.torch.cuda.empty_cache()# Execute a forward pass with dummy inputs to profile the memory usage# of the model.self.model_runner.profile_run()# Calculate the number of blocks that can be allocated with the# profiled peak memory.torch.cuda.synchronize()free_gpu_memory, total_gpu_memory = torch.cuda.mem_get_info()# NOTE(woosuk): Here we assume that the other processes using the same# GPU did not change their memory usage during the profiling.peak_memory = self.init_gpu_memory - free_gpu_memoryassert peak_memory > 0, ("Error in memory profiling. This happens when the GPU memory was ""not properly cleaned up before initializing the vLLM instance.")cache_block_size = self.get_cache_block_size_bytes()num_gpu_blocks = int((total_gpu_memory * self.cache_config.gpu_memory_utilization -peak_memory) // cache_block_size)num_cpu_blocks = int(self.cache_config.swap_space_bytes //cache_block_size)num_gpu_blocks = max(num_gpu_blocks, 0)num_cpu_blocks = max(num_cpu_blocks, 0)if self.model_runner.lora_manager:self.model_runner.remove_all_loras()gc.collect()torch.cuda.empty_cache()return num_gpu_blocks, num_cpu_blocks# --------------------- cache相关 ------------------------def initialize_cache(self, num_gpu_blocks: int,num_cpu_blocks: int) -> None:"""Allocate GPU and CPU KV cache with the specified number of blocks.This also warms up the model, which may record CUDA graphs."""raise_if_cache_size_invalid(num_gpu_blocks,self.cache_config.block_size,self.model_config.max_model_len)self.cache_config.num_gpu_blocks = num_gpu_blocksself.cache_config.num_cpu_blocks = num_cpu_blocksself._init_cache_engine()self._warm_up_model()def _init_cache_engine(self):assert self.cache_config.num_gpu_blocks is not Noneself.cache_engine = CacheEngine(self.cache_config, self.model_config,self.parallel_config)self.gpu_cache = self.cache_engine.gpu_cachedef _warm_up_model(self) -> None:if not self.model_config.enforce_eager:self.model_runner.capture_model(self.gpu_cache)# Reset the seed to ensure that the random state is not affected by# the model initialization and profiling.set_random_seed(self.model_config.seed)
六、ModelRunner
这部分主要讲一下ModelRunner的两个方法:self.profile_run()和self.capture_model()。
self.profile_run()是用于跑一跑dummy input然后看一下具体的内存使用情况,最关键的代码是self.execute_model(seqs, kv_caches),也就是说我们需要准备好输入seqs和缓存kv_caches,其中kv_caches用于模型中Attention的计算,初始都为None。详细注释见下方。
class ModelRunner:# ...@torch.inference_mode()def profile_run(self) -> None:# top-k采样,获取内存使用情况sampling_params = SamplingParams(top_p=0.99, top_k=self.vocab_size - 1)# 一个batch中最大处理的token数量,典型的32kmax_num_batched_tokens = self.scheduler_config.max_num_batched_tokens# 最大的序列数量,典型的256max_num_seqs = self.scheduler_config.max_num_seqs# profile的时候要求序列数量为max_num_seqs,token总数等于max_num_batched_tokensseqs: List[SequenceGroupMetadata] = []model_config = self.model_config# lora: pass# vlm: passfor group_id in range(max_num_seqs):# 均分所有token,计算每个seq的长度seq_len = (max_num_batched_tokens // max_num_seqs +(group_id < max_num_batched_tokens % max_num_seqs))# SequenceData和SequenceGroupMetadata已经在前面文章中讲过,不再赘述# 构造dummy inputseq_data = SequenceData([0] * seq_len)dummy_multi_modal_data = Noneseq = SequenceGroupMetadata(request_id=str(group_id),is_prompt=True,seq_data={group_id: seq_data},sampling_params=sampling_params,block_tables=None,lora_request=dummy_lora_requests_per_seq[group_id]if dummy_lora_requests_per_seq else None,multi_modal_data=dummy_multi_modal_data,)seqs.append(seq)# 构造kv caches,由于尚未开始推理,初始化为Nonenum_layers = self.model_config.get_num_layers(self.parallel_config)kv_caches = [None] * num_layers# 执行模型self.execute_model(seqs, kv_caches)# cuda同步torch.cuda.synchronize()return@torch.inference_mode()def execute_model(self,seq_group_metadata_list: Optional[List[SequenceGroupMetadata]],kv_caches: List[torch.Tensor],) -> Optional[SamplerOutput]:# 准备输入张量(input_tokens, input_positions, attn_metadata, sampling_metadata,lora_requests, lora_mapping, multi_modal_kwargs) = self.prepare_input_tensors(seq_group_metadata_list)# lora: pass# 仅在decode阶段使用cuda graph(它能提升效率)prefill_meta = attn_metadata.prefill_metadata # 具体是怎样的,暂时不必管它decode_meta = attn_metadata.decode_metadataif prefill_meta is None and decode_meta.use_cuda_graph:graph_batch_size = input_tokens.shape[0]model_executable = self.graph_runners[graph_batch_size]else:model_executable = self.model# 模型具体执行,模型在vllm/model_executor/models/中有定义,这边找到qwen2.py文件hidden_states = model_executable(input_ids=input_tokens,positions=input_positions,kv_caches=kv_caches,attn_metadata=attn_metadata,**multi_modal_kwargs,)# Compute the logits.logits = self.model.compute_logits(hidden_states, sampling_metadata)# Only perform sampling in the driver worker.if not self.is_driver_worker:return None# Sample the next token. 采样output = self.model.sample(logits=logits,sampling_metadata=sampling_metadata,)return output
self.capture_model()使用CUDA Graph技术(仅在解码过程中使用),捕获一个模型的执行过程,以便在后续的推理过程中可以重用这个捕获的图,从而提高性能,代码中给出了简单注释;
class ModelRunner:# ...@torch.inference_mode()def capture_model(self, kv_caches: List[torch.Tensor]) -> None:"""Cuda graph capture a model. ...CUDA Graph主要用于解码阶段,因为对于较大的批量大小,CUDA Graph的性能提升不明显,并且由于CUDA Graph需要固定大小的张量,支持大或可变批量大小需要较高的GPU内存开销"""# 提示信息,可以了解一下assert not self.model_config.enforce_eagerlogger.info("Capturing the model for CUDA graphs. This may lead to ""unexpected consequences if the model is not static. To ""run the model in eager mode, set 'enforce_eager=True' or ""use '--enforce-eager' in the CLI.")logger.info("CUDA graphs can take additional 1~3 GiB memory per GPU. ""If you are running out of memory, consider decreasing ""`gpu_memory_utilization` or enforcing eager mode. ""You can also reduce the `max_num_seqs` as needed ""to decrease memory usage.")start_time = time.perf_counter()# dummy inputsmax_batch_size = max(_BATCH_SIZES_TO_CAPTURE)input_tokens = torch.zeros(max_batch_size, dtype=torch.long).cuda()input_positions = torch.zeros(max_batch_size, dtype=torch.long).cuda()slot_mapping = torch.empty(max_batch_size, dtype=torch.long).cuda()slot_mapping.fill_(_PAD_SLOT_ID)seq_lens = torch.ones(max_batch_size, dtype=torch.int32).cuda()block_tables = torch.from_numpy(self.graph_block_tables).cuda()# 创建用于存储输出隐藏状态的缓冲区hidden_states,# 该缓冲区将在第一次图捕获后填充。hidden_states: Optional[torch.Tensor] = None# 需要捕获的若干batch sizegraph_batch_size = _get_graph_batch_size(self.scheduler_config.max_num_seqs)batch_size_capture_list = [bs for bs in _BATCH_SIZES_TO_CAPTURE if bs <= graph_batch_size]# 捕获CUDA Graph,graph_capture()是上下文管理器(一些并行策略)with graph_capture() as graph_capture_context:# NOTE: Capturing the largest batch size first may help reduce the# memory usage of CUDA graph.for batch_size in reversed(batch_size_capture_list):# Create dummy attn_metadata.attn_metadata = self.attn_backend.make_metadata(num_prefills=0,num_prefill_tokens=0,num_decode_tokens=batch_size,slot_mapping=slot_mapping[:batch_size],seq_lens=None,seq_lens_tensor=seq_lens[:batch_size],max_query_len=None,max_prefill_seq_len=0,max_decode_seq_len=self.max_seq_len_to_capture,query_start_loc=None,seq_start_loc=None,context_lens_tensor=None,block_tables=block_tables[:batch_size],use_cuda_graph=True,)if self.lora_config:lora_mapping = LoRAMapping([0] * batch_size,[0] * batch_size,)self.set_active_loras(set(), lora_mapping)# 创建CUDAGraphRunner实例,并使用capture方法捕获模型的执行过程graph_runner = CUDAGraphRunner(self.model)hidden_states = graph_runner.capture(input_tokens[:batch_size],input_positions[:batch_size],hidden_states[:batch_size]if hidden_states is not None else None,kv_caches,attn_metadata,memory_pool=self.graph_memory_pool,stream=graph_capture_context.stream,)self.graph_memory_pool = graph_runner.graph.pool()# graph_runner存起来self.graph_runners[batch_size] = graph_runnerend_time = time.perf_counter()elapsed_time = end_time - start_time# This usually takes < 10 seconds.logger.info("Graph capturing finished in %.0f secs.", elapsed_time)
七、CacheEngine
self._allocate_kv_cache():该方法就是收集(初始化)kv_cache,用处就是先占住gpu和cpu资源;self.get_cache_block_size():这个方法计算了每一个block对应的字节数,也就是上面Worker中的cache_block_size。1)每个block存放block_size个token的kv_caches;2)单个token对应的k的元素个数为num_heads * head_size * num_layers,v也一样;3)通过1)和2)计算出block中包含的元素个数,根据不同的数据类型就能得到这个block占用的字节数了(见注释);self.swap_in()、self.swap_out()和self.copy()这几个方法并没有在初始化阶段用到,但这边解释一下:当处理大量用户请求的时候,涉及到资源的分配,比如在此之前,有部分数据时缓存在cpu上的,现在gpu上有剩余可用的显存了,那就应该使用self.swap_in()将数据搬到gpu上进行计算;反之,gpu可用显存都占满了,可能会将原本在gpu上的部分缓存搬至cpu,等待机会搬回gpu,此时使用self.swap_out()。
# vllm/worker/cache_engine.py
class CacheEngine:"""Manages the KV cache.This class is responsible for initializing and managing the GPU and CPU KVcaches. It also provides methods for performing KV cache operations, suchas swapping and copying."""def __init__(self,cache_config: CacheConfig,model_config: ModelConfig,parallel_config: ParallelConfig,) -> None:self.cache_config = cache_config   # 传入的配置self.model_config = model_configself.parallel_config = parallel_configself.head_size = model_config.get_head_size()   # 多头注意力每个头的维度self.num_layers = model_config.get_num_layers(parallel_config)  # 每个pp对应的层的个数self.num_kv_heads = model_config.get_num_kv_heads(parallel_config) # 每个tp对应的kv heads的个数self.block_size = cache_config.block_sizeself.num_gpu_blocks = cache_config.num_gpu_blocksself.num_cpu_blocks = cache_config.num_cpu_blocksif cache_config.cache_dtype == "auto":self.dtype = model_config.dtypeelse:self.dtype = STR_DTYPE_TO_TORCH_DTYPE[cache_config.cache_dtype]# Get attention backend.self.attn_backend = get_attn_backend(model_config.get_num_attention_heads(parallel_config),self.head_size,self.num_kv_heads,model_config.get_sliding_window(),model_config.dtype,cache_config.cache_dtype,self.block_size,)# Initialize the cache.self.gpu_cache = self._allocate_kv_cache(self.num_gpu_blocks, "cuda")self.cpu_cache = self._allocate_kv_cache(self.num_cpu_blocks, "cpu")def _allocate_kv_cache(self,num_blocks: int,device: str,) -> List[torch.Tensor]:"""Allocates KV cache on the specified device."""kv_cache_shape = self.attn_backend.get_kv_cache_shape(num_blocks, self.block_size, self.num_kv_heads, self.head_size)  # 计算kv_cache的形状pin_memory = is_pin_memory_available() if device == "cpu" else Falsekv_cache: List[torch.Tensor] = []for _ in range(self.num_layers):   # 添加每一层的kv缓存# null block in CpuGpuBlockAllocator requires at least that# block to be zeroed-out.# We zero-out everything for simplicity.kv_cache.append(torch.zeros(kv_cache_shape,dtype=self.dtype,pin_memory=pin_memory,device=device))return kv_cachedef swap_in(self, src_to_dst: torch.Tensor) -> None:for i in range(self.num_layers):self.attn_backend.swap_blocks(self.cpu_cache[i], self.gpu_cache[i],src_to_dst)def swap_out(self, src_to_dst: torch.Tensor) -> None:for i in range(self.num_layers):self.attn_backend.swap_blocks(self.gpu_cache[i], self.cpu_cache[i],src_to_dst)def copy(self, src_to_dsts: torch.Tensor) -> None:self.attn_backend.copy_blocks(self.gpu_cache, src_to_dsts)@staticmethoddef get_cache_block_size(cache_config: CacheConfig,model_config: ModelConfig,parallel_config: ParallelConfig,) -> int:head_size = model_config.get_head_size()num_heads = model_config.get_num_kv_heads(parallel_config)num_layers = model_config.get_num_layers(parallel_config)# block_size默认16, 也就是存16个token的kv_caches# 具体计算以字节为单位的大小时,需要考虑kv的大小,也就是num_heads * head_size * num_layerskey_cache_block = cache_config.block_size * num_heads * head_sizevalue_cache_block = key_cache_blocktotal = num_layers * (key_cache_block + value_cache_block)if cache_config.cache_dtype == "auto":dtype = model_config.dtypeelse:dtype = STR_DTYPE_TO_TORCH_DTYPE[cache_config.cache_dtype]dtype_size = get_dtype_size(dtype)   # bf16对应的dtype_size就是2return dtype_size * total
总结
本篇主要介绍了LLMEngine初始化部分的内容,涉及了GPUExecutor、Worker、ModelRunner和CacheEngine等多个类的方法,有助于理解在使用vllm文本生成之前(初始化阶段)的工作原理。对于LLMEngine的另一个重要组成部分Scheduler,会在后续文章(请求处理阶段)中讲述。
相关文章:

vLLM (4) - LLMEngine上篇
系列文章目录 vLLM (1) - Qwen2推理&部署 vLLM (2) - 架构总览 vLLM (3) - Sequence & SequenceGroup vLLM (4) - LLMEngine上篇 vLLM (5) - LLMEngine下篇 文章目录 系列文章目录前言一、类图二、LLM三、LLMEngine四、GPUExectuor五、Worker六、ModelRunner七、Cache…...

Java重修笔记 第五十天 HashSet 和 TreeSet 的去重机制比较
HashSet 和 TreeSet 的去重机制比较 1. HashSet 的去重机制:HashCode() equals() 。通过运算得到 key ,也就是该对象的哈希值,再通过哈希值得到该对象在 table 表上的索引位置,若该位置上没有链表数据就直接存放,若…...

提前购|基于SSM+vue的创新型产品提前购平台(源码+数据库+文档)
创新型产品提前购平台 基于SSMvue的创新型产品提前购平台 一、前言 二、系统设计 三、系统功能设计 系统功能实现 后台模块实现 管理员模块实现 发布企业管理实现 个体管理实现 投资企业管理实现 四、数据库设计 五、核心代码 六、论文参考 七、最新计算机毕设选…...

上海市计算机学会竞赛平台2024年7月月赛丙组求和问题
题目描述 给定 nn 个整数 a1,a2,…,ana1,a2,…,an,请问这个序列最长有多少长的前缀,满足元素的和大于或等于 00?如果任何长度大于 00 的前缀之和都为负数,则输出 00 输入格式 第一行:单个整数表示 nn第二行&a…...

【LVI-SAM】激光雷达点云处理特征提取LIO-SAM 之FeatureExtraction实现细节
激光雷达点云处理特征提取LIO-SAM 之FeatureExtraction实现细节 1. 特征提取实现过程总结1.0 特征提取过程小结1.1 类 FeatureExtraction 的整体结构与作用1.2 详细特征提取的过程1. 平滑度计算(calculateSmoothness())2. 标记遮挡点(markOcc…...

[数据集][目标检测]血细胞检测数据集VOC+YOLO格式2757张4类别
数据集格式:Pascal VOC格式YOLO格式(不包含分割路径的txt文件,仅仅包含jpg图片以及对应的VOC格式xml文件和yolo格式txt文件) 图片数量(jpg文件个数):2757 标注数量(xml文件个数):2757 标注数量(txt文件个数):2757 标注…...

opencart journal 3 在价格前添加文本prefix
要修改的文件: /catalog/view/theme/journal3/template/product.twig 行274: <div class="product-price">{{ price }}</div>{% else %}<div class="product-price-new">{{ special }}</div><div class="product-pric…...

c++ string类的模拟实现的注意事项
一.构造函数 第一种形式,使用字符指针赋值 为了防止修改,我们传入了常量字符串。但是这里的初始化列表出错了,因为_str是一个变量,将常量给到一个变量涉及到权限的放大,是错误的。那该怎么写呢?对_str的赋…...

Unity3D中控制3D场景中游戏对象显示层级的详解
前言 在Unity3D开发中,控制游戏对象的显示层级(也称为渲染顺序或渲染层级)是一个常见的需求,特别是在处理复杂的3D场景时,如角色、道具、UI元素等的可见性和渲染顺序的管理变得尤为重要。Unity通过几种不同的机制来实…...

代码执行漏洞-Log4j2漏洞 vulhub CVE-2021-44228
步骤一:执行以下命令启动靶场环境并在浏览器访问!!! 查看端口 浏览器访问 可以发现 /solr/admin/cores?action 这⾥有个参数可以传,可以按照上⾯的原理 先构造⼀个请求传过去存在JNDI注⼊那么ldap服务端会执⾏我们传上去的payload JDNI项⽬地址 https://github.com…...

uniapp / uniapp x UI 组件库推荐大全
在 uniapp 开发中,我们大多数都会使用到第三方UI 组件库,提起 uniapp 的UI组件库,我们最常使用的应该就是uview了吧,但是随着日益增长的需求,uview 在某些情况下已经不在满足于我们的一些开发需求,尽管它目…...

花8000元去培训机构学习网络安全值得吗,学成后就业前景如何?
我就是从培训机构学的网络安全,线下五六个月,当时学费不到一万,目前已成功入行。所以,只要你下决心要入这一行,过程中能好好学,那这8000就花得值~ 因为只要学得好,工作两个多月就能赚回学费&am…...

PhpStorm 下调试功能配置
调试是开发过程中的关键环节,能够极大地减少应用程序中的错误并提高代码质量。PhpStorm 作为一款功能强大的 IDE,提供了丰富的调试功能,结合 Xdebug,可以让开发者更轻松地进行 PHP 应用程序的调试。本指南将详细介绍如何在 PhpSto…...
和MVVM(Model-View-ViewModel))
MVC(Model-View-Controller)和MVVM(Model-View-ViewModel)
1、MVC MVC(Model-View-Controller) 是一种常用的架构模式,用于分离应用程序的逻辑、数据和展示。它通过三个核心组件(模型、视图和控制器)将应用程序的业务逻辑与用户界面隔离,促进代码的可维护性、可扩展…...
【H2O2|全栈】关于HTML(4)HTML基础(三)
HTML相关知识 目录 HTML相关知识 前言 准备工作 标签的具体分类(三) 本文中的标签在什么位置中使用? 列表 编辑编辑 有序列表 无序列表 自定义列表 表格 拓展案例 预告和回顾 后话 前言 本系列博客将分享HTML相关知识点…...

关于找不到插件 ‘org.springframework.boot:spring-boot-maven-plugin:‘的解决方案
找到项目结构后,点击库,全选所有后点击应用即可...

深入RabbitMQ世界:探索3种队列、4种交换机、7大工作模式及常见概念
文章目录 文章导图RabbitMQ架构及相关概念四大核心概念名词解读 七大工作模式及四大交换机类型0、前置了解-默认交换机DirectExchange1、简单模式(Simple Queue)-默认DirectExchange2、 工作队列模式(Work Queues)-默认DirectExchange3、发布/订阅模式(Publish/Subscribe)-Fano…...

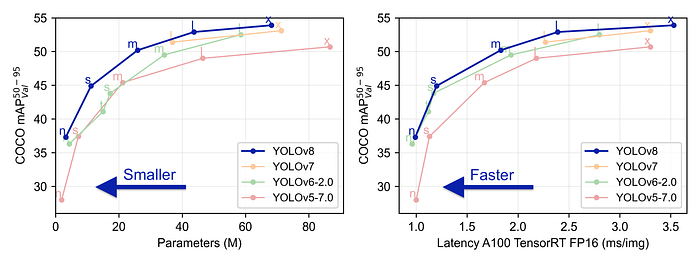
将目标检测模型导出到C++|RT-DETR、YOLO-NAS、YOLOv10、YOLOv9、YOLOv8
点击下方卡片,关注“小白玩转Python”公众号 最近,出现了更新的YOLO模型,还有RT-DETR模型,这是一个声称能击败YOLO模型的变换器模型,我想将这些模型导出并进行比较,并将它们添加到我的库中。在这篇文章中&a…...

【Windows】解决新版 Edge 浏览器开机自启问题(简单有效)
文章目录 1.前言2.查找资料3.查找方法4.解决办法1.点击浏览器的三个...,然后点击设置2.选择【开始、主页和新建标签页】选项卡,然后关闭【Windows设备启动时】 结语 参考文章: 解决新版 Edge 浏览器开机自启问题(简单有效…...

如何给3D人物换衣服CC4
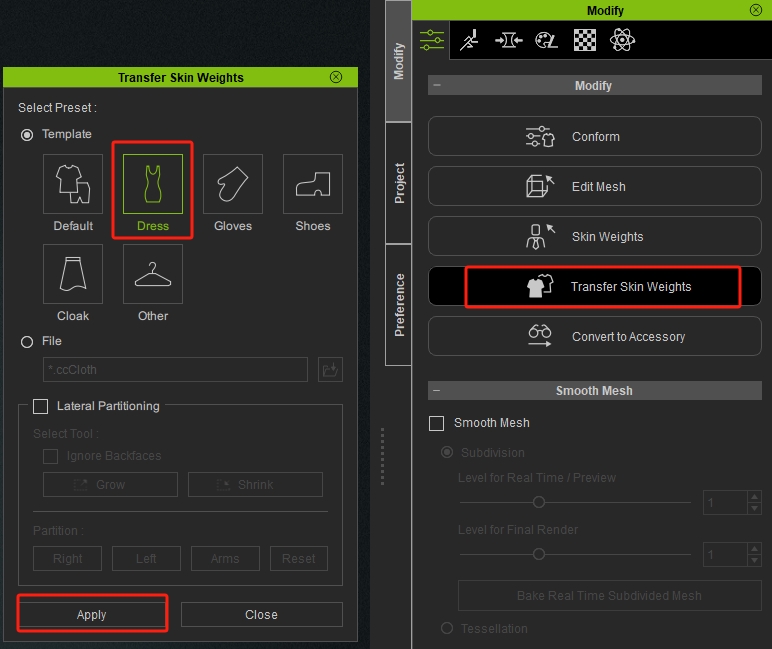
1.导入人物 2.设置人物Apose 3.导入衣服 create -> accessory 选择fbx文件 设置衣服的大小和位置。 4.绑定衣服 设置衣服的权重 添加动作就可以看效果了。...

生成xcframework
打包 XCFramework 的方法 XCFramework 是苹果推出的一种多平台二进制分发格式,可以包含多个架构和平台的代码。打包 XCFramework 通常用于分发库或框架。 使用 Xcode 命令行工具打包 通过 xcodebuild 命令可以打包 XCFramework。确保项目已经配置好需要支持的平台…...

C++_核心编程_多态案例二-制作饮品
#include <iostream> #include <string> using namespace std;/*制作饮品的大致流程为:煮水 - 冲泡 - 倒入杯中 - 加入辅料 利用多态技术实现本案例,提供抽象制作饮品基类,提供子类制作咖啡和茶叶*//*基类*/ class AbstractDr…...

RocketMQ延迟消息机制
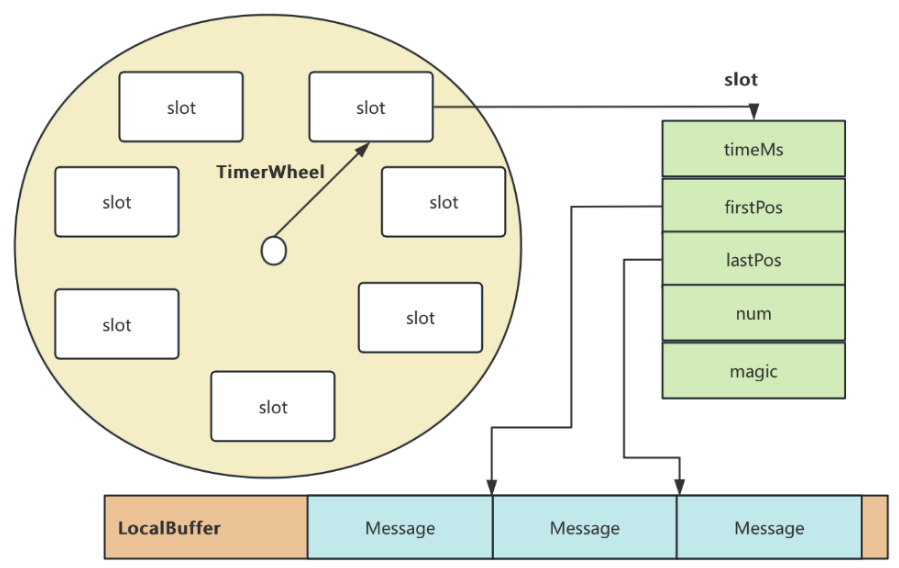
两种延迟消息 RocketMQ中提供了两种延迟消息机制 指定固定的延迟级别 通过在Message中设定一个MessageDelayLevel参数,对应18个预设的延迟级别指定时间点的延迟级别 通过在Message中设定一个DeliverTimeMS指定一个Long类型表示的具体时间点。到了时间点后…...

Cinnamon修改面板小工具图标
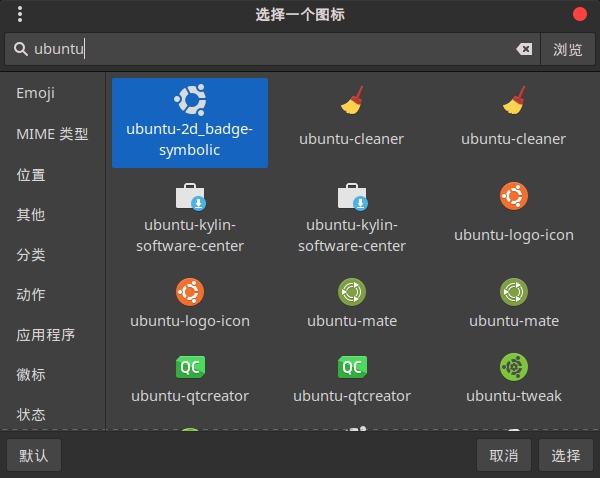
Cinnamon开始菜单-CSDN博客 设置模块都是做好的,比GNOME简单得多! 在 applet.js 里增加 const Settings imports.ui.settings;this.settings new Settings.AppletSettings(this, HTYMenusonichy, instance_id); this.settings.bind(menu-icon, menu…...

现代密码学 | 椭圆曲线密码学—附py代码
Elliptic Curve Cryptography 椭圆曲线密码学(ECC)是一种基于有限域上椭圆曲线数学特性的公钥加密技术。其核心原理涉及椭圆曲线的代数性质、离散对数问题以及有限域上的运算。 椭圆曲线密码学是多种数字签名算法的基础,例如椭圆曲线数字签…...

IoT/HCIP实验-3/LiteOS操作系统内核实验(任务、内存、信号量、CMSIS..)
文章目录 概述HelloWorld 工程C/C配置编译器主配置Makefile脚本烧录器主配置运行结果程序调用栈 任务管理实验实验结果osal 系统适配层osal_task_create 其他实验实验源码内存管理实验互斥锁实验信号量实验 CMISIS接口实验还是得JlINKCMSIS 简介LiteOS->CMSIS任务间消息交互…...

06 Deep learning神经网络编程基础 激活函数 --吴恩达
深度学习激活函数详解 一、核心作用 引入非线性:使神经网络可学习复杂模式控制输出范围:如Sigmoid将输出限制在(0,1)梯度传递:影响反向传播的稳定性二、常见类型及数学表达 Sigmoid σ ( x ) = 1 1 +...

【论文阅读28】-CNN-BiLSTM-Attention-(2024)
本文把滑坡位移序列拆开、筛优质因子,再用 CNN-BiLSTM-Attention 来动态预测每个子序列,最后重构出总位移,预测效果超越传统模型。 文章目录 1 引言2 方法2.1 位移时间序列加性模型2.2 变分模态分解 (VMD) 具体步骤2.3.1 样本熵(S…...
)
是否存在路径(FIFOBB算法)
题目描述 一个具有 n 个顶点e条边的无向图,该图顶点的编号依次为0到n-1且不存在顶点与自身相连的边。请使用FIFOBB算法编写程序,确定是否存在从顶点 source到顶点 destination的路径。 输入 第一行两个整数,分别表示n 和 e 的值(1…...

Java 二维码
Java 二维码 **技术:**谷歌 ZXing 实现 首先添加依赖 <!-- 二维码依赖 --><dependency><groupId>com.google.zxing</groupId><artifactId>core</artifactId><version>3.5.1</version></dependency><de…...
