kubernetes微服务基础及类型
目录
1 什么是微服务
2 微服务的类型
3 ipvs模式
ipvs模式配置方式
4 微服务类型详解
4.1 ClusterIP
4.2 ClusterIP中的特殊模式headless
4.3 nodeport
4.4 metalLB配合loadbalance实现发布IP
1 什么是微服务
用控制器来完成集群的工作负载,那么应用如何暴漏出去?需要通过微服务暴漏出去后才能被访问
-
Service是一组提供相同服务的Pod对外开放的接口。
-
借助Service,应用可以实现服务发现和负载均衡。
-
service默认只支持4层负载均衡能力,没有7层功能。(可以通过Ingress实现)


2 微服务的类型
| 微服务类型 | 作用描述 |
|---|---|
| ClusterIP | 默认值,k8s系统给service自动分配的虚拟IP,只能在集群内部访问 |
| NodePort | 将Service通过指定的Node上的端口暴露给外部,访问任意一个NodeIP:nodePort都将路由到ClusterIP |
| LoadBalancer | 在NodePort的基础上,借助cloud provider创建一个外部的负载均衡器,并将请求转发到 NodeIP:NodePort,此模式只能在云服务器上使用 |
| ExternalName | 将服务通过 DNS CNAME 记录方式转发到指定的域名(通过 spec.externlName 设定 |
[root@k8s-master yaml]# kubectl create deployment testpod --image myapp:v1 --replicas 2 --dry-run=client -o yaml
apiVersion: apps/v1
kind: Deployment
metadata:creationTimestamp: nulllabels:app: testpodname: testpod
spec:replicas: 2selector:matchLabels:app: testpodstrategy: {}template:metadata:creationTimestamp: nulllabels:app: testpodspec:containers:- image: myapp:v1name: myappresources: {}
status: {}[root@k8s-master yaml]# kubectl create deployment testpod \
--image myapp:v1 --replicas 2 --dry-run=client -o yaml > testpod.yml# 修改之后的
apiVersion: apps/v1
kind: Deployment
metadata:labels:app: testpodname: testpod
spec:replicas: 2selector:matchLabels:app: testpodtemplate:metadata:labels:app: testpodspec:containers:- image: myapp:v1name: myapp
启动并查看状态
[root@k8s-master yaml]# kubectl apply -f testpod.yml
deployment.apps/testpod created[root@k8s-master yaml]# kubectl get pods
NAME                       READY   STATUS    RESTARTS   AGE
testpod-7b864c4646-ds7p8   1/1     Running   0          5s
testpod-7b864c4646-x8lzf   1/1     Running   0          5s[root@k8s-master yaml]# kubectl get deployments.apps
NAME      READY   UP-TO-DATE   AVAILABLE   AGE
testpod   2/2     2            2           16s[root@k8s-master yaml]# kubectl get deployments.apps --show-labels
NAME      READY   UP-TO-DATE   AVAILABLE   AGE   LABELS
testpod   2/2     2            2           23s   app=testpod
为 testpod 增加服务资源
[root@k8s-master yaml]# kubectl expose deployment testpod \
--port 80 --dry-run=client -o yamlapiVersion: v1
kind: Service
metadata:creationTimestamp: nulllabels:app: testpodname: testpod
spec:ports:- port: 80protocol: TCPtargetPort: 80selector:app: testpod
status:loadBalancer: {}[root@k8s-master yaml]# kubectl expose deployment testpod \
--port 80 --dry-run=client -o yaml >> testpod.yml apiVersion: apps/v1
kind: Deployment
metadata:labels:app: testpodname: testpod
spec:replicas: 2selector:matchLabels:app: testpodtemplate:metadata:labels:app: testpodspec:containers:- image: myapp:v1name: myapp---
apiVersion: v1
kind: Service
metadata:labels:app: testpodname: testpod
spec:ports:- port: 80protocol: TCPtargetPort: 80selector:app: testpod
声明一下控制器并测试
[root@k8s-master yaml]# kubectl apply -f testpod.yml
deployment.apps/testpod unchanged
service/testpod created[root@k8s-master yaml]# kubectl get services
NAME         TYPE        CLUSTER-IP      EXTERNAL-IP   PORT(S)   AGE
kubernetes   ClusterIP   10.96.0.1       <none>        443/TCP   3d11h
testpod      ClusterIP   10.107.129.69   <none>        80/TCP    6m55s[root@k8s-master yaml]# curl 10.107.129.69
Hello MyApp | Version: v1 | <a href="hostname.html">Pod Name</a>[root@k8s-master yaml]# curl 10.107.129.69
Hello MyApp | Version: v1 | <a href="hostname.html">Pod Name</a>
微服务默认使用iptables调度
[root@k8s-master yaml]# kubectl get services --show-labels
NAME         TYPE        CLUSTER-IP      EXTERNAL-IP   PORT(S)   AGE     LABELS
kubernetes   ClusterIP   10.96.0.1       <none>        443/TCP   3d11h   component=apiserver,provider=kubernetes
testpod ClusterIP 10.107.129.69 <none> 80/TCP 14m app=testpod[root@k8s-master yaml]# iptables -nL -t nat 
3 ipvs模式
-
Service 是由 kube-proxy 组件,加上 iptables 来共同实现的
-
kube-proxy 通过 iptables 处理 Service 的过程,需要在宿主机上设置相当多的 iptables 规则,如果宿主机有大量的Pod,不断刷新iptables规则,会消耗大量的CPU资源
-
IPVS模式的service,可以使K8s集群支持更多量级的Pod
ipvs模式配置方式
1 在所有节点中安装ipvsadm
[root@k8s-master yaml]# yum install ipvsadm -y2 设置为ipvs模式
[root@k8s-master yaml]# kubectl -n kube-system edit cm kube-proxymetricsBindAddress: ""mode: "ipvs"nftables:masqueradeAll: false
3 重启pod,在pod运行时配置文件中采用默认配置,当改变配置文件后已经运行的pod状态不会变化,所以要重启pod
以下使用的方法是删掉命名空间中的pod控制器的缘故会重新起一个
[root@k8s-master yaml]# kubectl -n kube-system get pods | \
awk '/proxy/{system("kubectl -n kube-system delete pods " $1)}'pod "kube-proxy-4fllj" deleted
pod "kube-proxy-6jgd2" deleted
pod "kube-proxy-zkn5x" deleted# 由于使用的是deployment控制器,删除了之后会再次启动
[root@k8s-master yaml]# kubectl -n kube-system get pods
NAME                                 READY   STATUS    RESTARTS      AGE
coredns-66d4c695bb-29qbq             1/1     Running   2 (28h ago)   3d11h
coredns-66d4c695bb-6th24             1/1     Running   2 (28h ago)   3d11h
etcd-k8s-master                      1/1     Running   2 (28h ago)   3d11h
kube-apiserver-k8s-master            1/1     Running   2 (28h ago)   3d11h
kube-controller-manager-k8s-master   1/1     Running   2 (28h ago)   3d11h
kube-proxy-4p7ds                     1/1     Running   0             15s
kube-proxy-ggnb6                     1/1     Running   0             14s
kube-proxy-r66fc                     1/1     Running   0             14s
kube-scheduler-k8s-master            1/1     Running   2 (28h ago)   3d11h# 查看ipvs策略是否加载
[root@k8s-master yaml]# ipvsadm -Ln
IP Virtual Server version 1.2.1 (size=4096)
Prot LocalAddress:Port Scheduler Flags-> RemoteAddress:Port           Forward Weight ActiveConn InActConn
TCP  10.96.0.1:443 rr-> 192.168.239.100:6443         Masq    1      0          0
TCP  10.96.0.10:53 rr-> 10.244.0.2:53                Masq    1      0          0         -> 10.244.0.3:53                Masq    1      0          0
TCP  10.96.0.10:9153 rr-> 10.244.0.2:9153              Masq    1      0          0         -> 10.244.0.3:9153              Masq    1      0          0
TCP  10.107.129.69:80 rr-> 10.244.1.29:80               Masq    1      0          0         -> 10.244.2.33:80               Masq    1      0          0
UDP 10.96.0.10:53 rr-> 10.244.0.2:53 Masq 1 0 0 -> 10.244.0.3:53 Masq 1 0 0 
在使用ipvs模式之后发现添加了一个网卡专属于ipvs的
[root@k8s-master yaml]# ip a | tailinet6 fe80::78a9:7cff:fe93:958a/64 scope link valid_lft forever preferred_lft forever
11: kube-ipvs0: <BROADCAST,NOARP> mtu 1500 qdisc noop state DOWN group default link/ether c6:3e:41:c4:d3:9f brd ff:ff:ff:ff:ff:ffinet 10.96.0.1/32 scope global kube-ipvs0valid_lft forever preferred_lft foreverinet 10.107.129.69/32 scope global kube-ipvs0valid_lft forever preferred_lft foreverinet 10.96.0.10/32 scope global kube-ipvs0valid_lft forever preferred_lft forever
4 微服务类型详解
4.1 ClusterIP

特点:
clusterip模式只能在集群内访问,并对集群内的pod提供健康检测和自动发现功能
默认值,k8s系统给service自动分配的虚拟IP,只能在集群内部访问
并且在集群内访问是通过域名的方式来访问的
示例:
# 创建一个pod
[root@k8s-master yaml]# kubectl run testpods --image myapp:v1  # 查看pod 的IP 与标签
[root@k8s-master yaml]# kubectl get pods -o wide --show-labels
NAME       READY   STATUS    RESTARTS   AGE   IP            NODE        NOMINATED NODE   READINESS GATES   LABELS
testpods   1/1     Running   0          10m   10.244.1.36   k8s-node1   <none>           <none>            run=testpods# 创建services 的 yaml 文件将刚刚创建的pod对外发布[root@k8s-master yaml]# kubectl expose pod testpods --port 80 \
--target-port 80 --dry-run=client -o yaml > servise.yml[root@k8s-master yaml]# vim servise.yml
# 以下是修改过后的
apiVersion: v1
kind: Service
metadata:labels:run: testpodsname: testpods
spec:ports:- port: 80protocol: TCPtargetPort: 80selector:run: testpods    # 这里的值必须与pod的标签一致不然就无法对外发布type: ClusterIP    # 这里使用ClusterIP,不写也没有关系,因为是默认值
声明一下
[root@k8s-master yaml]# kubectl apply -f servise.yml
service/testpods created[root@k8s-master yaml]# kubectl describe service testpods
Name:              testpods
Namespace:         default
Labels:            run=testpods
Annotations:       <none>
Selector:          run=testpods
Type:              ClusterIP
IP Family Policy:  SingleStack
IP Families:       IPv4
IP:                10.97.188.175     # 前端IPVS调度IP
IPs:               10.97.188.175
Port:              <unset>  80/TCP
TargetPort:        80/TCP
Endpoints:         10.244.1.36:80    # Endpoints显示的为后端pod的IP
Session Affinity:  None
Events:            <none>[root@k8s-master yaml]# kubectl get services
NAME         TYPE        CLUSTER-IP      EXTERNAL-IP   PORT(S)   AGE
kubernetes   ClusterIP   10.96.0.1       <none>        443/TCP   4d9h
testpods     ClusterIP   10.97.188.175   <none>        80/TCP    2m53s
为了掩饰标签一致性才能对外发布,以下实验实例
以上面实验为基础,创建一个新的pod 并修改他的标签
[root@k8s-master yaml]# kubectl run testpods1 --image myapp:v2
pod/testpods1 created[root@k8s-master yaml]# kubectl get pods --show-labels
NAME        READY   STATUS    RESTARTS   AGE   LABELS
testpods    1/1     Running   0          27m   run=testpods
testpods1   1/1     Running   0          15s   run=testpods1[root@k8s-master yaml]# kubectl describe service testpods
Name:              testpods
Namespace:         default
Labels:            run=testpods
Annotations:       <none>
Selector:          run=testpods
Type:              ClusterIP
IP Family Policy:  SingleStack
IP Families:       IPv4
IP:                10.97.188.175
IPs:               10.97.188.175
Port:              <unset>  80/TCP
TargetPort:        80/TCP
Endpoints:         10.244.1.36:80        # 此时就只有原先的pod
Session Affinity:  None
Events:            <none># 将新创建的pod标签修改覆盖
[root@k8s-master yaml]# kubectl label pods testpods1 run=testpods --overwrite
pod/testpods1 labeled# 查看Endpoints的变化
[root@k8s-master yaml]# kubectl describe service testpods
Name:              testpods
Namespace:         default
Labels:            run=testpods
Annotations:       <none>
Selector:          run=testpods
Type:              ClusterIP
IP Family Policy:  SingleStack
IP Families:       IPv4
IP:                10.97.188.175
IPs:               10.97.188.175
Port:              <unset>  80/TCP
TargetPort:        80/TCP
Endpoints:         10.244.1.36:80,10.244.2.42:80
Session Affinity:  None
Events:            <none># 集群内访问他发现是轮循
[root@k8s-master yaml]# curl 10.97.188.175
Hello MyApp | Version: v2 | <a href="hostname.html">Pod Name</a>
[root@k8s-master yaml]# curl 10.97.188.175
Hello MyApp | Version: v1 | <a href="hostname.html">Pod Name</a>
[root@k8s-master yaml]# curl 10.97.188.175
Hello MyApp | Version: v2 | <a href="hostname.html">Pod Name</a>
[root@k8s-master yaml]# curl 10.97.188.175
Hello MyApp | Version: v1 | <a href="hostname.html">Pod Name</a>
[root@k8s-master yaml]# curl 10.97.188.175
Hello MyApp | Version: v2 | <a href="hostname.html">Pod Name</a>
查看集群内DNS服务
[root@k8s-master yaml]# kubectl -n kube-system get service
NAME       TYPE        CLUSTER-IP   EXTERNAL-IP   PORT(S)                  AGE
kube-dns   ClusterIP   10.96.0.10   <none>        53/UDP,53/TCP,9153/TCP   4d9h
查看testpod 的域名解析是否正常
[root@k8s-master yaml]# dig testpods.default.svc.cluster.local. @10.96.0.10; <<>> DiG 9.16.23-RH <<>> testpods.default.svc.cluster.local. @10.96.0.10
;; global options: +cmd
;; Got answer:
;; WARNING: .local is reserved for Multicast DNS
;; You are currently testing what happens when an mDNS query is leaked to DNS
;; ->>HEADER<<- opcode: QUERY, status: NOERROR, id: 59510
;; flags: qr aa rd; QUERY: 1, ANSWER: 1, AUTHORITY: 0, ADDITIONAL: 1
;; WARNING: recursion requested but not available;; OPT PSEUDOSECTION:
; EDNS: version: 0, flags:; udp: 4096
; COOKIE: e633e2637dcddbd3 (echoed)
;; QUESTION SECTION:
;testpods.default.svc.cluster.local. IN A;; ANSWER SECTION:
testpods.default.svc.cluster.local. 8 IN A      10.97.188.175  # 为前端services 的IP;; Query time: 1 msec
;; SERVER: 10.96.0.10#53(10.96.0.10)
;; WHEN: Sat Sep 07 11:27:16 CST 2024
;; MSG SIZE  rcvd: 125
新建一个容器查看
[root@k8s-master yaml]# kubectl run busybox -it \--image busyboxplus:latest  -- /bin/sh/ # nslookup testpods
Server:    10.96.0.10
Address 1: 10.96.0.10 kube-dns.kube-system.svc.cluster.localName:      testpods
Address 1: 10.97.188.175 testpods.default.svc.cluster.local/ # cat /etc/resolv.conf
nameserver 10.96.0.10
search default.svc.cluster.local svc.cluster.local cluster.local
options ndots:5/ # curl testpods
Hello MyApp | Version: v2 | <a href="hostname.html">Pod Name</a>
/ # curl testpods
Hello MyApp | Version: v1 | <a href="hostname.html">Pod Name</a>
/ # curl testpods
Hello MyApp | Version: v2 | <a href="hostname.html">Pod Name</a>
/ # curl testpods.default.svc.cluster.local.
Hello MyApp | Version: v1 | <a href="hostname.html">Pod Name</a>
/ # curl testpods.default.svc.cluster.local.
Hello MyApp | Version: v2 | <a href="hostname.html">Pod Name</a>
/ # curl testpods.default.svc.cluster.local.
Hello MyApp | Version: v1 | <a href="hostname.html">Pod Name</a>
4.2 ClusterIP中的特殊模式headless
headless(无头服务)
Headless Services是一种特殊的service,其spec:clusterIP表示为None,这样在实际运行时就不会被分配ClusterIP。也被称为无头服务。
对于无头 Services 并不会分配 Cluster IP,kube-proxy不会处理它们, 而且平台也不会为它们进行负载均衡和路由,集群访问通过dns解析直接指向到业务pod上的IP,所有的调度有dns单独完成
# 可以是控制器
---
apiVersion: v1
kind: Service
metadata:name: testpodslabels:run: testpods
spec:ports:- port: 80protocol: TCPtargetPort: 80selector:run: testpodstype: ClusterIPclusterIP: None  # 直接设置为 None
[root@k8s-master yaml]# kubectl delete service testpods
service "testpods" deleted[root@k8s-master yaml]# kubectl apply -f servise.yml
service/testpods created[root@k8s-master yaml]# kubectl get service
NAME TYPE CLUSTER-IP EXTERNAL-IP PORT(S) AGE
kubernetes ClusterIP 10.96.0.1 <none> 443/TCP 4d20h
testpods ClusterIP None <none> 80/TCP 13s[root@k8s-master yaml]# kubectl describe service testpods
Name: testpods
Namespace: default
Labels: run=testpods
Annotations: <none>
Selector: run=testpods
Type: ClusterIP
IP Family Policy: SingleStack
IP Families: IPv4
IP: None # 没有前端,证明不经过服务直接转到了后端pod
IPs: None
Port: <unset> 80/TCP
TargetPort: 80/TCP
Endpoints: 10.244.1.36:80,10.244.2.42:80
Session Affinity: None
Events: <none>4.3 nodeport
通过ipvs暴漏端口从而使外部主机通过master节点的对外ip:<port>来访问pod业务
其访问过程为:
![]()
---
apiVersion: v1
kind: Service
metadata:name: testpodslabels:run: testpods
spec:ports:- port: 80protocol: TCPtargetPort: 80selector:run: testpodstype: NodePort[root@k8s-master yaml]# kubectl delete -f servise.yml
[root@k8s-master yaml]# kubectl apply -f servise.yml [root@k8s-master yaml]# kubectl get service
NAME         TYPE           CLUSTER-IP       EXTERNAL-IP       PORT(S)        AGE
kubernetes   ClusterIP      10.96.0.1        <none>            443/TCP        5d
testpods     NodePort       10.111.173.191   <none>            80:30110/TCP   4s[root@complete ~]# curl 192.168.239.100:30110
Hello MyApp | Version: v1 | <a href="hostname.html">Pod Name</a>
[root@complete ~]# curl 192.168.239.100:30110
Hello MyApp | Version: v2 | <a href="hostname.html">Pod Name</a>
[root@complete ~]# curl 192.168.239.100:30110
Hello MyApp | Version: v1 | <a href="hostname.html">Pod Name</a>
[root@complete ~]# curl 192.168.239.100:30110
Hello MyApp | Version: v2 | <a href="hostname.html">Pod Name</a>
4.4 metalLB配合loadbalance实现发布IP
MetalLB 是一个流行的开源解决方案,用于在 Kubernetes 集群中提供类似于云提供商的 LoadBalancer 类型服务的功能。MetalLB 允许你在没有云提供商的情况下,在物理服务器或私有云环境中分配和管理外部 IP 地址。
MetalLB 是一个专注于解决 Kubernetes 集群内部负载均衡问题的工具,特别是在没有云提供商负载均衡器支持的环境下。它提供了类似云提供商负载均衡器的功能,使得 Kubernetes 服务能够通过 LoadBalancer 类型的服务暴露到外部网络。MetalLB 不是用来搭建整个云平台的工具,而是为了解决特定的网络负载均衡需求。如果需要构建完整的云平台,还需要考虑其他组件和技术栈,比如计算、存储、网络虚拟化等。

# 使用魔法下载镜像
[root@k8s-master loadbanlan]# docker pull quay.io/metallb/speaker:v0.14.8
[root@k8s-master loadbanlan]# docker pull quay.io/metallb/controller:v0.14.8# 打上标签
[root@k8s-master loadbanlan]# docker tag quay.io/metallb/controller:v0.14.8 reg.shuyan.com/metallb/controller:v0.14.8
[root@k8s-master loadbanlan]# docker tag quay.io/metallb/speaker:v0.14.8 reg.shuyan.com/metallb/speaker:v0.14.8# 传到自己的镜像仓库
[root@k8s-master ~]# docker push reg.shuyan.com/metallb/controller:v0.14.8
[root@k8s-master ~]# docker push reg.shuyan.com/metallb/speaker:v0.14.8
下载部署文件
wget https://raw.githubusercontent.com/metallb/metallb/v0.13.12/config/manifests/metallb-native.yaml修改下载下来的文件
指定自己的镜像仓库
[root@k8s-master loadbanlan]# vim metallb-native.yaml
image: metallb/speaker:v0.14.8
image: metallb/controller:v0.14.8

apiVersion: metallb.io/v1beta1
kind: IPAddressPool
metadata:name: first-poolnamespace: metallb-system
spec:addresses:- 192.168.239.200-192.168.239.250---
apiVersion: metallb.io/v1beta1
kind: L2Advertisement
metadata:name: examplenamespace: metallb-system
spec:ipAddressPools:- first-pool
在 Kubernetes 中,LoadBalancer 类型的 Service 是一种特殊的 Service,它旨在将集群内部的服务暴露给外部网络。LoadBalancer 类型的 Service 通过使用云提供商或网络负载均衡器将外部流量路由到集群内的后端服务。
[root@k8s-master loadbanlan]# kubectl create deployment load \
--image myapp:v1 --dry-run=client -o yamlapiVersion: apps/v1
kind: Deployment
metadata:creationTimestamp: nulllabels:app: loadname: load
spec:replicas: 1selector:matchLabels:app: loadstrategy: {}template:metadata:creationTimestamp: nulllabels:app: loadspec:containers:- image: myapp:v1name: myappresources: {}
status: {}[root@k8s-master loadbanlan]# kubectl create deployment load \
--image myapp:v1 --dry-run=client -o yaml > load.yml[root@k8s-master loadbanlan]# kubectl expose deployment load \
--port 80 --target-port 80 --dry-run=client -o yamlapiVersion: v1
kind: Service
metadata:creationTimestamp: nulllabels:app: loadname: load
spec:ports:- port: 80protocol: TCPtargetPort: 80selector:app: load
status:loadBalancer: {}[root@k8s-master loadbanlan]# kubectl expose deployment load \
--port 80 --target-port 80 --dry-run=client -o yaml >> load.yml# 修改之后的
apiVersion: apps/v1
kind: Deployment
metadata:labels:app: loadname: load
spec:replicas: 4selector:matchLabels:app: loadtemplate:metadata:labels:app: loadspec:containers:- image: myapp:v1name: myapp
---
apiVersion: v1
kind: Service
metadata:labels:app: loadname: load
spec:ports:- port: 80protocol: TCPtargetPort: 80selector:app: loadtype: LoadBalancer
声明分配IP的配置文件
[root@k8s-master loadbanlan]# kubectl apply -f configmap.yml
ipaddresspool.metallb.io/first-pool created
l2advertisement.metallb.io/example created[root@k8s-master loadbanlan]# kubectl get service
NAME         TYPE           CLUSTER-IP       EXTERNAL-IP       PORT(S)        AGE
kubernetes   ClusterIP      10.96.0.1        <none>            443/TCP        4d23h
load         LoadBalancer   10.105.244.178   192.168.239.200   80:30911/TCP   16m
testpods     ClusterIP      None             <none>            80/TCP         3h13m
不在kubernetes集群中的也能直接访问到
[root@complete ~]# curl 192.168.239.200
Hello MyApp | Version: v1 | <a href="hostname.html">Pod Name</a>
相关文章:
kubernetes微服务基础及类型
目录 1 什么是微服务 2 微服务的类型 3 ipvs模式 ipvs模式配置方式 4 微服务类型详解 4.1 ClusterIP 4.2 ClusterIP中的特殊模式headless 4.3 nodeport 4.4 metalLB配合loadbalance实现发布IP 1 什么是微服务 用控制器来完成集群的工作负载,那么应用如何暴漏出去&…...

linux-L3_linux 查看进程(node-red)
linux 查看进程 以查看进程node-red为例 ps aux | grep node-red...

区块链之变:揭秘Web3对互联网的改变
传统游戏中,玩家的虚拟资产(如角色、装备)通常由游戏公司控制,玩家无法真正拥有这些资产或进行交易。而在区块链游戏中,虚拟资产通过去中心化技术记录在区块链上,玩家对其拥有完全的所有权,并能…...
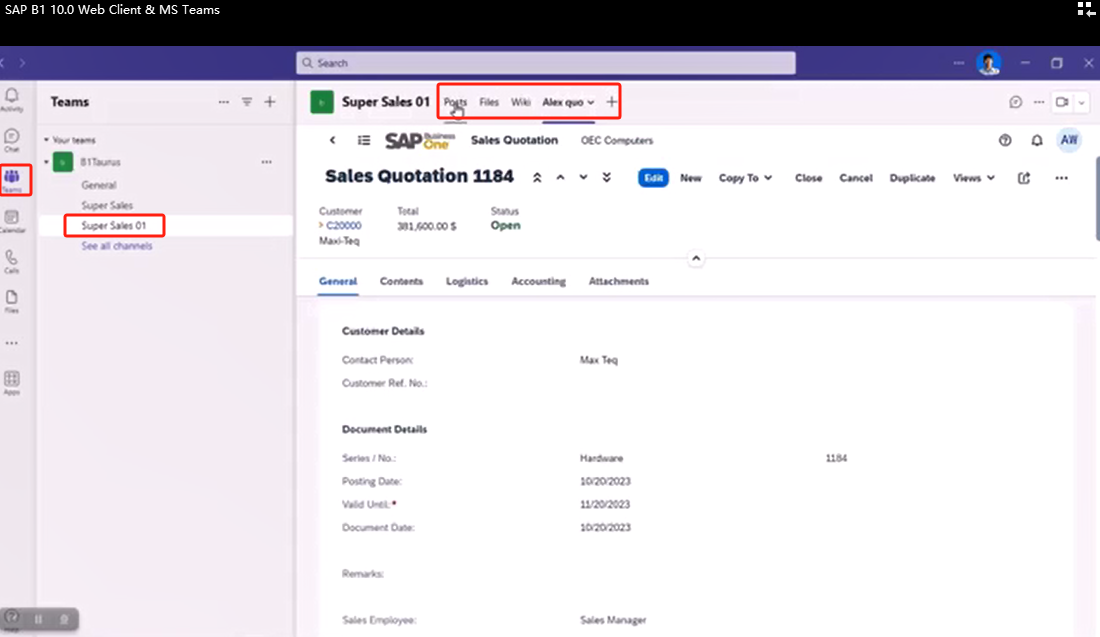
SAP B1 Web Client MS Teams App集成连载一:先决条件/Prerequisites
一、先决条件/Prerequisites 在设置 SAP Business One 应用之前,确保您已具备以下各项:Before you set up the SAP Business One app, make sure you have acquired the following: 1.Microsoft Teams 管理员账户/A Microsoft Teams admin account 您需…...
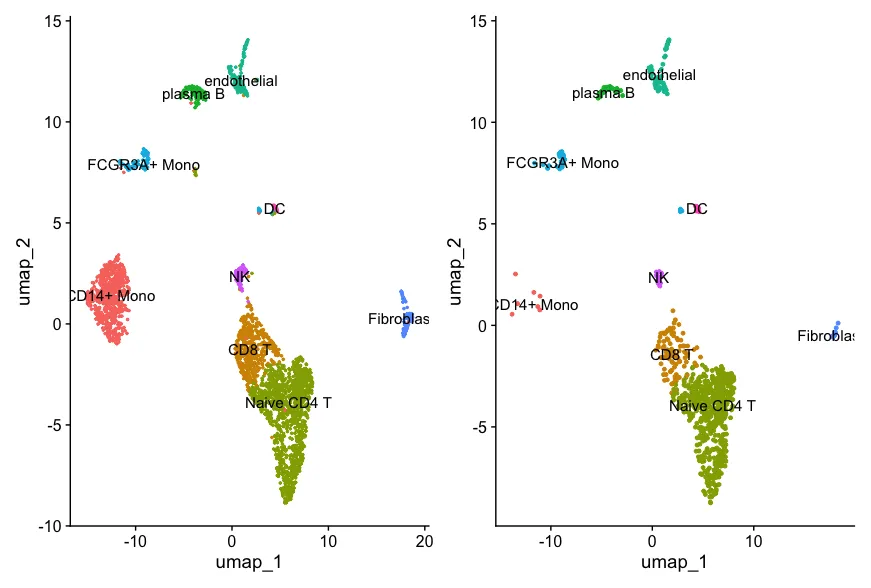
去除单细胞数据中环境游离的RNA污染-decontX工具学习
DecontX 是一种用于单细胞 RNA 测序数据的去除环境污染物(decontamination)的工具,主要用于减少由细胞外RNA造成的污染效应。 开发者在20年的文章中已经把这个工具适用的情况说的非常清楚了:简单来说就是基于微流控的单细胞技术会…...
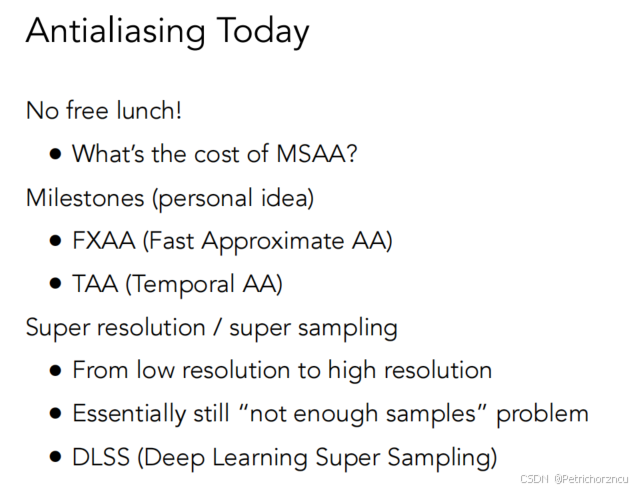
Games101图形学笔记——光栅化
这里写目录标题 Rasterization光栅化屏幕空间隔行扫描三角形采样采样产生的问题反走样处理方法:采样前模糊 频率,时域傅里叶级数展开傅里叶变换 滤波高通滤波低通滤波 卷积卷积的一些定理 反走样MSAA(Multisample Anti-Aliasing)多…...
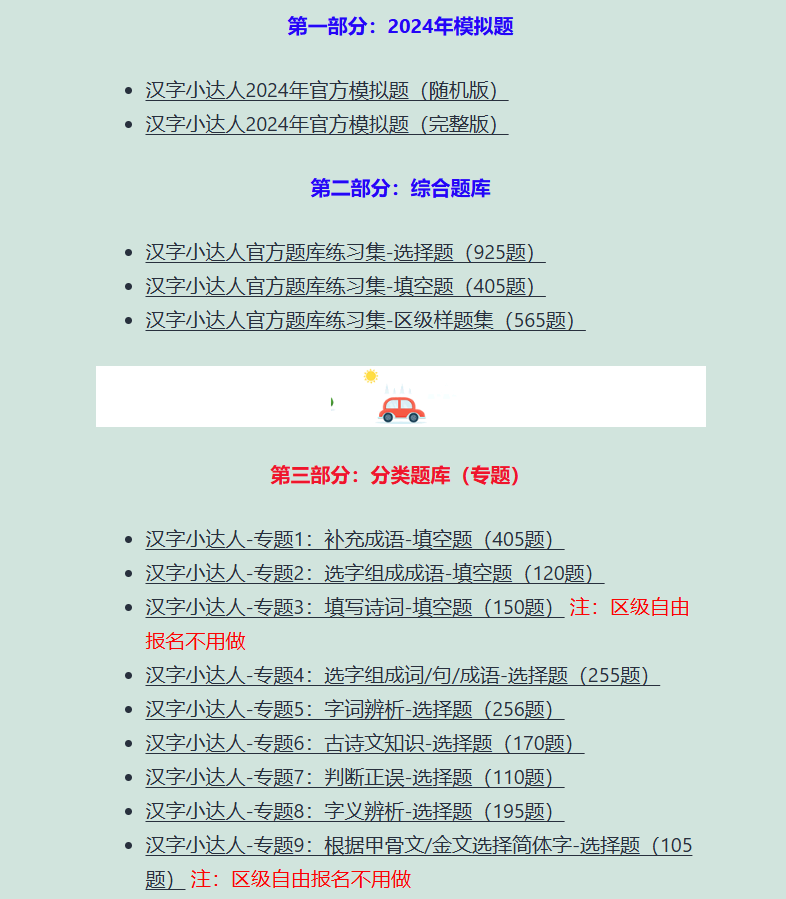
2024年汉字小达人区级自由报名的几个最新问题和真题练一练
2024年第十一届汉字小达人的区级活动的时间9月25-30日正式开赛,还有不到两周。 今天继续回答家长和孩子们的几个问题,并给大家看看一些真题,让孩子对汉字小达人的题型和比赛有直观的了解,从而更好地备考。 本专题在比赛前持续更…...
从简单分析到智能问数,Smartbi AIChat让数据回归业务
大数据产业创新服务媒体 ——聚焦数据 改变商业 在某科技公司,资深数据分析师李晨(化名)正忙于分析新产品的市场表现。面对传统自助式BI工具,李晨在功能界面中手动设置各种查询条件,进行了一番复杂的拖拉拽操作&#…...
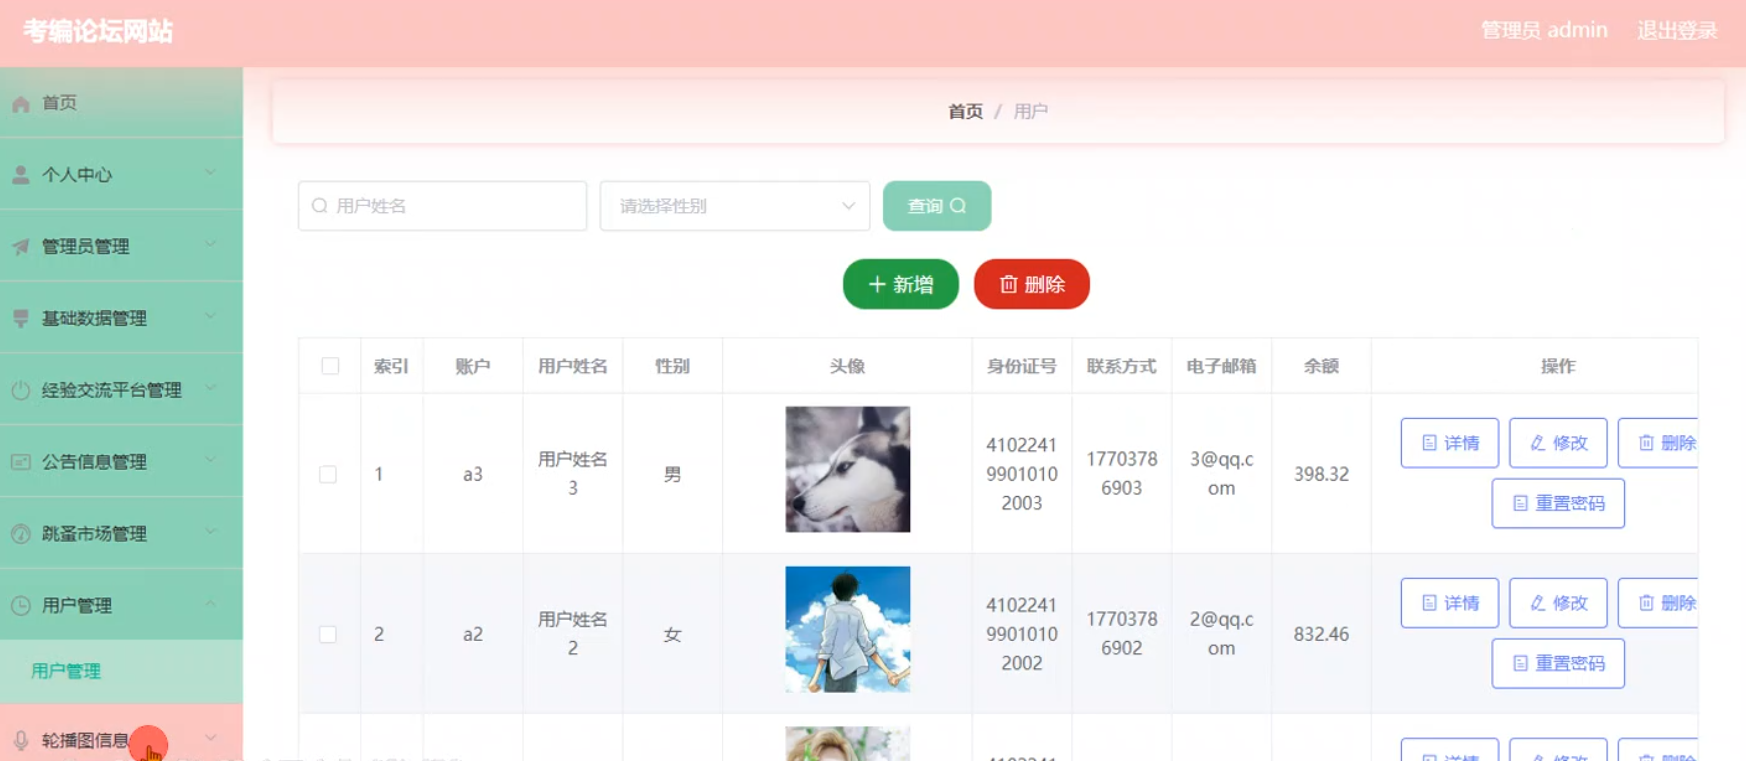
基于SpringBoot+Vue+MySQL的考编论坛网站
系统展示 用户前台界面 管理员后台界面 系统背景 在当前信息化高速发展的时代,考编已成为众多求职者的重要选择。然而,备考过程中信息获取、经验交流及资源分享的需求日益凸显。基于SpringBoot、Vue.js与MySQL构建的考编论坛网站应运而生,旨在…...
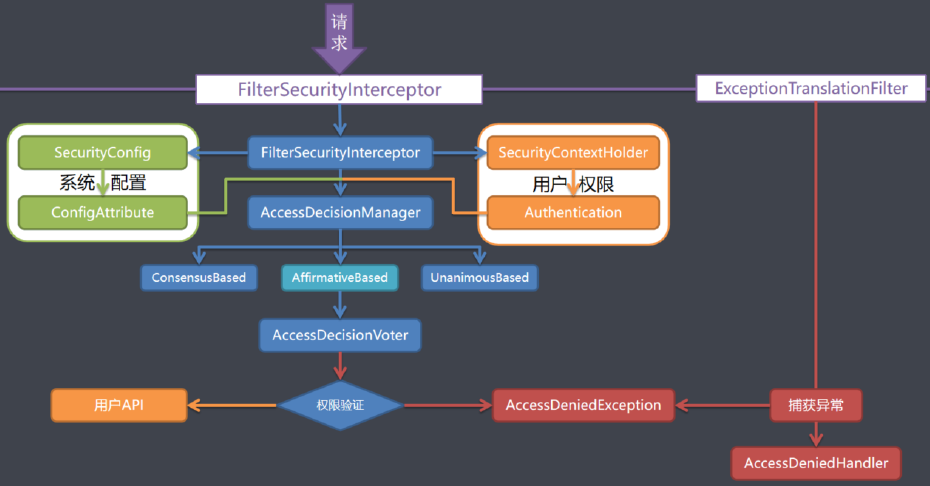
SpringSecurity剖析
1、SpringSecurity 入门 1.1、简介 Spring Security是一个功能强大且高度可定制的身份验证和访问控制框架。它是用于保护基于Spring的应用程序的实际标准。Spring Security是一个框架,致力于为Java应用程序提供身份验证和授权。与所有Spring项目一样,Sp…...

一文搞懂 Flink Graph 构建过程源码
一文搞懂 Flink Graph 构建过程 1. StreamGraph构建过程1.1 transform(): 构建的核心1.2 transformOneInputTransform1.3 构造顶点1.4 构造边1.5 transformSource1.6 transformPartition1.7 transformSink 1. StreamGraph构建过程 链接: 一文搞懂 Flink 其他重要源码点击我 e…...
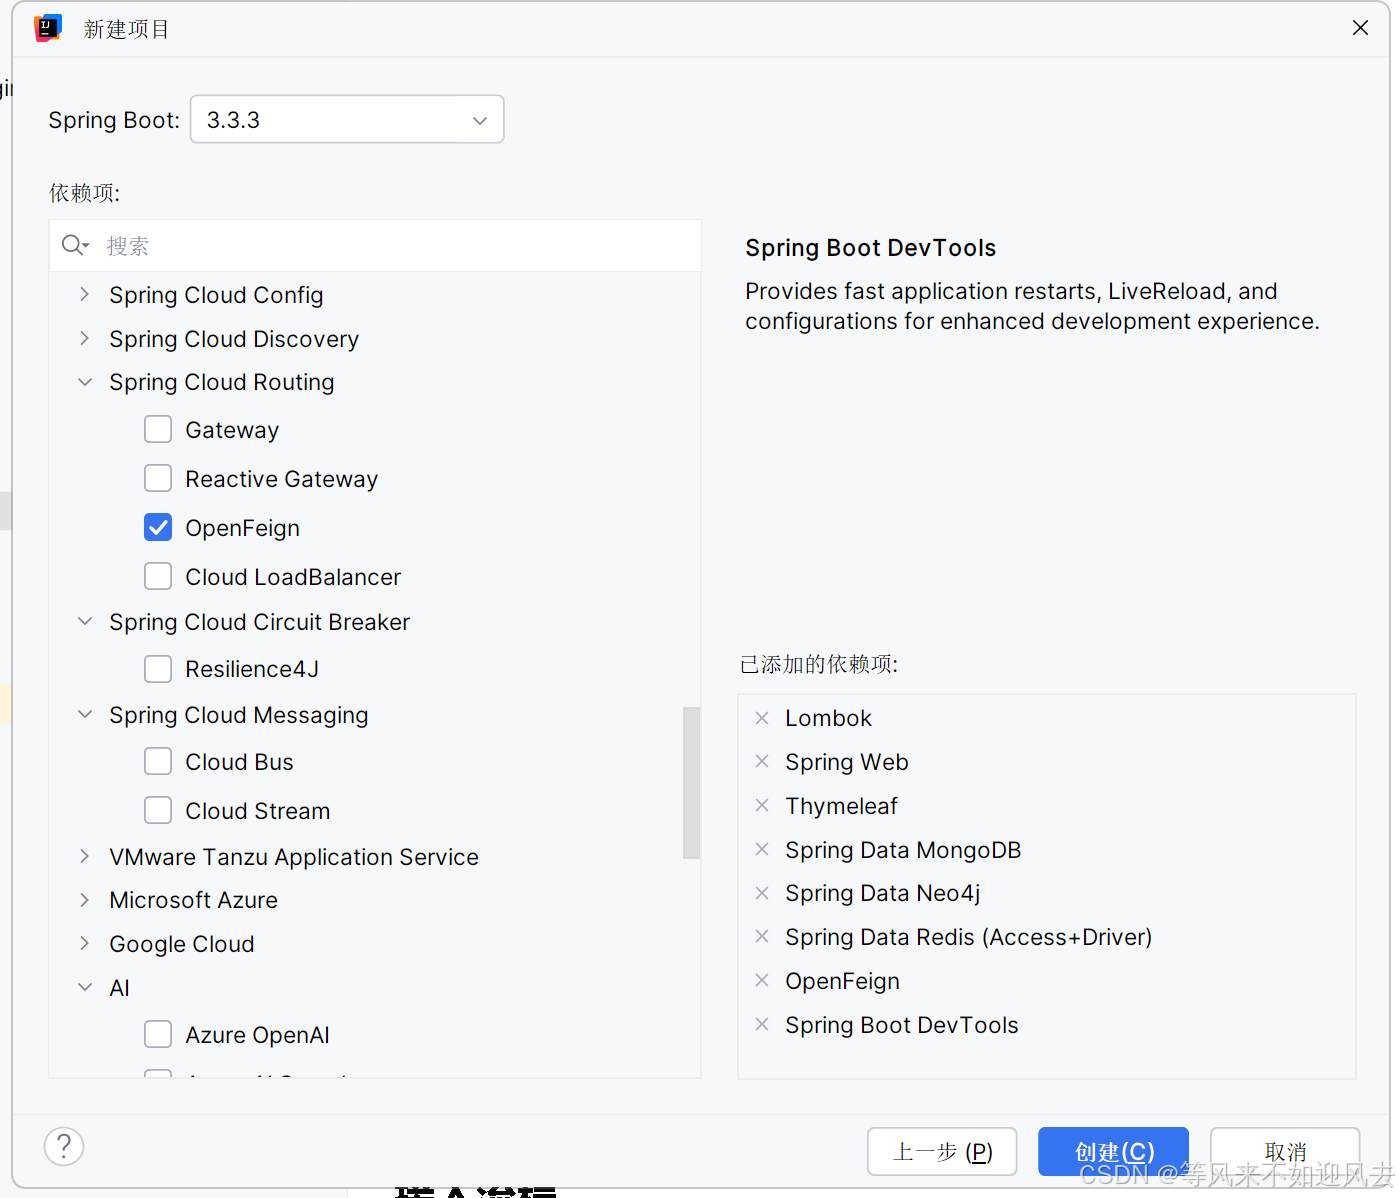
【spring】IDEA 新建一个spring boot 项目
参考新建项目-sprintboot 选择版本、依赖,我选了一堆 maven会重新下载一次么?...
LeetCode[简单] 搜索插入位置
给定一个排序数组和一个目标值,在数组中找到目标值,并返回其索引。如果目标值不存在于数组中,返回它将会被按顺序插入的位置。 请必须使用时间复杂度为 O(log n) 的算法。 思路:类似与二分查找 唯一需要注意的是,搜索…...
Bootstrap框架的HTML示例)
(代码可运行)Bootstrap框架的HTML示例
Bootstrap:一套流行的前端开发框架,基于HTML、CSS和JavaScript,适用于快速构建响应式Web应用。 以下是一个使用Bootstrap构建的简单响应式Web应用的HTML示例: <!DOCTYPE html> <html lang"en"> <head&…...

IntelliJ IDEA 2024创建Java项目
一、前言 本文将带领大家手把手创建纯Java项目,不涉及Maven。如有问题,欢迎大家在评论区指正说明! 二、环境准备 名称版本jdk1.8idea2024 1.4操作系统win10 jdk的安装教程 idea的安装教程 三、创建项目 首先我们点击新建项目 然后我们…...

Python之 条件与循环(Python‘s Conditions and loops)
💝💝💝欢迎来到我的博客,很高兴能够在这里和您见面!希望您在这里可以感受到一份轻松愉快的氛围,不仅可以获得有趣的内容和知识,也可以畅所欲言、分享您的想法和见解。 推荐:Linux运维老纪的首页…...

C++学习,多态纯虚函数
多态字面意思是多种形态,当类之间存在层次结构,并且类之间是通过继承时,就会用到多态。多态允许通过基类指针或引用来调用派生类中的成员函数。这种机制允许函数,在运行时根据对象的实际类型来确定执行哪个函数,从而实…...

飞速(FS)与西门子联合打造交换机自动化灌装测试生产线
2024年9月,备受信赖的信息通信技术(ICT)解决方案提供商飞速(FS)与工业自动化领域的领先企业西门子公司正式宣布,双方共同打造的ILTP(智能灌装测试平台)和自动化生产线将正式启动。此…...

Vue组合式API:setup()函数
1、什么是组合式API Vue 3.0 中新增了组合式 API 的功能,它是一组附加的、基于函数的 API,可以更加灵活地组织组件代码。通过组合式 API 可以使用函数而不是声明选项的方式来编写 Vue 组件。因此,使用组合式 API 可以将组件代码编写为多个函…...

Redis底层数据结构(详细篇)
Redis底层数据结构 一、常见数据结构的底层数据结构1、动态字符串SDS(Simple Dynamic String)组成 2、IntSet组成如何保证动态如何确保有序呢? 底层如何查找的呢? 3、Dict(dictionary)3.1组成3.2 扩容3.3 收缩3.4 rehash 4、ZipList连锁更新问题总结特…...

Altium Designer实战:用xSignals搞定DDR4内存的等长布线,告别时序烦恼
Altium Designer实战:用xSignals实现DDR4内存精准等长布线 在高速PCB设计中,DDR4内存接口的布线一直是硬件工程师面临的技术高地。当信号速率突破2400MHz时,地址、命令与数据线之间哪怕几个ps的时序偏差都可能导致系统不稳定。传统手工计算网…...

AutoCut终极指南:如何用文本编辑器快速剪辑100个视频
AutoCut终极指南:如何用文本编辑器快速剪辑100个视频 【免费下载链接】autocut 用文本编辑器剪视频 项目地址: https://gitcode.com/GitHub_Trending/au/autocut 还在为手动剪辑视频而烦恼吗?AutoCut项目让你告别复杂的视频编辑软件,通…...

深度解析Scarab:空洞骑士模组管理器的专业实现与架构设计
深度解析Scarab:空洞骑士模组管理器的专业实现与架构设计 【免费下载链接】Scarab An installer for Hollow Knight mods written with Avalonia. 项目地址: https://gitcode.com/gh_mirrors/sc/Scarab 空洞骑士模组管理器Scarab为玩家提供了高效、专业的模组…...
)
低多边形≠简陋!掌握这7个结构化Prompt技巧,3分钟产出可商用IP形象(附Figma网格对齐校验表)
更多请点击: https://intelliparadigm.com 第一章:低多边形设计的认知革命:从“简陋感”到“结构化美学” 低多边形(Low-Poly)设计曾长期被误读为建模能力不足的妥协产物,但其本质是一场对数字视觉语法的系…...

CircuitPython状态灯、安全模式与文件系统故障排查实战指南
1. 项目概述与核心价值 如果你正在用CircuitPython做项目,无论是物联网传感器节点、智能穿戴设备还是互动艺术装置,大概率都遇到过这样的瞬间:板子上的RGB状态灯突然开始闪烁诡异的颜色,或者电脑上那个熟悉的 CIRCUITPY U盘图标…...

WipperSnapper+Adafruit IO:无代码物联网开发实战,从传感器到云端自动化
1. 项目概述与核心价值如果你和我一样,在物联网(IoT)项目初期,常常被复杂的嵌入式编程、网络协议和云平台对接搞得焦头烂额,那么今天分享的这个实战项目,或许能让你眼前一亮。我们这次不谈复杂的代码&#…...

MQ-3与MiCS-5524气体传感器对比:从原理到实战的选型指南
1. 项目概述与核心价值在嵌入式开发、环境监测乃至一些创意DIY项目中,气体检测是一个常见且关键的需求。无论是为了安全预警(如天然气泄漏),还是进行环境质量评估(如VOC监测),选择一款合适的传感…...

2025最权威的AI辅助论文网站实际效果
Ai论文网站排名(开题报告、文献综述、降aigc率、降重综合对比) TOP1. 千笔AI TOP2. aipasspaper TOP3. 清北论文 TOP4. 豆包 TOP5. kimi TOP6. deepseek 在学术研究跟论文写作这个领域当中,人工智能工具的兴起给学者和学生带来了从来没…...

MOXA NPort 5110串口服务器避坑指南:网线直连、波特率设置与Web管理那些事儿
MOXA NPort 5110串口服务器实战避坑手册:从硬件部署到批量管理的深度解析 第一次接触工业级串口服务器时,我对着那个巴掌大的金属盒子发呆了十分钟——RJ45、DB9、电源接口密密麻麻挤在一起,配套光盘里还有三个不同功能的配置工具。直到现场调…...

AURIX Tricore TC397开发实战:基于UDE的仿真调试与问题排查指南
1. 环境准备与工具安装 第一次接触AURIX Tricore TC397的开发板时,我完全被它强大的多核架构吸引住了。这款芯片在汽车电子领域应用广泛,但调试过程确实让不少新手头疼。经过几个项目的实战,我总结出一套基于UDE的调试方法,能帮你…...