C++ Qt / VS2019 +opencv + onnxruntime 部署语义分割模型【经验2】
前序工作
C++ Qt / VS2019 +opencv + onnxruntime 部署语义分割模型【经验】
引言
前序工作中介绍了Pytorch模型如何转为ONNX格式,以及在Python中如何使用onnx模型
介绍了如何在VA或QT中配置Onnxruntime运行库
本文重点列出全部源代码及其使用
依赖库
onnxruntime: 1.8.1
opencv: 330
头文件
#pragma once
#include <string>
#include <onnxruntime_cxx_api.h>
#include <iostream>
#include <vector>
#include <opencv2/opencv.hpp>
#include <opencv2/dnn.hpp>
#include <time.h>class ObjectSeg
{
protected:Ort::Env env_;Ort::SessionOptions session_options_;Ort::Session session_{ nullptr };Ort::RunOptions run_options_{ nullptr };std::vector<Ort::Value> input_tensors_;std::vector<const char*> input_node_names_;std::vector<int64_t> input_node_dims_;size_t input_tensor_size_{ 1 };std::vector<const char*> out_node_names_;size_t out_tensor_size_{ 1 };int image_h;int image_w;cv::Mat normalize(cv::Mat& image);cv::Mat preprocess(cv::Mat image);public:ObjectSeg() = delete;ObjectSeg(std::wstring model_path, int num_threads, std::vector<int64_t> input_node_dims);cv::Mat predict_image(cv::Mat& src);void predict_image(const std::string& src_path, const std::string& dst_path);void predict_camera();};
源文件
#include "Seg.h"ObjectSeg::ObjectSeg(std::wstring model_path, int num_threads = 1, std::vector<int64_t> input_node_dims = { 1, 3, 64, 64 }) {input_node_dims_ = input_node_dims;for (int64_t i : input_node_dims_) {input_tensor_size_ *= i;out_tensor_size_ *= i;}//std::cout << input_tensor_size_ << std::endl;session_options_.SetIntraOpNumThreads(num_threads);session_options_.SetGraphOptimizationLevel(GraphOptimizationLevel::ORT_ENABLE_EXTENDED);OrtCUDAProviderOptions cuda_options{0,OrtCudnnConvAlgoSearch::EXHAUSTIVE,std::numeric_limits<size_t>::max(),0,true};session_options_.AppendExecutionProvider_CUDA(cuda_options);std::cout << "************* Infer model on GPU! *************" << std::endl;try {session_ = Ort::Session(env_, model_path.c_str(), session_options_);}catch (...) {}Ort::AllocatorWithDefaultOptions allocator;//获取输入nameconst char* input_name = session_.GetInputName(0, allocator);input_node_names_ = { input_name };//std::cout << "input name:" << input_name << std::endl;const char* output_name = session_.GetOutputName(0, allocator);out_node_names_ = { output_name };//std::cout << "output name:" << output_name << std::endl;
}cv::Mat ObjectSeg::normalize(cv::Mat& image) {std::vector<cv::Mat> channels, normalized_image;cv::split(image, channels);cv::Mat r, g, b;b = channels.at(0);g = channels.at(1);r = channels.at(2);b = (b / 255. - 0.485) / 0.229;g = (g / 255. - 0.456) / 0.224;r = (r / 255. - 0.406) / 0.225;normalized_image.push_back(r);normalized_image.push_back(r);normalized_image.push_back(g);normalized_image.push_back(b);cv::Mat out = cv::Mat(image.rows, image.cols, CV_32F);cv::merge(normalized_image, out);return out;
}/*
* preprocess: resize -> normalize
*/
cv::Mat ObjectSeg::preprocess(cv::Mat image) {image_h = image.rows;image_w = image.cols;cv::Mat dst, dst_float, normalized_image;cv::resize(image, dst, cv::Size(int(input_node_dims_[3]), int(input_node_dims_[2])), 0, 0);dst.convertTo(dst_float, CV_32F);normalized_image = normalize(dst_float);return normalized_image;
}/*
* postprocess: preprocessed image -> infer -> postprocess
*/
cv::Mat ObjectSeg::predict_image(cv::Mat& src) {cv::Mat preprocessed_image = preprocess(src);cv::Mat blob = cv::dnn::blobFromImage(preprocessed_image, 1, cv::Size(int(input_node_dims_[3]), int(input_node_dims_[2])), cv::Scalar(0, 0, 0), false);//std::cout << "load image success." << std::endl;// create input tensorauto memory_info = Ort::MemoryInfo::CreateCpu(OrtArenaAllocator, OrtMemTypeDefault);input_tensors_.emplace_back(Ort::Value::CreateTensor<float>(memory_info, blob.ptr<float>(), blob.total(), input_node_dims_.data(), input_node_dims_.size()));std::vector<Ort::Value> output_tensors_ = session_.Run(Ort::RunOptions{ nullptr },input_node_names_.data(),input_tensors_.data(),input_node_names_.size(),out_node_names_.data(),out_node_names_.size());// post progress// 3. post process.Ort::Value& scores = output_tensors_.at(0); // (1,21,h,w)auto scores_dims = scores.GetTypeInfo().GetTensorTypeAndShapeInfo().GetShape();const unsigned int output_classes = scores_dims.at(1);const unsigned int output_height = scores_dims.at(2);const unsigned int output_width = scores_dims.at(3);// time cost!cv::Mat class_mat = cv::Mat(output_height, output_width, CV_8UC3, cv::Scalar(0));cv::Mat color_mat = class_mat.clone();for (unsigned int i = 0; i < output_height; ++i){uchar* p_class = class_mat.ptr<uchar>(i);cv::Vec3b* p_color = color_mat.ptr<cv::Vec3b>(i);for (unsigned int j = 0; j < output_width; ++j){// argmaxunsigned int max_label = 0;float max_conf = scores.At<float>({ 0, 0, i, j });for (unsigned int l = 0; l < output_classes; ++l){float conf = scores.At<float>({ 0, l, i, j });if (conf > max_conf){max_conf = conf;max_label = l;}}if (max_label == 0) continue;// assign label for pixel(i,j)p_class[j] = cv::saturate_cast<uchar>(max_label);// assign color for detected class at pixel(i,j).p_color[j][0] = cv::saturate_cast<uchar>(255); // ((max_label % 10) * 20);p_color[j][1] = cv::saturate_cast<uchar>(255);// ((max_label % 5) * 40);p_color[j][2] = cv::saturate_cast<uchar>(255); // ((max_label % 10) * 20);// assign names map}}//cv::imwrite("1.png", color_mat);input_tensors_.clear();return color_mat;
}void ObjectSeg::predict_image(const std::string& src_path, const std::string& dst_path) {cv::Mat image = cv::imread(src_path);cv::Mat mask = predict_image(image);cv::imwrite(dst_path, mask);std::cout << "predict image over" << std::endl;}
主函数
#include <windows.h>
#include <vector>
#include <iostream>
#include <opencv2/opencv.hpp>
#include "Seg.h"
#include <string>int main()
{std::wstring model_path(L"model.onnx");std::cout << "infer...." << std::endl;ObjectSeg object_seg(model_path, 1, { 1, 3, 512, 512 });for (int i = 0; i < 20; i++){DWORD star_time = GetTickCount();cv::Mat src = cv::imread("(1).jpg");int height = src.rows;int width = src.cols;cv::Mat mask = object_seg.predict_image(src);cv::imwrite("09051.png", mask);DWORD end_time = GetTickCount();std::cout << "这个程序" << i << "运行时间为:" << (end_time - star_time) << "ms." << std::endl;}return 0;
}
相关文章:

C++ Qt / VS2019 +opencv + onnxruntime 部署语义分割模型【经验2】
前序工作 C Qt / VS2019 opencv onnxruntime 部署语义分割模型【经验】 引言 前序工作中介绍了Pytorch模型如何转为ONNX格式,以及在Python中如何使用onnx模型 介绍了如何在VA或QT中配置Onnxruntime运行库 本文重点列出全部源代码及其使用 依赖库 onnxruntime…...

代码随想录算法训练营Day9
232.用栈实现队列 Collection——List——Vector类——Stack类 class MyQueue {Stack<Integer> stackIn;Stack<Integer> stackOut;public MyQueue() {stackInnew Stack();stackOutnew Stack();} public void push(int x) {stackIn.push(x);}public int pop() {no…...
-有监督微调基本概念)
2025秋招NLP算法面试真题(二十)-有监督微调基本概念
1.基本概念 1.微调方法是啥?如何微调? 微调(Fine-tuning)是一种迁移学习的方法,用于在一个预训练模型的基础上,通过在特定任务的数据上进行有监督训练,来适应该任务的要求并提高模型性能。微调利用了预训练模型在大规模通用数据上学习到的语言知识和表示能力,将其迁移…...

使用宝塔部署项目在win上
项目部署 注意: 前后端部署项目,需要两个域名(二级域名,就是主域名结尾的域名,需要在主域名下添加就可以了),前端一个,后端一个 思路:访问域名就会浏览器会加载前端的代…...

[大语言模型-论文精读] Diffusion Model技术-通过时间和空间组合扩散模型生成复杂的3D人物动作
Generation of Complex 3D Human Motion by Temporal and Spatial Composition of Diffusion Models L Mandelli, S Berretti - arXiv preprint arXiv:2409.11920, 2024 通过时间和空间组合扩散模型生成复杂的3D人物动作 摘要 本文提出了一种新的方法࿰…...

vue 引入 esri-loader 并加载地图
记录一下: npm i esri-loader 引入css 在app.vue中 <style> import url(https://js.arcgis.com/4.6/esri/css/main.css); </style> 新建js文件 在js文件中引入esri-loader 并加载其init.js文件 加载init.js 需要其中的loadScript 部分如下&…...

LobeChat:使用服务端数据库部署 - Docker+NextAuth(github)+腾讯云
总流程 Docker部署 身份验证服务-NextAuth github S3存储服务 腾讯云COS 1. 安装Docker brew install docker --cask2. 创建pgvector容器(PostgresSQL) docker run --name [myPgvector] -p 5432:5432 -e POSTGRES_PASSWORD[pwd] -d -e POSTGRES_USER[username] pgvector/…...

长列表加载性能优化
一、长列表优化概述 列表是应用开发中最常见的一类开发场景,它可以将杂乱的信息整理成有规律、易于理解和操作的形式,便于用户查找和获取所需要的信息。应用程序中常见的列表场景有新闻列表、购物车列表、各类排行榜等。随着信息数据的累积,特…...

Vue ElemetUI table的行实现按住上下键高亮上下移动效果
1、添加初始化的方法 // 添加键盘事件监听器: mounted() {window.addEventListener(keydown, this.handleKeydown);}, // 这段代码的作用是在 Vue 组件销毁之前移除一个键盘事件监听器 // 这样做可以确保当组件不再使用时,不会留下任何未清理的事件监听…...

windows C++-指定特定的计划程序策略
通过计划程序策略,可控制计划程序在管理任务时使用的策略。 本文演示如何使用计划程序策略来增加将进度指示器打印到控制台的任务的线程优先级。 示例 以下示例并行执行两个任务。 第一个任务计算第 n 个斐波那契数。 第二个任务将进度指示器打印到控制台。 第一…...

python脚本程序怎么写更优雅?argparse模块巧妙应用
前言 命令行程序,也称CLI程序,另一个直观的名字是脚本程序,简称脚本,由于没有图形用户界面(GUI),所以脚本程序常见的交互方式有3种: 1、脚本程序中读取环境变量,比如env…...

【React】(推荐项目)使用 React、Socket.io、Nodejs、Redux-Toolkit、MongoDB 构建聊天应用程序 (2024)
使用 React、Socket.io、Nodejs、Redux-Toolkit、MongoDB 构建聊天应用程序 (2024) 学习使用 React、Socket.io、Node.js、Redux-Toolkit 和 MongoDB 构建响应式实时消息聊天应用程序。这个项目涵盖了从设置到实施的所有内容,提供了宝贵的见解和实用技能。无论您是…...

C++:std::move 和 std::forward
先说结论: std::forward:用于完全按照传递的参数转发,保留其值类别(左值或右值)std::move:用于将对象转换为右值引用,通常用于启用移动语义并转移所有权 示例: 先看一个简单的示例࿰…...

PHP探索校园新生态校园帮小程序系统小程序源码
探索校园新生态 —— 校园帮小程序系统,让生活更精彩! 🌱【开篇:走进未来校园,遇见新生态】🌱 你是否厌倦了传统校园的繁琐与单调?是否渴望在校园里也能享受到便捷、智能的生活体验࿱…...

通信工程学习:什么是MANO管理编排
MANO:管理编排 MANO:Management and Network Orchestration(管理和网络编排)在网络功能虚拟化(NFV)架构中扮演着至关重要的角色。MANO是一个由多个功能实体组合而成的层次,这些功能实体负责管理…...
备战软考Day04-计算机网络
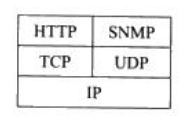
1、计算机网络的分类 2、七层网络体系结构 3、网络的设备与标准 4、TCP/IP协议族 TCP/IP作为Internet的核心协议,被广泛应用于局域网和广域网中,目前已成为事实上的国际标准 1、TCP/IP分层模型 TCP/IP协议是Internet的基础和核心,和OSI参考…...

可以把台式电脑做成服务器吗
是的,台式电脑可以被改造成服务器。以下是一些步骤和考虑因素,可以帮助你实现这一目标: 1. 选择合适的操作系统 Windows Server:如果你习惯于Windows环境,可以选择Windows Server版本,适合运行多种服务&a…...

JavaScript 输出方式
JavaScript 提供了多种输出方式,用于在浏览器中显示信息。以下是几种常见的输出方式及其详细代码示例: 1. console.log() 用于在浏览器的开发者控制台输出信息,常用于调试。 优点: 调试方便:可以输出任意类型的数据&…...

微服务(一)
目录 一、概念 1、单体架构 2、微服务 3、springcloud 二、微服务的拆分 1、微服务的拆分原则 1.1 什么时候拆 1.2 怎么拆 2、服务调用 2.1 resttemplate 2.2 远程调用 一、概念 1、单体架构 单体架构(monolithic structure):顾名…...

Uniapp时间戳转时间显示/时间格式
使用uview2 time 时间格式 | uView 2.0 - 全面兼容 nvue 的 uni-app 生态框架 - uni-app UI 框架 <text class"cell-tit clamp1">{{item.create_time}} --- {{ $u.timeFormat(item.create_time, yyyy-mm-dd hh:MM:ss)}} </text>...

VMOS+小黄鸟无root抓包实战:从环境搭建到证书导入的完整避坑指南
1. 为什么需要VMOS小黄鸟组合抓包 很多安卓开发者或者安全爱好者都遇到过这样的困扰:想要分析某个APP的网络请求,却发现抓包工具显示"无网络连接"。这种情况在安卓7.0及以上版本尤为常见,主要是因为系统加强了SSL证书验证机制。传统…...
)
别再手动算矩阵了!CloudCompare 2025版点云变换保姆级教程(齐次/欧拉/轴角一键搞定)
别再手动算矩阵了!CloudCompare 2025版点云变换保姆级教程(齐次/欧拉/轴角一键搞定) 点云数据处理中,最让人头疼的莫过于各种空间变换操作。传统方法需要手动计算变换矩阵,不仅容易出错,还耗费大量时间。Cl…...

求职时间管理神器:3秒智能标记招聘岗位时效性实战指南
求职时间管理神器:3秒智能标记招聘岗位时效性实战指南 【免费下载链接】NewJob 一眼看出该职位最后修改时间,绿色为2周之内,暗橙色为1.5个月之内,红色为1.5个月以上 项目地址: https://gitcode.com/GitHub_Trending/ne/NewJob …...

Oto 核心架构深度解析:Context 与 Player 的设计哲学
Oto 核心架构深度解析:Context 与 Player 的设计哲学 【免费下载链接】oto ♪ A low-level library to play sound on multiple platforms ♪ 项目地址: https://gitcode.com/gh_mirrors/ot/oto Oto 是一个跨平台的低级音频播放库,其核心架构围绕…...

5分钟快速上手:Proxmark3GUI图形界面终极指南
5分钟快速上手:Proxmark3GUI图形界面终极指南 【免费下载链接】Proxmark3GUI A cross-platform GUI for Proxmark3 client | 为PM3设计的跨平台图形界面 项目地址: https://gitcode.com/gh_mirrors/pr/Proxmark3GUI 对于RFID技术初学者来说,Proxm…...

Apex Legends压枪宏终极指南:轻松掌握自动武器检测与后坐力补偿技术
Apex Legends压枪宏终极指南:轻松掌握自动武器检测与后坐力补偿技术 【免费下载链接】Apex-NoRecoil-2021 Scripts to reduce recoil for Apex Legends. (auto weapon detection, support multiple resolutions) 项目地址: https://gitcode.com/gh_mirrors/ap/Ape…...

2位相位可重构天线设计与波束控制技术解析
1. 2位相位可重构天线技术概述相位可重构天线作为现代无线通信系统的关键组件,其核心价值在于能够动态调整辐射波束的方向和形状。这种能力使其成为5G/6G通信、雷达系统和卫星通信等场景中的理想选择。2位相位可重构天线通过4种离散相位状态(00、01、10、…...

为什么83%的用户误读NotebookLM引用溯源?一文讲透证据链完整性校验四步法
更多请点击: https://intelliparadigm.com 第一章:为什么83%的用户误读NotebookLM引用溯源?一文讲透证据链完整性校验四步法 NotebookLM 的“引用溯源”功能并非传统意义上的文献标注,而是一套基于语义锚点与片段置信度的轻量级证…...

Proxmark3GUI图形化工具:5分钟学会RFID卡片分析与数据管理
Proxmark3GUI图形化工具:5分钟学会RFID卡片分析与数据管理 【免费下载链接】Proxmark3GUI A cross-platform GUI for Proxmark3 client | 为PM3设计的跨平台图形界面 项目地址: https://gitcode.com/gh_mirrors/pr/Proxmark3GUI Proxmark3GUI是一款为Proxmar…...

Hyper-V DDA图形工具:5分钟完成GPU直通的终极指南
Hyper-V DDA图形工具:5分钟完成GPU直通的终极指南 【免费下载链接】DDA 实现Hyper-V离散设备分配功能的图形界面工具。A GUI Tool For Hyper-Vs Discrete Device Assignment(DDA). 项目地址: https://gitcode.com/gh_mirrors/dd/DDA 还在为复杂的Hyper-V离散…...