第100+27步 ChatGPT学习:概率校准 Temperature Scaling
基于Python 3.9版本演示
一、写在前面
最近看了一篇在Lancet子刊《eClinicalMedicine》上发表的机器学习分类的文章:《Development of a novel dementia risk prediction model in the general population: A large, longitudinal, population-based machine-learning study》。
学到一种叫做“概率校准”的骚操作,顺手利用GPT系统学习学习。
文章中用的技术是:保序回归(Isotonic regression)。
为了体现举一反三,顺便问了GPT还有哪些方法也可以实现概率校准。它给我列举了很多,那么就一个一个学习吧。
这一期,介绍一个叫做 Temperature Scaling 的方法。
二、Temperature Scaling
Temperature Scaling的核心思想是通过引入一个温度参数(temperature parameter, T)来调整模型的logits(未归一化的输出值),从而校准输出的概率分布。具体来说,它是一种后处理方法,即在训练完模型后进行校准,而不改变模型的结构或训练过程。
(1)主要步骤
1)训练模型:首先,训练你的分类模型,获得logits和初步的概率预测。
2)验证集校准:使用验证集来找到最优的温度参数T。通过最小化负对数似然(negative log-likelihood, NLL)或者期望校准误差(expected calibration error, ECE)等校准指标来找到最佳的T。
3)校准:使用找到的最优温度参数T对测试集或实际应用中的预测概率进行校准。
三、Temperature Scaling代码实现
下面,我编一个1比3的不太平衡的数据进行测试,对照组使用不进行校准的SVM模型,实验组就是加入校准的SVM模型,看看性能能够提高多少?
(1)不进行校准的SVM模型(默认参数)
import numpy as np
import matplotlib.pyplot as plt
import pandas as pd
from sklearn.model_selection import train_test_split
from sklearn.preprocessing import StandardScaler
from sklearn.svm import SVC
from sklearn.metrics import confusion_matrix, roc_auc_score, roc_curve# 加载数据
dataset = pd.read_csv('8PSMjianmo.csv')
X = dataset.iloc[:, 1:20].values
Y = dataset.iloc[:, 0].values# 分割数据集
X_train, X_test, y_train, y_test = train_test_split(X, Y, test_size=0.30, random_state=666)# 标准化数据
sc = StandardScaler()
X_train = sc.fit_transform(X_train)
X_test = sc.transform(X_test)# 使用SVM分类器
classifier = SVC(kernel='linear', probability=True)
classifier.fit(X_train, y_train)# 预测结果
y_pred = classifier.predict(X_test)
y_testprba = classifier.decision_function(X_test)y_trainpred = classifier.predict(X_train)
y_trainprba = classifier.decision_function(X_train)# 混淆矩阵
cm_test = confusion_matrix(y_test, y_pred)
cm_train = confusion_matrix(y_train, y_trainpred)
print(cm_train)
print(cm_test)# 绘制测试集混淆矩阵
classes = list(set(y_test))
classes.sort()
plt.imshow(cm_test, cmap=plt.cm.Blues)
indices = range(len(cm_test))
plt.xticks(indices, classes)
plt.yticks(indices, classes)
plt.colorbar()
plt.xlabel('Predicted')
plt.ylabel('Actual')
for first_index in range(len(cm_test)):for second_index in range(len(cm_test[first_index])):plt.text(first_index, second_index, cm_test[first_index][second_index])plt.show()# 绘制训练集混淆矩阵
classes = list(set(y_train))
classes.sort()
plt.imshow(cm_train, cmap=plt.cm.Blues)
indices = range(len(cm_train))
plt.xticks(indices, classes)
plt.yticks(indices, classes)
plt.colorbar()
plt.xlabel('Predicted')
plt.ylabel('Actual')
for first_index in range(len(cm_train)):for second_index in range(len(cm_train[first_index])):plt.text(first_index, second_index, cm_train[first_index][second_index])plt.show()# 计算并打印性能参数
def calculate_metrics(cm, y_true, y_pred_prob):a = cm[0, 0]b = cm[0, 1]c = cm[1, 0]d = cm[1, 1]acc = (a + d) / (a + b + c + d)error_rate = 1 - accsen = d / (d + c)sep = a / (a + b)precision = d / (b + d)F1 = (2 * precision * sen) / (precision + sen)MCC = (d * a - b * c) / (np.sqrt((d + b) * (d + c) * (a + b) * (a + c)))auc_score = roc_auc_score(y_true, y_pred_prob)metrics = {"Accuracy": acc,"Error Rate": error_rate,"Sensitivity": sen,"Specificity": sep,"Precision": precision,"F1 Score": F1,"MCC": MCC,"AUC": auc_score}return metricsmetrics_test = calculate_metrics(cm_test, y_test, y_testprba)
metrics_train = calculate_metrics(cm_train, y_train, y_trainprba)print("Performance Metrics (Test):")
for key, value in metrics_test.items():print(f"{key}: {value:.4f}")print("\nPerformance Metrics (Train):")
for key, value in metrics_train.items():
print(f"{key}: {value:.4f}")
结果输出:

记住这些个数字。
这个参数的SVM还没有LR好。
(2)进行校准的SVM模型(默认参数)
import numpy as np
import matplotlib.pyplot as plt
import pandas as pd
from sklearn.model_selection import train_test_split
from sklearn.preprocessing import StandardScaler
from sklearn.svm import SVC
from sklearn.metrics import confusion_matrix, roc_auc_score, brier_score_loss
from sklearn.calibration import calibration_curve# 加载数据
dataset = pd.read_csv('8PSMjianmo.csv')
X = dataset.iloc[:, 1:20].values
Y = dataset.iloc[:, 0].values# 分割数据集
X_train, X_test, y_train, y_test = train_test_split(X, Y, test_size=0.30, random_state=666)# 标准化数据
sc = StandardScaler()
X_train = sc.fit_transform(X_train)
X_test = sc.transform(X_test)# 使用SVM分类器
classifier = SVC(kernel='rbf', C=0.1, probability=True)
classifier.fit(X_train, y_train)# 获取未校准的概率预测
y_train_probs = classifier.predict_proba(X_train)[:, 1]
y_test_probs = classifier.predict_proba(X_test)[:, 1]# Temperature Scaling
class TemperatureScaling:def __init__(self):self.temperature = 1.0def fit(self, logits, true_labels):from scipy.optimize import minimizedef nll_loss(T):scaled_logits = logits / Tprobs = np.exp(scaled_logits) / np.sum(np.exp(scaled_logits), axis=1, keepdims=True)log_probs = np.log(probs[np.arange(len(true_labels)), true_labels])return -np.mean(log_probs)logits = np.log(np.column_stack([1 - logits, logits]))  # 转换成logitsresult = minimize(nll_loss, [1.0], bounds=[(0.1, 10.0)])self.temperature = result.x[0]def predict_proba(self, probs):logits = np.log(np.column_stack([1 - probs, probs]))  # 转换成logitsscaled_logits = logits / self.temperatureexp_scaled_logits = np.exp(scaled_logits)probs = exp_scaled_logits[:, 1] / np.sum(exp_scaled_logits, axis=1, keepdims=True)[:, 0]return probs# 训练Temperature Scaling模型
temp_scaling = TemperatureScaling()
temp_scaling.fit(y_train_probs, y_train)# 进行校准
calibrated_train_probs = temp_scaling.predict_proba(y_train_probs)
calibrated_test_probs = temp_scaling.predict_proba(y_test_probs)# 预测结果
y_train_pred = (calibrated_train_probs >= 0.5).astype(int)
y_test_pred = (calibrated_test_probs >= 0.5).astype(int)# 混淆矩阵
cm_test = confusion_matrix(y_test, y_test_pred)
cm_train = confusion_matrix(y_train, y_train_pred)
print(cm_train)
print(cm_test)# 绘制混淆矩阵函数
def plot_confusion_matrix(cm, classes, title='Confusion Matrix'):plt.imshow(cm, cmap=plt.cm.Blues)indices = range(len(cm))plt.xticks(indices, classes)plt.yticks(indices, classes)plt.colorbar()plt.xlabel('Predicted')plt.ylabel('Actual')for first_index in range(len(cm)):for second_index in range(len(cm[first_index])):plt.text(second_index, first_index, cm[first_index][second_index])plt.title(title)plt.show()# 绘制测试集混淆矩阵
plot_confusion_matrix(cm_test, list(set(y_test)), 'Confusion Matrix (Test)')# 绘制训练集混淆矩阵
plot_confusion_matrix(cm_train, list(set(y_train)), 'Confusion Matrix (Train)')# 计算并打印性能参数
def calculate_metrics(cm, y_true, y_pred_prob):a = cm[0, 0]b = cm[0, 1]c = cm[1, 0]d = cm[1, 1]acc = (a + d) / (a + b + c + d)error_rate = 1 - accsen = d / (d + c)sep = a / (a + b)precision = d / (b + d)F1 = (2 * precision * sen) / (precision + sen)MCC = (d * a - b * c) / (np.sqrt((d + b) * (d + c) * (a + b) * (a + c)))auc_score = roc_auc_score(y_true, y_pred_prob)brier_score = brier_score_loss(y_true, y_pred_prob)metrics = {"Accuracy": acc,"Error Rate": error_rate,"Sensitivity": sen,"Specificity": sep,"Precision": precision,"F1 Score": F1,"MCC": MCC,"AUC": auc_score,"Brier Score": brier_score}return metricsmetrics_test = calculate_metrics(cm_test, y_test, calibrated_test_probs)
metrics_train = calculate_metrics(cm_train, y_train, calibrated_train_probs)print("Performance Metrics (Test):")
for key, value in metrics_test.items():print(f"{key}: {value:.4f}")print("\nPerformance Metrics (Train):")
for key, value in metrics_train.items():print(f"{key}: {value:.4f}")
看看结果:

大同小异吧。
四、换个策略
参考那篇文章的策略:采用五折交叉验证来建立和评估模型,其中四折用于训练,一折用于评估,在训练集中,其中三折用于建立SVM模型,另一折采用Temperature Scaling概率校正,在训练集内部采用交叉验证对超参数进行调参。
代码:
import numpy as np
import matplotlib.pyplot as plt
import pandas as pd
from sklearn.model_selection import train_test_split, GridSearchCV, KFold
from sklearn.preprocessing import StandardScaler
from sklearn.svm import SVC
from sklearn.metrics import confusion_matrix, roc_auc_score, brier_score_loss
from sklearn.calibration import calibration_curve# 加载数据
dataset = pd.read_csv('8PSMjianmo.csv')
X = dataset.iloc[:, 1:20].values
Y = dataset.iloc[:, 0].values# 分割数据集
X_train, X_test, y_train, y_test = train_test_split(X, Y, test_size=0.30, random_state=666)# 标准化数据
sc = StandardScaler()
X_train = sc.fit_transform(X_train)
X_test = sc.transform(X_test)# 定义五折交叉验证
kf = KFold(n_splits=5, shuffle=True, random_state=666)
calibrated_probs = []
true_labels = []# Temperature Scaling
class TemperatureScaling:def __init__(self):self.temperature = 1.0def fit(self, logits, true_labels):from scipy.optimize import minimizedef nll_loss(T):scaled_logits = logits / Tprobs = np.exp(scaled_logits) / np.sum(np.exp(scaled_logits), axis=1, keepdims=True)log_probs = np.log(probs[np.arange(len(true_labels)), true_labels])return -np.mean(log_probs)logits = np.log(np.column_stack([1 - logits, logits]))  # 转换成logitsresult = minimize(nll_loss, [1.0], bounds=[(0.1, 10.0)])self.temperature = result.x[0]def predict_proba(self, probs):logits = np.log(np.column_stack([1 - probs, probs]))  # 转换成logitsscaled_logits = logits / self.temperatureexp_scaled_logits = np.exp(scaled_logits)probs = exp_scaled_logits[:, 1] / np.sum(exp_scaled_logits, axis=1, keepdims=True)[:, 0]return probsbest_params = None  # 用于存储最优参数for train_index, val_index in kf.split(X_train):X_train_fold, X_val_fold = X_train[train_index], X_train[val_index]y_train_fold, y_val_fold = y_train[train_index], y_train[val_index]# 内部三折交叉验证用于超参数调优inner_kf = KFold(n_splits=3, shuffle=True, random_state=666)param_grid = {'C': [0.01, 0.1, 1, 10, 100], 'kernel': ['rbf']}svm = SVC(probability=True)clf = GridSearchCV(svm, param_grid, cv=inner_kf, scoring='roc_auc')clf.fit(X_train_fold, y_train_fold)best_params = clf.best_params_# 使用最佳参数训练SVMclassifier = SVC(kernel=best_params['kernel'], C=best_params['C'], probability=True)classifier.fit(X_train_fold, y_train_fold)# 获取未校准的概率预测y_val_fold_probs = classifier.predict_proba(X_val_fold)[:, 1]# Temperature Scaling 校准temp_scaling = TemperatureScaling()temp_scaling.fit(y_val_fold_probs, y_val_fold)calibrated_val_fold_probs = temp_scaling.predict_proba(y_val_fold_probs)calibrated_probs.extend(calibrated_val_fold_probs)true_labels.extend(y_val_fold)# 用于测试集的SVM模型训练和校准
classifier_final = SVC(kernel=best_params['kernel'], C=best_params['C'], probability=True)
classifier_final.fit(X_train, y_train)
y_test_probs = classifier_final.predict_proba(X_test)[:, 1]# Temperature Scaling 校准
temp_scaling_final = TemperatureScaling()
temp_scaling_final.fit(y_test_probs, y_test)
calibrated_test_probs = temp_scaling_final.predict_proba(y_test_probs)# 预测结果
y_train_pred = (np.array(calibrated_probs) >= 0.5).astype(int)
y_test_pred = (calibrated_test_probs >= 0.5).astype(int)# 混淆矩阵
cm_test = confusion_matrix(y_test, y_test_pred)
cm_train = confusion_matrix(true_labels, y_train_pred)
print("Training Confusion Matrix:\n", cm_train)
print("Testing Confusion Matrix:\n", cm_test)# 绘制混淆矩阵函数
def plot_confusion_matrix(cm, classes, title='Confusion Matrix'):plt.imshow(cm, cmap=plt.cm.Blues)indices = range(len(cm))plt.xticks(indices, classes)plt.yticks(indices, classes)plt.colorbar()plt.xlabel('Predicted')plt.ylabel('Actual')for first_index in range(len(cm)):for second_index in range(len(cm[first_index])):plt.text(second_index, first_index, cm[first_index][second_index])plt.title(title)plt.show()# 绘制测试集混淆矩阵
plot_confusion_matrix(cm_test, list(set(y_test)), 'Confusion Matrix (Test)')# 绘制训练集混淆矩阵
plot_confusion_matrix(cm_train, list(set(true_labels)), 'Confusion Matrix (Train)')# 计算并打印性能参数
def calculate_metrics(cm, y_true, y_pred_prob):a = cm[0, 0]b = cm[0, 1]c = cm[1, 0]d = cm[1, 1]acc = (a + d) / (a + b + c + d)error_rate = 1 - accsen = d / (d + c)sep = a / (a + b)precision = d / (b + d)F1 = (2 * precision * sen) / (precision + sen)MCC = (d * a - b * c) / (np.sqrt((d + b) * (d + c) * (a + b) * (a + c)))auc_score = roc_auc_score(y_true, y_pred_prob)brier_score = brier_score_loss(y_true, y_pred_prob)metrics = {"Accuracy": acc,"Error Rate": error_rate,"Sensitivity": sen,"Specificity": sep,"Precision": precision,"F1 Score": F1,"MCC": MCC,"AUC": auc_score,"Brier Score": brier_score}return metricsmetrics_test = calculate_metrics(cm_test, y_test, calibrated_test_probs)
metrics_train = calculate_metrics(cm_train, true_labels, np.array(calibrated_probs))print("Performance Metrics (Test):")
for key, value in metrics_test.items():print(f"{key}: {value:.4f}")print("\nPerformance Metrics (Train):")
for key, value in metrics_train.items():print(f"{key}: {value:.4f}")# 绘制校准曲线
def plot_calibration_curve(y_true, probs, title='Calibration Curve'):fraction_of_positives, mean_predicted_value = calibration_curve(y_true, probs, n_bins=10)plt.plot(mean_predicted_value, fraction_of_positives, "s-", label="Temperature Scaling Calibration")plt.plot([0, 1], [0, 1], "k--")plt.xlabel('Mean predicted value')plt.ylabel('Fraction of positives')plt.title(title)plt.legend()plt.show()# 绘制校准曲线
plot_calibration_curve(y_test, calibrated_test_probs, title='Calibration Curve (Test)')
plot_calibration_curve(true_labels, np.array(calibrated_probs), title='Calibration Curve (Train)')
输出:

效果一般般吧。
五、最后
各位可以去试一试在其他数据或者在其他机器学习分类模型中使用的效果。
数据不分享啦。
相关文章:

第100+27步 ChatGPT学习:概率校准 Temperature Scaling
基于Python 3.9版本演示 一、写在前面 最近看了一篇在Lancet子刊《eClinicalMedicine》上发表的机器学习分类的文章:《Development of a novel dementia risk prediction model in the general population: A large, longitudinal, population-based machine-learn…...

Python知识点:如何应用Python工具,使用NLTK进行语言模型构建
开篇,先说一个好消息,截止到2025年1月1日前,翻到文末找到我,赠送定制版的开题报告和任务书,先到先得!过期不候! 如何使用NLTK进行语言模型构建 在自然语言处理(NLP)中&a…...

深入浅出MySQL
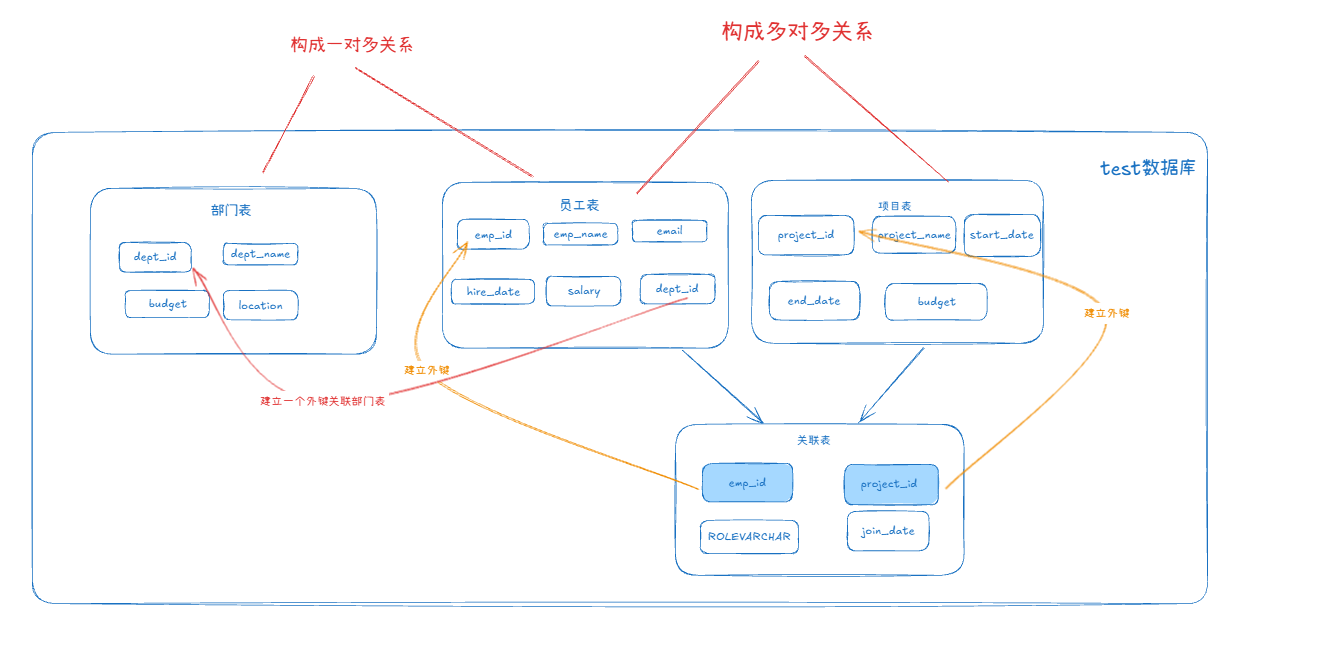
深入浅出MySQL 以下内容参考自 《MySQL是怎样运行的:从根儿上理解MySQL》一书,强烈推荐 存储引擎 对于不同的表可以设置不同的存储引擎 CREATE TABLE tableName (xxxx ) ENGINE 引擎名称; # 修改 ALTER TABLE tableName ENGINE xxx; 编码格式 my…...

【WRF工具】cmip6-to-wrfinterm工具概述:生成WRF中间文件
cmip6-to-wrfinterm工具概述 cmip6-to-wrfinterm工具安装cmip6-to-wrfinterm工具使用快速启动(Quick start)情景1:MPI-ESM-1-2-HR(默认):情景2:BCMM情景3:EC-Earth3 更改使用&#x…...

大厂面试真题:阿里经典双重检测DCL对象半初始化问题
阿里面试题中提到的双重检测DCL(Double-Checked Locking)对象半初始化问题,是Java多线程编程中一个经典的问题。以下是对这一问题的详细解析: 一、双重检测锁(DCL)概述 双重检测锁是一种用于实现单例模式…...

20款奔驰CLS300升级原厂抬头显示HUD 23P智能辅助驾驶 触摸屏人机交互系统
以下是为您生成的一份关于 18 款奔驰 CLS 老款改新款的改装文案: 18 款奔驰 CLS 老款改新款:科技升级,畅享极致驾驶体验 在汽车改装的世界里,每一次的升级都是对卓越的追求。今天,让我们一同探索 18 款奔驰 CLS 老款改…...

GoogleNet原理与实战
在2014年的ImageNet图像识别挑战赛中,一个名叫GoogLeNet 的网络架构大放异彩。以前流行的网络使用小到11,大到77的卷积核。本文的一个观点是,有时使用不同大小的卷积核组合是有利的。 回到他那个图里面你会发现,这里的一个通过我们最大的池化…...

MongoDB 数据库服务搭建(单机)
下载地址 下载测试数据 作者:程序那点事儿 日期:2023/02/15 02:16 进入下载页,选择版本后,右键Download复制连接地址 下载安装包 wget https://fastdl.mongodb.org/linux/mongodb-linux-x86_64-rhel70-5.0.14.tgz …...

基于springboot+小程序的智慧物业平台管理系统(物业1)
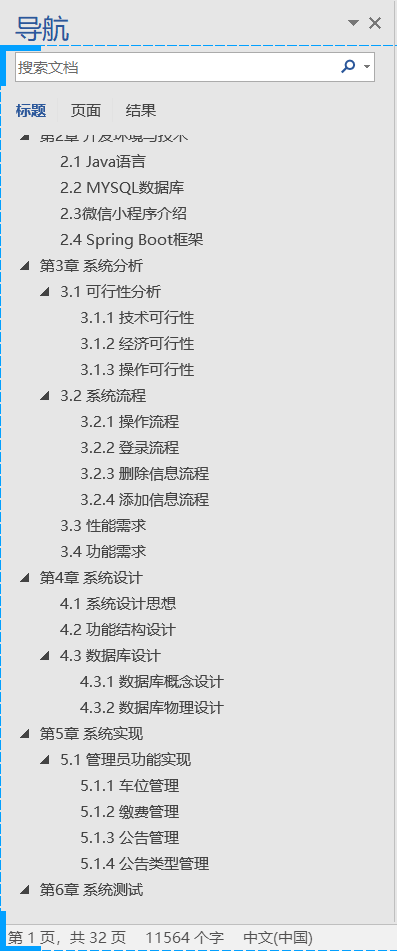
👉文末查看项目功能视频演示获取源码sql脚本视频导入教程视频 1、项目介绍 智慧物业平台管理系统按照操作主体分为管理员和用户。 1、管理员的功能包括报修管理、投诉管理管理、车位管理、车位订单管理、字典管理、房屋管理、公告管理、缴费管理、维修指派管理、…...

[SpringBoot] 苍穹外卖--面试题总结--上
前言 1--苍穹外卖-SpringBoot项目介绍及环境搭建 详解-CSDN博客 2--苍穹外卖-SpringBoot项目中员工管理 详解(一)-CSDN博客 3--苍穹外卖-SpringBoot项目中员工管理 详解(二)-CSDN博客 4--苍穹外码-SpringBoot项目中分类管理 详…...
[C#]使用onnxruntime部署yolov11-onnx实例分割模型
【官方框架地址】 https://github.com/ultralytics/ultralytics.git 【算法介绍】 在C#中使用ONNX Runtime部署YOLOv11-ONNX实例分割模型,涉及到模型的加载、数据预处理、模型推理和后处理几个关键步骤。 首先,需要确保已经安装了ONNX Runtime的NuGe…...

Polars的Config
Config Config 内容使用示例设置并行执行设置日志详细程度指定null值设置推断schema的行数启用低内存模式获取当前配置选项的值 在Polars的Python API中,Config部分提供了配置选项,允许用户自定义Polars的行为。以下是一些可配置的选项及其使用示例&…...

【面试官】 多态连环问
以下是一些关于封装的常见面试题及答案: 封装 1. 什么是封装? 答案:封装是面向对象编程的三大特性之一,它是将数据和操作数据的方法绑定在一起,并且通过访问修饰符限制对数据的直接访问,只提供特定的方法来…...

Vue 路由设置
为了防止遗忘,记录一下用Vue写前端配置路由时的过程,方便后续再需要用到时回忆。 一、举个例子 假如需要实现这样的界面逻辑: 在HomePage中有一组选项卡按钮用于导航到子页面,而子页面Page1中有一个按钮,其响应事件是…...

力扣110:判断二叉树是否为平衡二叉树
利用二叉树遍历的思想编写一个判断二叉树,是否为平衡二叉树 示例 : 输入:root [3,9,20,null,null,15,7] 输出:true思想: 代码: int getDepth(struct TreeNode* node) {//如果结点不存在,返回…...
)
Chromium 中JavaScript Fetch API接口c++代码实现(一)
Fetch API主要暴露了三个接口一个方法。 三个接口 Request(资源请求)Response(请求的响应)Headers(Request/Response头部信息)一个方法 fetch()(获取资源调用的方法更多介绍参考 Fetch API - Web API | MDN (mozilla.org) 一、 来看一段前端代码 <!DOCTYPE html> <h…...

ARM(5)内存管理单元MMU
一、虚拟地址和物理地址 首先,计算机系统的内存被组成一个由M个连续的字节大小组成的数组。每字节都会有一个唯一的物理地址。CPU访问内存最简单的方式就是使用物理地址。如下图: 图 1 物理地址,物理寻址 而现在都是采用的都是虚拟寻址的方法。CPU生成一…...

文件上传漏洞原理
原理:\n应用中存在上传功能,但是上传的文件没有经过严格的合法性检验或者检验函数存在缺陷,导致可以上传木马文件到服务器,并且能够执行其中的恶意代码。\n\n危害:\n服务器的网页篡改,网站被挂马࿰…...

Web安全 - 安全防御工具和体系构建
文章目录 安全标准和框架1. 国内安全标准:等级保护制度(等保)2. 国际安全标准:ISO27000系列3. NIST安全框架:IDPRR方法4. COBIT与ITIL框架 防火墙防火墙的基本作用防火墙的三种主要类型防火墙的防护能力防火墙的盲区 W…...

服务器数据恢复—raid磁盘故障导致数据库文件损坏的数据恢复案例
服务器存储数据恢复环境&故障: 存储中有一组由3块SAS硬盘组建的raid。上层win server操作系统层面划分了3个分区,数据库存放在D分区,备份存放在E分区。 RAID中一块硬盘的指示灯亮红色,D分区无法识别;E分区可识别&a…...

React 第五十五节 Router 中 useAsyncError的使用详解
前言 useAsyncError 是 React Router v6.4 引入的一个钩子,用于处理异步操作(如数据加载)中的错误。下面我将详细解释其用途并提供代码示例。 一、useAsyncError 用途 处理异步错误:捕获在 loader 或 action 中发生的异步错误替…...

突破不可导策略的训练难题:零阶优化与强化学习的深度嵌合
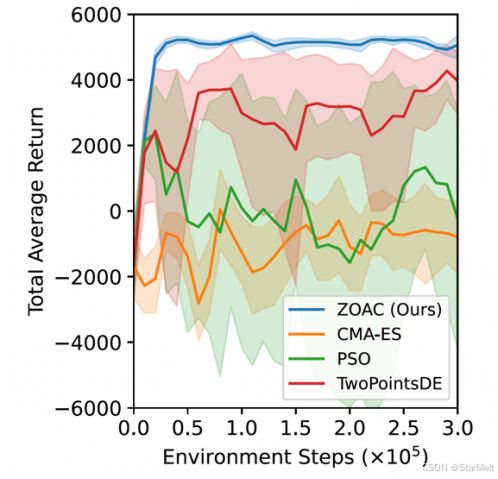
强化学习(Reinforcement Learning, RL)是工业领域智能控制的重要方法。它的基本原理是将最优控制问题建模为马尔可夫决策过程,然后使用强化学习的Actor-Critic机制(中文译作“知行互动”机制),逐步迭代求解…...
:にする)
日语学习-日语知识点小记-构建基础-JLPT-N4阶段(33):にする
日语学习-日语知识点小记-构建基础-JLPT-N4阶段(33):にする 1、前言(1)情况说明(2)工程师的信仰2、知识点(1) にする1,接续:名词+にする2,接续:疑问词+にする3,(A)は(B)にする。(2)復習:(1)复习句子(2)ために & ように(3)そう(4)にする3、…...
Cesium相机控制)
三维GIS开发cesium智慧地铁教程(5)Cesium相机控制
一、环境搭建 <script src"../cesium1.99/Build/Cesium/Cesium.js"></script> <link rel"stylesheet" href"../cesium1.99/Build/Cesium/Widgets/widgets.css"> 关键配置点: 路径验证:确保相对路径.…...

学习STC51单片机31(芯片为STC89C52RCRC)OLED显示屏1
每日一言 生活的美好,总是藏在那些你咬牙坚持的日子里。 硬件:OLED 以后要用到OLED的时候找到这个文件 OLED的设备地址 SSD1306"SSD" 是品牌缩写,"1306" 是产品编号。 驱动 OLED 屏幕的 IIC 总线数据传输格式 示意图 …...

pikachu靶场通关笔记22-1 SQL注入05-1-insert注入(报错法)
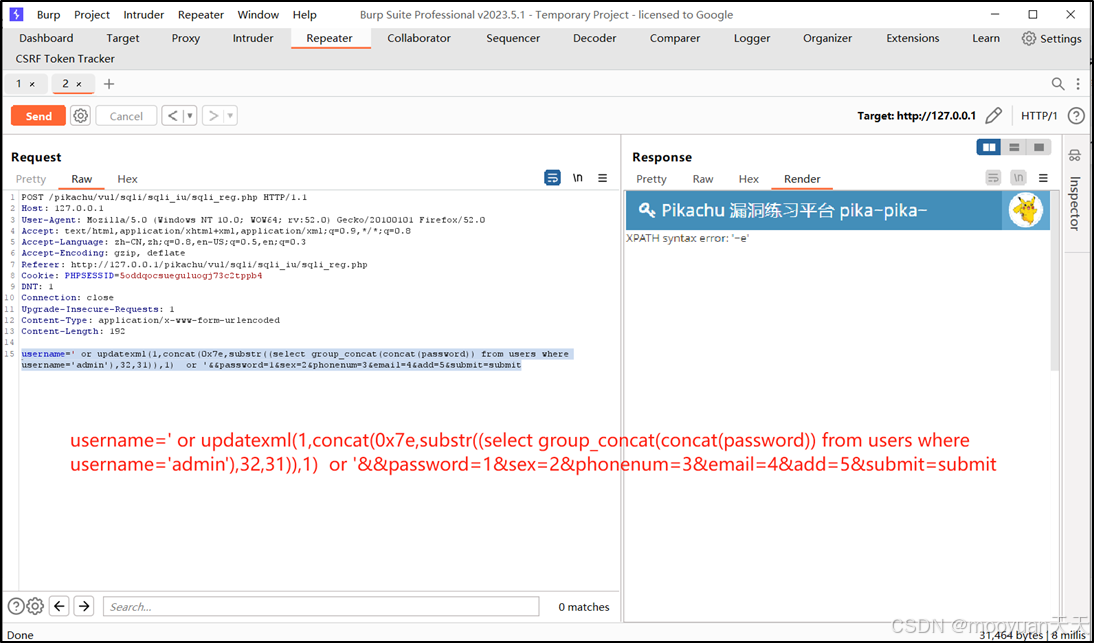
目录 一、SQL注入 二、insert注入 三、报错型注入 四、updatexml函数 五、源码审计 六、insert渗透实战 1、渗透准备 2、获取数据库名database 3、获取表名table 4、获取列名column 5、获取字段 本系列为通过《pikachu靶场通关笔记》的SQL注入关卡(共10关࿰…...

html-<abbr> 缩写或首字母缩略词
定义与作用 <abbr> 标签用于表示缩写或首字母缩略词,它可以帮助用户更好地理解缩写的含义,尤其是对于那些不熟悉该缩写的用户。 title 属性的内容提供了缩写的详细说明。当用户将鼠标悬停在缩写上时,会显示一个提示框。 示例&#x…...

OPENCV形态学基础之二腐蚀
一.腐蚀的原理 (图1) 数学表达式:dst(x,y) erode(src(x,y)) min(x,y)src(xx,yy) 腐蚀也是图像形态学的基本功能之一,腐蚀跟膨胀属于反向操作,膨胀是把图像图像变大,而腐蚀就是把图像变小。腐蚀后的图像变小变暗淡。 腐蚀…...

MySQL 知识小结(一)
一、my.cnf配置详解 我们知道安装MySQL有两种方式来安装咱们的MySQL数据库,分别是二进制安装编译数据库或者使用三方yum来进行安装,第三方yum的安装相对于二进制压缩包的安装更快捷,但是文件存放起来数据比较冗余,用二进制能够更好管理咱们M…...

C语言中提供的第三方库之哈希表实现
一. 简介 前面一篇文章简单学习了C语言中第三方库(uthash库)提供对哈希表的操作,文章如下: C语言中提供的第三方库uthash常用接口-CSDN博客 本文简单学习一下第三方库 uthash库对哈希表的操作。 二. uthash库哈希表操作示例 u…...
