【vue】⾃定义指令+插槽+商品列表案例
代码获取
07-⾃定义指令+插槽+商品列表案例
⼀、⾃定义指令
1. 基本使⽤
1.1 指令介绍
-
内置指令:v-model、v-for、v-bind、v-on… 这都是Vue给咱们内置的⼀些指令,可以直接使⽤
-
⾃定义指令:同时Vue也⽀持让开发者,⾃⼰注册⼀些指令。这些指令被称为⾃定义指令
1.2 作⽤
封装⼀段 公共的DOM操作 代码,便于复⽤
1.3 语法
- 注册
// main.js 中
app.directive('指令名', {// 元素挂载后(成为真实DOM) ⾃动触发⼀次⾃动执⾏mounted(el) {// el: 指令所在的DOM元素}
})
- 使⽤
<p v-指令名></p>
1.4 代码⽰例
需求:当⻚⾯加载时, 让元素获取焦点
// main.js
// 注册全局指令app.directive('focus', {mounted(el) {console.log(el)// input 元素// 聚焦el.focus()}
})
App.vue
<script setup></script>
<template><div class="app"><input type="text" v-focus /></div>
</template>
1.5 总结
- ⾃定义指令的作⽤是什么?
答:封装⼀段公共的 DOM操作 的代码
- 使⽤⾃定义指令的步骤是哪两步?
答: 先注册、后使⽤
- 指令配置选项中的 mounted 钩⼦何时执⾏?
答:元素 挂载后 (成为DOM树的⼀部分时) ⾃动执⾏
2. 绑定数据
2.1 需求
实现⼀个 color 指令 :传⼊不同的颜⾊, 给标签设置⽂字颜⾊
2.2 语法
1.在绑定指令时,可以通过“等号”的形式为指令 绑定 具体的参数值
<div v-color="colorStr">Some Text</div>
2.通过 binding.value 可以拿到指令值,指令值修改会 触发 updated 钩⼦
app.directive('指令名', {// 挂载后⾃动触发⼀次mounted(el, binding) { },// 数据更新, 每次都会执⾏updated(el, binding) { }
})
2.3 代码⽰例
// main.js
app.directive('color', {mounted(el, binding) {el.style.color = binding.value},updated(el, binding) {el.style.color = binding.value}
})
App.vue
<script setup>
import { ref } from 'vue'
// 颜⾊
const colorStr = ref('red')
</script><template><p v-color="colorStr"></p>
</template>
2.4 简化形式
对于⾃定义指令来说,⼀个很常⻅的情况是仅仅需要在 mounted 和 updated 上实现相同的⾏为。这种情况下我们可以直接⽤⼀个函数来定义指令,如下所⽰:
app.directive('color', (el, binding) => {// 这会在 `mounted` 和 `updated` 时都调⽤el.style.color = binding.value
})
3. 封装v-loading指令
3.1 场景
实际开发过程中,发送请求需要时间,在请求的数据未回来时,⻚⾯会处于空⽩状态 , ⽤⼾体验不好
3.2 解决⽅案
封装⼀个 v-loading 指令,实现加载中的效果
3.3 分析
-
本质 loading效果就是⼀个蒙层,盖在了盒⼦上
-
数据请求中,开启loading状态,添加蒙层
-
数据请求完毕,关闭loading状态,移除蒙层
3.4 实现
-
准备⼀个 loading类,通过伪元素定位,设置宽⾼,实现蒙层
-
开启关闭 loading状态(添加移除蒙层),本质只需要添加移除类即可
-
结合⾃定义指令的语法进⾏封装复⽤
3.5 代码实现
App.vue
<script setup>
import axios from 'axios'
import { ref } from 'vue'// 新闻列表
const newsList = ref([])
const isFinish = ref(false)getNewsData()// 获取新闻列表
async function getNewsData() {isFinish.value = false// 请求新闻数据const resp = await axios.get('http://localhost:4000/api/news')// 保存数据newsList.value = resp.data.data// 睡眠1秒await new Promise((resolve) => {setTimeout(() => {resolve()}, 1000)})isFinish.value = true
}
</script><template><div class="box"><ul><li v-for="item in newsList" :key="item.id" class="news" v-loading="!isFinish"><div class="left"><div class="title">{{ item.title }}</div><div class="info"><span>{{ item.source }}</span><span>{{ item.time }}</span></div></div><div class="right"><img :src="item.img" alt="img" /></div></li></ul></div>
</template><style>
.loading:before {z-index: 999;content: '';position: absolute;left: 0;top: 0;width: 100%;height: 100%;background: #fff url('./assets/loading.gif') no-repeat center;background-size: auto;
}.box {position: relative;width: 800px;min-height: 600px;margin: 10px auto;border-radius: 5px;
}.news {display: flex;margin: 0 auto;padding: 20px 0;cursor: pointer;
}.news .left {flex: 1;display: flex;flex-direction: column;justify-content: space-between;padding-right: 10px;
}.news .left .title {font-size: 20px;
}.news .left .info {color: #999999;
}.news .left .info span {margin-right: 20px;
}.news .right {width: 160px;height: 120px;
}.news .right img {width: 100%;height: 100%;object-fit: cover;
}
</style>
main.js
import App from "./App.vue";
import { createApp } from "vue";const app = createApp(App);// main.js
app.directive('loading', (el, binding) => {if (binding.value) {el.classList.add('loading')} else {el.classList.remove('loading')}
})app.mount("#app");
⼆、插槽
插槽分类
-
默认插槽
-
具名插槽
-
作⽤域插槽
1. 默认插槽
1.1 作⽤
让组件内部的⼀些 结构 ⽀持 ⾃定义
1.2 需求
将需要多次显⽰的对话框,封装成⼀个组件
1.3 问题
组件的内容部分,不希望写死,希望能使⽤的时候⾃定义。怎么办
1.4 插槽的基本语法
-
组件内需要定制的结构部分,改⽤ <slot></slot> 占位
-
使⽤组件时, <MyDialog></MyDialog>写成双标签 , 包裹结构, 传⼊替换slot
1.5 代码⽰例
MyDialog.vue
<script setup>
</script>
<template><div class="dialog"><div class="dialog-header"><h3>友情提⽰</h3><span class="close">✖️</span></div><div class="dialog-content"><slot></slot></div><div class="dialog-footer"><button>取消</button><button>确认</button></div></div>
</template><style scoped>
* {margin: 0;padding: 0;
}.dialog {width: 470px;height: 230px;padding: 0 25px;background-color: #ffffff;margin: 40px auto;border-radius: 5px;
}.dialog-header {height: 70px;line-height: 70px;font-size: 20px;border-bottom: 1px solid #ccc;position: relative;
}.dialog-header .close {position: absolute;right: 0px;top: 0px;cursor: pointer;
}.dialog-content {height: 80px;font-size: 18px;padding: 15px 0;
}.dialog-footer {display: flex;justify-content: flex-end;
}.dialog-footer button {width: 65px;height: 35px;background-color: #ffffff;border: 1px solid #e1e3e9;cursor: pointer;outline: none;margin-left: 10px;border-radius: 3px;
}.dialog-footer button:last-child {background-color: #007acc;color: #fff;
}
</style>
App.vue
<script setup>
import MyDialog from '@/components/MyDialog.vue';
</script><template><div><MyDialog>你确定要删除吗?</MyDialog><MyDialog>你确定要退出吗?</MyDialog></div>
</template><style scoped></style>
1.6 总结
- 组件内某⼀部分结构不确定,想要⾃定义怎么办?
答:使⽤ 插槽 (技术)
- 插槽的步骤分为哪⼏步?
答:两步; 先占位、后传⼊
2. 插槽默认值
2.1 问题
通过插槽完成了内容的定制,传什么显⽰什么, 但是如果不传,则是空⽩
能否给插槽设置 默认显⽰内容 呢?
2.2 解决⽅案
封装组件时,可以为 <slot></slot> 提供默认内容
2.3 语法
在 <slot></slot> 标签内,放置内容, 作为默认内容
2.4 效果
-
使⽤组件时,不传,则会显⽰slot的默认内容
-
使⽤组件时,传了,则slot整体会被换掉, 从⽽显⽰传⼊的
2.5 总结
- 插槽默认内容有什么⽤?
答:使⽤组件不传内容时, 防⽌出现空⽩
- 默认内容何时显⽰?何时不显⽰?
答:使⽤组件时, 不传内容,则显⽰默认内容; 否则显⽰传递的内容
3. 具名插槽
3.1 需求
⼀个组件内有多处结构,需要外部传⼊标签,进⾏定制
上⾯的弹框中有三处不同,但是默认插槽只能定制⼀处内容,这时怎么办?
3.2 具名插槽语法
-
多个slot使⽤name属性区分名字
-
template配合v-slot:名字 来分发对应标签
3.3 v-slot的简写
v-slot写起来太⻓,vue给我们提供⼀个简单写法 v-slot: 直接简写为 #
3.4 代码实现
MyDialog.vue
<script setup>
</script>
<template><div class="dialog"><div class="dialog-header"><slot name="header"><h3>友情提⽰</h3></slot><span class="close">✖️</span></div><div class="dialog-content"><slot name="main">默认值</slot></div><div class="dialog-footer"><slot name="footer"><button>取消</button><button>确定</button></slot></div></div>
</template><style >
* {margin: 0;padding: 0;
}.dialog {width: 470px;height: 230px;padding: 0 25px;background-color: #ffffff;margin: 40px auto;border-radius: 5px;
}.dialog-header {height: 70px;line-height: 70px;font-size: 20px;border-bottom: 1px solid #ccc;position: relative;
}.dialog-header .close {position: absolute;right: 0px;top: 0px;cursor: pointer;
}.dialog-content {height: 80px;font-size: 18px;padding: 15px 0;
}.dialog-footer {display: flex;justify-content: flex-end;
}.dialog-footer button {width: 65px;height: 35px;background-color: #ffffff;border: 1px solid #e1e3e9;cursor: pointer;outline: none;margin-left: 10px;border-radius: 3px;
}.dialog-footer button:last-child {background-color: #007acc;color: #fff;
}
</style>
App.vue
<script setup>
import MyDialog from '@/components/MyDialog.vue';
</script><template><MyDialog><template #header><h3>友情提示</h3></template><template #main><p>请输入正确手机号</p></template><template #footer><button>取消</button><button>确定</button></template></MyDialog><MyDialog><template #header><h3>警告</h3></template><template #main><p>你确定要退出吗</p></template><template #footer><button>取消</button><button>确定</button></template></MyDialog>
</template><style scoped></style>
3.5 总结
- 组件内有多处不确定的结构 怎么办?
答:具名插槽
- 具名插槽的使⽤语法是什么?
答:1、 <slot name=“名字”> 默认内容 </slot>
2、 <template #名字> 要展⽰的内容 </template>
4. 作⽤域插槽
4.1 作⽤
带数据的插槽, 可以让组件功能更强⼤、更灵活、复⽤性更⾼; ⽤ slot 占位的同时, 还可以给 slot 绑定数据,将来使⽤组件时, 不仅可以传内容, 还能使⽤ slot 带来的数据
4.2 场景
封装表格组件
4.3 使⽤步骤
- 给 slot 标签, 以添加属性的⽅式传值
<slot a="hello" :b="666"></slot>
- 所有添加的属性, 都会被收集到⼀个对象中
{ a: 'hello', b: 666 }
- 在template中, 通过 #插槽名= “obj” 接收,默认插槽名为 default
<!-- obj会收集 slot 上绑定的所有⾃定义属性 -->
<template #default="obj">
{{ obj }}
</template>
4.4 静态代码
components/MyTable.vue
<script setup></script><template><table class="my-table"><thead><tr><th>序号</th><th>姓名</th><th>年纪</th><th>操作</th></tr></thead><tbody><tr><td>1</td><td>赵⼩云</td><td>19</td><td><button>查看</button></td></tr><tr><td>1</td><td>张⼩花</td><td>19</td><td><button>查看</button></td></tr><tr><td>1</td><td>孙⼤明</td><td>19</td><td><button>查看</button></td></tr></tbody></table>
</template><style>
.my-table {width: 450px;text-align: center;border: 1px solid #ccc;font-size: 24px;margin: 30px auto;
}.my-table thead {background-color: #1f74ff;color: #fff;
}.my-table thead th {font-weight: normal;
}.my-table thead tr {line-height: 40px;
}.my-table th,
.my-table td {border-bottom: 1px solid #ccc;border-right: 1px solid #ccc;
}.my-table td:last-child {border-right: none;
}.my-table tr:last-child td {border-bottom: none;
}.my-table button {width: 65px;height: 35px;font-size: 18px;border: 1px solid #ccc;outline: none;border-radius: 3px;cursor: pointer;background-color: #ffffff;margin-left: 5px;
}
</style>
App.vue
<script setup>
import { ref } from 'vue'import MyTable from './components/MyTable.vue'const tableData1 = ref([{ id: 11, name: '狗蛋', age: 18 },{ id: 22, name: '⼤锤', age: 19 },{ id: 33, name: '铁棍', age: 17 }
])const tableData2 = ref([{ id: 21, name: 'Jack', age: 18 },{ id: 32, name: 'Rose', age: 19 },{ id: 43, name: 'Henry', age: 17 }
])
</script>
<template><MyTable /><MyTable />
</template><style>
body {background-color: #fff;
}
</style>
4.5 代码实现
MyTable
<script setup>
const proper = defineProps({data: {type: Array,default: () => []}
})
</script><template><table class="my-table"><thead><tr><th>序号</th><th>姓名</th><th>年纪</th><th>操作</th></tr></thead><tbody v-for="(item, index) in data" :key="item.id"><tr><td>{{index + 1}}</td><td>{{item.name}}</td><td>{{item.age}}</td><td><slot :index="index"><button>none</button></slot></td></tr></tbody></table>
</template><style>
.my-table {width: 450px;text-align: center;border: 1px solid #ccc;font-size: 24px;margin: 30px auto;
}.my-table thead {background-color: #1f74ff;color: #fff;
}.my-table thead th {font-weight: normal;
}.my-table thead tr {line-height: 40px;
}.my-table th,
.my-table td {border-bottom: 1px solid #ccc;border-right: 1px solid #ccc;
}.my-table td:last-child {border-right: none;
}.my-table tr:last-child td {border-bottom: none;
}.my-table button {width: 65px;height: 35px;font-size: 18px;border: 1px solid #ccc;outline: none;border-radius: 3px;cursor: pointer;background-color: #ffffff;margin-left: 5px;
}
</style>
App.vue
<script setup>
import { ref } from 'vue'import MyTable from './components/MyTable.vue'const tableData1 = ref([{ id: 11, name: '狗蛋', age: 18 },{ id: 22, name: '⼤锤', age: 19 },{ id: 33, name: '铁棍', age: 17 }
])const tableData2 = ref([{ id: 21, name: 'Jack', age: 18 },{ id: 32, name: 'Rose', age: 19 },{ id: 43, name: 'Henry', age: 17 }
])const showDetail = (index) => {alert('查看详情: ' + JSON.stringify(tableData2.value[index]))
}</script>
<template><MyTable :data="tableData1" ><template #default="{ index }"><button @click="tableData1.splice(index, 1)">删除</button></template></MyTable><MyTable :data="tableData2"><template #default="{ index }"><button @click="showDetail(index)">查看</button></template></MyTable></template><style>
body {background-color: #fff;
}
</style>
4.6 总结
- 作⽤域插槽的作⽤是什么?
答:让插槽带数据, 使得组件功能更强⼤、更灵活
-
作⽤域插槽的使⽤步骤是什么?
答:1、 slot上绑定数据
2、 <template #名字=“{ 数据 }”> </template>
三、综合案例
1. 整体效果和分析
1.1 整体效果

1.2 结构分析

1.3 需求说明
1、my-table 表格组件封装
-
动态传递表格数据渲染
-
表头⽀持⽤⼾⾃定义
-
主体⽀持⽤⼾⾃定义
2、my-tag 标签组件封装
-
双击显⽰输⼊框,输⼊框获取焦点
-
失去焦点,隐藏输⼊框
-
回显标签信息
-
内容修改, 回⻋修改标签信息
2. 封装 MyTable 并渲染
2.1 静态代码
components/MyTable.vue
<script setup>
</script><template><table class="my-table"><thead><tr><th>编号</th><th>名称</th><th>图⽚</th><th width="100px">标签</th></tr></thead><tbody><tr><td>1</td><td>⽑茸茸⼩熊出没,⼉童⽺羔绒背⼼73-90cm</td><td><img src="https://yanxuanitem.nosdn.127.net/cd4b840751ef4f7505c85004f0bebcb5.png" /></td><td>标签内容1</td></tr><tr><td>2</td><td>⽑茸茸⼩熊出没,⼉童⽺羔绒背⼼73-90cm</td><td><img src="https://yanxuanitem.nosdn.127.net/cd4b840751ef4f7505c85004f0bebcb5.png" /></td><td>标签内容2</td></tr></tbody></table>
</template><style lang="scss" scoped>
.my-table {width: 100%;border-spacing: 0;img {width: 100px;height: 100px;object-fit: contain;vertical-align: middle;}th {background: #f5f5f5;border-bottom: 2px solid #069;}td {border-bottom: 1px dashed #ccc;}td,th {text-align: center;padding: 10px;transition: all .5s;&.red {color: red;}}.none {height: 100px;line-height: 100px;color: #999;}
}
</style>
App.vue
<script setup>
import { ref } from 'vue'
import MyTable from './components/MyTable.vue'// 商品列表
const goodsList = ref([{id: 101,picture:'https://yanxuan-item.nosdn.127.net/f8c37ffa41ab1eb84bff499e1f6acfc7.jpg',name: '梨⽪朱泥三绝清代⼩品壶经典款紫砂壶',tag: '茶具'},{id: 102,picture:'https://yanxuan-item.nosdn.127.net/221317c85274a188174352474b859d7b.jpg',name: '全防⽔HABU旋钮⽜⽪⼾外徒步鞋⼭宁泰抗菌',tag: '男鞋'},{id: 103,picture:'https://yanxuan-item.nosdn.127.net/cd4b840751ef4f7505c85004f0bebcb5.png',name: '⽑茸茸⼩熊出没,⼉童⽺羔绒背⼼73-90cm',tag: '⼉童服饰'},{id: 104,picture:'https://yanxuan-item.nosdn.127.net/56eb25a38d7a630e76a608a9360eec6b.jpg',name: '基础百搭,⼉童套头针织⽑⾐1-9岁',tag: '⼉童服饰'}
])
</script>
<template><MyTable />
</template><style lang="scss">
#app {width: 1000px;margin: 50px auto;img {width: 100px;height: 100px;object-fit: contain;vertical-align: middle;}
}
</style>
3. MyTable插槽⾃定义
MyTable.vue
<script setup>
// 接受父组件传递的商品列表
const props = defineProps({goodsList: {type: Array,required: true}
})
</script><template><table class="my-table"><thead><slot name="theadSlot"></slot></thead><tbody v-for="(goods, index) in goodsList" :key="goods.id"><slot name="tbodySlot" :goods="goods" :index="index"></slot></tbody></table>
</template><style lang="scss"  >.my-table {width: 100%;border-spacing: 0;img {width: 100px;height: 100px;object-fit: contain;vertical-align: middle;}th {background: #f5f5f5;border-bottom: 2px solid #069;}td {border-bottom: 1px dashed #ccc;}td,th {text-align: center;padding: 10px;transition: all .5s;&.red {color: red;}}.none {height: 100px;line-height: 100px;color: #999;}
}
</style>
App.vue
<script setup>
import { ref } from 'vue'
import MyTable from './components/MyTable.vue'// 商品列表
const goodsList = ref([{id: 101,picture:'https://yanxuan-item.nosdn.127.net/f8c37ffa41ab1eb84bff499e1f6acfc7.jpg',name: '梨⽪朱泥三绝清代⼩品壶经典款紫砂壶',tag: '茶具'},{id: 102,picture:'https://yanxuan-item.nosdn.127.net/221317c85274a188174352474b859d7b.jpg',name: '全防⽔HABU旋钮⽜⽪⼾外徒步鞋⼭宁泰抗菌',tag: '男鞋'},{id: 103,picture:'https://yanxuan-item.nosdn.127.net/cd4b840751ef4f7505c85004f0bebcb5.png',name: '⽑茸茸⼩熊出没,⼉童⽺羔绒背⼼73-90cm',tag: '⼉童服饰'},{id: 104,picture:'https://yanxuan-item.nosdn.127.net/56eb25a38d7a630e76a608a9360eec6b.jpg',name: '基础百搭,⼉童套头针织⽑⾐1-9岁',tag: '⼉童服饰'}
])
</script>
<template><MyTable :goodsList="goodsList" ><template #theadSlot><tr><th>编号</th><th>名称</th><th>图⽚</th><th width="100px">标签</th></tr></template><template #tbodySlot="{ goods, index }"><tr><td>{{ index + 1 }}</td><td>{{ goods.name }}</td><td><img :src="goods.picture" /></td><td>{{ goods.tag }}</td></tr></template></MyTable></template><style lang="scss">
#app {width: 1000px;margin: 50px auto;img {width: 100px;height: 100px;object-fit: contain;vertical-align: middle;}
}
</style>
4. 封装MyTag组件
MyTag.vue
<!-- @format --><script setup>import { ref } from 'vue'const model = defineModel()// 是否处于编辑状态const isEdit = ref(false)// 双击const onDblClick = () => {isEdit.value = true}// 在输入框上敲击了回车const onEnter = (e) => {// 获取输入框的值,并去除首尾空格const tagName = e.target.value.trim()if (tagName) {// 如果有值,需要把这个同步到父组件中(直接修改 model )model.value = tagName}// 敲完回车,不管输入框有没有值,都要让输入框消失isEdit.value = false}
</script><template><div class="my-tag"><inputv-focusv-if="isEdit"class="input"type="text":value="model"@blur="isEdit = false"placeholder="输入标签"@keydown.enter="onEnter" /><divclass="text"v-else@dblclick="onDblClick">{{ model }}</div></div>
</template><style lang="scss" scoped>.my-tag {cursor: pointer;.input {appearance: none;outline: none;border: 1px solid #ccc;width: 100px;height: 40px;box-sizing: border-box;padding: 10px;color: #666;&::placeholder {color: #666;}}}
</style>
总体代码获取
e lang=“scss”>
#app {
width: 1000px;
margin: 50px auto;
img {width: 100px;height: 100px;object-fit: contain;vertical-align: middle;
}
}
### 4. 封装MyTag组件`MyTag.vue````vue
<!-- @format --><script setup>import { ref } from 'vue'const model = defineModel()// 是否处于编辑状态const isEdit = ref(false)// 双击const onDblClick = () => {isEdit.value = true}// 在输入框上敲击了回车const onEnter = (e) => {// 获取输入框的值,并去除首尾空格const tagName = e.target.value.trim()if (tagName) {// 如果有值,需要把这个同步到父组件中(直接修改 model )model.value = tagName}// 敲完回车,不管输入框有没有值,都要让输入框消失isEdit.value = false}
</script><template><div class="my-tag"><inputv-focusv-if="isEdit"class="input"type="text":value="model"@blur="isEdit = false"placeholder="输入标签"@keydown.enter="onEnter" /><divclass="text"v-else@dblclick="onDblClick">{{ model }}</div></div>
</template><style lang="scss" scoped>.my-tag {cursor: pointer;.input {appearance: none;outline: none;border: 1px solid #ccc;width: 100px;height: 40px;box-sizing: border-box;padding: 10px;color: #666;&::placeholder {color: #666;}}}
</style>
总体代码获取
相关文章:

【vue】⾃定义指令+插槽+商品列表案例
代码获取 07-⾃定义指令插槽商品列表案例 ⼀、⾃定义指令 1. 基本使⽤ 1.1 指令介绍 内置指令:v-model、v-for、v-bind、v-on… 这都是Vue给咱们内置的⼀些指令,可以直接使⽤ ⾃定义指令:同时Vue也⽀持让开发者,⾃⼰注册⼀些…...

多线程——线程的等待通知
目录 前言 一、wait() 方法 1.方法介绍 2.代码示例 3.wait 和 sleep 的区别 二、notify() 方法 1.方法介绍 2.代码示例 三、notifyAll() 方法 1.方法介绍 2.代码示例 结尾 前言 由于线程之间是抢占式执行的,因此线程之间的执行顺序是难以预知的…...

模态与非模态的对话框
本文学习自: 《Qt Creato快速入门》 #include "widget.h" #include <QApplication>int main(int argc, char *argv[]) {QApplication a(argc, argv);Widget w;w.show();return a.exec(); }1. #include "widget.h" #include "ui_w…...

C语言练习
题目: 1.运用switch选择语句,编写一段C语言,请根据输入的数字,显示相应的星期日,如果数字所对应的星期日并不存在请显示“抱歉,您输入的内容并不存在。” 分析:1.在本题中,要运用到…...

CyberRt实践之Hello Apollo(Apollo 9.0版本)
apollo9.0环境安装参考官方网站 apollo.baidu.com/community/Apollo-Homepage-Document?docBYFxAcGcC4HpYIbgPYBtXIHQCMEEsATAV0wGNkBbWA5UyRFdZWVBEAU0hFgoIH0adPgCY%2BADwCiAVnEAhAILiAnABZxEgOzK1Y%2BQA51M3ROUnJBsbK2WZoyUdkBhcXoAMhlwDFlARnUXZdzE9AGY%2BbFINADYpUhCEFW…...

【JavaScript】LeetCode:61-65
文章目录 61 课程表62 实现Trie(前缀树)63 全排列64 子集65 电话号码的字母组合 61 课程表 Map BFS拓扑排序:将有向无环图转为线性顺序。遍历prerequisites:1. 数组记录每个节点的入度,2. 哈希表记录依赖关系。n 6&a…...

【SpringAI】(一)从实际场景入门大模型——适合Java宝宝的大模型应用开发
一、简单场景介绍 假设你需要为一个商城项目接入一个基于SpringAI的智能客服系统,现在我们来基本模拟一下: 当我通过系统提问,大模型会针对我的问题进行回答。 当我们通过程序提问时,SpringAI会将我们的提问封装成Prompts&#x…...

植物大战僵尸杂交版
最新版植物大战僵尸杂交版 最近本款游戏火爆 下载资源如下: win版本:2.3.7 链接:下载地址 提取码:9N3P Mac(苹果版本):2.0.0 链接:下载地址 提取码:Bjaa 介绍ÿ…...

live2d 实时虚拟数字人形象页面显示,对接大模型
live2dSpeek 测试不用gpu可以正常运行 https://github.com/lyz1810/live2dSpeek 运行的话还需要额外下载https://github.com/lyz1810/edge-tts支持语音 ## 运行live2dSpeek >npm install -g http-server >http-server . ## 运行edge-tts python edge-tts.py...

SpringCloud-持久层框架MyBatis Plus的使用与原理详解
在现代微服务架构中,SpringCloud 是一个非常流行的解决方案。而在数据库操作层面,MyBatis Plus 作为 MyBatis 的增强工具,能够简化开发,提升效率,特别是在开发企业级应用和分布式系统时尤为有用。本文将详细介绍 MyBat…...

Servlet的HttpServletRequest
HttpServletRequest是Java Servlet规范中定义的一个接口,它表示客户端向服务器发送的请求,并提供了与HTTP请求相关的方法和属性。 getSession方法():用于获取与当前请求相关联的HttpSession对象。 setAttribute(String name, Object value)…...

U9销售订单不能带出最新价格出来
业务员突然说系统带不出来销售价格。了解之后,不是带不出来价格,是做了价格调整之后,最新价格没有匹配出来,带出来的价格是历史价格。检查,分析相关的单据,生效日期,失效日期,审核状…...

Jmeter接口测试企业级项目实战day1
1.接口测试 接口测试工具: JMeter:支持多种接口类型,还能测试性能,开源,开源进行二次扩展。 Postman:简单,方便,局限性比较大,适合开发临时行调试 APIFox等:新…...
接口测试面试题含答案
1、解释一下正向和逆向测试。 正向测试:针对接口设计预期的功能和行为,验证接口是否按照预期工作。 逆向测试:针对错误输入、不合理的条件或非预期的使用方式,验证接口是否能够适当地处理这些情况并提供合理的错误处理。 2、什…...

横板营业执照提取生成
前言 有一段时间没发博客了,今天分享下几个月前做的营业执照提取器UI 预览图 框架 b-ui很好用,这个前端框架作者 发布的插件我都会用,鱿鱼助手也是基于这个框架开发的 代码 html <template><view><template><view…...

webm格式怎么转换成mp4?这5种转换方法很好用
现如今,视频格式繁多,而webm作为一种由谷歌开发的视频格式,以其高画质和低带宽需求著称。然而,并非所有设备和播放器都完美支持webm格式,这时将其转换为兼容性更强的MP4格式就显得尤为重要。下面给大家分享5种非常简单…...

C/C++语言基础--C++异常看这一篇就够了
本专栏目的 更新C/C的基础语法,包括C的一些新特性 前言 通过前面几节课,我们学习了抽象、封装、继承、多态等相关的概念,接下来我们将讲解异常,异常是专门处理错误的;这一次加了不少图标,希望大家喜欢;C语…...

DFT ATPG中常见影响coverage的因素有哪些?
# DFT ATPG中常见影响Coverage的因素 ## 一、电路结构复杂性 1. **逻辑层次深度** - **原理** - 当电路的逻辑层次很深时,信号在传播过程中会经过多个逻辑门的处理。这使得测试向量难以准确地控制和观察内部节点的状态。例如,在一个具有多层嵌套逻辑的电路中,如一个…...

Python机器学习数据清洗到特征工程策略
Python机器学习数据清洗到特征工程策略 目录 ✨ 数据清洗:处理缺失值与异常值的策略🔄 特征选择:筛选与数据目标高度相关的特征🛠 特征工程:数据转换与生成新特征的多样化方法📊 类别型变量的数值化&…...

多线程-进阶(2)CountDownLatchConcurrentHashMapSemaphore
目的; JUC(java.util.concurrent) 的常⻅类 接着上一节课到 1.信号量 Semaphore 信号量, ⽤来表⽰ "可⽤资源的个数". 本质上就是⼀个计数器。 理解信号量 可以把信号量想象成是停⻋场的展⽰牌: 当前有⻋位 100 个. 表⽰有 100 个可⽤资源. 当有⻋开进去的时候,…...
Qt/C++开发监控GB28181系统/取流协议/同时支持udp/tcp被动/tcp主动
一、前言说明 在2011版本的gb28181协议中,拉取视频流只要求udp方式,从2016开始要求新增支持tcp被动和tcp主动两种方式,udp理论上会丢包的,所以实际使用过程可能会出现画面花屏的情况,而tcp肯定不丢包,起码…...

Java 8 Stream API 入门到实践详解
一、告别 for 循环! 传统痛点: Java 8 之前,集合操作离不开冗长的 for 循环和匿名类。例如,过滤列表中的偶数: List<Integer> list Arrays.asList(1, 2, 3, 4, 5); List<Integer> evens new ArrayList…...
如何在看板中有效管理突发紧急任务
在看板中有效管理突发紧急任务需要:设立专门的紧急任务通道、重新调整任务优先级、保持适度的WIP(Work-in-Progress)弹性、优化任务处理流程、提高团队应对突发情况的敏捷性。其中,设立专门的紧急任务通道尤为重要,这能…...
Nuxt.js 中的路由配置详解
Nuxt.js 通过其内置的路由系统简化了应用的路由配置,使得开发者可以轻松地管理页面导航和 URL 结构。路由配置主要涉及页面组件的组织、动态路由的设置以及路由元信息的配置。 自动路由生成 Nuxt.js 会根据 pages 目录下的文件结构自动生成路由配置。每个文件都会对…...

浅谈不同二分算法的查找情况
二分算法原理比较简单,但是实际的算法模板却有很多,这一切都源于二分查找问题中的复杂情况和二分算法的边界处理,以下是博主对一些二分算法查找的情况分析。 需要说明的是,以下二分算法都是基于有序序列为升序有序的情况…...
图表类系列各种样式PPT模版分享
图标图表系列PPT模版,柱状图PPT模版,线状图PPT模版,折线图PPT模版,饼状图PPT模版,雷达图PPT模版,树状图PPT模版 图表类系列各种样式PPT模版分享:图表系列PPT模板https://pan.quark.cn/s/20d40aa…...
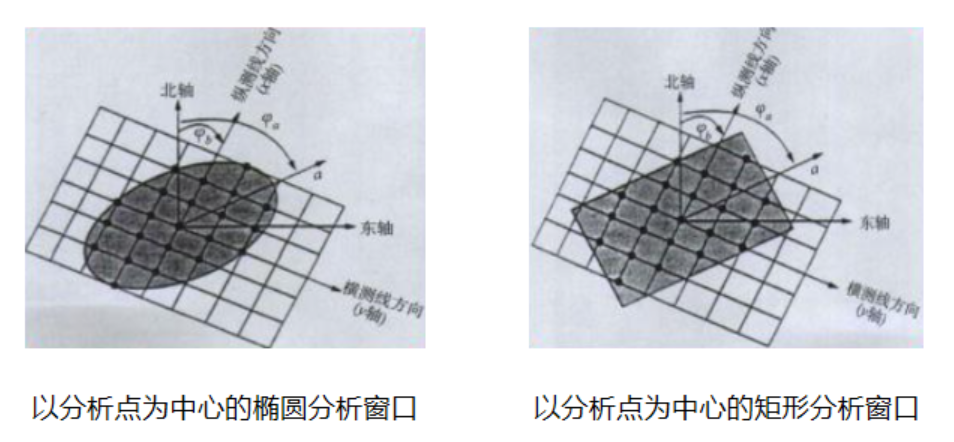
论文笔记——相干体技术在裂缝预测中的应用研究
目录 相关地震知识补充地震数据的认识地震几何属性 相干体算法定义基本原理第一代相干体技术:基于互相关的相干体技术(Correlation)第二代相干体技术:基于相似的相干体技术(Semblance)基于多道相似的相干体…...
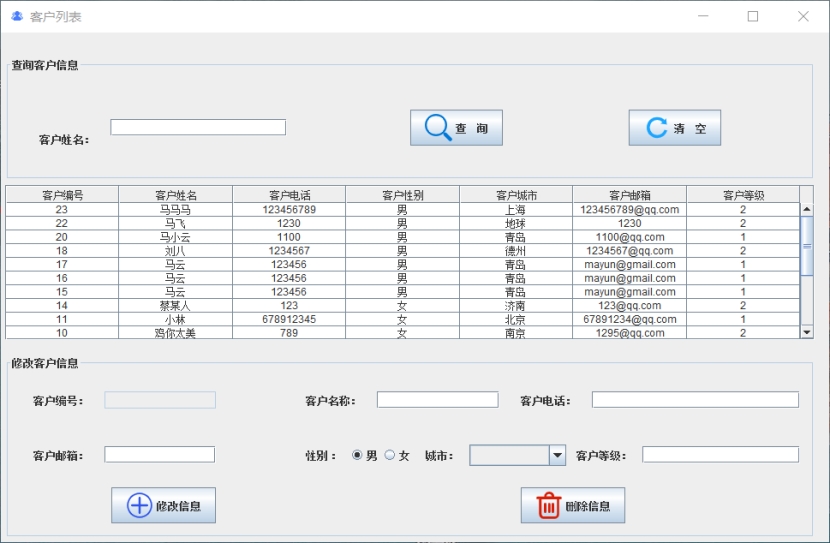
基于Java+MySQL实现(GUI)客户管理系统
客户资料管理系统的设计与实现 第一章 需求分析 1.1 需求总体介绍 本项目为了方便维护客户信息为了方便维护客户信息,对客户进行统一管理,可以把所有客户信息录入系统,进行维护和统计功能。可通过文件的方式保存相关录入数据,对…...

CSS | transition 和 transform的用处和区别
省流总结: transform用于变换/变形,transition是动画控制器 transform 用来对元素进行变形,常见的操作如下,它是立即生效的样式变形属性。 旋转 rotate(角度deg)、平移 translateX(像素px)、缩放 scale(倍数)、倾斜 skewX(角度…...

为什么要创建 Vue 实例
核心原因:Vue 需要一个「控制中心」来驱动整个应用 你可以把 Vue 实例想象成你应用的**「大脑」或「引擎」。它负责协调模板、数据、逻辑和行为,将它们变成一个活的、可交互的应用**。没有这个实例,你的代码只是一堆静态的 HTML、JavaScript 变量和函数,无法「活」起来。 …...
