RTSP流图片采样助手(yolov5)
在监控和视频分析领域,实时采样视频流中的图像数据是十分重要的。本文将介绍一个基于Python和Tkinter构建的RTSP流图片采样助手的设计与实现,旨在简化RTSP流的采样过程,并支持根据用户定义的特殊标签进行筛选。
项目概述
该项目的主要功能包括:
- 从多个RTSP流中实时采样图像。
- 根据用户定义的特殊标签筛选并保存图像。
- 提供友好的图形用户界面(GUI)以便于用户操作。
技术栈
- Python: 主要编程语言。
- OpenCV: 用于视频流处理和图像处理。
- Tkinter: 用于创建图形用户界面。
- PyTorch: 用于加载和使用深度学习模型进行目标检测。
- Subprocess: 用于ping测试IP地址的连通性。
关键功能实现
1、GUI设计
使用Tkinter创建用户界面,用户可以输入多个IP地址、密码、特殊标签和取样间隔时间。以下是创建GUI的代码片段:
root = tk.Tk()
root.title("RTSP流图片取样助手")tk.Label(root, text="IP地址(每行一个):").pack()
ip_entry = scrolledtext.ScrolledText(root, height=15, width=50)
ip_entry.pack()tk.Label(root, text="密码(每行一个):").pack()
password_entry = scrolledtext.ScrolledText(root, height=15, width=50)
password_entry.pack()tk.Label(root, text="特殊标签(以逗号分隔):").pack()
special_items_entry = tk.Entry(root, width=50)
special_items_entry.pack()
special_items_entry.insert(0, "person")tk.Label(root, text="取样间隔时间(秒):").pack()
interval_entry = tk.Entry(root, width=10)
interval_entry.pack()
interval_entry.insert(0, "5")model_var = StringVar(root)
model_var.set("未选择模型")
model_button = Button(root, text="选择模型", command=select_model)
model_button.pack()status_text = tk.Text(root, height=10, width=50)
status_text.pack()start_button = Button(root, text="开始采样", command=lambda: start_detection_thread(stop_event, status_text))
start_button.pack()stop_button = Button(root, text="停止采样", command=lambda: stop_detection(stop_event))
stop_button.pack()root.mainloop()
2、视频流处理
通过OpenCV打开RTSP流并读取视频帧。以下是处理视频流的代码片段:
cap = cv2.VideoCapture(rtsp_url)
if not cap.isOpened():print(f"Error: Could not open video stream {rtsp_url}")returnwhile not stop_event.is_set():ret, frame = cap.read()if not ret:print("Error: Failed to read frame from the video stream.")break
3、目标检测
集成深度学习模型进行目标检测。在每一帧中,我们使用模型识别物体并绘制边框。以下是模型推理的代码:
if model is not None:boxes = detect(imgsz, conf_thres, iou_thres, model, infer_frame, stride, device)save_frame = Falsefor box in boxes:if float(box[4]) > conf_thres:x1, y1, x2, y2, label_id = int(box[0]), int(box[1]), int(box[2]), int(box[3]), int(box[5])label = _names[int(label_id)]plot_one_box(x1, y1, x2, y2, plot_frame, conf_or_proportion=conf_thres, label_cls_id=label, line_thickness=3, color=globalColors[int(label_id)])if label in special_items:save_frame = True
4.、图像保存逻辑
根据用户输入的特殊标签筛选图像并保存。以下是相关代码:
current_time = time.time()
if (model is None or save_frame) and (current_time - last_save_time) >= sample_interval:frame_filename = os.path.join(ip_folder, f"detected_{int(current_time)}.jpg")cv2.imwrite(frame_filename, infer_frame)print(f"Saved frame: {frame_filename}")last_save_time = current_time
5.、多线程处理
为了能够同时处理多个RTSP流,我们使用线程来管理每个流的采样。这样可以确保主线程始终响应用户的操作。以下是创建线程的示例代码:
threads = []
for index, (ip, password) in enumerate(zip(ip_list, password_list)):rtsp_url = rtsp_base_url.format("admin", password, ip)thread = threading.Thread(target=start, args=(rtsp_url, index, imgsz, conf_thres, iou_thres, model, device, half, stride, special_items, _names, globalColors, save_special_items_name, stop_event, status_text, sample_interval, ip))thread.start()threads.append(thread)for thread in threads:thread.join()
6、 停止采样
用户可以点击“停止采样”按钮来中断正在进行的采样操作。以下是实现该功能的代码:
def stop_detection(stop_event):stop_event.set()start_detection_thread.running = False
运行示例
运行程序后,用户需要在GUI中输入以下信息:
- IP地址: 监控摄像头的RTSP流地址(每行一个)。
- 密码: 对应的RTSP流密码(每行一个)。
- 特殊标签: 用户希望采样的物体标签(以逗号分隔)。
- 取样间隔时间: 图像采样的时间间隔(单位:秒)。
- 点击“开始采样”后,程序将开始处理指定的RTSP流并根据设置保存图像。如果需要停止采样,只需点击“停止采样”按钮。
源码
1、主程序
import subprocess
from tools import *  # 确保你有 tools.py 文件,包含所需的函数
import cv2
import os
import torch
import random
import time
import tkinter as tk
from tkinter import scrolledtext, messagebox, StringVar, Button, filedialog
import threading
import warningswarnings.filterwarnings("ignore")def ping_ip(ip):"""Ping an IP address and return True if it is reachable, else False."""try:output = subprocess.check_output(['ping', '-n', '1', ip], stderr=subprocess.STDOUT, universal_newlines=True)return Trueexcept subprocess.CalledProcessError:return Falsedef start(rtsp_url, idx, imgsz, conf_thres, iou_thres, model, device, half, stride, special_items, _names, globalColors, save_special_items_name, stop_event, status_text, sample_interval, ip_address):if not ping_ip(ip_address):messagebox.showerror("Error", f"无法连接到 IP 地址: {ip_address}")returncap = cv2.VideoCapture(rtsp_url)if not cap.isOpened():print(f"Error: Could not open video stream {rtsp_url}")returnstatus_text.insert(tk.END, f"正在采样视频流: {rtsp_url}_{idx}\n")last_save_time = time.time()ip_folder = os.path.join(save_special_items_name, f'{ip_address}_{str(idx)}')os.makedirs(ip_folder, exist_ok=True)while not stop_event.is_set():ret, frame = cap.read()if not ret:print("Error: Failed to read frame from the video stream.")breakinfer_frame = frame.copy()plot_frame = frame.copy()if model is not None:boxes = detect(imgsz, conf_thres, iou_thres, model, infer_frame, stride, device)save_frame = Falsefor box in boxes:if float(box[4]) > conf_thres:x1, y1, x2, y2, label_id = int(box[0]), int(box[1]), int(box[2]), int(box[3]), int(box[5])label = _names[int(label_id)]plot_one_box(x1, y1, x2, y2, plot_frame, conf_or_proportion=conf_thres, label_cls_id=label, line_thickness=3, color=globalColors[int(label_id)])if label in special_items:save_frame = Truecurrent_time = time.time()if (model is None or save_frame) and (current_time - last_save_time) >= sample_interval:frame_filename = os.path.join(ip_folder, f"detected_{int(current_time)}.jpg")cv2.imwrite(frame_filename, infer_frame)print(f"Saved frame: {frame_filename}")last_save_time = current_timecv2.imshow(f'Detection - {rtsp_url}_{idx}', plot_frame)if cv2.waitKey(1) & 0xFF == ord('q'):breakcap.release()cv2.destroyAllWindows()status_text.insert(tk.END, f"视频流 {rtsp_url}_{idx} 已停止采样。\n")def run_detection(ip_list, password_list, special_items, model_path, stop_event, status_text, sample_interval):rtsp_base_url = "rtsp://{}:{}@{}:554/Streaming/Channels/101"conf_thres = 0.25iou_thres = 0.5imgsz = 640save_special_items_name = "special_items_datasets"device = select_device("0" if torch.cuda.is_available() else "cpu")half = device.type != 'cpu'model = Noneif model_path:model = torch.load(model_path, map_location=device)['model'].float()model.to(device).eval()if half:model.half()if not os.path.exists(save_special_items_name):os.makedirs(save_special_items_name)img = torch.zeros((1, 3, imgsz, imgsz), device=device)if model is not None:_ = model(img.half() if half else img) if device.type != 'cpu' else None_names = model.module.names if hasattr(model, 'module') else model.namesglobalColors = [[random.randint(0, 255) for _ in range(3)] for _ in _names]stride = max(int(model.stride.max()), 32)else:_names = []globalColors = []stride = 32threads = []for index, (ip, password) in enumerate(zip(ip_list, password_list)):rtsp_url = rtsp_base_url.format("admin", password, ip)thread = threading.Thread(target=start, args=(rtsp_url, index, imgsz, conf_thres, iou_thres, model, device, half, stride, special_items, _names, globalColors, save_special_items_name, stop_event, status_text, sample_interval, ip))thread.start()threads.append(thread)for thread in threads:thread.join()start_detection_thread.running = Falsedef start_detection_thread(stop_event, status_text):if hasattr(start_detection_thread, 'running') and start_detection_thread.running:messagebox.showwarning("Warning", "Detection is already running.")returnstop_event.clear()  # 重置 stop_eventstart_detection_thread.running = Truestatus_text.delete(1.0, tk.END)status_text.insert(tk.END, "开始采样...\n")ip_list = ip_entry.get("1.0", tk.END).strip().split("\n")password_list = password_entry.get("1.0", tk.END).strip().split("\n")special_items = special_items_entry.get().strip().split(",")model_path = model_var.get() if model_var.get() != "未选择模型" else Nonesample_interval = int(interval_entry.get())if len(ip_list) != len(password_list):messagebox.showerror("Error", "IP addresses and passwords must match.")start_detection_thread.running = Falsereturndetection_thread = threading.Thread(target=run_detection, args=(ip_list, password_list, special_items, model_path, stop_event, status_text, sample_interval))detection_thread.start()status_text.insert(tk.END, "采样正在进行中...\n")def stop_detection(stop_event):stop_event.set()start_detection_thread.running = Falsedef select_model():model_path = filedialog.askopenfilename(title="选择模型文件", filetypes=[("PyTorch Model", "*.pt")])if model_path:model_var.set(model_path)if __name__ == '__main__':# Tkinter GUIroot = tk.Tk()root.title("RTSP流图片取样助手")tk.Label(root, text="IP地址(每行一个):").pack()ip_entry = scrolledtext.ScrolledText(root, height=15, width=50)ip_entry.pack()tk.Label(root, text="密码(每行一个):").pack()password_entry = scrolledtext.ScrolledText(root, height=15, width=50)password_entry.pack()tk.Label(root, text="特殊标签(以逗号分隔):").pack()special_items_entry = tk.Entry(root, width=50)special_items_entry.pack()special_items_entry.insert(0, "person")tk.Label(root, text="取样间隔时间(秒):").pack()interval_entry = tk.Entry(root, width=10)interval_entry.pack()interval_entry.insert(0, "5")model_var = StringVar(root)model_var.set("未选择模型")model_button = Button(root, text="选择模型", command=select_model)model_button.pack()stop_event = threading.Event()status_text = tk.Text(root, height=10, width=50)status_text.pack()start_button = Button(root, text="开始采样", command=lambda: start_detection_thread(stop_event, status_text))start_button.pack()stop_button = Button(root, text="停止采样", command=lambda: stop_detection(stop_event))stop_button.pack()root.mainloop()
2、工具程序
# !/usr/bin/python3
# -*- coding:utf-8 -*-
# cython: language_level=3
import os.path
import random
import shutil
import time
from pathlib import Path
import cv2
import numpy as np
import torch
from tqdm import tqdm
from utils.augmentations import letterbox
from utils.general import non_max_suppression, scale_boxes
from utils.torch_utils import select_device
NUM_THREADS = min(8, max(1, os.cpu_count() - 1))  # number of YOLO multiprocessing threadsdef img_transpose(img0, img_size, stride):assert img0 is not None, 'Image Not Found 'img = letterbox(img0, img_size, stride=stride)[0]img = img[:, :, ::-1].transpose(2, 0, 1)img = np.ascontiguousarray(img)return imgdef calculate_box_area(x1, y1, x2, y2):return (x2 - x1) * (y2 - y1)def detect(img_size, conf_thres, iou_thres, model, img0, stride, device):imgsz = img_sizeimg = img_transpose(img0, imgsz, stride)img = torch.from_numpy(img).to(device)  # 移动到与模型相同的设备img = img.float()  # 确保是全精度img /= 255.0if img.ndimension() == 3:img = img.unsqueeze(0)pred = model(img, augment=False)[0]pred = non_max_suppression(pred, conf_thres, iou_thres, classes=None, agnostic=False)for i, det in enumerate(pred):if det is not None and len(det):det[:, :4] = scale_boxes(img.shape[2:], det[:, :4], img0.shape).round()return detdef plot_one_box(x1, y1, x2, y2, img, conf_or_proportion=None, label_cls_id=None, line_thickness=None, color=None):tl = line_thickness or round(0.002 * (img.shape[0] + img.shape[1]) / 2) + 1c1, c2 = (x1, y1), (x2, y2)cv2.rectangle(img, c1, c2, color, thickness=tl, lineType=cv2.LINE_AA)if label_cls_id:full_label = str(label_cls_id) + (f'_{conf_or_proportion}' if conf_or_proportion is not None else '')tf = max(tl - 1, 1)  # font thicknesst_size = cv2.getTextSize(full_label, 0, fontScale=tl / 3, thickness=tf)[0]# Compute the size of the label background based on the full label text sizec2 = c1[0] + t_size[0], c1[1] - t_size[1] - 3cv2.rectangle(img, c1, (c2[0], c1[1] - t_size[1] - 3), color, -1, cv2.LINE_AA)# Draw label text above the rectangle backgroundbottom_left_corner_of_text = (c1[0], c1[1] - 2)cv2.putText(img, full_label, bottom_left_corner_of_text, 0, tl / 3, [225, 255, 255], thickness=tf,lineType=cv2.LINE_AA)
3、代码依赖
将以上两个代码放在yolov5-7.0的根目录运行即可
4、程序打包(参考我的博客《使用 PyInstaller 打包 Python 应用程序时解决 FileNotFoundError 的问题》)
spec代码:
# -*- mode: python ; coding: utf-8 -*-block_cipher = Nonea = Analysis(['pic.py'],pathex=['C:\\Users\\linds\\anaconda3\\envs\\py36\\Lib\\site-packages\\torch\\lib'],binaries=[(r'.\utils\general.pyc', r'.\utils' ),(r'C:\\Users\\linds\\anaconda3\\envs\\py36\\Lib\\site-packages\\torch\\lib\\*', 'torch\\lib'),(r'C:\\Users\\linds\\anaconda3\\envs\\py36\\Lib\\site-packages\\torchvision\\*.dll', 'torchvision')],datas=[(r'utils/general.py', 'utils'), ('utils/general.pyc', 'utils')],hiddenimports=['torch', 'torchvision', 'PIL'], # 添加隐藏导入hookspath=[],hooksconfig={},runtime_hooks=[],excludes=[],win_no_prefer_redirects=False,win_private_assemblies=False,cipher=block_cipher,noarchive=False)for d in a.datas:if 'cp36-win_amd64.pyd' in d[0]:a.datas.remove(d)breakfor d in a.datas:if 'cp36-win_amd64.pyd' in d[0]:a.datas.remove(d)breakpyz = PYZ(a.pure, a.zipped_data,cipher=block_cipher)exe = EXE(pyz,a.scripts,a.binaries,a.zipfiles,a.datas, [],name='pic',debug=False,bootloader_ignore_signals=False,strip=False,upx=True,upx_exclude=[],runtime_tmpdir=None,console=True,disable_windowed_traceback=False,target_arch=None,codesign_identity=None,entitlements_file=None )
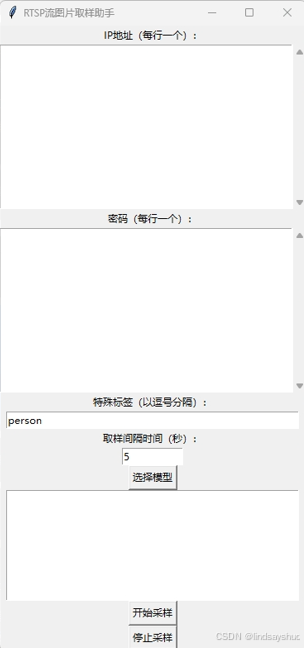
5、软件截图
总结
本项目展示了如何使用Python、OpenCV和Tkinter构建一个功能强大的RTSP流图片采样助手。该工具可用于监控、视频分析和机器学习等多个领域,能够帮助用户实时采样并保存感兴趣的图像数据。
通过这个项目,您可以更好地理解视频流处理、目标检测以及多线程编程的基本概念。希望这个项目能为您提供灵感,欢迎随时反馈与交流!
相关文章:
RTSP流图片采样助手(yolov5)
在监控和视频分析领域,实时采样视频流中的图像数据是十分重要的。本文将介绍一个基于Python和Tkinter构建的RTSP流图片采样助手的设计与实现,旨在简化RTSP流的采样过程,并支持根据用户定义的特殊标签进行筛选。 项目概述 该项目的主要功能包…...

MySQL、MariaDB、OceanBase远程异地定时备份脚本
问题背景 公司需要在异地机房远程备份数据库,以防止数据丢失,同时要支持MySQL、MariaDB和OceanBase。由于MariaDB和OceanBase支持MySQL语法,所以可以直接用MySQL Client进行备份。 安装MySQL客户端 yum install mysql编写脚本 编写/backu…...
【远程监控新体验】OpenObserve结合内网穿透无公网IP远程访问全攻略
文章目录 前言1. 安装Docker2. Docker镜像源添加方法3. 创建并启动OpenObserve容器4. 本地访问测试5. 公网访问本地部署的OpenObserve5.1 内网穿透工具安装5.2 创建公网地址6. 配置固定公网地址前言 本文主要介绍如何在Linux系统使用Docker快速本地化部署OpenObserve云原生可观…...
详解)
深度学习:异常检测(Anomaly Detection)详解
异常检测(Anomaly Detection)详解 异常检测,也称为离群点检测,是一种用于识别在数据中显著偏离正常行为或预期模式的数据点的技术。这些异常数据点可能代表系统错误、欺诈行为、网络入侵或任何其他重要且通常需要进一步调查的现象…...
智慧公厕系统提升公共服务满意度
在现代城市化进程中,公共服务体系的完善与提升成为了政府和社会各界的重要任务。作为公共厕所这样一个普遍而基础的市政设施,其服务质量直接影响到市民的生活品质和城市形象。近年来,智慧公厕系统的引入逐渐成为提升公共服务满意度的重要手段…...

幼儿和青少年编程学习路径
1. 引言 编程在现代教育中的重要性 随着信息时代的来临,编程不再是一个小众技能,而是成为未来社会各行业的重要基础能力。从计算机科学到人工智能,再到数据科学和软件工程,编程技能无疑是未来全球经济的核心驱动力之一。越来越多…...
leetcode48:旋转矩阵
题目: 给定一个 n n 的二维矩阵 matrix 表示一个图像。请你将图像顺时针旋转 90 度。 你必须在 原地 旋转图像,这意味着你需要直接修改输入的二维矩阵。请不要 使用另一个矩阵来旋转图像。 示例 1: 输入:matrix [[1,2,3],[4,5…...
安装CentOS 8镜像和创建CentOS 8虚拟机教程
一、安装虚拟机 网上查找教程,我用的是VMware 17 二、下载CentOS 8镜像 1.阿里云下载CentOS 8镜像 centos安装包下载_开源镜像站-阿里云 (aliyun.com) 选择需要下载的版本,(建议)下载dvd1版本的iso(也有下载boot版本的iso,创…...
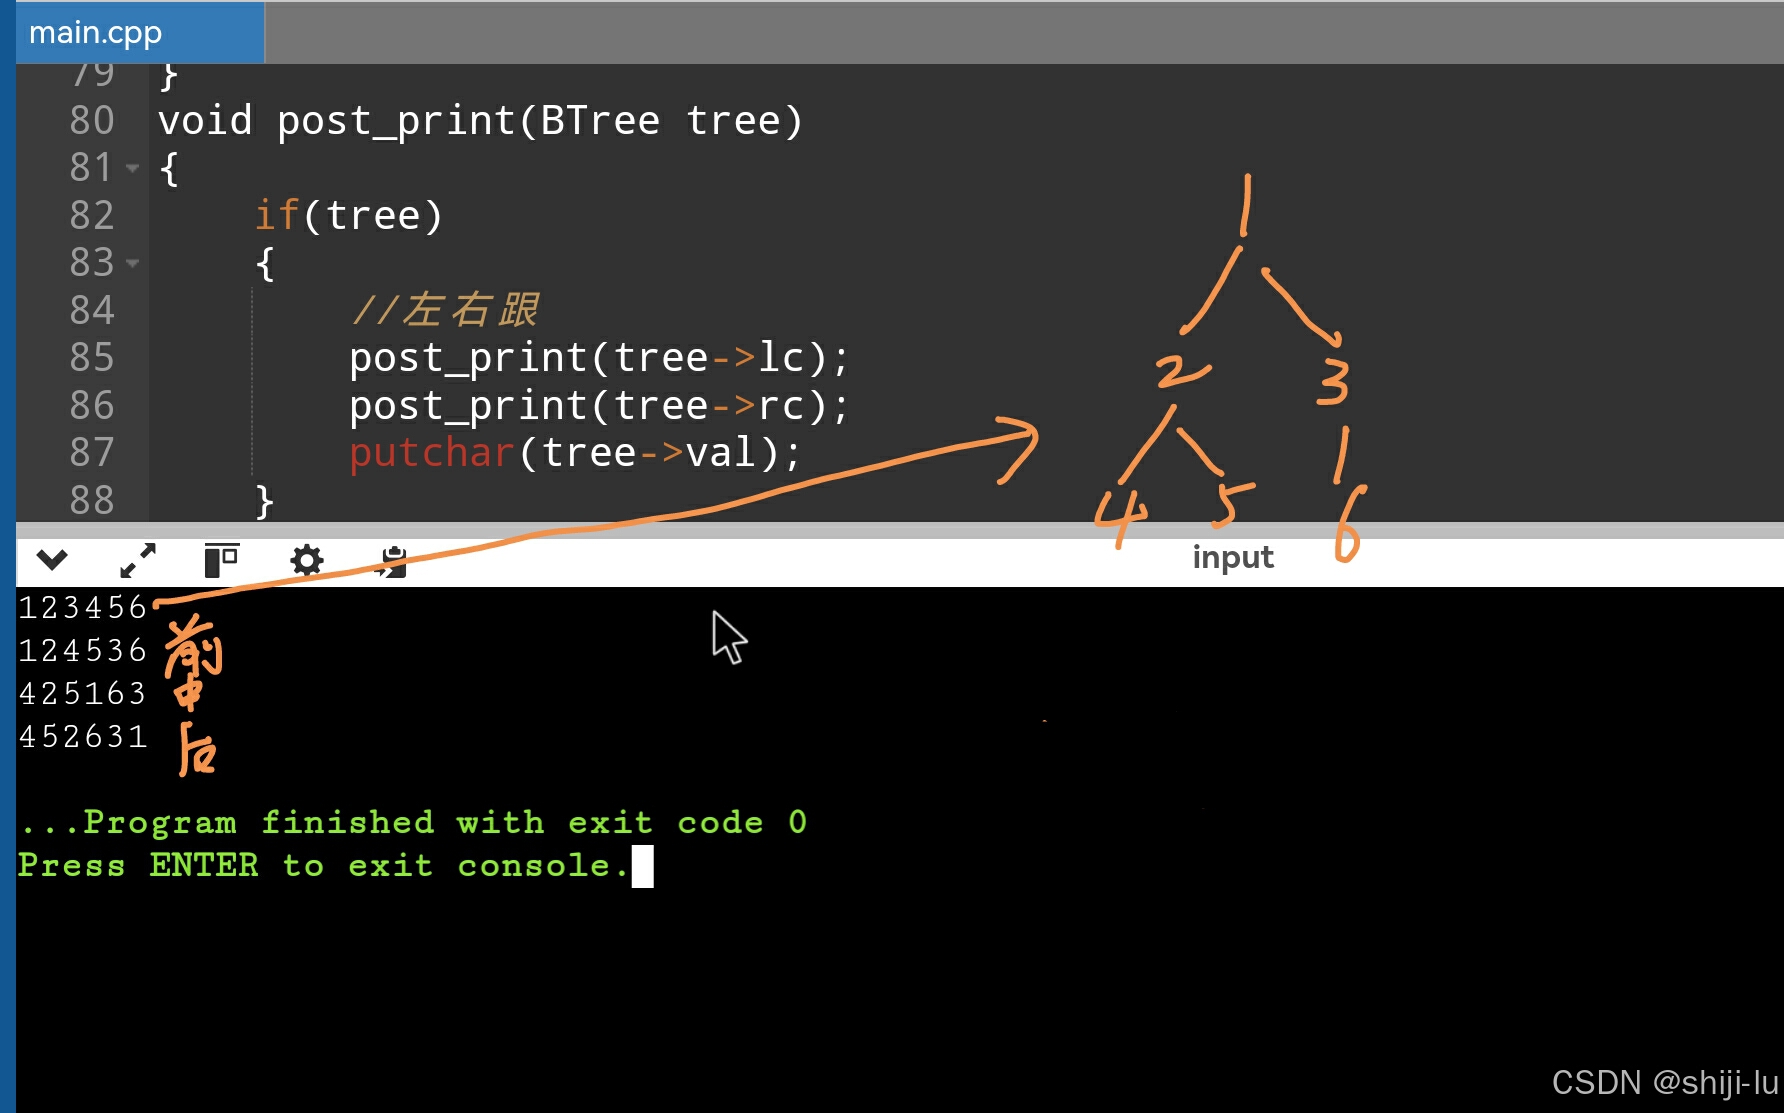
针对考研的C语言学习(二叉树专题)
二叉树层次建树 对于二叉树,建树过程中需要一个(尾插法的)链表(或队列)来辅助确认当前父亲节点 由于尾插法需要一个尾指针。因此可以理解为队列,只不过是不带头结点的链表版队列。 但其实就是一个辅助找…...

【ARM 嵌入式 编译系列 10.9 -- Clang 编译器】
> ARM GCC 编译精讲系列课程链接 < 文章目录 Clang 编译器详细介绍Clang 主要特点Clang 许可协议Clang 与 GCC 主要差异Clang 使用示例Summary Clang 编译器详细介绍 Clang 是一个由 LLVM 项目开发的编译器前端,支持 C、C、Objective-C 和 Objective-C 等编程…...
《深度学习》【项目】自然语言处理——情感分析 <上>
目录 一、项目介绍 1、项目任务 2、评论信息内容 3、待思考问题 1)目标 2)输入字词格式 3)每一次传入的词/字的个数是否就是评论的长度 4)一条评论如果超过32个词/字怎么处理? 5)一条评论如果…...
)
RU19.25 Standalone (GI和DB分开打)
参考文档:Patch 36916690 - GI Release Update 19.25.0.0.241015 2.1.1.1 OPatch Utility Information 12.2.0.1.42 or later 2.1.1.2 Validation of Oracle Inventory 分别在GI和Oracle Home下执行 $ <ORACLE_HOME>/OPatch/opatch lsinventory -detail -o…...

探索 Jupyter 核心:nbformat 库的神秘力量
文章目录 探索 Jupyter 核心:nbformat 库的神秘力量1. 背景介绍:为何选择 nbformat?2. nbformat 是什么?3. 如何安装 nbformat?4. 简单的库函数使用方法4.1 读取 Notebook 文件4.2 修改 Notebook 中的单元格4.3 添加 M…...
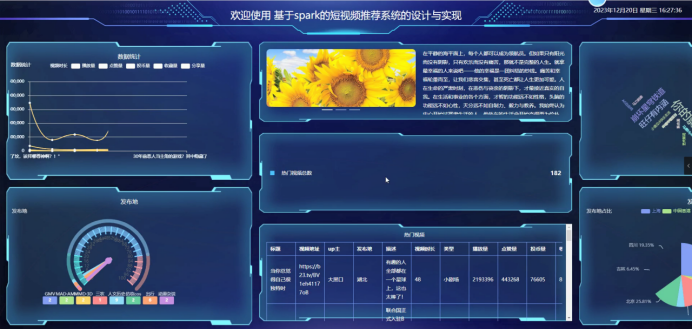
python+大数据+基于spark的短视频推荐系统【内含源码+文档+部署教程】
博主介绍:✌全网粉丝10W,前互联网大厂软件研发、集结硕博英豪成立工作室。专注于计算机相关专业毕业设计项目实战6年之久,选择我们就是选择放心、选择安心毕业✌ 🍅由于篇幅限制,想要获取完整文章或者源码,或者代做&am…...

Elasticsearch字段数据类型
1. 前言 ES文档的每个字段都至少有一个数据类型,此类型决定了字段值如何被存储以及检索。例如,字符串类型可以定义为text或者keyword,前者用于全文检索,会经过分词后索引;后者用于精准匹配,值会保持原样被…...

简述RESTFul风格的API接口
目录 传统的风格API REST风格 谓词规范 URL命令规范 避免多级URL 幂等 CURD的接口设计 REST响应 响应成功返回的状态码 重定向 错误代码 客户端 服务器 RESTful的返回格式 返回格式 从上一篇文章我们已经初步知道了怎么在VS中创建一个webapi项目。这篇文章来探讨一…...

探索光耦:光耦——不间断电源(UPS)系统中的安全高效卫士
在现代社会,不间断电源(UPS)系统已成为保障关键设备和数据安全的关键设施,广泛应用于企业数据中心、家庭电子设备等场景。UPS能在电力中断或波动时提供稳定电力,确保设备持续运行。而在这套系统中,光耦&…...
at命令和cron命令
第一章 例行性工作 1、单一执行的例行性工作 单一执行的例行性工作:仅处理执行一次就结束了 . 1.1 at命令的工作过程 /etc/at.allow:里面的用户是可以使用at命令的 --- 但实际上这个allow文件不存在,所以指全部的人都可以使用该命令&#…...

搜维尔科技:使用Manus Primel Xsens数据手套直接在Xsens及其插件中捕获手指数据
使用Manus Primel Xsens数据手套直接在Xsens及其插件中捕获手指数据 搜维尔科技:使用Manus Primel Xsens数据手套直接在Xsens及其插件中捕获手指数据...

Avalonia UI获取Popup显示位置,可解决异常显示其他应用程序的左上角
1.通过 PlacementTarget 获取位置 如果 Popup 是相对于某个控件(PlacementTarget)显示的,你也可以获取该控件的位置,然后计算 Popup 的相对位置。 // 假设 popup 是你的 Popup,target 是你的目标控件(Pla…...

markdownReader:终极Chrome插件,让本地Markdown文件阅读体验提升300%
markdownReader:终极Chrome插件,让本地Markdown文件阅读体验提升300% 【免费下载链接】markdownReader markdownReader is a extention for chrome, used for reading markdown file. 项目地址: https://gitcode.com/gh_mirrors/ma/markdownReader …...

别再只搜WOL教程了!华硕/微星主板BIOS里这两个隐藏选项没开,魔术包收到也白搭
华硕/微星主板WOL终极配置指南:破解BIOS隐藏选项的实战手册 深夜加班后想远程唤醒家里的台式机渲染视频,却发现魔术包石沉大海?你可能已经按照无数教程配置了网卡唤醒选项,却忽略了主板BIOS里那两个致命的隐藏开关。本文将用实验室…...
实现大数组和GUI缓存)
告别内存焦虑:用STM32+外部SRAM(IS62WV51216)实现大数组和GUI缓存
STM32外部SRAM实战:突破内存限制的工程化解决方案 当你在STM32上开发图形界面或处理音频流时,是否遇到过程序突然崩溃的窘境?那些隐藏在编译通过背后的内存溢出问题,往往在项目后期才暴露出来。最近接手的一个智能家居控制面板项目…...
)
Unity游戏逆向第一步:手把手教你从APK里提取Assembly-CSharp.dll(附ILSpy使用指南)
Unity游戏逆向实战:从APK提取C#脚本的完整指南 在移动游戏开发领域,Unity引擎凭借其跨平台特性占据了重要地位。对于开发者而言,了解Unity打包后的文件结构不仅是调试的必要技能,也是学习优秀游戏设计的重要途径。本文将详细介绍如…...

【仅限首批Early Access用户】Claude 3.5 Sonnet的“动态温度调节”机制详解:如何让模型在严谨性与创意性间智能切换?
更多请点击: https://intelliparadigm.com 第一章:Claude 3.5 Sonnet新功能详解 Anthropic 正式发布的 Claude 3.5 Sonnet 在推理速度、多模态理解与工具调用能力上实现显著跃升,尤其在代码生成与结构化输出方面表现突出。该模型原生支持 JS…...

STM32CubeMX实战指南:基本定时器中断配置与精准延时应用
1. 认识STM32基本定时器 第一次接触STM32定时器时,我完全被各种类型的定时器搞晕了。直到后来才发现,基本定时器其实是最好上手的。STM32F1系列通常包含TIM6和TIM7两个基本定时器,它们就像电子表里的秒表功能 - 只能计时,没有花哨…...

从零到一:联想小新Air14 2020锐龙版Windows 10重装实战指南
1. 为什么需要重装系统? 最近有不少朋友跟我吐槽,说用了两年的联想小新Air14 2020锐龙版越来越卡,开机要等半天,打开个文档都要转圈圈。这种情况我太熟悉了,作为一个帮朋友修过不下20台同款机型的老司机,我…...

sndcpy音频转发工具:Android设备音频镜像的完整指南
sndcpy音频转发工具:Android设备音频镜像的完整指南 【免费下载链接】sndcpy Android audio forwarding PoC (scrcpy, but for audio) 项目地址: https://gitcode.com/gh_mirrors/sn/sndcpy 想要在电脑上实时收听Android设备的音频内容吗?sndcpy音…...

一键解决!VisualCppRedist AIO彻底告别Windows DLL错误困扰
一键解决!VisualCppRedist AIO彻底告别Windows DLL错误困扰 【免费下载链接】vcredist AIO Repack for latest Microsoft Visual C Redistributable Runtimes 项目地址: https://gitcode.com/gh_mirrors/vc/vcredist 还记得那个令人抓狂的时刻吗?…...
)
【紧急预警】PlayAI新政策已生效!ElevenLabs未披露的商用语音水印机制曝光——2024年AI语音合规红线与替代方案速览(仅剩72小时窗口期)
更多请点击: https://intelliparadigm.com 第一章:【紧急预警】PlayAI新政策已生效!ElevenLabs未披露的商用语音水印机制曝光——2024年AI语音合规红线与替代方案速览(仅剩72小时窗口期) 水印机制逆向验证结果 通过对…...