Vue3使用AntV | X6绘制流程图:开箱即用
x6官方地址X6·图编辑引擎 | AntV
官方文档仔细地介绍了很多丰富的功能,这里的demo可以满足基本的使用,具体拓展还需要仔细看文档内容
先上效果图

1、安装
通过 npm 或 yarn 命令安装 X6。
# npm
npm install @antv/x6 --save# yarn
yarn add @antv/x6
初始化画布
<div id="container"></div>import { Graph } from '@antv/x6'const graph = new Graph({container: document.getElementById('container'),width: 800,height: 600,background: {color: '#F2F7FA',},
})使用插件
import { Snapline } from '@antv/x6-plugin-snapline'graph.use(new Snapline({enabled: true,}),
)
数据导出
graph.toJSON()具体依赖package.json
{"@antv/x6": "^2.0.0","@antv/x6-plugin-clipboard": "^2.0.0", // 如果使用剪切板功能,需要安装此包"@antv/x6-plugin-history": "^2.0.0", // 如果使用撤销重做功能,需要安装此包"@antv/x6-plugin-keyboard": "^2.0.0", // 如果使用快捷键功能,需要安装此包"@antv/x6-plugin-minimap": "^2.0.0", // 如果使用小地图功能,需要安装此包"@antv/x6-plugin-scroller": "^2.0.0", // 如果使用滚动画布功能,需要安装此包"@antv/x6-plugin-selection": "^2.0.0", // 如果使用框选功能,需要安装此包"@antv/x6-plugin-snapline": "^2.0.0", // 如果使用对齐线功能,需要安装此包"@antv/x6-plugin-dnd": "^2.0.0", // 如果使用 dnd 功能,需要安装此包"@antv/x6-plugin-stencil": "^2.0.0", // 如果使用 stencil 功能,需要安装此包"@antv/x6-plugin-transform": "^2.0.0", // 如果使用图形变换功能,需要安装此包"@antv/x6-plugin-export": "^2.0.0", // 如果使用图片导出功能,需要安装此包"@antv/x6-react-components": "^2.0.0", // 如果使用配套 UI 组件,需要安装此包"@antv/x6-react-shape": "^2.0.0", // 如果使用 react 渲染功能,需要安装此包"@antv/x6-vue-shape": "^2.0.0" // 如果使用 vue 渲染功能,需要安装此包
}
本文依赖
"dependencies": {"@element-plus/icons-vue": "^2.3.1","element-plus": "^2.7.6","pinia": "^2.1.7","vue": "^3.4.29","vue-router": "^4.3.3","@antv/x6": "latest","@antv/x6-plugin-clipboard": "latest","@antv/x6-plugin-history": "latest","@antv/x6-plugin-keyboard": "latest","@antv/x6-plugin-selection": "latest","@antv/x6-plugin-snapline": "latest","@antv/x6-plugin-stencil": "latest","@antv/x6-plugin-transform": "latest","@antv/x6-plugin-node-editor": "latest","insert-css": "latest"},完整代码,开箱即用
<template><div id="container"><div id="stencil"></div><div id="graph-container"></div></div>
</template>
<script setup lang="ts">
import { ref, onMounted } from 'vue'
import { Graph, Shape } from '@antv/x6'
import { Stencil } from '@antv/x6-plugin-stencil'
import { Transform } from '@antv/x6-plugin-transform'
import { Selection } from '@antv/x6-plugin-selection'
import { Snapline } from '@antv/x6-plugin-snapline'
import { Keyboard } from '@antv/x6-plugin-keyboard'
import { Clipboard } from '@antv/x6-plugin-clipboard'
import { History } from '@antv/x6-plugin-history'
// import { NodeEditor } from '@antv/x6-plugin-node-editor'
import insertCss from 'insert-css'onMounted(() => {// 初始化画布//- `Graph` 对象用于初始化流程图画布,`container` 指向 HTML 中 `graph-container` 这个 DOM 元素。流程图支持缩放、连线、拖拽等功能。const graph = new Graph({container: document.getElementById('graph-container'),grid: true,mousewheel: {enabled: true,zoomAtMousePosition: true,modifiers: 'ctrl',minScale: 0.5,maxScale: 3},connecting: {router: 'manhattan',connector: {name: 'rounded',args: { radius: 8 }},anchor: 'center',connectionPoint: 'anchor',allowBlank: false,snap: { radius: 20 },createEdge() {return new Shape.Edge({attrs: {line: {stroke: '#A2B1C3',strokeWidth: 2,targetMarker: {name: 'block',width: 12,height: 8}}},zIndex: 0})},validateConnection({ targetMagnet }) {return !!targetMagnet}},highlighting: {magnetAdsorbed: {name: 'stroke',args: { attrs: { fill: '#5F95FF', stroke: '#5F95FF' } }}}})// 插件配置//- 通过 `.use()` 方法注册了多个插件,包括 `Transform`(支持调整大小、旋转)、`Selection`(选择功能)、`Snapline`(自动对齐线)、`Keyboard`(键盘支持)等。graph.use(new Transform({ resizing: true, rotating: true })).use(new Selection({ rubberband: true, showNodeSelectionBox: true })).use(new Snapline()).use(new Keyboard()).use(new Clipboard()).use(new History())// 初始化 stencil//- `Stencil` 是用于提供左侧工具栏的组件,用户可以从工具栏中拖拽图形到画布中。支持基本图形和系统设计图的两类分组const stencil = new Stencil({title: '流程图',target: graph,stencilGraphWidth: 200,stencilGraphHeight: 180,collapsable: true,groups: [{ title: '基础流程图', name: 'group1' },{ title: '系统设计图', name: 'group2', graphHeight: 250, layoutOptions: { rowHeight: 70 } }],layoutOptions: { columns: 2, columnWidth: 80, rowHeight: 55 }})document.getElementById('stencil')?.appendChild(stencil.container)// #region 快捷键与事件graph.bindKey(['meta+c', 'ctrl+c'], () => {const cells = graph.getSelectedCells()if (cells.length) {graph.copy(cells)}return false})graph.bindKey(['meta+x', 'ctrl+x'], () => {const cells = graph.getSelectedCells()if (cells.length) {graph.cut(cells)}return false})graph.bindKey(['meta+v', 'ctrl+v'], () => {if (!graph.isClipboardEmpty()) {const cells = graph.paste({ offset: 32 })graph.cleanSelection()graph.select(cells)}return false})// undo redograph.bindKey(['meta+z', 'ctrl+z'], () => {if (graph.canUndo()) {graph.undo()}return false})graph.bindKey(['meta+shift+z', 'ctrl+shift+z'], () => {if (graph.canRedo()) {graph.redo()}return false})// select allgraph.bindKey(['meta+a', 'ctrl+a'], () => {const nodes = graph.getNodes()if (nodes) {graph.select(nodes)}})// deletegraph.bindKey('backspace', () => {const cells = graph.getSelectedCells()if (cells.length) {graph.removeCells(cells)}})// zoomgraph.bindKey(['ctrl+1', 'meta+1'], () => {const zoom = graph.zoom()if (zoom < 1.5) {graph.zoom(0.1)}})graph.bindKey(['ctrl+2', 'meta+2'], () => {const zoom = graph.zoom()if (zoom > 0.5) {graph.zoom(-0.1)}})// 控制连接桩显示/隐藏const showPorts = (ports: NodeListOf<SVGElement>, show: boolean) => {for (let i = 0, len = ports.length; i < len; i += 1) {ports[i].style.visibility = show ? 'visible' : 'hidden'}}graph.on('node:mouseenter', () => {const container = document.getElementById('graph-container')!const ports = container.querySelectorAll('.x6-port-body') as NodeListOf<SVGElement>showPorts(ports, true)})graph.on('node:mouseleave', () => {const container = document.getElementById('graph-container')!const ports = container.querySelectorAll('.x6-port-body') as NodeListOf<SVGElement>showPorts(ports, false)})// 注册自定义节点//- 通过 `Graph.registerNode` 注册了不同形状(矩形、圆形、多边形等)的自定义节点,并且定义了连接桩的位置和样式。const ports = {groups: {top: {position: 'top',attrs: {circle: {r: 4,magnet: true,stroke: '#5F95FF',strokeWidth: 1,fill: '#fff',style: { visibility: 'hidden' }}}},right: {position: 'right',attrs: {circle: {r: 4,magnet: true,stroke: '#5F95FF',strokeWidth: 1,fill: '#fff',style: { visibility: 'hidden' }}}},bottom: {position: 'bottom',attrs: {circle: {r: 4,magnet: true,stroke: '#5F95FF',strokeWidth: 1,fill: '#fff',style: { visibility: 'hidden' }}}},left: {position: 'left',attrs: {circle: {r: 4,magnet: true,stroke: '#5F95FF',strokeWidth: 1,fill: '#fff',style: { visibility: 'hidden' }}}}},items: [{ group: 'top' }, { group: 'right' }, { group: 'bottom' }, { group: 'left' }]}// 注册不同形状的自定义节点Graph.registerNode('custom-rect', {inherit: 'rect',width: 66,height: 36,attrs: {body: { strokeWidth: 1, stroke: '#5F95FF', fill: '#EFF4FF' },text: { fontSize: 12, fill: '#262626' }},ports: { ...ports },//支持文字编辑tools: [{name: 'node-editor',args: {attrs: {backgroundColor: '#EFF4FF'}}}]})Graph.registerNode('custom-polygon', {inherit: 'polygon',width: 66,height: 36,attrs: {body: { strokeWidth: 1, stroke: '#5F95FF', fill: '#EFF4FF' },text: { fontSize: 12, fill: '#262626' }},ports: { ...ports, items: [{ group: 'top' }, { group: 'bottom' }] },//支持文字编辑tools: [{name: 'node-editor',args: {attrs: {backgroundColor: '#EFF4FF'}}}]})Graph.registerNode('custom-circle', {inherit: 'circle',width: 45,height: 45,attrs: {body: { strokeWidth: 1, stroke: '#5F95FF', fill: '#EFF4FF' },text: { fontSize: 12, fill: '#262626' }},ports: { ...ports },//支持文字编辑tools: [{name: 'node-editor',args: {attrs: {backgroundColor: '#EFF4FF'}}}]})// 加载图形节点到 stencilconst r1 = graph.createNode({shape: 'custom-rect',label: '开始',attrs: { body: { rx: 20, ry: 26 } }})const r2 = graph.createNode({ shape: 'custom-rect', label: '过程' })const r3 = graph.createNode({shape: 'custom-rect',label: '可选过程',attrs: { body: { rx: 6, ry: 6 } }})const r4 = graph.createNode({shape: 'custom-polygon',label: '决策',attrs: { body: { refPoints: '0,10 10,0 20,10 10,20' } }})const r5 = graph.createNode({shape: 'custom-polygon',label: '数据',attrs: { body: { refPoints: '10,0 40,0 30,20 0,20' } }})const r6 = graph.createNode({ shape: 'custom-circle', label: '连接' })stencil.load([r1, r2, r3, r4, r5, r6], 'group1')//------------------------------------------文字编辑--------------------// const source = graph.addNode({// x: 180,// y: 60,// width: 100,// height: 40,// attrs: {// body: {// stroke: '#5F95FF',// fill: '#EFF4FF',// strokeWidth: 1// }// },// tools: [// {// name: 'node-editor',// args: {// attrs: {// backgroundColor: '#EFF4FF'// }// }// }// ]// })// const target = graph.addNode({// x: 320,// y: 250,// width: 100,// height: 40,// attrs: {// body: {// stroke: '#5F95FF',// fill: '#EFF4FF',// strokeWidth: 1// }// },// tools: [// {// name: 'node-editor',// args: {// attrs: {// backgroundColor: '#EFF4FF'// }// }// }// ]// })// graph.addEdge({// source,// target,// attrs: {// line: {// stroke: '#A2B1C3',// strokeWidth: 2// }// },// tools: [// {// name: 'edge-editor',// args: {// attrs: {// backgroundColor: '#fff'// }// }// }// ]// })//-------------------------------------------------------// 加载图像节点const imageShapes = [{label: 'Client',image: 'https://gw.alipayobjects.com/zos/bmw-prod/687b6cb9-4b97-42a6-96d0-34b3099133ac.svg'},{label: 'Http',image: 'https://gw.alipayobjects.com/zos/bmw-prod/dc1ced06-417d-466f-927b-b4a4d3265791.svg'},{label: 'Api',image: 'https://gw.alipayobjects.com/zos/bmw-prod/c55d7ae1-8d20-4585-bd8f-ca23653a4489.svg'},{label: 'Sql',image: 'https://gw.alipayobjects.com/zos/bmw-prod/6eb71764-18ed-4149-b868-53ad1542c405.svg'},{label: 'Clound',image: 'https://gw.alipayobjects.com/zos/bmw-prod/c36fe7cb-dc24-4854-aeb5-88d8dc36d52e.svg'},{label: 'Mq',image: 'https://gw.alipayobjects.com/zos/bmw-prod/2010ac9f-40e7-49d4-8c4a-4fcf2f83033b.svg'}]const imageNodes = imageShapes.map((item) =>graph.createNode({shape: 'custom-image',label: item.label,attrs: { image: { 'xlink:href': item.image } }}))//- `stencil.load()` 方法用于将自定义节点加载到 Stencil 中,用户可以从左侧拖拽这些节点到画布上。stencil.load(imageNodes, 'group2')// 添加 CSS 样式//- 使用 `insertCss()` 动态添加了样式,使得画布、工具栏以及选择框等元素的样式更加统一。insertCss(`#container {display: flex;border: 1px solid #dfe3e8;}#stencil {width: 180px;height: 100%;position: relative;border-right: 1px solid #dfe3e8;}#graph-container {width: calc(100% - 180px);height: 100%;}.x6-widget-stencil, .x6-widget-stencil-title, .x6-widget-stencil-group-title {background-color: #fff !important;}.x6-widget-transform, .x6-widget-selection-box, .x6-widget-selection-inner {border: 1px solid #239edd;}`)
})
</script><style scoped lang="scss">
#container {display: flex;height: 50vh;
}
#stencil {width: 180px;height: 100%;border-right: 1px solid #dfe3e8;
}
#graph-container {flex-grow: 1;width: 800px;
}
</style>相关文章:
Vue3使用AntV | X6绘制流程图:开箱即用
x6官方地址X6图编辑引擎 | AntV 官方文档仔细地介绍了很多丰富的功能,这里的demo可以满足基本的使用,具体拓展还需要仔细看文档内容 先上效果图 1、安装 通过 npm 或 yarn 命令安装 X6。 # npm npm install antv/x6 --save# yarn yarn add antv/x6 …...

grpc 快速入门
gRPC 是一个现代的远程过程调用(RPC)框架,由 Google 开发。它使用 HTTP/2 作为传输协议,并采用 Protocol Buffers(protobuf)作为接口描述语言(IDL)。gRPC 提供高效的通信、语言无关性…...

layui 实现 城市联动
<div class"layuimini-container"><form id"app-form" class"layui-form layuimini-form"><div class"layui-form-item"><label class"layui-form-label">标题</label><div class"la…...
- 常用数学函数 - 分类及比较 - 对给定的浮点值分类(std::fpclassify))
C++11标准模板(STL)- 常用数学函数 - 分类及比较 - 对给定的浮点值分类(std::fpclassify)
常用数学函数 对给定的浮点值分类 std::fpclassify 定义于头文件 <math.h> #define fpclassify(arg) /* implementation defined */ (C99 起) 归类浮点值 arg 到下列类别中:零、非正规、正规、无穷大、 NaN 或实现定义类别。该宏返回整数值。 忽略 FLT_EV…...

报错:npm : 无法加载文件 C:\Program Files\nodejs\npm.ps1,因为在此系统上禁止运行脚本。
报错场景 使用npm run dev 报错 npm : 无法加载文件 C:\Program Files\nodejs\npm.ps1,因为在此系统上禁止运行脚本。有关详细信息,请参阅 https:/go.microsoft.com/fwlink/?LinkID135170 中的 about_Execution_Policies。 所在位置 行:1 字符: 1 npm…...

OpenCV基本操作(python开发)——(7)实现图像校正
OpenCV基本操作(python开发)——(1) 读取图像、保存图像 OpenCV基本操作(python开发)——(2)图像色彩操作 OpenCV基本操作(python开发)——(3&…...

[项目] C++基于多设计模式下的同步异步日志系统
[项目] C基于多设计模式下的同步&异步日志系统 文章目录 [项目] C基于多设计模式下的同步&异步日志系统日志系统1、项目介绍2、开发环境3、核心技术4、日志系统介绍4.1 日志系统的价值4.2 日志系统技术实现4.2.1 同步写日志4.2.2 异步写日志 5、相关技术知识5.1 不定参…...

Vue常用的修饰符有哪些?
修饰符(Modifiers)是用于指定以特殊方式绑定或处理Vue事件或指令的特殊符号。 事件修饰符 .stop: 阻止时间继续传播,相当于调用event.stopPropagation() .prevent: 阻止默认事件,相当于调用event.preventDefault() .capture: 使…...

AnatoMask的分层图像编码器-解码器
方法思想 采用多尺度编码器-解码器主干: 在编码器中,把CT图像分解成不同大小的图像块,从这些图像块中提取特征在解码器中,重建被掩盖图像时,考虑图像块的空间关系 输入D(深度Depth)张H&#x…...

面向对象编程的核心特性:封装、继承、多态与抽象
封装(Encapsulation): 定义:封装是面向对象编程中的一个基本原则,它指的是将对象的状态(属性)和行为(方法)捆绑在一起,并对外隐藏对象的内部实现细节…...

ubuntu openmpi安装(超简单)
openmpi安装 apt update apt install openmpi-bin openmpi-common libopenmpi-dev安装到此完毕 测试一下,success !...

Python中的SQL数据库管理:SQLAlchemy教程
Python中的SQL数据库管理:SQLAlchemy教程 在Python应用程序中,操作数据库是常见的需求之一。而 SQLAlchemy 是一个功能强大的数据库管理库,它提供了Pythonic的接口来管理和查询SQL数据库。SQLAlchemy 兼具 ORM(对象关系映射&…...

LeetCode --- 421周赛
题目列表 3334. 数组的最大因子得分 3335. 字符串转换后的长度 I 3336. 最大公约数相等的子序列数量 3337. 字符串转换后的长度 II 一、数组的最大因子得分 数据范围足够小,可以用暴力枚举移除的数字,得到答案,时间复杂度为O(n^2)&#…...

简单了解前缀树/字典树(Trie树)C++代码
介绍Trie树 Trie(发音类似 "try")或者说 前缀树 是一种树形数据结构,用于高效地存储和检索字符串数据集中的键。这一数据结构有相当多的应用情景,例如自动补全和拼写检查。 前缀树也有一些其它的名称:字典…...

ubuntu安装与配置Nginx(2)
1. 配置 Nginx Nginx 的配置文件通常位于 /etc/nginx/nginx.conf,而虚拟主机的配置文件通常在 /etc/nginx/sites-available/ 和 /etc/nginx/sites-enabled/ 目录中。 在/etc/nginx/conf.d目录下新建xx.conf文件,配置文件, nginx -t 检查语法…...
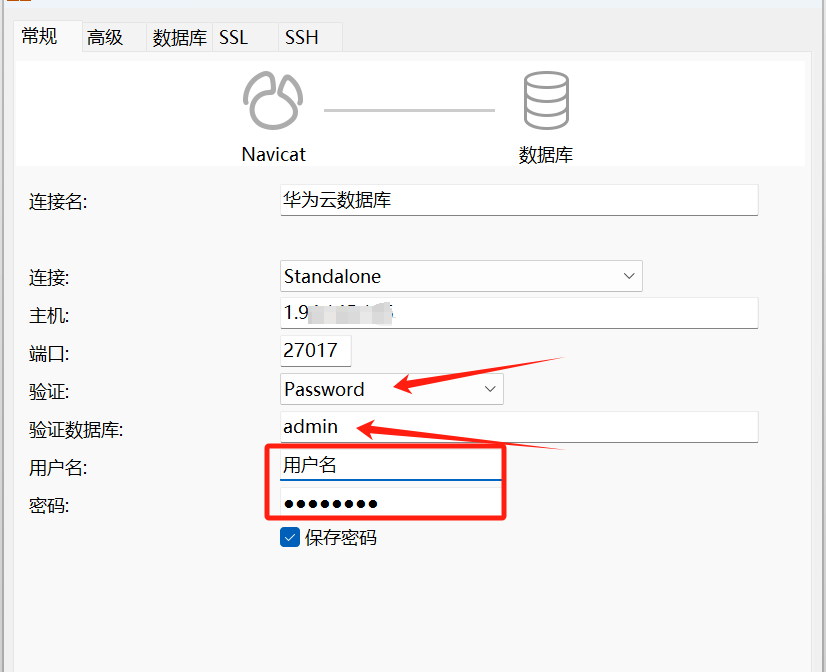
Linux环境下Mongodb部署
文章目录 一、系统环境二、MongoDb安装添加MongoDB官方库安装MongoDB配置MongoDB 三、MongoDB常见操作四、MongoDB用户管理创建用户修改密码删除用户 五、启用安全控制六、备份与还原1. 备份2. 恢复 七、外部工具连接MongoDB 一、系统环境 CentOS Stream 9 64bit 二、MongoD…...

(九)JavaWeb后端开发——Servlet
目录 1.Servlet由来 2.Servlet快速入门 3.Servlet执行原理 4.Servlet生命周期 1.Servlet由来 在JaveEE API文档中对Servlet的描述是:可以运行在服务器端的微小程序,但是实际上,Servlet就是一个接口,定义了Java类被浏览器访问…...
【零售和消费品&家居用品】家庭门窗开闭状态安全监控系统源码&数据集全套:改进yolo11-DCNV2
改进yolo11-GhostDynamicConv等200全套创新点大全:家庭门窗开闭状态安全监控系统源码&数据集全套 1.图片效果展示 项目来源 人工智能促进会 2024.11.01 注意:由于项目一直在更新迭代,上面“1.图片效果展示”和“2.视频效果展示”…...

【JavaScript】axios 二次封装拦截器(接口、实例、全局)
学习 coderwhy 老师结合 ts 二次封装 axios 目录结构 config config\index.ts // export const BASE_URL "http://codercba.com:9002"; export const TIME_OUT 10000;// 1. 根据环境变量区分接口地址 // let BASE_URL: string; // if (process.env.NODE_ENV &qu…...

Linux_02 Linux常用软件——vi、vim
vi编辑器有三种主要模式,每种模式的功能和用途不同: 一、命令模式 (Command Mode): - 启动 vi 时默认进入此模式。 - 你可以在此模式下移动光标,输入各种命令(如删除、复制、粘贴等)。 yy:…...

Claude年化收入首次反超OpenAI
梦晨 发自 凹非寺量子位 | 公众号 QbitAIAnthropic年化收入首超OpenAI!最新披露的热乎数据,Claude背后这家公司年化营收已突破300亿美元。作为对比的OpenAI最新数据,2月底披露年化收入为250亿美元。Anthropic大部分收入来自API,其…...

STM32双路直流电机PWM驱动与霍尔编码器闭环控制
1. 项目概述DCMotorDrive 是专为 RenBuggy 平台设计的双路直流电机驱动固件模块,其核心目标是实现对两台独立直流电机的高精度 PWM 调速控制,并集成霍尔传感器反馈通道,支持实时速度与位移闭环。该模块并非通用电机驱动芯片(如 L2…...

深入解析MTK平台fastboot启动流程与关键代码实现
1. MTK平台fastboot模式概述 fastboot是Android设备中一个极其重要的底层模式,它相当于PC主板上的BIOS界面。当你的手机进入fastboot模式时,实际上是在bootloader环境下运行一个精简的操作系统。这个模式允许开发者通过USB连接直接与设备底层通信&#x…...

MySQL 实战进阶:从单表优化到分布式数据库适配
MySQL 实战进阶:从单表优化到分布式数据库适配 在企业业务发展的不同阶段,MySQL 的应用场景从简单的单表查询,逐步演进到高并发、海量数据的处理场景。多数开发者在入门 MySQL 后,容易陷入“会用但不会优”的困境——单表数据量激…...

nuScenes 与 nuImages 对比分析:两大数据集工具使用全攻略
nuScenes 与 nuImages 对比分析:两大数据集工具使用全攻略 【免费下载链接】nuscenes-devkit The devkit of the nuScenes dataset. 项目地址: https://gitcode.com/gh_mirrors/nu/nuscenes-devkit nuScenes 与 nuImages 是自动驾驶领域的两大重要数据集&…...

从ReaxFF产物数量演化到反应动力学参数提取:一个Python脚本的实践
1. ReaxFF模拟与反应动力学分析入门 当你第一次看到LAMMPS的fix reaxff/species输出文件时,可能会被密密麻麻的数据搞得头晕。这些数字背后其实藏着化学反应的全部秘密——就像化学反应的"黑匣子飞行记录仪"。我在分析酯类热解反应时,花了整整…...

Beyond Compare 5 终极密钥生成指南:RSA加密与授权机制深度解析
Beyond Compare 5 终极密钥生成指南:RSA加密与授权机制深度解析 【免费下载链接】BCompare_Keygen Keygen for BCompare 5 项目地址: https://gitcode.com/gh_mirrors/bc/BCompare_Keygen 在文件比对与同步领域,Beyond Compare 5 凭借其卓越的对比…...

Windows下TensorFlow CPU加速终极方案:AVX2指令集优化版安装指南
Windows平台TensorFlow CPU性能飞跃:AVX2指令集优化实战手册 当你在PyCharm中运行TensorFlow代码时,是否见过这样的警告:"Your CPU supports instructions that this TensorFlow binary was not compiled to use: AVX2"?…...
)
XCP标定协议实战:从CAN到以太网的多协议适配指南(附A2L文件解析)
XCP标定协议实战:从CAN到以太网的多协议适配指南(附A2L文件解析) 在汽车电子开发领域,标定协议如同神经系统般连接着ECU与开发工具。当工程师面对不同硬件平台和传输协议时,如何实现XCP协议的灵活适配成为提升开发效率…...

AndroidX Media3与ExoPlayer集成实战:从零构建视频播放器
1. 为什么选择AndroidX Media3和ExoPlayer 如果你正在开发一个Android视频播放应用,可能会纠结该用系统自带的MediaPlayer还是第三方方案。我做过十几个视频类项目,实测下来ExoPlayer绝对是首选。这个谷歌开源的播放器不仅性能强悍,还支持DAS…...